Psychomotor Exam 3
1/53
There's no tags or description
Looks like no tags are added yet.
Name | Mastery | Learn | Test | Matching | Spaced | Call with Kai |
|---|
No analytics yet
Send a link to your students to track their progress
54 Terms
Indications for an NG Tube
Receive nutrition through a tube feeding using the stomach as a natural reservoir for food, decompress or drain unwanted fluid and air from the stomach, monitor bleeding in the gastrointestinal (GI) tract, remove undesirable substances (lavage) such as poisons, help treat intestinal obstruction
In class review (probably going to be on exam)
Delegation, NG tube med admin (30 mins after), concerned for 250 or above notify provider, intermittent feeding: prevent aspiration by high fowlers, concern of abd distension, after NG placement FIRST THING TO CHECK is chest xray, then check pH, 5.5 or below, if gagging constantly pull out and retry (could be curled in back of throat),
Residual
Amount of gastric content left in the stomach after a tube feeding
Assessments prior to insertion of NG Tube
Assess the patency of the pt's nares, auscultate for bowel sounds, inspect the abdomen for distension and firmness, if abdomen is distended, consider to measure the abdominal girth at the umbilicus to establish a baseline
NG tube insertion
-Assess abdomen, nares patency, facial trauma, nasal blockages
-Position: Fowler to high-fowler
-Clean gloves
-Measure tube: Nostril to tip of earlobe to tip of xiphoid process
-Lubricate tip and gently insert tube directing up and backward
-When pharynx is reached, instruct patient to touch chin to chest
-Advance tube while encouraging the patient to sip water or swallow
-Stop when patient breathes
-Advance until marking is reached
-Secure tube (do not let go of tube)
-Measure external length of tube
-Verify placement
Verify placement
X-ray: (per policy/order), most reliable method to verify placement
pH: aspirate small amount of stomach contents, note color and consistency of stomach contents, measure pH: Gastric contents are acidic <5.5, if pt is taking acid inhibiting may be 4-6, intestinal fluids is 7 or higher, resp fluid is 6 or higher
NG tube documentation
Size and type of NG tube, location of tube, measurement of exposed tube, client's response to procedure, method of confirmation (X-ray is most reliable method)
Care of Salem Sump tube
-Attach to INTERMITTENT suction if ordered
-Irrigate per policy
-Document irrigation and drainage
-Pause suction to listen to bowel sounds
-May administer medications if ordered; Hold suction for 30-60 minutes after
-Secure vent above level of stomach to prevent gastric contents from leaking and clogging air vent
Types of Feeding Tubes
Type of feeding tube is based on client problem: Short term, long term, risk for aspiration, digestive problems
Types of tube feeding
Formula based on physical condition and nutritional requirements, ordered by provider, or dietician if consulted, examples of available formulas: Jevity, Glucerna, Nepro, Two Cal, Pulmocare
Site care: G-tube/J-tube
Monitor every shift, monitor sutures if present, clean site daily with NS or soap and water, ensure area is dry after cleaning, rotate bumper daily, leave open to air, if drainage is present, apply precut gauze under bumper
Enteral Feeding Key assessments
Measure residual vol every 4-6 hours or per agency protocol, blood glucose every 6 hours or per agency protocol, measure and record I and O and weight class, labs, resp status, Gi assessment, tube insertion site for skin impairment
Enteral feeding med admin
Pause tube feeding, high fowlers, 10 rights, apply gloves, apply clamp, check placement and residual, select port, insert syringe, 5-10ml between med, flush tube w/ 30-60ml, one med at a time, flush w/ water, resume tube feeding
Enteral feeding
Tube feeding order must contain: Formula, feeding schedule or rate, water flush vol and frequency, residual check, some facilities have you insert 30mL of air into NG and pull back 5-10mL for pH testing. Continuous vs intermittent feeding
Enteral feeding procedure: Via pump or bolus
-Elevate HOB 30-45 degrees
-Gloves
-Verify tube placement
-Measure gastric residual (amount of feeding remaining in the stomach)
>200-250ml associated with high risk for aspiration
-Hold feeding per agency protocol for high residuals
-Return gastric residual (return volume per agency protocol)
Enteral feeding complications
Clogged feeding tube: Flush tube w/ 30-60mL water after use or every 4 hours, crush meds and mix w/ water and flush after admin
N/V: Ensure HOB is elevated, admin antiemetic as ordered, hold tube feeding and notify provider, aspirate for gastric residual, for cramping and nausea, provider may decrease the admin rate
Gastric residual exceeds 200mL: Notify HCP, ensure HOB is elevated, reassess residual volume 1 hour after you stop the feeding to determine if vol has lessened or increased, make sure health care provider is aware
3 or more diarrhea episodes in 24 hours: Notify HCP, confer w/ provider or dietician to modify type of formula, concentration, or rate of infusion, consider other causes, determine if client is receiving antibiotics or meds that will induce diarrhea, provide skin care to maintain integrity, long term feeding tube is peg tube
Peripheral IV lines
Fluid and electrolyte replacement because can't take PO, med admin, blood admin
IV Supplies
2 IV catheters (typically 22 gage) no more than 2 attempts, gloves, tourniquet, antiseptic swab, gauze, J-loop/saline lock, 10mL saline syringe, transparent dressing and tape, IV tubing and fluids as ordered
IV insertion prep
Educate client, find site, prime j-loop/saline lock to remove air, prepare supplies, pain prevention
IV insertion site selection
Adults: hand or inner arm, nondominant arm, use most distal site first
Babies: scalp, feet
AVOID: Same side as mastectomy, extremity with vascular dialysis fistulas, extremities with infection, infiltration, burn injury, antecubital, inside or wrist
IV Start Aids
Topical anesthetics, vein finder
IV insertion steps
1. Clean skin
2. Apply tourniquet (no more than 2 minutes)
3. Stabilize vessel and insert needle bevel up 10-15 degrees
4. Advance catheter
5. Remove tourniquet
6. Stabilize catheter
7. Remove needle
8. Connect Jloop/saline lock
9. Flush
10. Secure with dressing
IV Insertion: securing site
Tegaderm/bio-occlusive dressing should cover insertion site and hub, use tape to secure Jloop/saline lock, tape o tape, may use folded gauze date, time, initial
Documentation of IV insertion
Date/time of insertion, size of catheter, location and condition of IV site, number of insertion attempts, client tolerance of IV insertion, pertinent client teaching
IV maintenance
Document assessment of site per policy (often: at beginning of shift and hourly if infusing). Site: IV securement, redness, swelling, client reports of pain. Infusion: Fluids, rate, tubing expiration. Flush and document patency per policy, change site per policy (often every 72/96 hours; pediatrics; only when site goes bad)
IV complications
Fluid does not flow easily into vein, check connections, check the clamp is open, no kinks, arm isn't bent, may be against a valve
Inadvertently accessing an artery: Flushing will result in white appearance, blood return may pulsate, client may report numbness/tingling, remove, hold pressure at site, notify HCP
Infiltration: Skin around IV is edematous or cool to touch, fluid is leaking into tissues, remove and restart
Phlebitis: Inflammation of a vein, redness, swelling, heat, pain at site, caused by chemical irritation or mechanical trauma
Blown vein: Blood is leaking into the tissues through a hole in the vessel wall
Gravity admin
Volume/time converted to gtt/min, need to know the number of drops per mL of solution for the particular IV tubing, 1000 ml/8 hours, drop factor=20gtt/mL, want gtt/min, whole number
IV Push meds in a saline lock
Put on clean gloves, assess site, clean Jloop/saline lock port, attach saline flush syringe, unclamp Jloop/saline lock, pull back to check for blood return and flush to check for patency, flush, disconnect saline, attach med, inject med at recommended rate, dilute as recommended, disconnect med and attach saline flush, flush at same rate
IV push meds in an IV infusion
Put on clean gloves, assess site, pause pump, clean port nearest insertion site, attach med syringe, fold/clamp tubing above port, pull back to check for blood return, inject med at recommended rate, release tubing, restart pump
Discontinuing an IV
Remove tape around site, place a 2x2 gauze over insertion site, gently remove the catheter, now apply pressure to site for: 2-3 mins for general clients, 5-10 mins for clients an anticoagulant therapy (Aspirin or Coumadin)
Difference between primary and secondary bags IV
Primary: Fluids (saline, lactated ringers)
Secondary: Antibiotics (most of the time), potassium, magnesium, etc
Tonicity of IV solutions
Hypotonic: 0.33% NS, 0.45% NS (treat hypernatremia (dilutes plasma sodium))
Hypertonic: Can help stabilize blood pressure, increase urine output, reduce edema. D5.45: Maintain Fluid intake, D10W: Used for TPN, D5.9: temporarily treat hypovolemia
Isotonic: Treat fluid loss, dehydration. D5W: Dilutes amount of sodium in serum, 0.9%NS: Treat hypovolemia, hyponatremia, LR: Hypovolemia, burns, metabolic acidosis
Nursing assessments and interventions (IV therapy)
Review electrolytes, monitor VS, monitor I&O, breath sounds (crackles, congestion), peripheral vascular system, weight, IV infusion/tubing/site, avoid disconnecting IV tubing, snap gowns, admin med using ports on IV tubing
Primary infusions procedure
Close roller clamp on IV tubing, remove cap from IV bag, remove cap on IV tubing and insert into IV bag, hang IV bag on IV pole, squeeze drip chamber to fill at least halfway, open clamp slowly and prime tubing, close clamp, insert tube into IV pump, clean IV access port, remove cap on IV tubing and connect to access port (saline lock)
Gravity admin (IV therapy)
Drip rate (volume/time converted to Gtt/min), need to know the number of drops per mL of solution for the particular tubing. 1000mL/8 hours
Secondary infusion
Close clamp on secondary tubing, remove cap on IVPB, remove cap on secondary tubing and spike bag, clean access port above roller clamp on primary tubing, attach secondary tubing to primary tubing, position IVPB lower than primary IV, open clamp on secondary tubing allow primary IV solution to backfill (backprime), hang IVPB HIGHER than primary IV, open clamp on secondary tubing, program IV pump, ensure med is infusing
Thrombus: blood clot
Stop infusion, do not rub/massage
Fluid overload
Increased b/p, difficulty breathing, crackles in lungs, notify provider, monitor vital signs
Air embolus: Air in the circulatory system
Resp distress, increased heart rate, cyanosis, pinch infusion, place client on left side in Trendelenburg, call for assistance, monitor vital signs
IV troubleshooting
Cloudy white substance forms in tubing: incompatibility, Pump beeps "occluded patient side", When hanging an IVPB, fluid is dripping from the primary fluid, Pump beeps "air in line", Pump beeps "upstream occlusion", Pump beeps KVO
IV documentation
Date and time of admin, type of solution, vol of solution, rate of solution, assessment of IV site, tubing and dressing changes, complications if present
PCA
Patient controlled analgesia: Permits client to self-administer analgesics (bolus) with episodes of increased pain, within safety limits, Lockout interval is programmed to prevent overdose, May also include continuous rate, Assess respiratory rate, SPO2, LOC, and pain, Capnography
Mini infuser
Drug is mixed with a small amount of the IV solution and administered over a short period at the prescribed interval, "Smart (computerized) pumps" are being used by many facilities for IV infusions, including intermittent infusions
Phlebotomy
Collecting blood for lab sampling. Caution for contamination!!!
Blood transfusion
Definition: Infusion of whole blood or blood component into the client's venous circulation
When?: When a clients RBC, platelets, coagulation factors decrease to levels that compromise a client's health
Objectives: Increase circulation through blood volume, provide cellular components as replacement therapy, increase RBC in clients with severe anemia
Blood groups and types
ABO system: Based on the presence or absence of A and B red cell antigens.
AB: individual with A and B antigens (Universal recipient)
A: individual with only A antigens (May take type A or O blood)
B: individual with only B antigens (May take B or O blood)
O: no antigens. (Universal donor, can only receive type O blood)
Rh factor
Rh positive: individual with Rh factor
Rh negative: individual without Rh factor (Rh negative blood can only receive Rh negative blood)
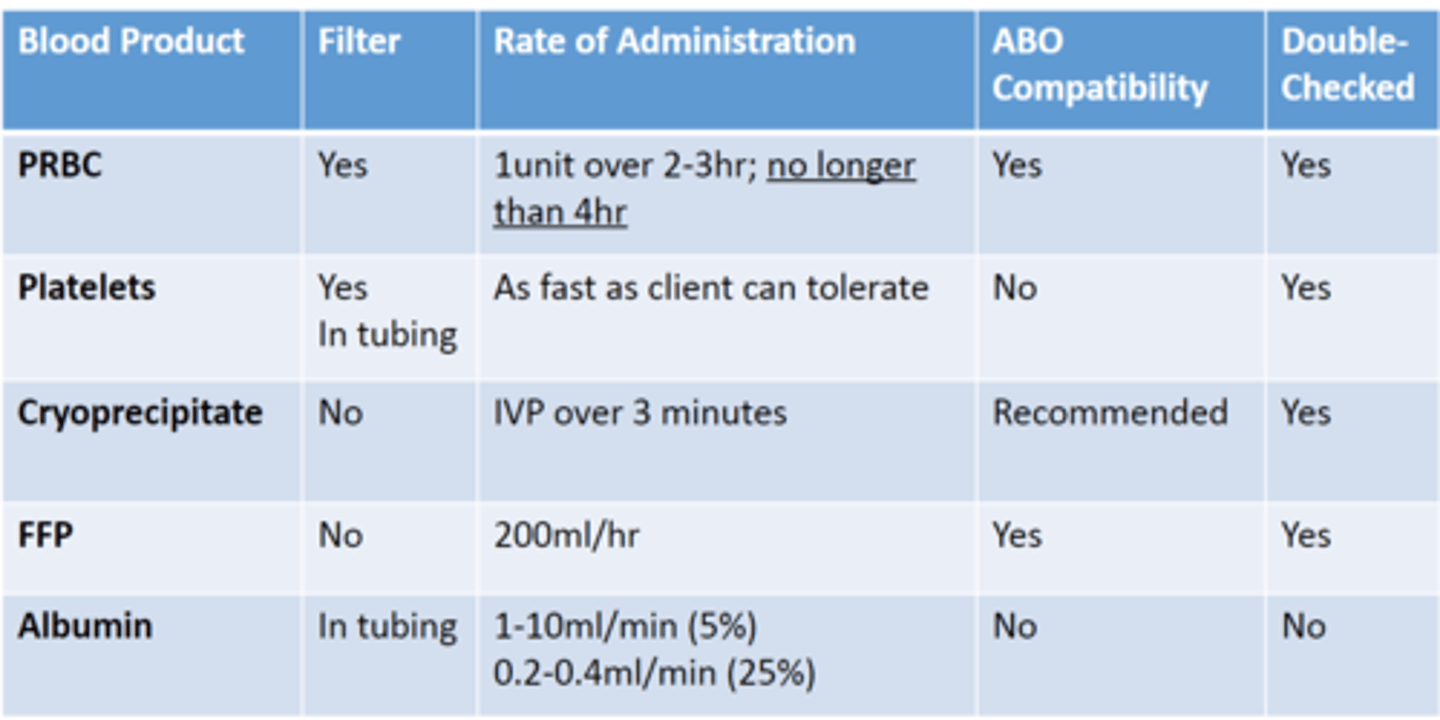
Types of blood products
Whole blood, packed red blood cells, platelets, cryoprecipitate, fresh frozen plasma, albumin
Blood products administration
Double-checking blood
Two nurse check, use client ID number, client name, blood group and type, expiration date, inspection of blood product for clots
Pre-transfusion assessment
Large bore 18-20 gauge catheter is preferred, determine if client has ever had blood transfusion reaction, check for Rx to give blood, check client has given consent, take baseline vitals, pre-med may be required
During blood infusion
Can only be infused through NS, infusion started slowly, stay w/ client for 15 mins after blood transfusion, monitor for transfusion reactions, after 15 mins no reaction, increase infusion rate to calculated rate
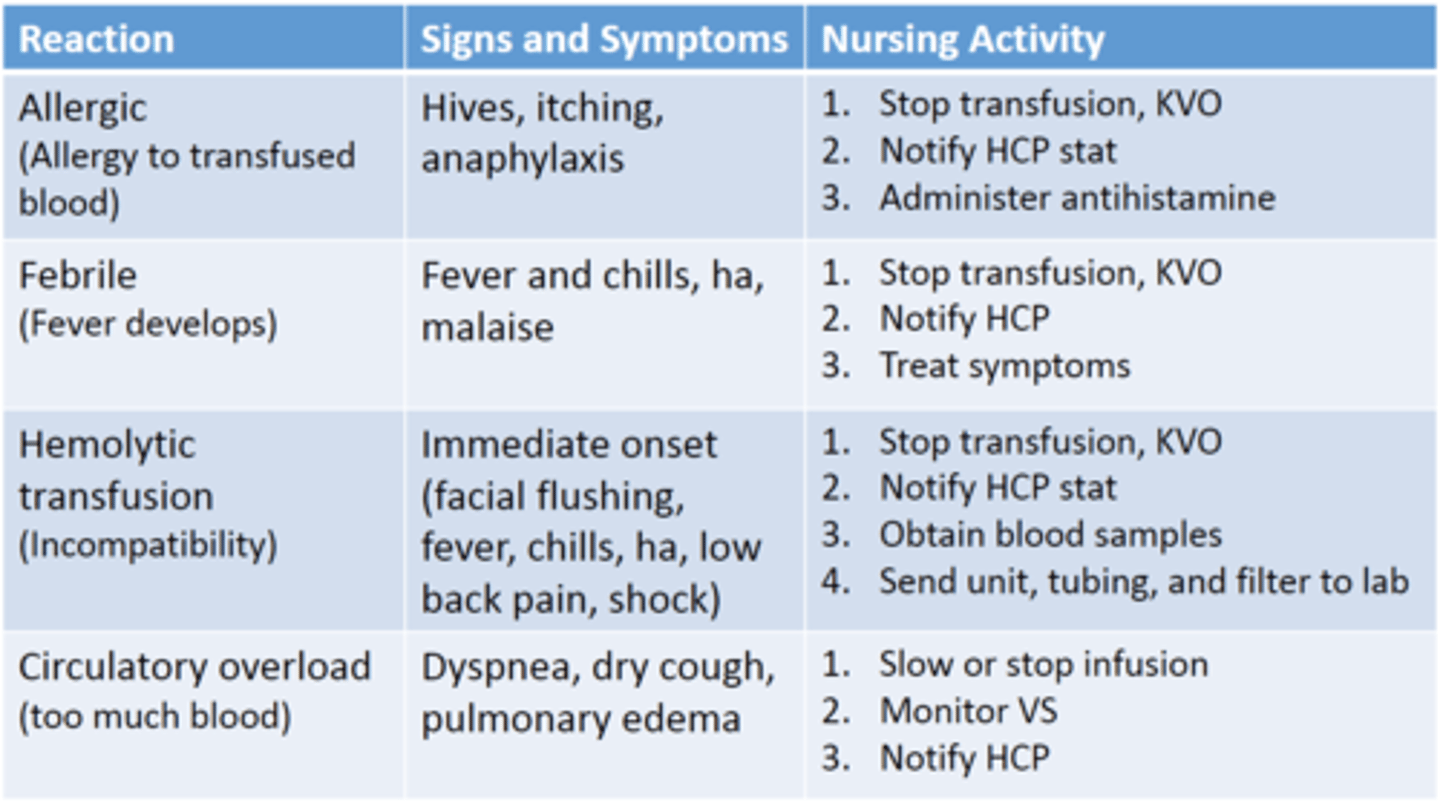
Transfusion reactions
Applying a cardiac monitor for telemetry
Display heart rate and rhythm, produce a printed record of cardiac rhythm, alarm sounds if hr is above or below specified limits, recognizes counts and abnormal heartbeats
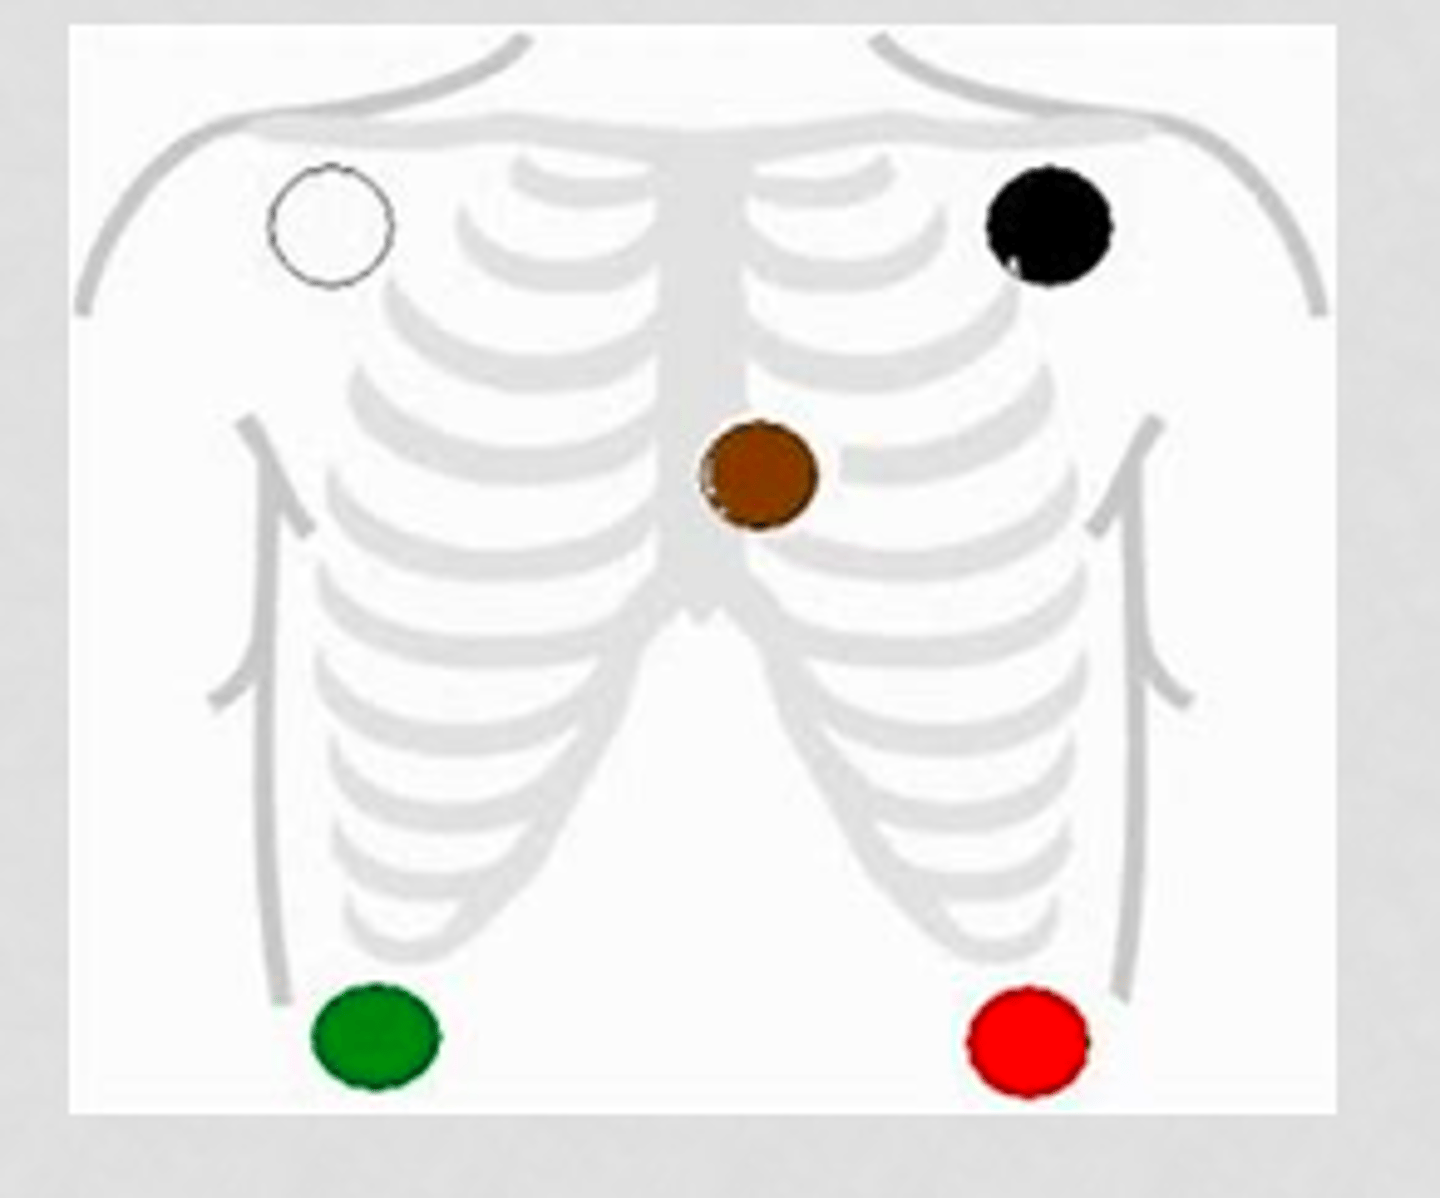
5 lead EKG
White to upper right, green to lower right, black to upper right, red to lower left, brown in the center
Snow over grass, smoke over fire, chocolate close to the heart