SAS: Ortho Exam 3
1/56
Earn XP
Description and Tags
Name | Mastery | Learn | Test | Matching | Spaced |
|---|
No study sessions yet.
57 Terms
Physical Exam
Orthopedic → systematic
When: Observe before stress/pain
Look for: regional and gross
Lameness, abnormal posture, gait, atrophy, behavior
“sound is down” → forelimb headbob lameness
look at “Bad” leg last
1st exam: awake, 2nd exam sedated
Neuro
Look for: conscious proprioception
Dt:
Non-Invasive: rads, CT, MRI (soft tissue), Scintigraphy
Invasive: FNA / Biopsy, Arthrography, Arthrocentesis, Arthroscopy
Regional Examination of the Forlimb
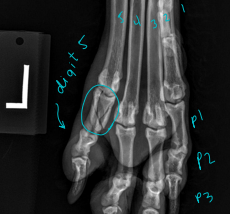
Digits & Metacarpal/Metatarsal Bones
Check each digit/nail bed and webbing
Pain, abnormal size, foreign material, draining tracts
Flex/extend phalangeal joints
Increased effusion: Tarsus (tarsocrural joint) – craniolateral and caudolateral
Carpus
Effusion: radiocarpal joint (cranial)
Increased effusion: (radiocarpal joint) – cranial
Check collateral ligaments
Long Bones (Radius/Ulna, Humerus)
Palpate systematically (avoid muscle belly pressure)
Look for atrophy, stiffness, swelling, proliferation, focal pain, neoplasia, panosteitis, HOD, HO, fractures
Elbow: hinge joint
Effusion: caudomedial/caudolateral
pronation, supination
Shoulder
Effusion: tricky
ROM: Check biceps tendon: cranial surface of joint
Abduction angle: medial collateral lig.
Regional Examination of the Hindlimb
Tarsus
Effusion: tarsocrural joint (craniolateral, caudolateral)
ROM: Check Achilles tendon integrity
pronation, supination, varus, valgus
Long Bones (Tibia/Fibula, Femur)
Palpate systematically (avoid muscle belly pressure)
Look for atrophy, stiffness, swelling, proliferation, focal pain, neoplasia, panosteitis, HOD, HO, fractures
Stifle
Effusion: parapatellar
Collateral lig: Medial limits valgus, Lateral limits varus, patella tracking
Hip
Effusion: rarely palpable
Ortolani maneuver (hip laxity; done under sedation)
Lumbosacral vs Hip Pain
Palpation: compression test
Standing exam: Take weight off legs, lateral
extension of limbs: iliopsoas pain (tightens w/ age)
Raise tail: flexes hip joint
Rectal exam: pressure dorsal to joint
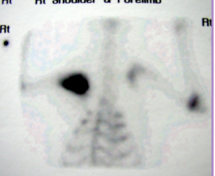
Scintigraphy
IV Radioactive substance (isotope)
Localization of lameness
ID avascular bone

Computed Tomography (CT) vs. Magnetic Resonance Imaging (MRI)
CT: Skull, spine, joints
3D reconstruction
MRI: Soft tissue
Cross-sectional and multiplanar anatomy
Articular cartilage
Ligaments
Joint capsule
Muscle and fascial planes
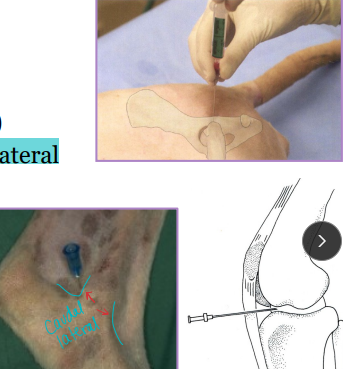
Arthrocentesis
When: Performed after non-invasive imaging
Why: confirm/categorize joint disease, monitor therapy
Risks: infection
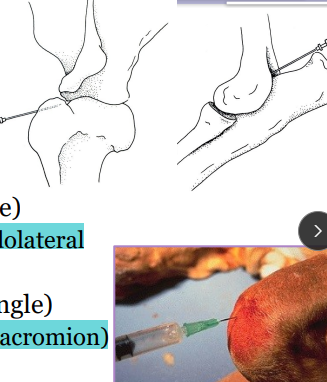
Where:
Carpus (cranial, flexed)
Elbow (caudomedial/lateral)
Shoulder (lateral, distal to acromion)
Tarsus (craniolateral/caudolateral)
Stifle (parapatellar, flexed)
Hip (dorsal/craniodorsal, neutral)
Synovial fluid analysis: color, turbidity, viscosity, bacteria

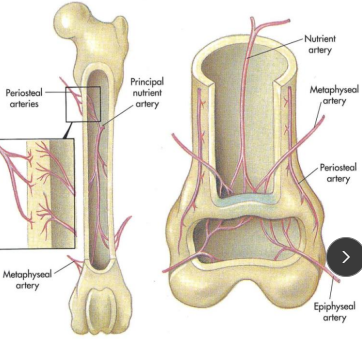
Normal Blood Supply of Long Bones
Proper Nutrient artery: medullary cavity (30%), inner 2/3 cortical bone (70%)
Medullary circulation is mostly disrupted → fracture
Metaphyseal arteries: proximal & distal metaphyseal
Hypertrophy if nutrient artery is damaged
Periosteal arteries: outer 1/3 cortical bone
Primary circulation in fractures
Epiphyseal arteries: supply epiphysis only (do not cross physis)
3 stages of fracture healing
Inflammation
Repair
Remodeling
Inflammatory Phase of Bone Fracture Healing
When: Immediate after fracture step 1
How:
Mediators: serotonin, histamine, thromboxane A, vasodilation, permeability
Hematoma: fibrin, platelets, clot → increased vascular permeability
Removal of necrotic osteocytes
New extraosseous blood vessels form
Cs: swelling, erythema, pain, impaired fxn
Repair Phase of Bone Fracture Healing
Step 2
Necrotic tissue replaced with new cells/matrix
Undifferentiated mesenchymal cells migrate to injury via inflammation
bone, cartilage, vessels, fibrous tissue
Callus formation: will form bone over time
Soft callus: cartilage (central) + fibrous tissue
Hard callus: bony (peripheral)
Remodeling Phase of Bone Fracture Healing
Step 3
Reorganization and reshaping of reparative tissue
Callus → more ordered structure and resorbed
↓ Cell density, ↓ vascularity = new bone formation
Matrix fibrils align along stress lines
Endochondral ossification → cartilage → bone
Woven bone → lamellar bone : late stages
parallel
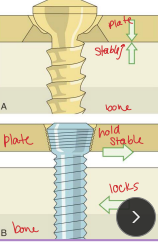
Direct (Primary) Bone Healing
Fracture ends in direct contact
Requires rigid stability
Osteoblasts cross fracture line → bone deposition
No callus required
Gap healing: Gap ≤ 150–300 µm minimal
Gap filled with fibrous bone @ fracture site
Haversian remodeling: longitudinal bone

Indirect (Secondary) Bone Healing
Occurs with instability
Ends not in contact
Requires callus formation
increased Motion = larger callus
Involves endochondral ossification
The 4 A’s of healing
Apparatus: implant integrity
Activity: evidence of bone formation/healing
Direct: fracture line becomes fuzzy
Indirect: callus
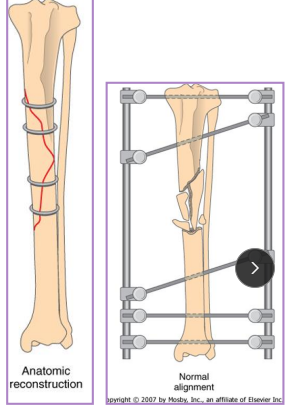
Alignment of bone
Apposition of repair
Complications of Bone Healing
Dt: Take xrays every 4-6 weeks postop** compare pre/post op
Delayed Union: Healing slower than expected, but evidence of healing present
Tx: wait, bone graft, stabilize, remove loose implants
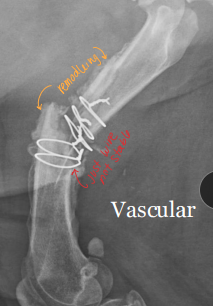
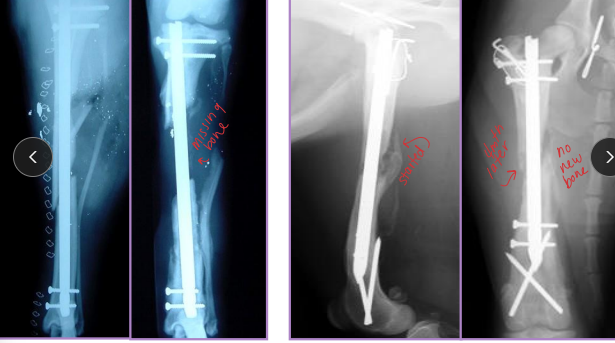
Nonunion: No progression on rads for 3+ months, instability, poor blood supply
Vascular (viable): callus present, fracture line persists
Tx: stabilize, remove implants, align
Avascular (non-viable): little/no callus, poor biology
Tx: curettage, rigid fixation, cancellous graft, remove loose implants
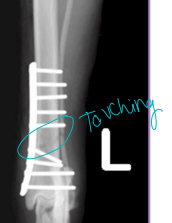
Malunion: Fracture healed in abnormal alignment
Varus: distal limb deviates medially: elbow/knee away
Valgus: distal limb deviates laterally: elbow/knees touching
Torsion: bone rotated on long axis
Translation: displacement, longitudinal axis intact
Recurvatum: apex caudal, distal limb cranial to fracture
Procurvatum (antecurvatum): apex cranial, distal limb caudal to fracture
Wolff’s Law: bone remodels along stress lines
explains partial correction of malunion
Bone Grafting Materials
placed into spaces around a fracture, or within defects in bone
Autograft (auto): donor = recipient (same animal)
best osteogenic potential
Allograft: donor = same species
Xenograft: donor = different species
less useful in ortho
Cortical: strong, structural support; osteoconduction only, min osteoinduction (banked, avascular, acellular)
risk of sequestrum with infection
Cancellous: highly cellular, weak mechanically; provides osteogenesis + induction + conduction (freah/frozen, high cellular)
Corticocancellous: mix (ribs, iliac crest, ulna) (chunk)
Synthetic: calcium phosphate, bioactive glass
Bone Graft Procedure
Why: Delayed union, nonunion, arthrodesis, osteotomies, high-risk fractures, segmental replacement, fill defects or cavities
Osteogenesis: direct new bone formation by grafted osteoblasts
Osteoinduction: stimulates progenitor cell proliferation (BMPs)
Osteoconduction: scaffold for new bone growth
Osteopromotion: enhances osteoinduction
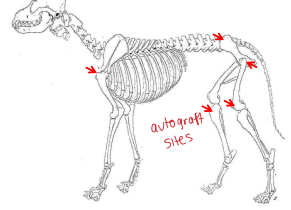
Sites: proximal humerus, wing of ilium, proximomedial tibia, distal femur, proximolateral femur
How: Harvest only when ready, use separate instruments if infection, store in blood (not saline)
Risk: Infection, donor site seeding, neoplasia, donor site morbidity (pain, fracture, seroma, dehiscence)
General Principles of Fracture Management and Repair
Evaluate, describe fracture, and plan
Open: Antibiotics asap, analgesia, cover, immobilize
Broad spec (ampicillin/sulbactam) intra/post-op
URGENT
Closed: Immobilize, analgesia, stabilize before repair
Cefazolin q90 min intra-op only
Not urgent
Joint involvement: urgent
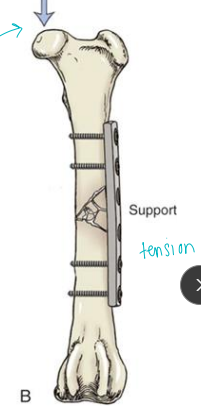
Fixation: load sharing, control forces, maintain alignment
Implant: tension surface > compression surface
Ensure peripheral nerves are intact: radial, sciatic
Skin prep: Clip after induction
#1 source of infection = patient’s own skin
Perform surgery
Evaluate: rads q4-6w; alignment, apparatus integrity, activity of healing, apposition
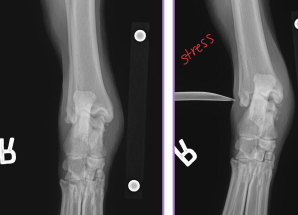
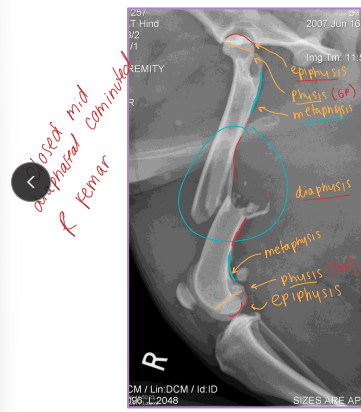
Fracture Classification
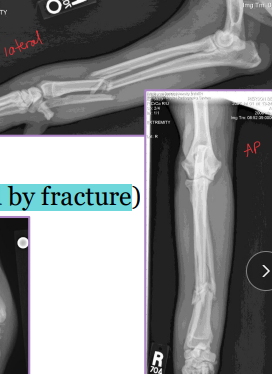
Location:
Spine, skull, joints: require special imaging (CT, oblique, stress views)
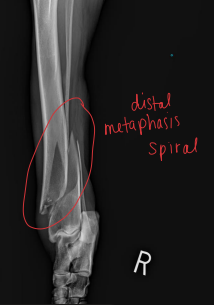
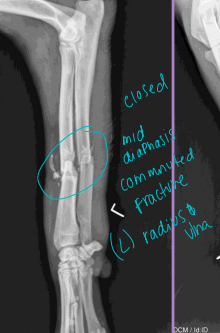
Long bones: Epiphysis, Physis (growth plate), Metaphysis, Diaphysis, Articular
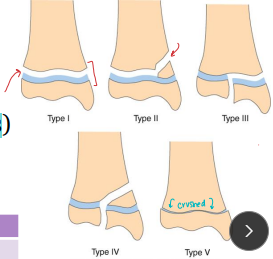
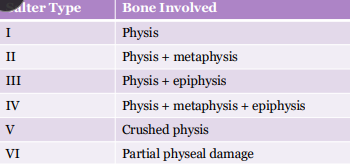
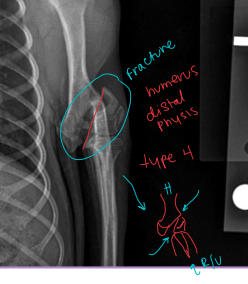
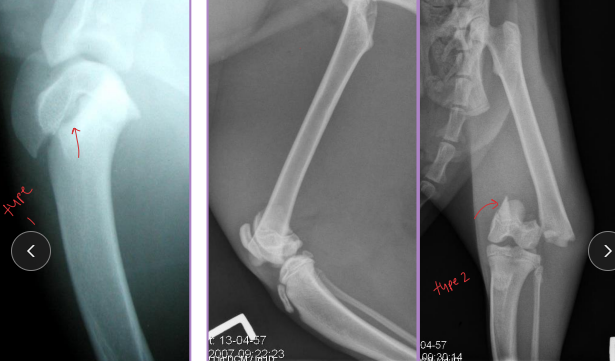
Salter-Harris = Physeal Fractures
Common in young animals (open physes)
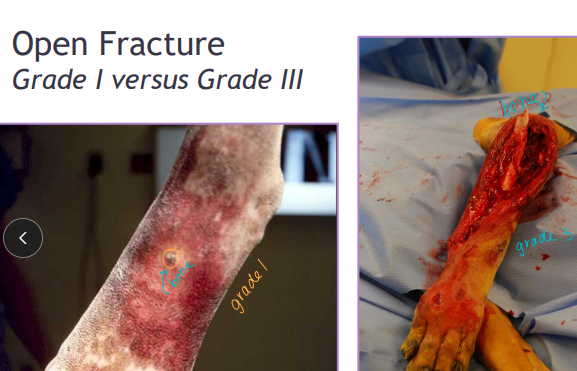
Gustilo/Anderson Grading system: Open fractures!
Grade I: inside-out, puncture <1 cm, clean
Grade II: wound >1 cm, mild soft tissue trauma, no flaps
Grade III: extensive trauma, skin loss, exposed bone
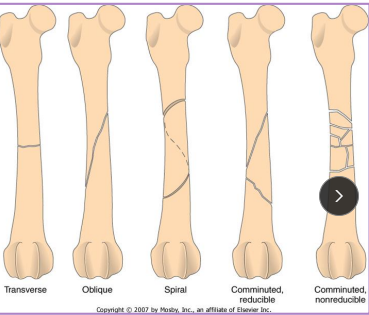
Describe the Fracture
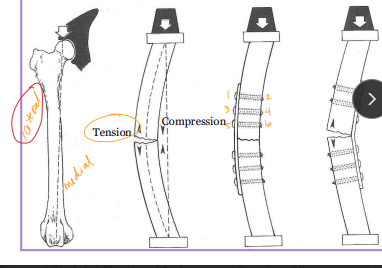
Forces: Tension, compression, bending, torsion, shear
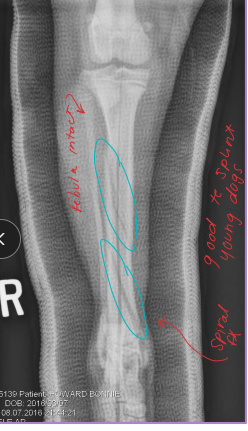
Pattern: Transverse, Oblique, Spiral, Comminuted
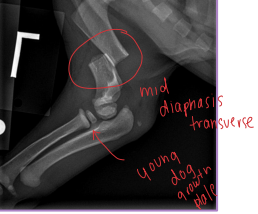
Physeal fractures
Young animals, open growth plates
Fracture Forces
Load sharing
Balance with degree of fixation and soft tissue damage
Plate should absorbs most the energy
Implant location
Tension surface **
Compression surface(weight is applied)
GOAL: • Appropriate fracture healing • Restoration of function
Halstead’s principles
Gentle tissue handling
Control hemorrhage
Maintain strict asepsis
Preserve blood supply
Eliminate dead space
Accurate tissue apposition
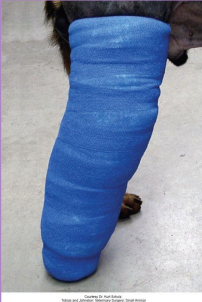
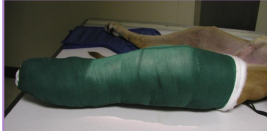
External Coaptation
Why: Immobilization, support, protect, analgesia, compression
Limb fractures, lig instability, pre/post-op support, swelling, luxation
How: Bandages and slings
Avoid excessive tightness: 2° & 3° layers
circulation risk
Always include joint above & below
Always allow visualization of 3/4 digits
Risk: Bandage sores, necrosis, slippage, nonunion
Bandage Components
Tape stirrups: adhesive strips for stability
Primary layer: non-adherent dressing
protects wounds
Secondary layer: cast padding or rolled cotton
Protects tissue, relieves pain, immobilizes limb
Tertiary layer: cling gauze + Vetwrap/Elasticon
Compression & protection
Robert Jones Bandage
Big and bulky!! - most compression
Why:Temp distal limb splint for below elbow/stifle
compression, immobilization, reduces swelling, dead space, pain, protect
How:
Cover with non-adherent dressing
Tape stirrups applied cranial/caudal or medial/lateral
Limb held in extension
x2 Rolled cotton(LG) or cast padding 3-6 layers layer(SM)
Apply each layer with 50% overlap, tight as possible
x2 Cling gauze (compression) layer
Fold stirrups over bandage
Vetwrap/Elasticon (compression) layer
gentle pressure
Check: “thump like a watermelon”
Toe alignment
Modified Robert Jones Bandage
Why: Less bulk, immobilization, compression, support
How:
Cover with non-adherent dressing
Tape stirrups applied cranial/caudal or medial/lateral
Limb held in standing angle
3-4 layers cast padding only
NO rolled cotton
Cling gauze (compression) layer
Fold stirrups over bandage
Vetwrap/Elasticon (compression) layer

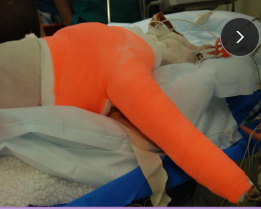
Splint Bandage
Why: Temp immobilization, support post-op, definitive for mod stable fracture, money constraints
No compression = not for swollen limbs
Types:
Distal limb: below elbow/stifle
Spica: proximal limb, extends to opposite hip/shoulder
Malleable: metal rods, thermoplastics, padded metal, cast tape
Rigid: preformed plastic/metal
Common complication: rub sores, monitor pressure points!!
Casts
Why: definitive fracture stabilization
indirect bone healing
Fractures are closed, stable (not axial), distal to elbow/stifle, heal quickly!!
How:
Limb immobilized
Closed reduction of fracture
Tape stirrups → stockinette! → casting tape
2-4 layers, 50% overlap
Check:
Rads with >50% reduction needed min
Common complication: rub sores, monitor pressure points!!, weekly checks
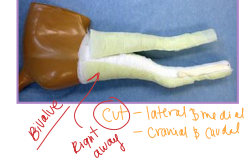
Removal: bivalve or saw/spreader
Bivalve: cast can be reused, cut once they are formed for easy cast changes!!
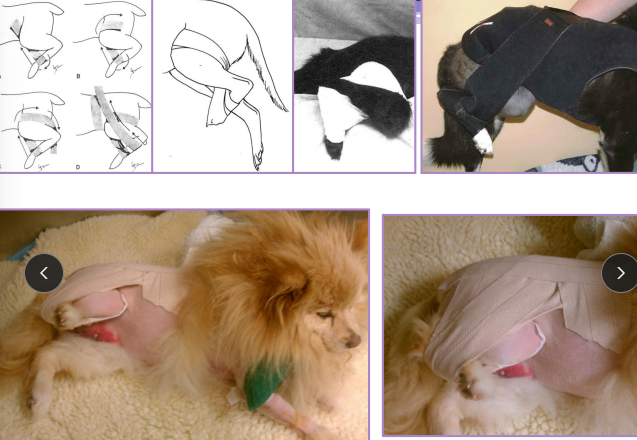
Ehmer Sling
Why: maintain reduction of craniodorsal hip luxation
abducts + internally rotates hip putting femur into acetabulum
How:
Under anesthesia, reduce hip first
Elasticon tape applied around metatarsals across dorsum to opposite hip
Keep metatarsal wrap loose (avoid swelling)
Repeat multiple times
Removal: after 10-14 days
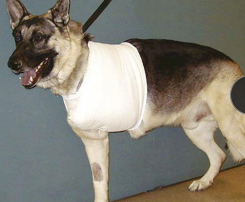
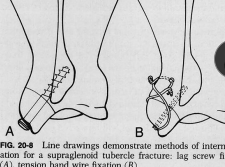
Velpeau Sling
Stabilizes shoulder with medial dislocation
Supports scapular fractures
Prevents weight-bearing
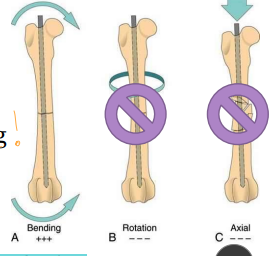
Intramedullary Pins
Why: Controls bending, Strength ∝ radius⁴
NOT effective against rotation or axial loading
Where: femur, tibia, ulna, humerus
NOT for radius!!!
Type:
Primary stabilizer: 60-70% diameter of medullary canal
big and bulky
Adjunct stabilizer: 30-40% diameter of medullary canal
smaller pin
Texture: smooth > threaded(don’t use)
How:
Adjunct fixation: required; plate/screws, cerclage, external fixator
Exception is physeal fractures in young dogs (can be sole implant)
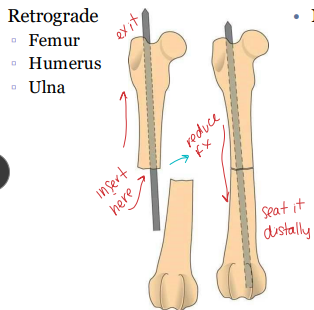
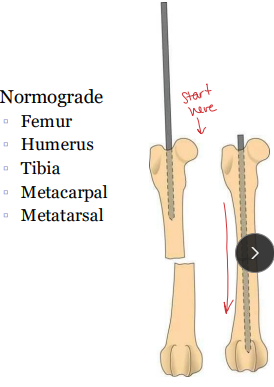
Intramedullary Pins insertion
Insertion:
Retrograde: fracture site → out epiphysis → repositioned → across fracture
Ulna: retrograde; canal is narrow distally
Humerus: normograde OR retrograde; proximolateral → distomedial
Normograde: proximally → down medullary canal → across fracture
Femur: normograde, ↓ sciatic/physis risk; start at trochanteric fossa
Tibia: normograde ONLY; start at tibial crest
medial, ~⅓ distance caudal to joint line, near patellar tendon
Humerus: normograde OR retrograde; start proximolateral → end distomedial (avoid fossa)
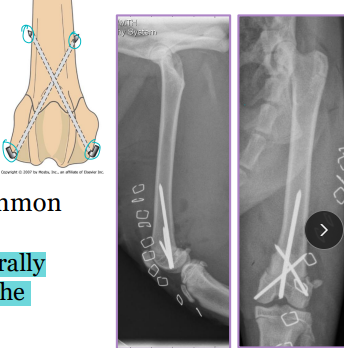
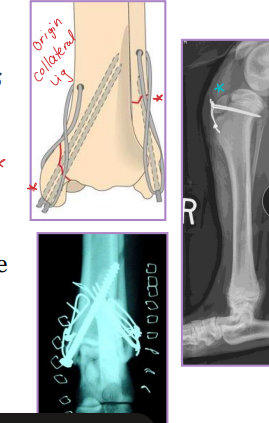
Cross Pins
Why: physeal fractures
femur, tibia
What: Small smooth IM pins
How: inserted laterally, cross physis and eachother
Cerclage Wire
What: Stainless steel 18–22 gauge
Why: adjunctive, long oblique fracture (>2× diameter)
never sole fixation
How: Fully encircles bone
Anatomical reduction
Use ≥ 2 wires perpendicular to fracture line
Closest wire 3-5 mm from fracture
Wires ~1 cm apart (closer is better)
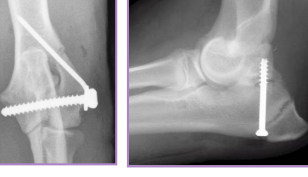
Screws
Classified: by outer diameter
Types: Stainless steel or titanium, partially or fully threaded, Locking vs. non-locking
standard Non-locking: rely on bone–plate friction
Locking: screw head threads into plate, plate/screw interface
fixed-angle stability
Individual: lag screw
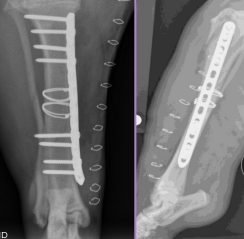
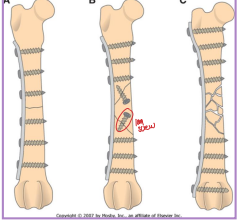
Plates
What:
Round (compression) or oval holes @ fracture line
Dynamic compression plate (DCP)
Limited-contact DCP (LC-DCP)
Locking plates: rigid plate-screw interface, for poor bone quality, less contouring needed
Why:
Compression: transverse fractures (plate/screws)
Neutralization: protects adjunct fixation (lag screw/cerclage + plate/screws)
Buttress: plate carries full load for unstable fracture
How:
Apply to tension surface of bone
Must engage ≥6 cortices on each side of fracture!!
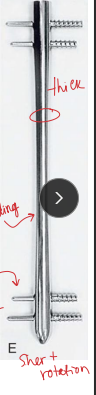
Interlocking Nail
What: IM pin + locking bolts proximal and distal
IM pin controls bending
Bolts control shear & rotation
Why: femur, tibia, humerus: limited to
$$, technically demanding, specialized
How:
Fills 80-90% of medullary canal
Place proximal and distal of break
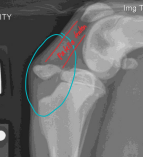
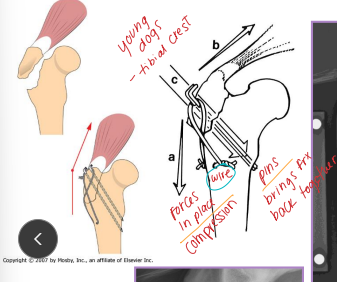
Tension Band Wiring
primary distractive forces
Why: Converts distractive into compressive forces
Patellar, Traction physeal, Olecranon fractures, Tibial crest avulsion
What: Kirschner wires + figure-of-eight cerclage wire (18-22g)

External Skeletal Fixation
Why: Long bone fractures, Arthrodesis, Spinal stabilization, Mandibular fractures, Distraction osteogenesis
What: Pins, Clamps, Connecting bar
Use threaded pins, Lg size possible (25% diameter of bone)
How: use the simplest frame design that will work
Place 3-4 pins per main fragment, evenly, and perpendicular to long axis of bone along safe corridors
Safe corridors: distal radius/ulna, tibia/fibula
Femur has NONE
Connecting bar placed 1-2 cm from bone
Clamp interface inside connecting bar
Risk: infection, neurovascular injury, breakage/loosening, loss of reduction, necrosis, delayed union, iatrogenic fracture
Safe corridors
Safe corridors: distal radius/ulna, tibia/fibula
Femur has NONE
Tibia: medial
Humerus: lateral
Radius: medial
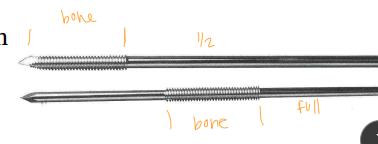
Fixation Pins
Class: thread location
Half pin and Full pin
Types:
Smooth (Steinmann pin, Kirschner wire)
↓ Pullout strength
↑ Susceptibility to cyclic loading
↑ Premature loosening
Threaded
Positive: threads rolled, strong
Negative: threads cut, weak
Tapered end improves strength
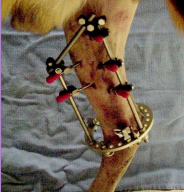
Types of External Skeletal Fixation
What:
Pins: Engage bone, provide stabilization
Clamps: Secure pins to connecting bar.
Connecting bar: Links clamps and pins.
Types:
Linear: Frame strength ↑ with complexity
Type IA: Unilateral, uniplanar
Type IB: Unilateral, biplanar
Type II: Bilateral, uniplanar
Type III: Bilateral, biplanar
Hybrid ring
Why: fractures with small bone fragments
What: Combo half pins + ring with small fixation wires
Circular
What: Kirschner wires + rings + connecting bars
Why: comminuted fractures, angular limb deformities
Linear Type 1/A ESF
½ pins
Unilateral, uniplanar
all pins enter one 1 side
all pins going in the same plane (medial→lateral)
Linear type 1B ESF
½ pins
Unilateral, biplanar
different planes
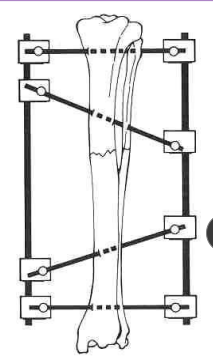
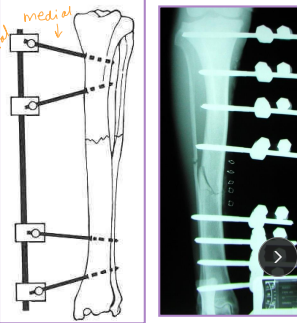
Linear type 2 ESF
Full pins
Bilateral, uniplanar
same plane (medial → lateral)
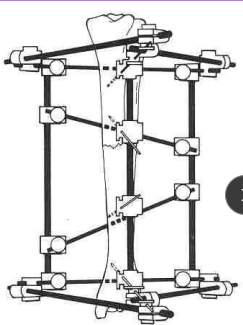
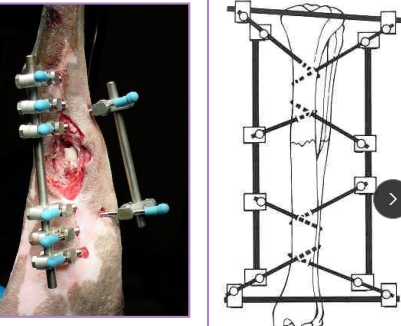
Linear type 3 ESF
full pins and ½ pins
bilateral, biplanar
type 1+2
different planes
Frame strength increases as frame complexity increases
Scapular Fractures
Body & Spine
Minimally displaced: stable, Velpeau sling 2-3w
Comminuted or Transverse: unstable, internal fixation**
can fold on itself
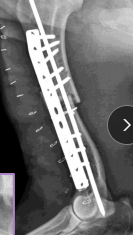
Supraglenoid Tuberosity
Et: immature dogs, avulsion/physeal separation from biceps pull
Tx: pin + tension band, or lag screw
Neck & Glenoid Cavity
Tx: reconstruction required, cross pins, lag screw
Humeral Fractures
spica splints required!
Considerations:
Radial n.: lateral/superficial to brachiali muscle
Proximal Physeal Fractures
Sig: growing dogs
Tx: parallel K-wires, cross the physis, heals fast
Diaphyseal Fractures
Tx: fxn alignment
Spiral: plate + screws, or IM pin + cerclage
pin sized to distal canal; normograde/retrograde; lateral → medial
Transverse: plate + screws, IM pin
Comminuted: plate + screws + IM pin, buttress, external fixator
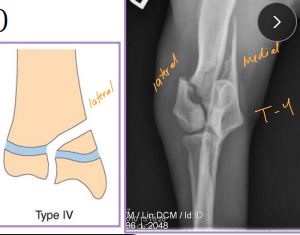
Condylar Fractures: Lateral > medial
Sig: Young dogs w/ Salter-Harris IV, older dogs w/ incomplete ossification of humeral condyle
Tx:
Lateral condyle: lag screw + anti-rotational K-wire
T or Y fracture: bilateral plates + screws
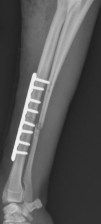
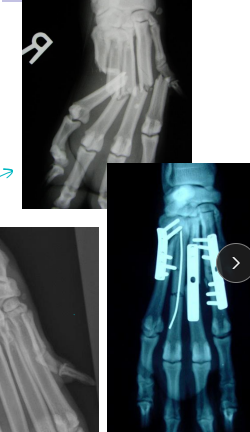
Radius & Ulna Fractures
Considerations: No soft tissue envelope, weight-bearing, blood supply poor in small breeds, poor healing, Robert/modified jones bandage
Tx: rigid fixation, often only radius tx
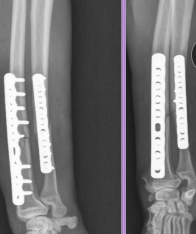
Bone plate & screws (#1)
IM pins contraindicated for radius
IM pins NOT in radius (cats need both)
JUST the radius in fixed(dogs)
External skeletal fixation→ open fractures, 1A ESF
Casting: acceptable if 50% reduction; best for transverse fractures in young dogs
NOT in toy breeds
Pathologic Fractures
Et: neoplasia, fungal osteomyelitis
Tx: Repairable if limb, adjunctive therapy
Px: Same as underlying disease
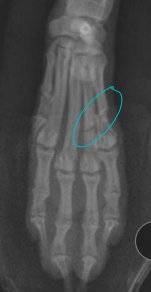
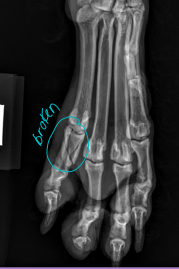
Carpal, Metacarpal, Digital, Metatarsal Fractures
Very common, greyhounds
Carpal: lag screw
Metacarpal and Metatarsal: medical tx most common
Tx: closed reduction + caudal splint (Rx #1), IM pins/plates + caudal splint (Sx)
Sx indicated if open, grossly displaced, intra-articular, or all 4 fractured
Digital: caudal splint bandage for 6w
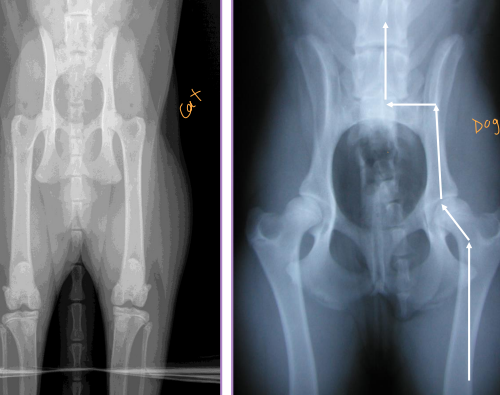
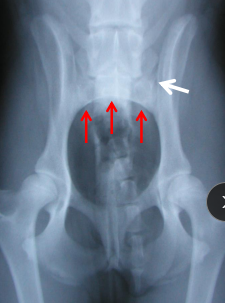
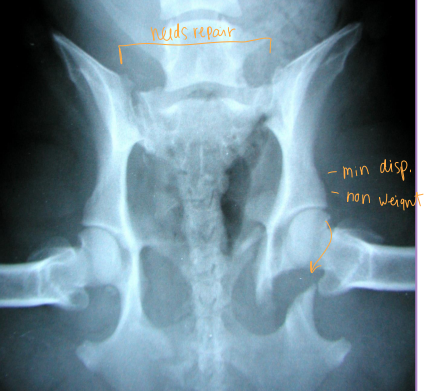
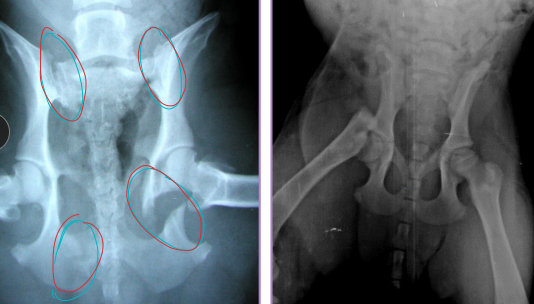
Pelvis Fractures
Considerations: Multi physes, normally breaks at multi sites
Sciatic n.: through ischiatic notch
Weight transfer: paw → tibia → femur → acetabulum → ilium → SI joint
Et: males > females, trama
Dt: Rads, CT for complex fractures/Sx planning
Tx:
Rx: non-displaced, unilateral, non-articular, non-weight-bearing fractures
6 w crate rest, sling, pain control, controlled walks, PT
Sx: ilium/acetabulum/SI joint (weight-bearing), bilateral fractures, displacement, colon compromise, pelvic canal compromise (parturition), sciatic entrapment
Ilium: plate + screws
Acetabulum: plate + screws, cross pins, PMMA
SI joint: screw stabilization
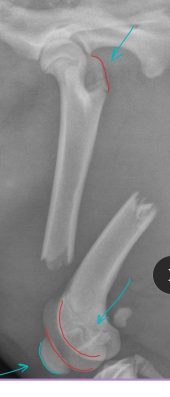
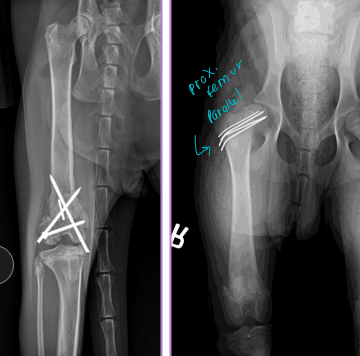
Femur Fractures
Capital Physis: Salter-Harris I, skeletally immature
Dt: AP & frog-leg radiographs
Tx: K-wires (diverging/parallel), temp“apple-coring” due to pins and blood supply
Patellar fractures: uncommon, direct blow
Apical (<1/3 patella): excision
Multifragmentary: patellectomy
Transverse (#1): wire + tension band
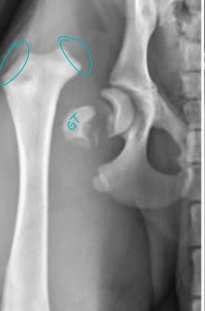
Greater Trochanter Avulsion: Young, gluteal muscle traction
Tx: pin + tension band
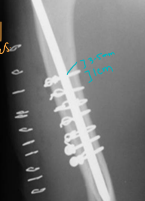
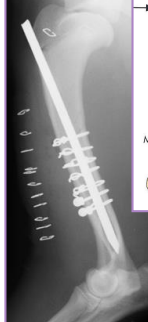
Diaphyseal fractures (#1)
Tx: plate + screws, interlocking nail, IM pin + cerclage
ESF not recommended as no safe corridors
Compartment syndrome: muscles feel like rock
Distal Physeal fractures: young, Salter-Harris type, growth plate involvement
Tx: cross pins (linear), plates (if comminuted)
Risk of quadriceps contracture(esp. extended postion) peg leg
Tibia & fibula Fractures
Considerations: Common, Min soft tissue envelope, risk of open fracture
fibula broke concurrently, not broke in young
Tx:
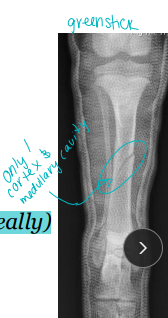
Rx: Casting/splinting
closed, transverse fractures, >50% reduction, lateral splint (greenstick fractures)
Sx: Plate + screws, IM pin + cerclage, Interlocking nail, ESF
Avulsion: tension band + K-wire, or K-wires alone
Physeal: urgent fixation, cross pins
younger animals
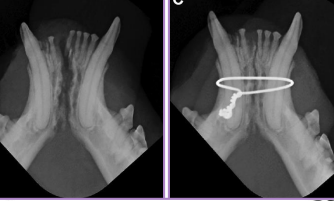
Fractures of the Mandible and Maxilla
Check occlusion!!
Considerations:
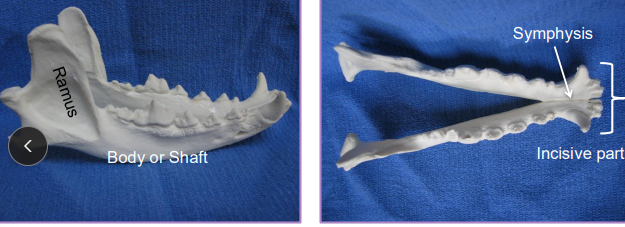
Body: bending forces, tension greatest at alveolar surface
Ramus: shear forces
Symphysis/Incisive region: rotational forces
Et: Trauma, severe dental disease, neoplasia
Mandibular: Dogs body and cats incisor region
Maxillary: Dogs alveolar region and cats midline palate separation
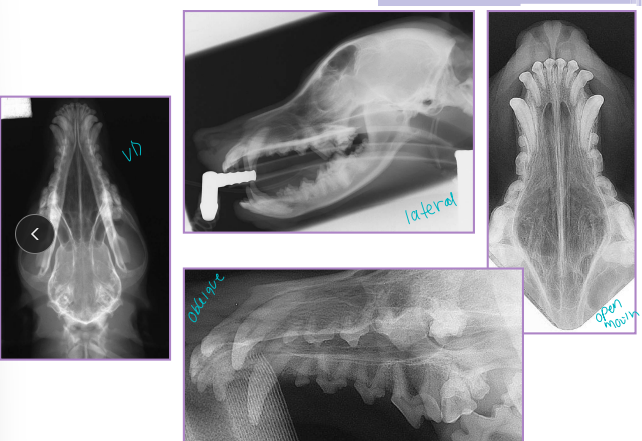
Dt: Rads, CT for surgical planning
Comp: Dental issues, malocclusion, facial deformity, oronasal fistula, palate defects, osteomyelitis, bone sequestration, delayed union/non-union
Treatment for Fractures of the Mandible and Maxilla
Keep teeth for stability & occlusion, strong fixation and tension at alveolar surface, pharyngostomy intubation
Non-surgical:
Tape muzzle: cheap, easy, unilateral stable fractures
not good for cats/brachycephalics
Symphyseal wiring: cats, cerclage wire between canines, 6-8w healed
Maxillomandibular bonding: bonds upper/lower canines, cats/brachycephalics
aspiration risk, slurry diet needed
Interdental splinting: acrylic/wire splinting, good for rostral, requires stable teeth
Surgical:
Interfragmentary wiring: good for linear, 2-piece fractures, requires exact reduction
not good for comminution/bone loss
Plates & screws: body/ramus, avoid tooth roots & mandibular canal, place ventrolaterally
ESF: strong, min invasive, high postop care, self-trauma risk