Cervical Spine Tests + Mobilizations
1/104
There's no tags or description
Looks like no tags are added yet.
Name | Mastery | Learn | Test | Matching | Spaced | Call with Kai |
|---|
No analytics yet
Send a link to your students to track their progress
105 Terms
what 3 TESTS are used for assessing UPPER CERVICAL STABILITY
1. Sharp-Purser Test
2. Alar Ligament Test
3. Transverse Ligament Test
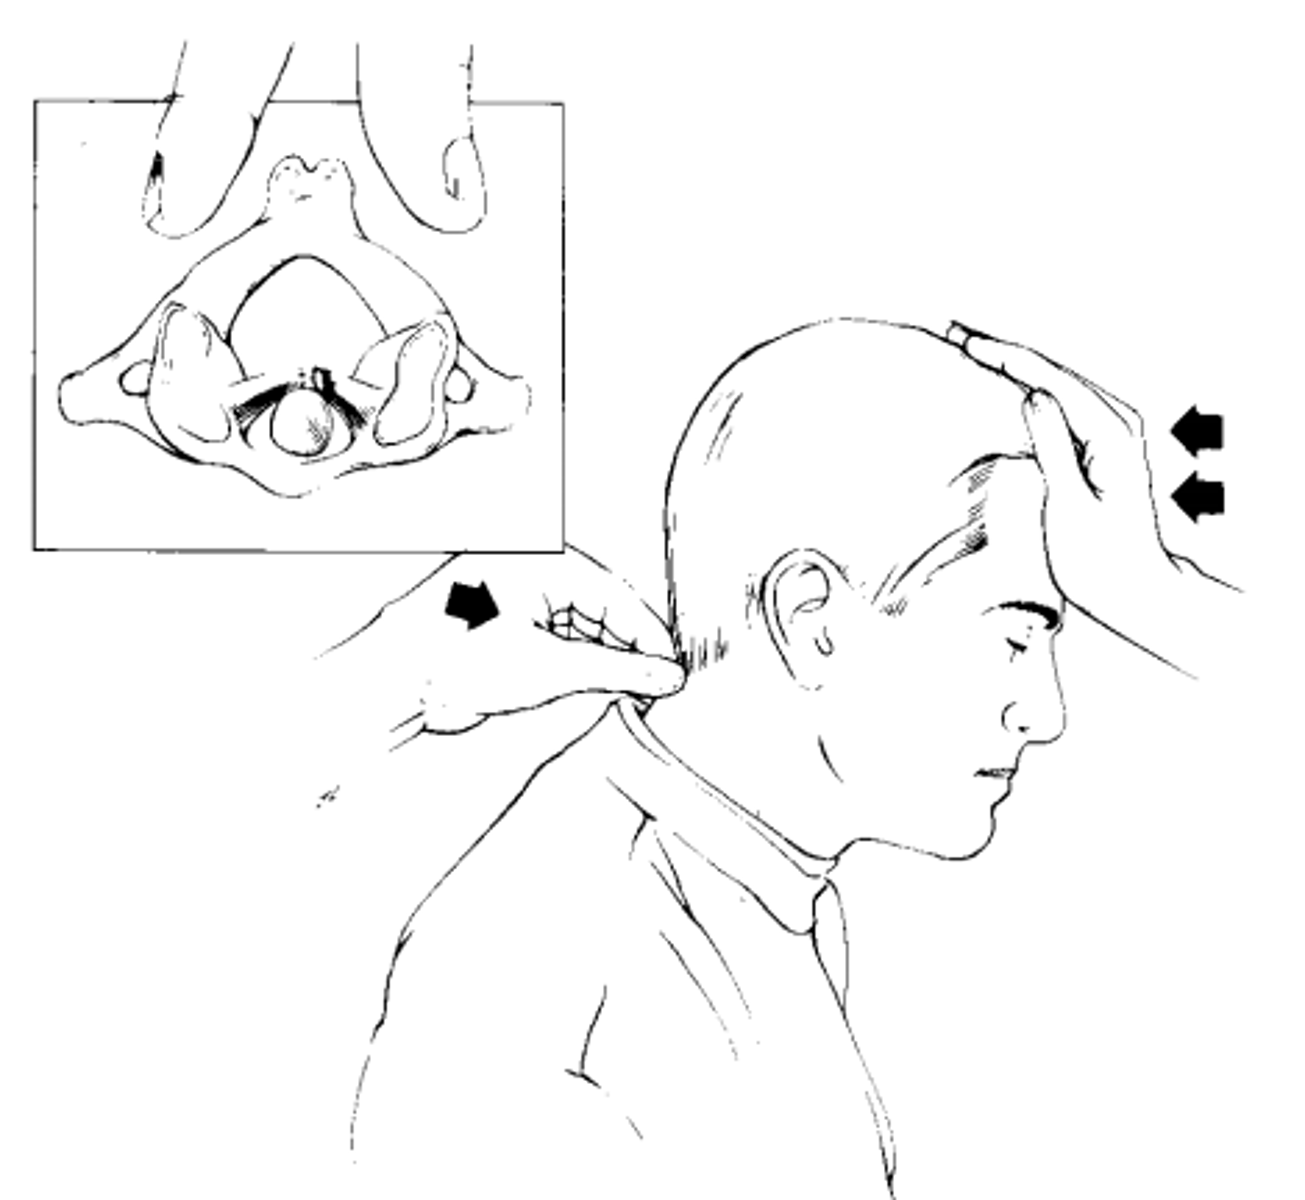
Sharp-Purser Test
Purpose: to determine subluxation of atlas on axis
Testing Procedure:
1. patient seated
2. passively flex head + neck to 20-30 degrees + assess for any symptoms
3. place one hand on the forehead
4. stabilize C2 with other hand using a pincer grasp
5. examiner applies a posteriorly-directed translation force (to avoid capital extension) through forehead
Positive Sign:
1. backwards cranial movement without axis moving
- indicates: reduction of a subluxed atlas
2. myelopathic symptoms decrease
3. audible clunk
what is the PURPOSE of the SHARP-PURSER TEST
to determine subluxation of atlas on axis
what are the 5 STEPS of the SHARP-PURSER TEST
1. patient seated
2. passively flex head + neck to 20-30 degrees + assess for any symptoms
3. place one hand on the forehead
4. stabilize C2 with other hand using a pincer grasp
5. examiner applies a posteriorly-directed translation force (to avoid capital extension) through forehead
what are 3 POSITIVE SIGNS of the SHARP-PURSER TEST
1. backwards cranial movement without axis moving
- indicates: reduction of a subluxed atlas
2. myelopathic symptoms decrease
3. audible clunk
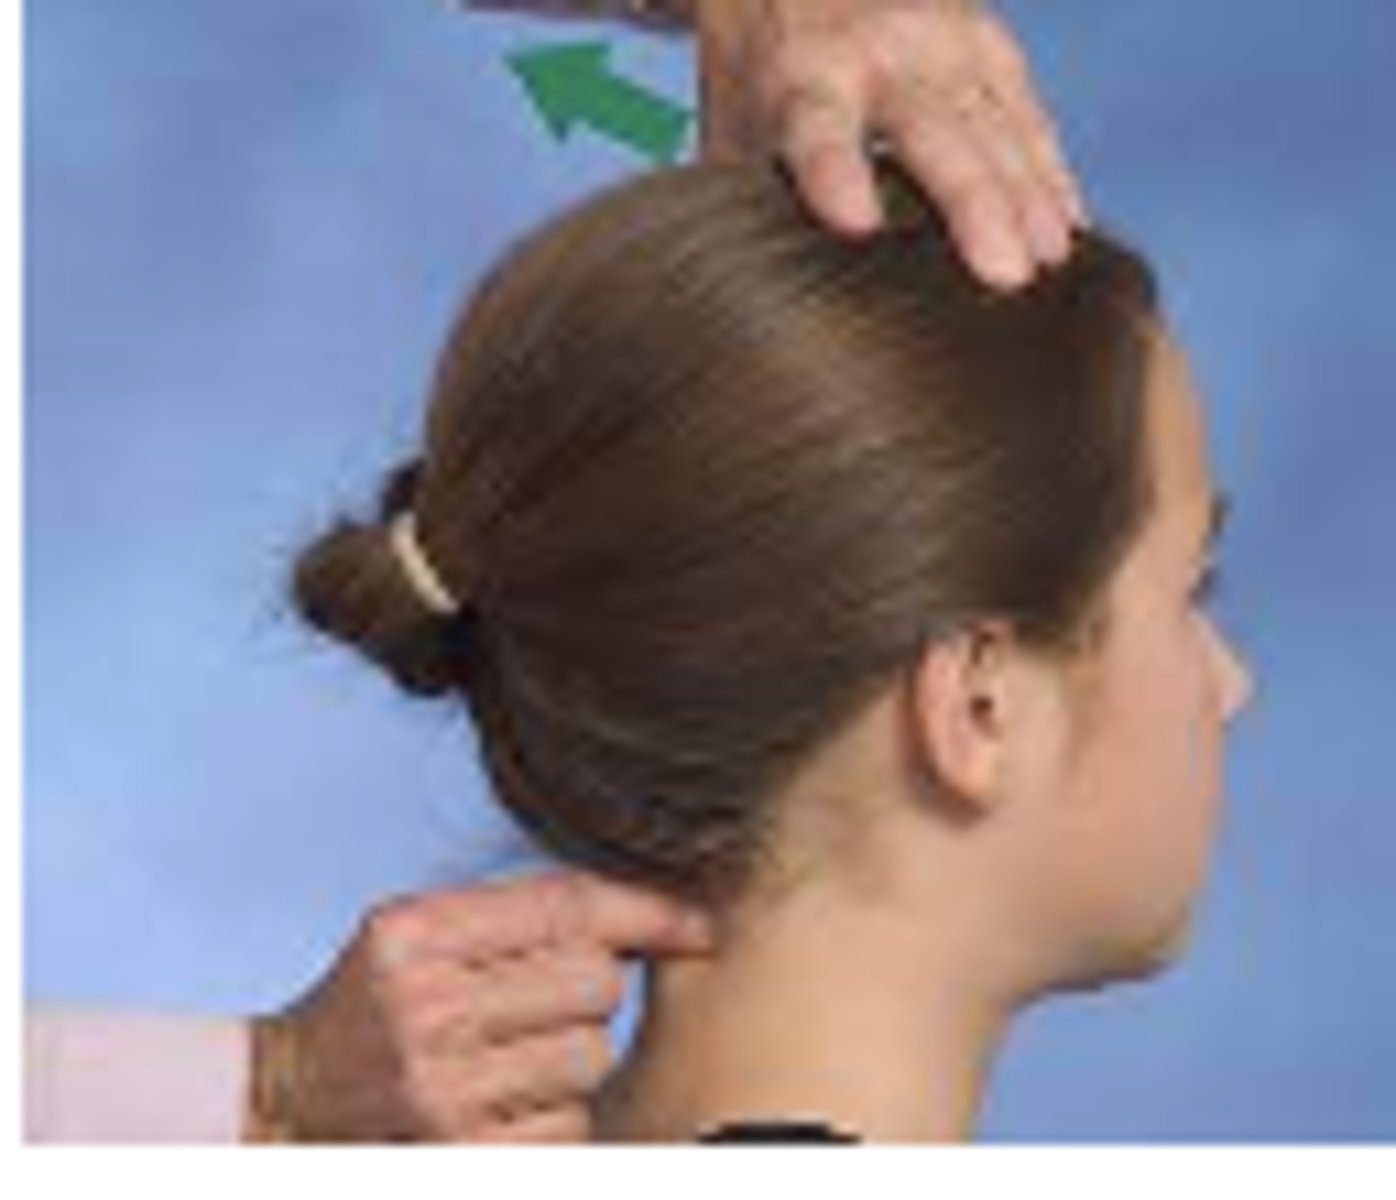
Alar Ligament Test
Testing Procedure:
1. patient is supine/seated
2. stabilize C2 between thumb + index finger
3. use other hand to sidebend the head
4. should feel C2 spinous process move immediately into your finger in opposite direction
Positive Sign: delay in movement of spinous process
what are the 4 STEPS of the ALAR LIGAMENT TEST
1. patient is supine/seated
2. stabilize C2 between thumb + index finger
3. use other hand to sidebend the head
4. should feel C2 spinous process move immediately into your finger in opposite direction
what is the POSITIVE SIGN of the ALAR LIGAMENT TEST
delay in movement of the spinous process
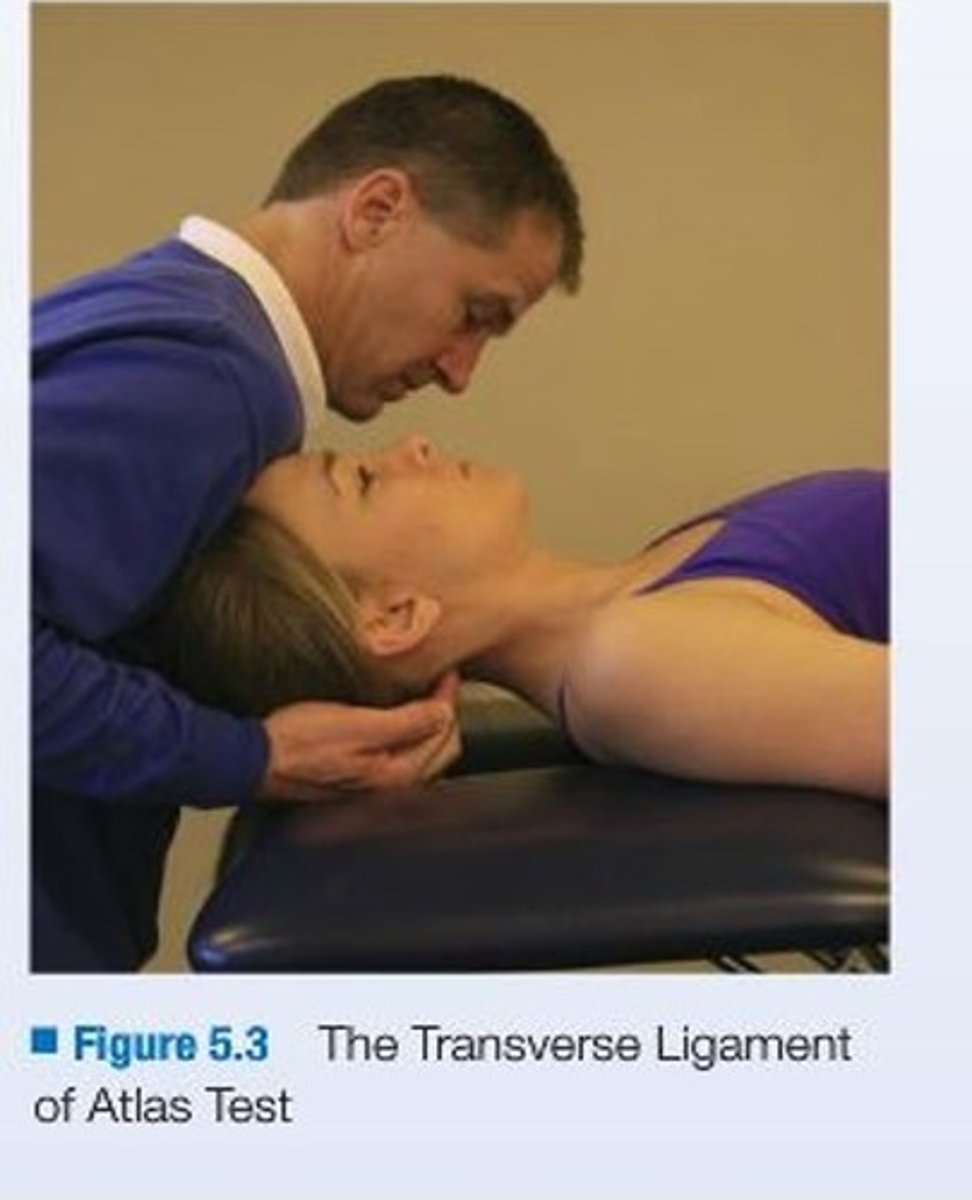
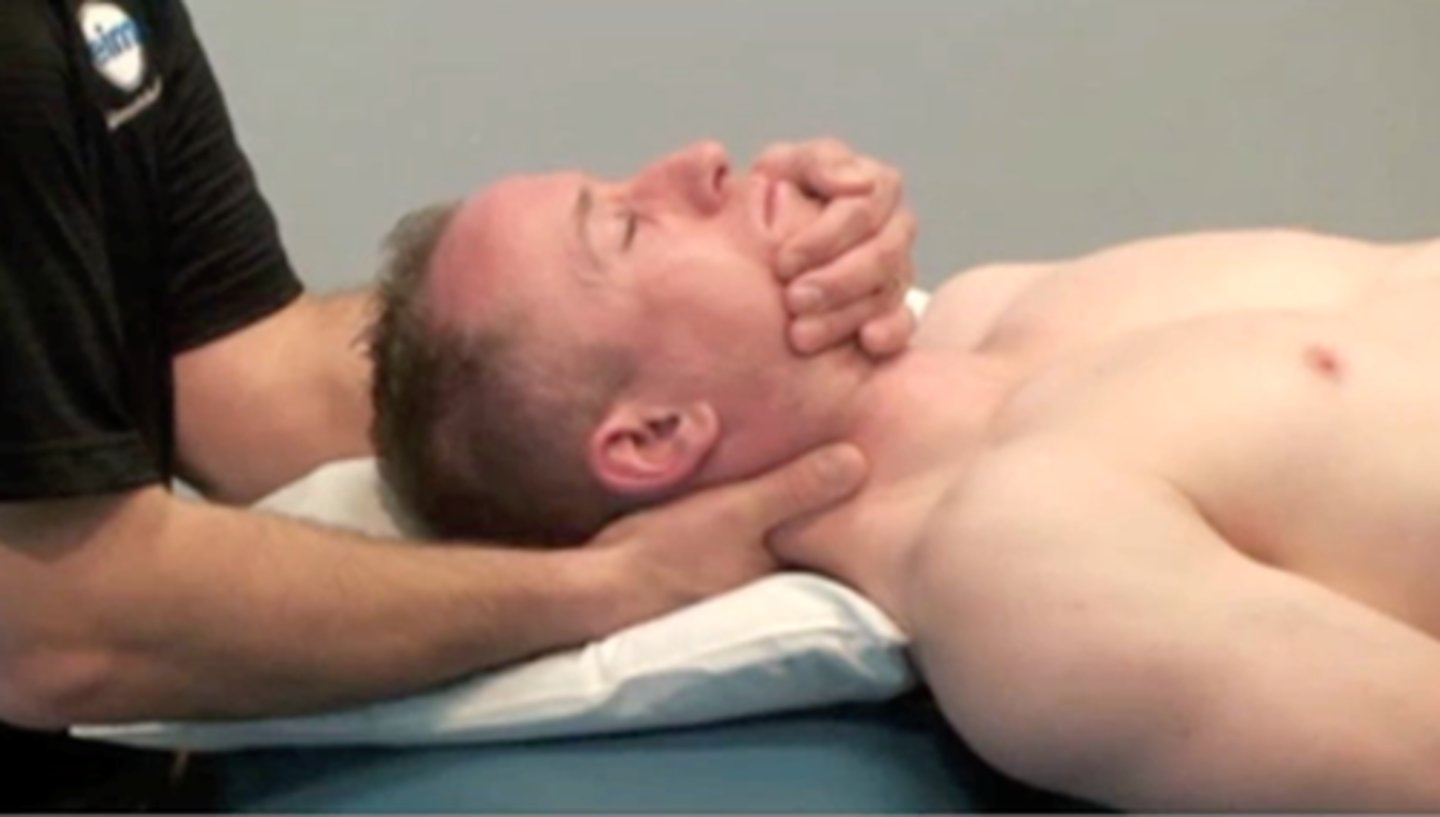
Transverse Ligament Test
Purpose: to test integrity of the transverse ligament
Testing Procedure:
1. patient supine
2. support occiput with index finger in space between occiput + C2
3. lift head + C1 carefully anterior together without FB or BB
4. hold for 10-20 seconds
Positive Sign:
1. soft end feel
2. muscle spasm
3. nystagmus
4. lump sensation in throat
what is the PURPOSE of the TRANSVERSE LIGAMENT TEST
to test for integrity of transverse ligament
what are the 4 STEPS of the TRANSVERSE LIGAMENT TEST
1. patient supine
2. support occiput with index finger in space between occiput + C2
3. lift head + C1 carefully anterior together without FB or BB
4. hold for 10-20 seconds
what are 4 POSITIVE SIGNS of the TRANSVERSE LIGAMENT TEST
1. soft end feel
2. muscle spasm
3. nystagmus
4. lump sensation in throat
what 2 SPECIAL TESTS are used for assessing for *VBI (Vertebrobasilar Insufficiency)
1. vertebral artery
2. pre-manipulative hold
VBI Testing
Purpose: to test for VBI
Testing Procedure:
1. patient is asked about signs + symptoms of VBI
- if definitive VBI symptoms -> referred out
2. perform end-range cervical rotation test
- position held for 10 seconds
- observation of VBI signs + symptoms
3. return head to neutral position + held for minimum of 10 seconds
4. perform body on head rotation test
Positive Sign: onset of VBI symptoms
what is the PURPOSE of VBI TESTING
to test for VBI
what are the 4 STEPS included in VBI TESTING
1. patient is asked about signs + symptoms of VBI
- if definitive VBI symptoms -> referred out
2. perform end-range cervical rotation test
- position held for 10 seconds
- observation of VBI signs + symptoms
3. return head to neutral position + held for minimum of 10 seconds
4. perform body on head rotation test (hold for 4 seconds)
- used to differentiate b/w VBI or vestibular
what is the POSITIVE SIGN associated with VBI TESTING
onset of VBI symptoms
VBI Testing: Pre-Manipulative Hold
Purpose: to test for VBI before manipulation
Testing Procedure:
1. pt in supine position
2. rotate + extend pt's head + hold position for 10 seconds
Positive Sign: onset of VBI symptoms
what is the PURPOSE of the PRE-MANIPULATIVE HOLD
to test for VBI before manipulation
what are the 2 STEPS of the PRE-MANIPULATIVE HOLD
1. pt in supine position
2. rotate + extend pt's head + hold position for 10 seconds
what is a POSITIVE SIGN associated with PRE-MANIPULATIVE HOLD
onset of VBI symptoms
what 3 SPECIAL TESTS are used for assessing for CERVICAL MYELOPATHY
1. Hoffman's reflex
2. Inverted Supinator
3. Babinski Sign
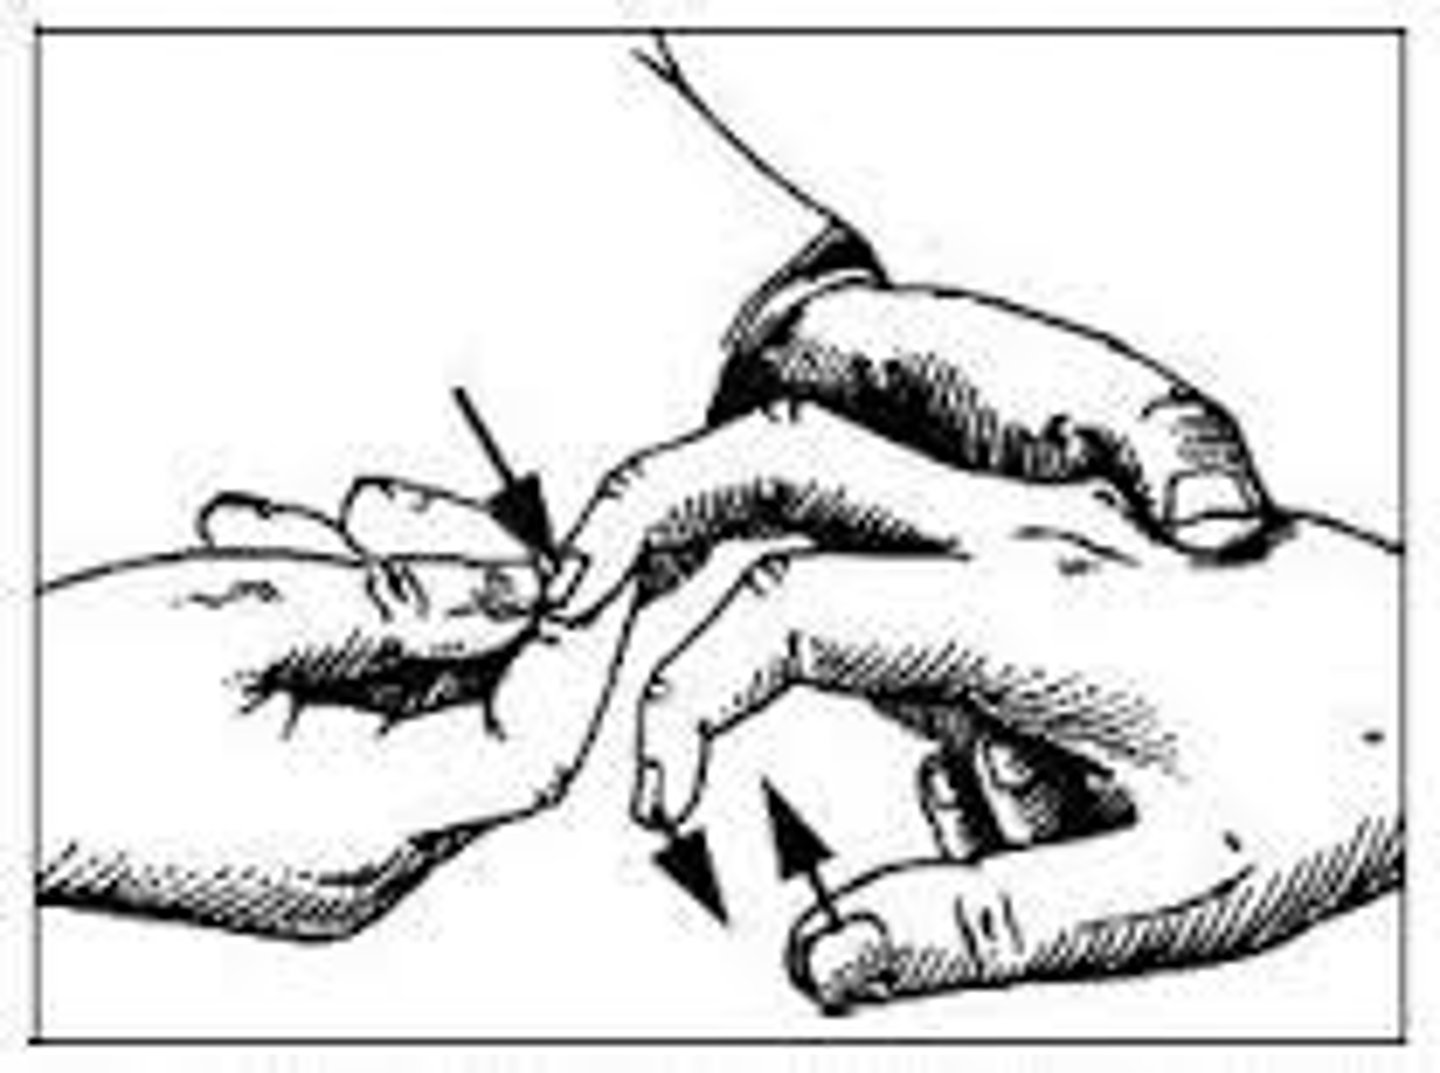
Hoffman's Reflex Test
Testing Procedure:
1. patient is sitting or standing
2. stabilize middle finger proximal to DIP
3. flick middle finger nail
Positive Sign: adduction + opposition of thumb + slight flexion of fingers
what are the 3 STEPS of the HOFFMAN'S REFLEX TEST
1. patient is sitting or standing
2. stabilize middle finger proximal to DIP
3. flick middle finger nail

what is the POSITIVE SIGN of the HOFFMAN'S REFLEX TEST
adduction + opposition of thumb + slight flexion of fingers
Inverted Supinator Test
Testing Procedure:
1. patient seated facing clinician
2. patient places slightly pronated forearm on examiner's forearm for relaxation
3. clinician applies a quick series of strikes near radial styloid area over brachioradialis tendon
Positive Sign: rapid finger flexion or slight elbow extension
what are the 3 STEPS of the INVERTED SUPINATOR TEST
1. patient seated facing clinician
2. patient places slightly pronated forearm on examiner's forearm for relaxation
3. clinician applies a quick series of strikes near radial styloid area over brachioradialis tendon
what is the POSITIVE SIGN of the INVERTED SUPINATOR TEST
rapid finger flexion or slight elbow extension
what is the POSITIVE SIGN associated with the BABINSKI SIGN
great toe extension + separation
what are the 5 TEST ITEM CLUSTER for CERVICAL MYELOPATHY
1. gait deviations
2. positive Hoffman
3. positive inverted supinator
4. positive Babinski
5. age >45 years old
what 4 TESTS are used for assessing for CERVICAL RADICULOPATHY
1. Spurling's A + B
2. Shoulder Abduction Relief Test
3. Distraction Test
4. ULTT A: median nerve bias test
what are the 4 TEST ITEM CLUSTER for CERVICAL RADICULOPATHY
1. Spurling's A (lateral flexion + compression)
2. ULTT A (median nerve bias test
3. distraction test (supine, chin grasp)
4. <60 degrees ipsilateral rotation
what SPURLING TEST is the MAIN TEST for nerve root symptoms (radiculopathy)
Spurling's A
Spurling's A
Purpose: test for nerve root symptoms (radiculopathy)
Testing Procedure: ipsilateral SB + compression
Positive Sign: increased in radicular signs
what are the 2 MOTIONS required to perform SPURLING'S A
1. ipsilateral SB
2. compression
Spurling's B
Purpose: test for nerve root symptoms (radiculopathy)
Testing Procedure: ipsilateral SB + extension + compression (overpressure)
Positive Sign: increased in radicular signs
what are the 3 MOTIONS required to perform SPURLING'S B
1. ipsilateral SB
2. extension
3. compression (overpressure)
what is the PURPOSE of SPURLING'S A + B
test for nerve root symptoms (radiculopathy)
what is the POSITIVE SIGN for SPURLING'S A + B
increase in radicular signs
Shoulder Abduction Relief Test
Testing Procedure:
1. instruct pt to place hand of affected extremity on their head
- to support the UE in the scapular place
Positive Sign: alleviation of radicular symptoms
how is the SHOULDER ABDUCTION RELIEF TEST performed
instruct pt to place hand of affected extremity on their head
(in order to support UE in scapular place)
what is the POSITIVE SIGN associated with the SHOULDER ABDUCTION RELIEF TEST
alleviation of radicular symptoms
what TYPE of TREATMENT is the SHOULDER ABDUCTION RELIEF TEST classified as
traction treatment
Distraction Test
Purpose: test for nerve root symptoms (radiculopathy)
Testing Procedure:
1. place one hand under pt's chin + other hand under occiput
- if TMJ issues: do suboccipital grasp
2. slowly distract with slight flexion
3. hold for 10-15 seconds
Positive Sign: decrease in radicular signs
what is the PURPOSE of the DISTRACTION TEST
test for nerve root symptoms (radiculopathy)
what are the 3 STEPS of the DISTRACTION TEST
1. place one hand under pt's chin + other hand under occiput
- if TMJ issues: do suboccipital grasp
2. slowly distract with slight flexion
3. hold for 10-15 seconds
what is the POSITIVE SIGN of the DISTRACTION TEST
decrease in radicular signs
Valsalva Maneuver
Purpose: to assess for cervical radiculopathy
Testing Procedure: ask patient when doing subjective if they have any problems with coughing or sneezing
Positive Sign:
- YES = dis problem or cervical radiculopathy
what is the PURPOSE of VALSALVA MANEUVER
to assess for cervical radiculopathy
what TEST is used for HEADACHE IMPAIRMENT
flexion rotation test
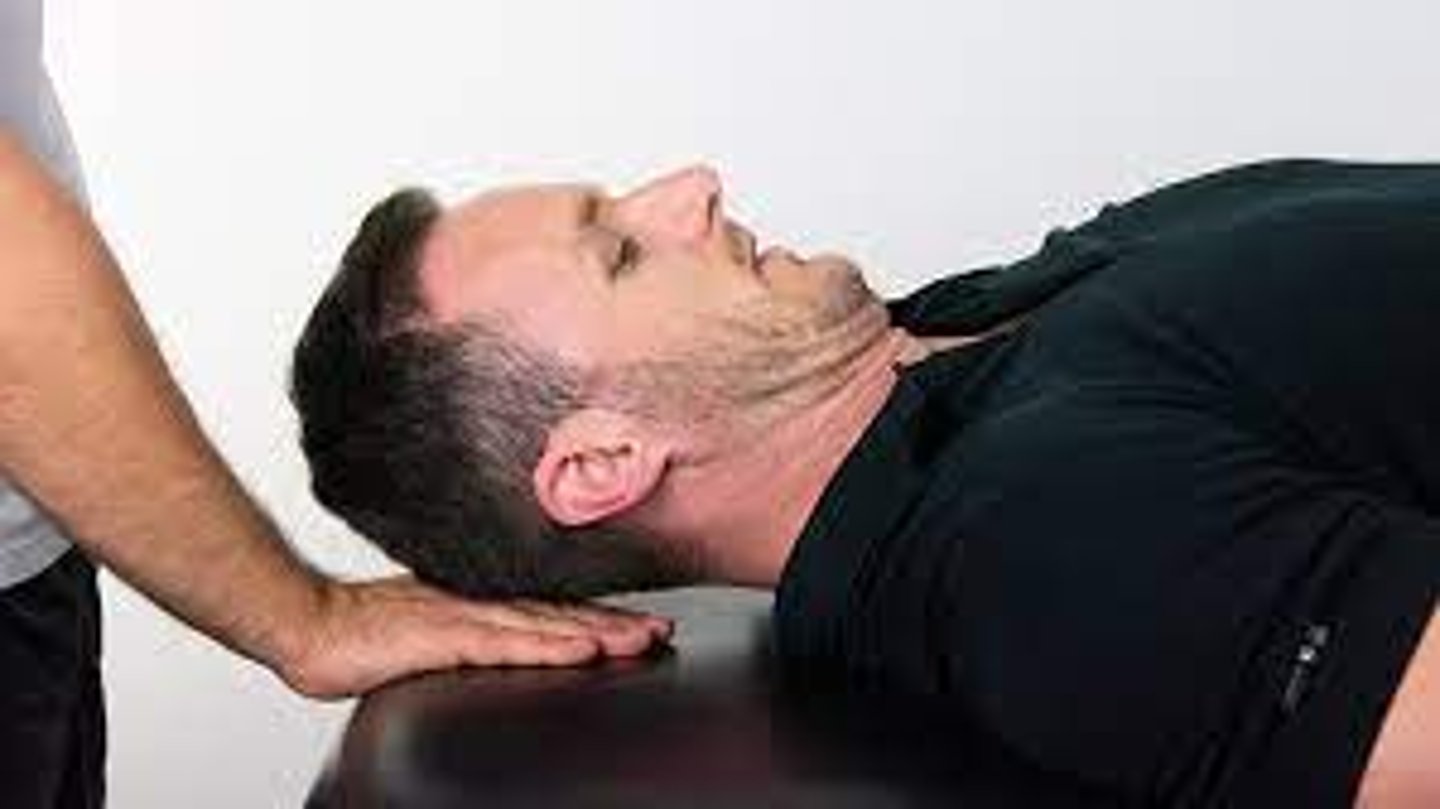
Flexion Rotation Test
Purpose: to test for upper cervical mobility headache impairment (cervicogenic HA)
Testing Procedure:
1. PT/examiner at head of table
2. assess resting symptoms
3. pt completes active full neck flexion
- to isolate C1 + C2
4. PT applies passive full rotation to both sides while assessing symptoms
Positive Sign:
1. either pain provocation or loss of 10 degrees relative to other side
what is the PURPOSE of the FLEXION ROTATION TEST
to test for upper cervical mobility headache impairment (cervicogenic HAs)
what are the 4 STEPS of the FLEXION ROTATION TEST
1. PT/examiner at head of table
2. assess resting symptoms
3. pt completes active full neck flexion
- to isolate C1 + C2
4. PT applies passive full rotation to both sides while assessing symptoms
what is the POSITIVE SIGN of the FLEXION ROTATION TEST
1. pain provocation
OR
2. loss of 10 degrees relative to other side
Neck Flexor Endurance Test
Purpose: to assess anterior, deep neck flexor endurance
Testing Procedure:
1. pt in supine/hooklying position
2. pt retracts chin (full retraction)
3. PT lifts pt's head (1 inch)
4. PT maintains hand position under pt's head
5. PT draws line on anterolateral neck skinfolds
6. pt instructed to hold chin tuck position + PT places hand under pt's head without touching
7. if pt's head touches PT's hand or skinfold is lost, PT instructs pt to correct
Test Terminated: pt cannot hold position or maintain skinfolds for >1 sec
Norms:
- Female: 29 seconds
- Male: 39 seconds
what is the PURPOSE of the NECK FLEXOR ENDURANCE TEST
to assess anterior, deep neck flexor endurance
what are the 7 STEPS of the NECK FLEXOR ENDURANCE TEST
1. pt in supine/hooklying position
2. pt retracts chin (full retraction)
3. PT lifts pt's head (1 inch)
4. PT maintains hand position under pt's head
5. PT draws line on anterolateral neck skinfolds
6. pt instructed to hold chin tuck position + PT places hand under pt's head without touching
7. if pt's head touches PT's hand or skinfold is lost, PT instructs pt to correct
when is the NECK FLEXOR ENDURANCE TEST terminated
when pt cannot hold position or maintain skinfolds for >1 sec
what are the NORMS of the NECK FLEXOR ENDURANCE TEST
- Female: 29 seconds
- Male: 39 seconds
what is the POSITIVE SIGN of QUADRANT TESTING
pain provocation
regarding QUADRANT TESTING, what QUADRANT provides MAXIMAL FORAMINAL CLOSURE
extension quadrant
during QUADRANT TESTING, what can be APPLIED for PROVOCATION
compression
what are the 4 TYPES of QUADRANT TESTING
1. flexion, LSB, LR
2. flexion, RSB, RR
3. extension, LSB, LR
4. extension, RSB, RR
when should QUADRANT TESTING be completed
at the end of session due to being most provocative
what are 4 TESTS used for THORACIC OUTLET SYNDROME
1. Allen's test
2. Adson Maneuver
3. Halstead Maneuver
4. Roos Test
Allen's Test
Purpose: to assess blood flow to the hand through radial + ulnar arteries
Testing Procedure:
1. pt is seated
2. pt clenches fist tightly for 30 seconds
3. PT simultaneously compresses both radial + ulnar arteries at the wrist
4. pt opens their hand
5. observe color of palm + fingers
6. release pressure on ulnar artery, but keep pressure on radial artery
7. pt opens + closes their hand several times
8. observe color
Results:
- if the hand returning to normal color (flushing) with 5-15 seconds: ulnar artery has good blood flow
what is the PURPOSE of ALLEN'S TEST
to assess blood flow to the hand through radial + ulnar arteries
what are the 8 STEPS of the ALLEN'S TEST
1. pt is seated
2. pt clenches fist tightly for 30 seconds
3. PT simultaneously compresses both radial + ulnar arteries at the wrist
4. pt opens their hand
5. observe color of palm + fingers
6. release pressure on ulnar artery, but keep pressure on radial artery
7. pt opens + closes their hand several times
8. observe color
regarding ALLEN'S TEST, what does it indicate if it takes the hand 5-15 seconds to return to normal color (flushing)
ulnar artery has good blood flow
Adson Maneuver
Purpose: to assess for thoracic outlet syndrome
Testing Procedure:
1. pt is seated
2. elbow fully extended
3. abduct pt's arm 30 degrees at the shoulder
4. palpate the radial pulse
5. have pt extend their neck + turn their head toward the affected side
6. have pt take a deep breath in + out
7. compare radial pulse to the resting pulse
Positive Sign: decrease or disappearance of radial pulse
what is the PURPOSE of the ADSON MANEUVER
to assess for thoracic outlet syndrome
what are the 7 STEPS of ADSON MANEUVER
1. pt is seated
2. elbow fully extended
3. abduct pt's arm 30 degrees at the shoulder
4. palpate the radial pulse
5. have pt extend their neck + turn their head toward the affected side
6. have pt take a deep breath in + out
7. compare radial pulse to the resting pulse
what is the POSITIVE SIGN of the ADSON MANEUVER
decrease or disappearance of radial pulse
Halstead Maneuver ("Reverse Adson's Test)
Purpose: to assess for thoracic outlet syndrome
Testing Procedure:
1. pt is seated
2. PT palpates radial pulse
3. abduct pt's arm to 45 degrees
4. extend the shoulder to 45 degrees
5. externally rotate arm while applying a downward distraction
6. pt turn head away from side being testing + extend their cervical spine
Positive Sign:
1. significant reduction or absence of radial pulse on affected side compared to unaffected side
OR
2. if pt experiences symptoms
what is the PURPOSE of the HALSTEAD MANEUVER
to assess for thoracic outlet syndrome
what are the 6 STEPS of the HALSTEAD MANEUVER
1. pt is seated
2. PT palpates radial pulse
3. abduct pt's arm to 45 degrees
4. extend the shoulder to 45 degrees
5. externally rotate arm while applying a downward distraction
6. pt turn head away from side being testing + extend their cervical spine
what are the 2 POSITIVE SIGNS of the HALSTEAD MANEUVER
1. significant reduction or absence of radial pulse on affected side compared to unaffected side
OR
2. if pt experiences symptoms
Roos Test
Purpose: to assess for thoracic outlet syndrome
Testing Procedure:
1. pt is seated
2. have pt abduct arms to 90 degrees
3. then externally rotate + flex elbow to 90 degrees
4. instruct pt to open + close hands fro 3 minutes
Positive Sign: reproduction of symptoms
what is the PURPOSE of the ROOS TEST
to assess for thoracic outlet syndrome
what are the 4 STEPS of the ROOS TEST
1. pt is seated
2. have pt abduct arms to 90 degrees
3. then externally rotate + flex elbow to 90 degrees
4. instruct pt to open + close hands fro 3 minutes
what is the POSITIVE SIGN of the ROOS TEST
reproduction of symptoms
what TEST is used for assessing FIRST RIB MOBILITY
cervical rotation lateral flexion test
Cervical Rotation Lateral Flexion Test
Purpose: to assess for 1st rib impairment
Testing Procedure:
1. patient is seated
2. PT passively rotates spine to end range rotation
3. maintaining rotation, passively flex the spine into opposite side bending
Positive Sign: significant limitation with a hard or abrupt end feel compared to contralateral side
what is the PURPOSE of the CERVICAL ROTATION LATERAL FLEXION TEST
to assess for 1st rib impairment
what are the 3 STEPS of the CERVICAL ROTATION LATERAL FLEXION TEST
1. patient is seated
2. PT passively rotates spine to end range rotation
3. maintaining rotation, passively flex the spine into opposite side bending
what is the POSITIVE SIGN of the CERVICAL ROTATION LATERAL FLEXION TEST
significant limitation with a hard or abrupt end feel compared to contralateral side
what are the 3 UPPER LIMB TENSION TESTS
1. ULTT A (Median Nerve)
2. ULTT B (Radial Nerve)
3. ULTT C (Ulnar Nerve)
what are 3 POSITIVE SIGNS of the UPPER LIMB TENSION TESTS
1. reproduction of symptoms
2. asymmetrical resistance or symptoms compared to uninvolved limb
3. symptoms change with neck movements
what is the PURPOSE of the PASSIVE INTERVERTEBRAL MOTION CERVICAL + UPPER THORACIC SPINE
to assess passive intervertebral motion (PIVM) with FB, BB, SB + rotation in cervical + upper thoracic spine
what 3 CERVICAL MOB TECHNIQUES are used for JOINT PLAY/MOBILIZATIONS
1. cervical down glide
2. cervical lateral glide
3. OA joint mobility (unilateral)
what are 2 PURPOSES of CERVICAL DOWN GLIDE
1. to assess passive intervertebral motion with down gliding of cervical facets
2. to improve motion with ipsilateral cervical side bending
what are 2 PURPOSES of CERVICAL LATERAL GLIDE
1. to assess passive intervertebral motion with lateral gliding of cervical facets
2. to improve motion with ipsilateral cervical side bending
what is the PURPOSE of OA JOINT MOBILITY
to assess OA accessory mobility unilaterally/bilaterally
what 2 CERVICAL MOB TECHNIQUES is used for JOINT PLAY ASSESSMENT
1. AA joint mobility
2. OA joint mobility (bilaterally)
what is the PURPOSE of AA JOINT MOBILITY
to assess AA mobility bilaterally
what are 3 CERVICAL MOB TECHNIQUES used for JOINT MOBILIZATION
1. cervical up glide
2. suboccipital release
3. manual traction
what is the PURPOSE of CERVICAL UP GLIDE
to improve motion with cervical facet up glide
what is CERVICAL UP GLIDE also viewed as
soft tissue mobilization + joint mobilization
what is the PURPOSE of SUBOCCIPITAL RELEASE
inhibitive technique for subcranial musculature + joint structures
what is the PURPOSE of MANUAL TRACTION
to improve facet joint mobility + increased patency of lateral cervical foramen