2. final impressions part 2
1/51
There's no tags or description
Looks like no tags are added yet.
Name | Mastery | Learn | Test | Matching | Spaced |
|---|
No study sessions yet.
52 Terms
what are the first eight steps of fabricating custom trays for maxillary impressions?
apply vaseline as a separating medium on trimmed prelim cast
outline the tray (3 lines: vestibule, tray, wax spacer)
add wax spacer
cut off excess
add extra wax layers over teeth
prepare windows through wax on top of teeth
place aluminum foil
fill windows with triad
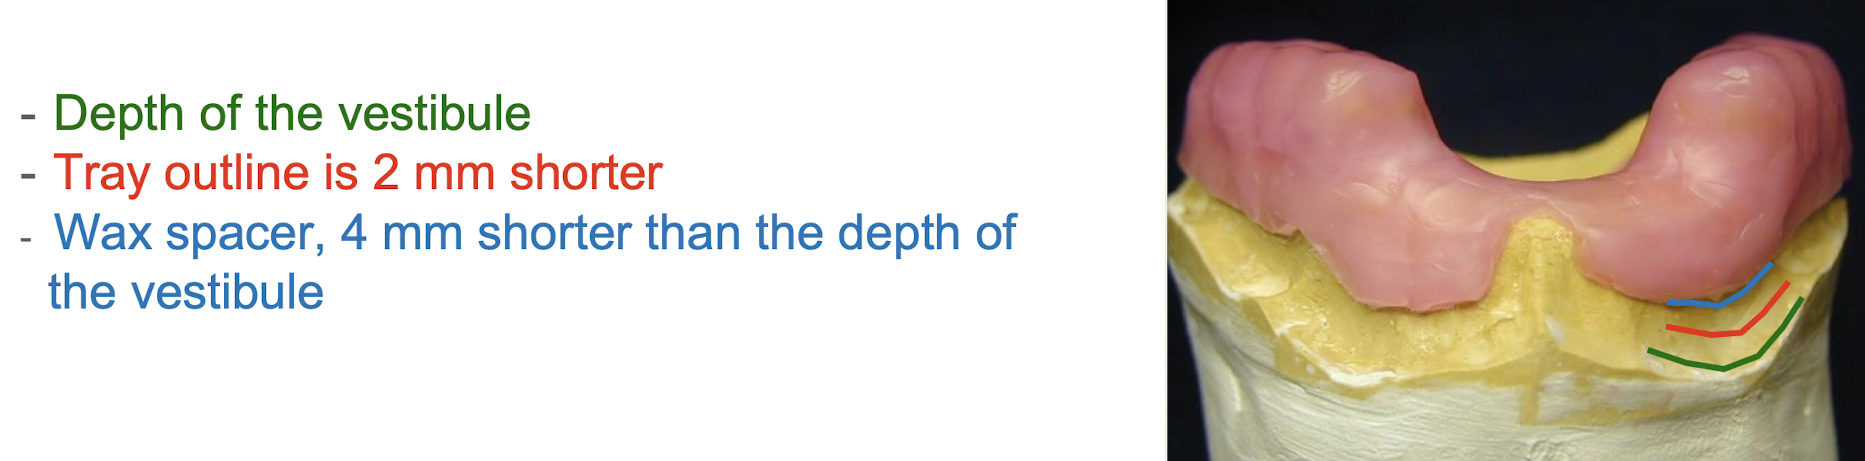
what are the three lines drawn for tray outline?
one at depth of vestibule
one outline of custom tray 2mm short of vestibule
one outline of wax spacer 2mm short of tray outline (optional)
*maxilla and mandible
explain the selective pressure method of outline of wax spacer
short at retromolar pad and buccal shelf area, putting pressure in primary bearing areas and relieve others
what type of wax is used for wax spacer?
baseplate wax
T or F: teeth indentations should not be visible in tray otherwise tray will sit in cast but not mouth
true
excess wax spacer should be trimmed with a (BLANK 1) and follow the outlines drawn (BLANK 2)mm from the depth of the vestibule. posteriorly the wax should be a little short of the lines connecting the (BLANK 3)
BLANK 1: 15 blade wax instrument
BLANK 2: 4mm
BLANK 3: pterygo-maxillary notches
how big are the windows for maxillary custom tray impressions?
(4) 2 × 2 mm
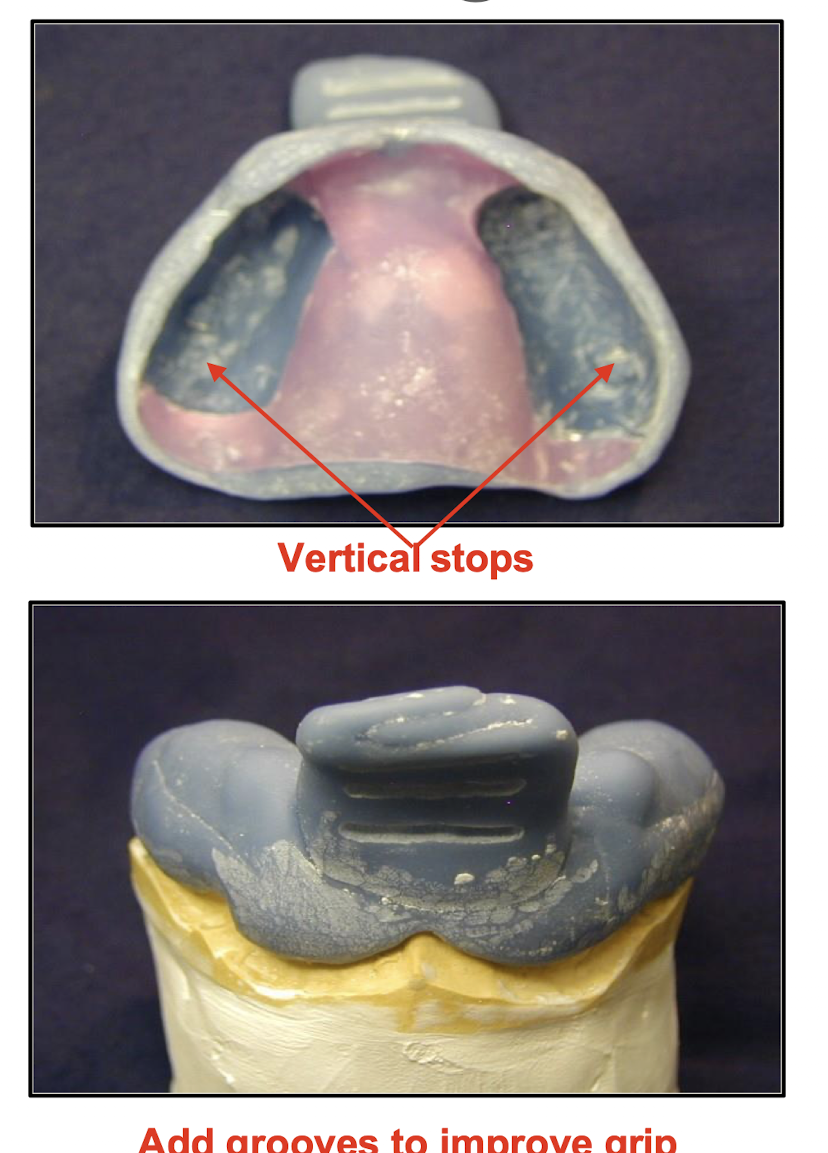
maintain vertical stop maintaining space for impression material to be filled by traid
is it necessary to place aluminum foil?
no
over teeth only as separator (wax from tray) and create windows that will be filled with traid to create a stopper
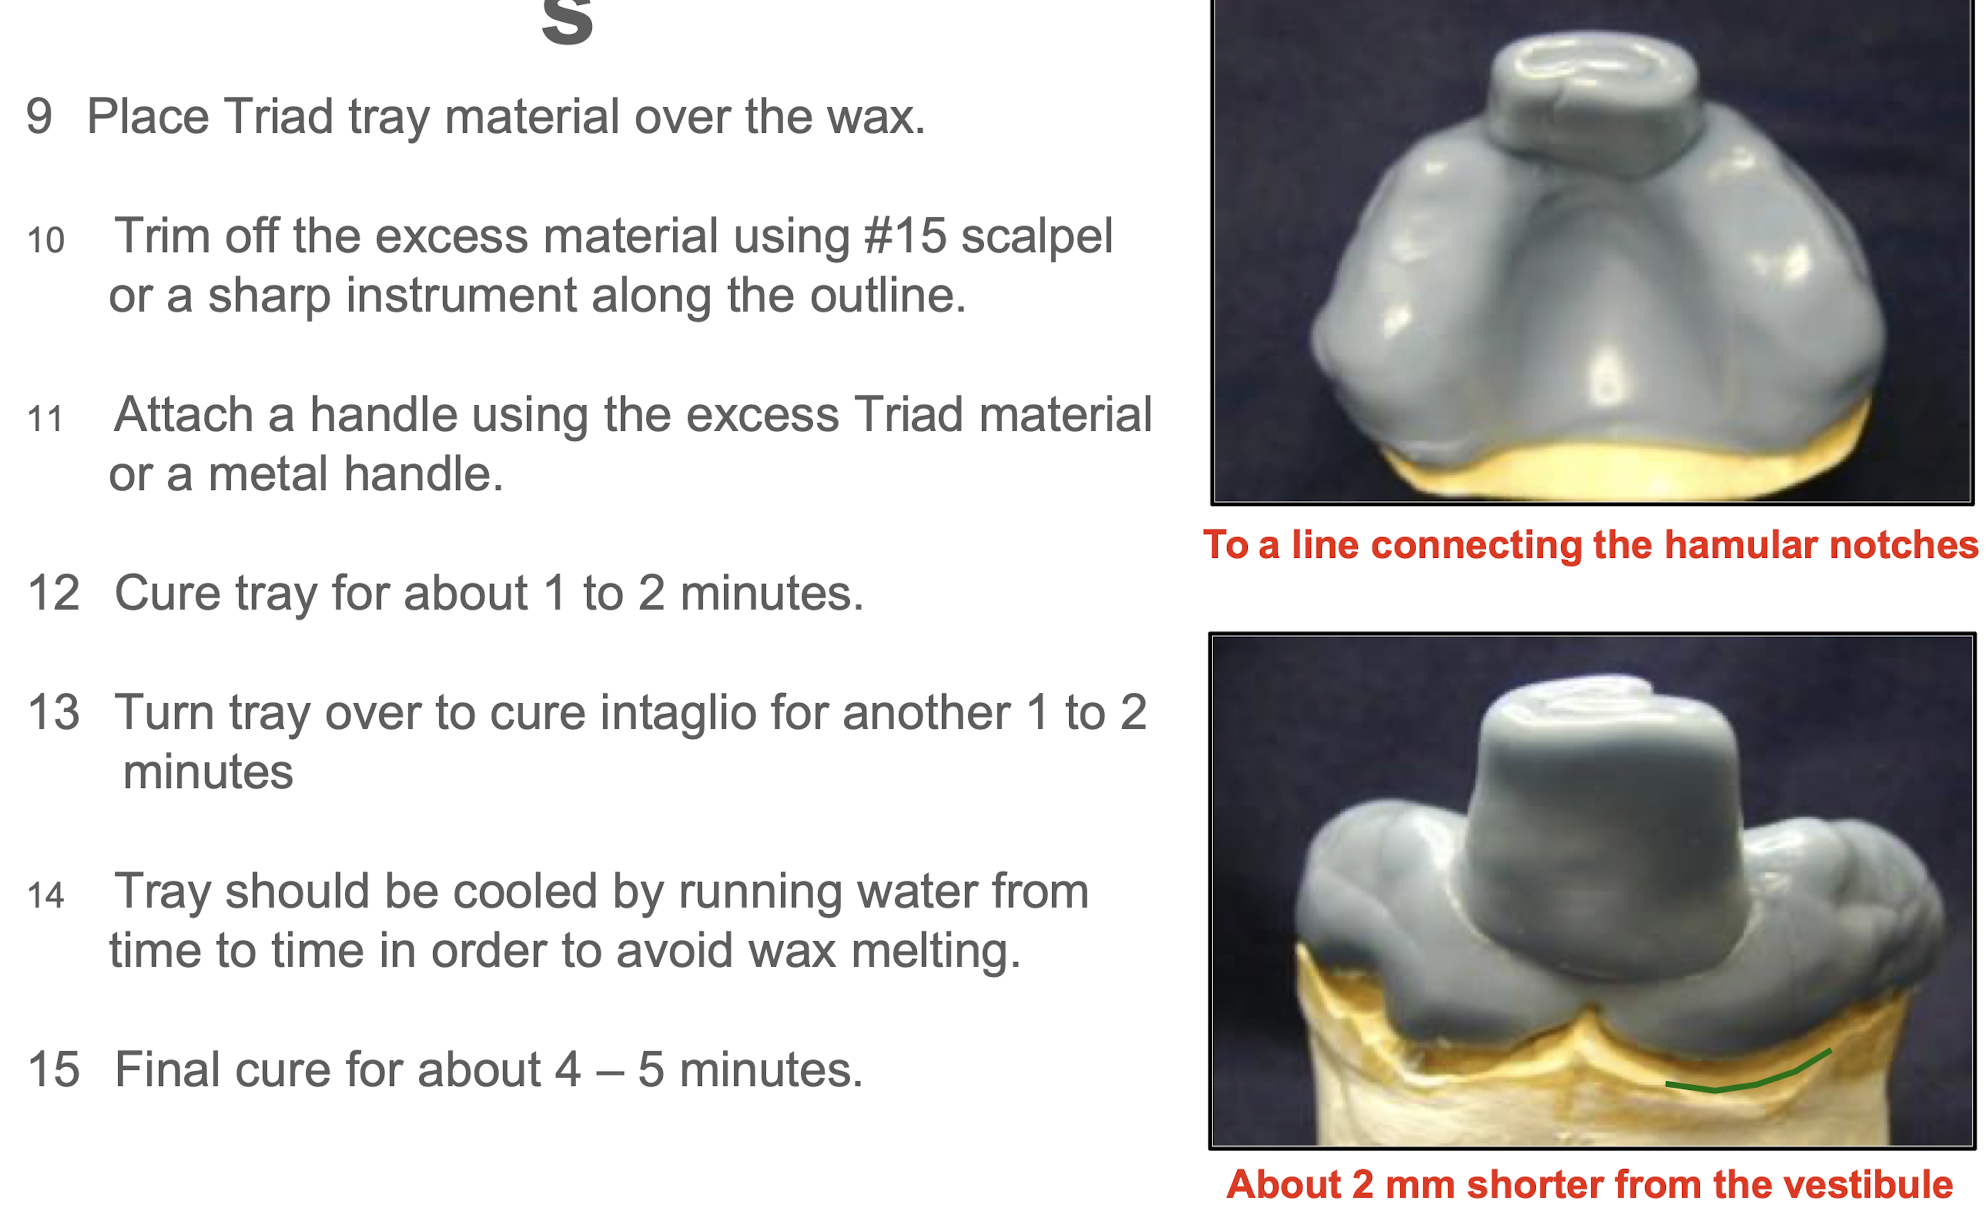
what are steps 9 -15 of fabricating custom trays for the maxilla?
Place Triad tray material over the wax
Trim off the excess material using #15 scalpel or a sharp instrument along the outline
Attach a handle using the excess Triad material or a metal handle
Cure tray for about 1 to 2 minutes
Turn tray over to cure intaglio for another 1 to 2 minutes
Tray should be cooled by running water from time to time in order to avoid wax melting
Final cure for about 4 – 5 minutes.
what are the final two steps of fabricating custom trays for the maxilla?
trim excess a the borders and smooth any sharpness (add grooves to improve grip)
Remove the wax and aluminum foil only on the teeth. The rest of the wax should be maintained during border molding and removed only before taking final impression.
what are the first six steps of fabricating custom trays for mandible?
start w properly trimmed diagnostic cast
outline tray w three lines
blockout undercuts with baseplate wax
apply vaseline as separating medium
cut a piece of baseplate wax into two strips (spacer)
soften and place one strip on one side then soften and place the other strip on the other side
what are steps 7-10 of fabricating custom trays for mandible?
trim back wax over primary bearing areas: buccal shelf and retromolar pad
add two layers of wax over teeth not on primary bearing areas still!
prepare three windows through wax over teeth evenly distributed across midline
these windows will be filled w triad to create vertical stops maintaining space for the impression material
(3) 2 × 2mm
place aluminum foil over teeth as separator, then open windows created
what steps do mandible and maxilla have in common?
11-16
Turn tray over to cure intaglio for another 1 to 2 minutes
Tray should be cooled by running water from time to time in order to avoid wax melting
Final cure for about 4 – 5 minutes
Tray should be cooled by running water from time to time in order to avoid wax melting
Final cure for about 4 – 5 minutes.
trim excess a the borders and smooth any sharpness (add grooves to improve grip
what is the last step of fabricating custom trays for mandible?
remove the wax and aluminum foil only on the teeth; the rest of the wax should be maintained during border molding and removed only before taking final impression
what does the altered cast technique help with?
getting more support from edentulous areas
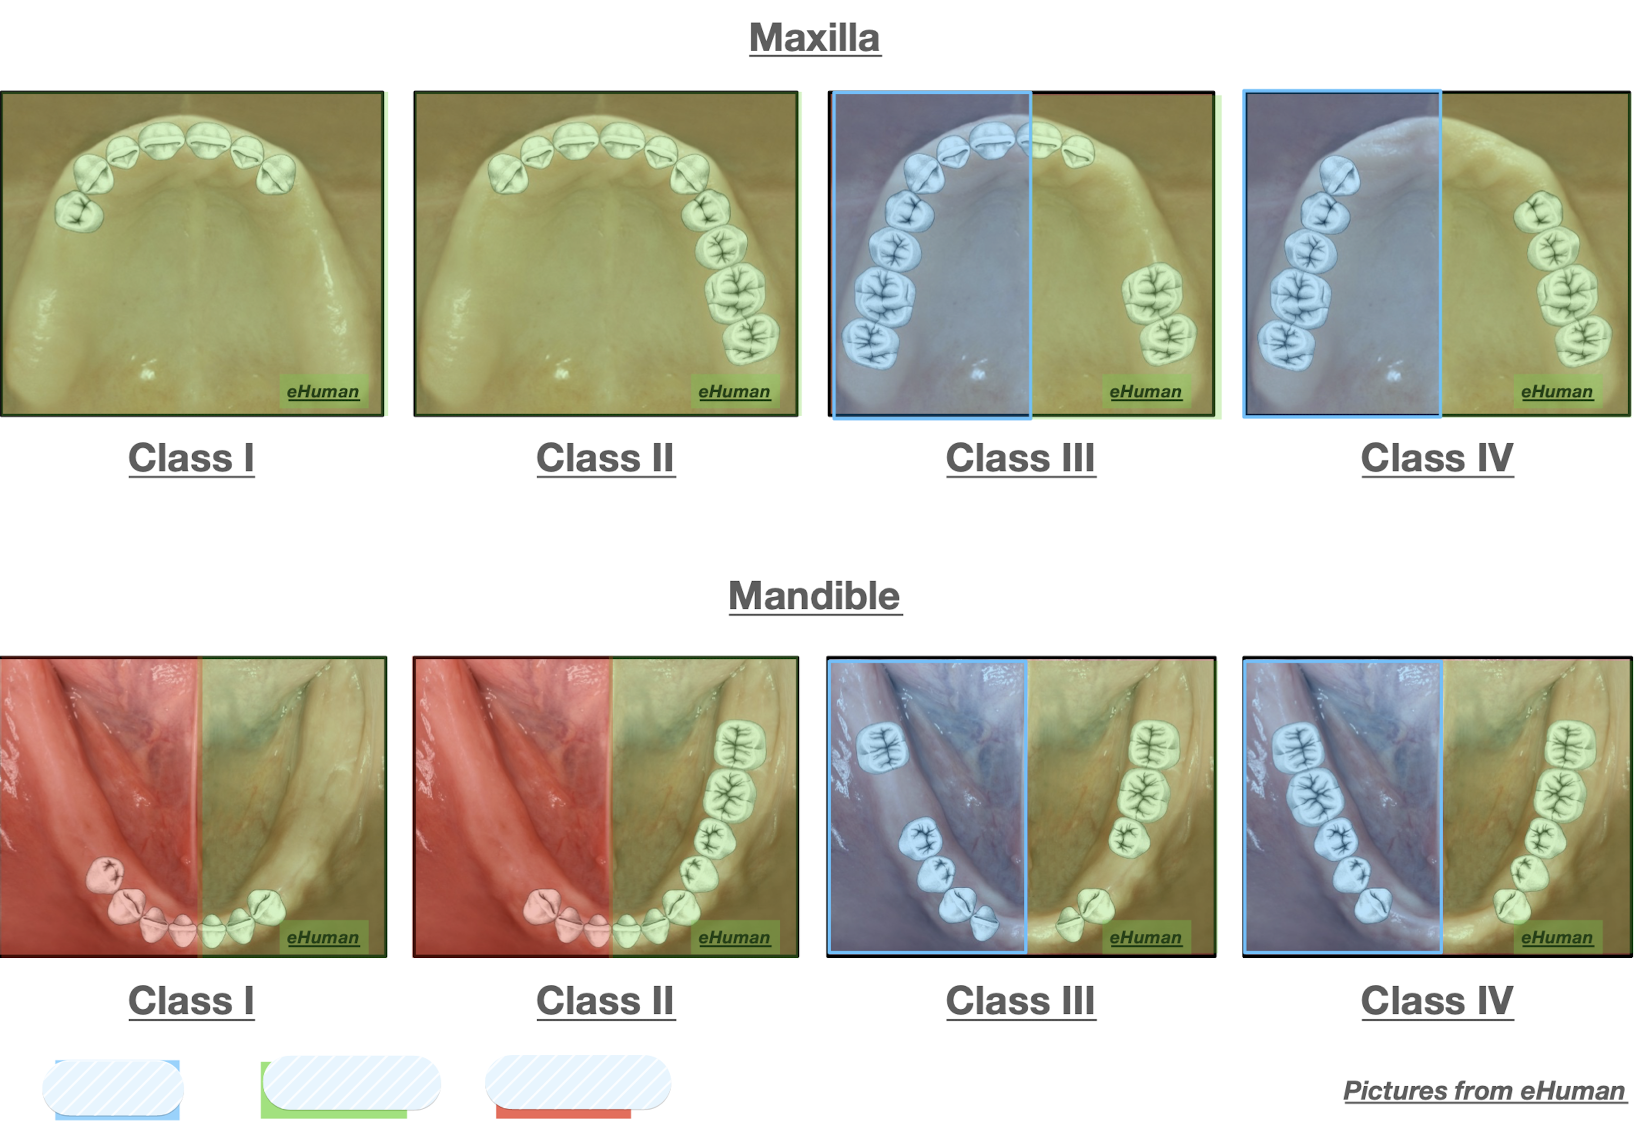
what are the six factors influencing support of the distal extension base?
contour and quality of residual ridge
denture base coverage
RPD design
type and accuracy of impression*
occlusal load applied
fit of denture base
which of the six factors influencing support of the distal extension base?
maxillary and mandibular secondary bearing areas
firm and dense soft tissue
round ridge form (vs knife edge)
contour and quality of residual ridge
which of the six factors influencing support of the distal extension base?
the broader the better
denture base coverage
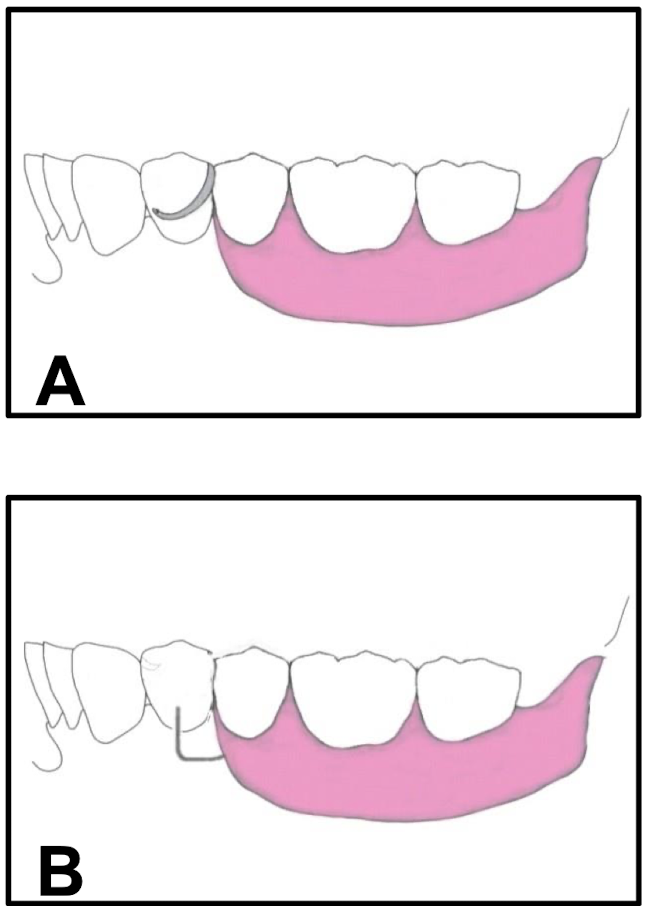
which of the six factors influencing support of the distal extension base?
rest are moved from distal to mesial (A → B)
rpd design
which of the six factors influencing support of the distal extension base?
viscosity of impression materials
rigidity of impression trays
impression techniques
type and accuracy of impression
which of the six factors influencing support of the distal extension base?
depends on number of artificial teeth (C vs D)
depends on width of occlusal tables
occlusal load applied

which of the six factors influencing support of the distal extension base?
intimate contact btwn intaglio of denture base and residual ridge
fit of denture base
another name for altered cast technique
dual technique
which technique?
Introduced in 1937 by Dr. Applegate
Was coined as altered cast technique by Dr. Holmes in 1965
Recommended for mandibular distal extension (Class I and II)
Purpose: to capture the residual ridges in their functional form and in relation to the remaining teeth
Advantages: improves fit of the denture bases, reduces the number of postoperative visits, preserves the residual ridges and improves stress distribution
altered cast techniques
what is the purpose of the altered cast technique?
to capture the residual ridges in their functional form and in relation to the remaining teeth
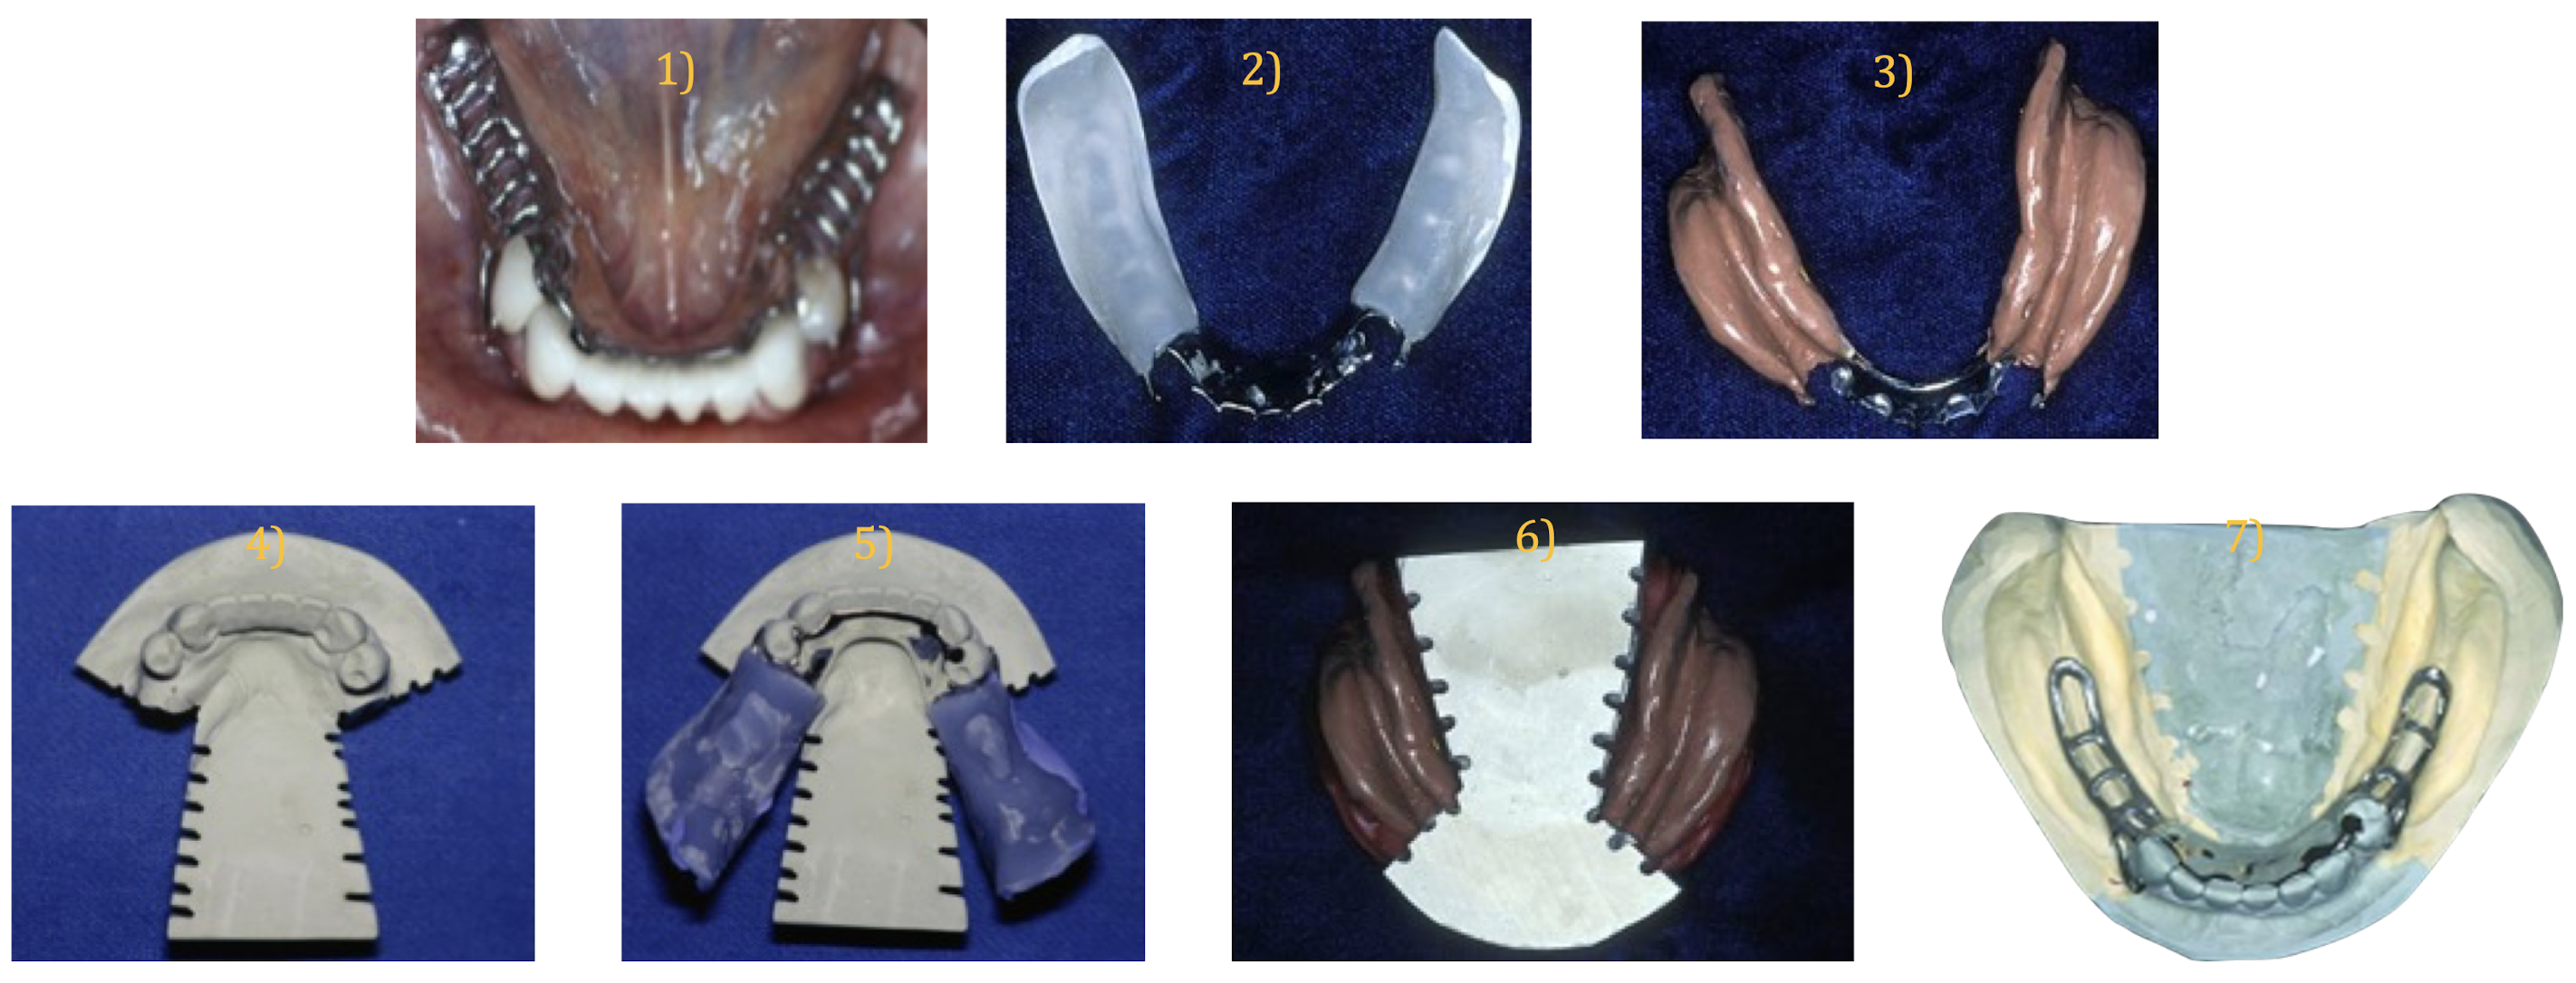
describe the altered cast technique steps
The framework is obtained from the lab and tried-in
Acrylic is added to the framework, border molding is performed, and the final impression is taken
The new impression is boxed to obtain the master cast
which technique?
altered cast
metal framework on initial case then fabricate a custom tray on top of metal framework for edentulous areas. use this custom tray to do border molding in mouth and take final impression.
4: cut eden areas and create notches for retention
5: metal framework w new impression
6: box and pour
7: final combined case with teeth from initial cast and edentulous areas from second impression
internet definition: corrects inaccuracies in the initial cast of a distal extension area, ensuring better fit, stability, and support for the denture base under functional load. The process involves creating a final impression of the edentulous ridge using a separate baseplate on the RPD framework, sectioning the original cast in the saddle area, and then re-pouring the sectioned part with a new stone to create an altered, more accurate cast
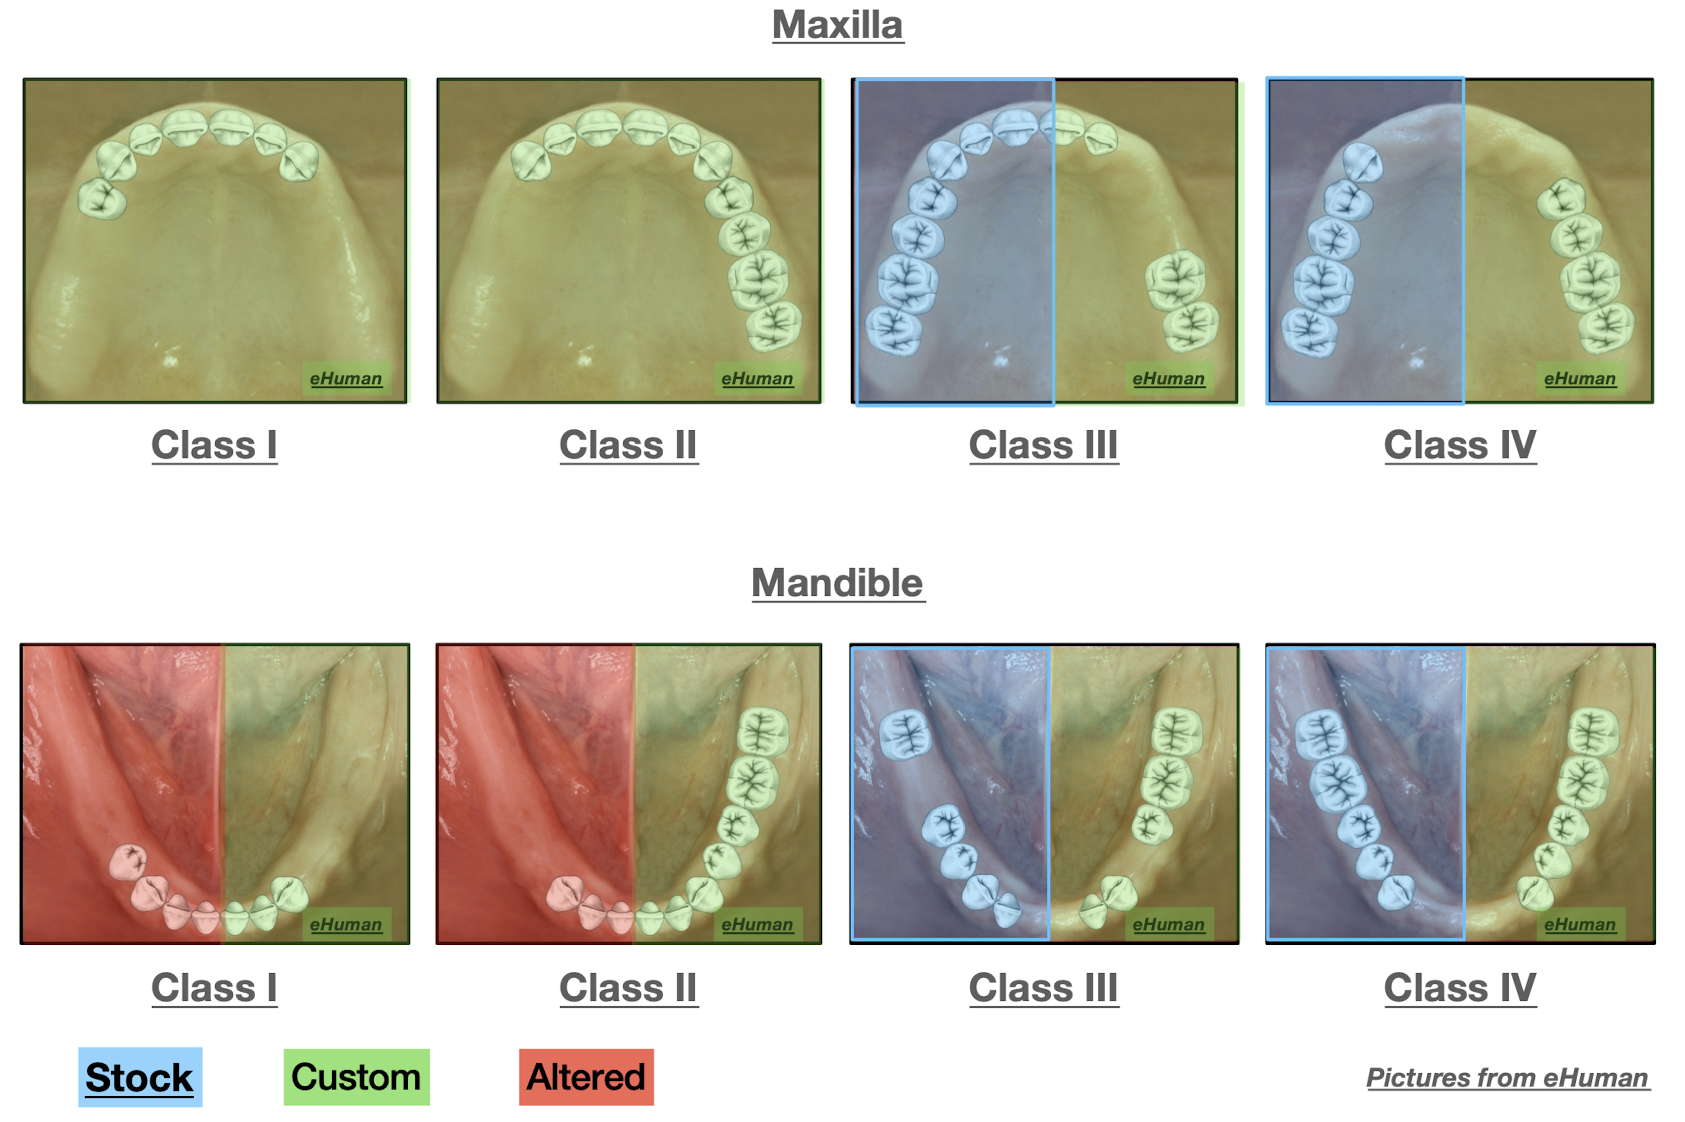
altered cast technique is indicated for which kenn classes?
mandibular class I and II
combined cast made of
teeth from initial cast and edentulous areas from second impression
what steps are added with the clinical visits with the altered cast technique?
at second visit: add acrylic t distal extension (lab) and border molding/final impression
between second and third visit: pour impression and record bae and wax rim
what are the first 10 steps of the altered cast technique impression?
block out undercuts with wax
draw the outlines: dentures and tray (vestibule. tray, wax spacer)
apply separating medium
seat metal framework on cast
apply resin tray material (traid) to metal struts or mesh
trim material'
after polymerization, trim border w lab bur and arbor band
adjust extensions/acrylic borders intra-orally
border mold tray with compound: structures to be captured and associated border molding movements
remove excess modeling compound in intaglio surface
which step?
Buccal shelf area: acrylic should be 2-3mm short of the buccal vestibule
Assess by moving cheek up/ down / forward/ backward/ in/ out.
Cover retromolar pad
Disto-lingual extension: ask patient to move his/her tongue forward Lingual extension: tongue touching the cheeks
step 8 Adjust the extensions/ acrylic borders intra-orally
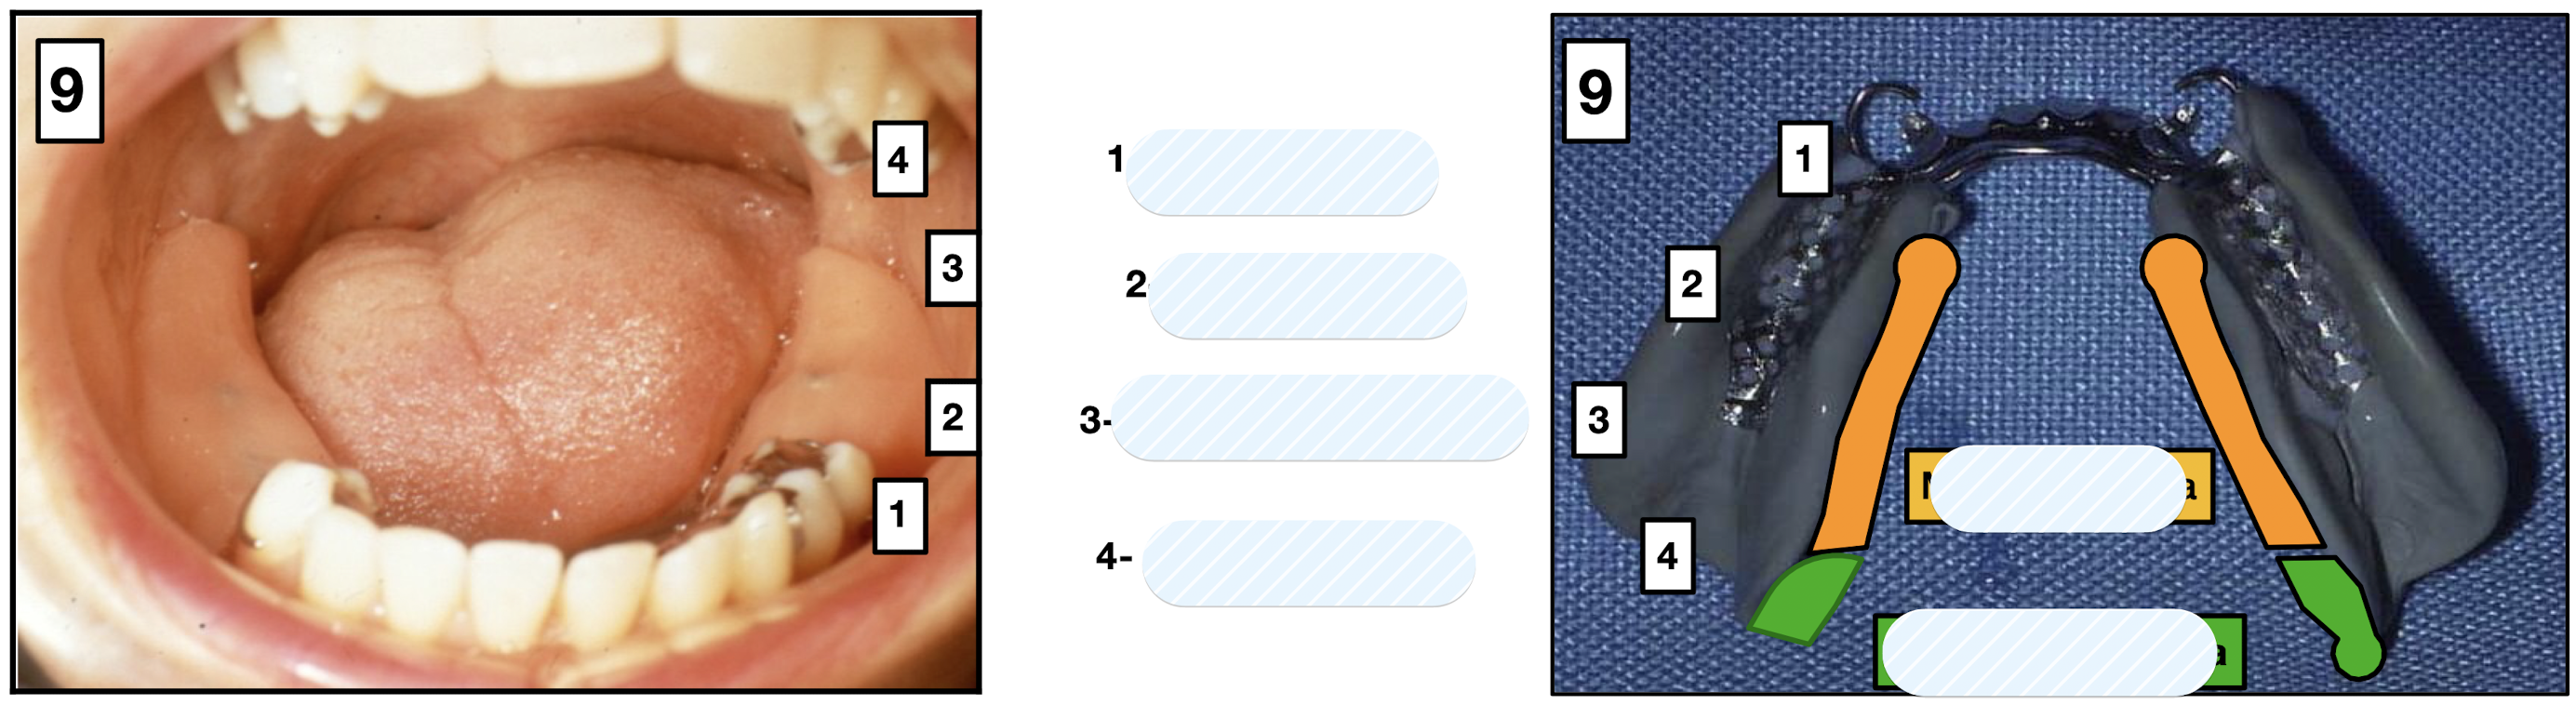
which structure for border molding?
cheek is elevated, pulled down, out, in, forward for orbicularis oris, back for bucinator
buccal frenum and buccal shelf
which structure for border molding?
hold down the framework and instruct the patient to close their mouth hence contracting the masseter muscle
masseteric notch
which structure for border molding?
patient opens mouth as wide as possible
retromolar pad
which structure for border molding?
tongue touching the cheeks
mylohyoid area
which structure for border molding?
ask patient to move his/her tongue forward
retromylohyoid fossa

which steps of altered cast technique impression?
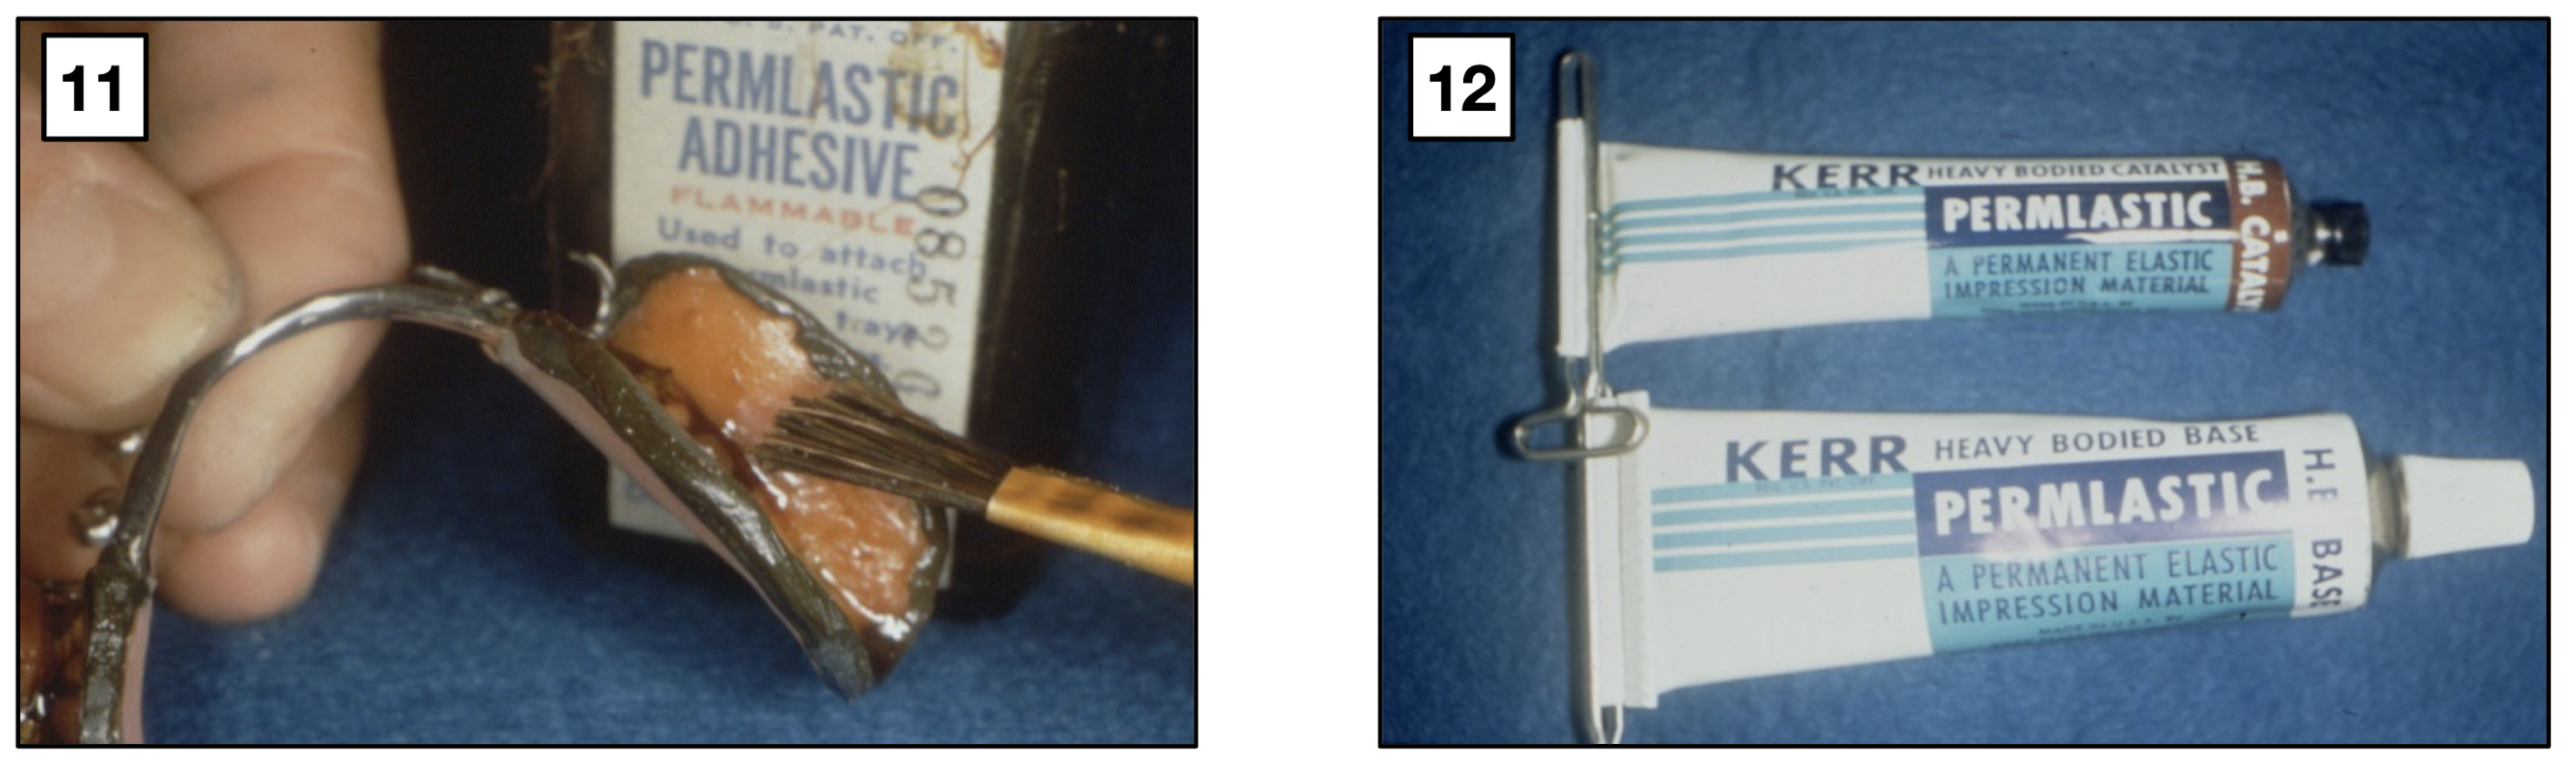
distal extension should be dried w gauze and adhesive should be applied
impression material (here polysulfide) is mixed and loaded onto the distal extension
last two steps of altered cast technique impression?
Seat the framework intra-orally
Make sure it is properly seated (look at rest seats)
As the impression material is setting, redo border molding movements
examine impression make sure no voids or inaccuracies
first five steps of cast fabrication (impression major step one and fabrication is major step 3.2)
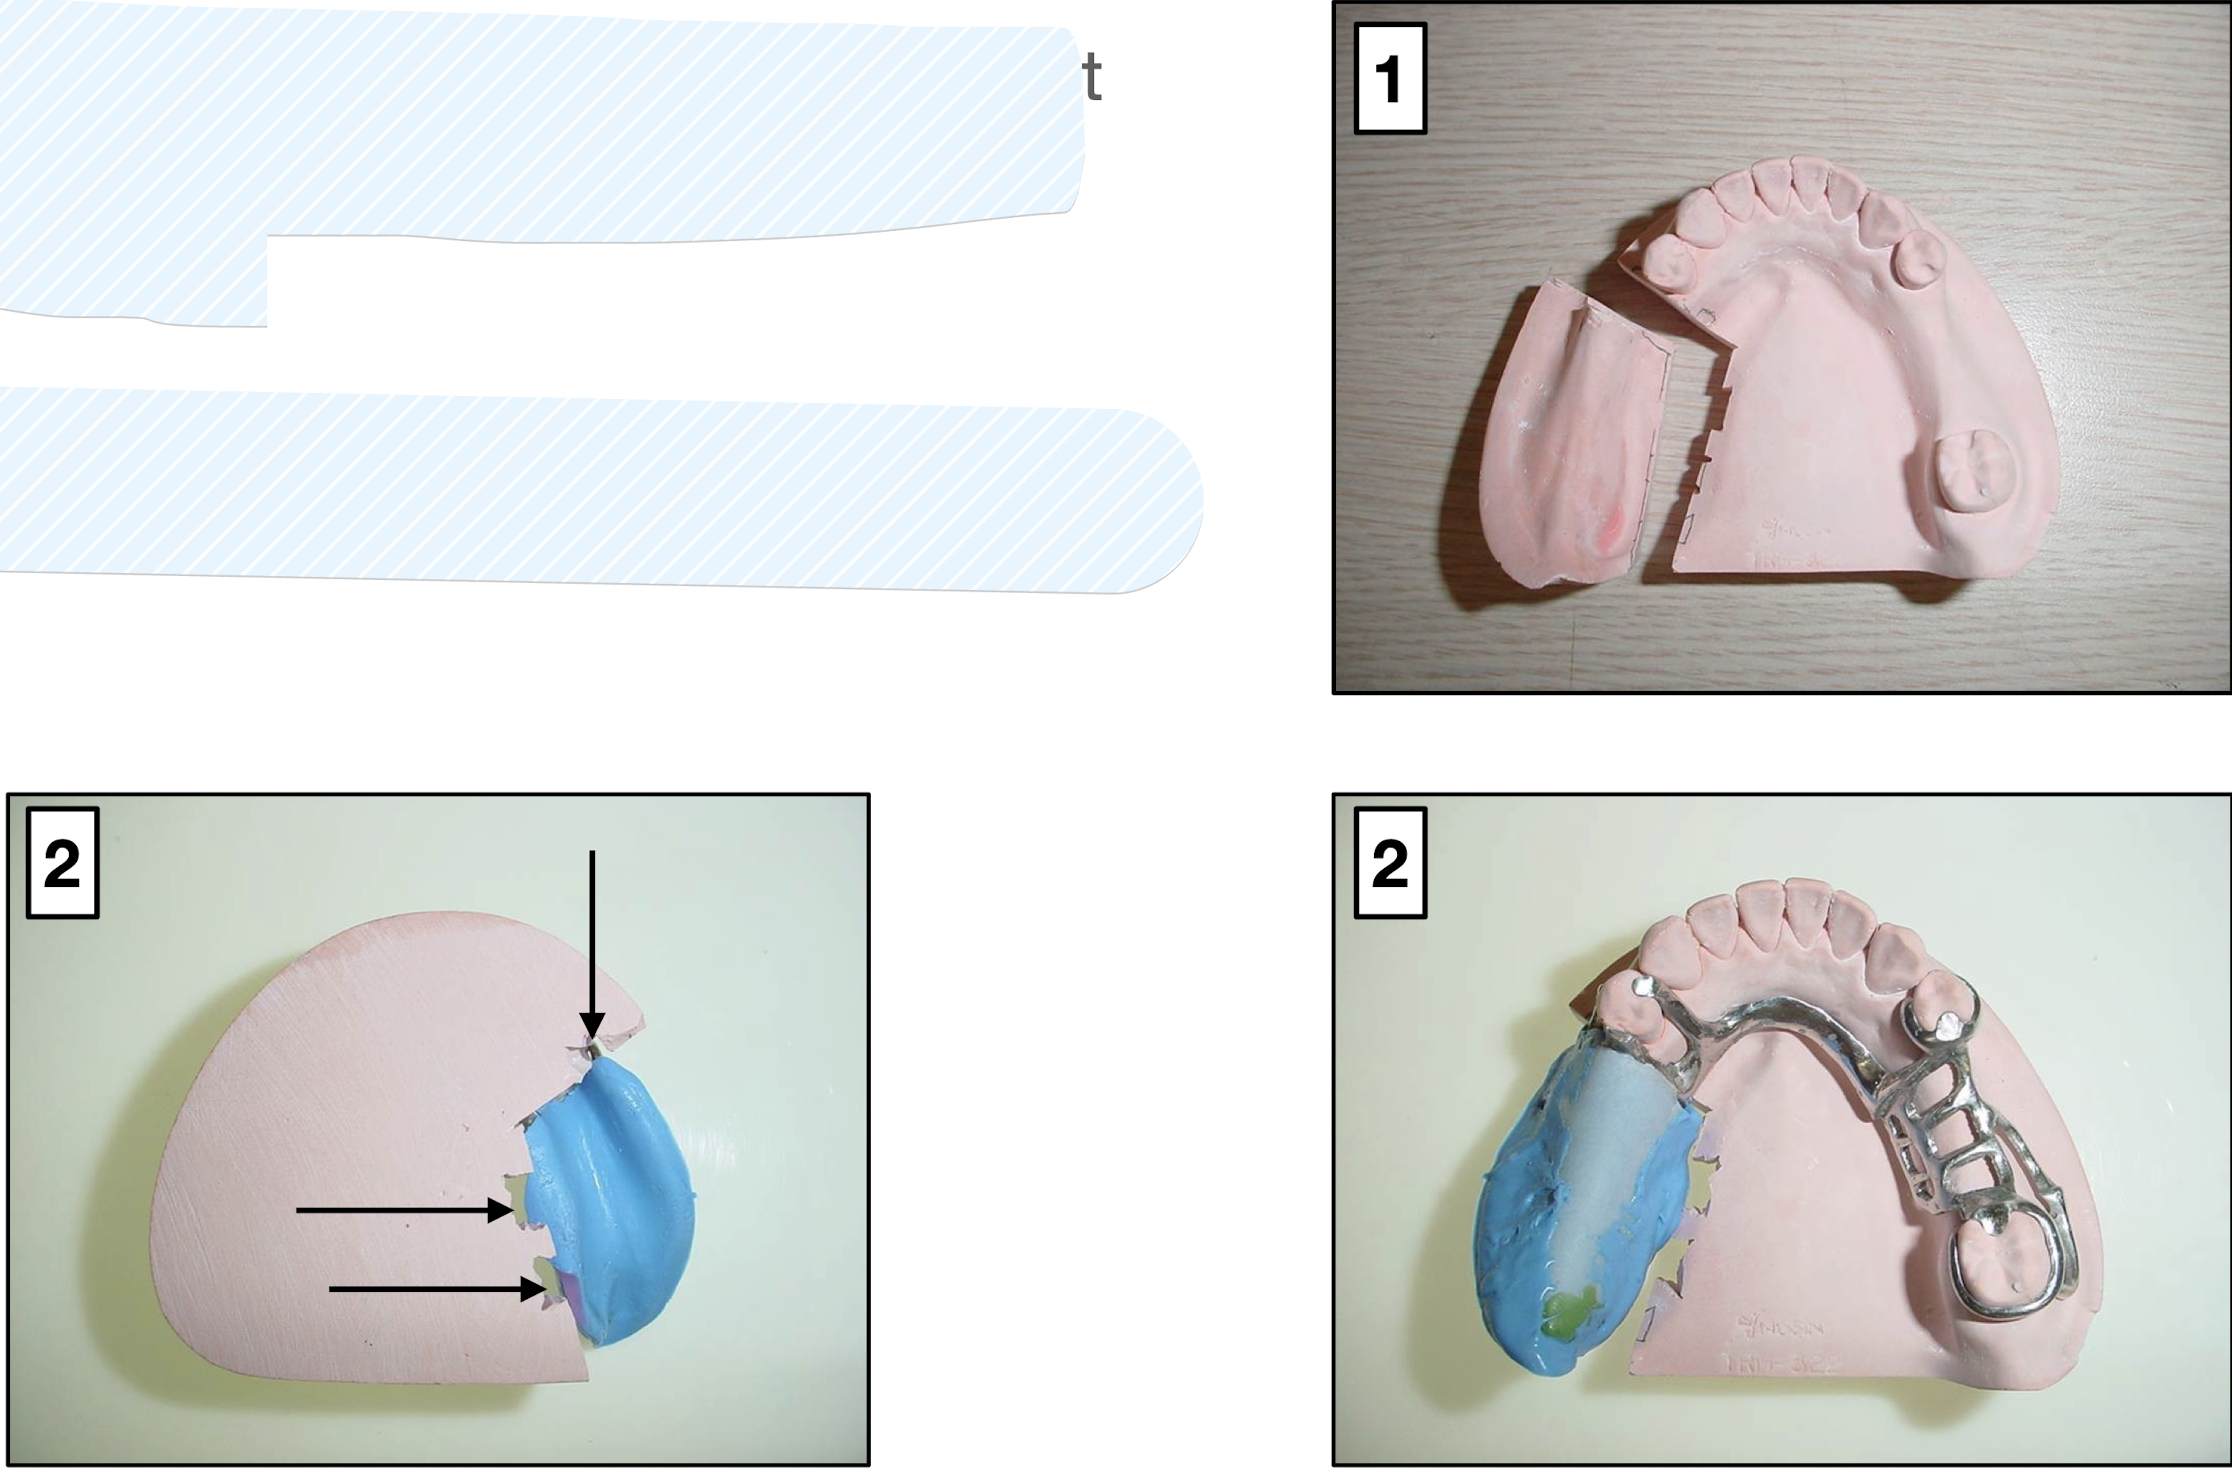
Cut off distal extensions from the cast you used to fabricate the metal framework
Put some retention notches and seat back framework on the cast
secure framework on cast with sticky wax
attach roping wax at periphery of impression for boxing
adding boxing wax around cast and impression
arrows
retention notches of step 2 of fabrication of cast
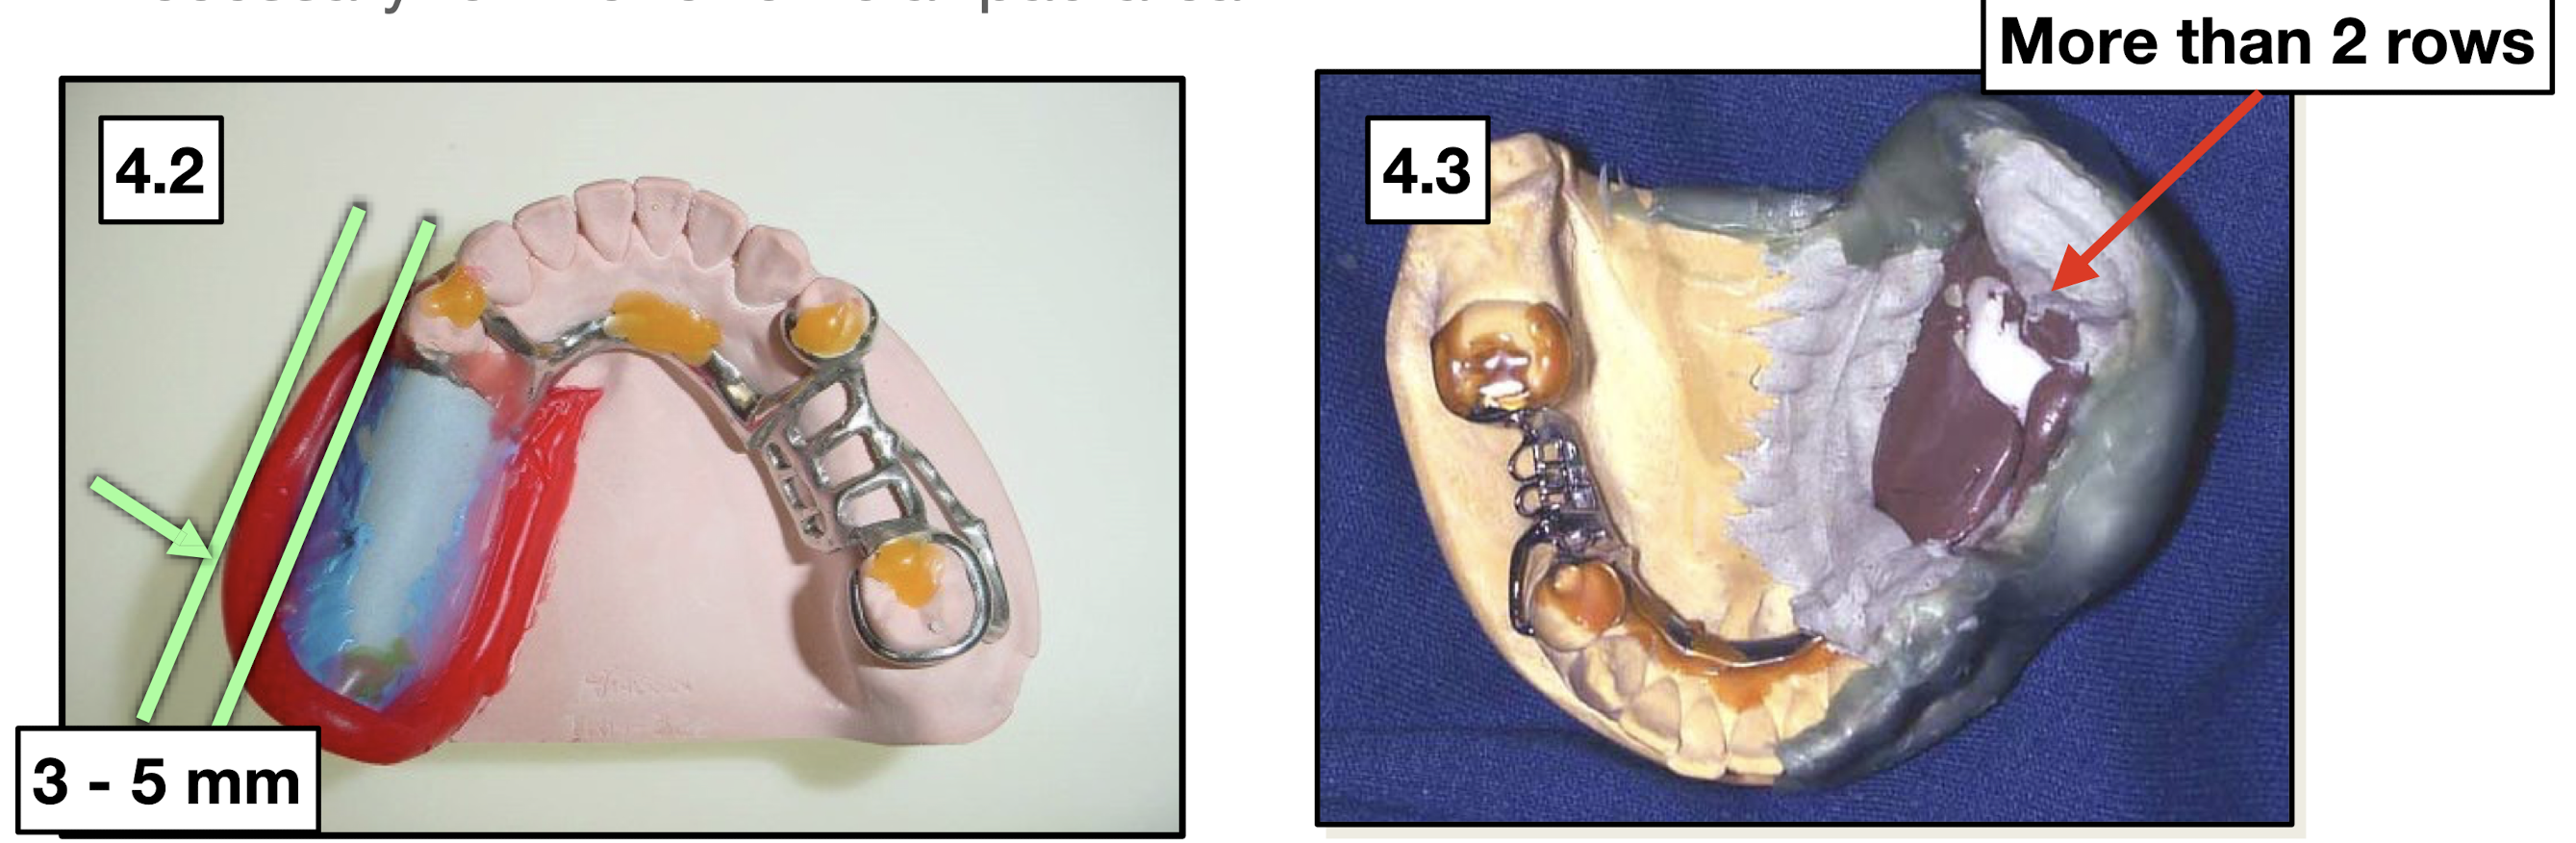
what are the three requirements of wax for step 4 of altered cast fabrication of cast: attach roping wax at periphery of impression for boxing?
wax should be 3mm above the impression border
roping wax should be 5 mm wide for land area
more than 2 rows of roping wax are necessary for retromolar pad area
step 4 altered cast fabrication of cast:
wax should be (BLANK)mm above impression border
3mm
step 4 altered cast fabrication of cast:
roping wax should be (BLANK)mm wide for land area
5mm
step 4 altered cast fabrication of cast:
more than (BLANK) rows of roping wax are necessary for retromolar pad area
2
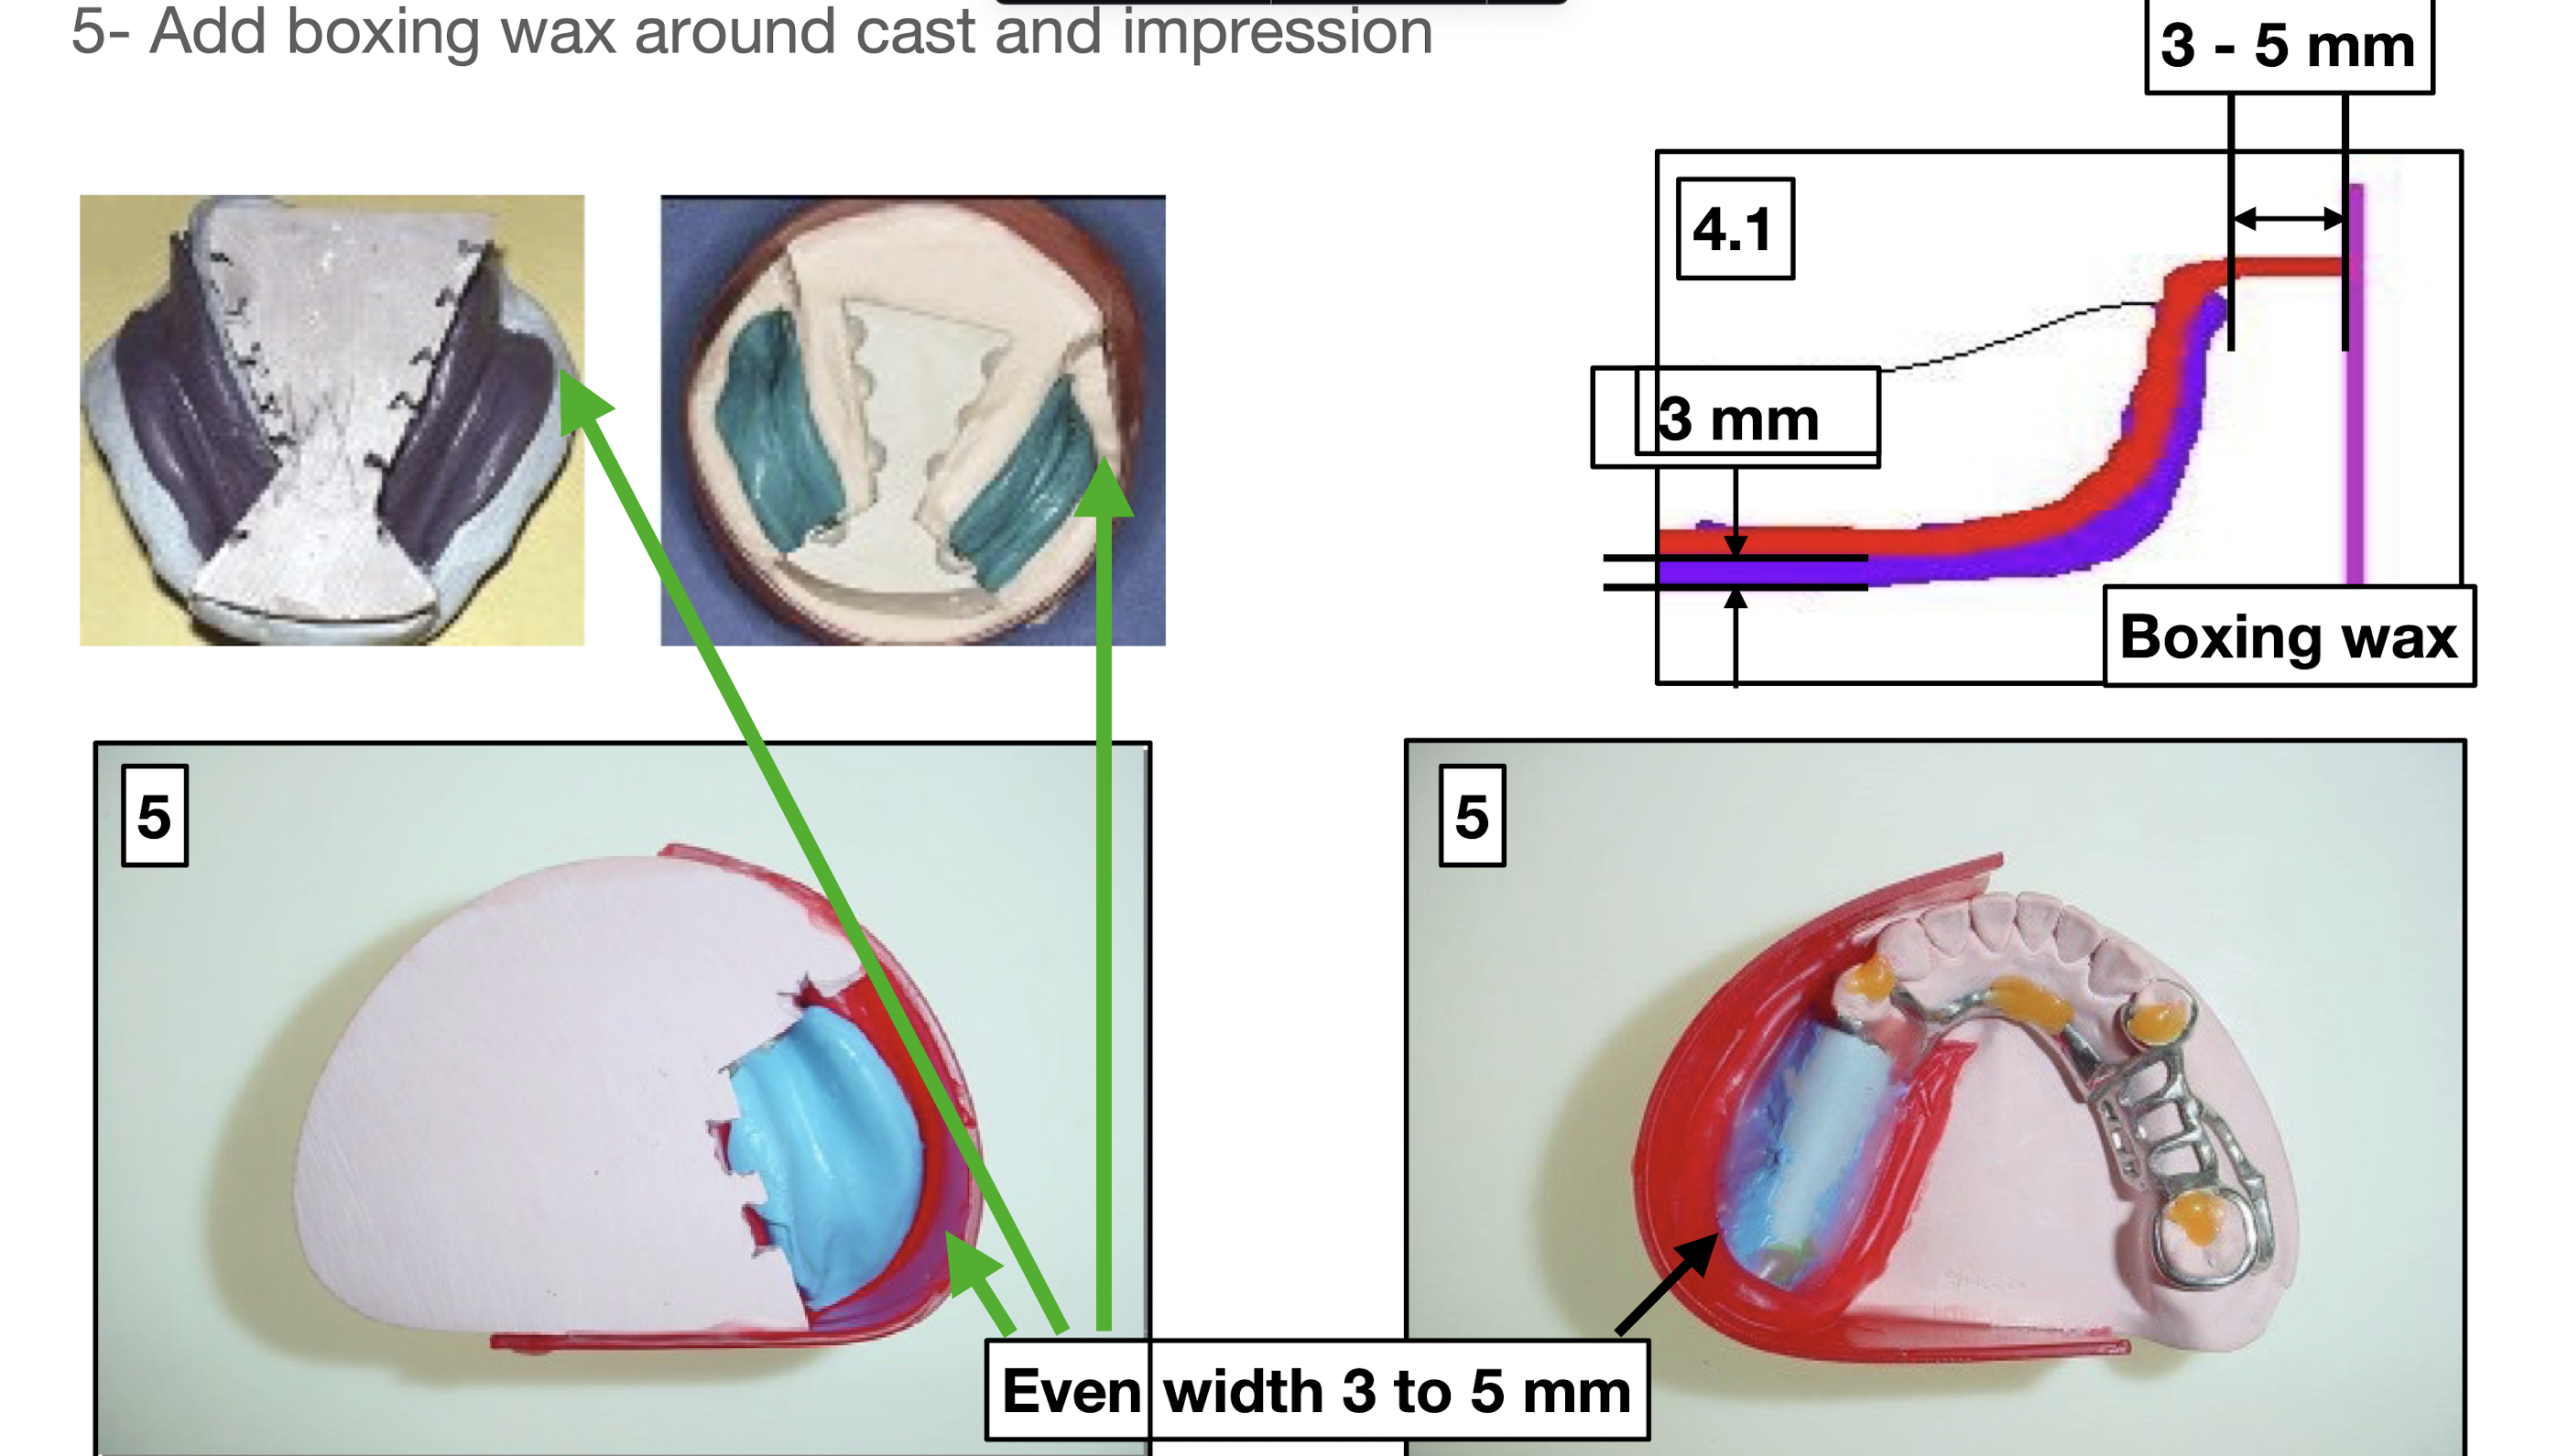
what step of altered cast fabrication of cast?
5
steps 6-11 of step 4 altered cast fabrication of cast:
pour w dental stone type III
remove wa and soak cast in warm water to soften modeling compourn
remove the framework carefully from the cast
flame the trias and remove it from the framework
clean up the metal framework and put it back on the cast (sometimes space under tissue stop)
check the fit of the tissue stops. If there is space it should be filled w cold curing resin (GC pattern)
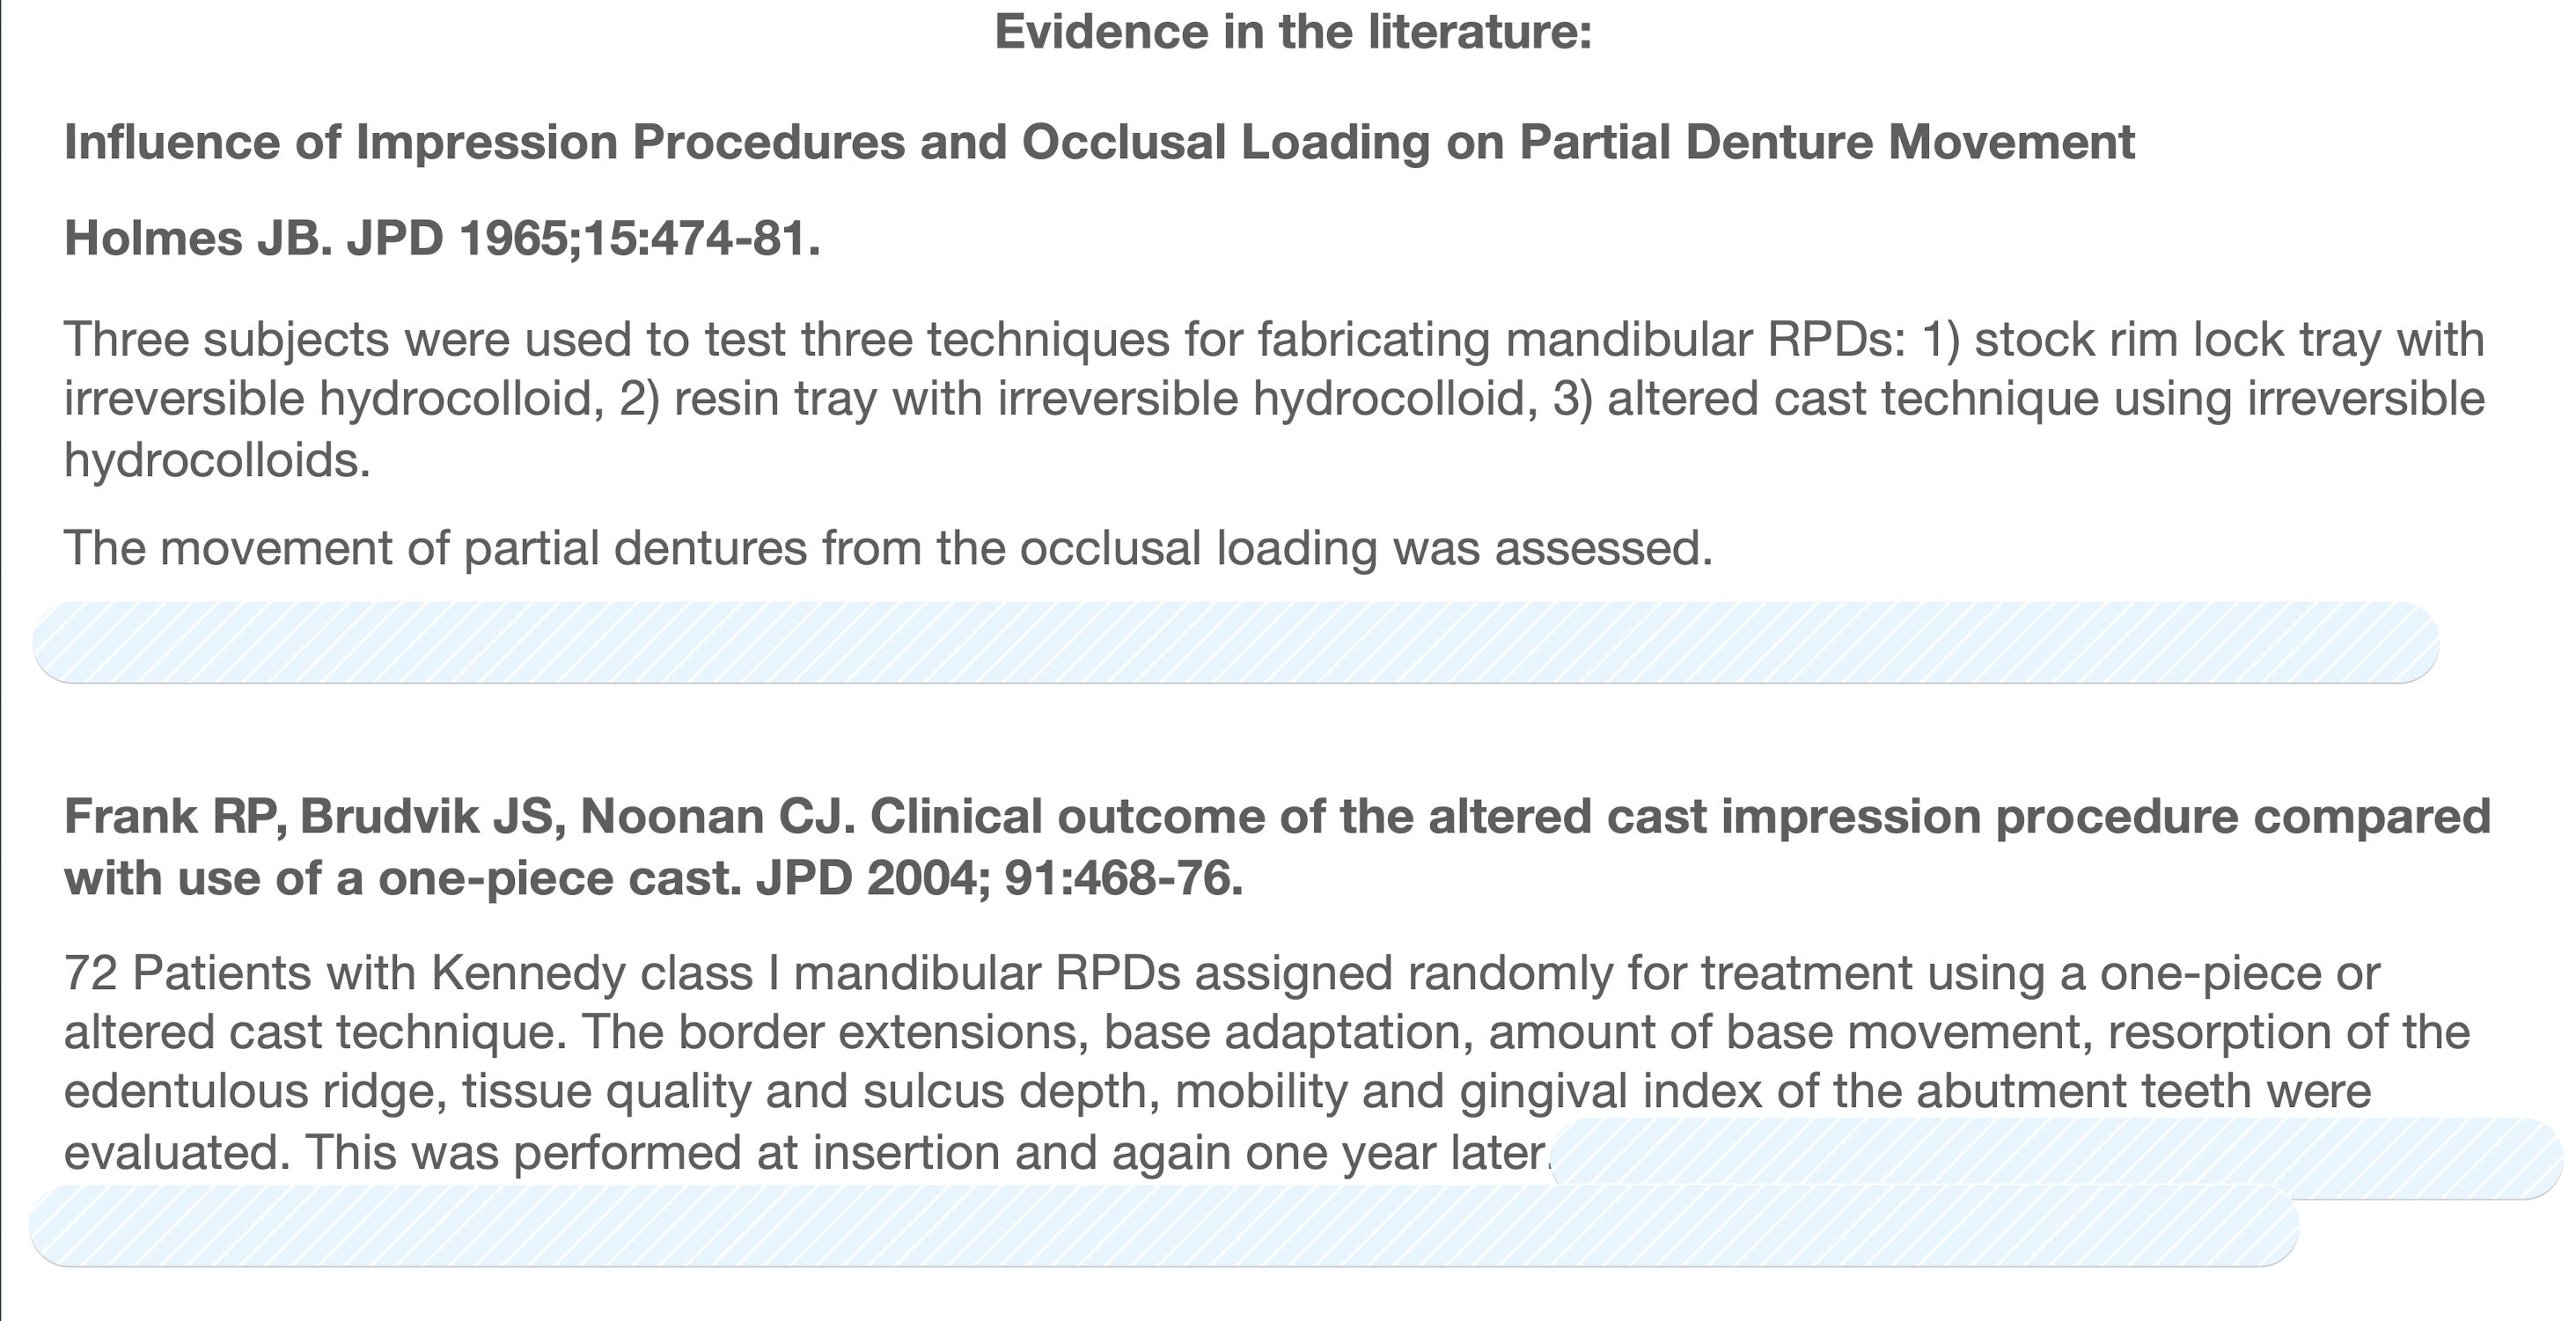
the altered cast technique provided the (most/least) amount of movement from the occlusal loading at the time
least

under extension was noted in (BLANK)% of the one-piece cas and none of the altered cast impression procedure, no other difference was found
22%