ppcm: draping positioning, and bed mobility basics
1/77
There's no tags or description
Looks like no tags are added yet.
Name | Mastery | Learn | Test | Matching | Spaced |
|---|
No study sessions yet.
78 Terms
the first thing one should do to prepare the patient and environment for mobility
Establish Rapport
how should one establish rapport in this setting?
Attentively listen: Make eye contact, get down on the patient's level, decrease perception of power
Respond respectfully and genuinely to concerns and fears
Be clear about your role and the goal of the session
Maintain confidentiality & modesty: Knock before entering, properly drape
Obtain consent prior to applying any manual assistance and respect cultural differences
Explain EVERYTHING before initiating them ( This should be consistent even if the patient may be cognitively impaired)
Include the patient in decision making when appropriate
how should one interact in the physical environment?
Respect the patient’s space – treat the patient room as if you are an invited guest
clearing the room of all obstacles and assessing any potential safety risks in the immediate area
Consider the patient’s deficits in relation to the environment
example of clearing room of obstacles
Simply moving a bed side table to the opposite side of the room or pushing a bedside chair out of the way can significantly change the outcome of a functional task
what are some ways one can respect a patients space? why is this important?
Asking to sit, to adjust volume on TV & to move personal belongings
Patients in the hospital are vulnerable and have little control over the environment
examples of considering the patients deficits in relation to the environment
Control hallway noise by closing room door or turning TV off
Turn lights on, open window blinds, stand where they can see you, etc.
Control for outside distractions
Use simple language /cues
things to ALWAYS do when preparing the patient for mobility
ALWAYS review the patient's chart for any changes in status PRIOR to initiating a mobility session (Patient status can drastically change from day to day)
ALWAYS check in with the patient's nurse prior to initiating a mobility session
ALWAYS obtain a subjective report for how the patient is feeling
ALWAYS don non-skid footwear prior to initiating ANY mobility
ALWAYS check the area surrounding the bedside for lines, drains, catheters that may not be visible to you prior to moving the patient in bed
ALWAYS screen the patient's cognition prior to initiating mobility
ALWAYS ask for assistance (nurse, PTA, another therapist) if you feel uncomfortable with any aspect of mobility
why should one check in with the patient's nurse prior to initiating mobility?
Ensures patient is not awaiting any procedures or medications or having a crisis that has not been reflected in the chart yet.
describe the importance of maintaining cleanliness of the environment
Healthcare-associated infection (HAI) refer to infections acquired in any healthcare facility and poses a threat to patients AND therapists
Can be spread through direct contact between patient & healthcare professional, professional to professional, contact with visitors, and/or contact with surfaces that have not be correctly sanitized between patients
Risk increases with more intensive and invasive complex patient care
Maintaining a clean environment is the responsibility of ALL healthcare workers
infection control cleaning policy and procedures
Equipment including assistive device use & hospital room/bed clean up upon discharge
Linens
Toys
Soiled Items
standard precautions most relevant to patient handling /mobilization are
Hand hygiene: Hand hygiene remains the number 1 method of reducing transmission of contaminants
2. Use of personal protective equipment:Masks,/face-shields, protective eyewear, gloves, gowns, etc.
3. Respiratory hygiene: Covering mouth, coughing/sneezing into elbow , stand at least 3 ft away from persons with unknown respiratory conditions
safety procedures for mobility
Consider patient status and medical report
Be prepared for worst case scenario….
Assess vital signs !! Keep a notepad to record #’s for easy recall
Obtain all equipment required prior to transitioning to an upright position
Monitor patient throughout mobility session for changes in status
NEVER leave your patient’s side
Remain close to patient and appropriately guard at all times
Consistently utilize proper body mechanics when mobilizing patients
tension
pulling forces
compression
pushing forces
distraction
separation of objects
shear
two forces in opposing directions in parallel to a common surface
Proper body mechanics in this context refers to
the methods utilized to help healthcare professionals prevent injury when assisting patients and performing procedural interventions
we want efficiency and ease!
The Basics of Proper Body Mechanics
Consider Base of support (BOS) is the contact area of an object against the surface
Assess your environment & plan ahead USE EQUIPMENT TO ASSIST YOU!
Position yourself close to the patient “load”
Maintain normal spinal curvature when possible
Avoid twisting of the spine
Bend at the hips and knees
Hold objects close
Push don’t pull
“Set” the trunk muscles prior to lifting
Align your body in order to enable you to use larger/stronger muscles to do the heavy work
Attaining a partial squat position will help LE’s generate power prior to lifting
Exhale during lifting
Avoid Valsalva Maneuver
Always get help when you need it or think you may need it
Rationale for Draping
Provide modesty
Maintain body temperature
Provide access and exposure to area to be treated
Protect skin or clothing from being soiled or damaged
Draping nonnegotiable
Always ensure your patient provides consent for you to expose any area of their body/skin
Goals of Patient Positioning
1.Patient Safety
2. Patient Comfort
3. Promote mobility
describe the patient safety aspect of patient positioning
Protection of vulnerable body parts without creating new hazards
Prevention of skin breakdown
Prevention of additional complications- DVT, contractures
tips for positioning
Always explain procedures to the patient
Have the patient participate as much as possible
Approximate normal positioning as much as possible
Use proper body mechanics
Ensure patient orthopedic precautions are maintained
Always position the patient with the call bell within reach
Consider avoiding pressure to high-risk areas for skin breakdown- Check skin before and after
pressure injuries typically occur over _________ and causes can be...
bony prominences
Decreased sensation
Increased moisture
Sheering
Ischemia
positioning in supine
Ensure patient is positioned in the center of the bed/mat
Establish normal spinal curve
Watch for increased lumbar lordosis: Can utilize pillows to decrease this
Upper Extremities can be positioned along side body or on abdomen
positioning in prone
Ensure patient is centered on the bed/mat
Establish as typical spinal curves as possible
Patient can place arms along side trunk or overhead
Pillow supports can be placed under the abdomen to decrease lordosis: Under lower limbs to decrease pressure to toes
positioning in sidelying
Ensure the patient is centered on the bed/mat
Use pillow supports or towel rolls for support of the cervical spine, upper extremities and lower legs
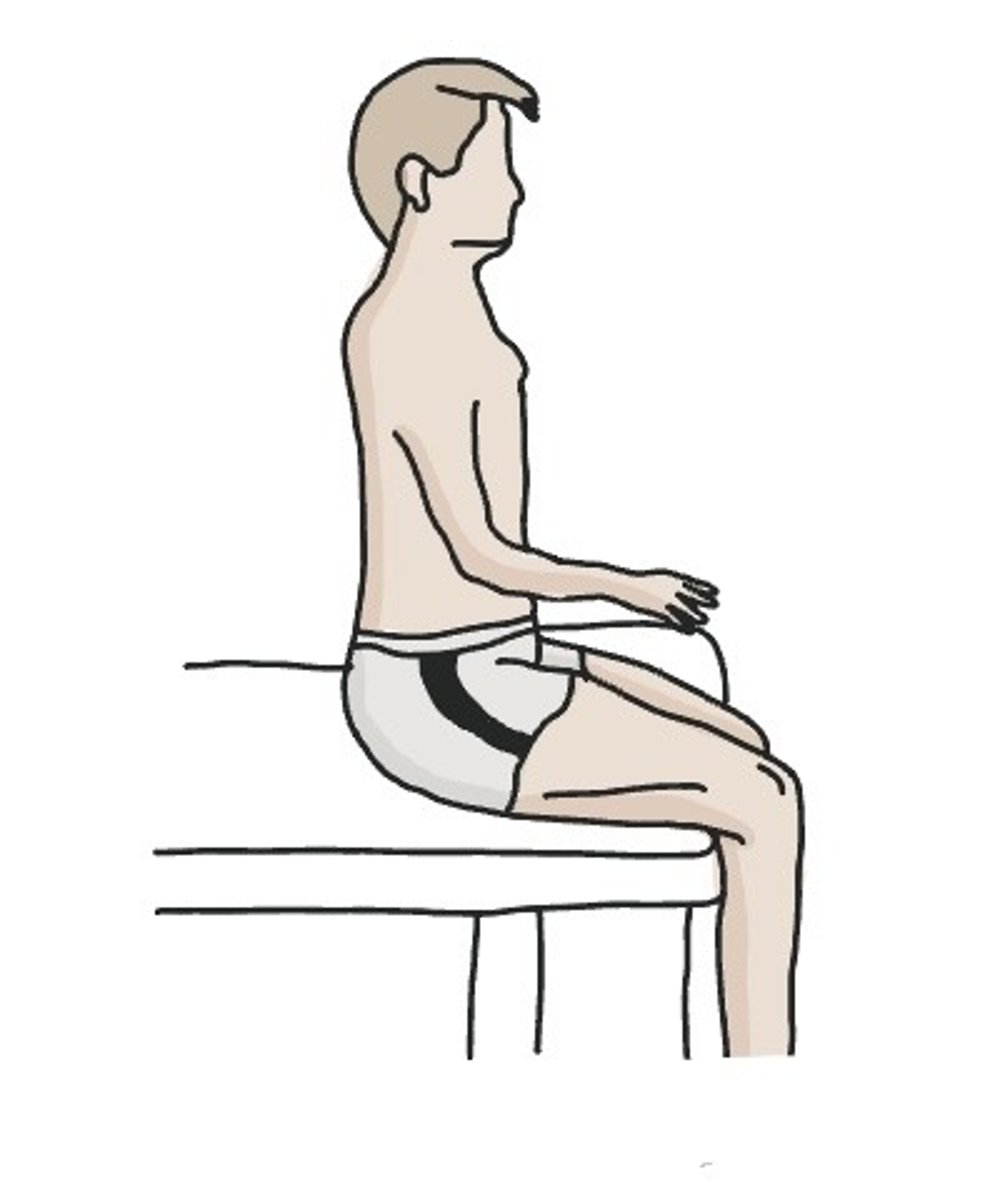
Positioning in Sitting
Be certain that the patient's hips are centered and all the way back against the chair support
Support the normal spinal curves as best you can: Lumbar support roll best
LE's should rest in a 90/90 degree position
UE's should also be fully supported by arm rests or held in the patient's lap
Fowlers position
Semi-reclined with knees somewhat flexed
HOB typically elevated 45-60 degrees
Often used for patients post-abdominal surgery
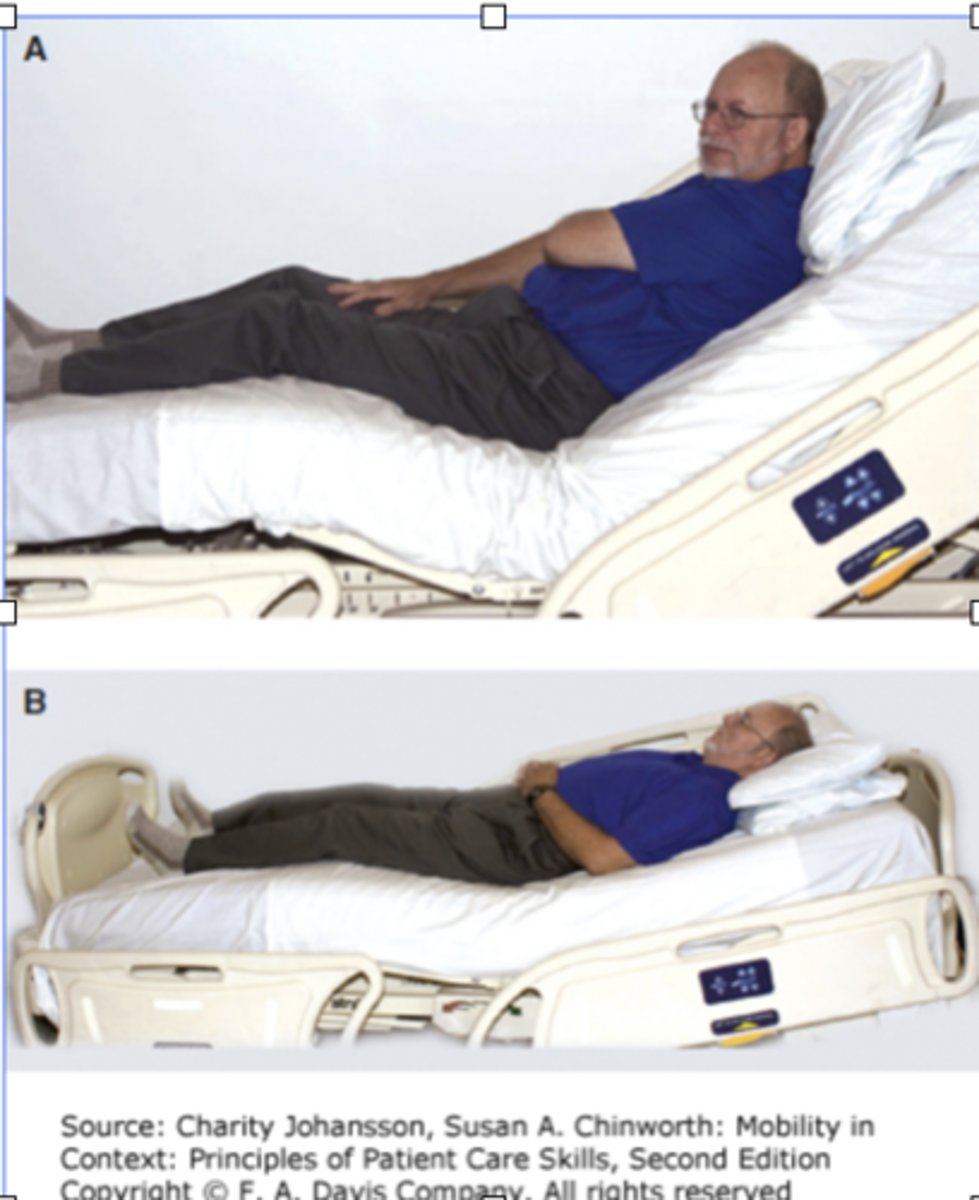
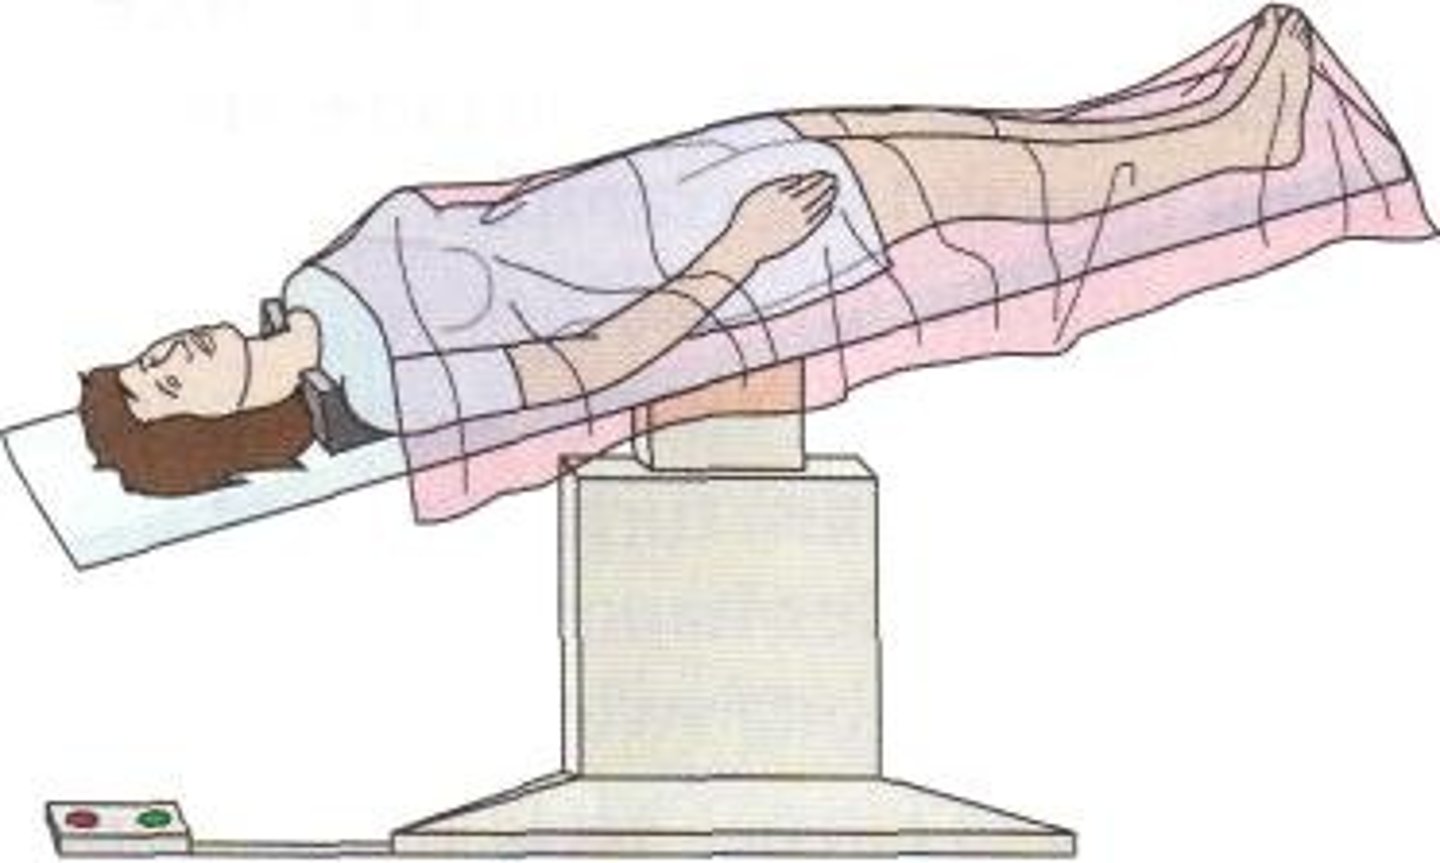
Trendelenburg Position
Supine with the HOB lower than the foot of the bed
Commonly used during abdominal surgery
Historically used to increase BP: No research suggesting effectiveness of this
Not typically used for PT
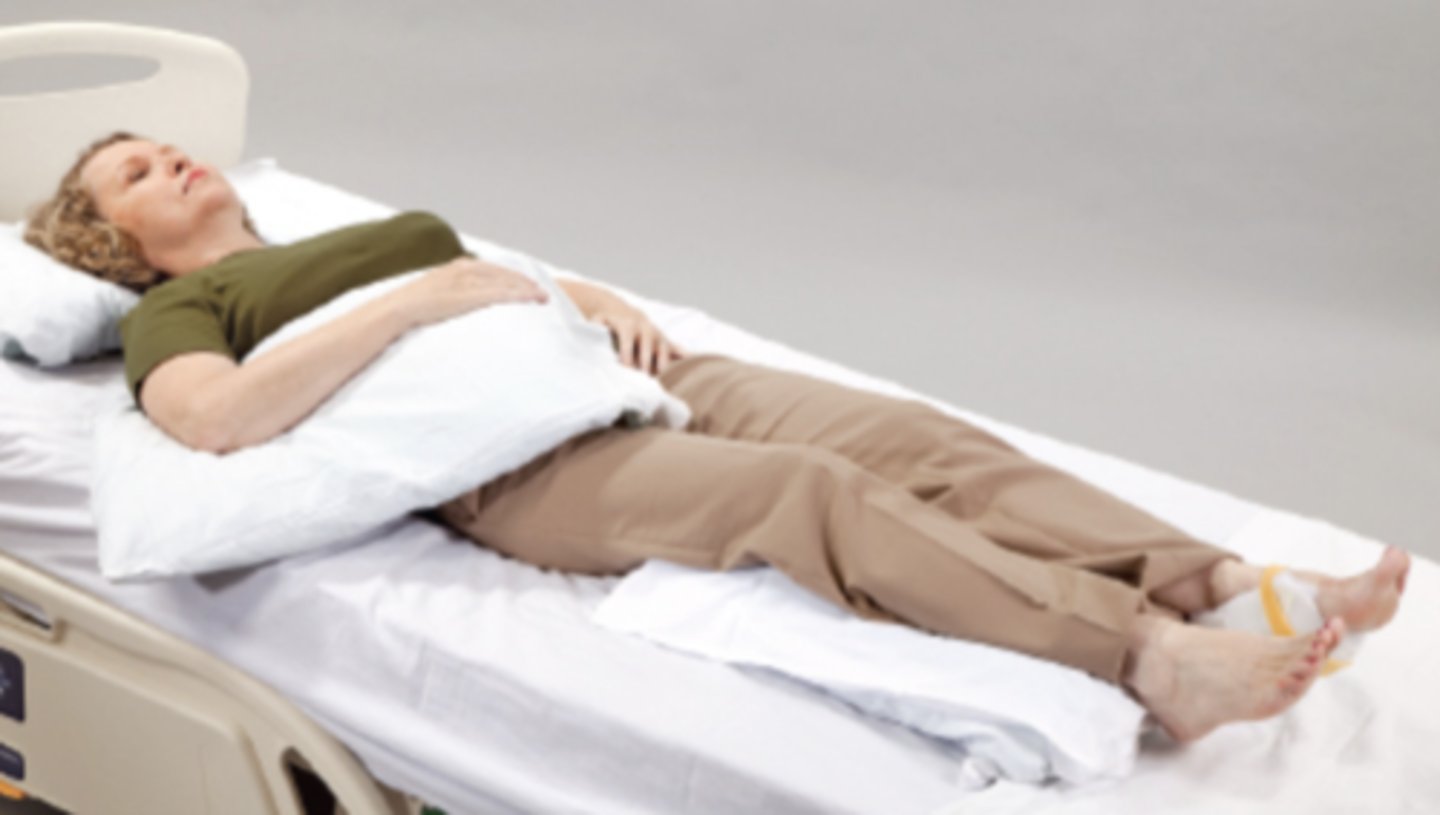
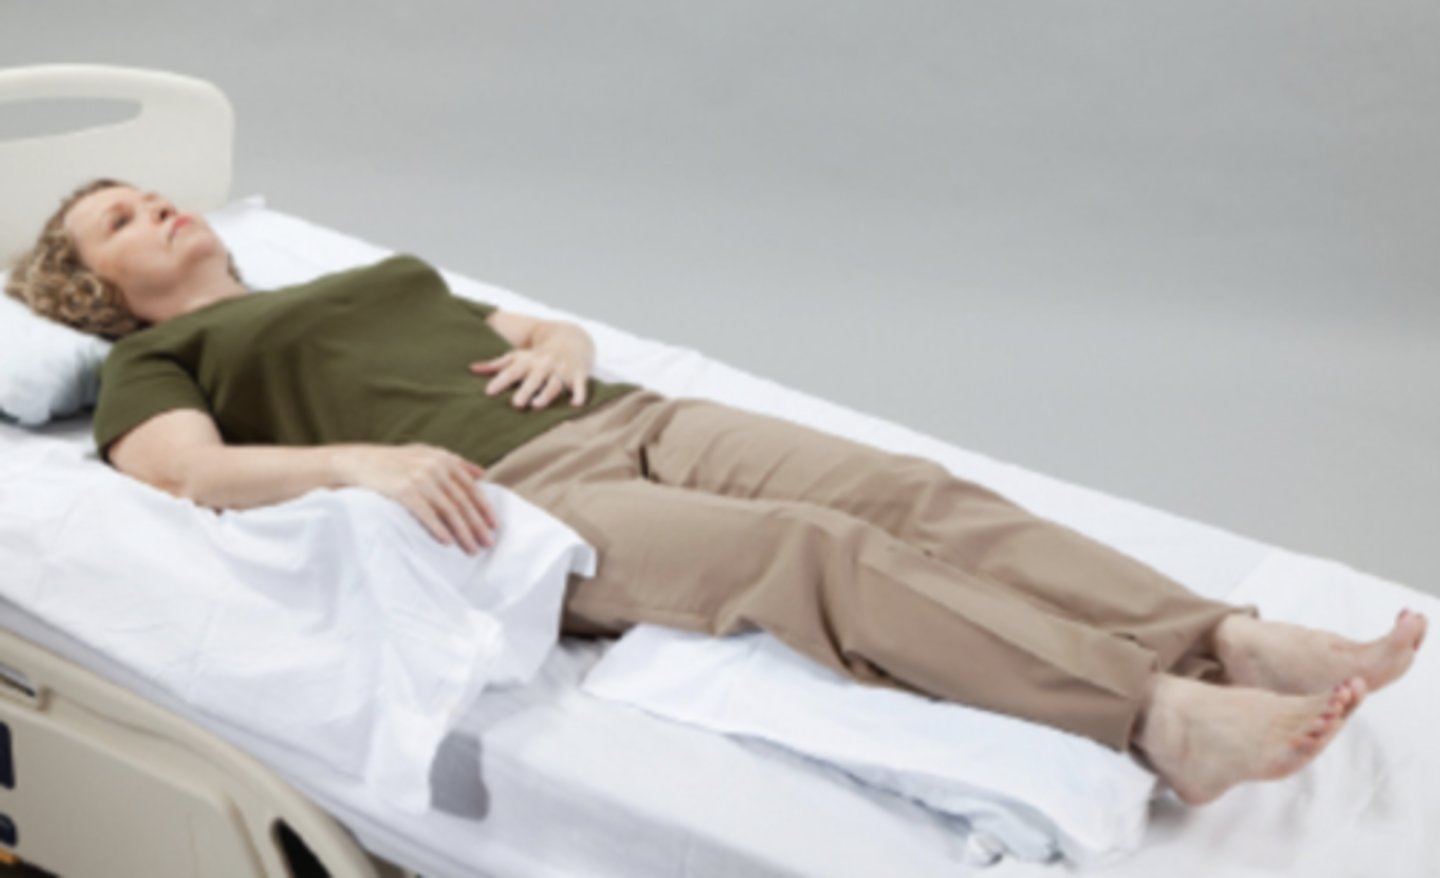
three quarters supine position
Long-term supine positioning with pillows.
Note the left heel protector, the support under the calves with suspension of the heels, and the neutral position of the glenohumeral joint achieved by raising the arm up off the mattress.
Example of positioning a patient with right-sided hemiplegia in supine.
Notice the use of pillows under the legs for heel protection and to guard against knee flexion contractures. Also notice the elevation of the right wrist and hand.
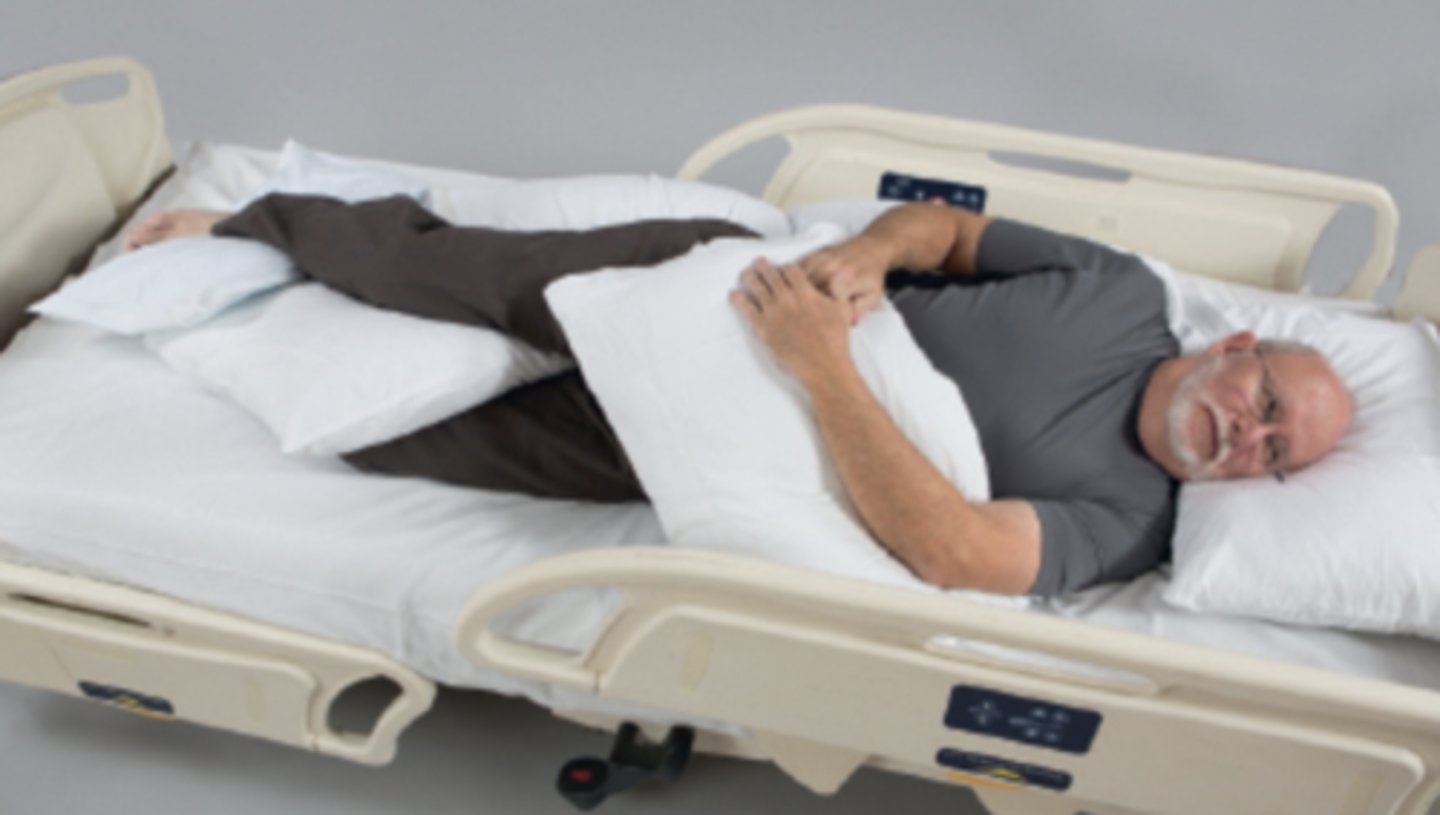
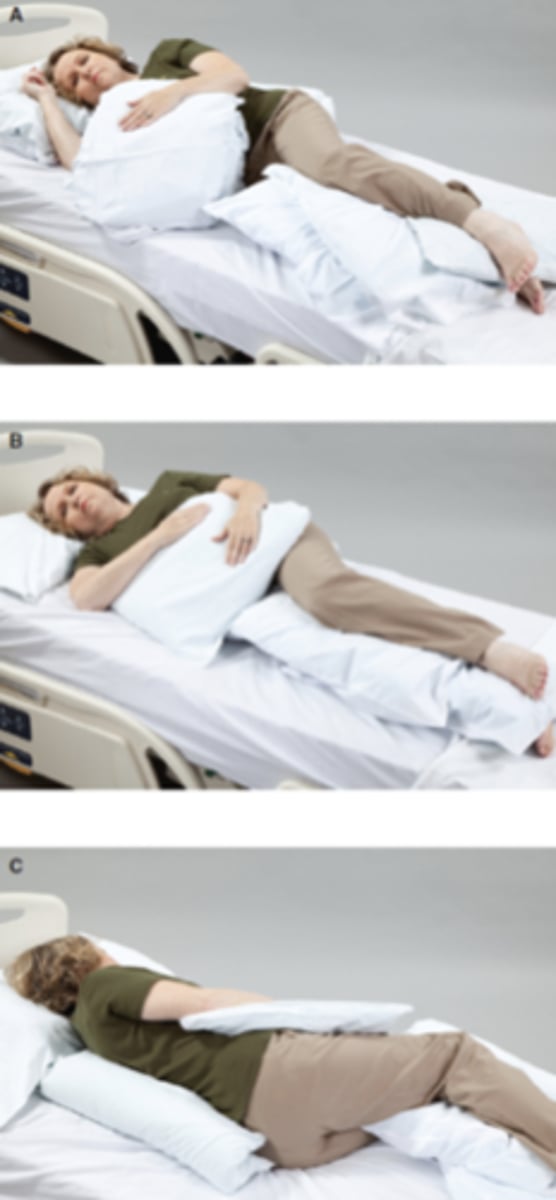
Examples of sidelying positioning for a person with left-sided hemiplegia.
(A) The left arm is supported to prevent the hand from falling below the level of the heart and to minimize stress on the left shoulder. The knees and ankles are cushioned to guard against pressure injuries. The right shoulder is positioned slightly forward to prevent direct pressure through the shoulder and arm, reducing the risk of nerve compression and impaired circulation.
(B) Here the upper body is rotated slightly posteriorly, and the nonhemiplegic arm rests on the pillow as well.
(C) To maintain sidelying or partial sidelying, a pillow is folded lengthwise and tucked, open edges inward, under the patient's trunk.
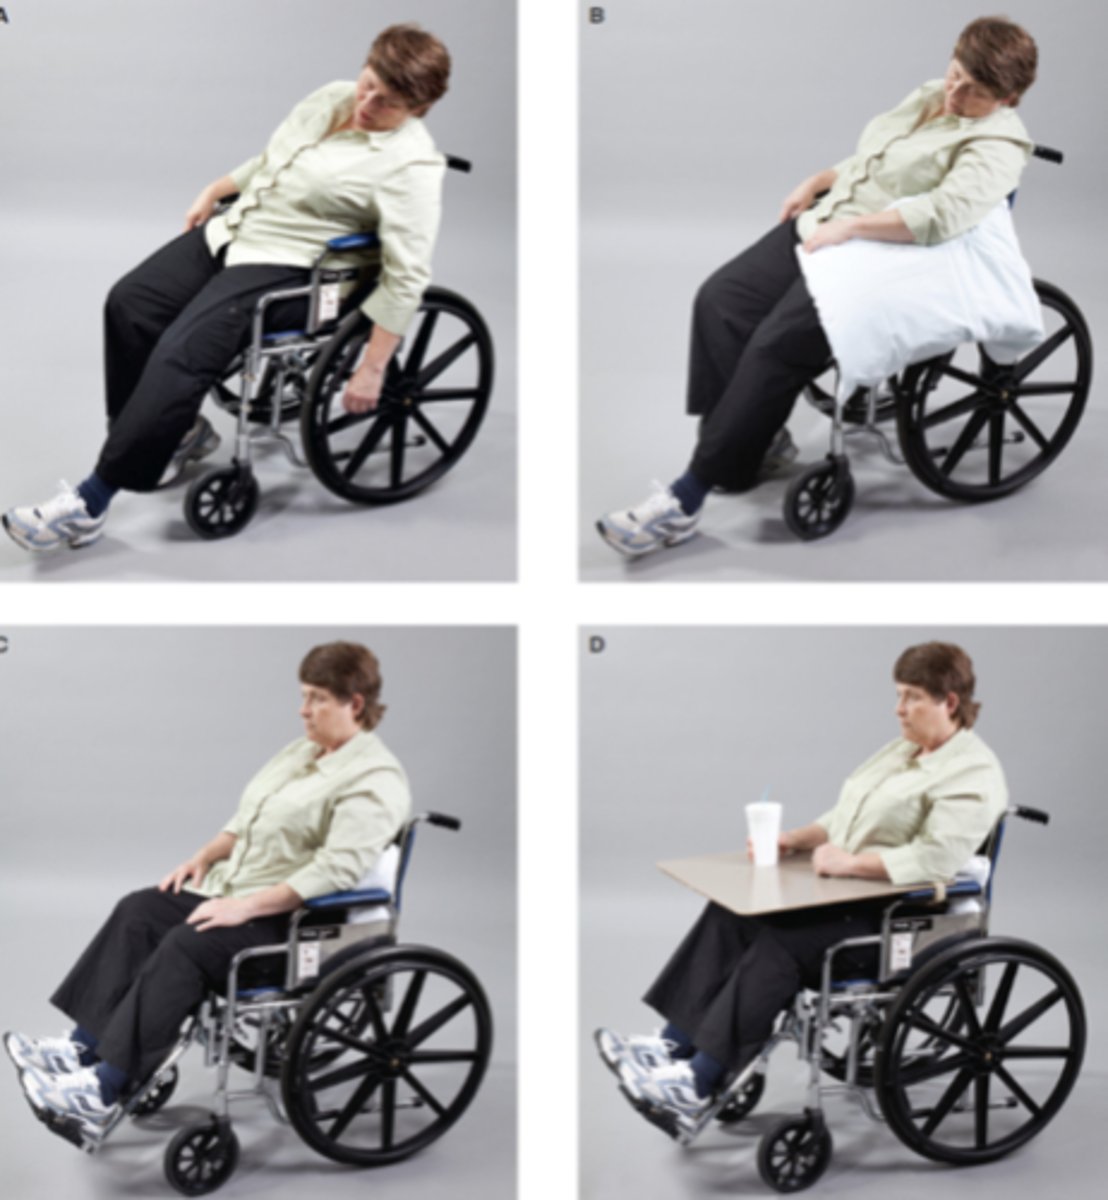
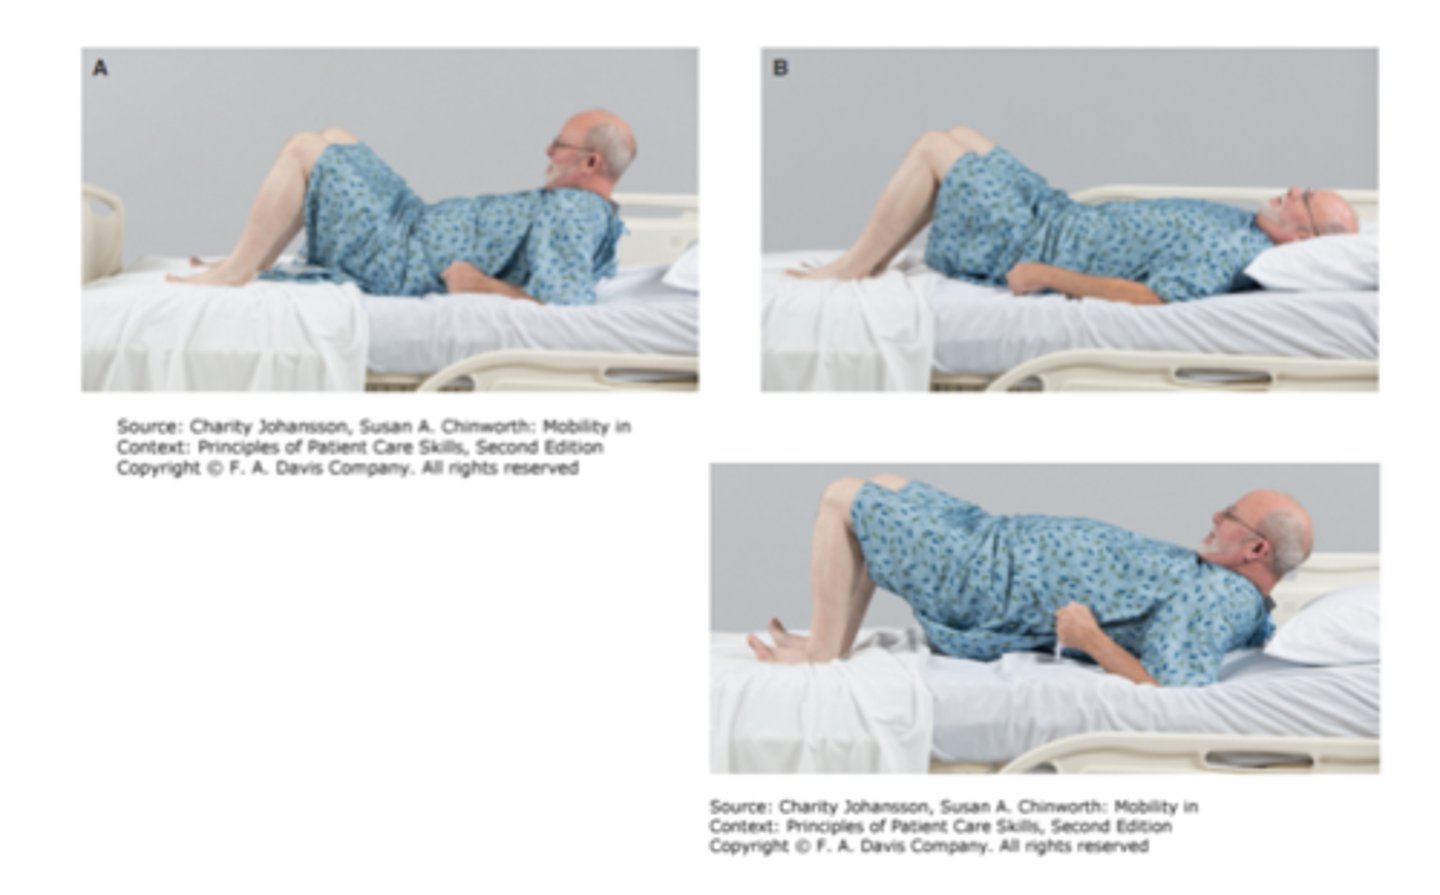
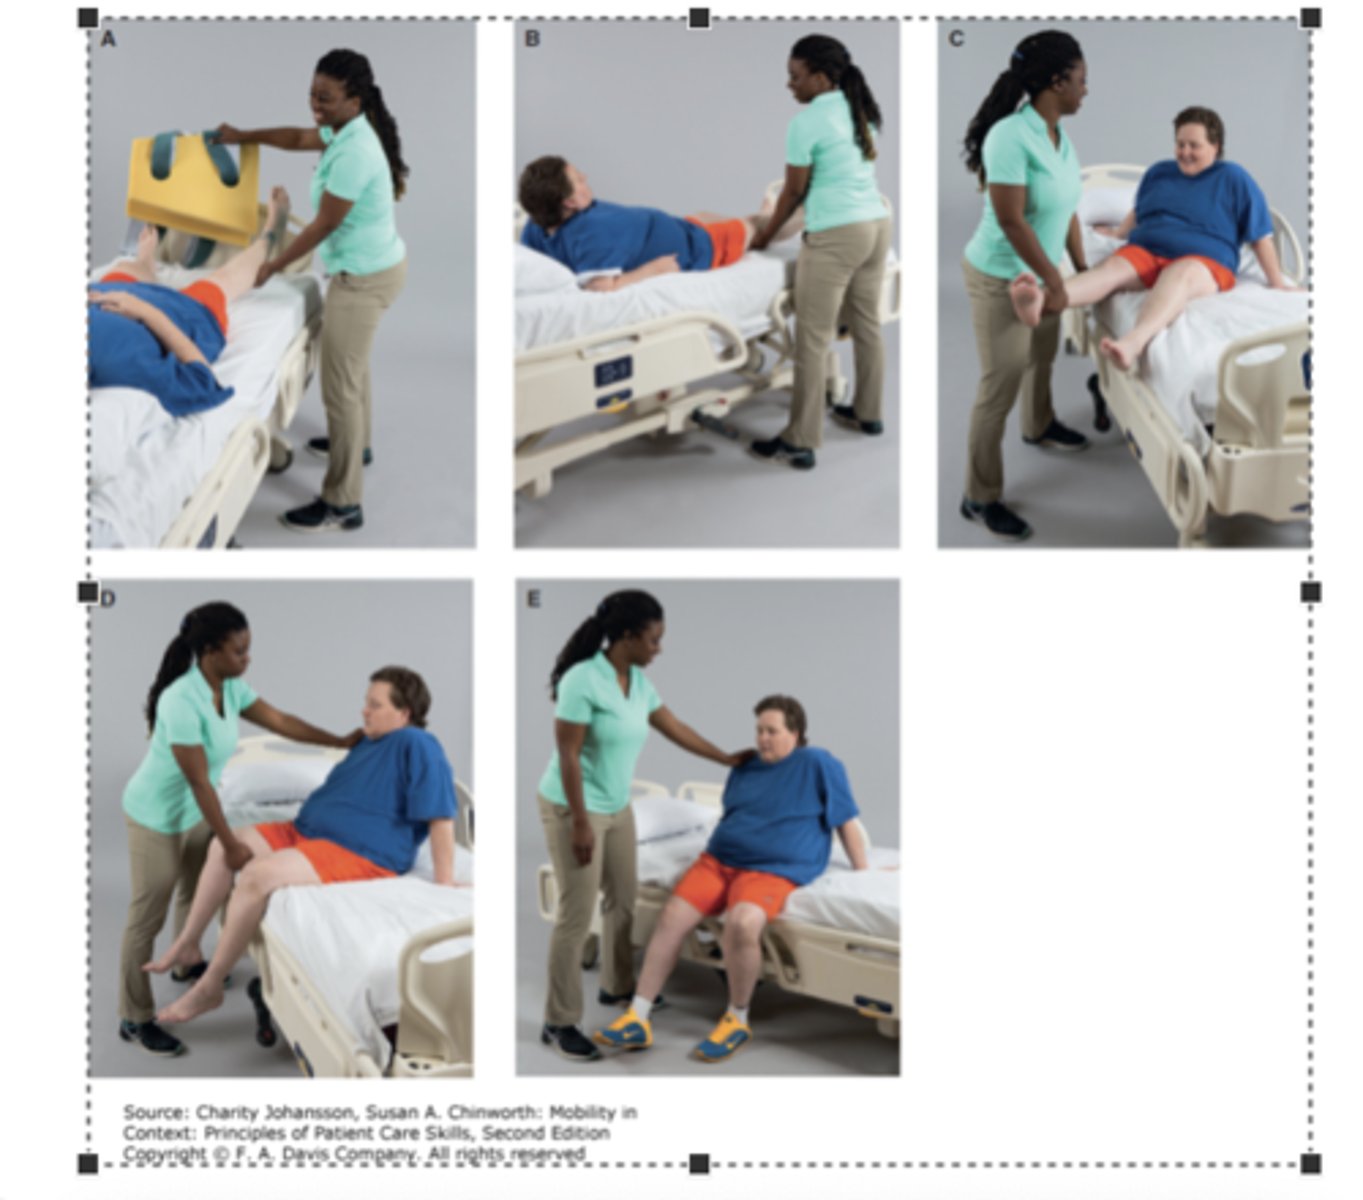
Progression and improvements in sitting
A) This individual is completely unsupported and at risk for a variety of problems.
(B) Distal repositioning of the arm with a pillow does not correct the trunk position.
(C) More central support at the lateral trunk, and hip and knee repositioning using legrests, results in better overall positioning.
(D) The use of a lap board to provide additional shoulder girdle support further enhances the patient's functional position.
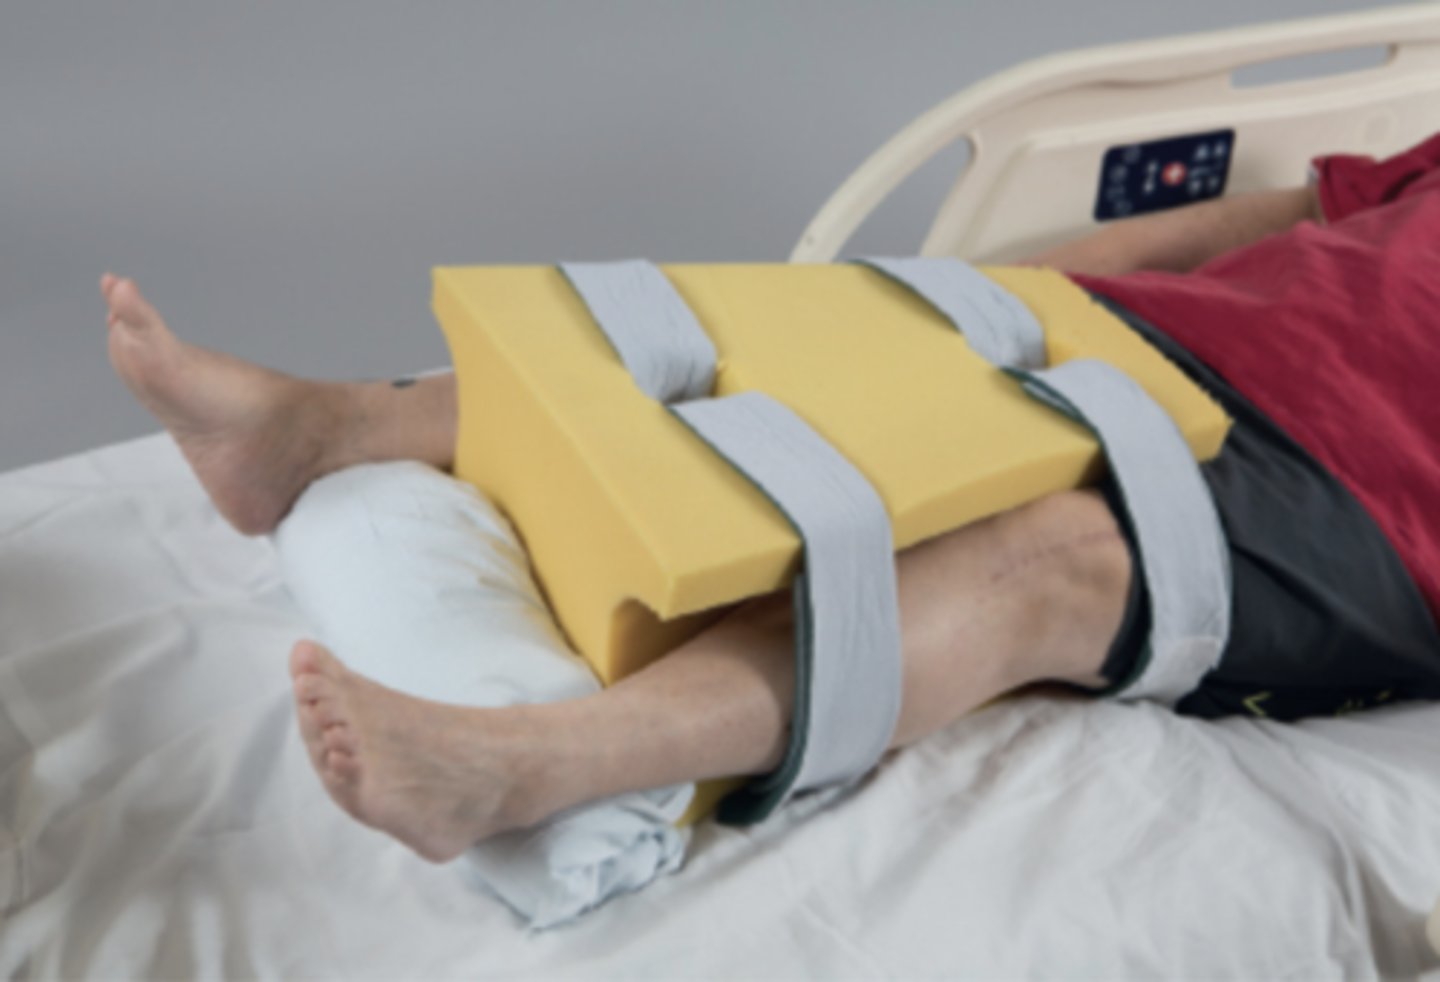
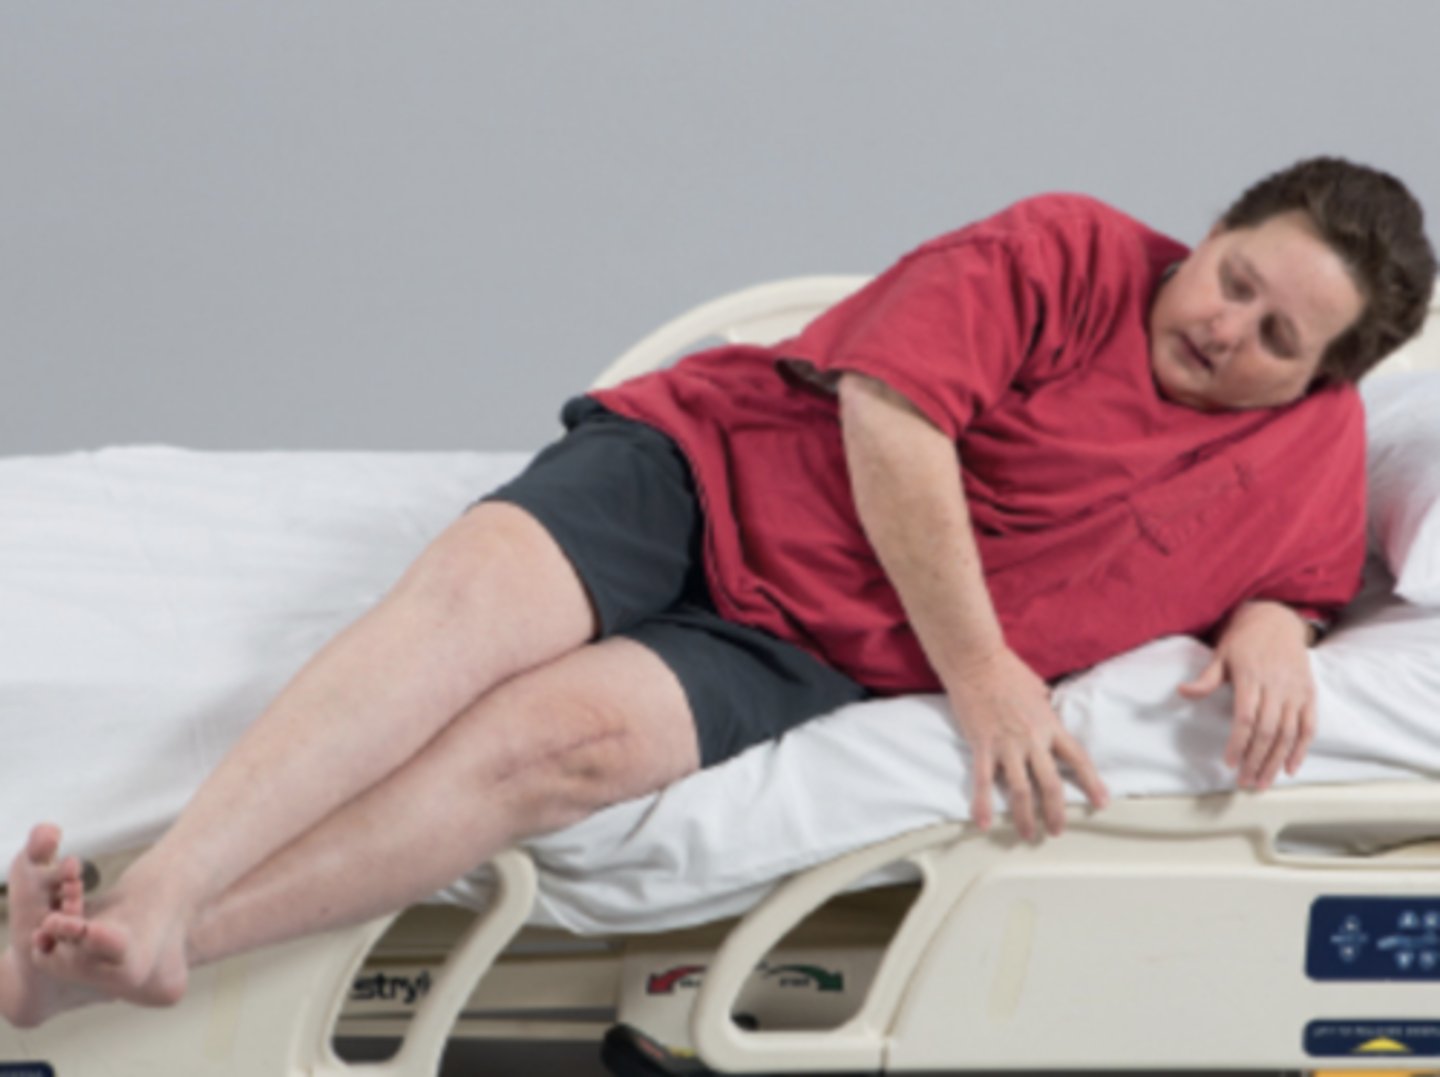
Sidelying precautions
In sidelying, the uppermost leg, whether lying directly on top or forward of the leg beneath it, naturally moves into hip adduction, violating the movement precautions for a patient with a total hip arthroplasty via a posterolateral approach.
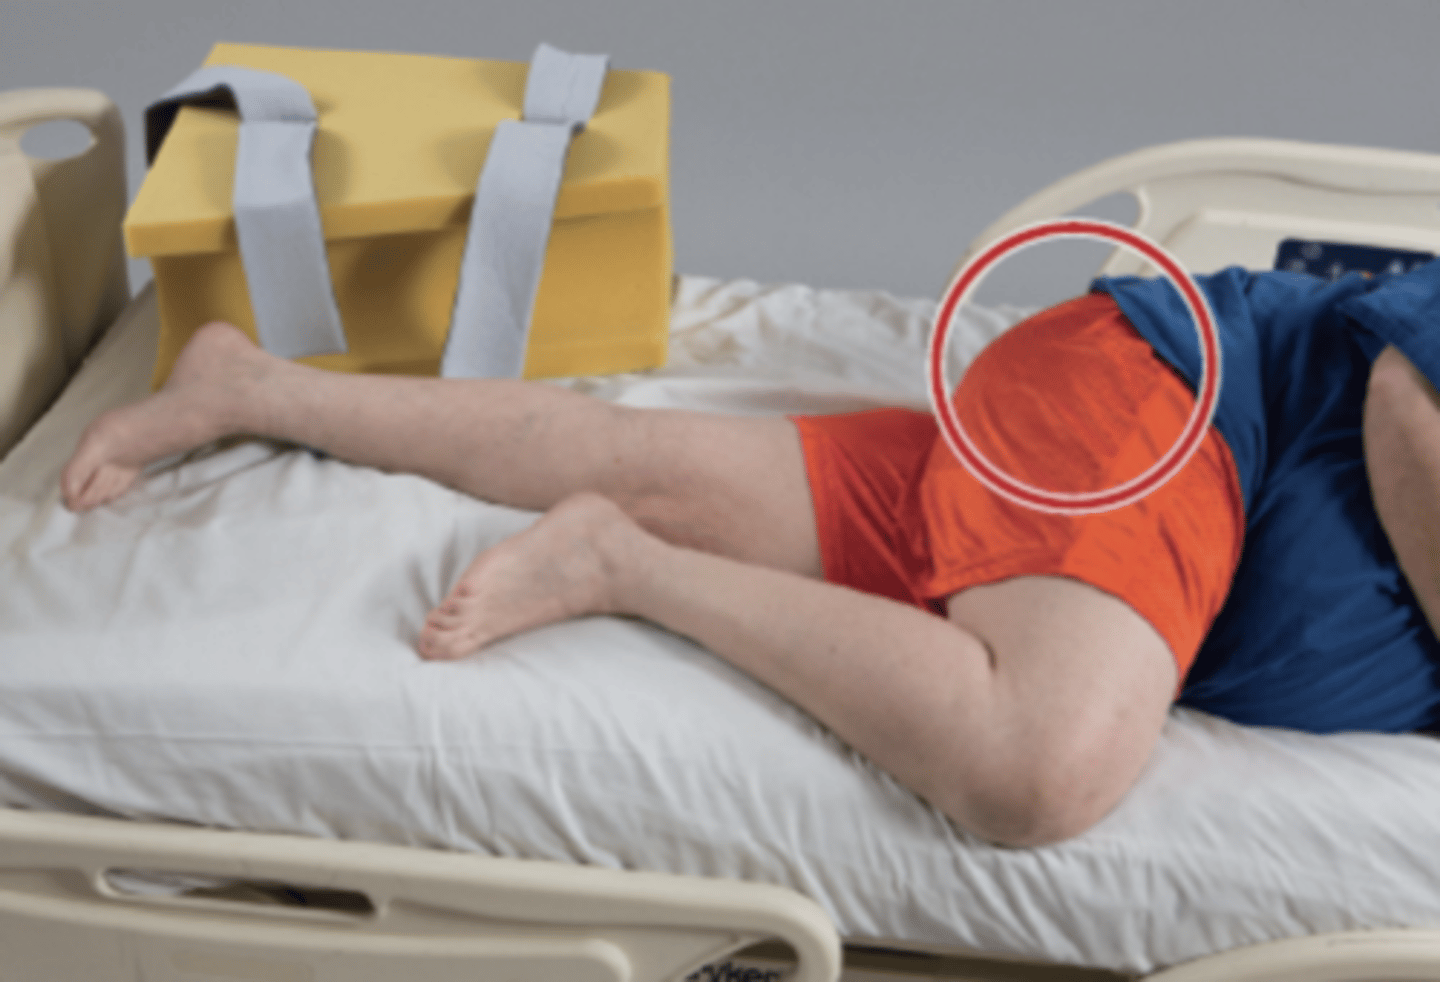
Typical use of an abduction or wedge pillow to prevent hip adduction.
Note that the heels are suspended to prevent pressure injuries to the heels.
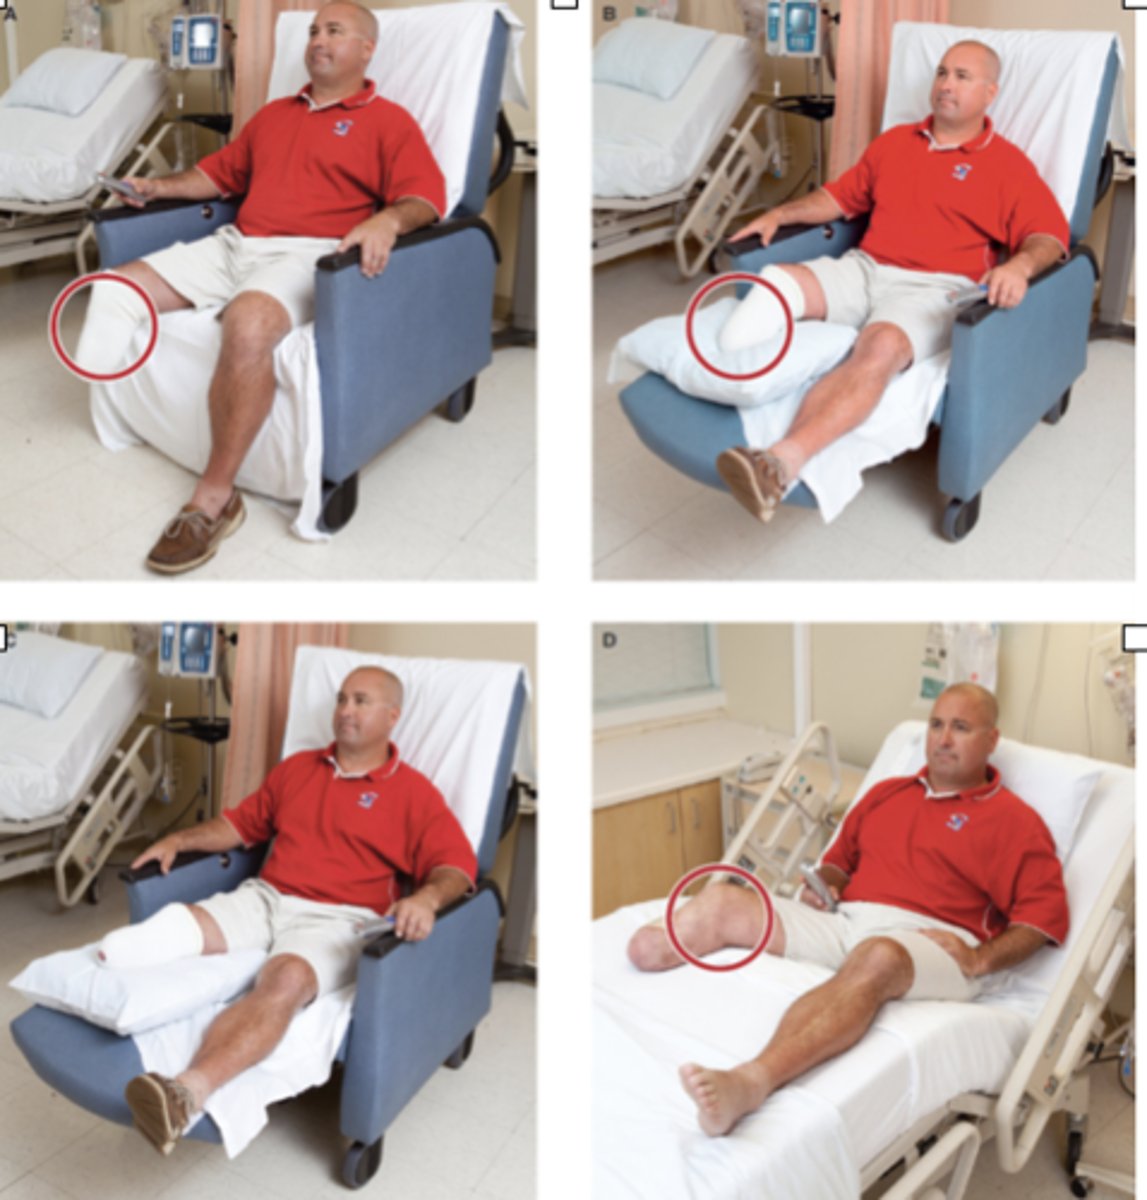
(A) Improper sitting position following a transtibial amputation. Although this position may initially feel comfortable, the residual limb is in a dependent position, which promotes swelling, and the knee is flexed (see red circle), which promotes knee flexion contracture.
(B) Here the residual limb is supported, but notice that the knee is still flexed, creating pressure on the distal end of the residual limb that could lead to pressure injuries.
(C) Preferred sitting position is with the residual limb completely supported and the knee resting in extension.
(D) This position of the bed may be comfortable, but over time, it increases the risk of the development of a knee flexion contracture.
(E) Here the bed position has been modified so that the patient's right knee is extended, reducing contracture risk.
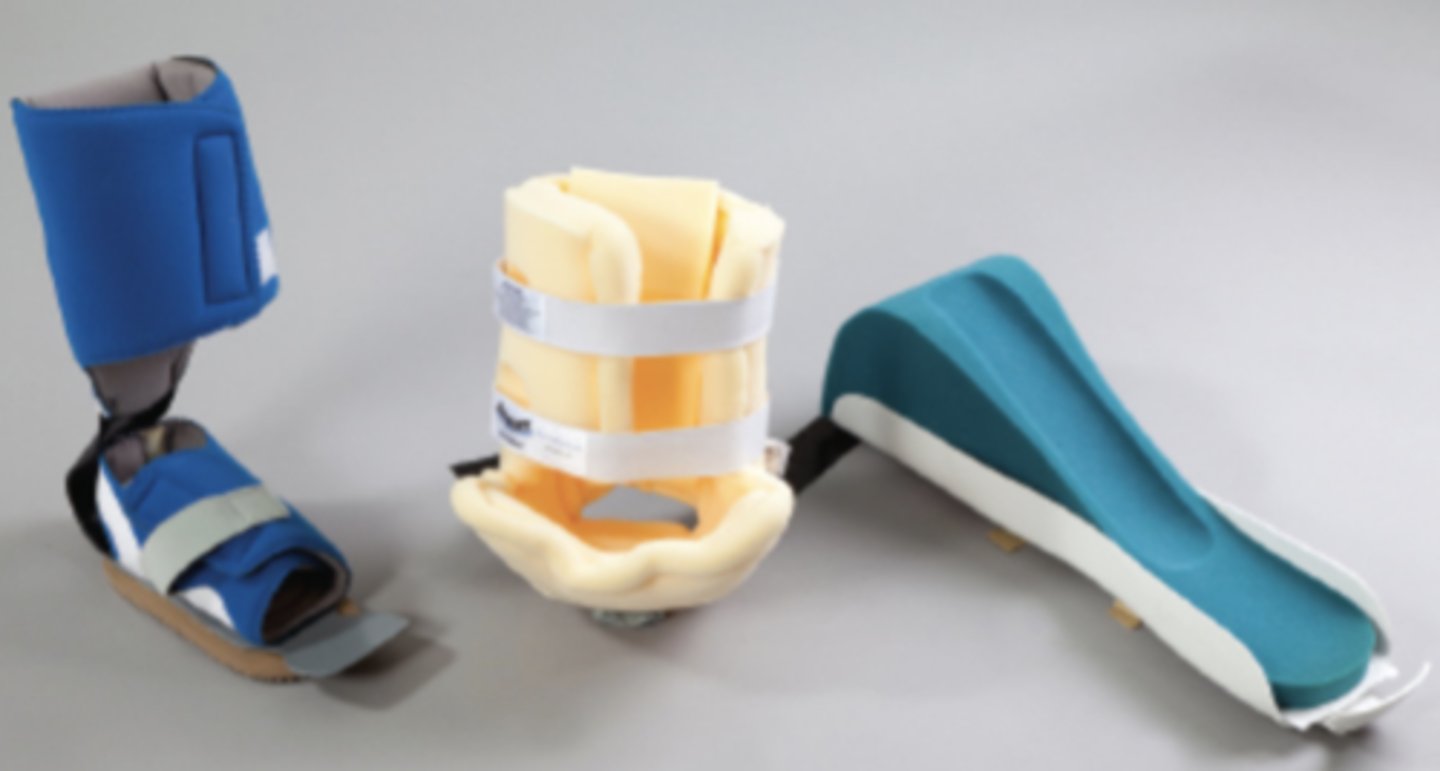
Common devices and methods used for cushioning and relieving pressure in patient positioning.
A padded splint (left) helps support the ankle and decreases the risk of ankle plantarflexion contracture.
A heel suspension boot (center) removes all pressure from the heel when the patient is supine.
A support splint for the arm (right) allows the wrist and hand to be elevated, facilitates extension, and provides cushioning for the forearm.
pressure areas for head and trunk in supine
Occipital tuberosity
Spine of the scapula
Inf angle of scapula
Vert processes
Sacrum
Post iliac crest
pressure areas for head and trunk in prone
Forehead
Lateral ear
Acromion
Sternum
Asis
pressure areas for head and trunk in sitting
Ischial tub
Scapula
Vertebral prominence
pressure areas for UE in supine
Medial cond of humerus
pressure areas for UE in prone
Ant head of humerus
pressure areas for UE in sidelying
Medial condyle of humerus
pressure areas for UE in sitting
Medial epicondyle of humerus
pressure areas for LE in supine
Post calcaneus
Greater troch
Head of fib
malleolus
pressure areas for LE in prone
Patella
Ridge of tibia
Dorsum of foot
pressure areas for LE in sidelying
Medial condyle of femur
Malleolus of tibia
pressure areas for LE in sitting
fibular head
General Principles of Assisting and Guarding the Patient
Clinicians guarding should stay as close to the patient as possible and remain near enough to anticipate and prevent falls.
Assist the patient as much as necessary but allow the patient to perform as independently as possible
Observe the patient’s performance at all times
Be ready to protect the patient…contact guarding to close guarding/supervision is always a good choice
Be prepared to step in to prevent breaking precautions
Use proper body mechanics: Alter height of bed to better position yourself
To minimize risk of injury to the clinician during bed mobility activities, the bed should typically be raised approximately to
the level of the top of the clinician's pelvis.
Supine tasks
Hooklying
Bridging
"Scooting"
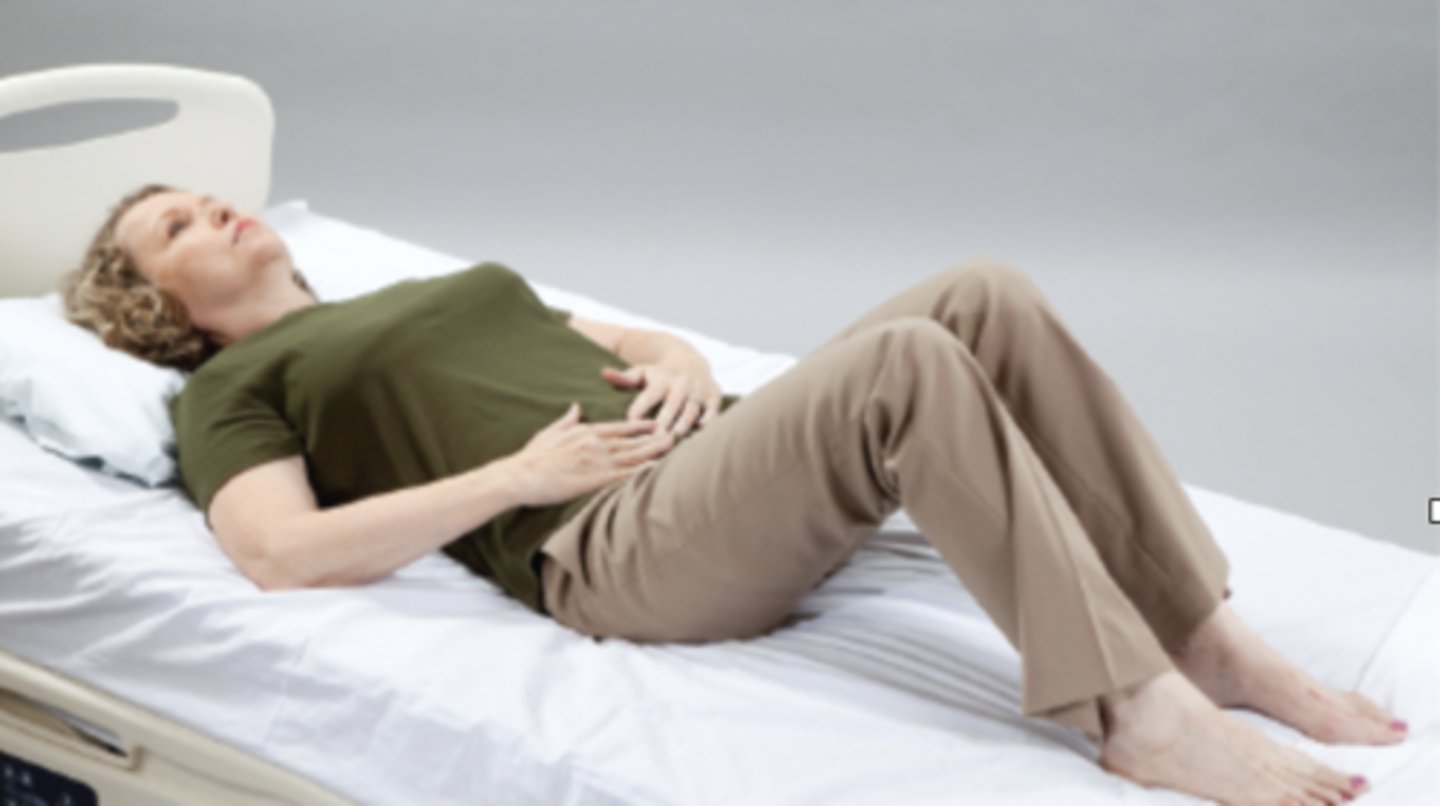
Hooklying
position with hips and knees flexed
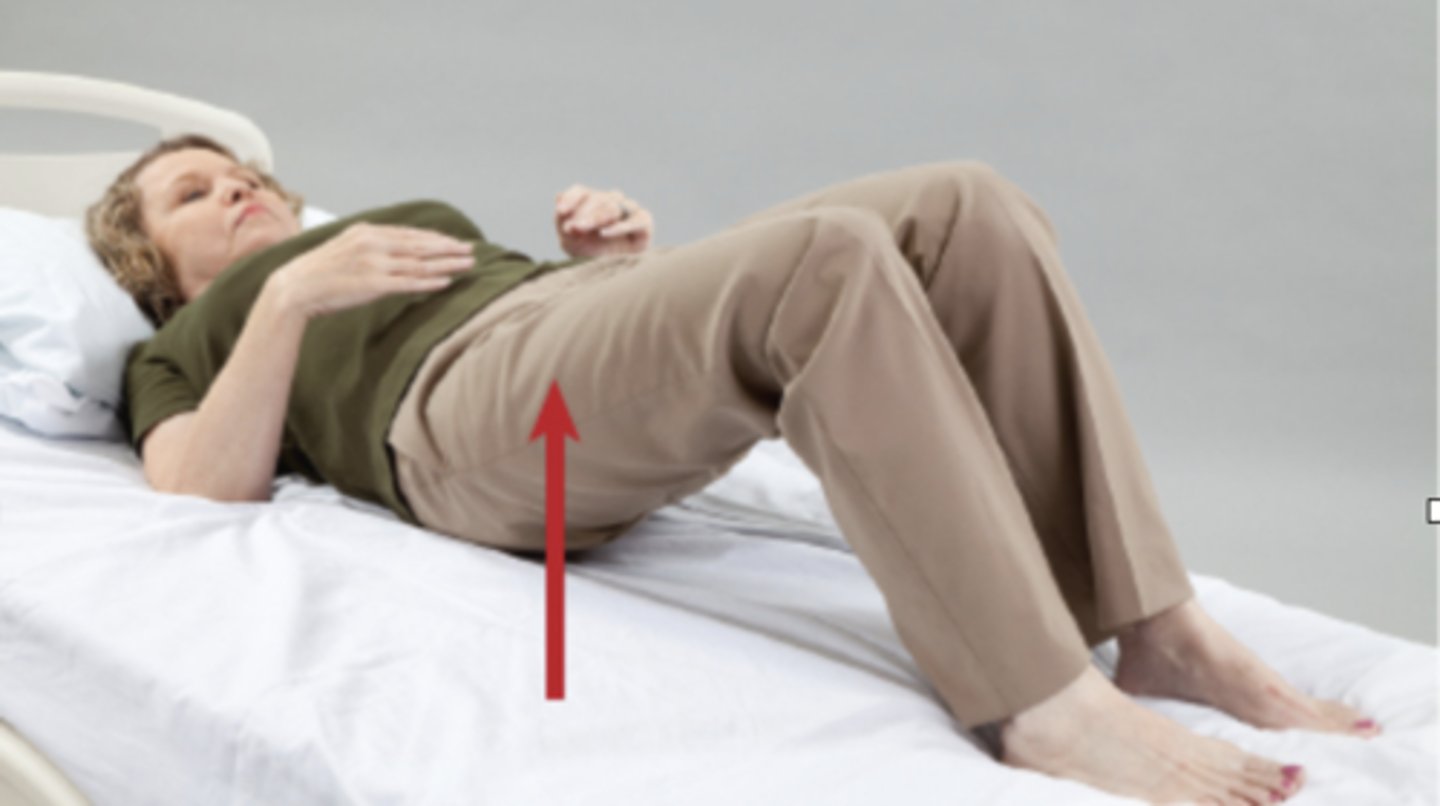
Bridging
position allowing the patient to lift hips and lower back
Side to side in bed movement segment
bridge, push down with elbows and feet, lift body/hips and scoot over, neck is flexed
Towards head of bed movement segment
bridge, push down with elbows and feet, lift body/hips and push up
Towards foot of bed movement segment
bridge, pull trunk down towards foot of bed with feet as elbows dig into bed
Scooting up in bed using bilateral bed rails
(A) The patient grasps the bed rails at or above the level of the head. The underhand grip provides more initial pulling power.
(B) Lifting the head slightly, the patient uses both arms to pull the body up toward the head of the bed.
(C) To complete the upward shift, the patient repositions the hands on top of the handrail to achieve a final push.

WHY is rolling important?
Used to change positions in bed
Prerequisite for out-of-bed activities
Used for self-care
Provides initial mobility and increases the strength and endurance of core musculature and joints
Promotes motor function and motor control
Prevention of bed sores
Enhances sensory integration
Promotes pressure relief
Guarding/Assisting the Patient for Rolling
ALWAYS roll the patient toward you
Manual contacts or manual guidance through patient's hips and shoulders if needed
Avoid "grabbing" the patient use open and wide spread fingers during hands on assistance
Flex LE's, scoot bottom to the side opposite the roll, let your legs drop to the side
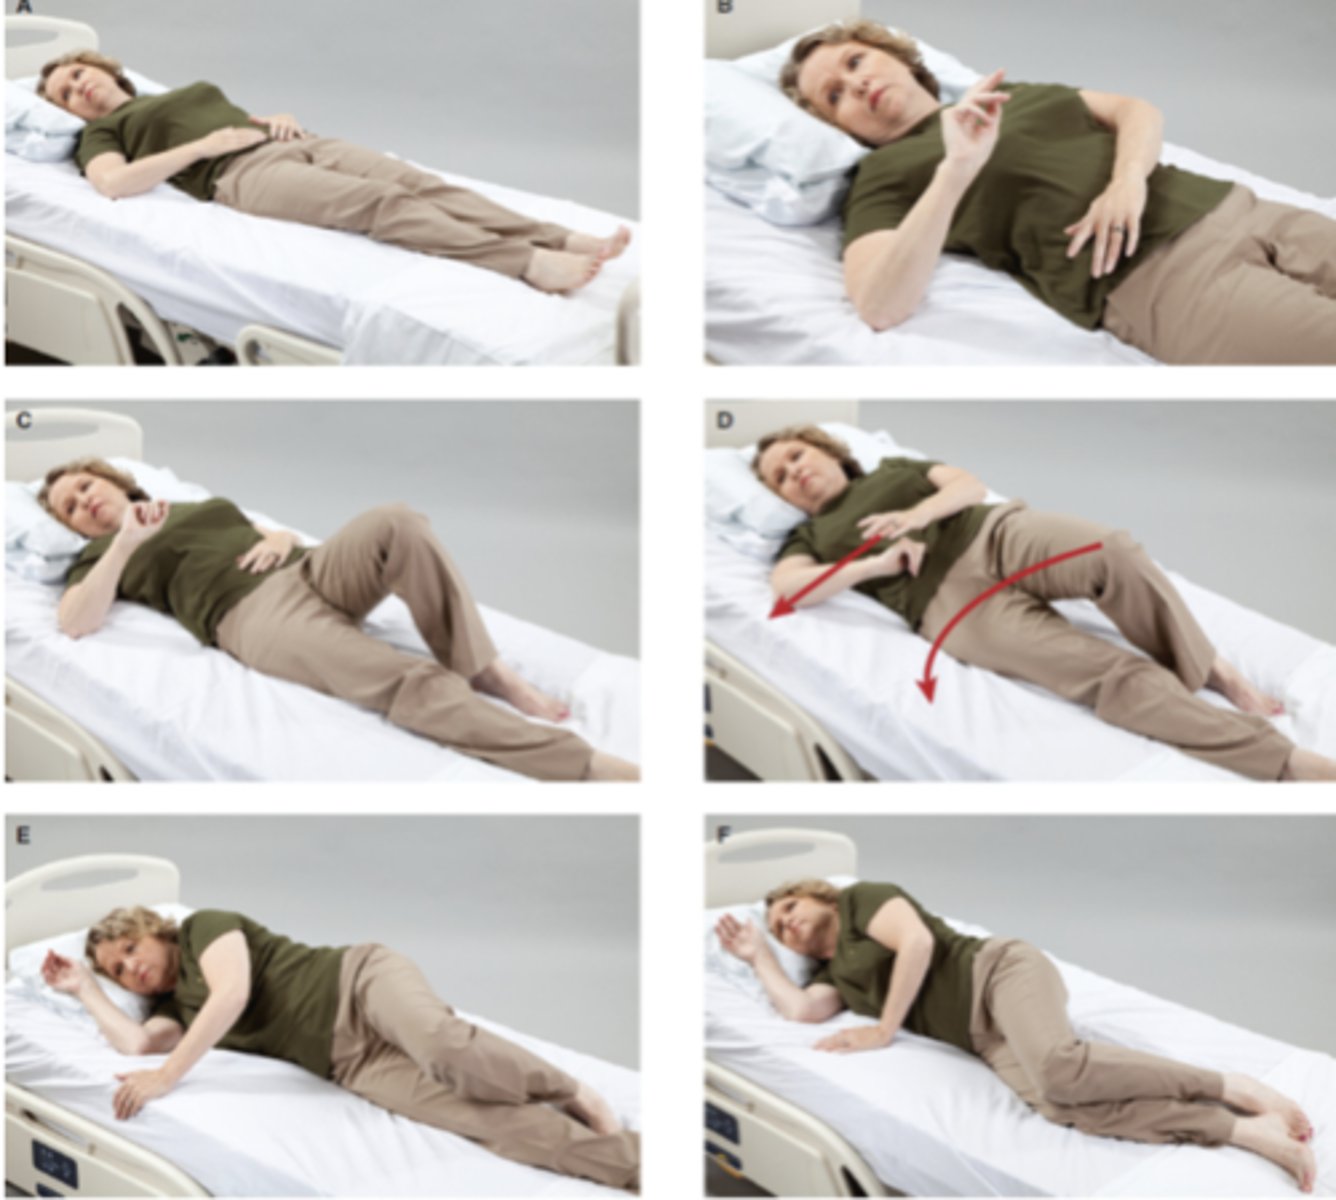
Rolling from supine to sidelying without the use of bed rails.
(A) The patient initiates the movement by turning the eyes and head; the patient's trunk will naturally follow the head.
(B) Abducting the right shoulder provides stability during the roll and places the arm in a good position for when sidelying is completed.
(C) Bend the knee opposite the direction of the turn; if going to the right, bend the left knee and vice versa.
(D) Reach across the body, and use the foot of the bent leg to push the trunk into sidelying.
(E) The roll from supine to sidelying is complete.
(F) Finish the positioning with trunk sidelying and extremities in a position of comfort.
Tips to Facilitate Rolling
Flex the head and neck while looking in the direction of the roll
If able, flex both knees or cross ankles
Enlist the help of the UE's
Utilize momentum
why the direction of rolls matters
Turning to affected side creates improved proprioception and body awareness through weight bearing
Forced use of neglected side
Can use unaffected arm to push up with and to reach for bed rail
Turning toward unaffected side forces affected side to move and be used
Technique for Transitioning to Sitting
Log Roll to sit through sidelying
Supine to sit through "sit up" method
Supine to sit through "sit up" method NOT recommended for
Post Op Abdominal surgery
Cardiac patients ( Incisions & Valsalva potential)
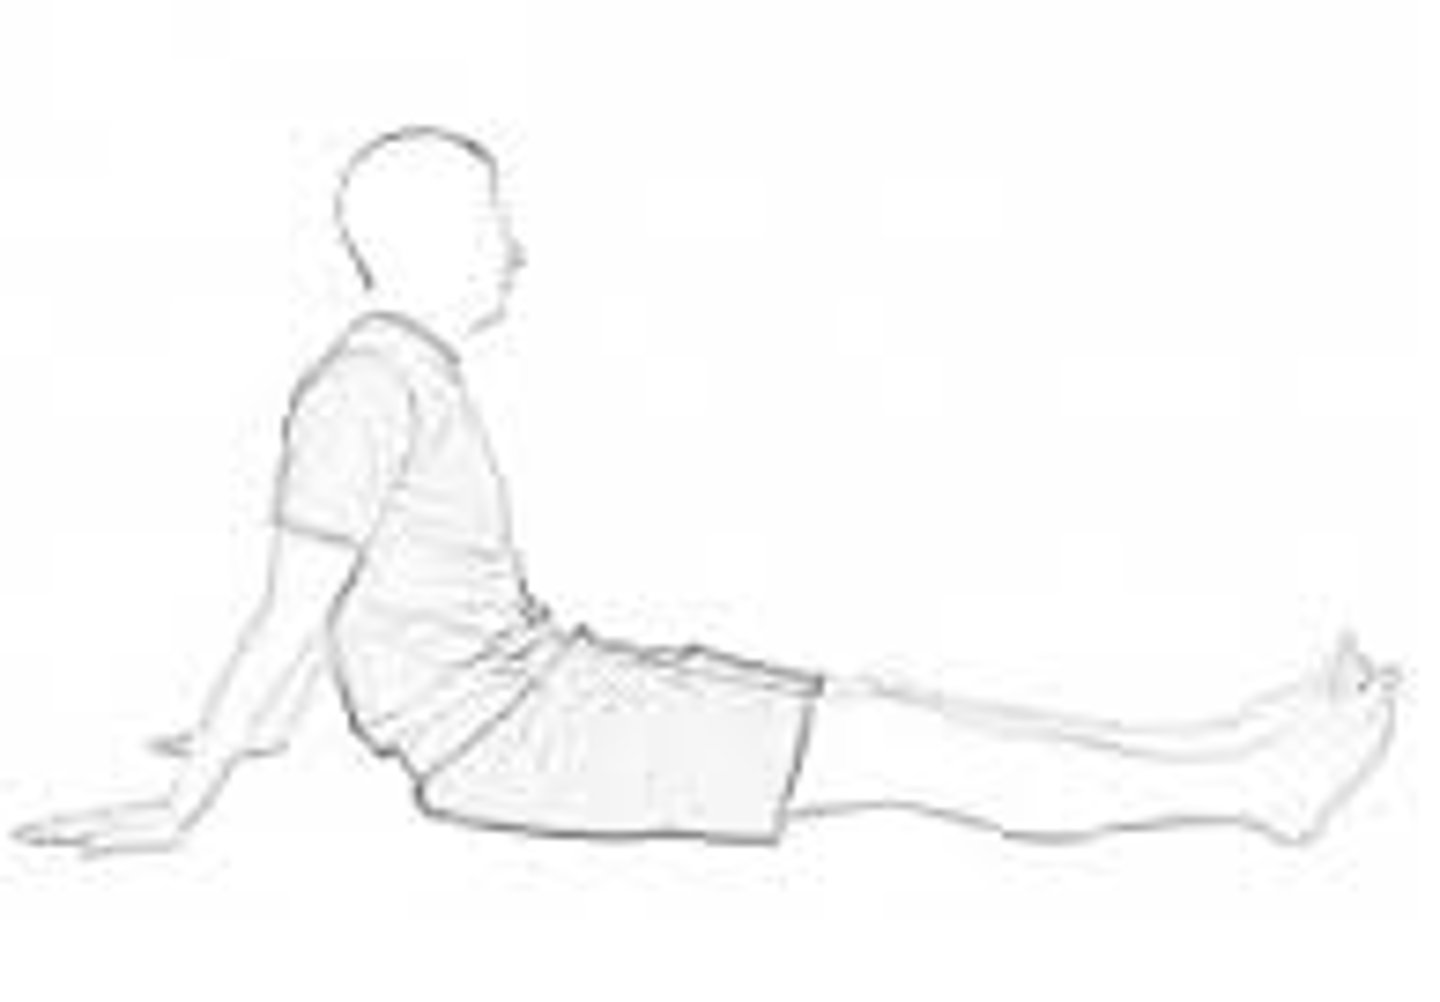
long sitting position
short sitting position
Coming from supine to sitting on the right side of the bed.
(A) Begin in the full supine position.
(B) Initiate the roll into sidelying by flexing the right arm and knee, turning the head, and reaching the right arm across the chest.
(C) In sidelying, press the right hand down into the bed and bring both feet off the edge of the bed.
(D) As the upper body becomes more upright, assisted by the lowering of the legs, come up on the left elbow then hand to push the torso into an upright position.
(E) Complete the task by sitting squarely on the edge of the bed, supported or guarded as needed. Shoes are donned in preparation for standing activities.
Guarding/Assisting the Patient in Short Sitting
Stand in front of patient
Place hands near patient's shoulders and or hips to prevent falling/losing balance
More supportive positions should be encouraged at first such as feet in contact with floor or stool
Sitting to Supine "back to bed" Technique
reverse the steps used to attain short sitting
May enlist the help of non-involved or stronger side (if applicable) to assist involved limb back onto the bed
Using the stronger leg to assist the weaker leg when moving from sitting into a sidelying position.
This patient has hooked her left ankle under the ankle of her weak right leg and is using the strength of her left leg to lift both legs up onto the bed.
The same technique can be used when moving from sidelying into sitting.
with patients requiring assistance with regard to bed mobility...
Technique will vary slightly based on assist required, however techniques are generally the same
Remember orthopedic precautions
Utilize Mobility aids to mobilize patients
Enlist help when needed Protect the skin! Avoid shear forces
general assisted technique for rolling
Flex unaffected hip and knee and scoop affected leg on top in crossed leg position
Have patient grasp affected arm out in front of patient and pull across body.
If rolling towards involved side, can grasp side rail of bed with uninvolved hand
scoop and turn method
CANNOT USE FOR HIP REPLACEMENT
Patient in hooklying position, roll patient on side using shoulder and hips for key points of control
Scoop patient under shoulder and knees
Use lower extremities as counter-weights
Bring to sitting
Total Hip Supine to Sitting Technique
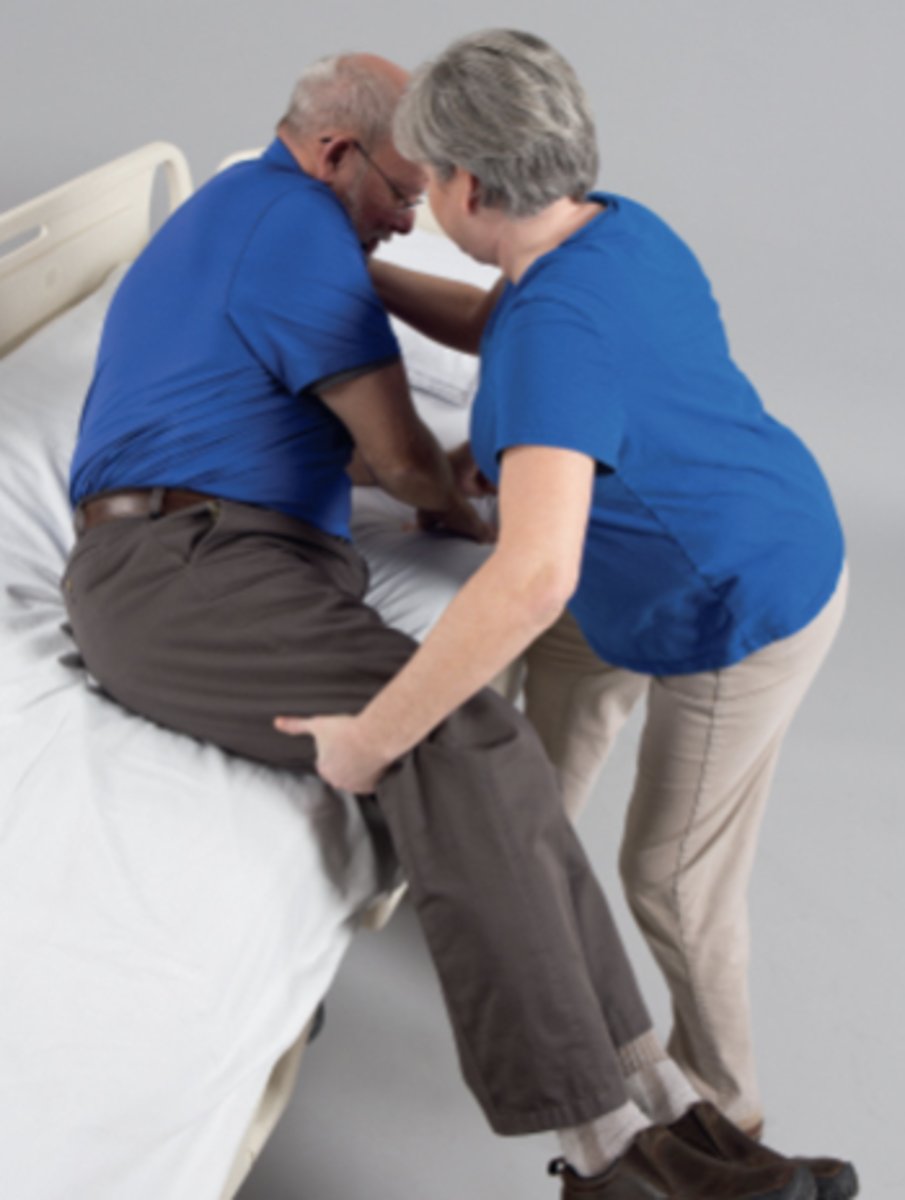
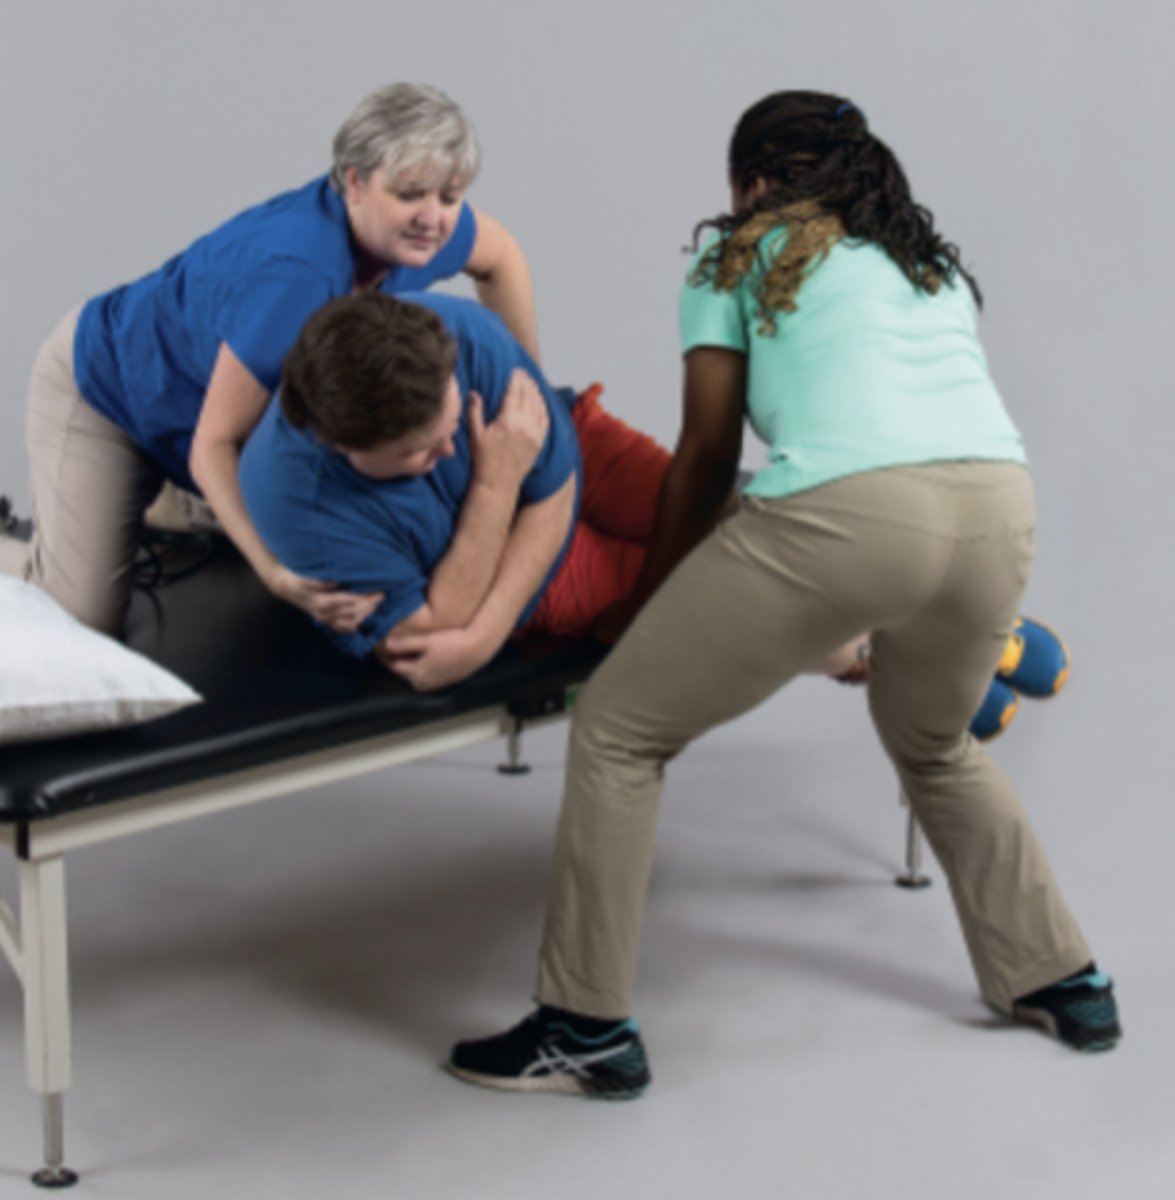
Two Person Bed Mobility
Sidelying to sitting with two clinicians for the dependent patient.
The clinician in front assists in lowering the patient's legs off the bed while providing a barrier to unwanted forward motion off the treatment mat.
The second clinician, positioned behind the patient, creates a force couple at the patient's right shoulder and left hip to assist in moving the patient to an upright position.
Equipment for Bed Mobility
Trapeze
Overhead loops
Bed rope ladder
Bed post or rails Bed-cane bedrail