OOP patterns
1/14
There's no tags or description
Looks like no tags are added yet.
Name | Mastery | Learn | Test | Matching | Spaced | Call with Kai |
|---|
No analytics yet
Send a link to your students to track their progress
15 Terms
Factory Pattern
The Factory Method is a design pattern that provides an interface for creating objects in a superclass, but allows subclasses to alter the type of objects that will be created.
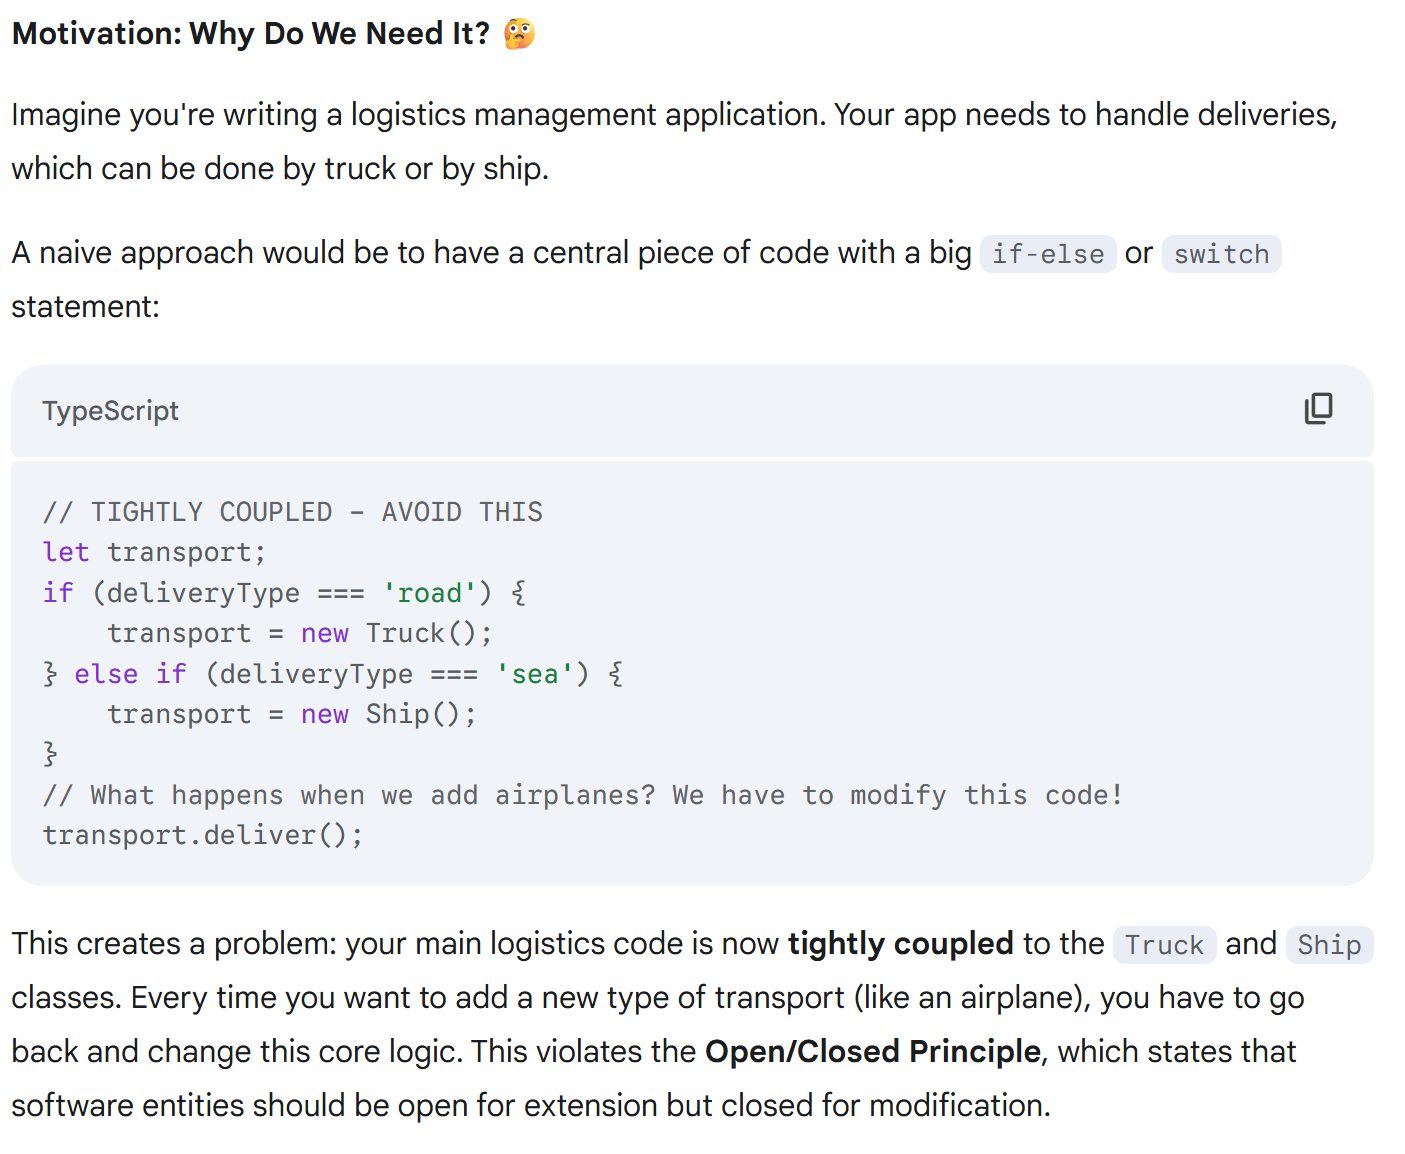
Factory Pattern (Motivation)
The Factory Method pattern solves this by delegating the responsibility of object creation to subclasses. The main class works with a generic object interface and calls a "factory method" to create it, without knowing the exact type of object it will get.
Analogy: Think of a restaurant group (Creator). The headquarters has a standard process for opening a new restaurant (business logic). However, it doesn't build the restaurant itself. Instead, it calls on a specialized team. If it's a pizzeria (ConcreteCreator), that team builds a Pizza (Product). If it's a burger joint (ConcreteCreator), that team builds a Burger (Product). The headquarters' process remains the same, but the final product changes based on which team is used.
Factory Pattern (use cases)
This pattern is useful when:
A class can't anticipate the class of objects it must create.
You want to provide users of your library or framework with a way to extend its internal components.
You want to localize the logic for creating an object, rather than scattering it across the application.
Examples:
UI Toolkits: A base
Dialogclass has acreateButton()factory method. AWindowsDialogsubclass would override it to create a nativeWindowsButton, while aMacDialogwould create aMacButton.Document Editors: A generic
Applicationclass defines an abstractcreateDocument()method. ATextEditorAppsubclass implements it to return aTextDocument, while aDrawingAppreturns aCanvasDocument.
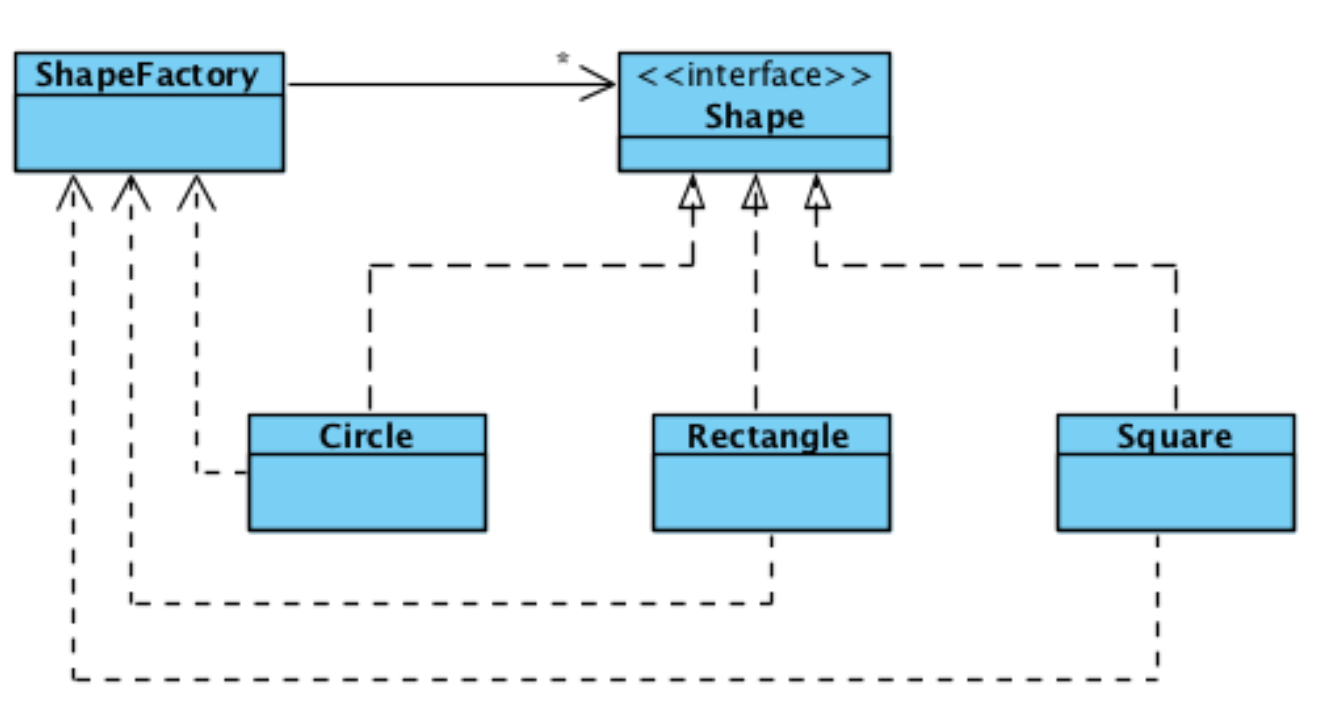
Factory Pattern (how to build)
Implementation: How to Build It
The pattern has four main components:
Product Interface: Defines the interface for the objects the factory will create (e.g.,
ITransportwith adeliver()method).Concrete Products: The actual classes that implement the
Productinterface (e.g.,Truck,Ship).Creator (or Factory): An
abstractclass that declares the factory method, which returns an object of theProducttype. It contains business logic that operates on theProduct.Concrete Creators: Subclasses that extend the
Creatorand override the factory method to return a specificConcreteProduct.
Factory pattern (example)
The TypeScript Implementation
The implementation involves four key parts: the interface (the "product" contract), the concrete classes (the "products"), the factory, and the client code that uses the factory.
1. The Notification Interface
This defines the required structure for any notification type. In TypeScript, an interface is perfect for this.
2. Concrete Notification Classes
These are the specific implementations. Each class must implement the Notification interface, guaranteeing it has a send method.
3. The NotificationFactory
This class centralizes the creation logic. It has a method that takes a type and returns an object that matches the Notification interface. Using a string literal union type ('email' | 'sms' | 'push') for the type parameter provides excellent autocompletion and compile-time error checking.
Singleton Motification
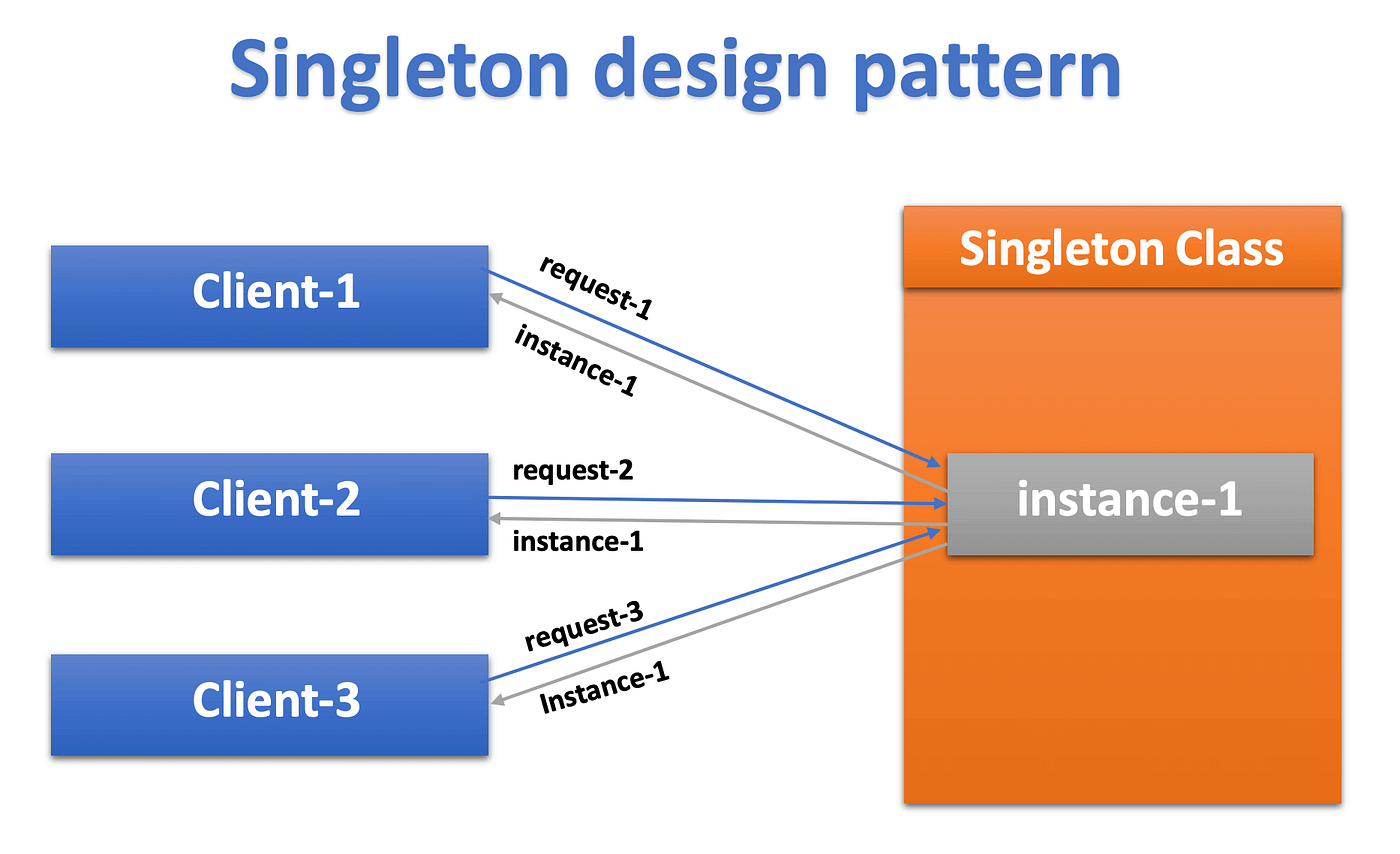
In software, You want to ensure that a class has only one instance and provide a single, global point of access to it.
The Singleton pattern solves two problems at once:
Guarantees a Single Instance: It ensure
s that no matter how many times you ask for an object of a certain class, you always get the exact same one.
Provides Global Access: It gives you a simple, well-known place to get that single instance, so you don't have to pass it around your entire codebase.
Singleton use cases
The Singleton pattern is best used for objects that manage a shared resource. Here are some classic examples:
Logging: You typically want a single logging object for your entire application to write messages to the same log file or console. If you had multiple loggers, they might try to write to the same file simultaneously, causing chaos.
Configuration Manager: Application settings (like database URLs, API keys, etc.) are often loaded from a file once at startup. A Singleton configuration object can hold these settings, ensuring all parts of the app read from the same source.
Database Connection Pool: Managing database connections is expensive. A Singleton can manage a pool of active connections, handing them out as needed and ensuring the pool is a single, shared resource.
Hardware Access: When your application needs to talk to a piece of hardware like a printer or a graphics card, you want a single object to manage that communication to prevent conflicting commands.
Singleton Implementation
Creating a Singleton involves three key steps:
Make the constructor private. This is the most important step. A private constructor prevents other classes from creating new instances of the Singleton using the
newoperator. This power is reserved for the Singleton class itself.Create a private static instance of the class. The class will hold its one and only instance in a static field. This field is private so that nothing outside the class can mess with it.
Provide a public static method to get the instance. This method (commonly named
getInstance()orInstance) is the global access point. The first time it's called, it creates the single instance and stores it in the static field. Every subsequent call simply returns that already-created instance.Building a Singleton in a language like TypeScript is straightforward thanks to its access modifiers (
public,private). Here are the essential ingredients:A
private staticinstance variable: The class holds its own single instance in astaticfield. It'sprivateso nothing outside the class can tamper with it.A
privateconstructor: This is crucial. It prevents you or other developers from creating new instances of the class using thenewkeyword (e.g.,new Logger()).A
public staticgetInstance()method: This is the "front door." It's the only way to get the Singleton object. The first time it's called, it creates the instance. On every subsequent call, it simply returns the instance it already created.
This approach is called lazy initialization because the instance is only created when it's first needed.
Singleton Thread safety
A note on Thread Safety: In a multi-threaded application, two threads might call getInstance() at the exact same time. If the instance hasn't been created yet, both might pass the if (instance == null) check and create two separate instances, violating the pattern. To fix this, you need to make the getInstance() method thread-safe, often by using a "lock" or by creating the instance eagerly (when the class is first loaded).
Singleton Example
When you run this code, you'll see the following output. Notice that "Logger instance created" appears only once, even though we call getInstance() twice.
--- Application Start ---
Logger instance created. This should only happen once.
[2025-08-09T00:00:42.000Z] Service A started.
[2025-08-09T00:00:42.000Z] Service B initialized.

Are both loggers the same instance? true

Printing all logs from Service A's logger:
--- All Logs ---
[2025-08-09T00:00:42.000Z] Service A started.
[2025-08-09T00:00:42.000Z] Service B initialized.
----------------
--- Application End ---
This clearly demonstrates that both serviceA_logger and serviceB_logger are references to the exact same object, successfully implementing the Singleton pattern.
![<p>When you run this code, you'll see the following output. Notice that "Logger instance created" appears only once, even though we call <code>getInstance()</code> twice.</p><pre><code>--- Application Start ---
Logger instance created. This should only happen once.
[2025-08-09T00:00:42.000Z] Service A started.
[2025-08-09T00:00:42.000Z] Service B initialized.
Are both loggers the same instance? true
Printing all logs from Service A's logger:
--- All Logs ---
[2025-08-09T00:00:42.000Z] Service A started.
[2025-08-09T00:00:42.000Z] Service B initialized.
----------------
--- Application End ---
</code></pre><p>This clearly demonstrates that both <code>serviceA_logger</code> and <code>serviceB_logger</code> are references to the exact same object, successfully implementing the Singleton pattern.</p>](https://knowt-user-attachments.s3.amazonaws.com/13b3564a-e8a2-4e95-9de3-ff039a65f79d.png)
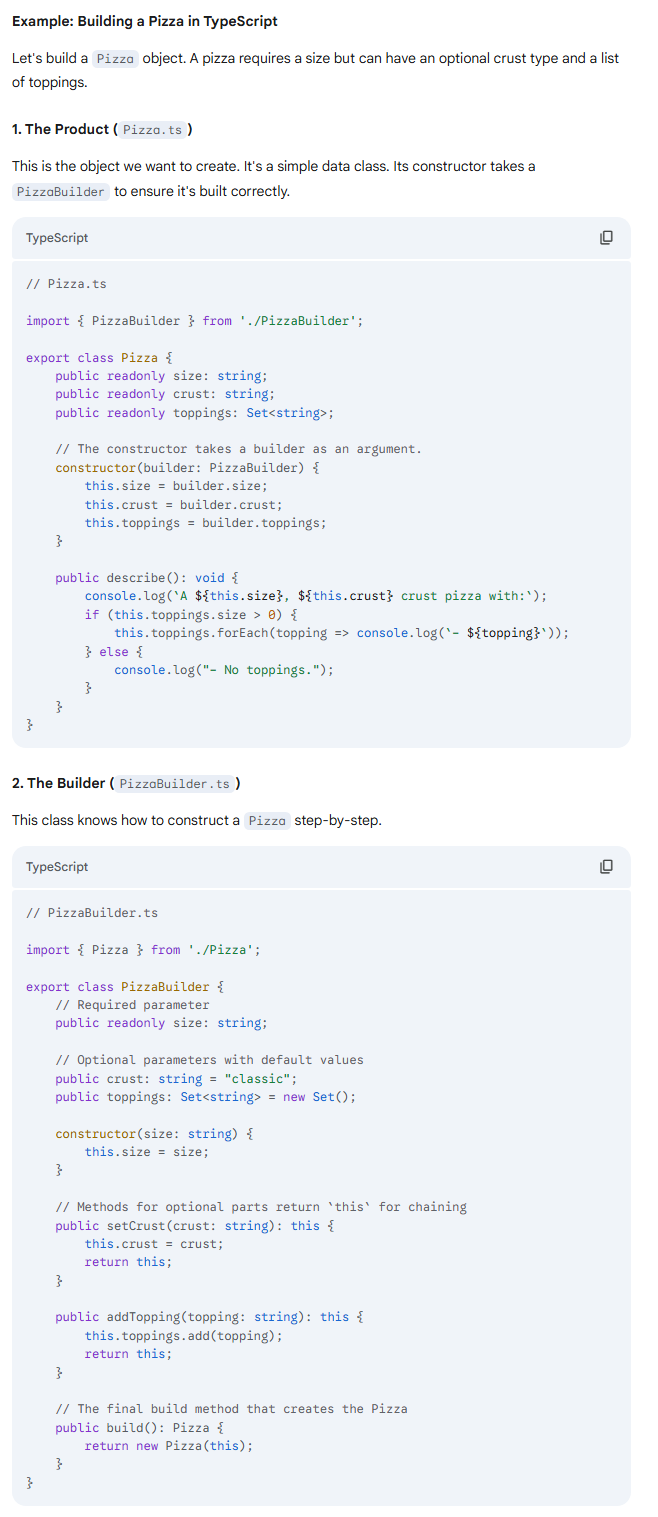
Builder pattern (motivation)
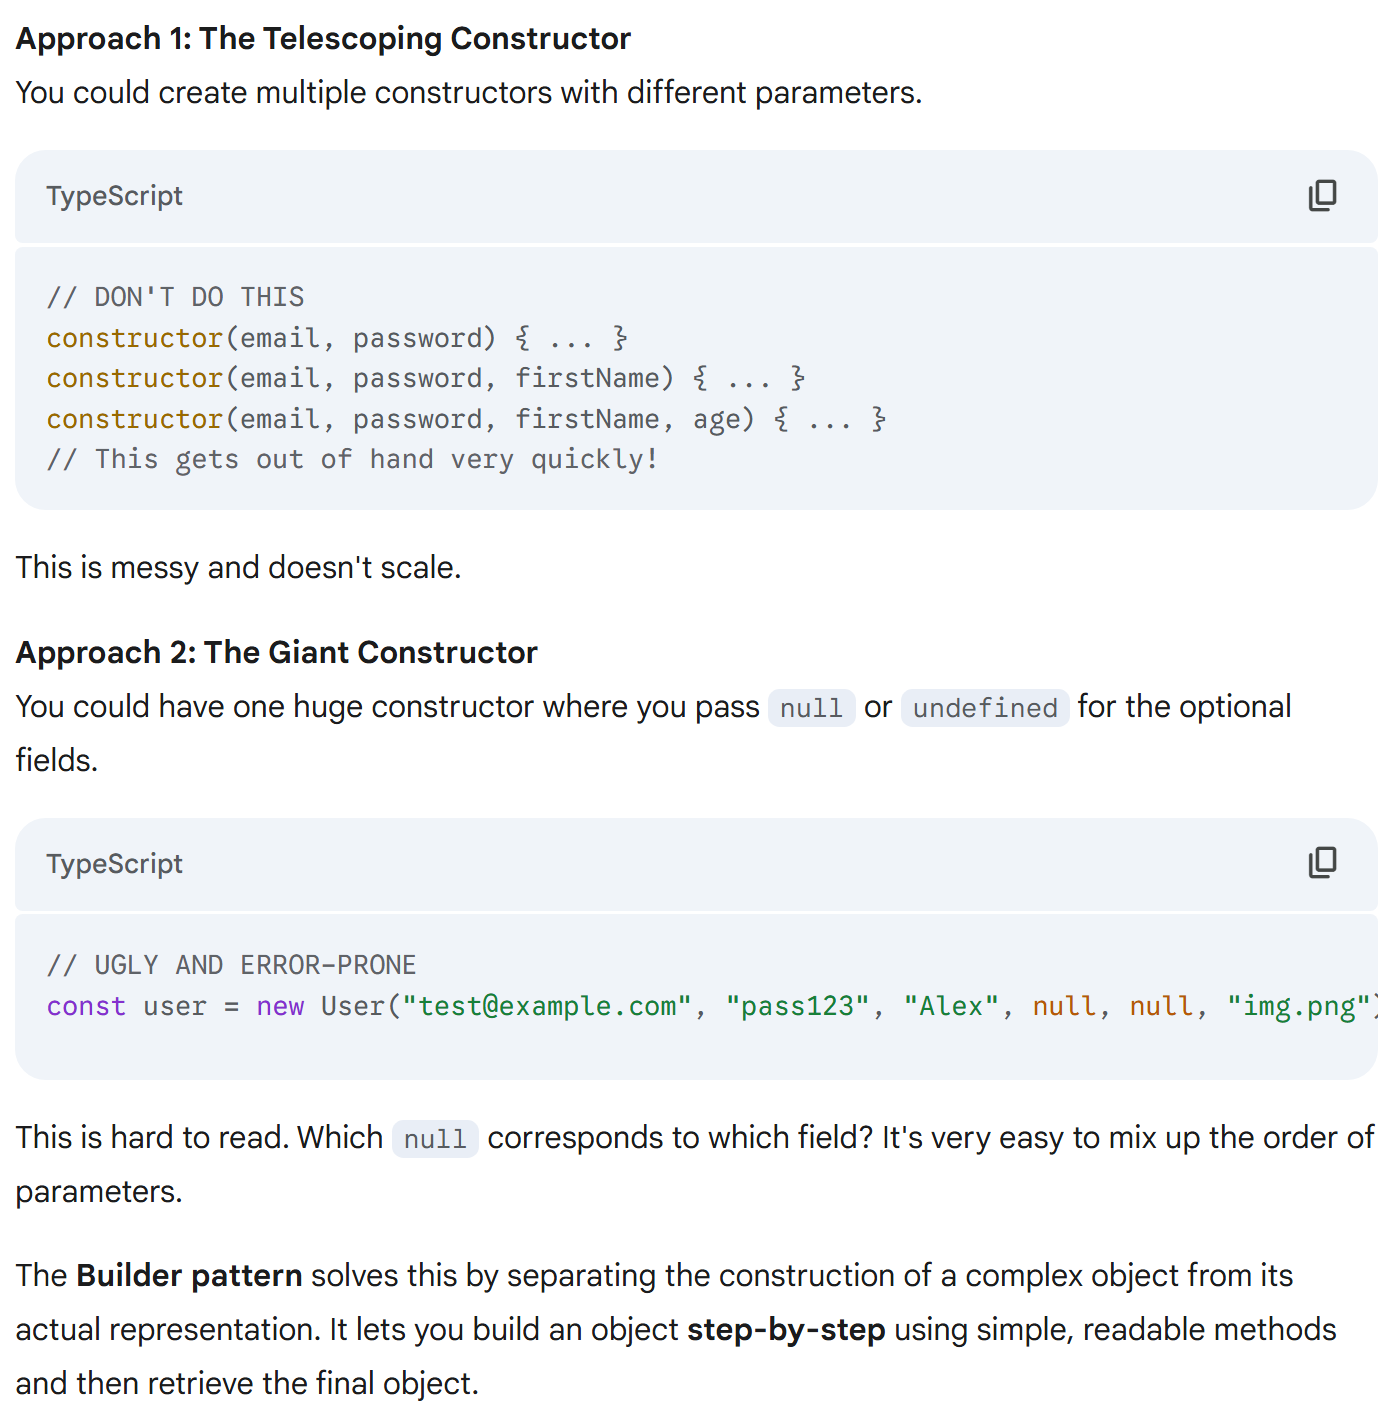
Imagine you need to create an object that has many configuration options, some required and some optional. Let's take a User profile as an example. A user must have an email and password, but their first name, last name, age, and profile picture are optional. But that way is messy and doesn't scale.
You could also have one huge constructor where you pass null or undefined for the optional fields. But this is hard to read. Which null corresponds to which field? It's very easy to mix up the order of parameters.
The Builder pattern solves this by separating the construction of a complex object from its actual representation. It lets you build an object step-by-step using simple, readable methods and then retrieve the final object.
Builder pattern (use cases)
When Is It a Good Idea? 🛠
The Builder pattern shines when you need to construct an object with many optional parts, or when the construction process is complex.
Building Query Strings: Constructing a complex SQL (like query builder in typeorm), or URL query with many optional parameters (
WHERE,ORDER BY,LIMIT, etc.).queryBuilder.select("users").where("age > 21").limit(10).build();
Creating Complex Objects: As mentioned, creating
Userprofiles,Configurationsettings, or any object with a lot of attributes.Assembling Documents: Building an HTML or XML document where you add elements like headers, paragraphs, and tables step-by-step.
The "Meal" Analogy: Think of ordering a custom pizza or a sandwich at a deli. You don't tell the cashier the entire order in one long, confusing sentence. You say, "I'll have a pizza... on thin crust... add mushrooms... add extra cheese." You build it piece by piece. The builder pattern does the same for objects.
Builder pattern (Implementation)
The pattern introduces a few key roles:
The
Product: This is the complex object you want to build (e.g., thePizzaclass). Its constructor is often made private or internal, so it can only be created by theBuilder.The
Builder: This is the star of the show. It's a class that has methods for configuring theProductstep-by-step (e.g.,setSize(),addTopping()).Method Chaining (Fluent Interface): The builder's methods typically
return this;, which allows you to chain calls together in a readable, fluent way.The
build()Method: The builder has a final method, usually calledbuild(), that assembles all the pieces and returns the finishedProduct.

Builder pattern (Example)
3. The Client Code (main.ts)
Now, let's see how easy and readable it is to create pizzas!
TypeScript
// main.ts

import { PizzaBuilder } from './PizzaBuilder';

console.log("--- Let's make some pizzas! ---");

// Build a complex pizza using the fluent interface
console.log("\nBuilding a 'Supreme' pizza:");
const supremePizza = new PizzaBuilder("large")
    .setCrust("thin")
    .addTopping("pepperoni")
    .addTopping("mushrooms")
    .addTopping("olives")
    .build();

supremePizza.describe();


// Build a simple pizza
console.log("\nBuilding a simple 'Cheese' pizza:");
const cheesePizza = new PizzaBuilder("medium")
    .build();

cheesePizza.describe();
Output of the Example:
--- Let's make some pizzas! ---

Building a 'Supreme' pizza:
A large, thin crust pizza with:
- pepperoni
- mushrooms
- olives

Building a simple 'Cheese' pizza:
A medium, classic crust pizza with:
- No toppings.
Notice how clean the creation process is. Each line is self-documenting. You can't misplace a parameter, and you can clearly see what options have been set for each pizza. This is the power of the Builder pattern.