MCTS Guide to Windows 7 configuration
1/70
There's no tags or description
Looks like no tags are added yet.
Name | Mastery | Learn | Test | Matching | Spaced |
|---|
No study sessions yet.
71 Terms
using hyper v 2.4.2
go to (control panel) >
((Program )>
( Turn windows feature on or off)
ok
create a virtual switch hyper v 2.4.2
Open Hyper-V Manager, right-click host > Quick Create
Choose or upload an ISO file
Adjust settings before booting:
Memory: e.g., set to 4096 MB (4 GB)
Processor: e.g., change from 8 to 2
Network Adapter: select the correct switch (e.g., Internal)
Optionally configure a firewall VM using 2 adapters (external + internal)
Name your VM, click Apply > OK
Click Connect > Start to begin the Windows installation process
This launches a VM console, just like booting a physical computer.
Add Virtual Hard Drive to VM 2.3.2
Open VM Settings in Hyper-V
(Right-click the VM > Settings)
(Under SCSI Controller, click Hard Drive > Add)
Fixed size: Allocates full size immediately. Best for performance.
Dynamically expanding: Grows as data is added. Saves space.
Differencing: Linked to a parent disk. Only changes are stored.
Creating a New VHD
Choose type (e.g., Dynamically expanding)
Set name and location
Set max size (e.g., 50 GB)
Click Finish
Click Apply to attach to the VM
Disk Formats
VHD: Older, max 2040 GB
VHDX: Modern, up to 64 TB (Windows 8+)
VHD Set: Shared VHDs for clustered VMs (Windows 10+)
✅ To Verify the Disk in the VM
Boot the VM > Open Disk Management
Windows will prompt to initialize the new diskTo Add an Existing VHD
In VM settings: SCSI Controller > Hard Drive > Add
Browse to and select the existing VHD
Click Apply
Create and Manage Checkpoints on Hyper-V
Right-click the VM > Checkpoint
Optionally rename the checkpoint (e.g., Clean OS Installed)
Make Changes & Test
Example changes: move icons, change themes, install software
After changes, create a second checkpoint (e.g., Changed theme)
Revert to a Checkpoint
Right-click the checkpoint > Apply
VM returns to the saved state
Optionally, take a new checkpoint before applying
Delete Checkpoints
Right-click > Delete Checkpoint to remove a single one
Use Delete Checkpoint Subtree to delete a parent and all children
Frees up disk space and reduces clutter
2.4.5Use Windows Sandbox
How to Install Windows Sandbox
Open Settings > Apps > Optional features
Click More Windows features
Check Windows Sandbox and click OK
Restart your computer
How to Use Windows Sandbox
Open Windows Sandbox from the Start menu
It opens a clean, temporary Windows desktop
Copy any installer or file from the host machine into Sandbox
Install and test the app as usual
Close Sandbox when done — all changes are wiped
slmgr /dli # Check license status
If status = Notification, Windows is not activated.
If status = Licensed, Windows is activated.
Extending the Grace Period – slmgr /rearm
This resets the grace period and reduces the rearm count by 1.
Reboot required after rearming.
For example, if rearm count = 1000, you can delay activation up to 1000 times.
✅ Installing and Activating a Product Key (03:46–05:20)
Install the new key:
slmgr /ipk XXXXX-XXXXX-XXXXX-XXXXX-XXXXXActivate Windows:
slmgr /atoVerify activation:
slmgr /dli   # Summary info
slmgr /dlv   # Detailed info
slmgr /xpr   # Shows if license is permanent or has an expiration
🧾 After Activation:
License Status: Licensedslmgr /xprwill confirm if it’s permanently activated.
🌐 Step 1: Check Network Connection (00:34–01:22)
Open Command Prompt and use
pingto test:ping www.microsoft.comTest activation-specific URLs (these must be reachable):
go.microsoft.comsls.microsoft.comactivation.sls.microsoft.com
Also check if ports 80 (HTTP) and 443 (HTTPS) are open to these URLs.
Step 2: Check Product Key (01:22–02:44)
Go to:
Start > Settings > ActivationIf needed, click Change product key to:
Re-enter or replace the current key.
Then click Next and wait for verification.
If using a Digital License, make sure:
You're signed in with your Microsoft account.
You chose “I don’t have a product key” during install (valid for digital license activation).
You're connected to the internet.
🛠 Step 3: Other Troubleshooting Tips (02:44–03:27)
Malware can interfere with activation.
Be cautious buying PCs from individuals—keys may be reused or invalid.
Enterprise systems may use:
MAK (Multiple Activation Key)
KMS (Key Management Service)
→ IT admins should check error codes for these.
🧩 Activation Might Fail If:
You're offline.
Product key is invalid or reused.
You're not logged into your Microsoft account (for digital license).
There’s a volume licensing issue (MAK/KMS).
⚠ What Is Windows Activation? (00:00–00:34)
It's a Digital Rights Management (DRM) system that verifies your Windows copy is genuine and follows the license agreement.
If activation fails, start by checking internet/network connectivity.
1. Start Menu
Access: Right-click Start > Settings > Personalization > Start
Options to Customize:
Show more pins or recommendations.
Show most-used and recently added apps.
Show recently opened items in Start, Jump Lists, and Taskbar.
Choose folders (e.g., Documents, Downloads) to show on the Start menu.
Taskbar
Access: Settings > Personalization > Taskbar
Customization Options:
Show/hide system icons like Search, Widgets, and Chat.
Auto-hide the taskbar (useful on desktops or tablets).
Align taskbar to the left or center.
Show desktop by clicking the far-right corner of the taskbar.
Choose which icons appear in the system tray (like Windows Security).
Enable tools like the Pen menu or Virtual Touchpad.
Manage taskbar display across multiple monitors.
3. Desktop
Access: Settings > Personalization > Background
Options:
Set the background to a picture, solid color, slideshow, or Windows Spotlight.
Choose how the image fits (fill, fit, stretch, etc.).
Browse to select custom images.
Themes
Access: Settings > Personalization > Themes
Why Use a Theme?
Themes apply a background, color scheme, and sounds in one step.
Choose from preinstalled themes or download more.
Lock Screen
Access: Settings > Personalization > Lock screen
Customizable Items:
Change lock screen background (Spotlight, picture, or slideshow).
Choose one app to show status (e.g., Calendar, Mail).
Decide whether to show lock screen background on the sign-in screen.
Notifications
Access: Settings > System > Notifications
Key Settings:
Enable or disable notifications from apps and senders.
Choose to show notifications on the lock screen.
Enable notification sounds.
Privacy Settings
Access: Settings > Privacy & security
General Privacy Options:
Control use of advertising ID (personalized ads).
Allow websites to use your language list.
Let Windows track app launches for better search results.
Decide whether to show suggested content in the Settings app.
Use company policies or personal preferences to guide decisions.
1. Access Time & Language Settings
Go to Start > Settings > Time & language
Date & Time
Set Time Automatically: Usually on by default.
Daylight Saving Time: Can be turned on/off as needed.
Time Zone: Can be adjusted manually (e.g., Mountain Time).
Sync Clock: Use the Sync now button to sync with an internet time server.
Extra Options: Add other calendars or check the last time sync occurred.
Language & Region
Display Language: You can only change it if other languages are installed.
Add Languages: Install more languages for typing, apps, or the full system.
Region Settings: Choose your country/region. This affects:
Date and time format
Number and currency formatting
Default content suggestions
Typing Settings
Features Include:
Typing suggestions
Autocorrect
These settings adjust based on your chosen language and region.
Speech Settings
Speech Language: Determines how the system understands spoken input.
Accents: Option to recognize non-native English accents.
System Voice: Choose from available voices (e.g., Microsoft David).
Preview Voice: Hear a sample.
Adjust Speed: Make the voice speak faster or slower.
Windows 11 Accessibility Options Overview
Accessibility settings in Windows 11 help users with vision, hearing, or mobility impairments. You can access all of these by going to:
Start > Settings > Accessibility
Settings are grouped into three main categories:
🔵 Vision | 🟢 Hearing | 🟠 Interaction
Text Size
Adjust text size with a slider (up to 225%).
✅ Visual Effects
Turn animations/transparency on or off.
Auto-hide scroll bars.
Set how long notifications stay visible.
Show/hide desktop background.
✅ Mouse Pointer & Touch
Resize the pointer.
Change pointer color (black, white, custom).
Enable touch screen feedback visuals.
Text Cursor
Adjust cursor thickness and color.
Makes the blinking cursor easier to see.
Magnifier
Zooms into parts of the screen.
Manage Startup Applications
Many apps set themselves to start when Windows boots up. This can help apps open faster or check for updates—but too many startup apps slow down your system.
To improve performance, you should review and manage your startup apps regularly.
🔹 Why This Matters (Manage Startup Applications)
Apps pre-load at startup for speed, updates, or background tasks.
Too many startup apps = slower boot times and performance issues.
Especially common on older or OEM systems (Dell, HP, etc.).
🔹 How to Access Startup App Settings (Manage Startup Applications)
Right-click the Taskbar
Select Task Manager
Go to the Startup tab
🧠 Old method: Used to be done in
msconfigor System Configuration.
🔹 What You’ll See in Task Manager (Manage Startup Applications)
Each startup app includes:
Name
Publisher
Status (Enabled/Disabled)
Startup Impact
🟢 Low
🟡 Medium
🔴 High – these slow down startup the most
🔹 How to Disable a Startup App (Manage Startup Applications)
If an app (like CCleaner) is rarely used:
Click the app in the list
Click the Disable button (bottom right)
⚠ Note:
Disabling does not stop the app immediately—it prevents it from starting next time the system boots.
To fully stop the app:
Reboot the system
Or manually close it from the system tray
🛠 Troubleshooting Windows Services in Windows Server
Windows services are background processes that often start automatically and run without a user interface. Some are critical for applications to work properly, so knowing how to troubleshoot them is essential for system admins.
🔹 1. Accessing the Services Console (Windows Services in Windows Server)
Click Start, type
services, and select Services (Desktop App).The window shows:
Service Name
Description
Status (Running / Stopped)
Startup Type (Automatic, Manual, Disabled)
Log On As (Local System or user account)
🔹 2. Troubleshooting a Failed Service (e.g., Veeam Agent)
Problem:
Veeam Backup Agent service won’t start.
🛠 Steps to Resolve:
Try to start the service → Error message shows logon failure.
Double-click the service → Go to Log On tab.
It shows it’s using a service account (e.g.,
Veeam_Service).Open Active Directory Users and Computers.
Navigate to Service Accounts OU.
Find the
Veeam_Serviceaccount.❗ If there's a down arrow on the account → it's disabled.
Right-click > Enable Account
Return to Services, start the service again → ✅ It should now work.
🔁 If it still fails, the password may be wrong. Update the credentials in the Log On tab of the service.
🔹 3. Troubleshooting Services with Dependencies (e.g., IIS)
Problem:
IIS Default Web Site won’t start.
🛠 Steps to Resolve:
Open Command Prompt (Admin) → run:
iisreset /start
Open IIS Manager → See that the Default Web Site is stopped.
Try to start the website → ❌ Fails.
Error: World Wide Web Publishing Service is not running.
Open Services app → Find that service → it’s Disabled.
Double-click it → Change Startup Type to Automatic → Apply.
Start the service.
Back in IIS Manager → Restart the Default Web Site.
Confirm with:
iisreset /statusUsing Task Manager to Monitor Services
Although limited, Task Manager offers basic service control:
To access:
Right-click the Taskbar → Task Manager
Or press
Ctrl + Shift + Esc
In Task Manager:
Go to the Services tab.
Right-click a service:
Start / Stop / Restart
Go to details to view associated processes.
🔎 Note: Task Manager shows the service name, while the Services app shows the display name. They may differ depending on the developer.
🛠 Enable or Disable Optional Windows Features
When Windows is installed, it only enables commonly used components. However, many optional features are available that can be turned on or off based on your needs. These include legacy components, development tools, file sharing protocols, and more.
Access Windows Features
Steps:
Open the Start menu and type
control, then open the Control Panel.Click Programs.
Under Programs and Features, click Turn Windows features on or off.
You’ll now see a list of optional Windows features.
Enable a Windows Feature
Example: Enable DirectPlay (used by some older games)
Steps:
In the Windows Features window, scroll and locate DirectPlay.
Check the box next to it.
Click OK.
Windows will apply the changes (this may take a few seconds).
When prompted, click Close.
✅ Result: The selected feature is now active.
Disable a Windows Feature
Example: Disable Microsoft XPS Document Writer
Steps:
In the same Windows Features window, find Microsoft XPS Document Writer.
Uncheck the box next to it.
Click OK.
Wait for Windows to apply the changes.
Click Close.
✅ Result: The selected feature is now removed from the system.
To share a local printer, complete the following steps on the computer the printer is attached to:
Right-click Start and select Settings > Bluetooth & devices.
Select Printers & scanners.
Select the desired printer.
Select Printer properties.
Select the Sharing tab, select Change Sharing Options.
Select Share this printer.
Enter a share name. (Use a share name that will make the printer easily identifiable by users.)
Click Apply and then OK.
If needed, add additional drivers to support other Windows versions.
The additional drivers are downloaded when the client connects to the printer. This prevents users from having to manually install the driver and potentially installing the wrong driver.
Open File Explorer.
Open Network.
An error message will display that states, "Network discovery is turned off...".
To turn it on, select the Network discovery is turned off banner and then select Turn on network discover and file sharing.
Open Settings > Network & internet.
Click the Wi-Fi or Ethernet tab.
Under Network profile type, select Private.
Shared Printer Connection
After a printer has been shared on the network, each client must connect to the shared printer as follows:
Right-click Start and select Settings > Bluetooth & devices.
Select Printers & scanners.
Select Add a device.
Wait while Windows searches for nearby printers.
Select the name of the printer you want to add (connect to).
Follow the on-screen instructions to install the printer onto your computer.
The printer that I want isn't listed
Find a printer in the directory, based on location or feature.
Select a shared printer by name.
Add a printer using a TCP/IP address or hostname.
Add a Bluetooth, wireless, or network discoverable printer.
Add a local or network printer with manual settings.
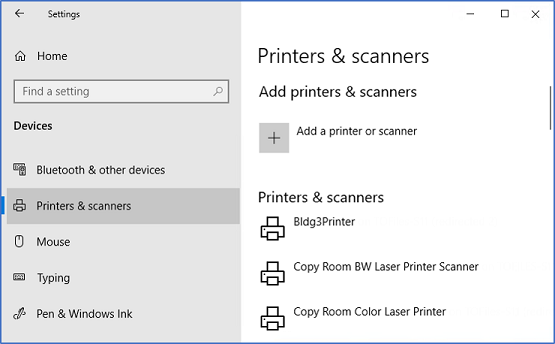
Print Management Using the Settings App
Devices and Printers
From Printers & scanners, you can add, delete, and manage the printers for the local computer. If given permissions, you can also add shared printers.
Opening the Print Management App (Windows Pro & Enterprise):
You can open Print Management using any of these methods:
Start Menu:
Right-click the Start button
Go to Windows Administrative Tools > Print Management
Search:
In the taskbar search box, type
PrintmanagementClick on the Print Management app
Command Line:
Open PowerShell or Command Prompt
Type
printmanagement.mscand press Enter
Add-Printer
Adds a printer to the specified computer.
Get-PrinterDriver
Retrieves the list of printer drivers installed on the specified computer.
Add-PrinterPort
Installs a printer port on the specified computer.
Get-PrintConfiguration
Gets the configuration information of a printer.
Get-PrintJob
Retrieves a list of print jobs in the specified printer.
Get-Printer
Retrieves a list of printers installed on a computer.
Get-PrinterDriver
Retrieves the list of printer drivers installed on the specified computer.
Get-PrinterPort
Retrieves a list of printer ports installed on the specified computer.
Get-PrinterProperty
Retrieves printer properties for the specified printer.
Read-PrinterNfcTag
Reads information about printers from an NFC tag.
Remove-PrintJob
Removes a print job on the specified printer.
Remove-Printer
Removes a printer from the specified computer.
Remove-PrinterDriver
Deletes printer driver from the specified computer.
Remove-PrinterPort
Removes the specified printer port from the specified computer.
Rename-Printer
Renames the specified printer.
Restart-PrintJob
Restarts a print job on the specified printer.
Resume-PrintJob
Resumes a suspended print job.
Set-PrintConfiguration
Sets the configuration information for the specified printer.
Set-Printer
Updates the configuration of an existing printer.
Set-PrinterProperty
Modifies the printer properties for the specified printer.
Suspend-PrintJob
Suspends a print job on the specified printer.
Write-PrinterNfcTag
Writes printer connection data to an NFC tag