Microscopy
1/21
There's no tags or description
Looks like no tags are added yet.
Name | Mastery | Learn | Test | Matching | Spaced |
|---|
No study sessions yet.
22 Terms
What is magnification?
How much bigger a sample appears to be under the microscope than it is in real life.
What is resolution?
The ability to distinguish between two separate points that are close together, allowing finer detail to be observed in a specimen
How do light microscopes work? What do they let us see?
Passes a beam of light through a specimen which travels through the eyepiece lens allowing the specimen to be observed & magnified.
Let us see cells and large subcellular structures like nuclei and vacuoles, often with help from stains.
What are the advantages of light microscopes?
Inexpensive
Easy to use
Portable
You can observe both dead & living specimens
What are the disadvantages of light microscopes?
Limited resolution & magnification
How do electron microscopes work?
Use electron beams instead of light to form an image. Providing higher resolution & magnification due to the smaller wavelength of electron beams.
What can electron microscopes let us see?
Much smaller things in more detail - like the internal structure of mitochondria & chloroplasts, or even smaller things like ribosomes & plasmids.
What are the advantages of electron microscopes?
Greater magnification & resolution.
Why do electron microscopes have a greater magnification & resolution?
They use a beam of electrons which has a shorter wavelength than photons of light.
How have electron microscopes enabled scientists to develop their understanding of cells?
They allow small sub-cellular structures (e.g. mitochondria & ribosomes) to be observed in detail
Enable scientists to develop more accurate explanations about how cell structure relates to function
What are the disadvantages of electron microscopes?
Very expensive
Large so less portable
Require training to use
Only dead specimens can be observed
What equation is used to calculate magnification?
Magnification = Image size / Real size
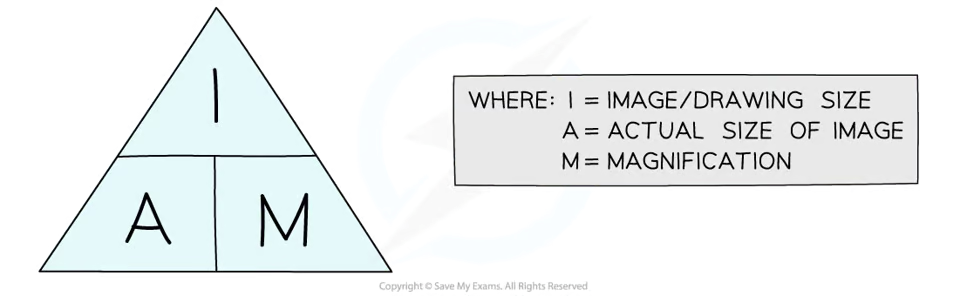
What should you do if image size & real size don’t have the same units?
Convert them first.
A specimen is 50μm wide. Calculate the width of the image of the specimen under a magnification of x100. Give your answer in mm.
Image size = Magnfication x Real size
Image size = 100 × 50 = 5000μm = 5mm
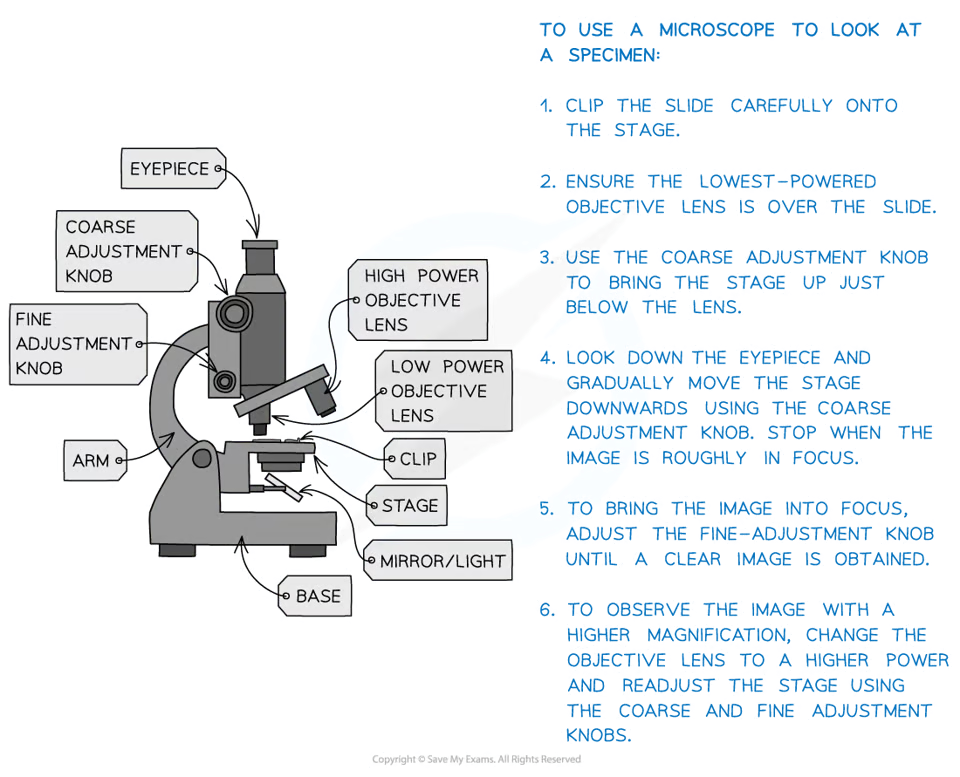
What are the parts of a light microscope?
Eyepiece
Coarse adjustment knob
Fine adjustment knob
Light
Stage
High & low power objective lenses
REQUIRED PRACTICAL: How do you prepare a microscope slide?
Add a drop of water to middle of a clean slide
Cut up an onion & separate it out into layers, use tweezers to peel off some epidermal tissue from the bottom of one of the layers
Using tweezers, place the epidermal tissue into the water on the slide
Add a drop of iodine solution - this is a stain, which will highlight objects in a cell by adding colour
Place a cover slip (a square of thin transparent plastic/glass) on top. To do this stand the cover slip upright on the slide, next to the water droplet, then carefully tilt and lower it so it covers the specimen. Don’t get air bubbles under there - they will obstruct your view of the specimen
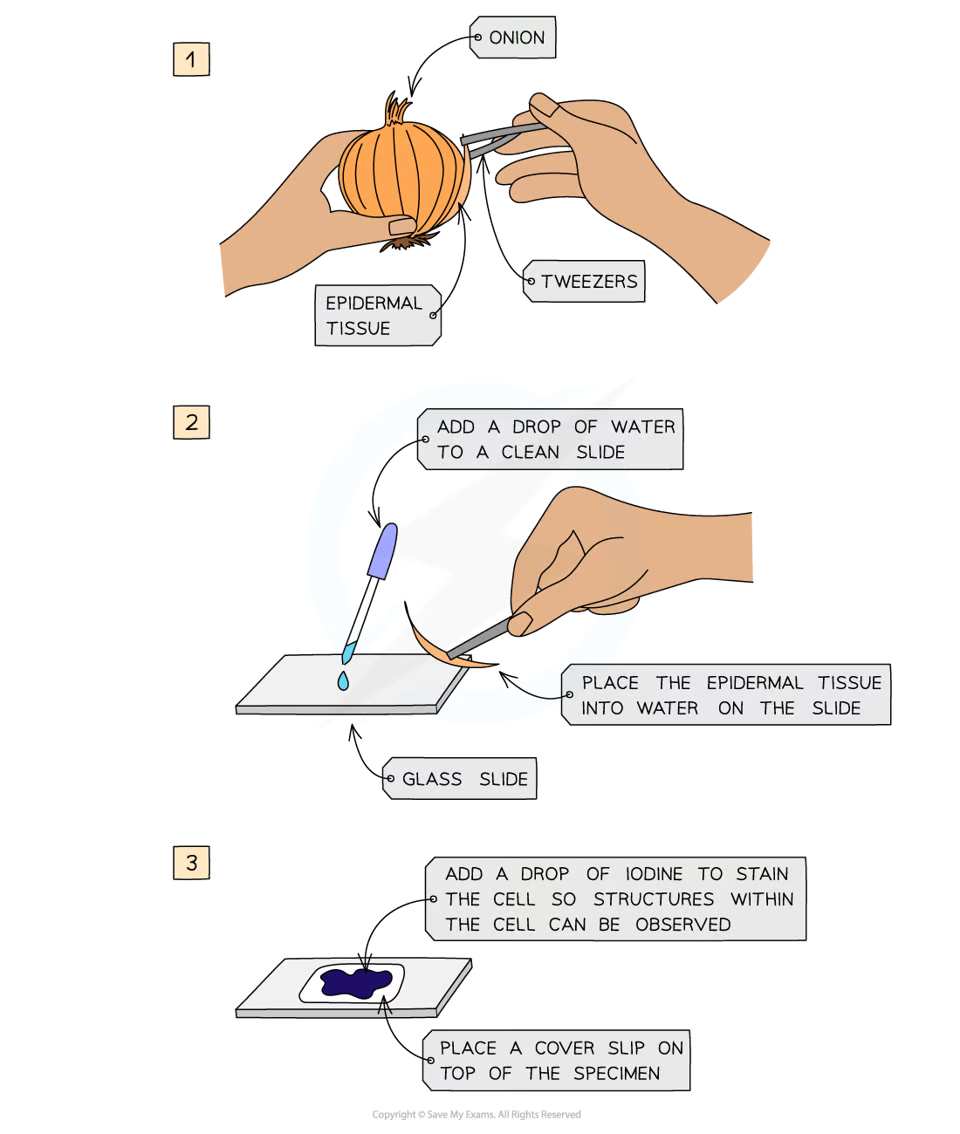
Why are stains like Iodine solution used?
They highlight structures by adding colour.
REQUIRED PRACTICAL: Use a light microscope to look at a slide
Clip the slide carefully onto the stage
Select the lowest-powered objective lens to be over the slide
Use the coarse adjustment knob to bring the stage up just below the objective lens
Look down the eyepiece, use the coarse adjustment knob to move the stage downwards until the image is roughly in focus
Adjust the focus with the fine adjustment knob until you get a clear image of what’s on the slide
To observe the image with a higher magnification, change the objective lens to a higher power and readjust the stage to refocus using the coarse & fine adjustment knobs
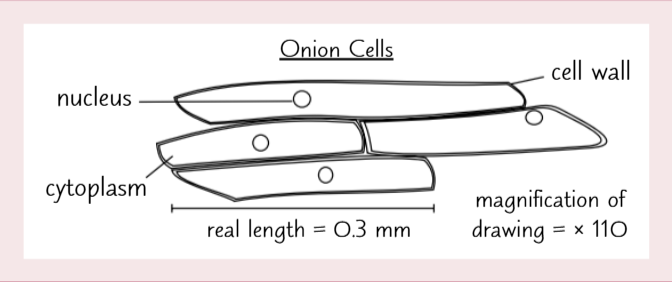
Rules for a biological drawing:
Always draw what you see with a sharp pencil
Make sure the drawing takes up at least half the space available
Draw with clear, unbroken lines
Drawing should not include colouring or shading
Structures should be drawn in proportion
Include a title of what you were drawing and write down the magnification used
Label important features of the drawing (e.g. nucleus, chloroplasts) using straight, uncrossed lines
Micrometres to millimetres:
divide by 1000
Why would you start using a microscope with the lowest objective lens?
Because it gives a wider field of view, making it easier to locate the specimen. You can then switch to a higher magnification for more detail once the specimen is found & focused.
Why should you be careful when using the highest objective lens?
Because it is very close to the slide, and could damage the slide or lens if the stage is moved to far up.