13 - Class III Preparations and Restorations
1/13
There's no tags or description
Looks like no tags are added yet.
Name | Mastery | Learn | Test | Matching | Spaced | Call with Kai |
|---|
No study sessions yet.
14 Terms
class III lingual outline form
located in middle third of proximal surface
lingual view → shows incisal and gingival walls perpendicular to long axis of tooth
axial wall → extended to width of marginal ridge, not extending into fossa unless decay is present
internal line angles are rounded
facial wall → parallel to long axis of tooth, located just beyond midline of tooth
extends to include decay
breaks contact to reach decay
gingival / incisal walls → parallel, perpendicular to long axis of tooth for retention
class III lingual approach
aim for lingual approach
facial enamel conserved for esthetics
color matching less critical
discoloration or deterioration of restoration is less visible
UNLESS
caries facially positioned → access from facial to conserve tooth structure
teeth irregularly aligned → access from facial to conserve tooth structure
extensive caries extending onto tooth structure
faulty restoration on facial needs to be replaced
class III lingual preparation guidelines
outline form for class III is in middle third of proximal surface
start in middle of contact point and move gingivally
incisal-gingivally → ≤3.0mm
mesiodistally → not in lingual fossa, ~1.5mm
the wall opposite of access, if broken, may extend <1.0mm beyond. contact area
gingival and facial contacts are broken, incisal contact is not broken
class III lingual preparation steps
start on lingual surface with #2 round carbide bur in center of outline form and removing enough tooth structure to place #330 bur into preparation
take #330 bur to enlarge preparation to extent of outline form
hold bur perpendicular to long axis of tooth to create incisal and gingival walls in correct orientation
end of bur creates facial wall, which must be parallel to long axis of tooth and just beyond midline
gingival and facial margins just break contact with adjacent tooth
use hand instruments to smooth incisal, axial, gingival, and facial walls
leave axio-gingival and axio-incisal internal line angles rounded
class III restoration
place a clear mylar matrix and wedge
matrix should be between wedge and preparation
wedge must be tight to establish strong interproximal contact with restoration
etch and bond as normal
while holding matrix band against facial surface of tooth, place and adapt a small amount of composite into retentive areas of preparation
light cure for 20 seconds
continue to add composite in layers no greater than 2mm thick, and cure each layer from lingual and facial direction for 20 seconds
while curing, hold fingers on both facial and lingual to allow for proper contour
recure once fingers are moved
after placing the final layer, remove excess around margins before curing
gently curl matrix around embrasures on both facial and lingual surfaces while curing final addition of composite
remove matrix and wedge, and check for excess material in embrasure with an explorer
if there is excess, remove before polishing
contact should be checked with floss
class III polishing
use composite finishing kit to contour and finish restoration
egg/football carbide bur or diamond to contour and remove any excess material in lingual fossa area
maintain convex shape and width of marginal ridge
use flame-shaped rubber abrasive instrument to polish lingual fossa and marginal ridge area
maintain convex shape and width of marginal ridge
use finishing strips to contour and remove any excess material interproximally
coarse then fine abrasive sides
create S-shape
polish lingual surface with polishing paste on a felt tip
when to do facial approach
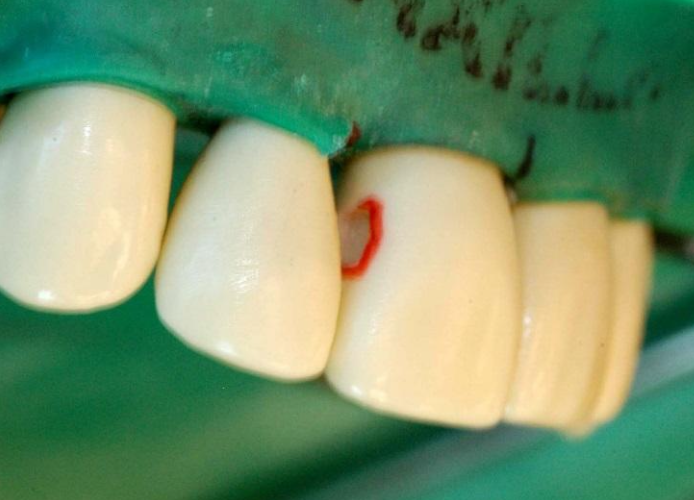
when decay (dark grey or brown) can be seen just beneath facial surface
cavitation from decay can be seen breaking through enamel in area of facial embrasure
class III facial esthetics
only remove what needs to be removed
stay where the decay is → don’t make a box/rectangle like in lingual approach
expand only what is needed → maintain convenience and access form
no unsupported enamel
class III facial preparation steps
start preparation with #1 or #2 round carbide bur on proximal surface
enlarge outline form to obtain clear visualization of internal aspects of preparation
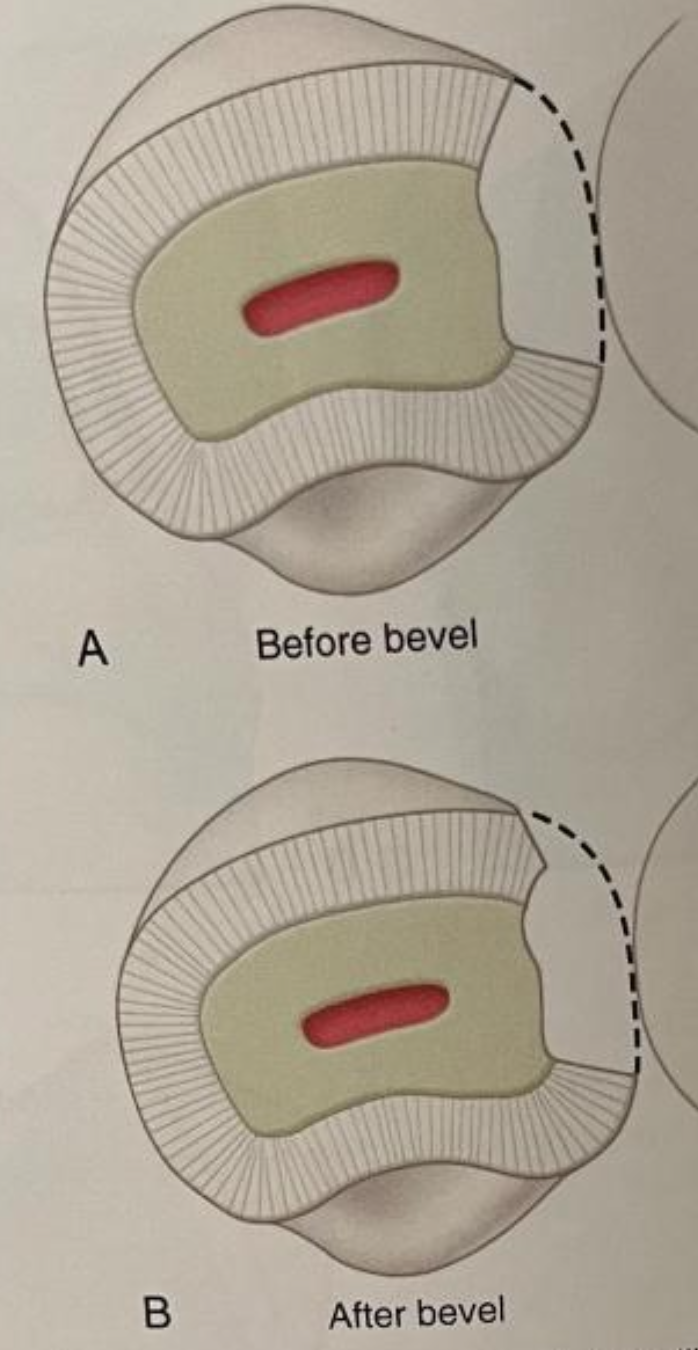
facial wall is slightly crescent-shaped when viewed from facial aspect
extend facial margin until all decay is removed, then bevel facial aspect of the preparation
only beveled if it must be extended to facial embrasure due to decay
1mm wide bevel placed on facial margin
bevel
cut an angle that is not a right angle, having a slant
bevel facial aspect of prep if decay is on facial or extends facially enough that it can be seen from the facial
increases surface area for bonding at margin, increasing marginal seal
improves esthetics by gradually transitioning from tooth to restoration
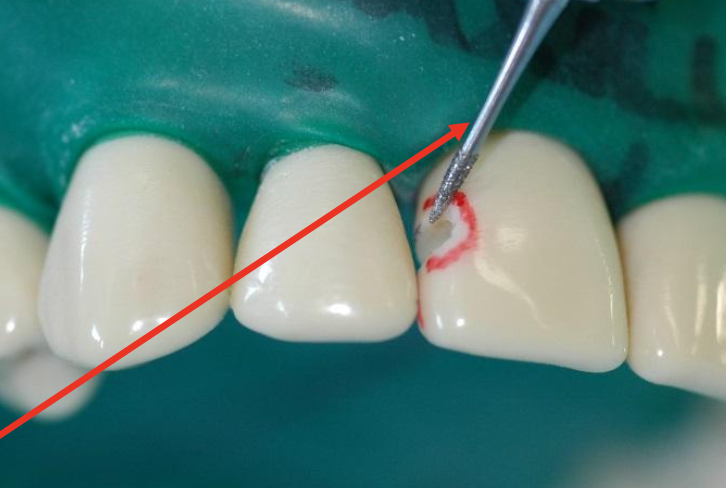
how to create bevel
use flame-shaped diamond to create bevel
avoid touching adjacent tooth with diamond by using shorter flame bur
facial + lingual approach
combination of facial and lingual approach for removal of extensive decay
outline form → extends from lingual, through to the facial surface of the tooth
lingual cavosurface margin has rectangular shape
lingual portion has parallel gingival and incisal walls
facial portion has crescent-shaped cavosurface margin
convenience form → allows for complete removal of decay from facial to lingual
1mm bevel on facial cavosurface margin
facial + lingual restoration
properly place mylar strip and wedge
add and cure composite in layers no greater than 2mm thick
make sure that facial bevel is covered completely
remove excess before curing composite, don’t leave excess interproximally
check for overhangs after curing with small end of explorer
facial contour must be convex like natural tooth
lingual marginal ridge and contact must be restored
polish tooth
choosing color
color is chosen before rubber dam is placed
do test amount on facial of tooth without etch and bond
write down shade selection, then place rubber dam