NUR 317 Exam 2 - Supporting Ventilation
1/83
There's no tags or description
Looks like no tags are added yet.
Name | Mastery | Learn | Test | Matching | Spaced |
|---|
No study sessions yet.
84 Terms
Respiratory physiotherapy
Using techniques to improve lung function, enhance breathing mechanics, and optimize respiratory health
Some common techniques and interventions used in respiratory physiotherapy include:
Breathing exercises – diaphragmatic breathing, pursed lip breathing
Airway clearance techniques – chest percussion, vibration, postural drainage
Breathing aids and devices – incentive spirometer (IS)
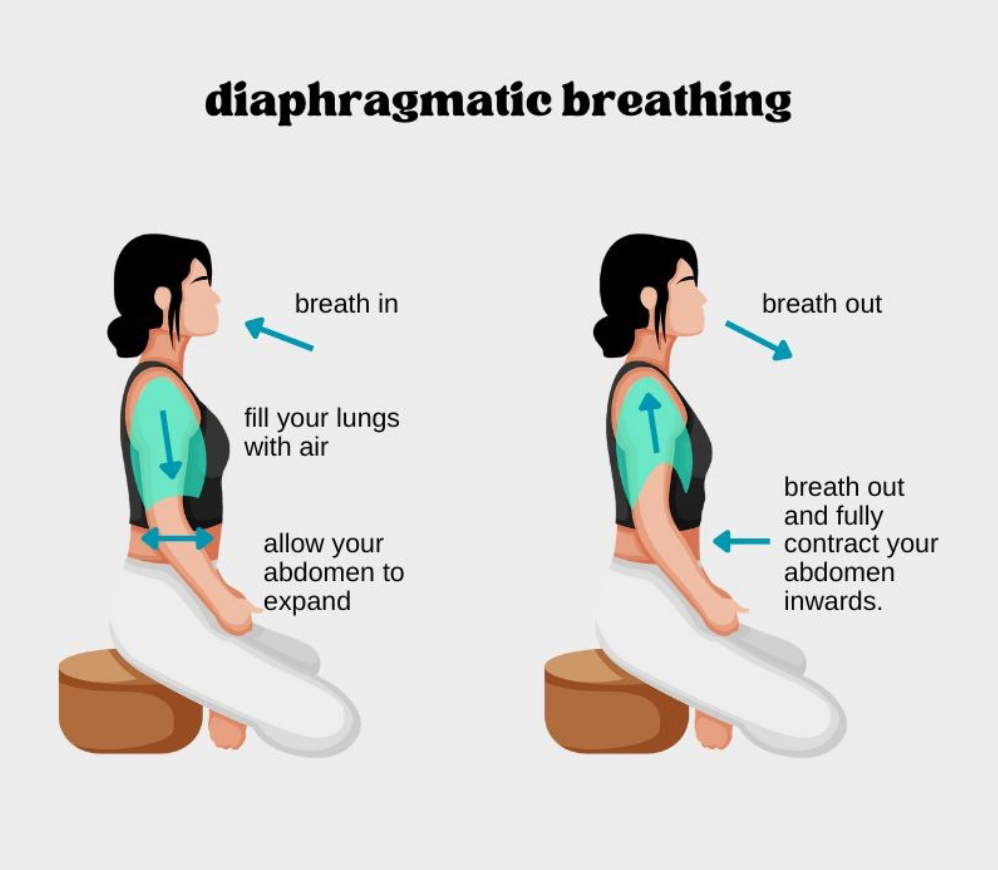
Diaphragmatic breathing
AKA abdominal breathing
Focuses on using the diaphragm to breathe
Improving lung function
Obstructive and restrictive disorders
Prevent post-op complications
Atelectasis
Pneumonia
Hypoxemia
Reducing anxiety and stress
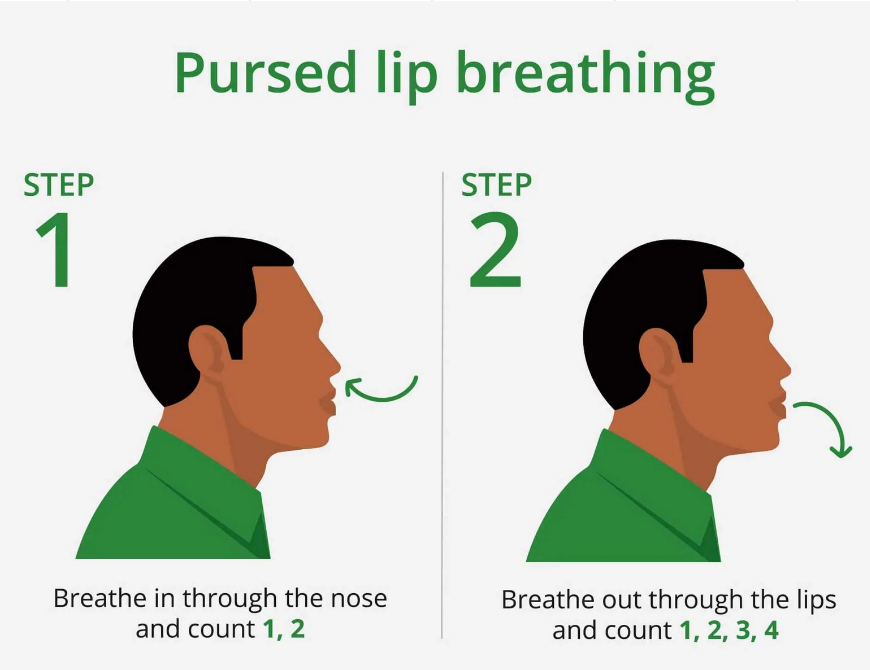
Pursed lip breathing
Prolongs expiration to prevent bronchiolar collapse and air trapping
Increases PEEP (positive end-expiratory pressure)
Obstructive and restrictive disorders
Supports post-op care and anxiety-related dyspnea
Pursed lip breathing method
Inhale slowly and deeply through the nose
Exhale slowly through pursed lips as if blowing out a candle
Be sure to relax facial muscles
Exhale should be 2-3 times longer than inhalation
Airway clearance techniques
Huff coughing
Postural draining
Percussion or vibration
Airway clearance devices
Huff coughing
Forced expiratory using small coughs
Clears excess mucus and secretions from the airway
Useful in pt with excessive mucus production
COPD
Bronchiectasis
Cystic fibrosis
Chronic bronchitis
Prevents atelectasis/pneumonia
Safer than forceful coughing in pts with abdominal incisions
Huff coughing method
Position the patient and ensure they are breathing deeply from the diaphragm
After holding the breath for a few seconds, the patient exhales with several small coughs, then rests for several breaths and repeats the cycle
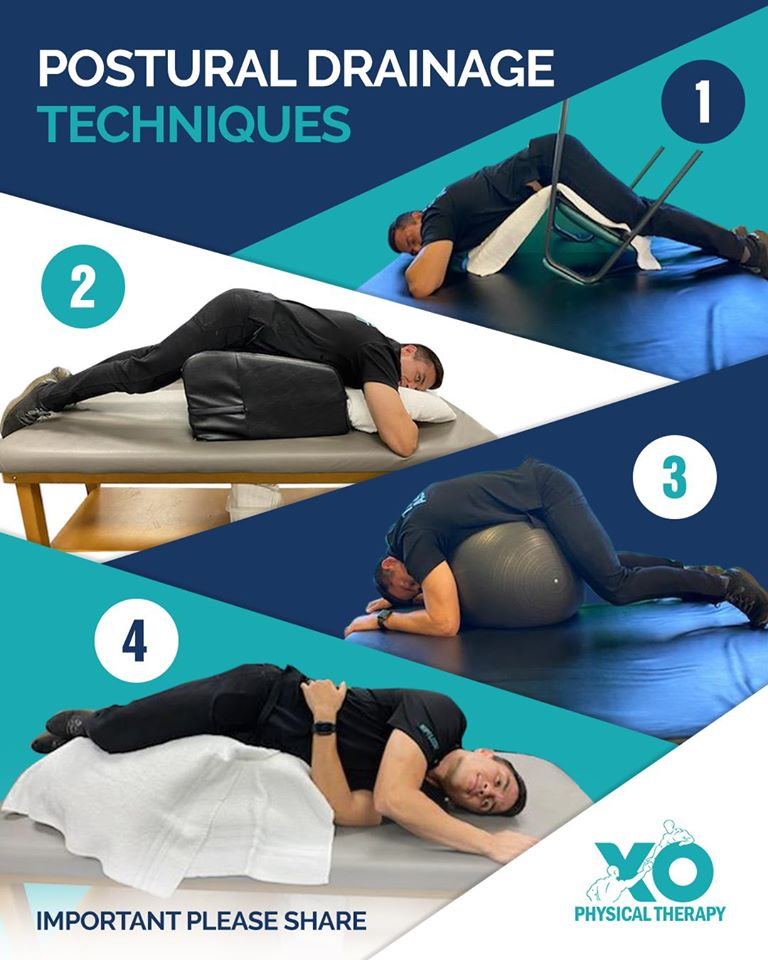
Postural draining
Uses gravity to drain secretions
5 min
Percussion or vibration
Breaks up thick fluids and promotes movement of secretions into the larger airways
Airway clearance devices
Combines high-frequency oscillations and PEEP to split the airway
Room air oxygen percentage
21% oxygen
Supplemental oxygen
Increases FiO₂ — ranges from 24% to 100% depending on device & flow rate
Oxygen therapy clinical indications
Used when room air is insufficient to maintain oxygen saturation (hypoxemia, pneumonia, PE, shock)
Oxygen target goals (not COPD patients)
SpO₂ > 92%
PaO₂ 80–100 mmHg
Prolonged high FiO2 alert
↑ risk of oxygen toxicity (> 60% for > 24 hrs)
Oxygen “dose”
Delivered FiO₂, titrated to optimize oxygenation while minimizing toxicity
Oxygen therapy
Improves survival in COPD patients, decreases WOB
Used in management of:
Lower airway
Restrictive and obstructive disorders
Non-lung diseases heart failure or other cancers
With all devices monitor for pressure injuries on face, nose, ears, neck
Nasal cannula
Low oxygen flow
For regular hospital and home care
O2 flow: 1-6 L/min
FiO2: 24-44%
Simple face mask
Moderate oxygen flow
For regular hospital and home care
O2 flow: 6-12 L/min
FiO2: 35-50%
Reservoir mask
High oxygen flow
For hospital care
O2 flow: 10-15 L/min
FiO2: 60-90%
Nasal high flow
Very high oxygen flow
Used in situations of respiratory failure
O2 flow: up to 60 L/min
FiO2: up to 60%
CPAP
Specialized form of pressure positive ventilation
Can be used for patients with apnea or to maintain an open airway
O2 flow: 15 L/min
FiO2: up to 100%
Ventilator
Invasive form of pressure positive ventilation
Required when a patient’s lungs are severely impaired
O2 flow: PRN for life support
FiO2: up to 100%
Venturi mask
Mask with a multi-flow adapter with different colored jet ports
Each adapter corresponds to a specific O2 concentration when connected to oxygen
Allows for precise and controlled oxygen therapy
Adjustable by switching out the adapters
Venturi mask adapters
Blue = 24%
White = 28%
Orange = 31%
Yellow = 35%
Red = 40%
Green = 60%
Humidification
High flow oxygen irritates the mucosa and dries the secretions
Humidity with sterile distilled water can prevent these complications
Supplied by bubble humidifier
Oxygen therapy monitoring
SpO₂ (noninvasive, pulse oximetry → % of Hgb saturated with O₂)
PaO2- pressure of oxygen dissolved in the arterial blood
Normal range 80-100 mm Hg
Reflects oxygen transfer from lungs to the blood
Green zone = normal (80–100)
Yellow zone = mild hypoxemia (60–79)
Red zone = severe hypoxemia (<60)
O2 therapy complications
Combustion
No smoking or open flames while O₂ is in use
Oxygen toxicity
Prolonged high FiO₂ ( >24 hrs) → damages alveolar-capillary membrane → pulmonary edema
Clinical pearl: always use the lowest FiO₂ needed to keep SpO₂ > 92% and PaO₂ 80–100 mmHg
Loss of hypoxic respiratory drive (CO₂ narcosis)
Seen in some COPD patients who rely on low O₂ levels to stimulate breathing
Too much O₂ → removes hypoxic drive → ↓ respiratory drive → worsening hypoventilation & ↑ CO₂
Non-invasive support
CPAP
BiPAP
CPAP (continuous positive airway pressure)
One constant pressure is delivered during both inspiration and expiration (8-10 cmH2O)
The main clinical role is to splint the upper airway open, preventing collapse (e.g., in obstructive sleep apnea)
Because pressure is continuous, it helps improve oxygenation by increasing functional residual capacity (FRC) and preventing alveolar collapse — but it doesn’t actively help with ventilation (CO₂ removal)
Think of CPAP as a “pneumatic stent” that keeps the airway and alveoli open all the time

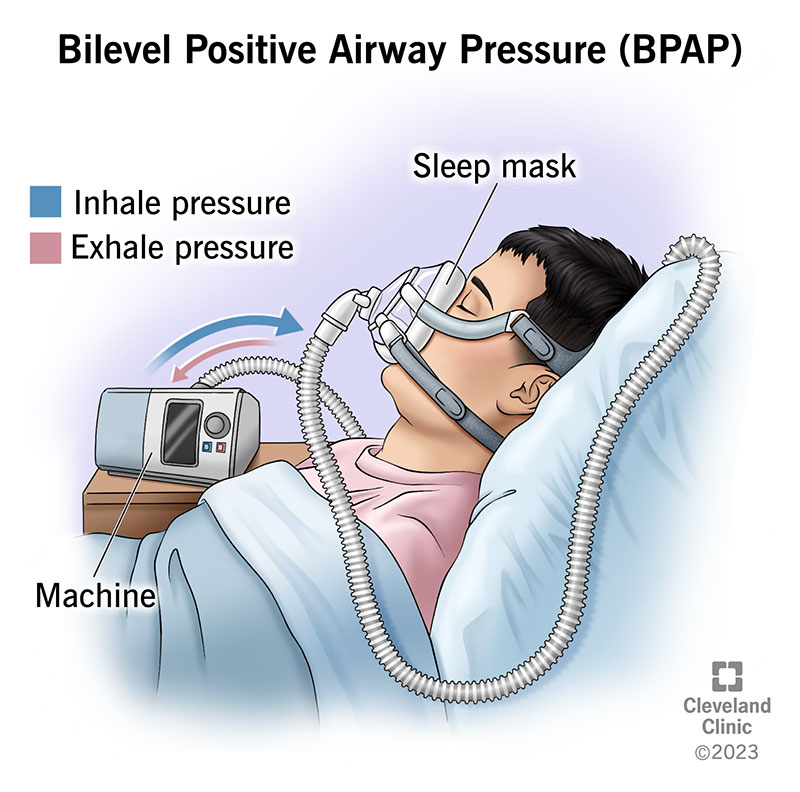
BiPAP (bilevel positive airway pressure)
Provides two different pressures:
IPAP (inspiratory positive airway pressure): higher pressure during inhalation → augments tidal volume and ventilation, helping blow off CO₂ (8–20 cm H₂O )
EPAP (expiratory positive airway pressure): lower pressure during exhalation → keeps alveoli open and improves oxygenation (4–10 cm H₂O)
Because it assists with both inhalation and exhalation, BiPAP supports both upper airway patency and ventilation of the lower airways/lungs
Useful in conditions like COPD exacerbations, hypercapnic respiratory failure, or acute pulmonary edema where patients need help with both
Complications of CPAP and BiPAP
Injury to facial tissue
Gastric distention
Aspiration pneumonia
Hypotension
Pneumothorax
CPAP and BiPAP should not be used in patients with:
Recent facial surgery
Excessive secretions
Inability to protect their airway
Severe facial burns
Facial or skull fractures
Invasive support
Nasopharyngeal airway
Oropharyngeal airway
Mechanical ventilation: endotracheal tube, proning, alarms, VAP
Tracheostomy
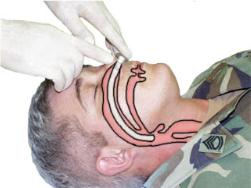
Nasopharyngeal airway
Airway adjunct inserted through the nose into the posterior pharynx
Maintains upper airway patency by bypassing obstruction from the tongue or secretions
Nasopharyngeal airway uses
Useful when: intubation is not required, or the mouth cannot be opened
Can be placed in conscious or unconscious patients (does not trigger gag reflex)
Often used for patients needing frequent suctioning
Can remain in place long-term (weeks to months) with proper care
Oropharyngeal airway
Temporary airway adjunct - minutes to an hour
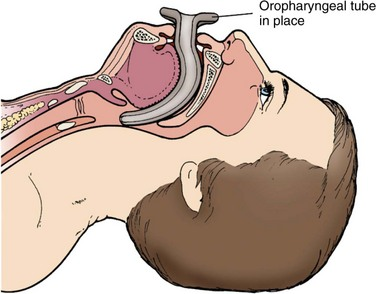
Oropharyngeal airway uses
Used to maintain or open the airway by stopping the tongue or secretions from covering the epiglottis
Only used in unconscious patients
Stimulates the gag reflex
Mechanical ventilation
A medical intervention that assists or replaces spontaneous breathing when patients cannot maintain adequate ventilation and oxygenation
Provides controlled or assisted breath, ensuring oxygen delivery to the lungs
Promotes effective CO2 elimination
Endotracheal tube (most common form)
Tracheostomy
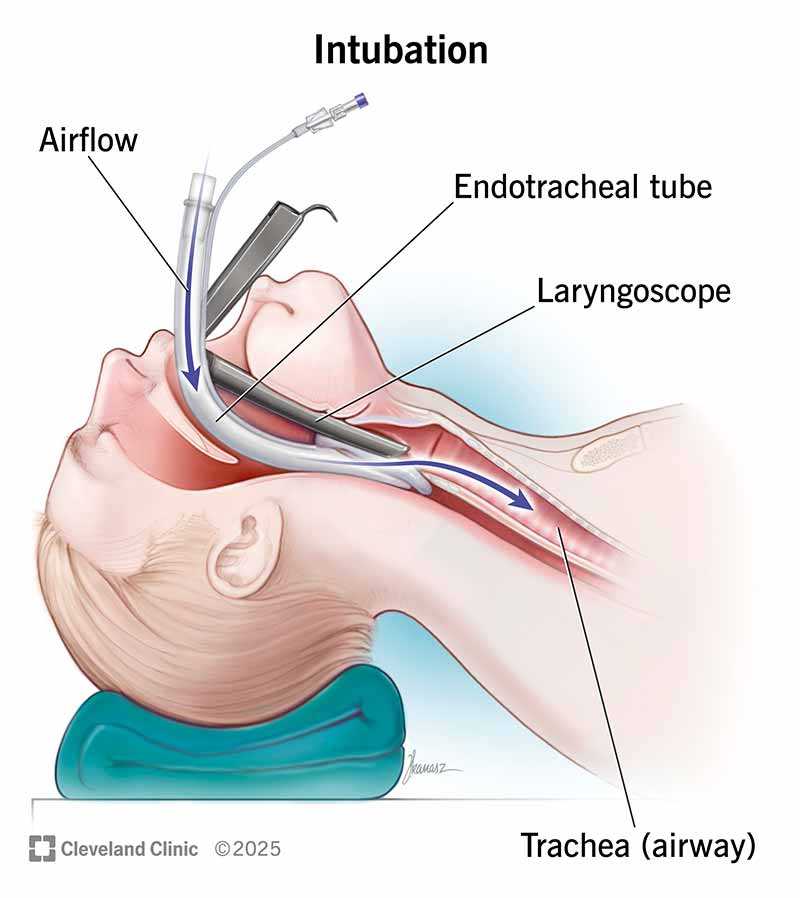
Endotracheal tube (ETT)
Tube inserted into the trachea
Inserted between the vocal cords into the trachea; cuff inflated below cords
Typically not used >14 days (consider tracheostomy if prolonged)
Indications:
Mechanical ventilation
Severe respiratory failure
Airway protection (e.g., ↓ LOC, aspiration risk)
Cardiac arrest
Post-op support (e.g., CABG)
Severe trauma (burns, facial trauma)
Neuromuscular disease (e.g., ALS)
Endotracheal tube and vented patients nursing considerations
Confirm and secure placement:
Colorimetric capnometer
Auscultation
Chest x-ray to confirm depth (2-3 cm above the carina)
Mark and document tube depth at lips/teeth (e.g 22-24 cm for adults)
Prevent accidental displacement
Secure with an ETT holder or tape
Monitor for tube displacement
Prevent pressure injuries
Move the ETT to the other side of the mouth q12 hrs to prevent device-related PI
Maintain airway patency
Suction as needed
Monitor for signs of mucous plugging (sudden respiratory distress, high airway pressure alarm)
Monitor cuff pressure
Cuff pressure 20-30 cm H2O to prevent:
Aspiration (if too low)
Tracheal injury/ischemia (if too high)
Check with manometer once a shift
Assess for complications
Airway trauma, ulcerations
Positive end-expiratory pressure (PEEP)
Ventilator setting
The positive pressure applied and measured in the alveoli at the end-expiration
It helps reduce FiO₂ needs and prevents alveoli collapse
Nurses must monitor oxygenation and watch for complications (e.g. ↓ cardiac output, barotrauma)
Low-pressure ventilator alarms
Ventilator tube disconnection
Airway cuff leak or displacement
Total or partial extubation
High-pressure ventilator alarms
Secretions
Kinked or compressed tubing
Bronchospasms
Coughing
Patient biting
Apnea ventilator alarms
Loss of airway
Over sedated
Respiratory arrest
Wrong vent setting
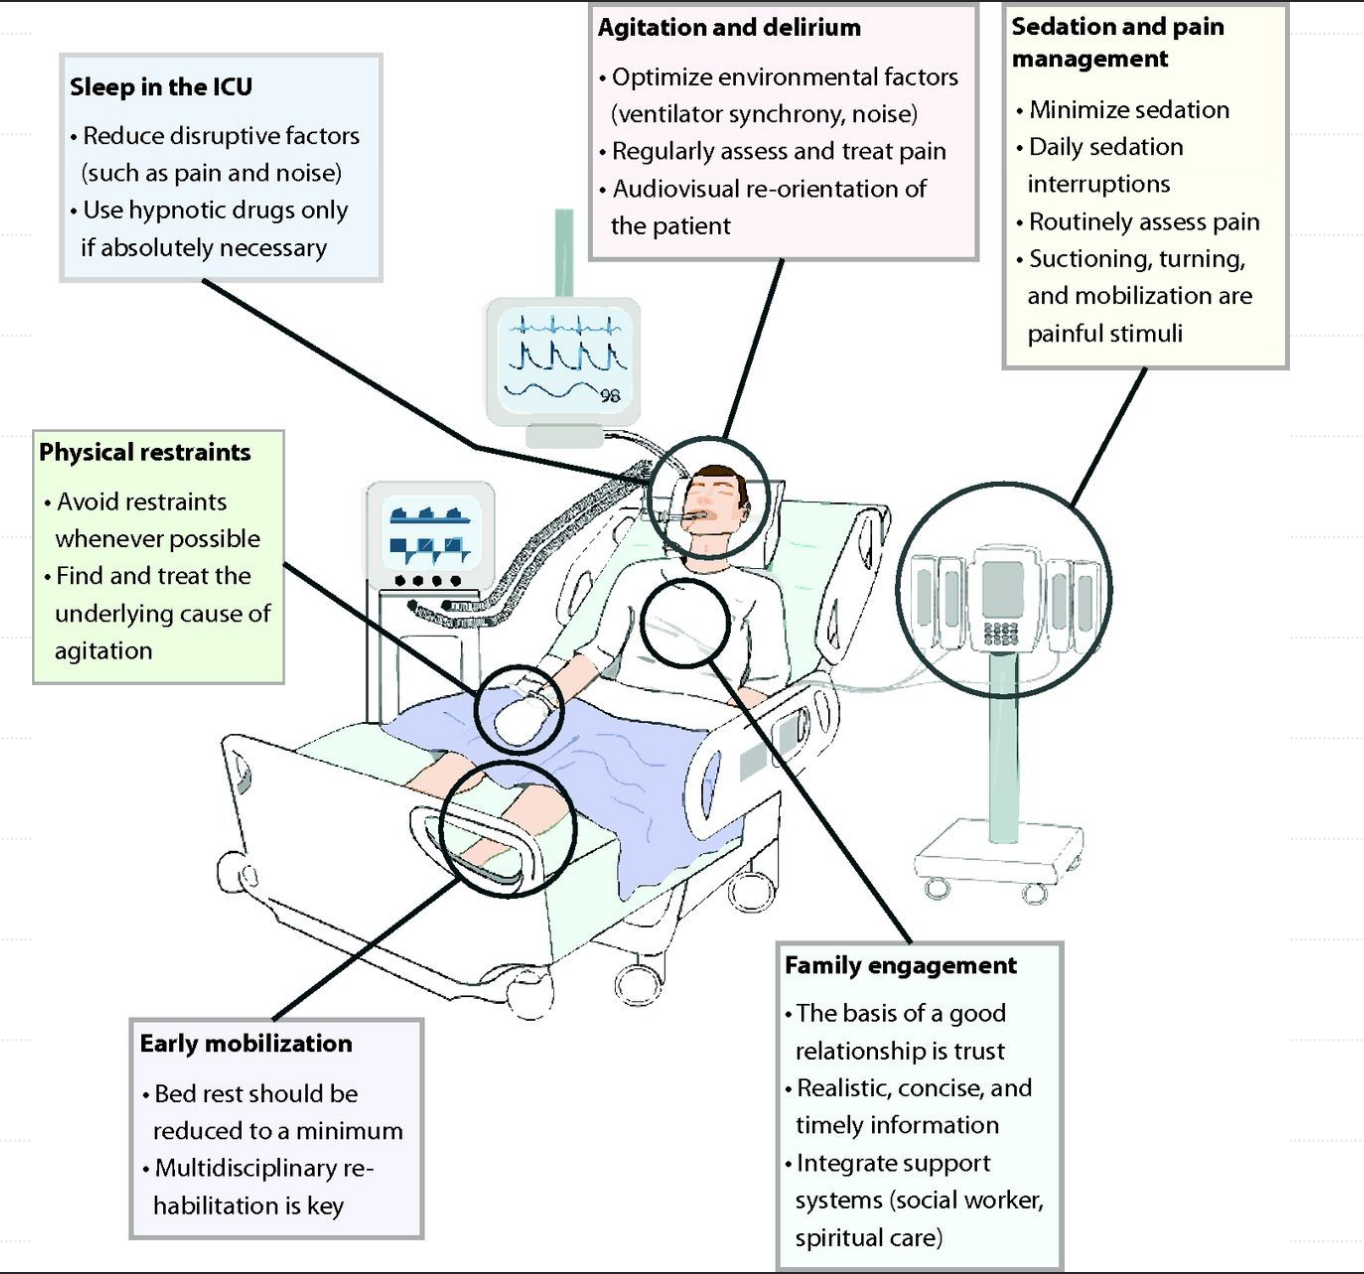
The Society of Critical Care Medicine’s ICU Liberation Bundle
Prone positioning
Positioning patient on stomach with face down
Improves lung recruitment
Gravity reverses effects of fluid in dependent parts of lungs
Heart rests on sternum, contributing to uniformity of pleural pressures
Nurse-intensive therapy (5 or more staff)
Requires increased sedation
Effective for ARDS and COVID patients
Monitor for pressure injuries
Ventilator associate pneumonia (VAP)
40% of MV patients develop ventilator-associated pneumonia
Clinical manifestations - PNA that develops ≥ 48 hours after endotracheal intubation and initiation of mechanical ventilation
Fever
High WBC count
Purulent odorous sputum
Crackles or wheezes
Pulmonary infiltrates
Organisms - bacteria are most common (viruses and fungi less common)
Pseudomonas aeruginosa: respiratory equipment, humidifiers, suction tubing
Klebsiella pneumonia & E. coli: part of normal gut flora, can colonize the oropharynx
Acinetobacter species: lives on the skin and hospital surfaces (bed rails, ventilators)
Staph aureus (including MRSA): found in nose, skin & oropharynx, can spread to respiratory equipment or airways
Ventilator associate pneumonia prevention
Hand hygiene
Early mobilization
Suctioning the subglottic aspiration port
Elevate HOB 30-45°
Oral care q 2-4 hrs
Chlorhexidine q 12 hrs – oral decontamination
Early weaning protocols
Daily sedation breaks
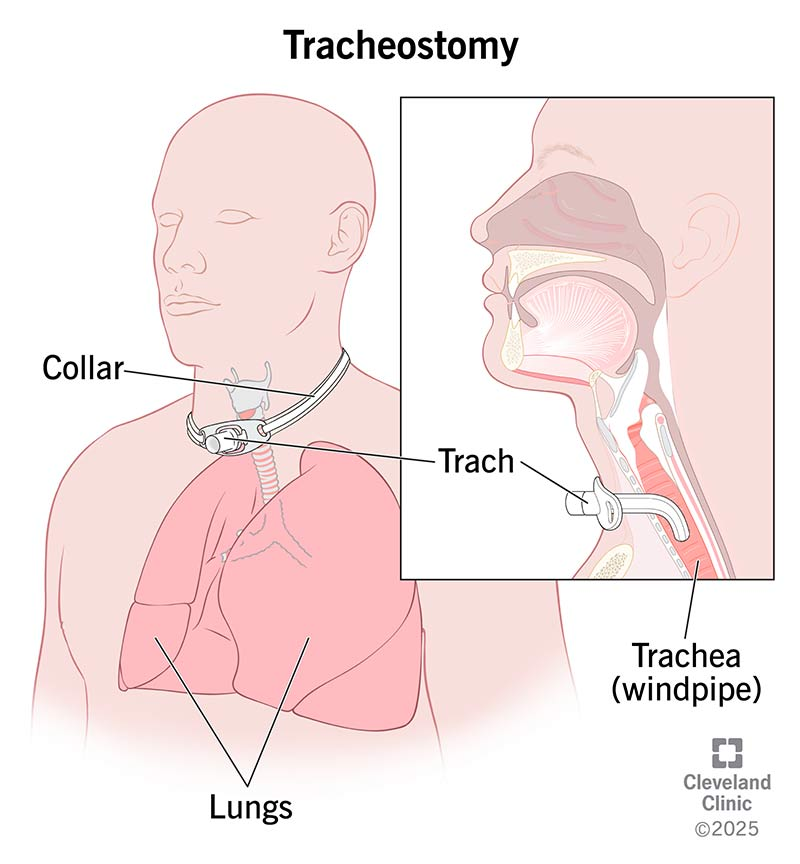
Tracheostomy
Placed into the trachea via a surgical incision
Used for long-term airway support
Permits long-term MV (over 10-14 days)
Facilitates weaning from MV
Used for urgent airway needs when oral or nasal intubation is not possible
Bypasses upper airway obstruction
Facilitates secretion removal
Advantages of tracheostomy over endotracheal tube
Cleaner; better oral and bronchial hygiene
Patient comfort increased
Less risk of damage to vocal cords
Tracheostomy post-op nursing management
Airway patency and ventilation
Monitor airway patency and cuff pressure (20 to 25 cm H2O)
Over-inflating the cuff can cause tracheal ischemia and necrosis
Assess respiratory status
Provide humidified O2 – thins secretions & prevents mucus plugs
Be prepared to suction as needed
Monitor for bleeding and obstruction
Infection prevention
Pain management
Stoma care
Communication
Tube security
Complications: monitor for signs of air leaking into surrounding tissue, pneumothorax
Tracheostomy nursing management
Prevent dislodgement - care w/ turning, repositioning
Accidental dislodgement
Assess the patient for signs of respiratory distress
Immediately call for help and activate response team
Maintain oxygenation with bag valve mask
Attempt to reinsert if appropriate
Monitor patient and prepare for reinsertion
Daily tracheostomy care - procedure for changing the inner cannula
Gather sterile supplies (cannula, gloves, saline, trach kit)
Wearing clean gloves, remove and inspect old inner cannula
Using sterile technique- insert new (or cleaned) inner cannula
Remove old gauze, perform hand hygiene
Clean stoma and under faceplate with saline
Replace trach dressing
Change trach ties if needed
Types of suctioning
Open suction technique (sterile procedure)
Closed-suction technique aka. in-line suction (clean procedure)
Reduces risk of infection and atelectasis
Maintains oxygenation and ventilation
Decreases exposure to secretions
More comfortable and faster
With both techniques - only suction as needed
Open vs closed suction technique
Open - requires disconnecting a mechanically ventilated patient from their ventilator (sterile)
Closed - uses an inline catheter that keeps the patient connected, thus maintaining ventilation and positive end-expiratory pressure (clean)
Suctioning preparation
Gather sterile suction kit, sterile saline, and PPE
Explain procedure to patient, provide reassurance
Position patient in semi-Fowler’s if tolerated
Suctioning hand hygiene and PPE
Wash hands, apply mask/eye protection
Don sterile gloves, maintain sterile field
Suctioning preoxygenation
Administer 100% O₂ via trach collar or manual resuscitation bag for 1–2 minutes to reduce risk of hypoxemia
Suctioning catheter insertion
Connect catheter to suction tubing
Insert catheter gently into tracheostomy without suction applied
Suctioning guidelines
Apply suction intermittently by occluding the port and withdrawing catheter
Limit suctioning to 10–15 seconds per pass
Suctioning recovery
Provide supplemental O₂ and allow patient to rest 2–3 minutes between passes
Repeat as needed until secretions are cleared
Suctioning post-procedure
Reassess SpO₂, heart rate, lung sounds, and overall respiratory status
Dispose of equipment, remove gloves, wash hands
Document procedure
Potential complications of suctioning
Hypoxemia, bronchospasm
Increased ICP, dysrhythmias
Bradycardia, hypotension
Mucosal trauma, bleeding, pain, infection
Planned decannulation
A patient progresses from ventilator → trach collar → cuff deflation → speaking valve/capping → decannulation
Indications for decannulation:
Pt can breathe effectively through their upper airway
Pt has a strong cough to clear secretions
Decannulation steps
Preoxygenate the patient before tube removal
Deflate the cuff of the tracheostomy tube
Remove the trach tube gently and quickly
Apply a sterile occlusive dressing over the stoma
Apply O2 via nasal cannula
Monitor respiratory status closely
Stoma care
Keep stoma covered with an occlusive dressing
Change dressing PRN keep the site dry and promote healing
Clean site w/ sterile NS
Monitor for signs of infection
Stoma should close within hours to days
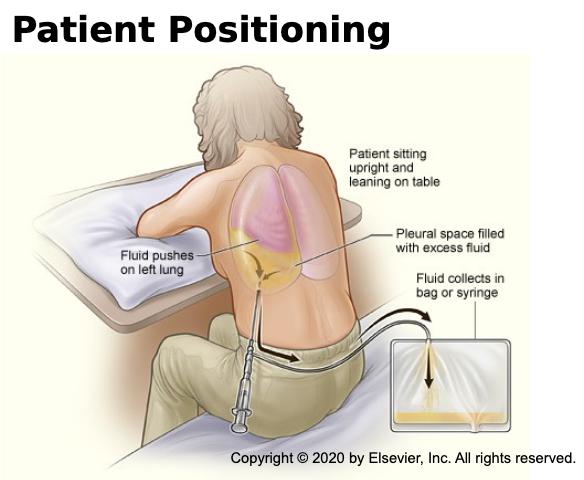
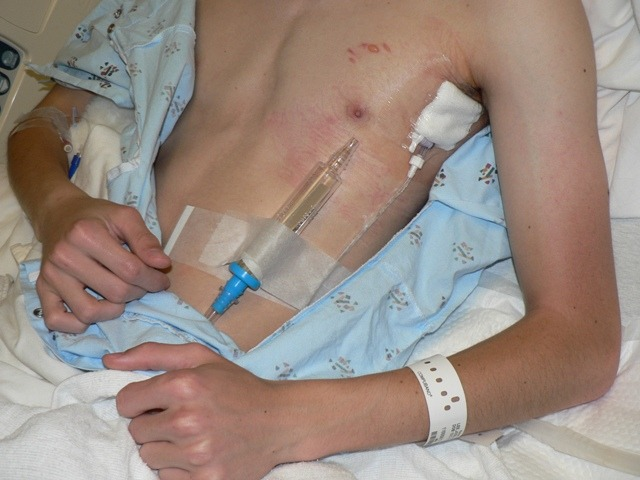
Thoracentesis
A less invasive way to remove pleural fluid
Used to remove small to moderate amounts of fluid from pleural space that cause breathing difficulties, provides immediate relief of symptoms and aids in diagnosis
Single one-time procedure
Diagnostic - analysis of fluid guide to treatment
Therapeutic - temporarily removes fluid and improves lung function (cirrhosis, cancer, heart failure)
Thoracentesis complications
Infection
Pneumothorax
Hemorrhage
Hypotension
Thoracentesis procedure
Preparation
Position: sitting upright (leaning forward)
Cleanse and sterilize insertion site
Administer local anesthesia
Insertion
Needle/catheter inserted into pleural space between ribs (lower chest)
Ultrasound often used for guidance
Fluid removal
Withdraw fluid/air through needle or catheter
Volume removed depends on patient condition
Post-procedure
Remove needle/catheter; apply dressing
Chest X-ray to confirm lung re-expansion and rule out complications
Chest tubes
Placed in the pleural space to re-establish negative pressure, drain pleural fluid, allow for lung expansion
Chest tube sizes range from 12F to 40F
Large sizes used to drain blood (40F)
Medium sizes used to drain fluid or pus (24F)
Small sizes used to drain air (12F)
Inseration of tube toracostomy (chest tube)
Patient positioning
Arm raised above the head on the affected side
Elevate HOB 45º when possible - this lowers the diaphragm and reduces risk for injury
A small incision (1-2 cm) between the ribs into the pleural space
Post procedure
Provider will suture in place and close incision
Connect to pleura drainage system
Cover wound with petroleum occlusive dressing
Obtain x-ray confirmation
Monitor patient and manage pain
Chest tube nursing management
Assess vital signs, lung sounds, pain, drainage amount, site infection, and SQ emphysema (cracking or popping sensation)
Encourage deep breathing, IS, and shoulder ROM exercises
Chest drainage – keep below chest, avoid overturning, measure output, replace unit when full
If unit breaks, insert distal end of tube in 2cm sterile water (this creates a water seal)
Never milking or stripping chest tubes of clots
After removal - apply an occlusive petroleum gauze dressing; CXR; monitor for respiratory distress
Chest tube unplanned dislodgement
Stay calm and immediately cover the open insertion site with a gloved hand
Call for assistance and ask a colleague to immediately notify the provider and obtain petroleum gauze, dry gauze, and tape to cover the site
Monitor for signs of respiratory distress
If the patient develops respiratory distress or sudden change in vital signs, call the rapid response team
Tape the occlusive dressing on 3 sides, allowing air to escape on the fourth side to reduce the risk of tension pneumothorax
Prepare for possible needle decompression
Prepare for reinsertion of a chest tube
Pleural drainage systems
Use a catheter inserted into the pleural space to remove fluid or air, which helps the lungs expand and alleviates symptoms like shortness of breath
Represents thoraic pressure
Bubbles will appear if there is an air leak or air is being pullled from the patient

Pleural drainage system compartments
Collection chamber- air or fluid from pleural space; fluid stays in first chamber, and the air is expelled into second
Water seal chamber - contains 2 cm of water and acts as a 1-way valve; incoming air enters and bubbles up; the water prevents backflow of air into the patient
Suction control chamber - applies dry or wet suction to the drainage system
Wet suction bubbling
Brisk bubbling of air occurs in the 2nd chamber when a pneumothorax is first evacuated
Intermittent bubbling occurs during exhalation, coughing, or sneezing until the air has been removed from the pleural space
Bubbling should cease once pneumothorax is resolved
Continuous bubbling indicates an air leak
Assess the patient for respiratory distress – could indicate dislodgement or worsening of pneumothorax
Loose connections & malfunctioning chest tube
Wet suction tidaling
Normal rise and fall of fluid levels in the water seal chamber with respirations
Indicated normal lung expansion and contraction
If tidaling stops, assess the chest tube may be occluded
Pleural drainage system key points
Keep the drainage system below the level of the patient’s chest
No dependent loops in the tubing
Never allow the drainage system to be knocked over - replace if this happens
Never clamp a chest tube without a provider order
A sudden cessation of drainage with no fluctuation in the water seal chamber suggests an obstruction → air/fluid buildup → cause tension pneumothorax
Replace the collection chamber when full
Flutter valve chest drainage
Rigid plastic tube, one-way rubber valve inside
Small to moderate pneumothorax
Inlet nozzle allows air to pass into valve through chest tube
Outlet nozzle air passes into collection device during expiration
Increased mobility
Can go home with flutter valve
Types of chest surgery
Thoracotomy
VATS (Video assisted toracoscopic surgery)
Thoracotomy
A thoracotomy is a surgical procedure that involves making an incision between the ribs to access the chest
The most common reason for a thoracotomy is to treat lung cancer
VATS
Video-assisted thoracoscopic surgery (VATS) is a minimally invasive procedure that allows doctors to perform surgery on the lungs and other structures in the chest cavity