OSCE
1/37
Earn XP
Description and Tags
Name | Mastery | Learn | Test | Matching | Spaced |
|---|
No study sessions yet.
38 Terms

Blood smear
Materials:
blood
microscope slides
capillary tubes
Step 1
collect the blood in the capillary tube
step 2
tap the capillary tube near to the bottom of the mirscope slide near the frosted edge. Note the frosted glass position. you dont need a lot of blood on the smear, 1-2 drops is sufficient
step 3
take a second slide and hold it at a 30-45 degree angle against the first slide
step 4
drawer the slide back until it meets the drop of blood. WAIT until the blood spreads width ways across the slide
step 5
once the blood has spread across the slide, push the slide forwards to make your blood smear
A) feathered edge
B) monolayer
C) body of the blood smear
what parts of the blood film are dianostically useful?
the feathered edge and monolayer


Packed vell volume and total protein (PCV and TP)
1. wearing gloves, gently invert your blood sample int eh haprin or EDTA tube to mix the sample.
2. open the lid and tilt the bottle to the side
3. insert the microhaematocrit tube into the blood and allow the blood to track up the tube
4. wait unti lthe tube is ¾ full and then place your finger over the top of the tube
5. with your finger still placed over the top of the tube press the bottom of the tube into the pasticine/wax tray to create a plug at the bottom of the microhaematocrit tube
place the capillary tube in the microcentrifuge and make sure its balanced. place the clay part on the outside
remember to always balance out the centrifuge (do this by preparing two samples and putting them at opposite sides of teh microcentrifuge)
usually setting is 10,000 rpm for 5 minutes

Reading the PCV
1. using the microhaematocrit reader place the tube where the top of the plasticine is level with the bottom line
2. adjust the tube so that the top is level with the plasma fraction of the tube
3. read the PCV reading at the top of the packed red cell level
4. this example is 38%

What is the overal range of PCV
35-45%
what is the general range for TP
6.5-8 gm/dl
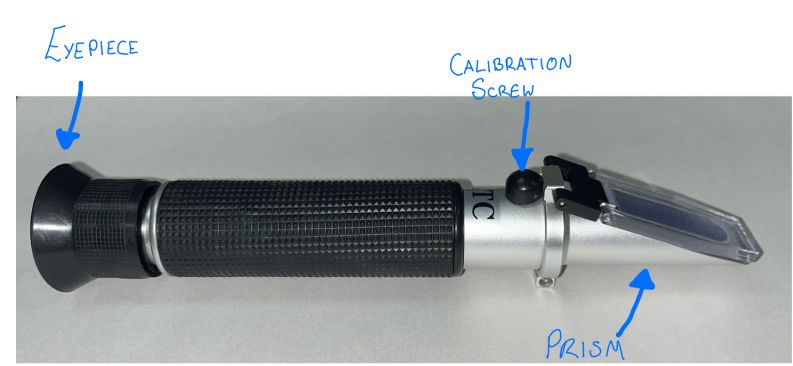
Read the serum specific graity aka the total protein (TP)
1. take the capillary tube you have just taken your PCV reading from and snap it carefully towards the end of the serum part of the tube
2. discard the red cell portion in the sharps bin
3. lift the cover plate
4. carefully (avoiding the sharp broken edge of the capillary tube) tap/dab this onto the prism of the refractometer to expel the serum and close the plate
5. point the refractometer to a light source
6. the total protein scale should be on the left hand side of the eyepeice
7. in this example the TP is 5 g/dl


Urine specific gravity
1. gently mix the urine sample, making sure it is in an appropriate container and labeled correctly
2. wearing gloves, apply 2-3 drops of your urine sample to the fractometer.
3. Hold the refractometer up to a light source and look through the eyepiece
4. read the scale correctly - in most refractometers it is labeled for protein and urine.

what is a normal range of urine specific gravity for cats and dogs
Cat: 1.035-1.060
Dog: 1.015-1.045

Urine dipstick analysis
1. select your dipstick test strips and make sure the strips are in date
2. remove one strip from the container and replace the lid
3. wearing gloves, gently mix the urine sample and pipette one drop of urine onto each of the agent pads of the urine dipstick
it is better to use a pipette to not contaminate the urine sample by dippig the dipstick in the urine
4. note the time
5. leave for the recommended time/s as indicated on the container
6. Hold the dipstick the correct way up agaisnt the container and compare against the color key on the container
7. read and record the results appropriately
8. dispose of the strip afterwards in the clinical waste bin

Urine sediment analysis
step 1: centrifuge the sample:
urine sediment exam is performed to identify crystals, casts, cells and or microorganisms (most commonly bacteria)
1. gently mix the sample
2. transfer an approprriate amount (usually 5 ml or 1ml) into a conical centrifuge tube
3. place the tubes into the centrifuge
4. make sure to balance out the centrifuge by putting a tube of equal size and weight opposite
5. secure the lid properly
6. set the centrifuge at 1500-2000 rpm for 5 minutes. remove teh sample very carefully you should see a plug of sediment at the botto. DONT mix the sample or you will have to start again
Step 2: prepare the urine sample
1. remove the supernatant (The fluid above the sediment) leaving a drop left with the sediment
2. throw away teh supernatant
3. with your finger, flick the sample tube to re-suspend the sediment into the small leftover drop of supernatant
4. optional add a drop of sedi-stain and flick the tube to resuspend the sample and stain
5. add a drop of the urine sample to a microscope slide
6. carefully apply a coverslip and try to avoid creating any bubles under the slip.
step 3 analyse the sample under the microscope
1. place the micrscope slide on the stage
2. lower the condenser
3. close the iris diaphragm
4. use the 4x or 10x lens to examine the slide
5. examine systematically in parallel rows

Struvite (triple phosphate)
coffin lid
radiopaque
usually associated wiht urinay tract infections (UTIs), less radiopaque than CaOx adn tend to be larger

Calcium oxalate
radiopaque
usually accumulates many small, irregular stones. Also cant be removed by medical dissolution

Ammonium urate

cystine
radiolucent

examples of different floatation fluid solutions
Saturated salt solution
specific gravity approxmately 1.18-1.20
1 liter water to 400g of sodium chloride
may cause some distortion of eggs
sodium nitrate solution
specific gravity approxiamtely 1.18
1 liter water and 400g sodium nitrate
if left for prolonged period can distort the eggs
can precipitate
salt/sugar solution
specific gravity approximately 1.28
1 liter of water and mix with 400g sodium chloride. then add 500g sugar to the saturagted salt solution and stir until dissolved
the aim of flotation fluid is to separate the parasites and eggs from the feces and this is achieved by the flotation solution being more dense than the parasites, causing them to float
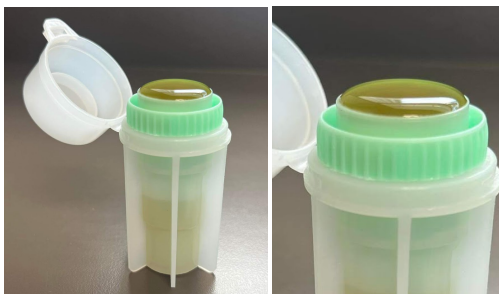
Passive fecal flotation
Step 1.
1. remove the green insert from the flotation chamber
2. place a small amount of feces in teh fecal flotation container and macerate it with some flotation solution and replace the green insert
3. fill to the top of the container with your flotation solution of choice, making sure to have a rounded meniscus
4. place a cover slide over the top of the meniscus, taking care to not spill the solution
step 2: wait 20 minutes
1. place the coverslip on a micrscope slide and analyse under the microscope for parasites
examples of parasites:
Hookworm ova
Roundworm ova
tapeworm ova or proglottids
coccidia

McMaster fecal egg count technique (no centrifuge)
Step 1: prepare the fecal sample
1. weight 4g feces
2. add 56ml flotation fluid to the feces in a beaker
3. stir the contents of the beaker thoroughly wiht a spatula
4. filter the suspension through the tea strainer (or cheesecloth) into a separate beaker
5. stir the filtrate mixture and simultaneously draw a sample using the pasteur pipette
step 2: prepre the McMaster chambers
1. fill both the McMaster chambers with the filtrate sample, making sure there are no bubbles in the chamber
2. allow the counting chamber to stand for 5 minutes (N.b. dont wait longer than this time as the flotation solution can distort the integrity of the eggs)
Step 3: Examine the sample under the microscope
1. examine the sample in the counting chamber using a compound microscope
2. use 10x magnification only
3. identify and count all the eggs noted in the engraved area of the chamber
4. do this for both sides of the chambers
step 4: calculate the results
1. count the number of eggs that sit between each grind of the chamber, ignoring those that lie outside the engraved squares.
2. multiply the total number by 50 which gives the number of eggs per gram of feces
3. eg if you count 20 eggs in the first chamber and 15 in the second:
(20+15) x 50 = 1750 epg

what is the McMaster technique particularly useful for identifying
Helminth eggs

Fine needle aspirate biopsy (FNAB)
step 1 prepare your materials and patient
1. prepare your slides and materials lay the slides on a clean bench
2. open the syringe packaging, taking care not to contaminate teh syringe and draw teh plunger back to 75% of they syringe capacity. place back in the sterile packaging to prevent contamination.
3. open the needle packaging, leaving it in situ but easily accessible
4. clip the hair on the patient to facilitate the biopsy sampling (a small clips is adequate). clean the skin with alcohol or another suitable product.
step 2 take the FNAB
1. stablize the biopsy site firmly between your thumb and index finger
2. insert the needle perpendicular to the skin surface and without drawing the needle and fan the needle by redirecting it around the mass in diferent directions
3. handle teh needle in an aseptic manner throughout ie holding only the needle hub
step 3 prepare the slide
1. withdraw the needle, taking care not to cause any contamination
2. attach the needle to the prepared (air-filled) syringe
3. position the needle tip close to the clean microscope slide
4. quickly depress the plunger expressing the sample onto the microscopic slide
5. place the second clean slide on top of the first slide perpendicular to the original slide
6. smoothly, without using pressure slide the top slide away from you
7. turn the top slide over to create two smeared samples
8. allow the sample to air dry and label them prior to staining

orthopedic exam palpation
1. spine - palpate along the spine
2. each limb from top to toe - compare limbs
look for anatomical abnormalities
swelling
heat
joint effusions
joint thickening
pain on palpation
3. Tail - palpate down the tail
manipulation flexion and extension
1. head
2. shoulder
3. elbow
4. carpus
5. hip
6. stifle
7. tarsus

Cranial drawer
a thumb on the caudal aspect of the femoral condylar region with the idex finger on the patella.
the other thumb is placed on the head of the fibular with the index finger on the tibial crest
If the tbia moves forward (cranially) with respect to the femur = positive indicator for a CCL rupture / tear

tibial thrust
Right index finger on tibial tuberosity
right thumb behind the lateral fabella
left hand flexes the hock
if the tibia moves cranially then indicates a CCL rupture/tear

Patella Luxation
Grade 1-4 based on severity
feel teh patella and see if it will luxate with gentle manipulation


Vestibular ataxia
most obvious sign (though not always present) is a head tilt
other signs include leaning, falling, rolling
strabismus, nystagmus
central vs peripheral vestibular disease

CN II
Oculomotor nerve
pupillary light reflex: optic and oculomoto nerves CN II and III
menace response: optic and facial nerves CN II and VII

Vision
dropped cotton ball, follow treat CN II optic
Menace - CN II optic, VII facial
PLR - CN II optic CN III oculomotor
Trigeminal nerve - CN V
motor function
check the size and symmetry of the masticatory muscles
check jaw tone
sensory function
corneal reflex
palpebral reflex
nasal stimulation response

palpebral response
CN V trigem (sensory), CN VII facial (motor)

Schirmer’s tear test (STT)
First thing to do in both eyes
performed prior to fluorescein staining
performed prior to artificial mydriatic use
performed prior to topical anesthetics
cats may have lower than normal production
normal: 15-30mm (usually above 10 mm OK)
determines tear production in mm

Fluorescein staining
examine for loss of corneal surface integrity
apply tip to bulbar conjunctiva, not cornea
flush excess stain
cobalt blue light for exam
interpret the staining immediately after flushing
evaluate lesions: location, color, shape and apttern

Tonometry => IOP intraocular pressure
pressure results from production of aqueous humor and the outflow resistance in teh ciliary cleft or filtration angle
Digital tonometer = tonopen, tonovet
normal IOP: 20 ± 5 mmHg

Horners syndrome
a non-painful condition where the flight-fight innervation to the eye (sympathetic innervation) is interrupted.
the condition usually occurs suddnely.
the most common clinical signs are: drooping of the eyelids on the affected side (ptosis)
loss of ocular sympathetic innervation
clinical signs
miosis
ptosis
enophthalmos
elevated third eyelid

Patellar reflex
this is the most reliable reflex of the femoral nerve

Sciatic reflex
Sciatic nerve stems from L5-L7, S1-S2

Triceps reflex
triceps muscle is innervated by the radial nerve → C7-T2

Postural response
Proprioception
dorsal paw placement (all 4 limbs)
normal righting response - delayed - not present
placing (tactile and visual) - small dogs and cats
tactile - front or hind limbs touching table surface, eyes covered
visual as above with eyes open
Hopping and wheelbarrowing (shows weakness or ataxia)
Hopping - lift limb at carpus or hock and displace weight laterally
wheelbarrow - lift both hind limbs and walk forward
