Clinical Skills Exam 1 Written Cards
1/152
There's no tags or description
Looks like no tags are added yet.
Name | Mastery | Learn | Test | Matching | Spaced |
|---|
No study sessions yet.
153 Terms
Dependent Assist 1/7
Pt performs <25% of task/activity
One or more people providing assistance for remaining % of activity
May also require verbal cueing
Total Assist 1/7
Pt does less than 25%
2+ people assist
Maximum Assist 2/7
Pt does 25-49%
Moderate Assist 3/7
Pt does 50-74%
Minimal Assistant 4/7
Pt does 75%
Contact Guard Assist 4/7
Pt does the task, but requires therapist hand on gait belt/person for safety
Supervision 5/7
Pt does the task, requires cues
No hand on belt
Modified Independent 6/7
Pt does the task, requires use of a device or extra time
Ex: Hand rail, wheel chair
Independent 7/7
Pt does task with no device, normal time
Dependent Assist
1/7 Patient does 0-24% of movement; full caregiver assist
Total assist
1/7 Patient <25%; 2+ caregivers assist
Maximal assist
2/7 Patient does 25-49%; caregiver provides majority effort
Moderate assist
3/7 Patient does 50-74%; moderate caregiver assistance
Minimal assist
4/7 Patient does ≥75%; minimal caregiver support
Contact guard assist
4/7 Patient performs task; caregiver hand on gait belt for safety
Supervision
5/7 Patient performs task with verbal cues
Modified Independent
6/7 Patient does task independently but uses device or extra time
Independent
7/7 Patient does task safely with no assistance or devices
Steps of an assisted pivot transfer
1. Position wheelchair at 45° angle to surface.
2. Apply gait belt securely.
3. Assist patient to stand using leg muscles, holding
gait belt.
4. Pivot toward target surface.
5. Assist patient to sit safely.
safety precautions of an assisted pivot transfer
Lock wheelchair brakes. Use supinated grip on gait belt. Watch for dizziness or fatigue. Avoid twisting patient's trunk. Avoid rapid movements or pulling on limbs.
Stand pivot transfer steps
1. Position wheelchair on patient's left side (opposite
side).
2. Secure gait belt; assist patient to stand.
3. Pivot patient toward right (wheelchair or surface).
4. Assist patient to sit.
stand pivot transfer safety precautions
Lock brakes and remove armrest if possible. Encourage patient to use legs to stand. Avoid twisting; keep patient close. Support as needed to prevent falls.
Seated repositioning steps
1. Use gait belt to provide support.
2. Cue patient to lean forward or sideways as needed.
3. Assist patient to scoot forward/backward/sideways on
seat.
seated repositioning precautions
avoid pulling on skin, slow and controlled movements, avoid shear forces on skin
squat/pivot partial stand transfer steps
1. Patient leans forward, pushes down on surface to
stand partially.
2. Caregiver supports gait belt and assists pivot.
3. Pivot patient toward target surface and assist to sit.
squat/ pivot partial stand transfer precautions
Ensure patient can bear weight as ordered. Monitor for balance and strength. Avoid twisting; maintain proper body mechanics.
Egon is a 20 yo who was in good health until he was involved in a motorcycle accident that required a transfemoral amputation of his right leg. He has progressed in rehab and is now ready to initiate gait activities. Kumar never used an assistive gait device. What would be the most appropriate AD for gait training? Perform initial gait training
AD- axillary crutches; two point gait
Zuul injured his spine in a MVC resulting in an injury at the T11 spinal cord level. He is medically stable and is beginning the more intensive phase of his rehabilitation. His goal is to return to college and live in a dormitory that has assistance for those with physical disabilities. How would this person complete bed mobility? What kind of transfer would you initially teach this person?
log roll, slide board transfer
Dr. Venkman underwent a right total hip arthroplasty with a posterolateral approach today, and he needs to get out of bed and sit up for a while. His left leg has full strength, sensation, and range of motion (ROM). His right leg is very sore (rates pain at 7/10), and he requires assistance with bed mobility. How will you educate the patient to perform bed mobility? What is the most appropriate assistive device for this patient?
Cannot roll onto the right hip, cross midline of the body, let leg externally rotate, or flex the hip over 90 degrees
AD: front wheel walker
Dana: 65 yo female s/p R TKA earlier today. She was previously using Single point Cane for ambulation due to R knee pain and weakness. Provide bed mobility and gait training for this patient: describe gait pattern and AD used. Demonstrate gait instruction.
no precautions, WB as tolerated
AD: front wheeled walker
Ray: 19 yo male s/p R ACL and meniscus repair two days ago. He is NWB x1 week. He is having difficulty with performing his gait efficiently. Choose an appropriate AD and provide adequate gait training
AD: axillary crutches. 3 point gait step through
Winston: 55 yo male with obesity just suffered first MI. He underwent CABG x3 yesterday. His heartrate has stabilized, and he plans to leave the cardiac ICU today to transfer to a rehab facility. He was previously FIM score 7/7 with ambulation without an AD. Nursing reports that he moves with minimal assistance. Choose an appropriate AD and provide gait training, bed mobility education, and transfer education
no elbows above shoulders, no pushing or pulling, no lifting over 5#, no reaching behind the back, bracing sternum with coughing,
long sit, high fowlers
General Safety Guidelines for Transfers
General Safety:
Always use a gaitbelt unless doing bed sliding dependent transfer (gaitbelt superior if PEG tube is used)
Lock bed, wheelchair, etc.
Transfer from taller to short surface
Bias patient body towards transfer
Patient feet should be slightly posterior to knee joint
How don/doff gaitbelt, placement of belt
Not against bare skin, around the patient's waist (pelvis), above ostomy bag and away from incisions, and supinated grip
What is the first type of scooting pattern? How do you perform it?
Side to side weight shift and slide.
Elongate trunk with pelvic lateral tilt, bring bottom/leg forward, and repeat for other side
What is the second type of scooting pattern? How do you perform it?
Push Up Scoot
Pt uses arms of chair and pushes up. Scooting both hips forward simultaneously
What is the third kind of scooting pattern? How do you perform it? What is special about this scooting pattern?
Pelvic Slide
Pt leans backward into chair and uses back of chair to assist with scoot forward
Don't encourage it!
Crutch placement for sit to stand on NWB leg
Both crutches on opposite side of NWB (holding on the inside)
Push down on armrest and crutch grips -> Stand and balance -> Transfer a crutch under each arm
Appropriate use of 1 knee block vs 2 knee block
Using the 1 knee block is preferential. 2 knee block is used for TKA and THA. It creates extension moment to counteract the flexion moment at the patient's hips and knees. Contact at patient's proximal tibia.
Lateral/Depression Transfer (steps)
Series of push ups and movement sideways. Pt extends UE w/shoulder depression to allow patient to lift their own body. Done in segments
1. Bias patient heel towards transfer surface
2. PT has one hand on belt, other hand may assist at shoulder
3. PT knees surrounding one or both of patient's knees
4. Patient leans forward, pushes up and moves sideways towards transfer surface
Slide Board Transfer (steps)
1. Instruct patient to keep hands flat and away from edge of board
2. Have patient lean away from transfer surface
Slide board is placed under buttocks. Place board where you would sit on a swing
3. Pt returns to upright position
4. Depression/Lateral Transfer
5. Have patient perform lateral pelvic tilt to remove board once on transfer surface
Independent Sliding Board Transfer to the Left Bed-to-Wheelchair (steps)
1. Angle right side of wheelchair close to bed. Secure surfaces
2. Lean trunk to right. Place one end of board under left hip and other end over wheelchair seat.
3. Place left hand out on board and press down with both hands
4. Lift, shift, and lower hips. Repeat as needed
5. Remove board
Do not allow the patient to grab the end of the board or the handle
Seated Anterior-Posterior Transfer (Common with SCI)
Requires good upper body strength
Used by bilateral lower extremity (LE) transfemoral amputations or SCI
Pop Transfers (steps)
Similar to SB transfers with patient harnessing momentum to swing hips through UEs using head and upper trunk movements
1. Head and upper trunk move opposite of desired hip movement
2. Therapist assists by guiding or lifting pt.'s hips
3. Make sure therapist blocks pt. from falling forward while allowing enough room for pt. to move head and trunk in the appropriate direction
Can be used for those with quadriplegia with a sliding board and pushing with UEs
Quad Transfers (steps)
1. Stand in front of patient with a staggered, squat position
2. Hold patient's trunk at the posterior shoulder/scapula with one hand while bringing their flexed opposite LE onto your thigh
3. Switch hand placement and bring their other flexed LE onto your other thigh
4. Hold their LEs in place by adducting your thighs together and gently leaning forward to set pressure anteriorly into their flexed LEs
5. Once stable, use gait belt to lift patient off bed/table/chair onto your legs while maintaining a squat position and balance
6. Once balanced, pivot patient to desired transfer
What comprises the therapeutic alliance?
Person (pt and PT)
Task
Environment
Before entering a room...
Chart review
Talk to nurse about: pain, meals, how are they doing? When do they take pain meds?
know precautions
When entering a room...
Introduce Self
HIPAA check
preferred name
explain what you are doing
Before exiting the room
Patient safe (stable, steady with back support)
call light with reach
all needs met (drink, personal items, phone, blanket, phone.
Assisted Pivot Transfer patient position
Feet back, with inner foot slightly forward
Trunk flexed (nose over toes)
The best COG is a
low center of gravity
Best base of support is
wide
First Law of motion (intertia)
body at rest tends to stay at rest unless acted upon by force
Second Law
Acceleration of a body depends on the mass of body and the amount of force applied
third law
a body in motion tends to stay in motion unless acted upon by a force
never use a pts _____ to lift
arms due to weak glenohumeral joint
Keep spine in a
neutral position
Lift with ________
legs and large muscle groups
turning schedule in bed
every 2 hours in long term, 15 minutes in short term
Sitting position keys
hips back and centered, feet on the ground, knees at 90 degree angle
If a patient is seated in a wheelchair without leg rests
foot support should be provided.
CVA positioning
Supporting the involved side and hand reduces tension on the shoulder joint and minimizes edema in the wrist and hand.
List the assistive devices from most to least supportive
Parallel bars
Walker
Bilateral axillary crutches
Bilateral forearm crutches
Bilateral canes
Hemi walker
Quad cane
Single-point cane
List the assistive devices from most to least ease of mobility
Single-point cane
Quad cane
Hemi walker
Bilateral canes
Bilateral forearm crutches
Bilateral axillary crutches
Walker
Parallel bars
How to fit a patient for all assistive devices. Step 1
Have the patient in good posture and wearing typical footwear when fitting the device.
How to fit a patient for all assistive devices. Step 2
Guard appropriately during fitting.
How to fit a patient for all assistive devices. Step 3
Device handle is typically at the level of the greater trochanter or ulnar styloid process.
How to fit a patient for all assistive devices. Step 4
You can estimate with the patient seated. Always confirm fit in functional walking position.
Gait instruction for a patient new to an assistive device. Step 1
Demonstrate technique.
Gait instruction for a patient new to an assistive device. Step 2
Encourage mental rehearsal and teach-back.
Gait instruction for a patient new to an assistive device. Step 3
Begin with simple tasks and progress in complexity and challenge.
Gait instruction for a patient new to an assistive device. Step 4
Provide externally referenced cues, as well as cuing to the internal experience.
Gait instruction for a patient new to an assistive device. Step 5
Instruct in care and maintenance of assistive device.
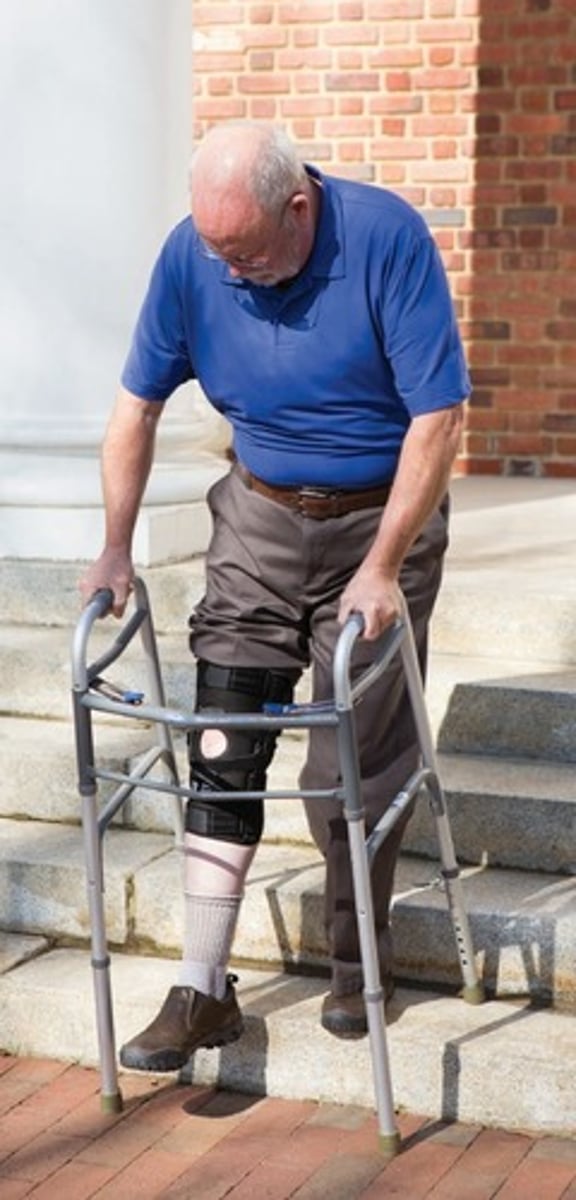
Stair ambulation with each device. Folded Walker
Rail on one side, folded walker on other
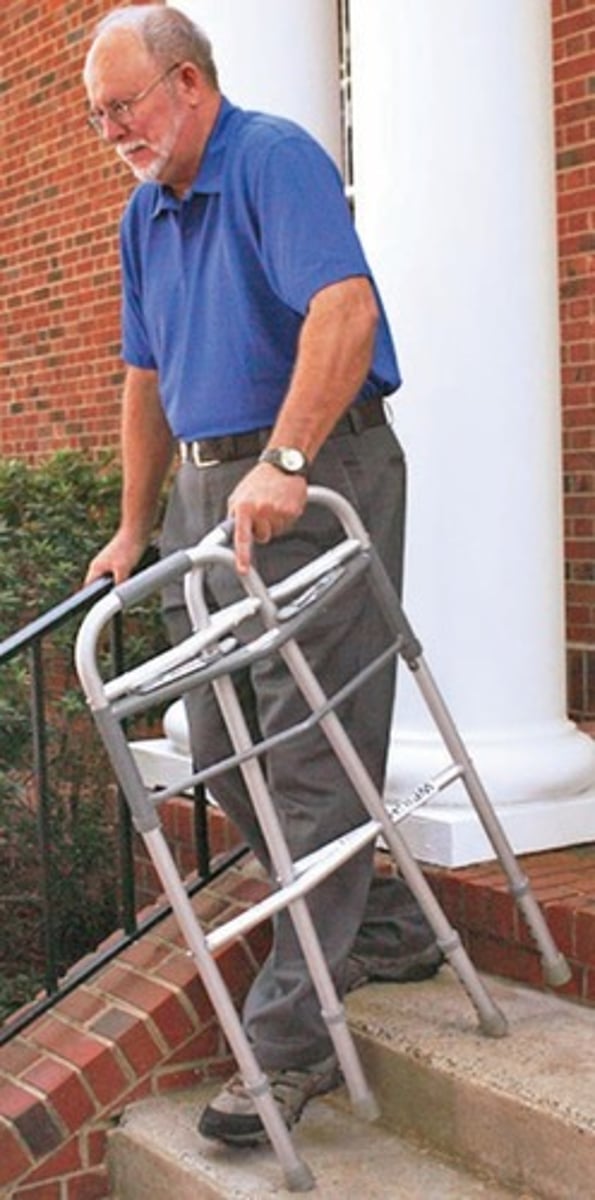
Stair ambulation with each device. Turned Walker
Rail on one side, walker turned sideways on other
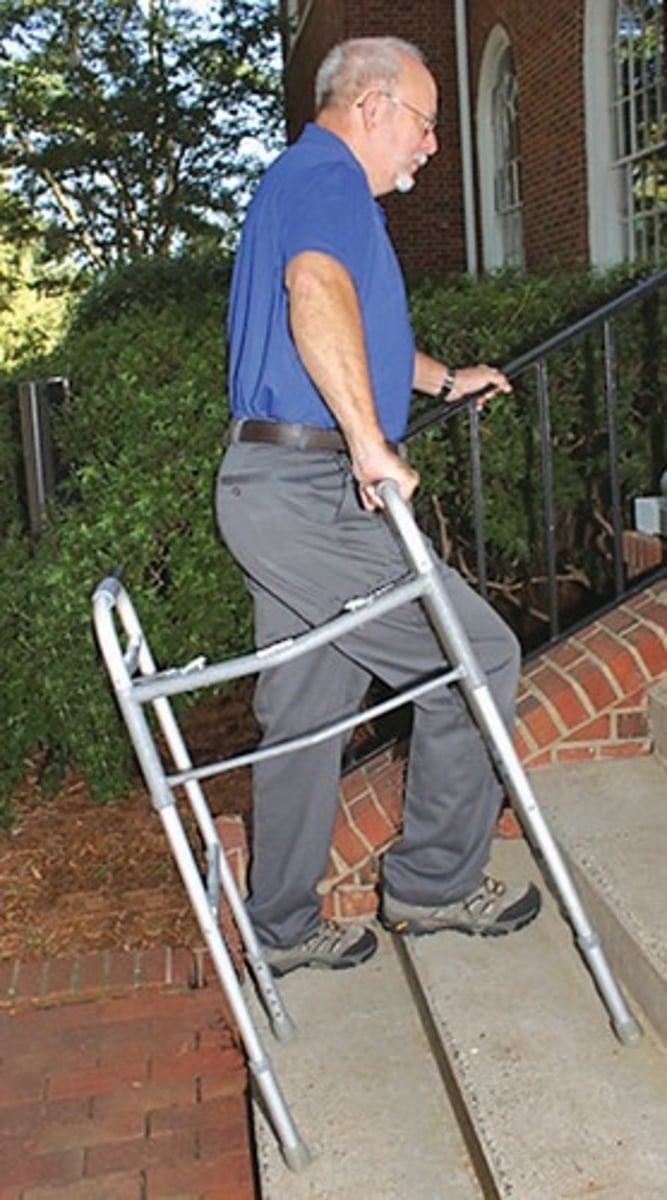
Stair ambulation with each device. Up backward Walker
Try to use this as a last resort.
Stair ambulation with each device. Axillary crutches
"Up with the good, down with the bad."
Move crutches with the involved or weaker LE.
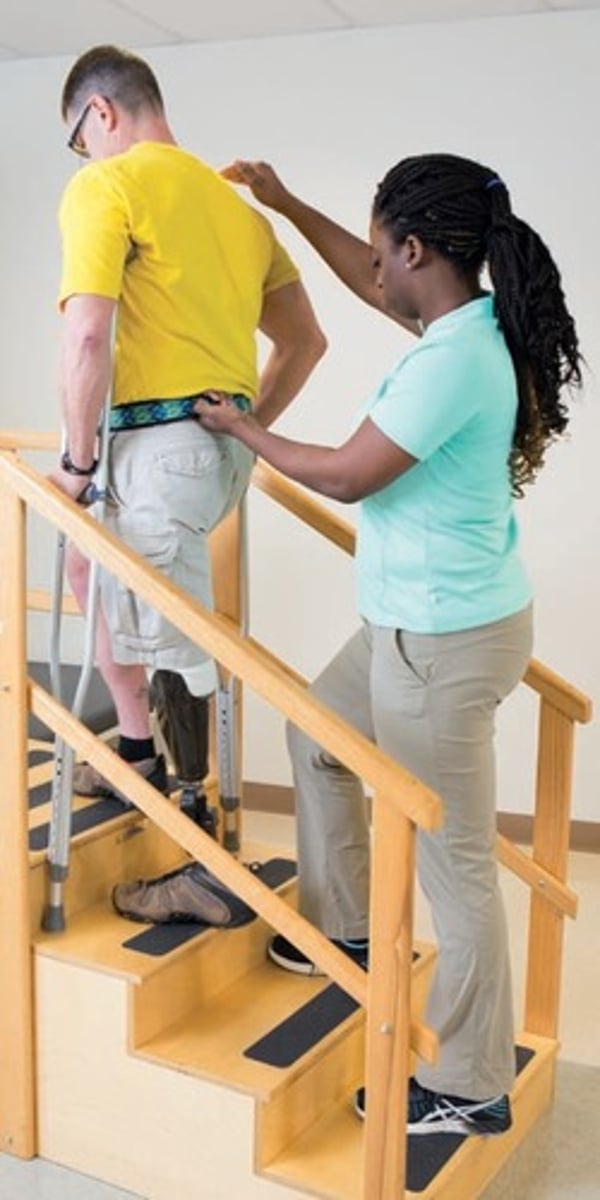
Stair ambulation with each device. Axillary crutches: Both crutches in one hand
Use of a sturdy rail can significantly increase security when ascending or descending stairs with axillary crutches.
Stair ambulation with each device. Axillary crutches: Two crutches held as "t"
Use of a sturdy rail can significantly increase security when ascending or descending stairs with axillary crutches.
Stair ambulation with each device. Axillary crutches: One crutch parallel to rail
Use of a sturdy rail can significantly increase security when ascending or descending stairs with axillary crutches.

Stair ambulation with each device. Forearm Crutches
Can perform as with axillary crutches
Can also perform reciprocal pattern (the contralateral arm and leg swing forward simultaneously.)
Stair ambulation with each device. Forearm Crutches: Locking knee braces
Typically ascending backwards, descending facing forward
Use of handrail advised
Stair ambulation with each device. Cane
"Up with the good, down with the bad."
May move cane to other hand in order to use handrail.
May need to turn quad cane sideways for secure placement.
Step-to-step or step-over-step
Benefits/drawbacks to use of loftstrand vs axillarycrutch
Axillary: Allow greater mobility; provide less stability. Allow unloading of one LE.
Loftstrand: Provide a moderate degree of stability. Slightly more difficult than axillary crutches but provide greater ease of movement
Appropriate falling technique with crutches
Dropping crutches out to the side
Slightly flexing elbows of extended arms
Turning head to the side
Appropriate falling technique without crutches
If necessary, deepen your stride and rest the patient on your forward thigh.
If resting on your thigh is not an option and no chair is available, carefully lower the patient to the floor, squatting down to maintain good spinal alignment.
Door management with each device: Door opens toward you
Stand close to the door, turned slightly toward the hinges.
Pull door open, then push it fully open with same hand.
Block door with crutch tip if needed.
Walk through doorway.
Door management with each device: Door opens away
Stand close to the door, facing door handle.
Push door wide open.
Block with crutch tip if needed.
Walk through.
Patient education on how to turn with an assistive device
Body's center of mass falls into line with the inside foot
Gait speed decreases
Person will take small steps with broad base of support
Refrain from pivoting on the LE, turn leg during swing phase (when leg
is off the ground) and then place foot on the ground.
Gait patterns: Step-to
LE advanced to ADs.
Gait patterns: Step-through
LE is advanced beyond ADs.
Gait patterns: Swing-to
ADs advance simultaneously followed by both LEs to level of ADs.
Gait patterns: Swing-through
Both ADs advance simultaneously followed by both LEs beyond ADs.
Gait patterns: Two-point gait
Two assistive devices are used. One LE and the opposite assistive device move simultaneously, touching the ground at the same time. Once stable, the other LE/assistive device moves
Gait patterns: Three-point gait
Used for those with impairments in one LE
Requires two assistive devices or a walker
Assistive device(s) are moved forward, then the involved LE past the crutches or back legs of the walker, then the uninvolved LE
Gait patterns: Four-point gait
Often described as a deliberate two-point gait pattern
Uses two assistive devices
Used for those with same impairments as two-point gait, but impairments are usually more severe
Can be a precursor to two-point gait
One assistive device is moved forward, then the opposite LE, then the next assistive device, and finally the other LE
Adult Normal HR
60-100bpm
Child Normal HR
80-100bpm
Infant Normal HR
100-120bpm
Adult Respiratory Rate RR
12-20 breaths/min