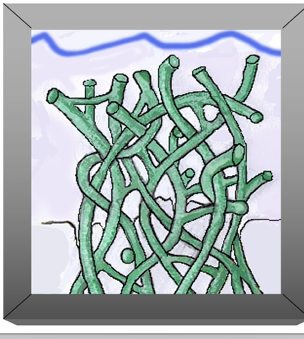
Adhesion - bonding to tooth surface
1/85
There's no tags or description
Looks like no tags are added yet.
Name | Mastery | Learn | Test | Matching | Spaced | Call with Kai |
|---|
No analytics yet
Send a link to your students to track their progress
86 Terms
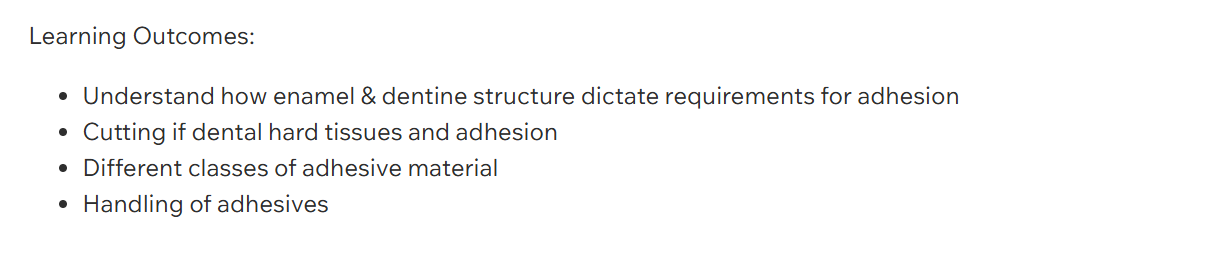
how does failure occur? 2
generally occur either due to fatigue or breaking
more commonly, the leakage of the restoration margin
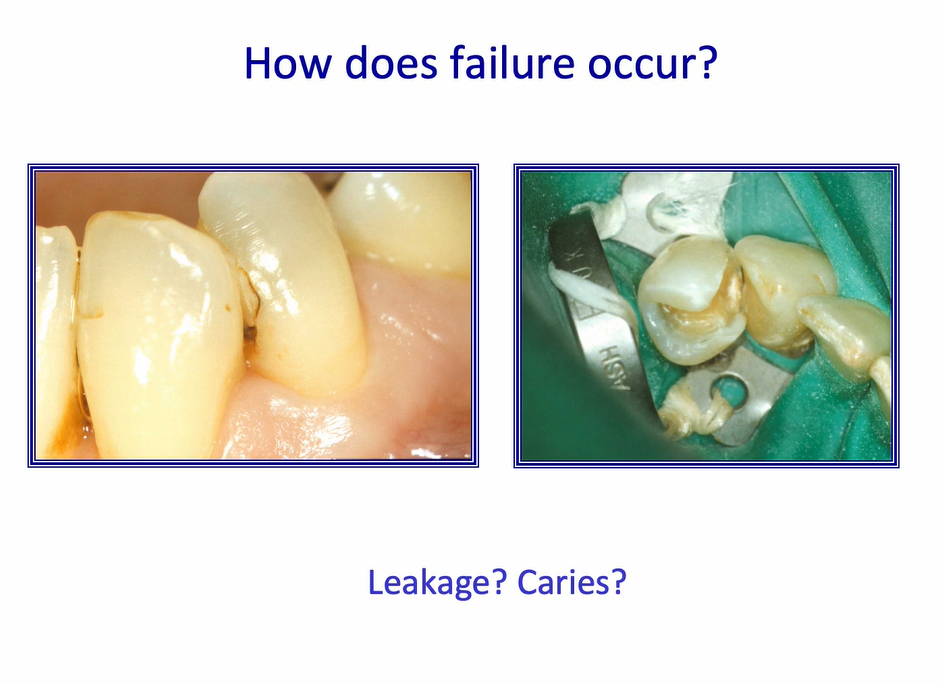
why do we need adhesion? 3
prevents leakage at the margins or at the restoration of the tooth-restoration interface
more conservative tooth preparations
strengthen tooth tissue
what two materials do we need to bond to?
enamel and dentine

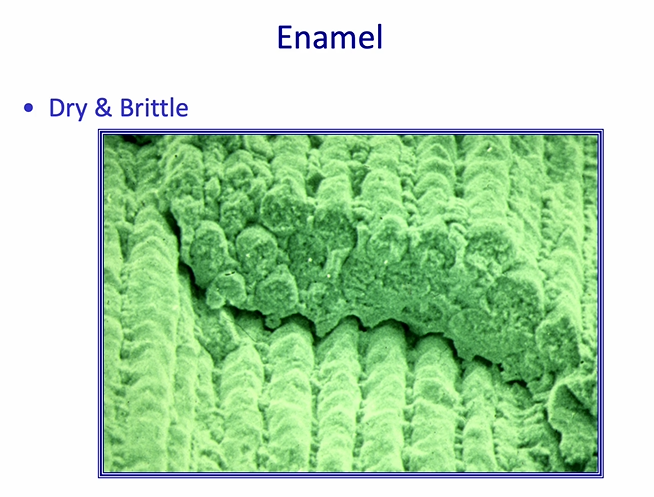
how can we describe the texture of enamel?
dry and brittle
very strong in certain directions
can be dried out to remove most of the water in the structure at the surface where it has been cut
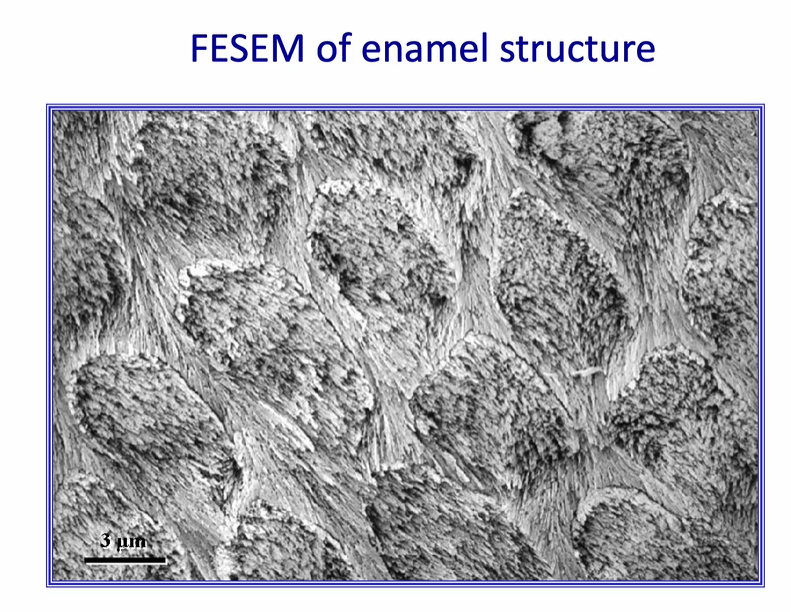
we usually try to increase the surface area - this is achieved by etching the surface of enamel
we usually try to increase the surface area - this is achieved by
etching the surface of enamel
high resolution image of etched enamel prisms
first thing we have to do when we do restorations is…
cut a cavity
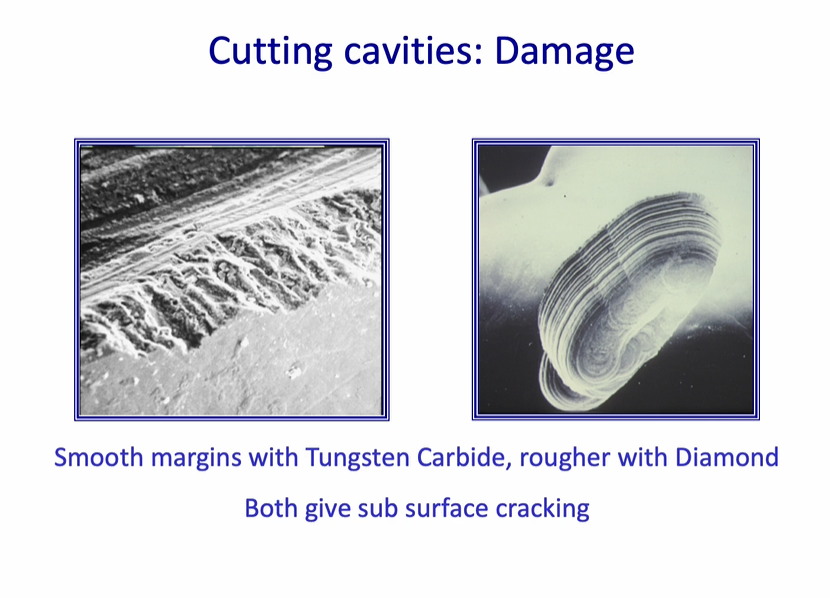
cutting cavities - damage
smooth burs - smooth margins with tungsten carbide, rougher than diamond - rough diamond bur
both give sub-surface cracking

all burs / handpieces cause cracking
cracks may affect the integrity of the restoration
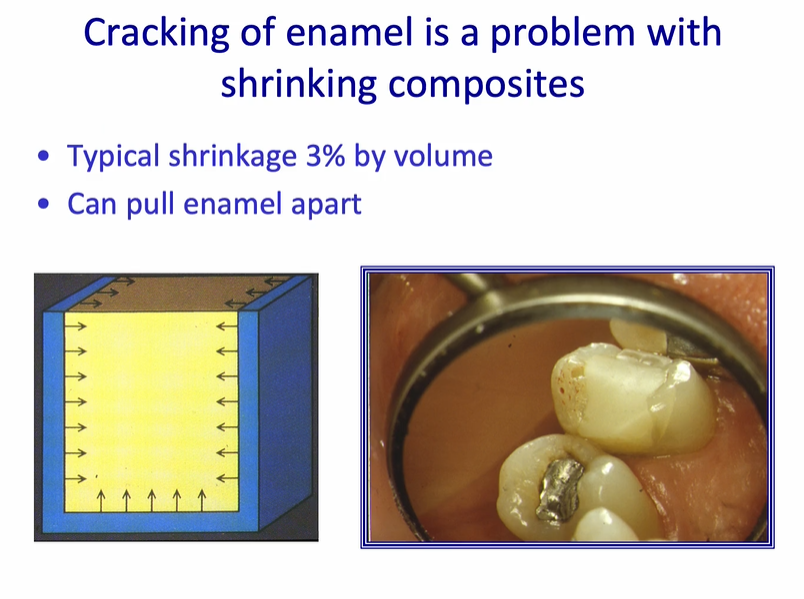
cracking of enamel is a problem with…
shrinking composites
cracking of enamel is a problem with shrinking composites
most composites shrink on polymerisation - can put a strain on cavity margin
this will be increased as the volume of the cavity margin increases - and the number of walls which are opposing each other
typical shrinkage 3% by volume
can pull enamel apart
right image - white line in the enamel is caused by stress from the composite
strains on cavity margins may be increased by…
this will be increased as the volume of the cavity margin increases - and the number of walls which are opposing each other
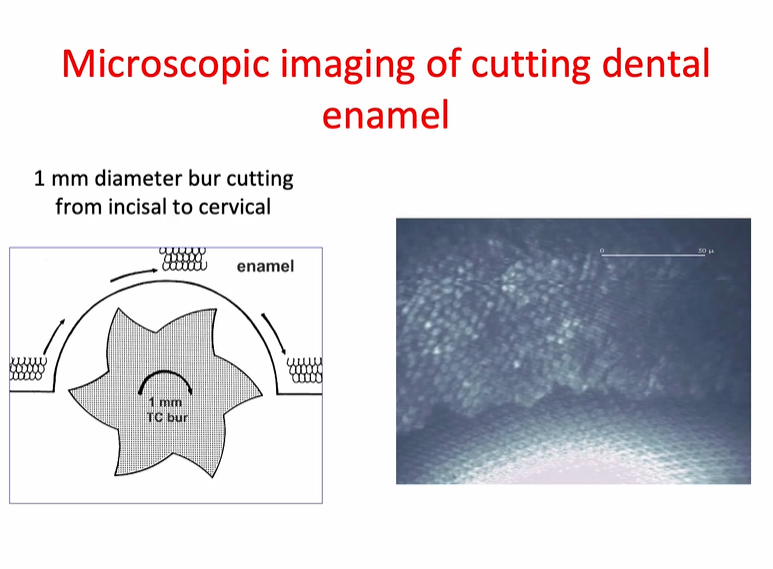
microscopic images of cutting dental enamel
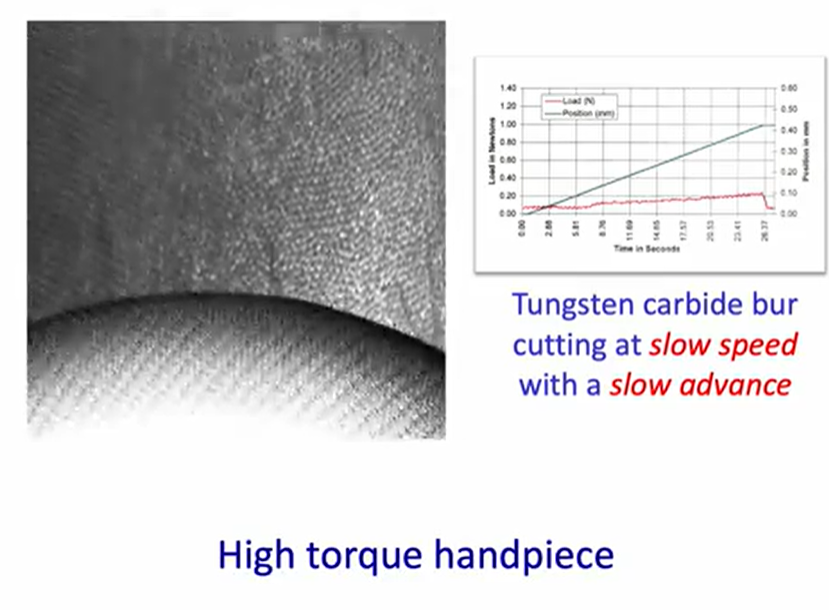
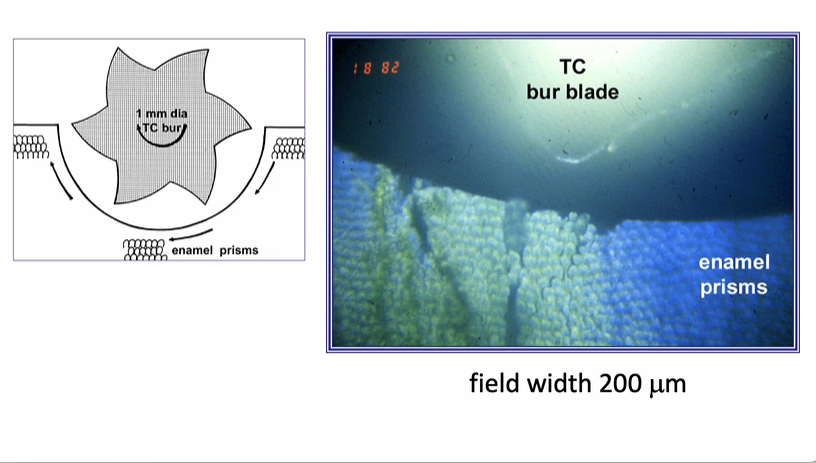
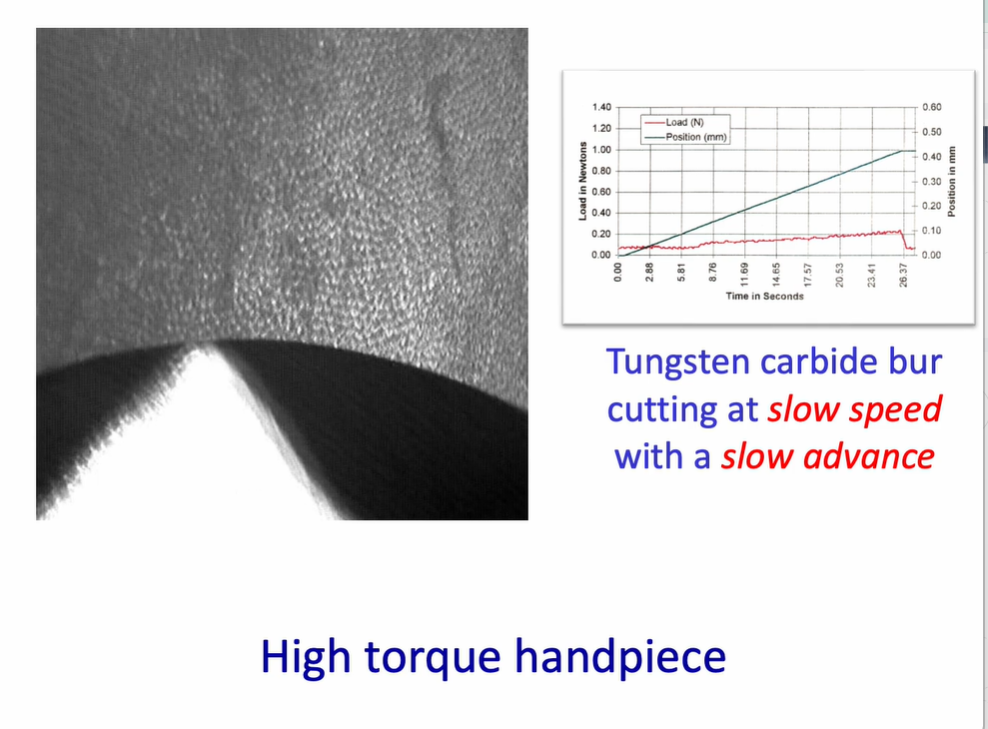
high torque handpiece running with a tungsten carbide bur - what is to note?
high torque handpieces cut at slow speeds and with slow advances (through tissues) - this is a very gentle
right shows a steady load and displacement graph - showing steady progression through the tissue - very little change in the load
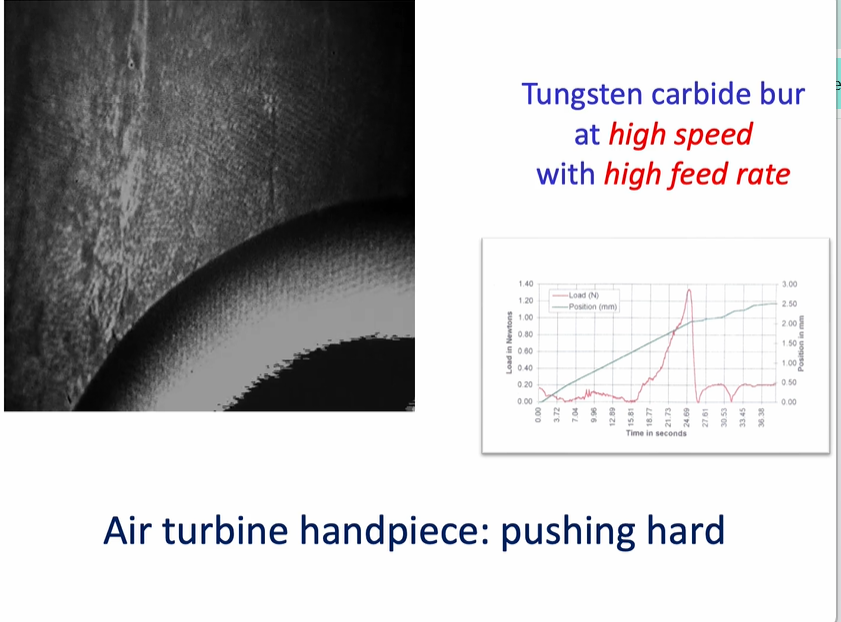
air turbine handpieces - what is of significance?
tungsten carbide bur at high speed with a high feed rate
air turbine handpiece - pushing hard - then the handpiece - handpiece starts to stall - bur will then stall, then recover, then stall then recover → this creates a rippling effect
this causes quite a lot of damage to the substrate
this is uncomfortable for the patient - and is not an efficient was of cutting the tissue
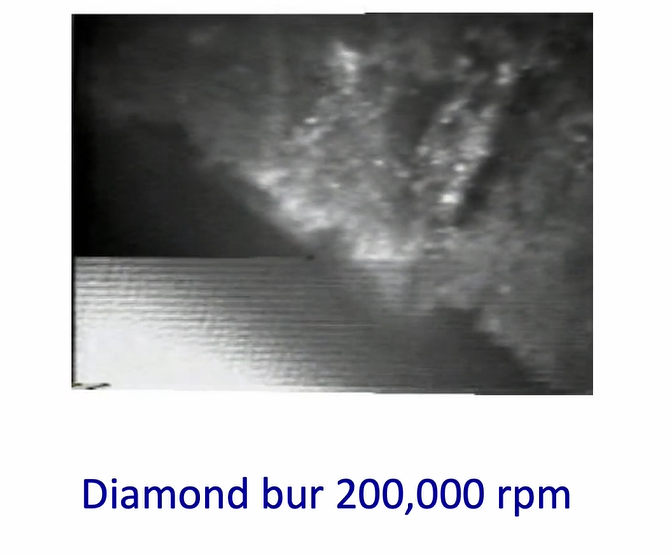
diamond bur rpm
200,000
size of the damage is relate to the roughness of the diamond used in manufacturing the bur
can put a lot of subsurface cracking into the enamel
looking at the tungsten carbide bur - we can look at the type of failure at the enamel margins
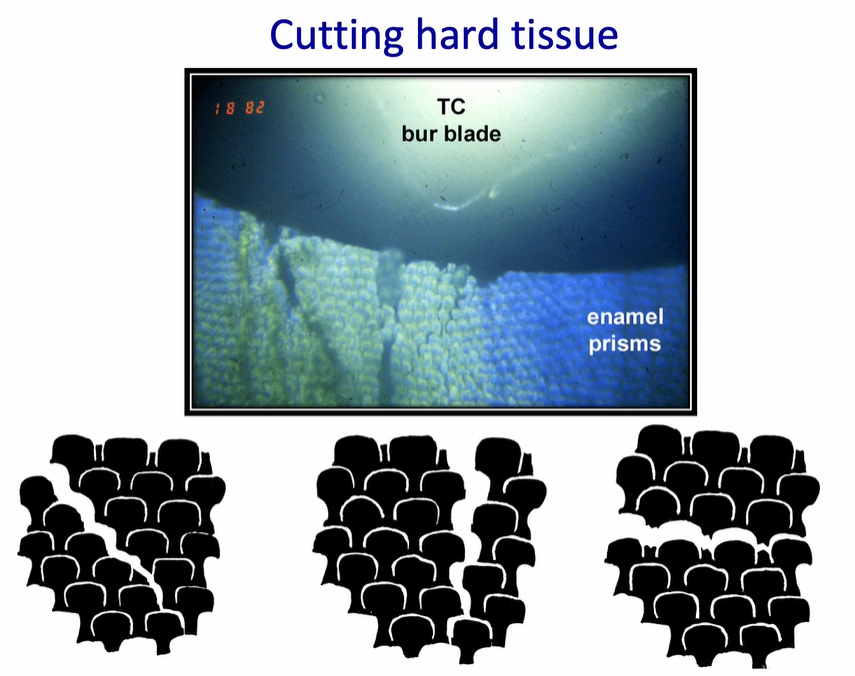
the cracking of the enamel will preferentially go around….
preferentially go around the enamel prisms and along the prisms from occlusal to cervical
going horizontally is a difficult area of the enamel to break - this causes quite significant chipping

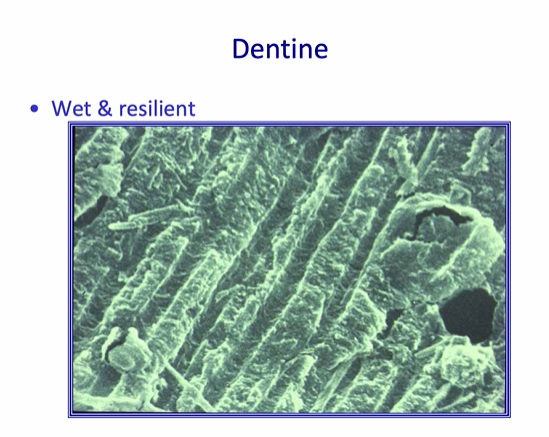
how can you describe the structure of dentine?
wet + resilient
consists of tubules that are approximately a micron in diameter - surrounded by intratubular dentine - which is a composite of collagen - covered with small crystallites of hydroxyapatite
bonding to this tissue has always been a challenge
range of materials - spectrum of adhesive properties 2 main types
two main types of materials - those that require adhesive or those that require self adhesive
composites are resin based - adhesives are always needed to make a bond to adhesive tissue
glass ionomer cement - is not resin based and is self adhesive
3 other types of materials that are mixtures of the two main types (composites or glass ionomer cement)
polyacid-modified composites - contains some resin, but has some glass ionomer material incorporated into them and adhesive is needed
resin-modified glass ionomers - some resin included - primer is needed
calcium tri-silicate cements - have a more therapeutic nature - still open to discusssion
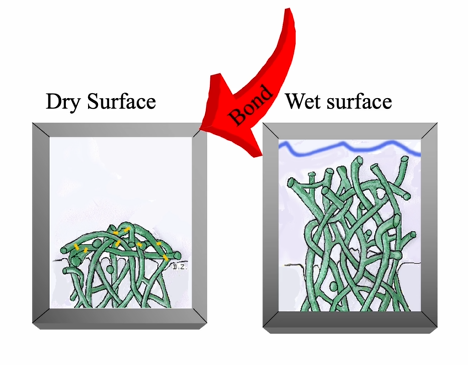
what are the general requirements for adhesion?4
good substrate wetting
a low ‘contact angle’ - material penetrates into structure
a clean substrate - with high surface energy - attractive for molecules to stick to
contamination must be avoided - especially with blood or saliva
what are the three main mechanisms of bonding? 3
mechanical theories
adsorption theories
diffusion theories
mechanical theories
involve the concept of interlocking of the solidified adhesive with irregularities of the surface of the adherend - composites
adsorption theories
chemical bonding - eg primary (ionic and covalent) and secondary (hydrogen, dipole interaction, or van der Waals) valence forces.
GICs (glass ionomer cements)
diffusion theories
mobile molecules across the interface
GICs Calcium Tri-silicate cements
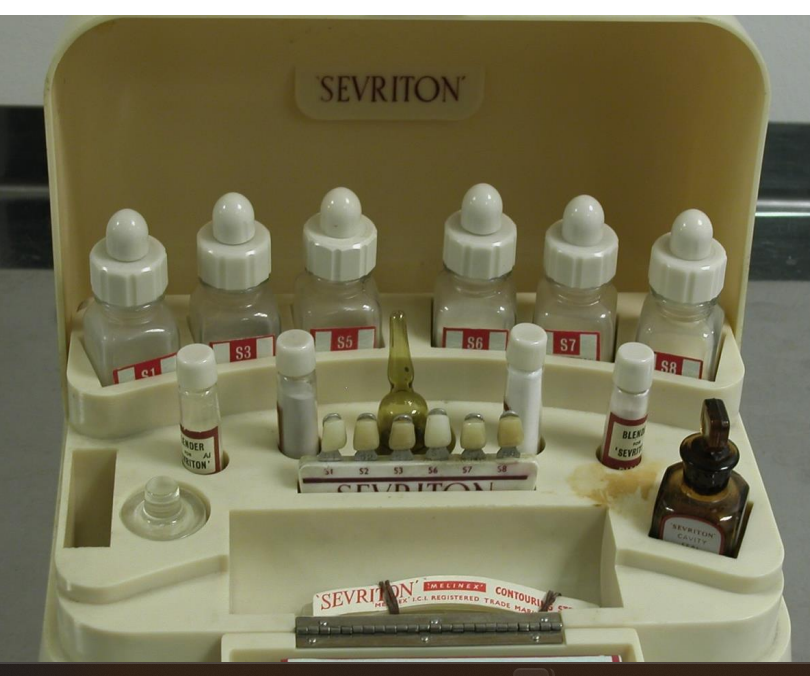
historically, dentine has been difficult to bond to
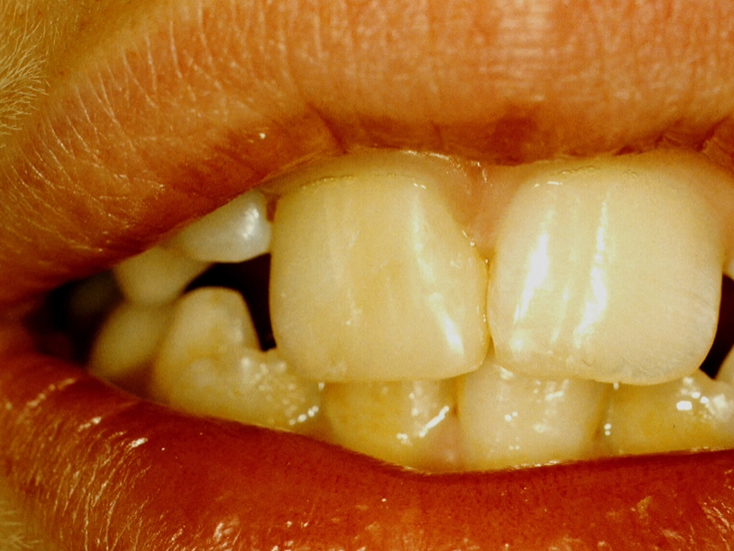
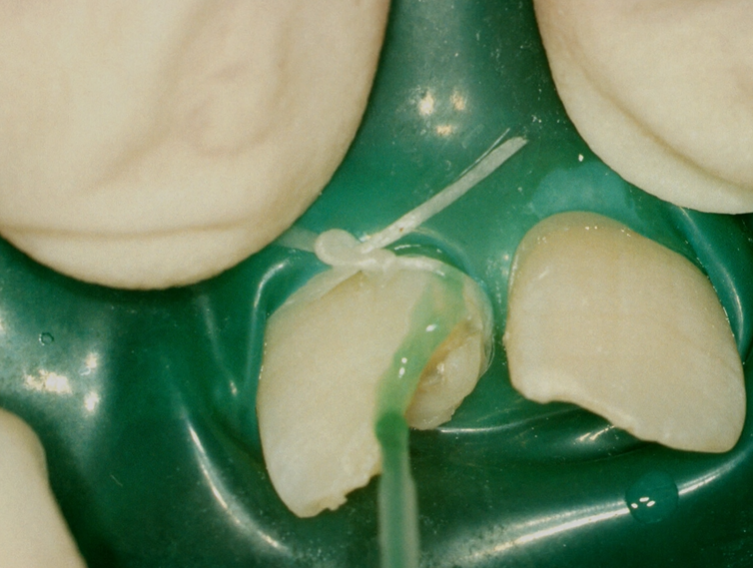
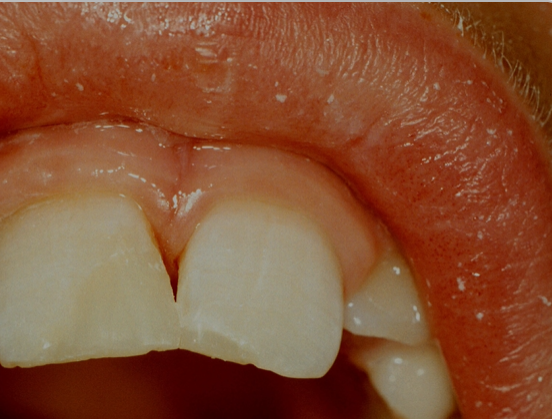
image is showing the gingival margin of a proximal cavity
serviton was the first to bind to both dentine and enamel
rather than using ‘generations’ we should classify materials based on their composition
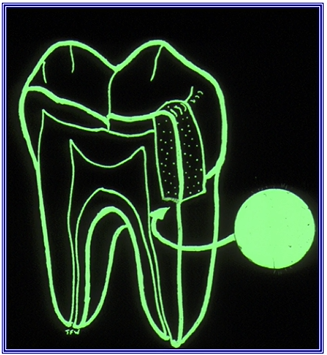
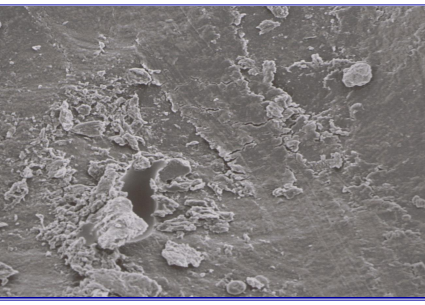
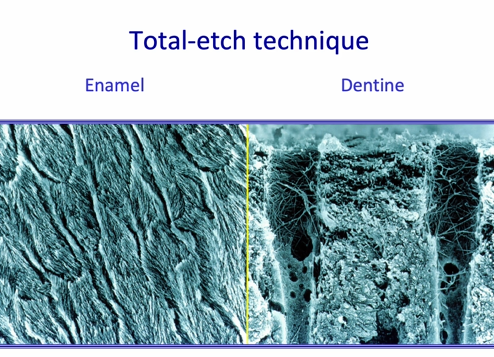
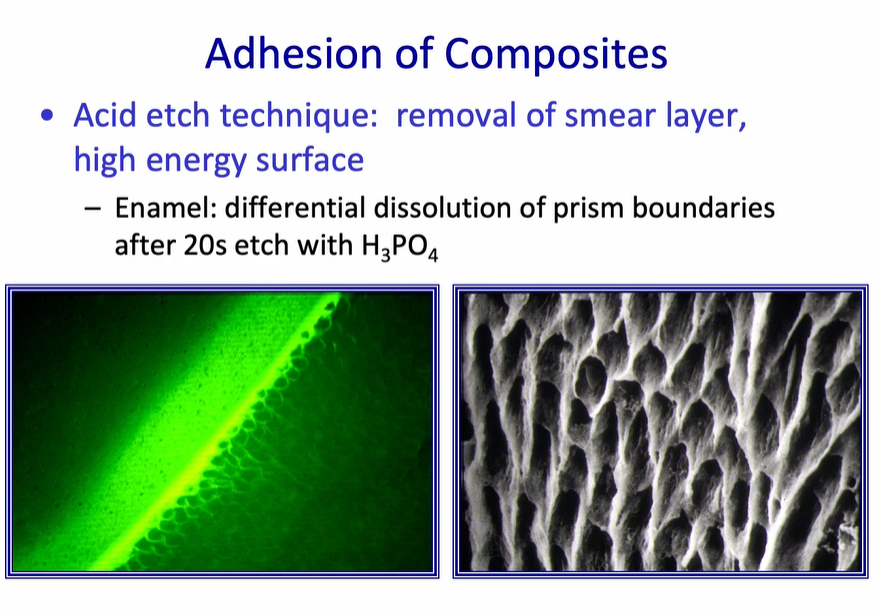
Adhesion of Composites - Acid etch technique - enamel
removal of smear layer, high energy surface
Enamel: differential dissolution of prism boundaries after 20s etch with H3PO4
this will leave behind a surface which is porous - into which a resin will then flow
this only works if the etching pattern is end on to the enamel prisms
the lateral walls of proximal cavities have prisms which are parallel to the cut margin
these prisms can be pulled apart easily - prisms are not strong in their long axis - can bend easily

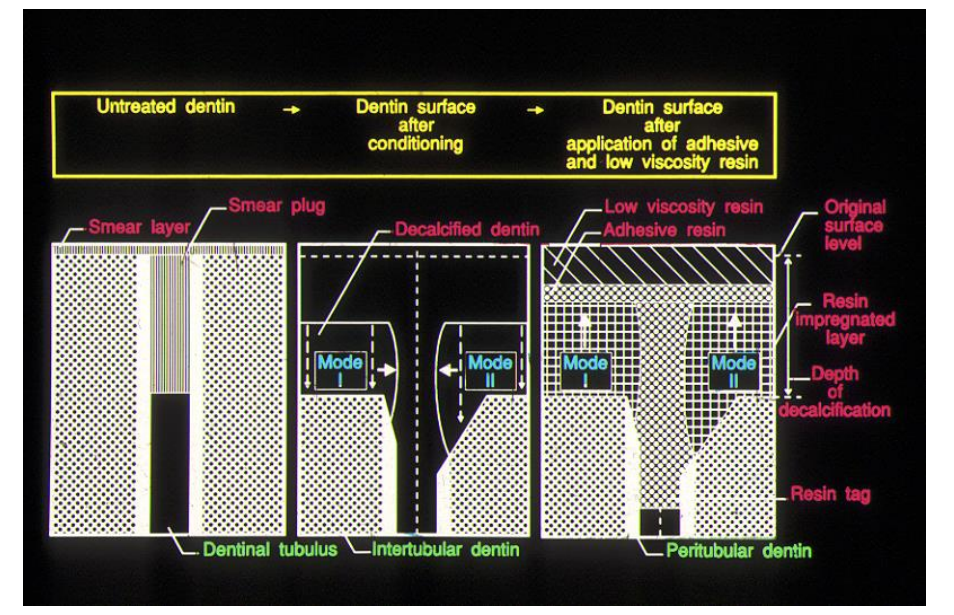
in the acid etch technique - the ‘smear layer’ contains …
debris from the cutting process - blood, saliva, cells
formed from a pressure welding technique - not from heat
seals the surface of the tooth - this is difficult to penetrate without any preparation
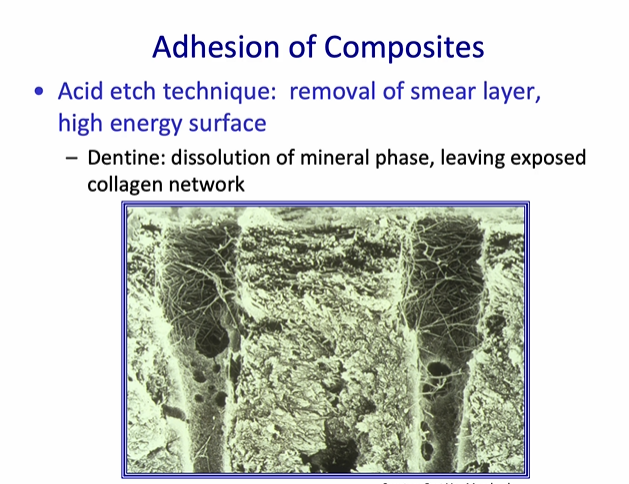
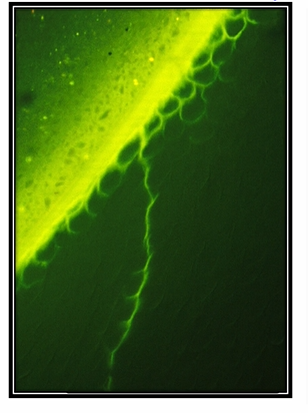
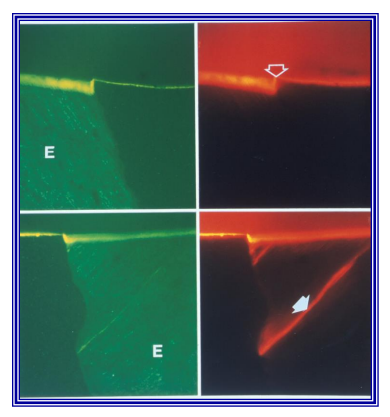
Adhesion of Composites - Acid etch technique - dentine
Acid etch technique: removal of smear layer, high energy surface
Dentine: dissolution of mineral phase, leaving exposed collagen network
when we remove the smear layer over dentine - we open up the dentine structure
the dentine tubules are widened - because the intratubular which is highly mineralised, dissolves immediately
intertubular dentine loses the mineral - leaving a collagen network
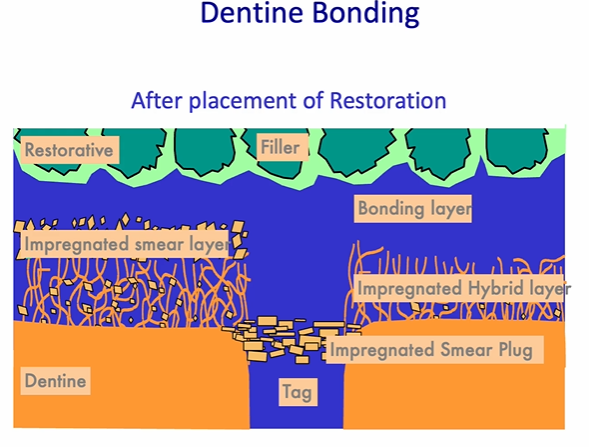
Resin Bond achieved with micromechanical retention into dentine
composite restoration is usually hydrophobic - layered interface to achieve a satisfactory bond to the tooth
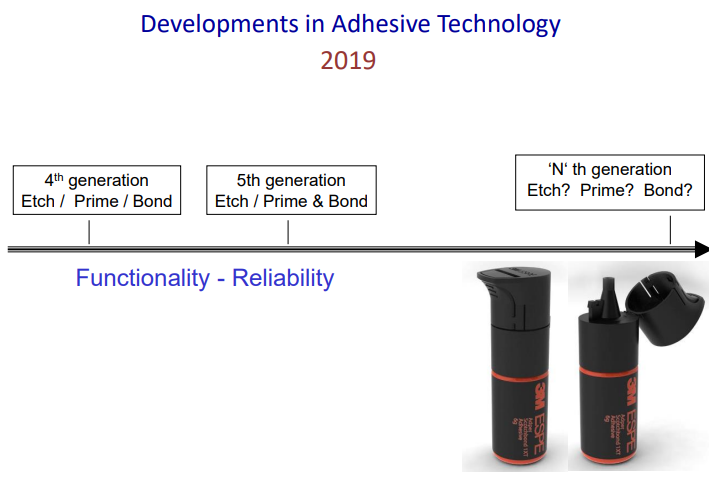
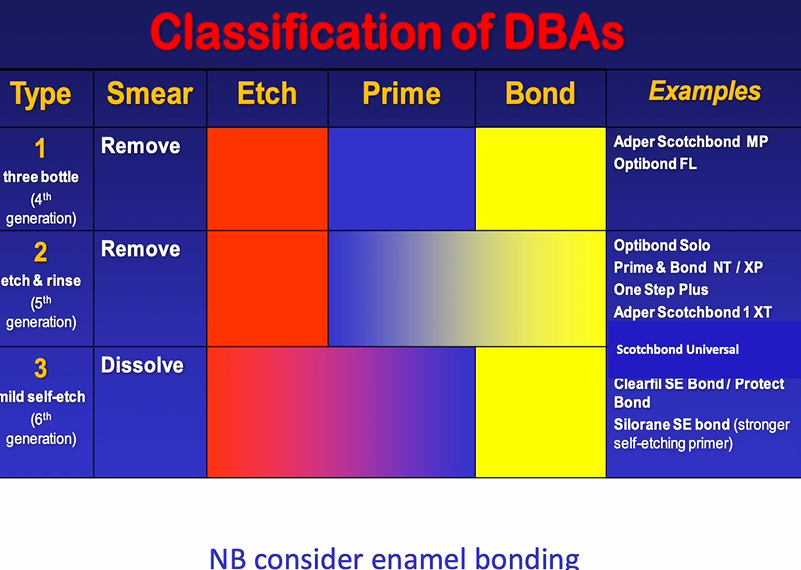
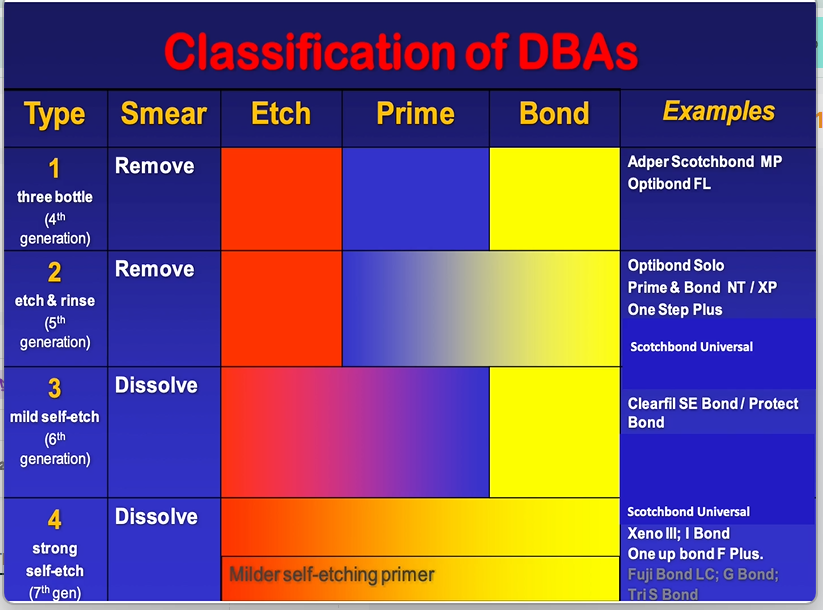
dental bonding agents must therefore be classified based on how they work - rather than when they were developed
always have etching phase, priming phase and a bonding phase
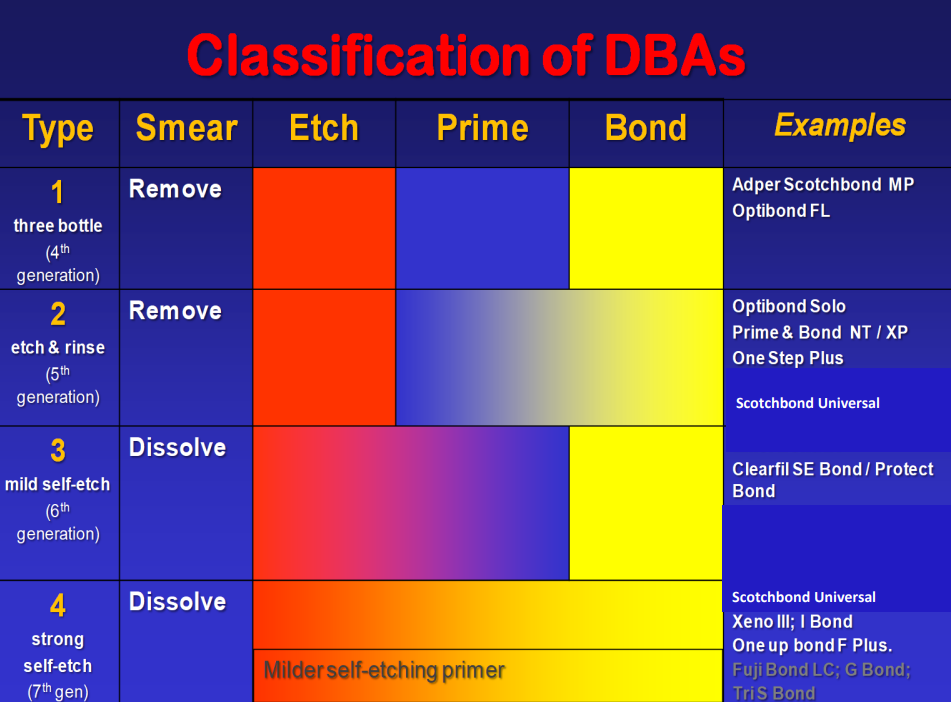
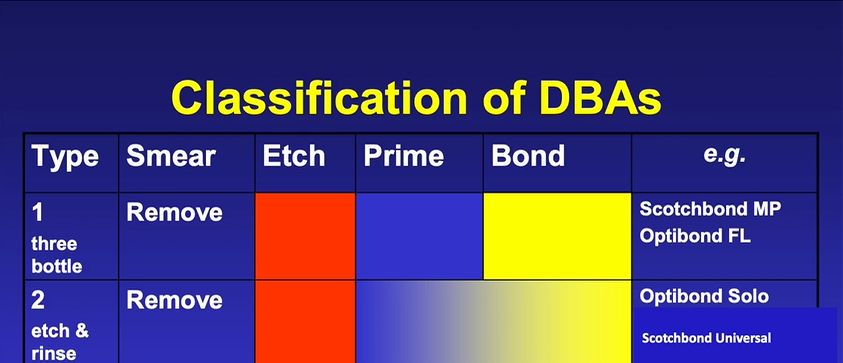
classification of older DBA
priming system is to wet the surface which has been etched , bonding is to seal it
type two has a smear phase then a prime and bond mixed together usually with volatile alcohol - eg acetone
one of the key ingredients of DBAs is that they are able to penetrate into wet tissue
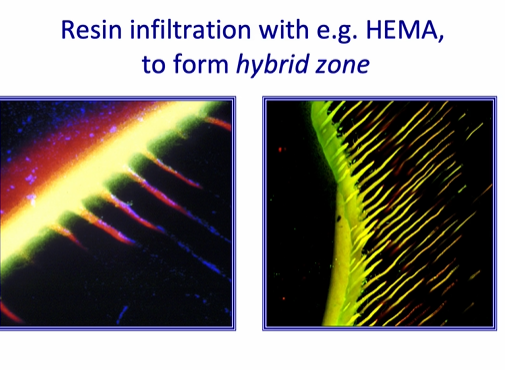
the resin infiltration is helped by the presence of HEMA - hydroxyethylmethacrolate to form the hybrid zone between the tooth and the restoration - it is neither tooth nor restoration
this provides a strong structure - making a bond between the composite and the tooth tissue - but the bond is mainly achieved not through penetration down the dentinal tubules but the intertubular penetration - and bonding to the dentinal collagen
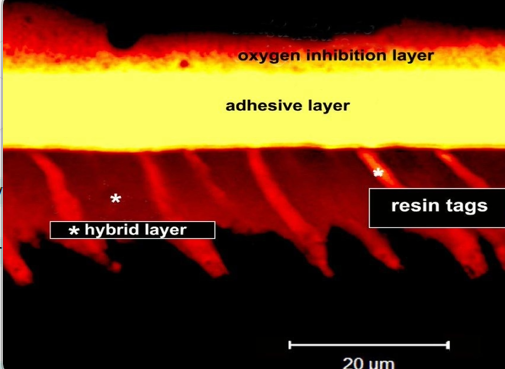

what is the oxygen inhibition layer?
adhesive layer is formed above the layer of collagen impregnated with resin
the oxygen inhibition layer - allows the composite to make a strong bond with the resin
total etch technique
phosphoric acid on the enamel
followed by etching of the dentine also with phosphoric acid
dentine etching is only done for a very short period of time
with modern self-etch adhesives it is not necessary

with the total etch technique we therefore produce a …
a very rough / porous technique at a microscopic level in both enamel and dentine
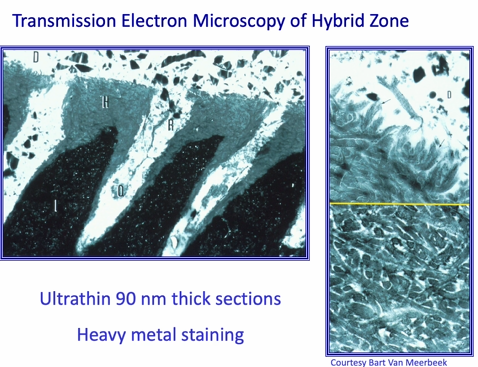
resin penetrates intimately within the collagen fibrils
can see the cross banding of the collagen in the TEMUs
schematic of collagen that has been etched
can see that the dentine has been removed from the collagen fibrils
this is then replaced with water - its important that the surface of the tooth doesn’t dry out
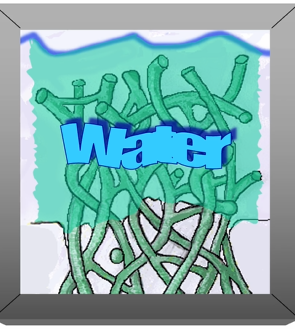
dentinal collagen is then replaced with water - its important that the surface of the tooth doesn’t dry out - why is this important (etching)
this allows the HEMA to enter and bind to the collagen
HEMA displaces the water and infiltrates around the collagen fibrils
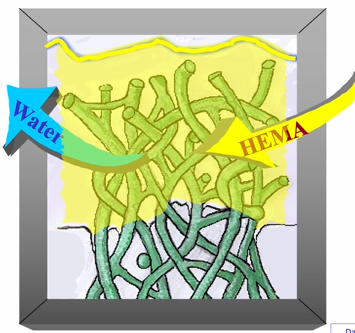

the bond will also mix with the (yellow) HEMA an forma strong structure at the adhesion interface
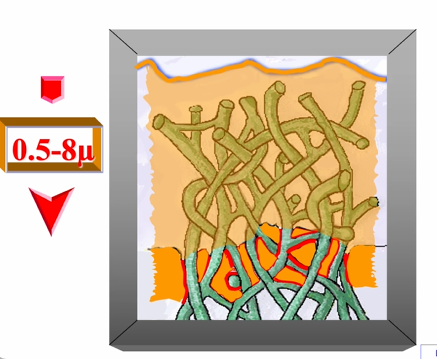
this is then light cured and then the hybrid layer will vary in thickness
range of thickness in the hybrid layer
0.5-0.8um thick - remember its the intertubular region, not the dentinal tubules
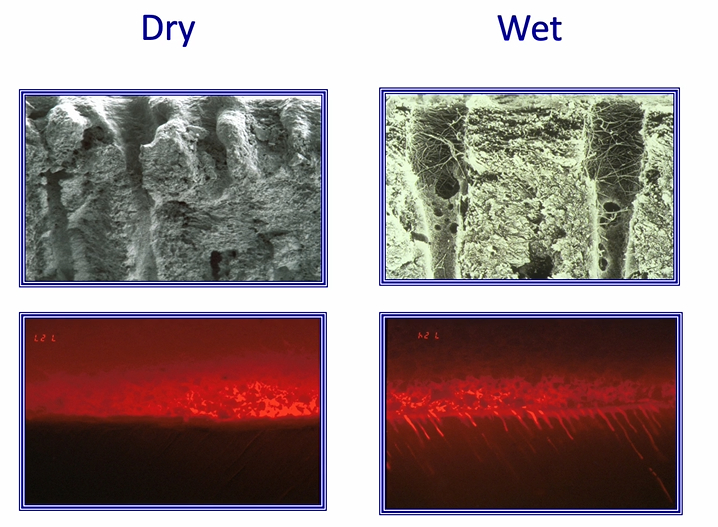
what happens if we dry the surface of the collagen?
collagen will collapse
no HEMA can penetrate - hybrid zone not achieved
whereas if you maintain the wet surface, the bond can displace the water - good adhesive interface

red labelled adhesive - sitting on the top of the tooth
bond can displace water in wet
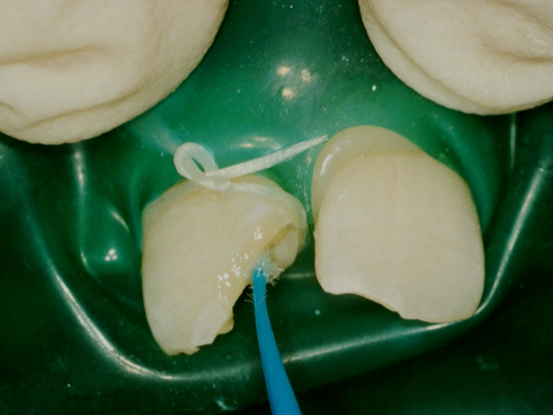
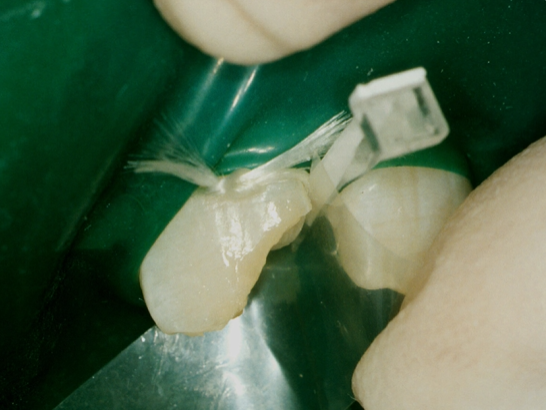
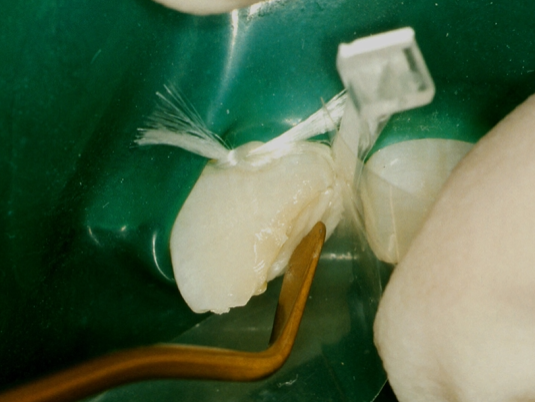
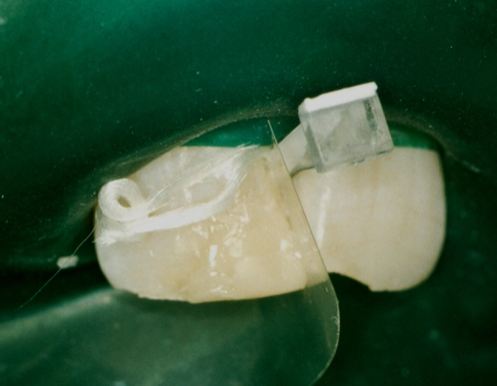
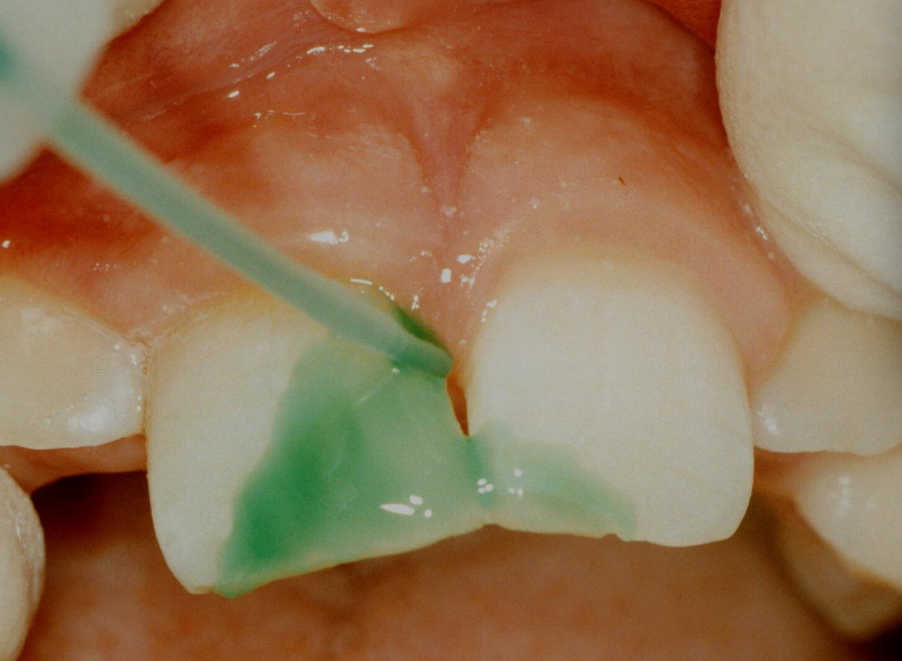
how is control of moisture/ wet bonding achieved clinically?
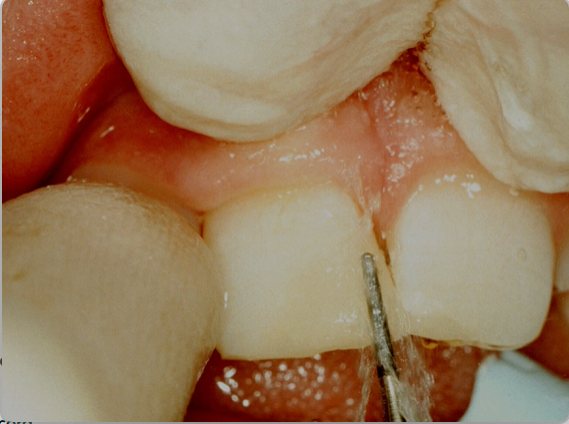
image shows proximal cavity
enamel is etched
dentine is etched
this is washed away with a good stream of water
surplus water is removed using a cotton pledget or paper towel or air syringe
a large amount of adhesive is placed onto the tooth and rubbed into it gently
critical step - evaporate all the solvent that was within the adhesive you just applied - you know you’ve achieved the correct degree of evaporation when there is no longer any rippling on the surface under the air stream
once the surface is shiny but not rippling - light cure the adhesive - it’s ready for the composite to be placed

top left - composite (starry)
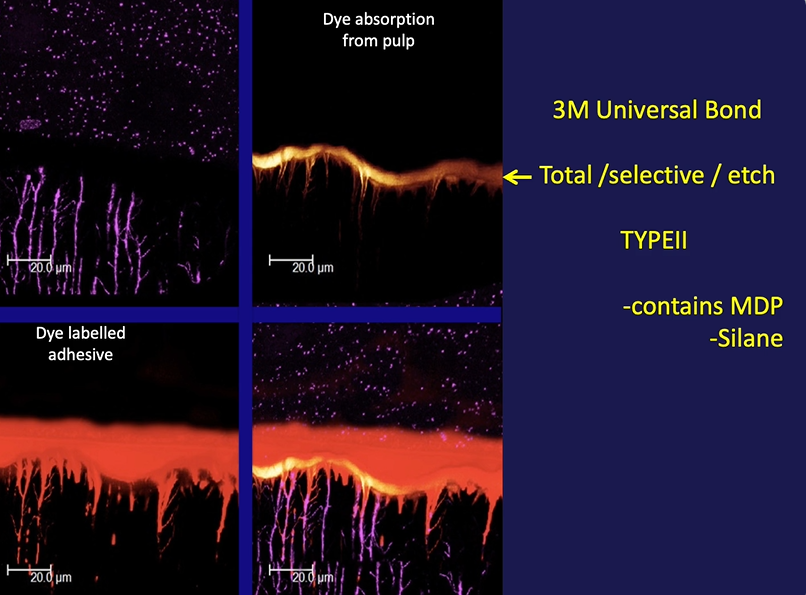
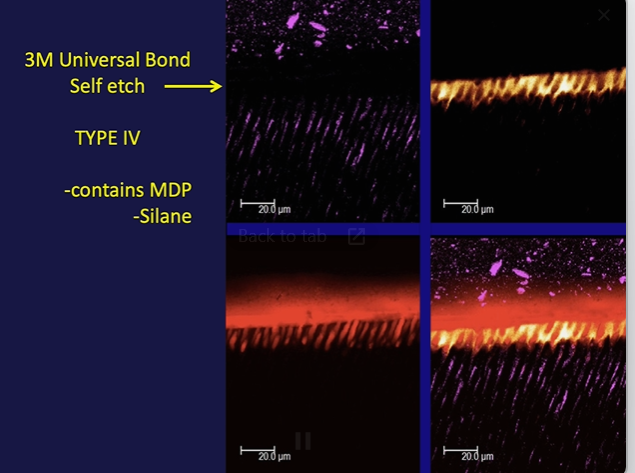
MDP aids in chemical bonding of the resin
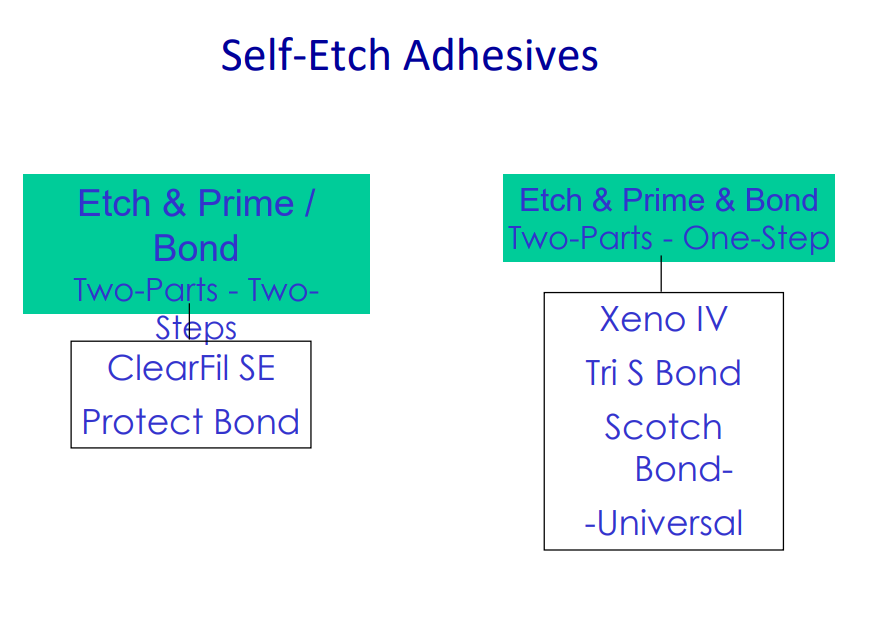
type3
consists of a primer (acidic)
and sealing resin over the surface
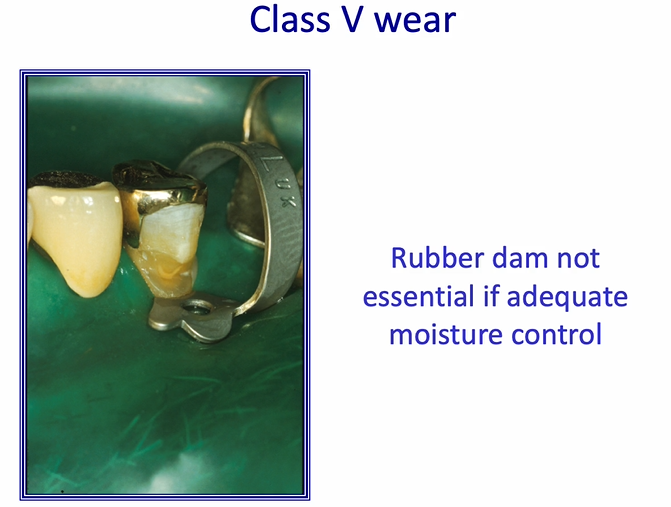
class V wear cavity
isolated with a rubber dam
rubber dam not essential if there is good isolation by other means - if adequate moisture control
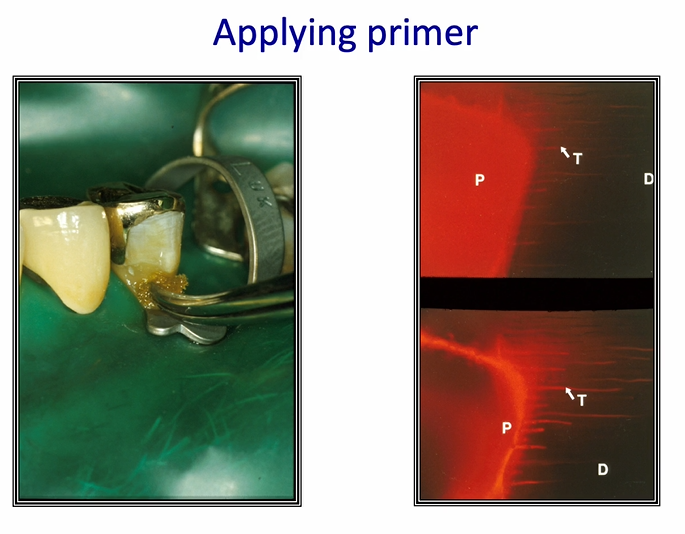
once the primer is applied and the air is thinned - primer layer is much thinner and is penetrating into the dentinal tubules
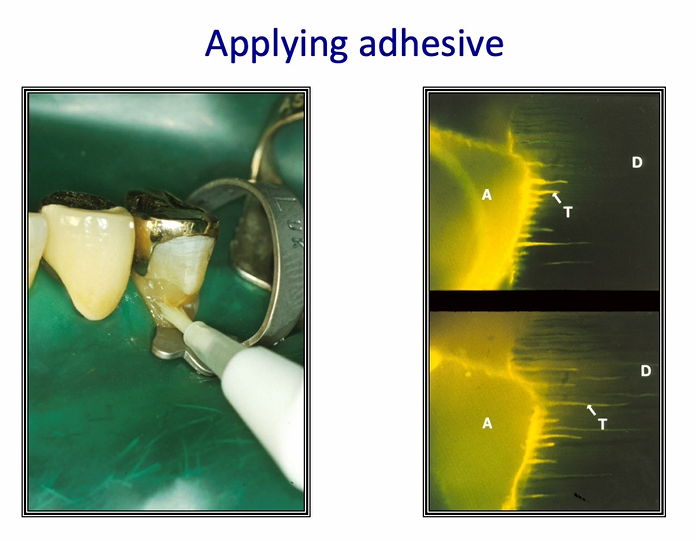
after air blowing - the layer of adhesive becomes thicker
controlling some of these resins may not be as straightforward as you may assume

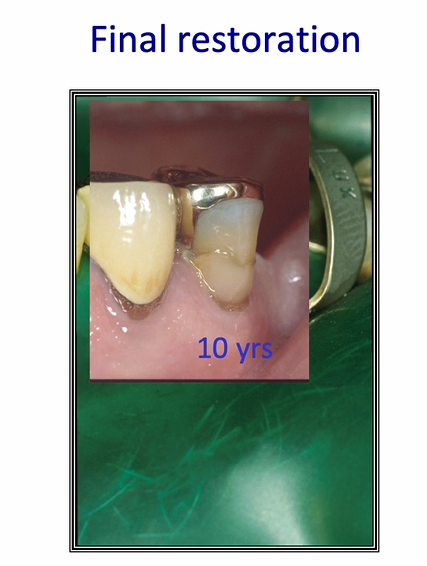
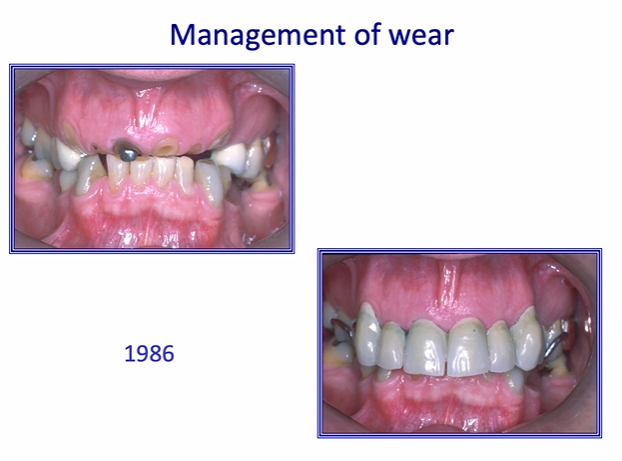
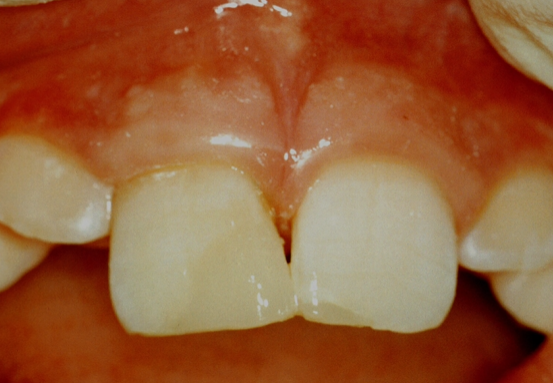
final restoration after 10 years
can see some staining around the margins
etching effect of the self etch adhesive is quite poor - especially in the enamel bonding
seal is not as good as it should be

can be difficult to thin down resin layers
1st molar - can see a dark line associated with the white composite filling
the dark line may be a residual caries or it may be the resin of the adhesive bond - inadequately air thinned
type 4 adhesive
comprises all the stages in one - may be two solutions that need to be mixed - goes on in one go
self etch adhesives 2
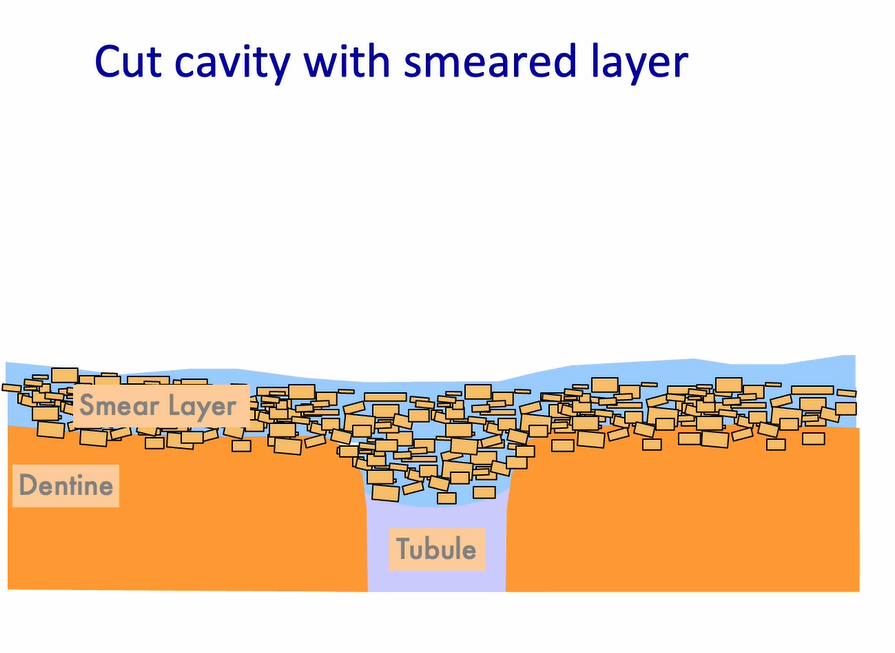
smear layer - the debris which plugs into the dentinal tubules
when we add the self etch adhesive - this fluffs up and becomes solubilised in the acidic primer
dentine is modified, smear plug is modified
resin penetrates into the smear layer
if you apply enough, and rub it rigorously - you can dissolve the smear layer
can achieve a reasonable bond to the tooth

dentine bonding - evaporation of solvent in the bonding and light curing
light curing effect comes from the blue light
air inhibited layer and a bonding layer on the surface
allows the composite to bind to the air inhibited layer
after placement of the restoration
restoration and the adhesive will make a tight junction
are the dentinal tubules in black or red?
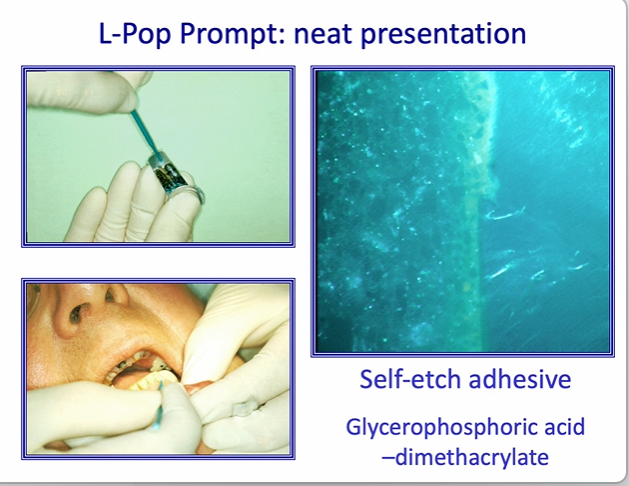

what adhesive was used? serviton cavity seal
Adhesion of conventional Glass Ionomer Cements
Condition the dentine with Poly Acrylic Acid
(PAA) - active ingredient
Cleans pellicle from tooth.
'Pre-wets' tooth surface
Removes smeared layer
Dynamic bonding with tooth
ionic exchange with tooth
GIC Maturation
Setting reaction – acid base reaction of poly-acrylic acid / alumino-silicate glass. round - PAA, jagged - glass, green - enamel/dentine
Maturation – proceeds rapidly over 24 h. – maximal at 6 months.
Ionic exchange – between glass particles and matrix.
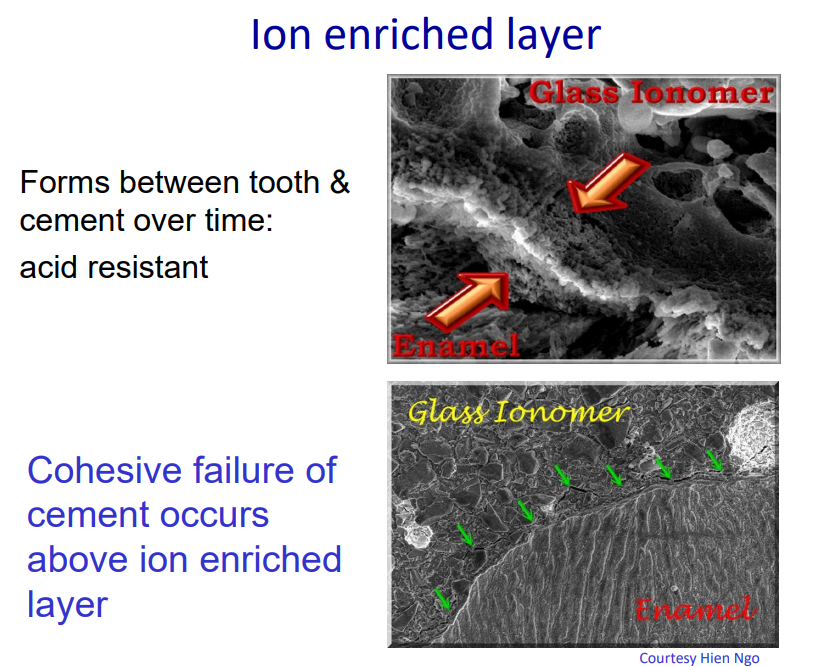
Evidence of dynamic GIC bonding:
bonding is so strong to the enamel its capable of cracking the enamel - this will happen if the GIC is allowed to dry out
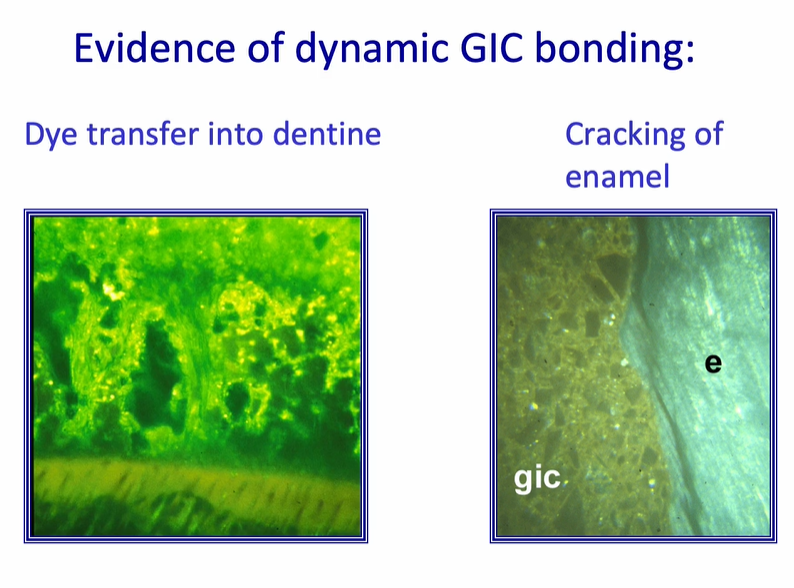
the cement bonds strongly to tooth tissue
many of the failures occur within the GIC - this called a cohesive failure of cement
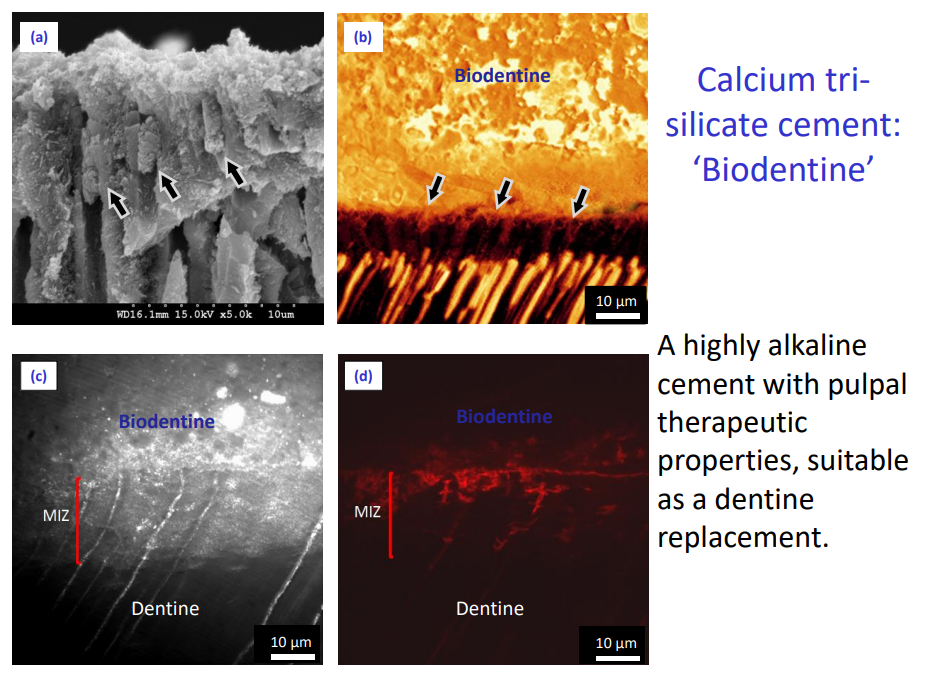
Calcium trisilicate cement: ‘Biodentine’
A highly alkaline cement with pulpal therapeutic properties, suitable as a dentine replacement.
Adhesion resin-modified glass-ionomer cements.
Contain HEMA & GIC Components
Mechanism of adhesion as for Conventional GICs
Limited mechanical penetration of resin into conditioned, primed, surface
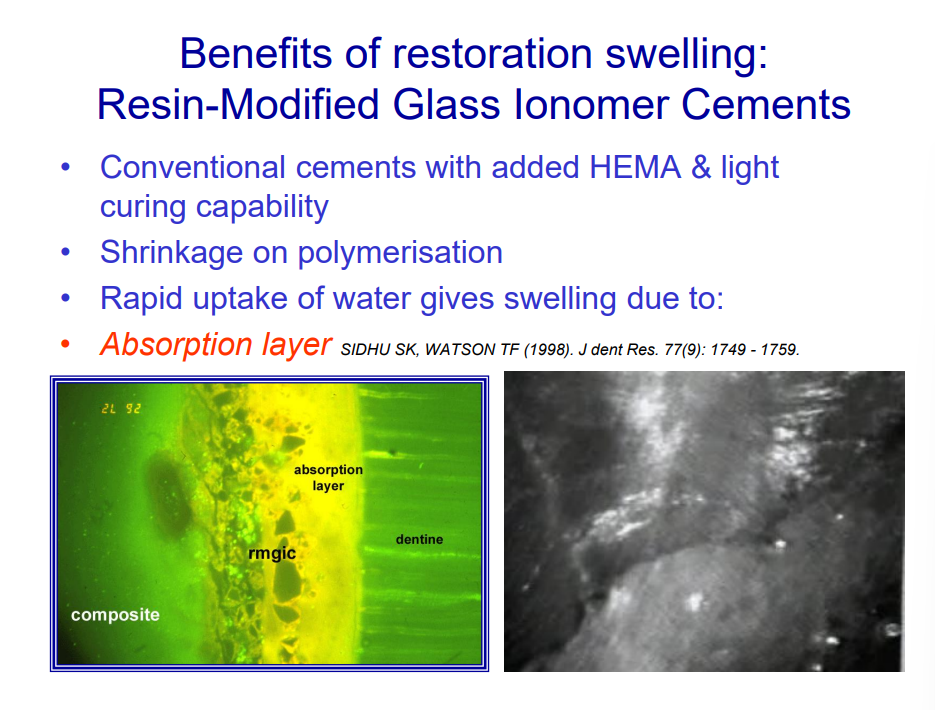
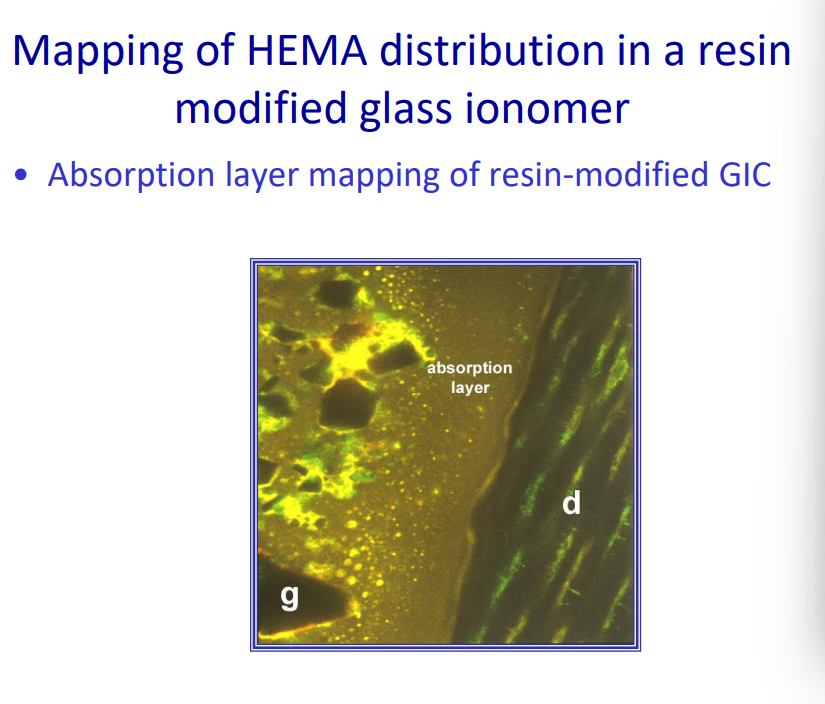
'Absorption layer' next to dentine compensates for shrinkage of resin, by swelling following water up-take.
Benefits of restoration swelling: Resin-Modified Glass Ionomer Cements
compensates for the resin shrinking by the resin itself swelling in water
this forms a seal at the adhesion interface
Mapping of HEMA distribution in a resin modified glass ionomer
Absorption layer mapping of resin-modified GIC
nb - their colour stability is less ideal - once swollen they may stain easier
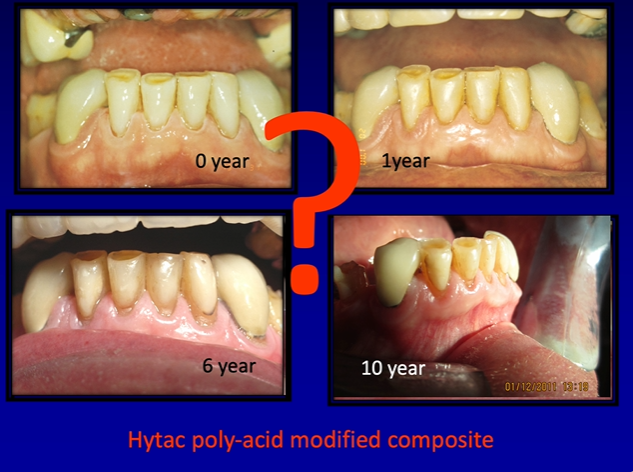
Polyacid modified composites (compomers)
Composites with some GIC components
These can be considered as composites for the purposes of adhesion
Adhesion of Composites - acid etch - enamel
Acid etch technique: removal of smear layer, high energy surface
formation of a honeycomb layer within the enamel which is then infiltrated with the resin
– Enamel: differential dissolution of prism boundaries after 20s etch with H3PO4
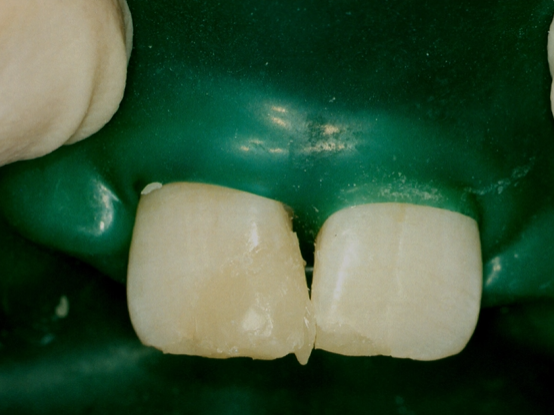
incisal edge being etched - green phosphoric acid
etchant is then thoroughly washed away by water syringe
Adhesion of Composites - acid etch - dentine
Acid etch technique: removal of smear layer, high energy surface
Dentine: dissolution of mineral phase, leaving exposed collagen network
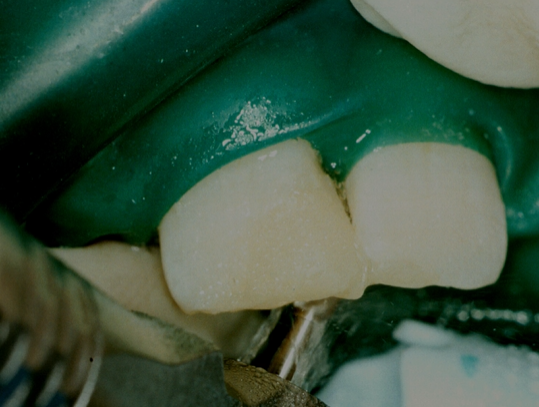
excess water is removed - but not over dried - resin infiltration which forms the hybrid zone

applied generously using a microbrush
adhesive is blown away - primer is evaporated - look for no further rippling
once there is no further rippling
surface is light cured

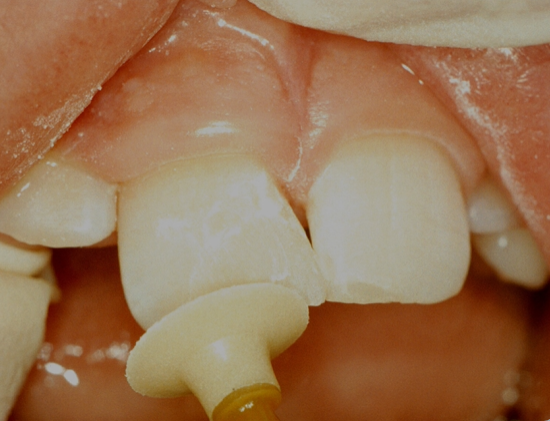
to restore the contours we are using a wedge and a clear matrix
dentine shade is being built up at the core of the tooth using a clean instrument
then, light cured to give the shape of the dentine core
composite - in the enamel shade is built up in excess
with the matrix removed we can see a little bit of excess
excess is trimmed with a water jet and fine diamond burs to recontour the restoration
better done with the rubber dam removed - gives access to all the tooth tissue
restoration is polished using
a silicone rubber disc
final restoration has good contour
colour match is less good because the natural tooth tissue has dried out from being isolated from the mouth by the dental dam - shade needs to be taken before the dental dam is applied
‘Post sealing’ may help to reduce leakage
Re-etch margins after polishing, then apply resin helps to seal any minor cracks that come from cavity preparation or any cracks in the margins of the restoration
etchant is briefly applied then washed away
resin placed over the surface of the tooth

contour matches the tooth well - with an irregular surface as teeth are not always dead flat