OMM Spring Cumulative
1/17
There's no tags or description
Looks like no tags are added yet.
Name | Mastery | Learn | Test | Matching | Spaced | Call with Kai |
|---|
No study sessions yet.
18 Terms
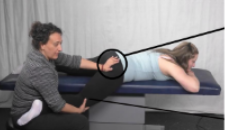
Standing Flexion Test
1. Ask your patient to stand with his/her feet 6-8 inches apart
2. Physician is eye level with the PSISs (kneeling or sitting)
3. Place thumbs lightly at the inferior aspect of the PSISs (Your thumbs must be on the patient’s skin.)
a. *Make sure your thumbs are horizontal (ie. parallel to the floor) for an optimal comparison
4. Instruct Pt to slowly bend forward from the waist as if they were going to touch their toes without bending their knees
5. As the Pt is flexing, the physician observes the movement of her thumbs on PSISs (test may be repeated to confirm).
Note: Positive Standing Flexion Test is indicated by the side where the thumb moves “first and furthest” (ie. more cephalad). The side of the positive test is the side for which the dysfunction is named. This test is specific for ilio-sacral dysfunction
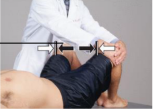
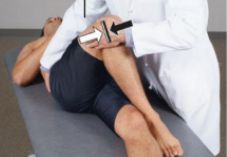
ASIS Compression Test (Pelvic Rock Test)
1. Ask your patient to lie supine
2. Place your thenar and hypothenar eminences along the patient’s ASISs bilaterally
3. Introduce gentle but firm posterior and medial pressure toward the ipsilateral sacro-iliac joint on one side at a time
a. Slow
b. Allow the ilia to recoil anteriorly against gentle pressure
4. Assess for quality of motion
a. One side usually offers more resistance
Note: Diagnosis: The side that offers more resistance with downward and medial pressure is the side of the positive test. However, this test is nonspecific. It could be indicative of ilio-sacral dysfunction (i.e. pelvic) or of sacro-iliac dysfunction (i.e. sacral). Used to confirm findings.
Static Exam
1. The first step is to reseat the pelvis!
a. This will make sure the pelvis is evenly placed on the table
and that your patient is not leaning towards one side or the other
b. Ask your patient to bend his or her knees and place feet flat on table, then lift pelvis off table, then place their pelvis back down and straighten his or her legs onto the table
2. Next, examine the Anterior and Posterior Landmarks
ASIS Static
1. Pt supine, physician standing with dominant eye closest to patient
2. Stand so that your dominant eye can be over the vertical midline of the pt.
a. Facing the patient’s head
b. May need to lean your side over the table to get your eye midline
3. Lay the edge of your thumbs perpendicular to the inferior aspect of each ASIS – snugly – to determine which ASIS is relatively superior and which is inferior
4. Then, using the umbilicus as a landmark, determine the relationship of the ASISs to the midline.
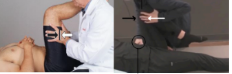
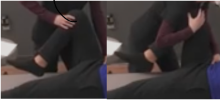
Pubic Tubercle Static
Same beginning steps as above
**Let your patient know that you intend to examine the lower part of their pelvis at the pubic bone (consider showing the patient where this landmark is to be clear).
1. Starting at the level of the umbilicus, gently inch down with the heel of your hand (fingers pointing cephalad) until it meets the bony pubic symphysis
2. Then gently place your thumb (or index finger) pads over the superior aspect of the pubic tubercles bilaterally to determine which side is relatively superior and which is inferior.
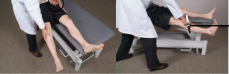
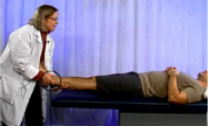
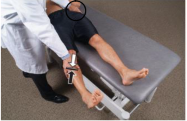
Medial Malleoli Static
If not done so already, have the patient “reseat” their pelvis by bending knees, feet flat on the table, lifting the pelvis in the air, and putting the pelvis and then the legs back down
1. Gently add traction inferiorly at both ankles to remove any slack
2. Place your thumb pads just inferior to the medial malleoli
bilaterally to determine which side is relatively superior and which is inferior.
PSIS Heights
1. Perform prone so you can see and feel after checking ASIS
heights.
2. Find the iliac crests.
3. Place thumbs on the inferior slope of the PSISs bilaterally to determine which PSIS is relatively superior and which is inferior.
4. Alternatively (more challenging): One could determine the PSIS heights with your partner supine.
a. Reach around posteriorly with both hands to find the bilateral PSISs
b. It is best to be on the skin to examine the PSISs
Naming Pelvic Somatic Dysfunction
1) Follow the steps in order
2) Be meticulous and consistent with your hand placement
3) Use your dominant eye over the body’s midline
4) Name findings based on the side of the positive standing flexion test
MET for Anterior Rotation Pelvic Dysfunction
MET for Posterior Rotation Pelvic Dysfunction
MET for Superior Shear Pelvic Dysfunction
MET for Inferior Shear Pelvic Dysfunction
MET for Inflare Pelvic Dysfunction

MET for Outflare Pelvic Dysfunction
MET for Superior Shear Pubic Dysfunction
MET for Inferior Shear Pubic Dysfunction
MET for Pubic Compression (Pubic Dysfunction)
MET for Pubic Gapping (Pubic Dysfunction)