1 - Selective Caries Removal and Cavity Preparation: Feitosa
1/69
There's no tags or description
Looks like no tags are added yet.
Name | Mastery | Learn | Test | Matching | Spaced | Call with Kai |
|---|
No analytics yet
Send a link to your students to track their progress
70 Terms
Caries lesions initiates a cascade of re-treatment with increasing loss of ______ _____ ______
dental hard tissue
The death spiral (picture)

To reduce the speed of the death spiral process we must make the preparation as _____ as possible
make minimal preparation.
- Do the prep as small as possible
What type of caries removal do we practice
Selective caries removal
_____ ____ is the name of the disease
dental caries
is the consequence and manifestation of the disease- the signs or symptoms of the disease
carious lesion
Involves control of the disease through prevention and noninvasive means at a patient level
dental caries management
Controls the disease symptoms at the tooth level
carious lesion management
Clinical and radiographic classifications are by ____ and _____
severity and activity
Managing caries can be patient specific (as learned in cariology), or lesion specific and can be ____ or ___-_____
- Surgical
- Non-surgical
intital caries are surgical or non surgival
non-surgical
first visual changes in the enamel - can be remineralized
Based on Lesion Severity- Visual
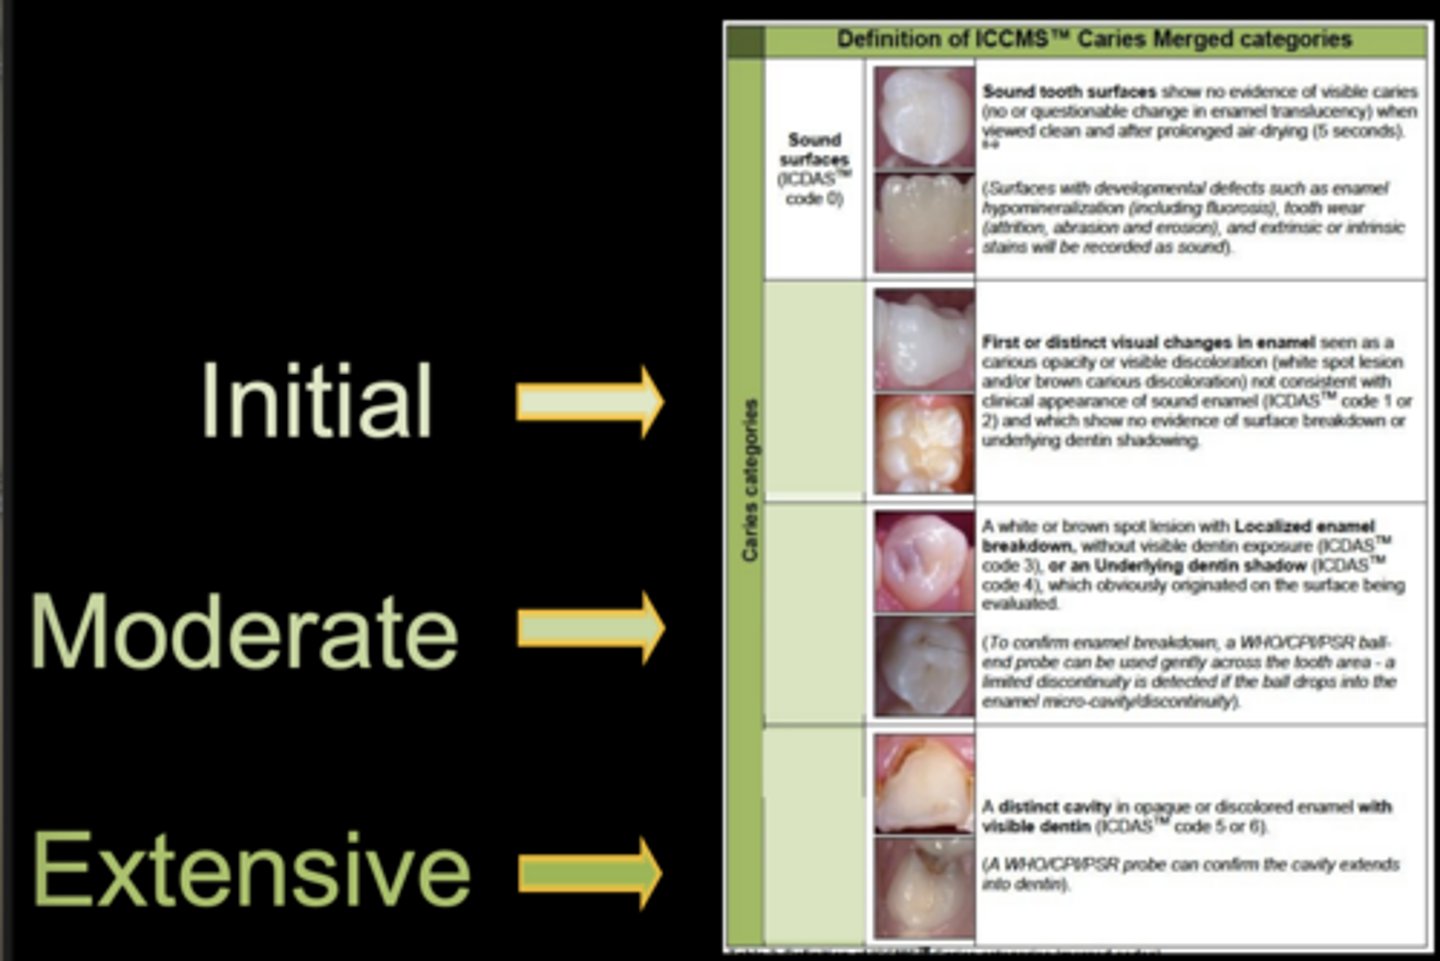
initial caries description
Class I or II
first visual changes in the enamel (white spot lesion or brown carious discoloration)
no dentin shadowing
moderate carious lesion
Class III or IV
can be localized enamel breakdown with no dentin shadowing (III)
OR
underlying dentin shadowing (IV)
no dentin is exposed
extensive carious lesion
Class 5 or 6
a distinct cavity with visible dentin
Based on Radiographic Assessment
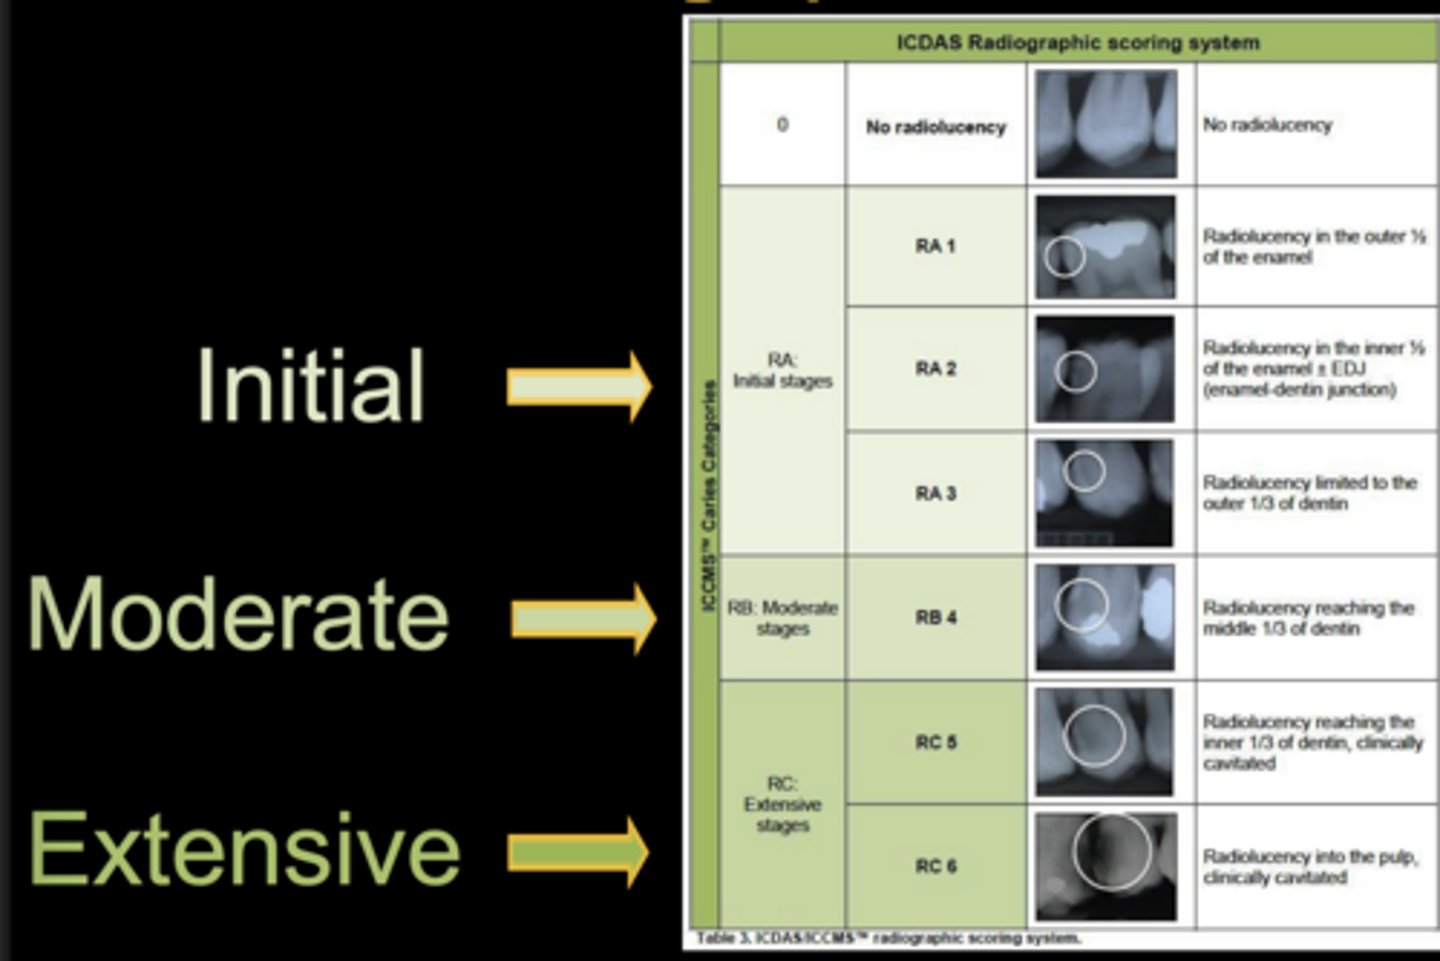
RA 1 - initial
radiolucency in the outer ½ of the enamel
RA 2 - intitial
radiolucency in the inner ½ of the enamel + DEJ
RA 3 - initial
radiolucency in the outer 1/3 of dentin
RA 4 - moderate
radiolucency in the middle 1/3 of dentin
RA 5 - extensive
radiolucency reaching inner 1/3 dentin, clinically cavitated
RA 6 - extensive
radiolucency into the pulp
Before reaching for a handpiece the dentist must also consider _______ options
non-invasive
with carious tissue removal we want to retain the tooth and the healthy/vitality of its ____ for as long as possible
pulp
To retain the tooth and the healthy/vitality of its pulp for as long as possible
Reversible Pulpitis
Sensibility/Vitality - noraml responses to:
- Thermal tests
- Electric Pulp tests
in caries removal we want to avoid ____ exposure
pulp
in caries removal we want provision of sound cavity margins to achieve an adequate _____ _____
peripheral seal
in caries removal we want to control the lesion and inactivate remaining _____
bacteria
For moderate lesions (not reaching inner third of dentin) - the restoration ______ may be more important
longevity
outer 1/3 dentin and enamel = restoration
Extensive- Deep lesions (radiographically involving inner pulpal third or quarter of dentin or with clinically assessed risk of pulpal exposure) preservation of _____ _____ should be prioritized
pulpal health
inner 1/3 dentil + pulp = vitality of tooth main priority
When I do a selective caries removal can I leave caries (soft stained dentin) on the margin
NO
On the margin you need to have the best ______
bonding
centrally you can leave some of the _____ ____
affected dentin
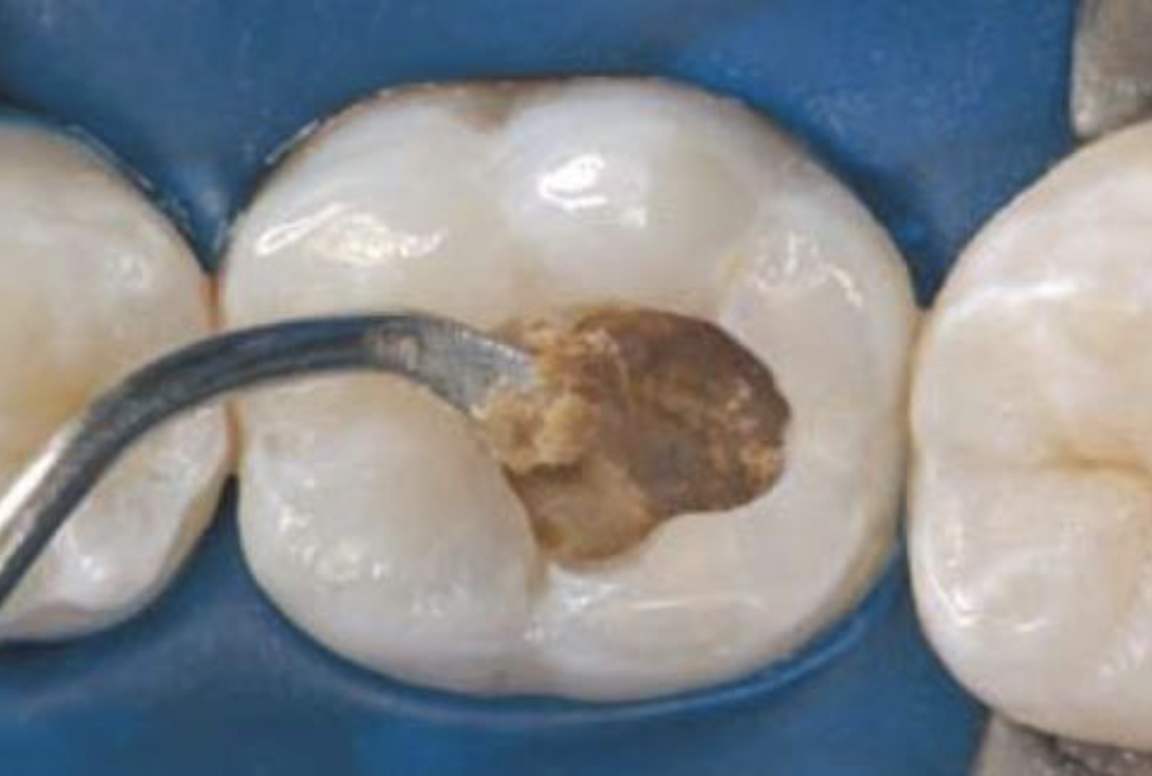
4 characteristics of dentin
Soft
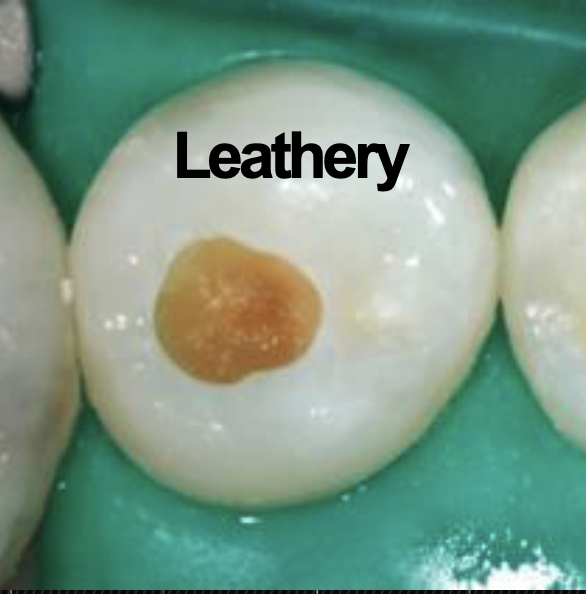
Leathery
Firm
Hard
Will deform when a hard instrument is pressed onto it and can be easily scooped up (with a sharp hand excavator) with little force being required
Soft Dentin
Although dentin does not deform when an instrument is pressed onto it this dentin can still be easily lifted without much force being required
Leathery Dentin
May be little difference between leathery and firm dentin, with leathery being a transition on the spectrum between soft and firm dentin
Physically resistant to hand excavation, and some pressure needs to be exerted through an instrument to lift it
Firm Dentin
A pushing force needs to be used with a hard instrument to engage the dentin, and only a sharp cutting edge or a bur will lift it. A scratchy sound or "cri dentinaire" can be heard when a straight probe is taken across the dentin
Hard Dentin
Most external area of the preparation: in coronal areas is the enamel and DEJ, in gingival areas only dentin
periphery
in coronal areas the periphery is the _____ and ____, in gingival areas only _____
enamel and DEJ
dentin
The periphery must be ____, _____, and free of ______
clean, hard and free of discoloration
Once restored the periphery is closest to the oral environment, so it is imperative to have a good restoration ____ in these areas
seal
Caries removal steps: 1. Access
If lesion is NOT sufficiently cavitated, removal of enamel is necessary (High speed, with water)
Where there is enamel, extend the periphery depth and width to the depths of the 330 until the dentin at the DEJ is no longer
soft/stained.
(Halo of yellow/hard dentin exposed)
some caries lesion are accessible and initial enamel removal is ____ ______
not necessary
Remove the remaining firm caries and demineralization along the DEJ with a small round bur using slow speed ______ [with/without] water?
Without
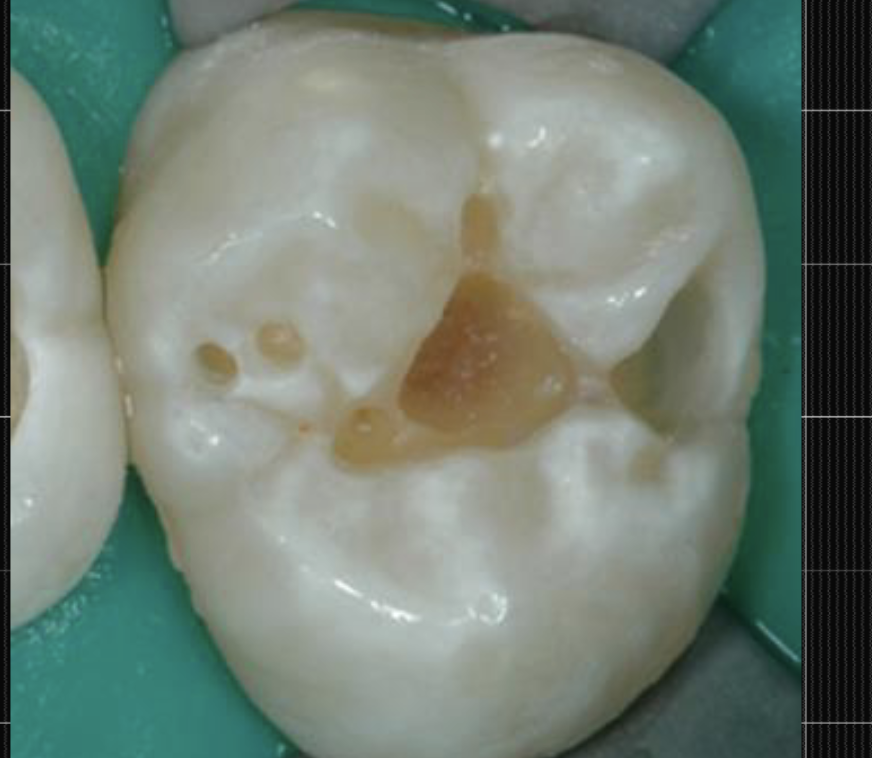
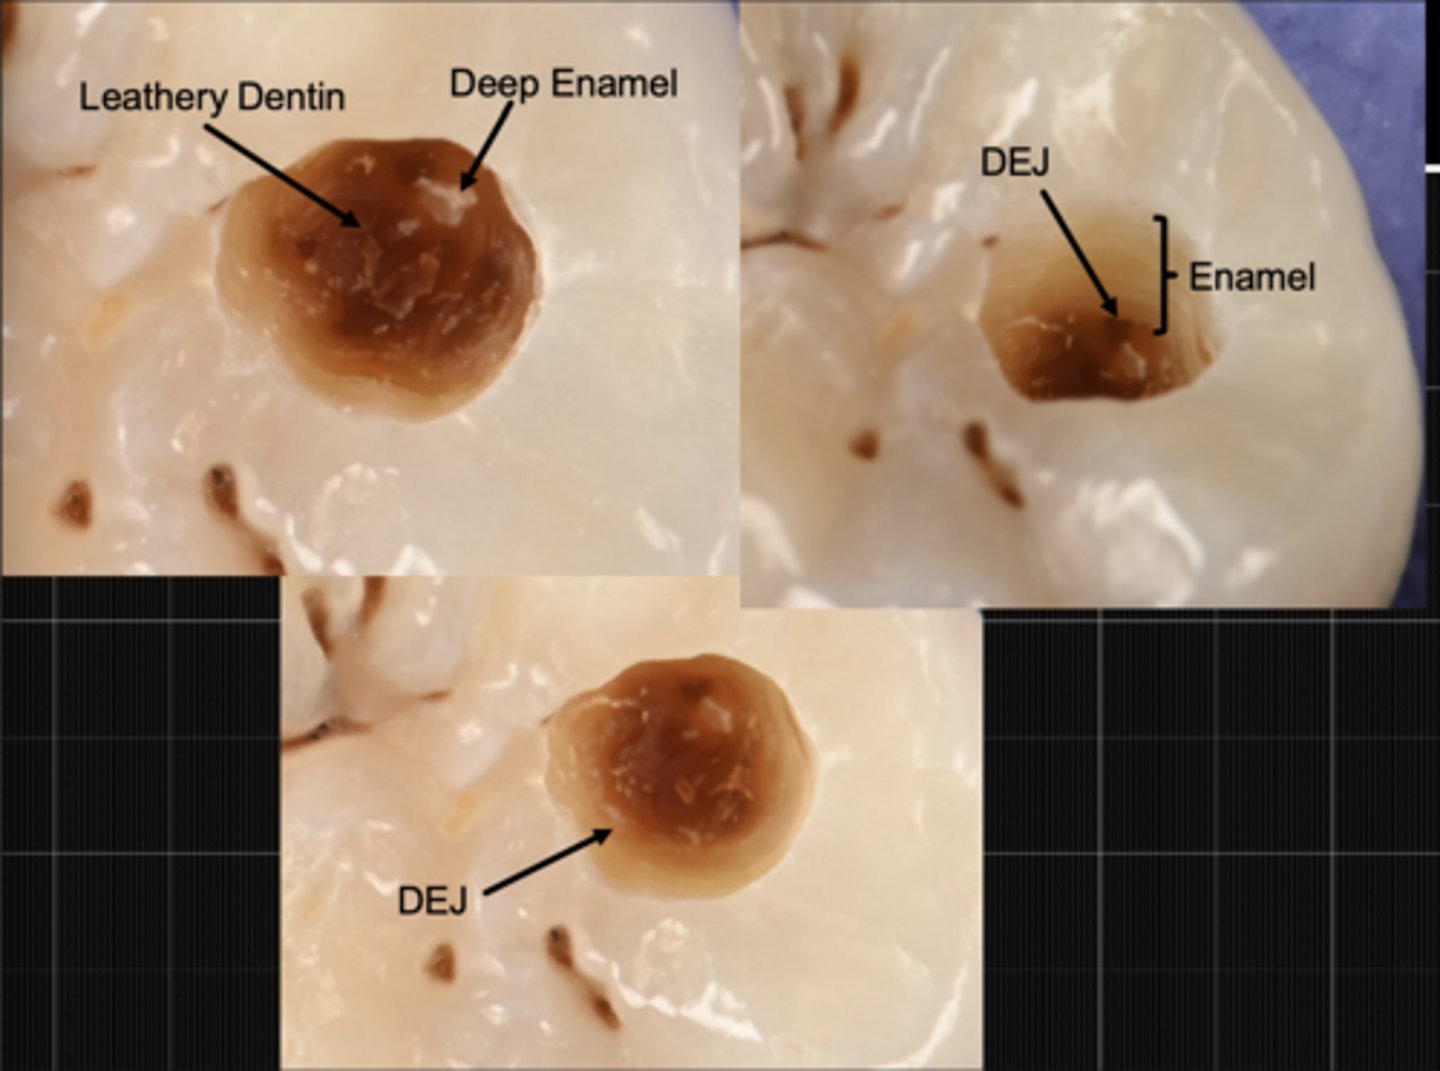
Ideally the dentin at the DEJ should be ____ and _____
hard and clean
The dentin along the DEJ should have a ____ _____ apprearance in the shape of a halo of approximately __mm
light yellow
1mm
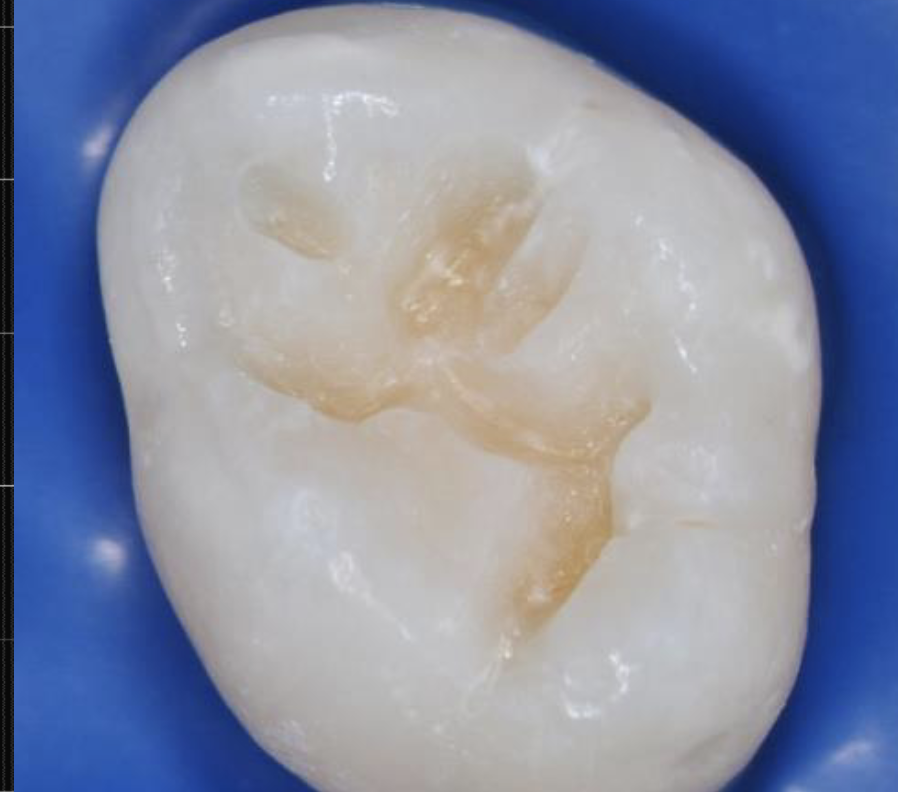
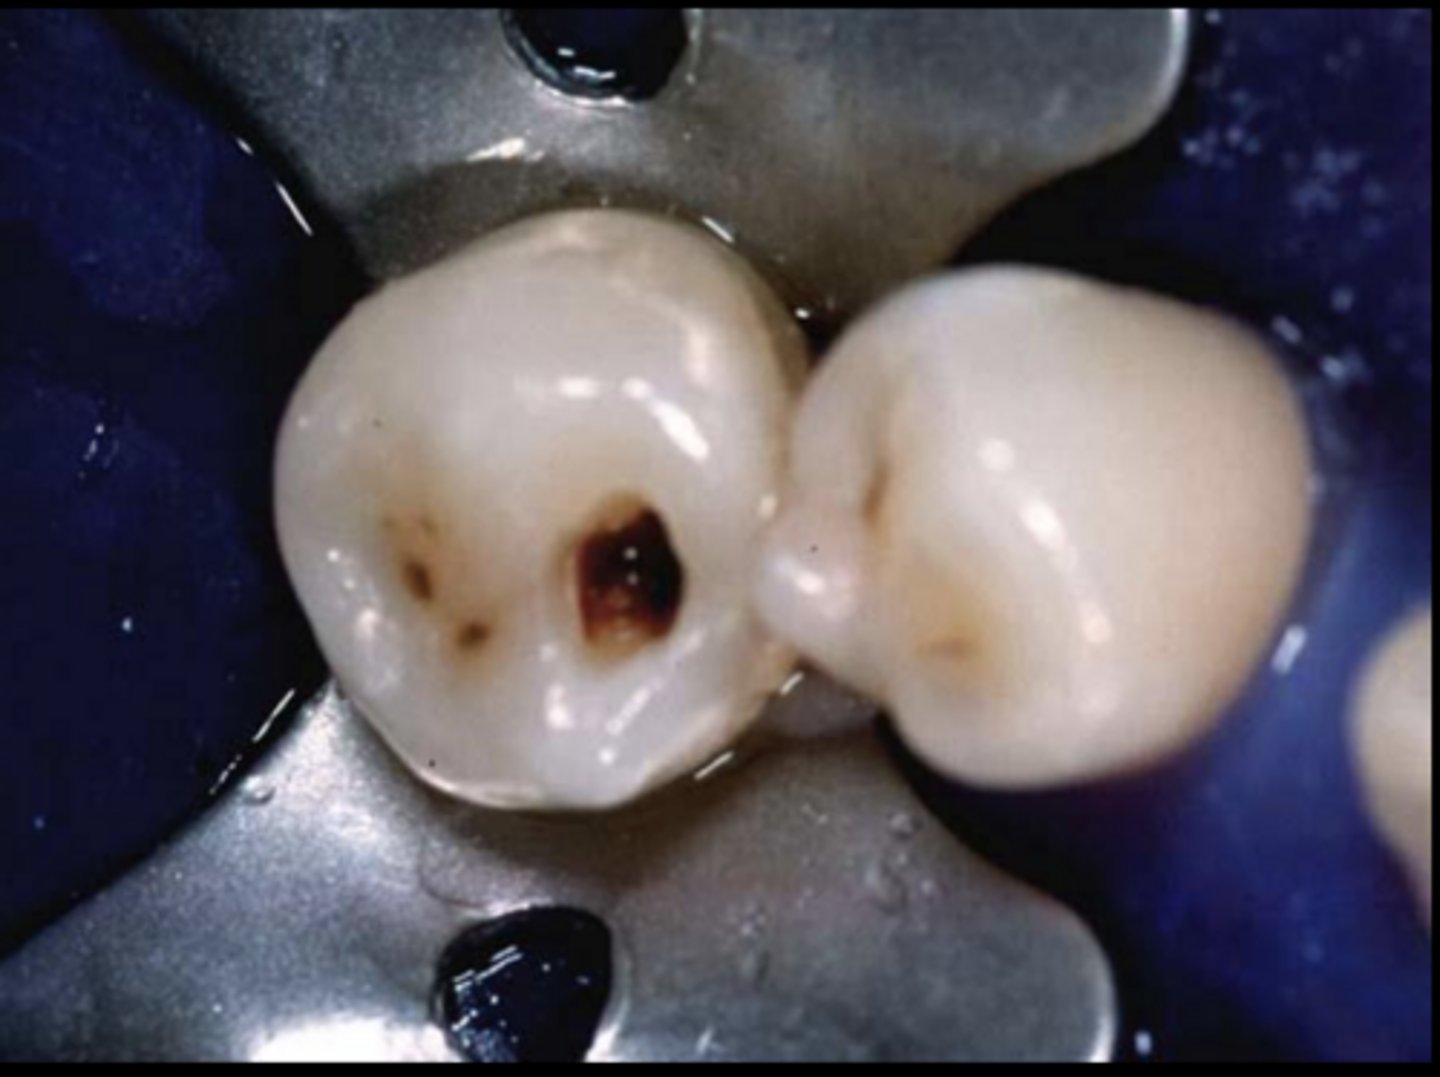
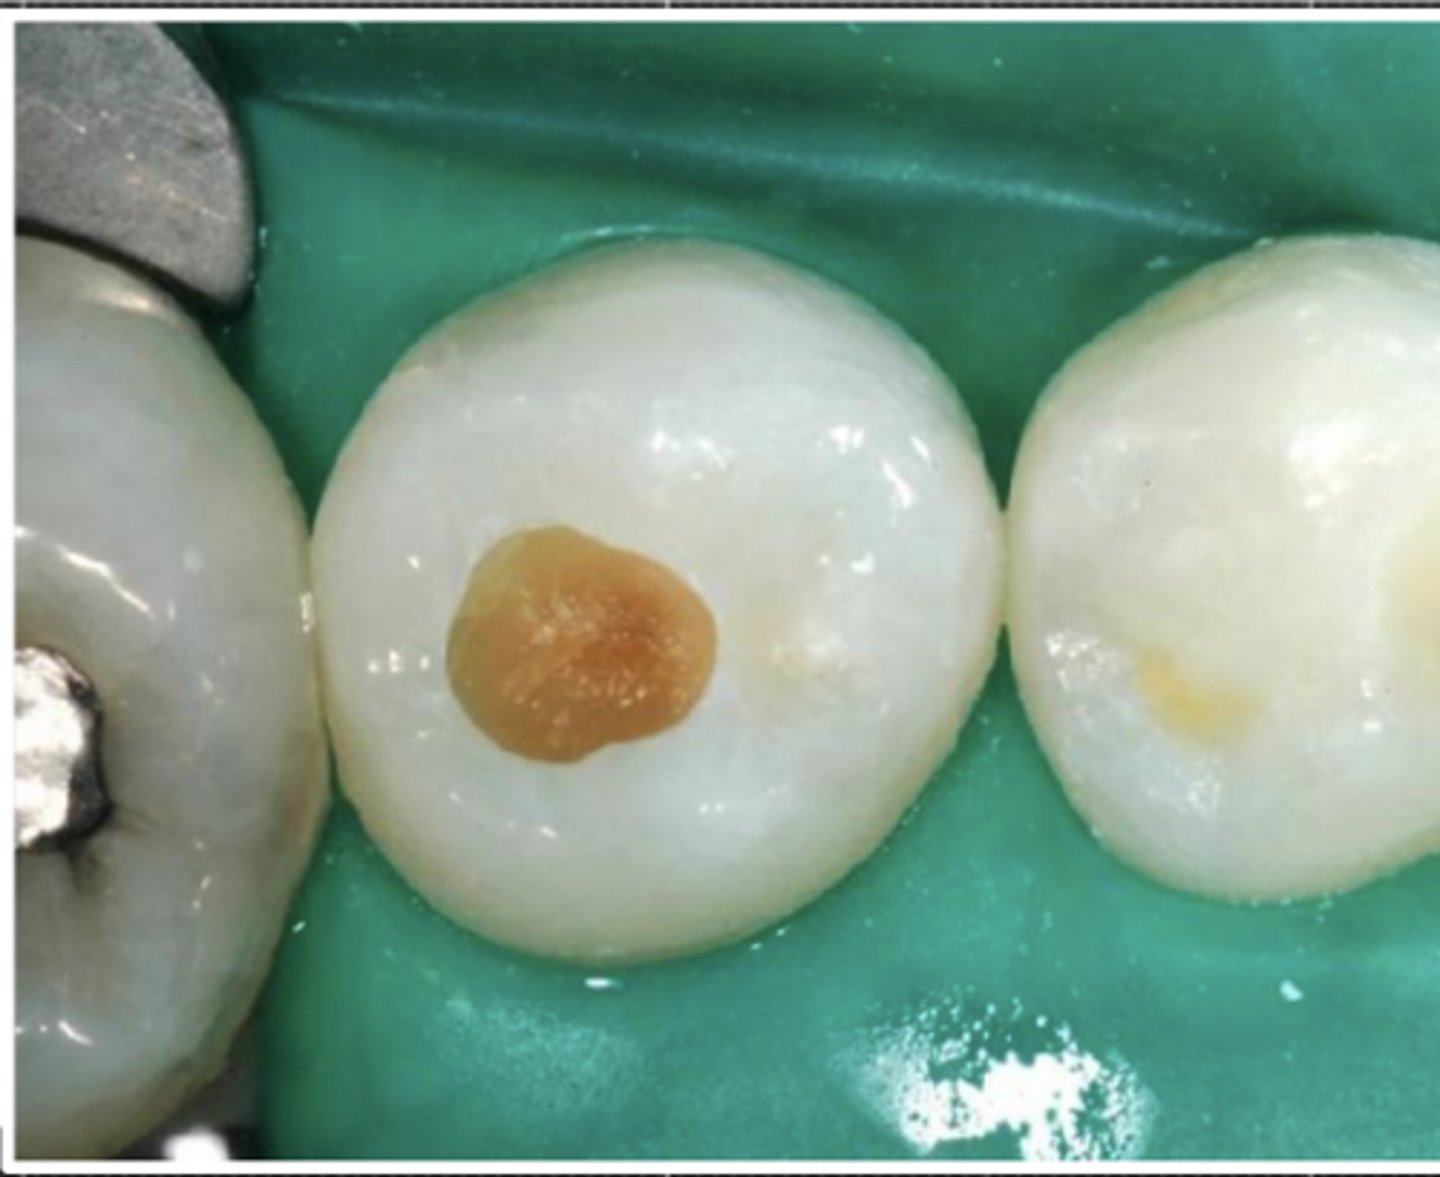
Pictures
Caries removal instrument/ aids
Appropriate radiographs and current pulpal status
Clean dry tooth- avoid repeated or forceful drying to prevent pulpal damage
Adequate illumination and magnification
Spoon excavator, small and large round burs on slow speed
Mirror- most commonly missed areas are under cusp tips and at DEJ, always check with a mirror for these access-limited areas using multiple mirror angulations
For best visualization during caries removal turn your handpiece water
off
Intermittently spray water from the air/water syringe to keep the dentin _____ will help with preserving the _____
moist, pulp
Do not _____ the tooth, keep it moist
desiccate
Moist dentin allows for visualization of the ______
lesion
Margins should be ____ and _____. It is important to remove undermined ______
smooth and uniform
enamel
prior to restoring the remaining enamel should be _____ allowing for the most durable sealing of the restoration
sound
Final enamel presentation: DEJ should visibly free of ____ and _____
stain and discoloration
Final enamel presentation: Enamel feels ____ with an explorer
hard
Final enamel presentation: Enamel cannot be removed with a _____ _____
spoon excavator
Final enamel presentation: if enamel is little demineralized, it is _____ and ____, not ____ or _____
shiny and intact, Not flaky or dull
Selective removal is based on _____ ____
Lesion severity
what constitutes moderate lesion severity
caries limited to the outer 1/3 of dentin
what constitutes extensive lesion severity
Caries extending into inner 1/3 of dentin
Moderate severity is selective to
FIRM dentin
Extensive severity is selective to
SOFT Dentin
Pulpally remove carious tissue until ____ or _____ dentin is reached or until it is resistant to ____ _____
leathery or firm dentin, spoon excavation
- using a larger bur on slow speed or gently with a spoon
- Firm dentin on the pulpal floor, rather than aiming for hard dentin
The periphery of cavity should be ____/___
clean/hard (sound dentin)
Tissue removal to allow adequate ____ _____ and ____ for a durable restoration
marginal sealing and bonding
In a moderate lesion we are centrally leaving affected (soft) dentin to
stay far from pulp
Extensive lesions: Selective caries removal steps
Evaluate the lesion- visually and radiographically
Access- remove enamel to obtain a clear DEJ. High speed with water
Caries removal at DEJ with smaller round bur, e.g #2 or #4 on Slow speed without water, so you can visualize what is being removed
If needed, remove soft wet disorganized carious tissue to leathery (experience required)