hsc MA final practicum
1/30
There's no tags or description
Looks like no tags are added yet.
Name | Mastery | Learn | Test | Matching | Spaced | Call with Kai |
|---|
No analytics yet
Send a link to your students to track their progress
31 Terms
Glucose
Units: Results are reported in mg/dL.
Supplies: Gather a lancet, alcohol wipe, gauze, and glucometer.
Procedure:
Locate and warm the 4th digit (ring finger).
Insert the glucose strip into the glucometer and wait for the start signal.
Clean the site and puncture with the lancet.
Wipe away the first drop of blood with gauze.
Apply the glucose strip to the blood until the meter fills and beeps.
Have the patient hold gauze on the finger and apply a bandage.

Mono
Supplies: Lancet, alcohol wipe, and gauze.
Procedure:
Locate the finger of choice.
Clean the site, puncture with the lancet, and wipe the first drop of blood.
Allow blood to drip onto the designated area of the test.
Apply one drop of the specific developer solution.
Read results after 10 minutes
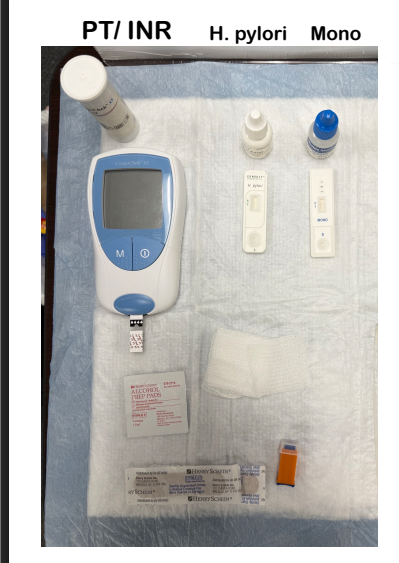
H. pylori
Supplies: Lancet, alcohol wipe, and gauze.
Procedure:
Locate the finger of choice.
Clean the site, puncture with the lancet, and wipe the first drop of blood.
Allow blood to drip onto the designated area of the test.
Apply one drop of the specific developer solution.
Read results after 10 minutes

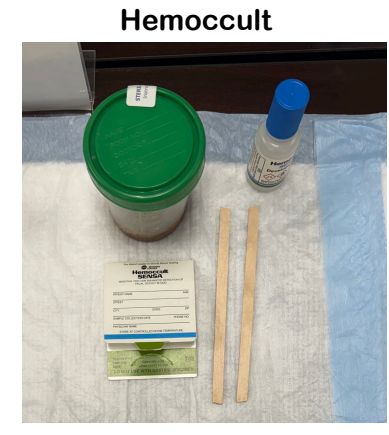
Hemoccult
Sample Collection: The patient provides a stool sample.
Initial Step: Apply the sample to windows A and B, close the card, and wait 3–5 minutes.
Development:
Flip the card to the back side.
Apply two drops of developer over the stool smear.
Read results within 60 seconds; any trace of blue is a positive result.
Control Test:
Apply one drop of developer between the positive (+) and negative (-) areas.
Read within 10 seconds.
A blue color must show in the positive area and no blue in the negative area
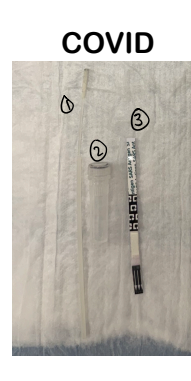
covid
COVID-19 Testing
Preparation: Have the patient blow their nose and tilt their head back.
Collection: Insert a nasopharyngeal swab, twist, and remove.
Processing:
Place the swab into the solution and twist.
Insert the test strip into the solution.
Reading: Read after 15 minutes.
A control line must be present.
A positive test is indicated by double lines.
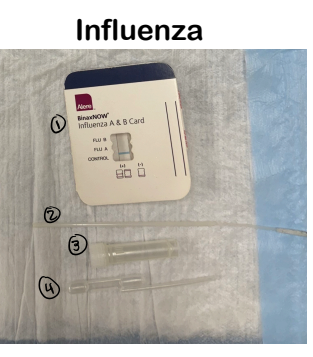
influenza
Preparation: Have the patient blow their nose and tilt their head back.
Collection: Insert a nasopharyngeal swab, twist, and remove.
Processing:
Place the swab into the solution and twist.
Pipette the solution onto the test card and close it.
Reading: Read after 15 minutes.
A control line must be present.
A positive test is indicated by double lines.
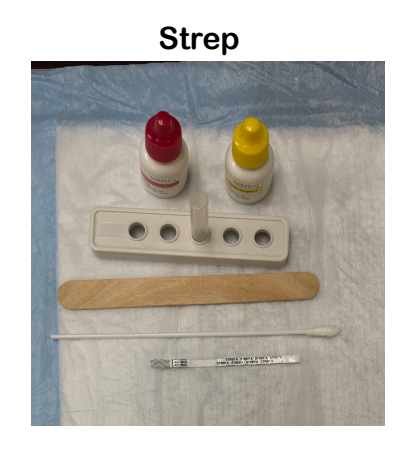
Strep (streptoccus screening)
Setup: Place the tube in the holder and add 4 drops each of reagent A and B. (so 4 drops of reagant A and 4 drops of reagnant B)
Collection: Swab both sides of the throat; use a tongue depressor if needed.
Processing:
Insert the swab into the tube and wait 1 minute.
Squeeze out the swab and discard it in biohazard.
Place the strep dipstick into the solution.
Reading: Read results in 5 minutes.
(Remember - M shape bc of yellow and red=Mcdonalds)
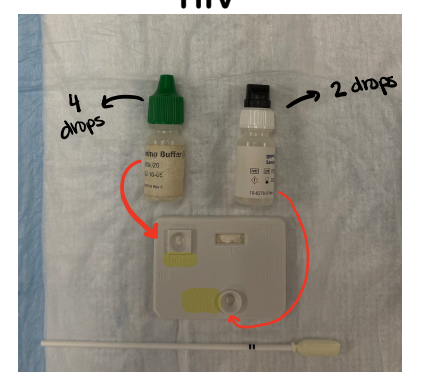
HIV
HIV Testing
Collection: Gently swab the test stick along the upper and lower gums four times for at least 30 seconds.
Processing:
Insert the stick into the SampleTrainer bottle and snap the shaft at the notch.
Replace the cap and shake for at least 10 seconds.
Invert the bottle vertically over the sample/buffer well and add 2 full drops.
Wait 5 minutes, then add 4 drops of green-cap Running Buffer vertically into the buffer well.
Reading: Read between 25–40 minutes.
One line is negative; two lines are positive.
If nonreactive, you must wait the full 40 minutes before reporting a negative.
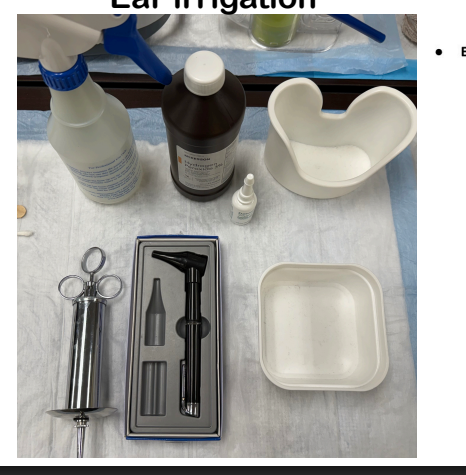
Ear Irrigation
Assessment: View the ears with an otoscope.
Procedure:
Prepare a warm solution of water and a dollop of hydrogen peroxide.
Draw up the solution and clean the ears.
Recheck with the otoscope to confirm progress; repeat as needed.
Stool softener can be used to break up stubborn wax (let sit 5 minutes per side).
(10 panel CLIA) Drug Screen
Collecting urine:
General Collection (Clean Catch Mid-Stream)
Male Anatomy: Wipe once, then perform a mid-stream catch.
Female Anatomy: Wipe three times (right, left, middle) from front to back, then perform a mid-stream catch
Actual Procedure:
Collection: After collection, screw the cap until it clicks.
Temperature: Check the temperature at 2–4 minutes; read the green color on the indicator strip.
Security: Donor initials and dates the seal, which is then placed over the cap.
Reading: Remove the label after 5 minutes to read.
2 lines = negative.
1 line at top = positive.
1 line at bottom = invalid.
Positive results must be sent for MRO confirmation.
Urine culture
Collecting urine:
General Collection (Clean Catch Mid-Stream)
Male Anatomy: Wipe once, then perform a mid-stream catch.
Female Anatomy: Wipe three times (right, left, middle) from front to back, then perform a mid-stream catch
Actual Procedure:
Submerge a stick into urine.
Puncture the vacuum tube via needle inside the tube holder.
Label tube with name, date, time, and initials.
Place in a transport bag.
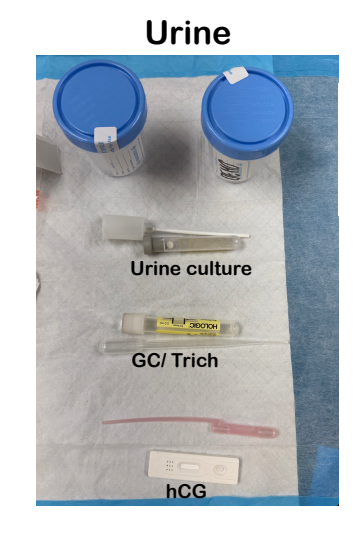
Gonococcus, Chlamydia (bacterium) aka GC/Chlamydia Testing, Trichomonas (protozoan)
Collecting urine:
General Collection (Clean Catch Mid-Stream)
Male Anatomy: Wipe once, then perform a mid-stream catch.
Female Anatomy: Wipe three times (right, left, middle) from front to back, then perform a mid-stream catch
Actual Procedure:
Remove the top of the tube.
Use pipette to draw up urine to the fill area of the tube (2mL).
Label the tube: Patient’s name, date, time, and initials.
Place the sample in a transport bag. Send to the lab
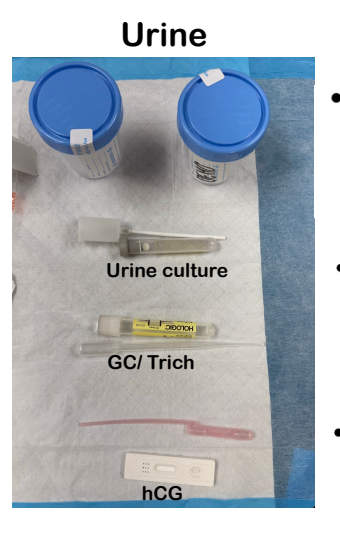
hCG (pregnancy test)
Collecting urine:
General Collection (Clean Catch Mid-Stream)
Male Anatomy: Wipe once, then perform a mid-stream catch.
Female Anatomy: Wipe three times (right, left, middle) from front to back, then perform a mid-stream catch
Actual Procedure:
Ask pt to leave urine sample
Use a general pipette to drop 3 drops onto hCG labeled cassette.
Read result in 5min, Control must always be present.
just the line in the control=negative
double line = positive.

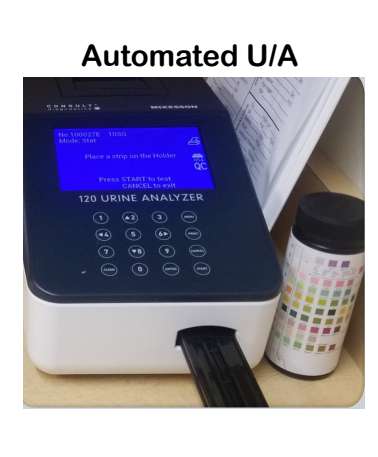
Urinalysis (automate)
Collecting urine:
General Collection (Clean Catch Mid-Stream)
Male Anatomy: Wipe once, then perform a mid-stream catch.
Female Anatomy: Wipe three times (right, left, middle) from front to back, then perform a mid-stream catch
Actual Procedure:
Press Start
Place dipstick into urine, submerge all the squares
Slide strip off the side of the cup or pat one side on blue chuck pad once--to prevent the colors from running.
Insert strip into the middle of the open chamber. WAIT. (do not push the chamber inside)
After 64 seconds, the sample will go into the chamber and the results will print.
Press print if the results do not print automatically. Tape results to your U/A Sheet
Press CANCEL to clear the results
Urinalysis (manual)
Collecting urine:
General Collection (Clean Catch Mid-Stream)
Male Anatomy: Wipe once, then perform a mid-stream catch.
Female Anatomy: Wipe three times (right, left, middle) from front to back, then perform a mid-stream catch
Actual Procedure:
Place a urine sample onto a blue chuck and remove the dipstick from the bottle.
Place dipstick into urine, submerge all the squares.
Slide strip off the side of the cup or pat one side on blue chuck pad once--to prevent the colors from running.
Wait for the squares to develop (time in seconds is listed next to each square on the bottle; the top leukocytes are finished after 120 sec).
Line up the stick with the container and record values, bottom up.

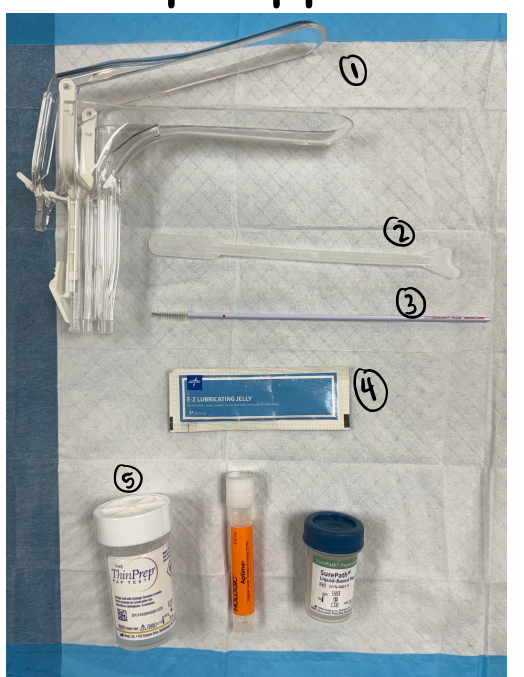
Pap Smear
Pap Smear
Supplies: 1)speculum 2)spatula 3) brush 4)lubricant 5)transport tube
Patient Prep: Provide a gown; the patient undresses from the waist down.
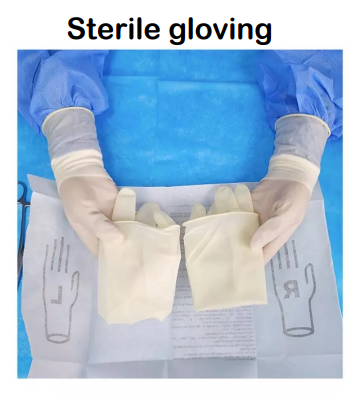
Sterile gloving
Lift table waist high
Open package-only touching the 2-inch margin
Use one hand to grab non-sterile side of one glove
Slide in first hand
Slide sterile hand under sterile side of the glove
Use leverage to slide in opposite hand
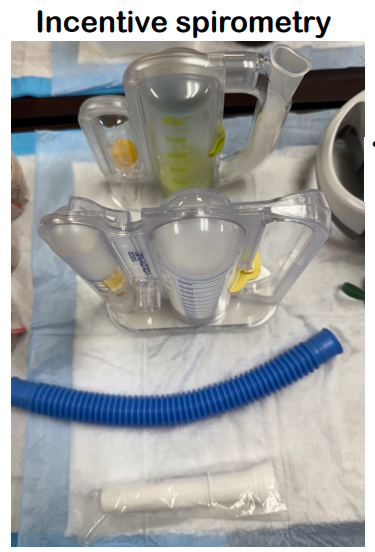
Spirometry (incentive spirometer)
Inform pt of lung volume goal (moving yellow tab up/down the spirometer)
Instruct pt to exhale completely, then inhale slowly until the lung volume is met
Ask pt to repeat goal every so often (e.g. during commercial breaks when watching TV)
Nebulizer
Assemble nebulizer kit
Add medication into container
Attach top of nebulizer and hand to pt
Have pt seated securely in upright position
Instruct the pt to inhale aerosol normally-taking a deeper breath during every other breath
Inform patients of possible lightheadedness and tell them to turn off the machine if this happens.

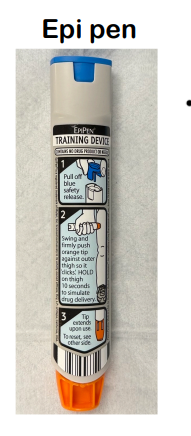
Epi pen
Recognize that patient is experiencing a severe allergic reaction
Hold the EpiPen with the orange tip (where the needle is) pointing downward and the blue safety cap pointing up.
Remember this phrase: Blue to the sky, orange to the thigh
Remove the blue safety cap.
Pull straight up on it.
Do not bend or twist it
Place the orange tip against the middle of the outer thigh.
Using a slight swing, jab the auto-injector into the thigh until you hear the device click
Hold the EpiPen firmly in place for three seconds.
Count slowly
Activate emergency response
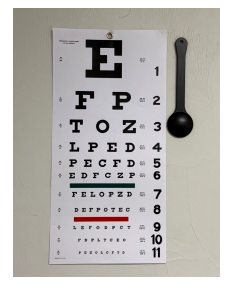
Snellen
Hand pt black eye occluder and position pt to 20 ft away from eye chart
Ask pt to cover R, then L eye, with eye occluder while reading lowest line possible
0-1 letters wrong = pass; go to the line below it
>1 wrong fail; go to the line above it
Record the results from each eye (e.g., 20/20 R, 20/15 L, 20/20 both)
Finally, ask pt to read with both eyes
Jaeger
Have the patient hold the chart 14-16 inches away from their eyes
Have them identify the smallest line they can read
The patient should read the smallest line; ask if they can read the line above it
The smallest line read correctly is the vision.
Document results

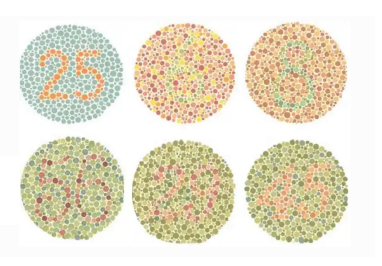
Ishihara
Bring out a test packet and ask pt to identify numbers and patterns within the circles
Pt can identify numbers verbally and/or identify with a finger.
Certain number combinations will help identify different kinds of color blindness
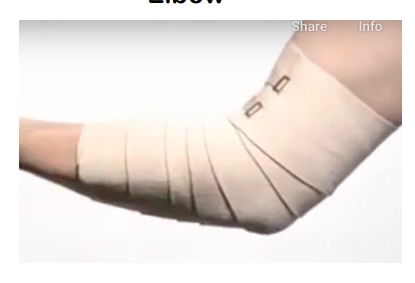
Elbow
begin mid-forearm, wrapping a few times
wrap up the arm, covering half of previous wrap as you go along
wrap to mid upper arm and secure with fastener.
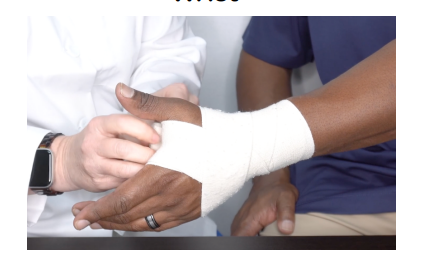
Wrist
Ensure you wrap your bandage above and below the joint.
Begin your wrap at the lower part of your forearm.
Overlap each layer of the bandage by about 50 percent.
Make figure-eight patterns around the joint to create stability.
Use the Velcro or fastener at the end to stabilize your wrap
Ankle
Begin wrapping at top of foot
wrap under and around top of foot to secure
while wrapping, create tension in lateral or medial motion, opposite direction of accident
multiple diagonal figure 8 motions around ankle
Finish wrap by fastening.

Knee
wrap around lower leg, below knee, circle a few times
wrap diagonally behind knee
wrap above knee
continue wrapping diagonally behind the knee, creating figure 8
repeat multiple times
finish by wrapping above the knee several times and securing with fastener

ID (give injection type, needle gauge & length, angle, possible locations)

Insulin (Sc) ( give needle gauge & length, angle, possible locations)

SC (give injection type, needle gauge & length, angle, possible locations)

IM (give injection type, needle gauge & length, angle, possible locations)
