CHAPTER 9: CLEANING & SHAPING THE ROOT CANAL SYSTEM
1/67
There's no tags or description
Looks like no tags are added yet.
Name | Mastery | Learn | Test | Matching | Spaced | Call with Kai |
|---|
No analytics yet
Send a link to your students to track their progress
68 Terms
major objective of the root canal treatment procedure
to remove the contents of the pulp space and shape the walls of the canals to receive the filling material
cleaning
refers to the removal of all contents of the root canal system before and during shaping
which includes organic subtracts, microflora, bacterial by-products, food debris, caries, denticles pulp stones, previous root canal filling materials and dentinal shavings
shaping
refers to specific cavity form with five design objectives
primary teeth: have minimal to no shaping – more on cleaning for RCT
permanent teeth: After cleaning, there should be shaping or it could be done simultaneously
5 phases of root canal shaping
phase I - negotiating the canal (patency filling)
phase II - coronal pre-enlargement
phase III - working length measurement
phase IV - root canal shaping techniques
phase V - root canal working width
phase I - negotiating the canal (patency filling)
anesthetize → rubber dam isolation → access → patency filing
#6 pink, #8 gray, #10 violet – first files to introduce the canal with something small
phase II - coronal pre-enlargement
coronal third (orifice area) pre-enlargement using Gates Glidden, SX, and K-files
phase III - working length measurement
WL - reference point to the apical
rubber stopper – part of the instrument that indicates the length of the file (WL)
Endo Block – measures the instrument
phase V - root canal working width
width – taper of the preparation
apical gauging then obturation will follow
primary objectives of cleaning and shaping
remove infected soft and hard tissue
give disinfecting irrigants access to the apical canal space
create space for the delivery of medicaments and subsequent obturation
retain the integrity of radicular structures
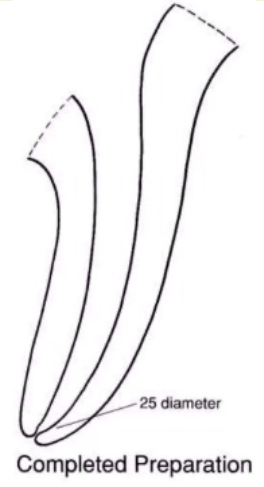
ideal final apical size after rct
file #20, #30
can go bigger as it is a case-to-case basis
herbert schilder’s five mechanical objectives
never transport the foramen
make preparation in multiple planes
keep the apical foramen as small as is practical
develop a continuously tapering conical form in the root canal preparation
make the canal narrower apically with the narrowest cross-sectional diameter at its terminus
biological objectives
to completely debride the pulp space from:
pulp tissue
endotoxins
dentinal debris
bacteria / microorganisms
Enterococcus faecalis (E. Faecalis)
bacteria commonly found in root canal treated teeth
weine’s rules for canal preparation
preparation environment: always prepare canals in a wet environment to facilitate cutting efficiency and debris removal
instrument use: use instruments extravagantly, especially smaller files; employ patency files to establish and verify working length
canal shaping: enlarge the canal while preserving the general preoperative anatomy; create a shape sufficient for irrigation and obturation without over-preparing.
working length control: determine the working length and keep instruments within canal confines, stopping ~0.5 mm short of the radiographic apex; use an Electric Apex Locator (EAL) for precise apical position
motions of instrument manipulation
referred to as envelopes of motion; no motion is better than the other
filling
reaming
turn and pull
watch winding
balanced force instrumentation
anti-curvature filling
filling
the term indicates a push-pull action with the instrument
to scrape and smoothen the canal walls and used for shaping
similar to a nail file → push-pull or in-and-out of the canal; straightforward
risk: the inward passage of a K-type file under working loads is capable of damaging the canal wall very quickly, even when the slightest curvature is encountered
circumferential filling
enhances preparation when a flaring method is used by widening the orifice
first moved toward the buccal side, then reinserted and removed slightly mesially
continues around the preparation to the lingual aspect and then to the distal until all dentin walls have received rasping
(oval canals common in premolars; introduce the file along the circumference of the canal)
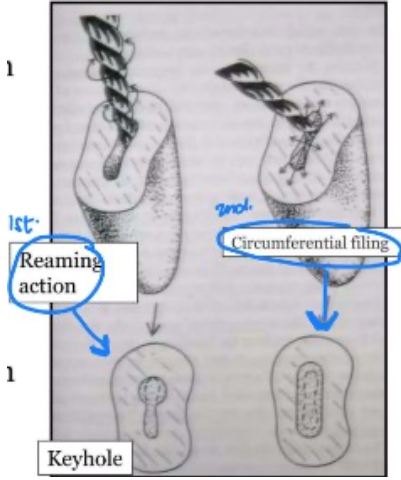
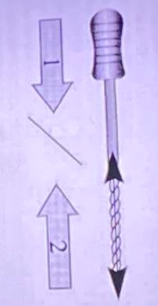
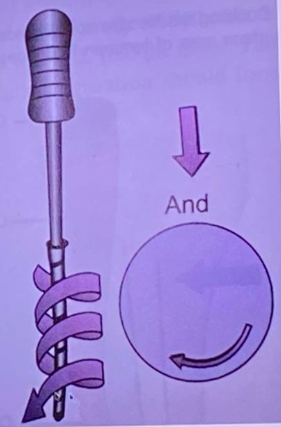
reaming
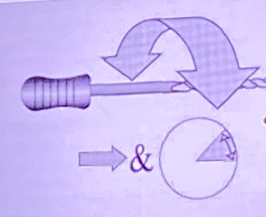
the term indicates clockwise or right-hand rotation of an instrument
twist it to the right then pull (may be risky but its subtle and goes unnoticed until an instrument fractures under the load)
to enlarge the canal and cut dentin; the rotating cutting edges cut dentin along the circumference, while the flutes collect and carry debris
divide the canal into 4 sections → insert the file → rotate slightly to the right (¼–½ turn) → push → repeat deeper → insert passively → rotate → pull out → repeat
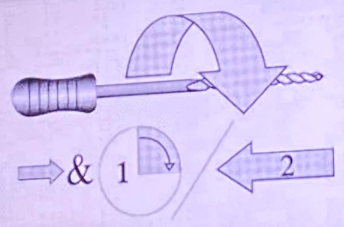
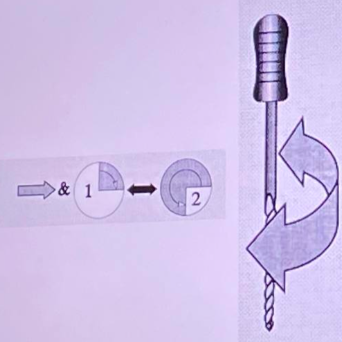
turn and pull motion
a quarter turn to the right is followed by a straight outward pull
the arrow indicates a light inward force, which engages the file before rotation
sometimes, you can go a complete 360 turn clockwise then pull outward (more aggressive and actively cutting than reaming)
watch winding motion
to negotiate canals, achieve patency, and reduce instrument stress
back-and-forth oscillation of a file (30–60° right and 30–60° left) as the instrument is pushed forward into the canal
procedure tips:
start with watch-winding to check canal patency
if the canal is constricted/narrow → continue with this motion
if the canal is wide → use filing motion
filing is performed last, after initial canal negotiation.
clockwise rotation: pushes the file tip and working edges into the canal.
counterclockwise rotation: partially cuts away engaged dentin.
balanced force technique
by james b. roane 1985
inward pressure and rotating force should always be very light.
stepwise motion: push → quarter turn to the right → push-pull → then turn ¾ counterclockwise
maintains canal curvature, safe in curved canals, reduces foramen transportation due to the balanced forces
technique steps:
with apical pressure, perform a ¼ turn clockwise
again with apical pressure, perform a ¾ turn counterclockwise.
if done properly, a “click” is heard when the instrument cuts dentin.
repeat sequence 2–3 times.
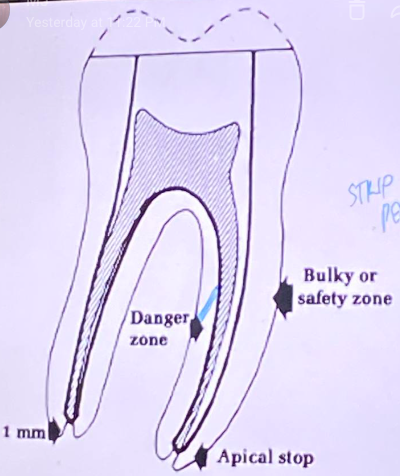
anti-curvature filing
by Abou-Rass, Frank, and Glick.
to file away from the inner curve of a root to reduce the risk of strip perforation
technique in multirooted teeth: filing is concentrated on the bulky or safety zone using a push-and-pull motion, away from the danger zone.
danger zone: always the inner surface of the tooth.
safety zone reference:
if distal root, safety zone = mesial.
if mesial root, safety zone = distal.
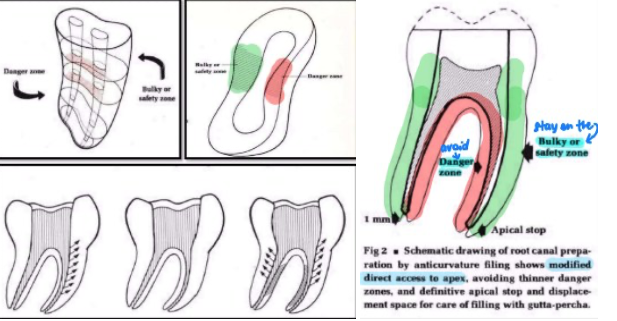
strip perforation
recapitulation
re-instrumentation with a smaller instrument following each irrigation step
use of a smaller instrument to remove debris produced during instrumentation
prevents pushing debris beyond the apex and apical plug formation
every time you introduce a file inside the canal, you have to go back to the previously used file before proceeding to a bigger file; used in manual filing
example of its sequence:
6 → irrigate → 8→ irrigate → 6 → irrigate → 10 → irrigate → 8 → irrigate → 15 → irrigate → 10 → irrigate → 20 → irrigate → 15 → irrigate → 25 → irrigate → 20 → irrigate → 30
techniques of pulp space preparation
apical to coronal
coronal to apical
hybrid technique
apical to coronal
use of hand instruments
standardized preparation, roane balance force
step back preparation & modifications by (schilder, weine, passive step back)
involves preparation of the apical third initially followed by middle and coronal third of the canal using larger instruments
coronal instrumentation with reaming motion and apical instrumentation with circumferential filing
other term for apical to coronal
step – back
telescopic
serial root canal prep
advantages of apical to coronal
ability to prepare proper apical stop
popular technique employed with 2% SS files
conservation of tooth structure, especially in cervical third
disadvantages of apical to coronal
decreased volume of irrigating solution
procedural mishaps
apical plug formation
extrusion of debris into periapex
tendency to straighten the canal
other term for coronal to apical
step down
crown down pressure less technique
double flare technique
coronal to apical
reaming motion
use of hand and rotary instruments (*enlarge coronal third first)
Involves preparation of the coronal two thirds of the canal first followed by middle and apical third of the canal.
advantages of coronal to apical
shaping is easier
minimizes debris extrusion
better penetration of irrigants because wide on coronal
elimination of the bulk of microorganisms , tissue, and debris from middle coronal third before shaping apical third
disadvantages of coronal to apical
gauging of the apical third is done as the last phase of the procedure
hybrid technique
use of hand and rotary
step back step down combination procedure
Involves combination crown down and step- back techniques. Starts preparing the coronal then apical then fuse the two creating a smooth taper.
coronal instrumentation with reaming motion and apical instrumentation with circumferential filing
method of hybrid technique
starts with coronal third → apical third → middle third
crown down then Step back
achieving patency with pre curved no.10 or smaller K file
passive pressureless placement of sequential sizes of #15, 20, and 25 K files to the point of canal binding
coronal pre-enlargement with GG drills, SX or K files in the sequence no. 3, 2, and 1 (Not beyond 3-4 mm of canal orifice)
establishing the working length
placement of 40 or smaller k file to the point of canal binding
enlarging working length from size 15 K-file to recommended master apical file sizes
canal preparation done with sequential use of progressively larger instruments placed successively short of working length
this step back is performed till middle third to obtain continuous taper preparation
advantages of hybrid technique
most commonly used today
optimizes the advantages of crown down and step back techniques
disadvantages of hybrid technique
since 1984, Middle third portion should be carefully prepared in order to prepare a continuous tapered preparation
phase I of step back preparation
apical preparation up to the file #25 (MAF) to full WL with recapitulation using prior size files
In this example, start with 10 (patency file) → recapitulation Before proceeding to the next, you go back
MAF → 25mm
IAF → 10mm
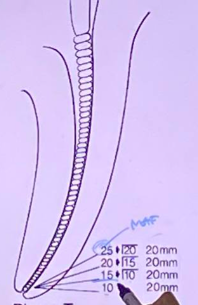
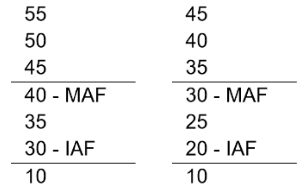
phase II of step back preparation (serial filing)
ideally its just 3 files bigger: 30 35, 40, 45
its objective is to create a tapering conical shape
stepping back procedure in 1mm increments (go 1 mm short - standard)
recapitulation with no. 25 file till full working length → as you go shorter, you have to increase the diameter of the canal
Now apical area is prepared and steps are produced
master apical file (MAF)
initial apical file (IAF) → first file being introduced in the canal (apically) aside from patency files depending on the size of the canal
(6, 8, 10 files cannot be your IAF since they are only used to check if the canal is present)
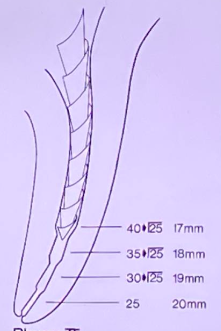
phase II-A of step back preparation
refining phase
gates glidden #2,3,4 are used to create coronal and middle preparations
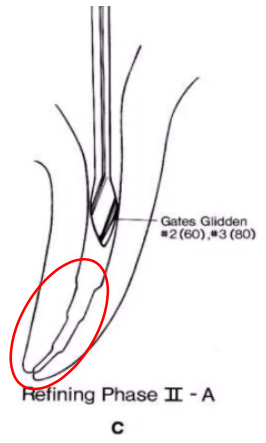
phase II-B of step back preparation
return to #25 last file (MAF)
short of working length to smooth the step back with vertical push-pull strokes (circumferential filing) H-files used
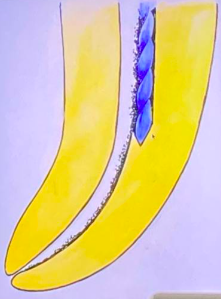
guttmann “final prep should be exact replica of original canal configuragtion'“
always smoothen the area using MAF with filing motion (push – pull motion) to scrape off the steps created
sign that the step is already scraped off
smooth, glassy surface
final preparation
final form with smooth taper
able to prepare the apical stop
advantages of final preparation
better tactile awareness
keeps apical preparation small in its original position-graudal taper
ability to prepare proper apical stop
avoids zipping
disadvantages of final preparation
chances of pushing debris into peri-radicular tissues
WL likely to change as canal curvatures are eliminated
advantages of coronal to apical preparation
better tactile awareness in negotiating the delicate apical third microanatomy
it reduces pressure
holds greater volume of irrigant → enhances cleaning
removal of dentin mud decreases post treatment problems
improves identifying the foramen
EPT more reliable
disdvantages of coronal to apical preparation
increased removal of tooth structure
step down preparation
first suggested by schilder in 1974
goerig 1982 named and described the technique in detail
principle → coronal aspect of the root canal is prepared and cleaned before the apical part
procedure of step down preparation
in this method, the access cavity is filled with sodium hypochlorite and the first instrument is introduced into the canal
start with exploration of the canal with a fine, stainless steel, .02 taper (#8, 10, 15, 20, determined by the canal width). it is important that the canal be patent to the apical constriction before cleaning and shaping begin
sometimes the chosen file will not reach the apical constriction, and one assumes that the file is binding at the apex. but more often than not, the file is binding in the coronal canal
in this case, one should start with a wider (0.04 or 0.06 taper) instrument or a gates-glidden drill to free up the canal so that a fine instrument may reach the mid- and apical canal
prepare the coronal portion of the canal to the depth of 16-18mm or to the beginning of the curve using files #15, 20, 25 in a circumferential filing motion
gates-glidden drills 1,2,3 are then used to refine the coronal preparation, the #3 drill extending 1-2mm into the canal orifice
A → #3 GG drill, B → #2 GG drill, C → #1 GG drill
estimated working length

steps
Pre-operative Radiograph
Measure crown length + refer to tables of tooth length
Estimate root length and entire working length
Take radiograph before prepping
Measure crown length radiographically or use average tooth length table
Apical Patency Radiograph
Insert patency file until preliminary working length (PWL)
Take x-ray
Use 27 mm file (IWL/PWL)
0.7 mm extrusion observed
Subtract 1 mm → adjust to 26 mm
Check if file goes beyond apex (nilapas) and if canals are present
Adjust if nilapas
Working Length Determination (Crown Down)
Root length = EWL – Crown length
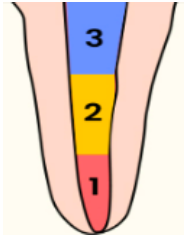
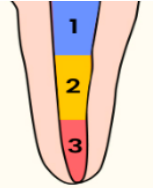
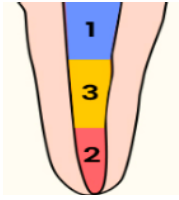
Divide root length into thirds:
Coronal third
Middle third
Apical third
Look for a file that binds at:
Crown length
Coronal third
Middle third
From file that binds at middle third:
Choose 3 larger files
Go 1 mm shorter as file size increases
IAF Selection and Radiograph
Insert file that binds at apical third
Take radiograph to verify EWL
Working length using IAF = IWL
Look for file that binds at 26 mm
Example:
File #30 (IAF)
Next: #35, #40
Serial Filing / Apical Preparation
From chosen IAF:
Choose 3 larger files
Maintain IWL for all
Serial files:
#30 – IAF
#35
#40 – MAF
MAF Selection and Radiograph
Insert last file used (MAF)
Take radiograph
Check preparation up to apical third
Step Back
From chosen MAF:
Choose 3 larger files
Go 1 mm shorter as file size increases
From 26 mm:
#45 – 25 mm
#50 – 24 mm
#55 – 23 mm
mishaps during cleaning and shaping
loss of working length
blockage of the canal system
ledging
breakage of instruments in the canal
zipping
stripping or lateral wall perforation
overinstrumentation
overpreparation / underpreparation
cause of loss of working length
due to rapid increases in file size and accumulation of dentinal debris in the apical 1/3 of the canal
malpositioned instrument stops
preventive measures of loss of working length
frequent irrigation with NaOCl
recapitulation
periodic radiographic verification of working length
proper use of instruments stops
use of directional stops in curved canals
cause of blockage of the canal system
packing of:
dentin chips
paper points
tissue debris
cotton pellets
restorative materials
fractured instrument in the canal
ledging
an artifically created irregularity on the surface of the root canal wall that prevents the placement of instruments to the apex of an otherwise patent canal
causes of ledging
attempt to prepare calcified canals
failure to pre-curve SS instruments
inadequate access cavity preparation
false estimation of pulp space direction
attempt to retrieve separated instruments
failure to use instruments in a sequential manner
causes of breakage of instruments in the canal
flexural fatigue
torsional fatigue
management of breakage of instruments in the canal
Bypass
Retrieval
prevention of breakage of instruments in the canal
Knowledge of the physical characteristics of the instrument
Flaws, such as shiny areas or unwinding are detected on the flütes
Instrument bending or crimping occurs due to excessive use
The file kinks instead of curving
Corrosion is noted on the instrument
zipping
Refers to transportation of the apical portion of the canal
It is characterized by a normally curved canal which has been straightened, especially in the apical third
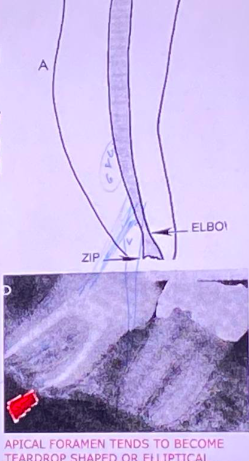
causes of zipping
Failure to pre-curve files
Rotation of instruments in Curved canals
The use of large, stiff Instruments to bore out a curved canal
stripping or lateral wall perforation
Refers to thinning of the lateral root wall with eventual perforation
causes of stripping or lateral wall perforation
Overzealous instrumentation in the mid-root areas of certain teal usuall molars
prevention of stripping or lateral wall perforation
Use of anti-curvature filing
Clean & shape the canals us files extravagantly & in a sequential manner
Avoid using large diameter instruments as instrument
overinstrumentation
Violates the periodontal ligament and alveolar bone
Loss of apical constriction creates:
An open apex
Lack of an adequate apical seal
Pain & discomfort to the patient

overpreparation / underpreparation
It is the failure to remove pulp tissue, dentinal debris, and micro-organisms from the root canal system.
treatment: "retreatment"
Underprepared canals are best managed by:
Proper length determination
Canal cleaning & shaping
Recapitulation