5. Class II (Amalgam and Composite resin) - Preparation in Deciduous molars
1/3
There's no tags or description
Looks like no tags are added yet.
Name | Mastery | Learn | Test | Matching | Spaced | Call with Kai |
|---|
No analytics yet
Send a link to your students to track their progress
4 Terms
Class II cavity preparation Occlusal requirements
0.2mm into dentin for composite resin restorations. The length of the cutting edge of a#330 bur is about 1.5 mm so the length of the bur or slightly less is your guide to ideal occlusal cavity depth .
In clinical cases do not include caries-free fissures
Cut the occlusal slot as described in class I. Take a more conservative approach. (keep the oblique ridge on teeth # A and J intact !!!!).
In clinical situation oblique and central ridges will be crossed if undermined by CARIES.
the depth is measured along the cavosurface margin throughout the occlusal slot.
All internal line angles should be rounded (#330 bur will produce round line angles).
The buccal and lingual walls are parallel or slightly convergent relevant to the long axis of the tooth.
The distal wall on tooth # A and the mesial wall on tooth # B are parallel or slightly divergent
Class II cavity preparation Proximal box:
Extend the occlusal outline through the marginal ridge just above the center of the contact area
Widen the isthmus enough to allow the occlusal walls to flow smoothly into the proximal box
The isthmus should be 1/3 of the intercuspal width only based on the extension of the caries lesion
After occlusal slot and isthmus are prepared begin preparing the proximal box.
The B & L walls of the proximal box should slightly convergent occlusally and the cavosurface margin at 90º
Deepen the proximal box gingivally until you break the gingival contact.
The gingival floor is just below the contact area which should be broken throughout its length bucco-lingually (0.5mm) for both amalgam and composite restorations.
In the clinical set up, remove any remaining caries with a large (#4 or #6) round bur.
We do not recommend the use of a spoon excavator on primary teeth due the increased likelihood of PULPAL EXPOSURE while using a spoon excavator
The height of the axial wall and the axial depth is about 1.0 mm each
Buccal and lingual contacts of the proximal box for composite restorations; not broken or slightly broken just to insert the T band.
Take extra care not to extend too far gingivally as the gingival floor may be perforated due to tooth cervical constriction.
Pulpo-axial line angle is bevelled to avoid stress concentration a # 3 or # 4 round bur can be used.
Check that all undermined enamel is removed, all caries is removed, and no visible debris is left in the preparation.
Some differences between amalgam and composite relevant to class II cavity preparation
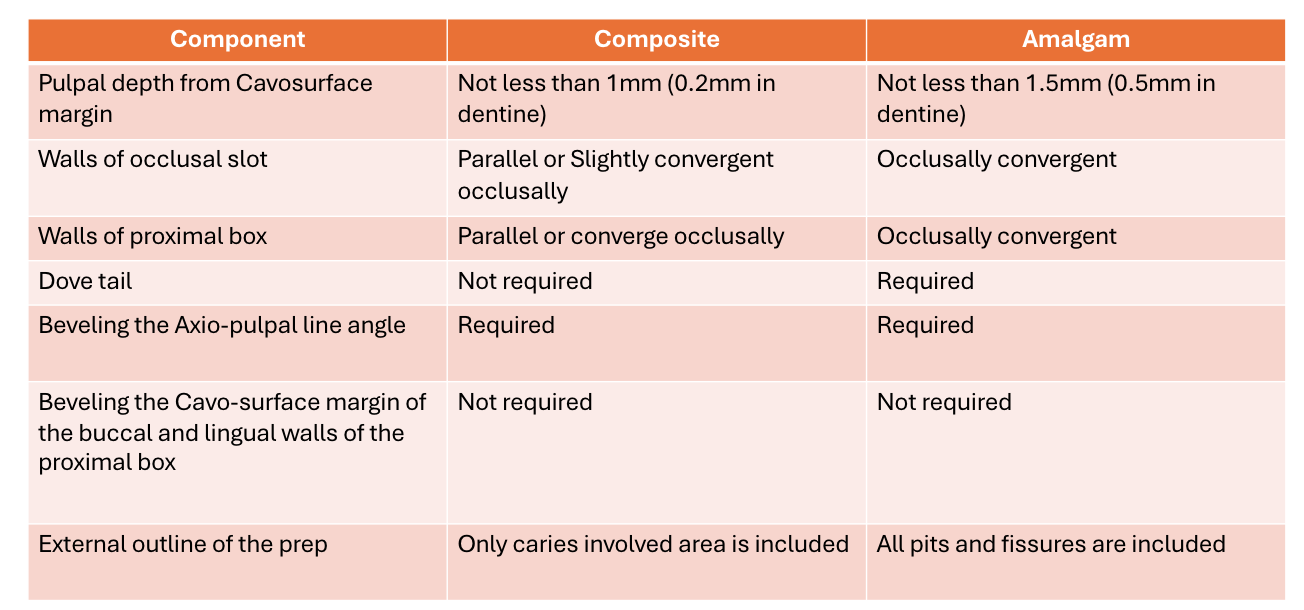
overall
Pulpal depth is 0.2mm in dentine for composite.
Do not cross oblique ridge on teeth A & J and transvers ridge on teeth S & L.
Prepare both cavities and properly break the contact as required.
The isthmus width should only be 1/3 of the buccolingual intercuspal width
The proximal box should be wider at the gingival wall to include the broad proximal contact area and to have convergent buccal and lingual walls.
The axial depth is 1mm in total which is the width of the gingival wall (seat).
The axial wall should follow the contour of the proximal surface of the tooth.
Prepare both cavities and then restore them together.
No differences in class II cavity preparation for amalgam and conventional
glass ionomer cements.