AOP adults II final
1/134
There's no tags or description
Looks like no tags are added yet.
Name | Mastery | Learn | Test | Matching | Spaced | Call with Kai |
|---|
No analytics yet
Send a link to your students to track their progress
135 Terms
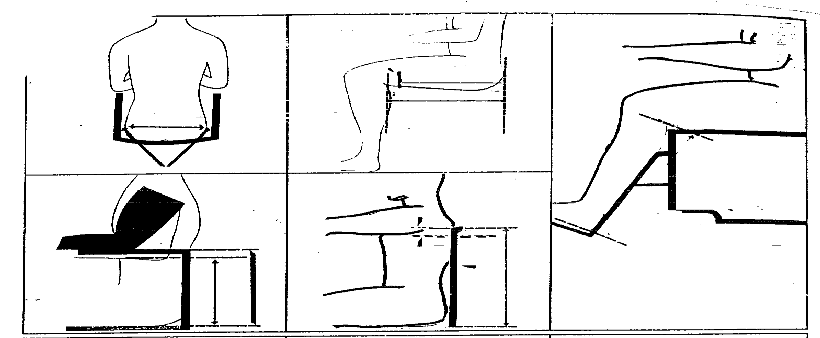
Wheelchair seat width
across widest point of hip or thighs and add two inches
wheelchair arm height
seat upholstery surface to point of bent elbow with upper arm and elbow straight down
add one inch
wheelchair seat depth
seated, measure rear of buttocks to behind bent knee; subtract 2-3 inches
back height
sweat level to armpit area and subtract 4 inches (standard back height)
top edge of back upholstery should be slightly below shoulder blades
seat height and foot rest adjustment range
lower leg from behind bent knee to bottom of heel with foot approximately 90 degrees to lower leg (lowest minimum practical seat height)
step plate should have at least 2 inches clearance with floor
wheelchair measurements
basic parts of the wheelchair

door openings for wheelchairs
32 inches minimum requirement
ideal is 36 inches
ramp ratio for wheelchairs
1-12 (1 inch of rise = 12 inch ramp)
3 inch rise = 36 inch ramp
ramps in public places must have a railing and curb with a four foot landing at the top
space needed for a 360 degree turn in a wheelchair
5 ft by 5 ft
ideal position for wheelchair
90-90-90 angles
Thigh to trunk
Thigh to lower leg
Lower leg to foot
Elbow
Symmetry of trunk (side and front)
Head and neck midline
LEs supported
Balanced pelvis!

purpose of a caster wheel on a wheelchair
smaller, helps with turns and maneuverability
recommendations for wheelchairs
When going up a ramp, it helps to lean forward to prevent tipping backwards
Going down a ramp: wheelie position or backwards
When a patient in a wheelchair is standing up, you should move the _____ out of the way.
casters
During a sliding board transfer with a patient in a wheelchair, you need to move what?
arm rests
For a stand pivot transfer for a patient in a wheelchair, you need to move what?
foot plates
What are the goals of wheelchair positioning?
-prevent _____/_____ (sitting in prolonged static position with bad positioning can cause this)
-decrease _____ problems (pressure sores, abrasions, shearing)
contracture deformity
skin
True or False: A sling wheelchair position is supportive and functional.
false
basic spinal precautions
BLT: no bending, lifting, twisting
physical agent modalities
physical agents such as heat, cold, water, light, sound, and electricity applied to impact functions of the body
reduce or modulate pain, reduce inflammation, increase ROM, promote circulation, decrease edema, facilitate healing, stimulate muscle activity, facilitate occupational performance
superficial thermal agents
hot packs, paraffin, hydrotherapy, cryotherapy
for hot packs, cold packs, and paraffin check skin before, during, after
head indications and contraindications
Heat indications
Chronic or subacute conditions
Increase extensibility of collagen tissue
Decrease joint stiffness
Analgesic effects
Sedation
Increased blood flow
Tissue repair
requirements
Need to be able to follow directions/cognitively intact, need to be extra cautious if not
Need family member to recite back the instructions if they are going to do heat themselves if the individual can’t
Not for acute flareup
Chronic and subacute okay
Not with swelling
Not good for MS population
Low endurance, sluggish
Not good for advanced cardiac patients
Fatigue, shortness of breath
Increasing blood flow and circulation with heat so be careful with cancer patients
Do not apply hot packs near cancer sites
If they are in remission, speak with doctor and learn precautions
Be careful with someone with increased body temperature
Pregnant people in third trimester
People with hot flashes
Patients with DVT (swelling and hot)
Contraindications: swelling
hot packs
15 to 20 minutes to reach therapeutic temeprature to stretch and move
stored between 160-165 degrees
never applied directly: 6-8 layers of toweling
check after 5 minutes: should be warm and red but no blisters
advantages: simple, widely available, can heat large surfaces, do at home
disadvantages: heaviness may be uncomfortable, doesn’t maintain max head, can’t conform well to small multi-surface body parts, static heat (must be non-mobile which limits AROM and AAROM)
heat increases blood flow: dilating vessels
for spasticity you can use hot or cold and see how they respond
A hot pack cover counts as ____ layers of toweling, so then you would add _____ more layers of toweling.
4; 4
Considerations for PAMs:
-Check _____
-_____ referral
-Review medical _____
-Check _____
-Remove _____
-Check skin _____
-Evaluate _____
-Position of _____ during application
licensure
-MD
-records
-equipment
-jewelry
-integrity
-sensation
-comfort
paraffin
paraffin wax and mineral oil
120-130 degrees F
able to heat irregular surfaces
moisturizing, scar management
good for rheumatoid arthritis
dip method
boy part should be washed
Immerse hand in bath for 1-2 seconds and pull out
Dip 5-10 times (presentation says 3-5 times)
Wrap in plastic bag and put a towel around it
Dont move for 8-10 minutes
Sometimes you can put a hot pack around the towel
Can use coban to apply stretch before dipping
immersion method- glove formed as above then body part immersed in paraffin bath
brush on method: paint paraffin on person for larger areas
advantages: irregular surfaces, simple, cheap, can do at home
disadvantages: static (no PROM, AROM, AAROM), does not maintain max heat (can use hot packs), small areas
Don’t use on open wound or burn, if wound is healed then it can be good for wound management and scar care
fluidotherapy
A whirling mixture of dry heat and particles (corn husks)
Doesn’t lose heat
Good for desensitization, light massage, and provides all effects of heat
Therapist can assist inside the machine
cryotherapy
superficial cold
Vinyl pouches with silica gel kept in freezer at -12.2 C
Cools by conduction
Wrapped in damp towel, applied to skin for 20 minutes (NEVER direct to skin)
Damp towel between skin and cold pack/wet paper towel (will penetrate quicker)
Can also be a dry towel
Ice massage: small paper cups filled with water with tongue depressor frozen inside; ice rubbed over area for 10 minutes to reach analgesia; good for small area
Also vapocoolant spray or gel, aerosol spray
Cold reduces edema and circulation
Don’t keep on longer than 15-20 minutes
Not for people with decreased circulation/circulation problems/neuropathies
Not for anemia, decreased RBC, decreased WBC/platelets (cancers), not for lupus
Not for open wounds
Need to be well protected and get clearance
deep thermal agents
ultrasound and phonophoresis
ultrasound
conversion heat transfer
Should NEVER be used in isolation
use of high frequency sound waves that produce thermal and non-thermal effects on the tissue
Generator with power source, coaxial cable, hand held transducer, crystal
Requires gel, use circular movements
3 MHz: 1-2 cm depth
3.3- superficial area
Fingers, lateral/medal epicondyles, patellar tendons
Heats up quicker
1 MHz: 3-5 cm depth
Heats up slower, penetrates deeper (quads, hamstrings, deep shoulder/rtc/capsule)
Duty cycle: % of time ultrasound introduced into body
100% = continuous (thermal) for adhesive capsulitis, bursitis, tendinitis, epicondylitis
50 or 20 % = pulsed (non-thermal)
Intensity: strength
Can apply directly or through immersion (for small joints)
Contraindications: heat precautions, do not do over organs, areas of infection, tumor, epiphyses of developing bones, bony prominences, pregnant individuals, cardiac pacemaker, STOP if burning, Not over open wound, wound must be closed for wound healing (NOT GOING OVER WOUND), Not over pacemakers
ultrasound: continuous waves
thermal effects: deep heat (continuous waves)
Continuous/thermal
Sound waves coming through continuously per second, no pause
Thermal ultrasound
Can help healing process
Break up scar tissue
Would still use 3 if healing the area that is superficial
ultrasound: pulsed
Non-thermal effect: mechanical vibration, cellular level without increased heat (pulsed)
nonthermal/pulse ultrasound
Usually start at 20%
Allows tissue to rest in between pules, not generating heat
Something like lateral epicondylitis
E.g. the area is hot and inflamed; pulsation will help the area flush out toxin/fluid buildup
electrotherapeutic agents
stimulate excitable membranes of nerve and muscle to facilitate return of function, address pain, muscle activity, improve tissue healing, decrease swelling and muscle spasms
influence physiological change in tissue
facilitate neuromuscular or sensory changes
current: direct, alternating, pulsed
amplitude, pulse/phase duration, duty cycle, frequency, modulation (ramp up/down time)
electrodes: various sizes, shapes, self adhesive
smaller electrodes: more stimulation
close together: current passes superficially
further apart: current passes deeper
TENS: pain
stimulation competes with pain
NMES: encourage muscle contracture, muscle reeducation, alternating current
NMES
Neuromuscular E-Stimulation (NMES) (also FES): stimulate innervated nerves
Pulsating to activate muscles
NMES: decrease muscle spasms, edema, spasticity, strengthen muscles, maintain muscle mass
FES: target muscles to facilitate functional activities or movements
Peripheral nerve
Need to do FES: functional electrical stimulation
Need to stimulate and work with it in function
Stimulate; open the box
Document that you are doing FES
Do not do if they have a pacemaker, metal replacements, automatic defibrillator, not near tumors or active cancer, infections, do not do at bladder site or uterus, cuts, skin issues, check for adhesive allergies, impaired sensation, cognitive impairments
Person needs to be able to tell you what they feel/give feedback
Person needs to be able to follow directions
15 min at a time
considerations for PAMs
All modalities: inspect skin before and after
Can inspect skin during
Check on them to make sure they can tolerate the modality
Remove jewelry
Evaluation sensation
Position of comfort
Impaired or absent sensation never use heat or cold
common hand/wrist deformities
Claw hand: ulnar nerve deformity
Combined ulnar and median: intrinsic minus?
Drop wrist: radial nerve
3 phases of healing for tendons
3 phases of healing: inflammation, fibroplastic/reparative, remodeling
extrinsic healing
Extrinsic healing: fibroblasts and inflammatory cells migrate from outside the tendon; adhesion formation
Phases: inflammation, fibroplastic/reparative, remodeling
Inflammatory
Immediately after injury for 5-7 days
Edema formation peaks
Migration of inflammatory cells
Release of mediators and cytokines to begin/prepare for repair
Proliferative phase
Several days to 21 days after injury
Fibroblast start laying down collagen to create scar
Adhesion formation begins about 7 days
Collagen production peaks at 21 days
remodeling/maturation
3 weeks to 1 year
Excess collagen degrades
Conversion of type III to type I collagen
intrinsic healing
Intrinsic healing: migration of cells from endo/epitenon
tendon injuries
Outcomes for extensor tendon injuries are better, more predictable
Early active motion protocols are standard, early passive and immobilization programs are used sparingly and only for specific reasons
Rationale for early active motion is that tendons that are stressed with just the right amount of loading exhibit significantly higher tensile strength and fewer adhesions
flexor tendon injuries
Key factors
Zone of injury
1-2 most common (2 most complicated)
3-5 less concern for adhesions, can be progressed through stages faster typically
Repair construct
Number of core strads cross the repair side
Epitendinous suture
Nature of injury
Associated neurovascular injuries, soft tissue, avulsion vs. laceration, osseous injuries, repairs made under tension
Timing of repair
Patient
Goals of treatment
Protect repair and prevent rupture
Facilitate development of not only a strong repair but also one that glides freely in both directions
Prevent flexion contracture
Not trying to get full ROM
protocols for tendon injuries: immobilization
for kids and unreliable patients
protocols for tendon injuries: early PROM
not common
Modified standard
Kleinart protocol
OT starts 3-5 days post op, PROM only no AROM allowed
protocols for tendon injuries: early active motion
Most widely used now, several variation exists
OT starts at ideally 1-3 days post op
Next day is too soon
Ranges from place and hold, short-arc > full flexion
Only real way to achieve meaningful proximal tendon excursion
Patient needs to be smart, motivated, responsible
At least a 4 strand repair with epitendinous suture
Ideally OT should start right of way
Edema and stiffness ideally no more than mild-moderate; severe edema and stiffness can prohibit use of EAM
WALANT
wide awake local anesthesia no tourniquet
zone 1-2 early active motion week 0-4
Week 0-4
Fabricate dorsal block splint at 1st post op visit
Wrist in neutral, MPs at 60-70 and IPs at 0
Wound care
Take bulky dressing down, placement of non-adherent dressing
Accurate assessment of tendon gliding: quantify disparity between A and PROM in flexion
Passive stretching and retrograde massage to ensure flexibility and reduce resistance to flexion
With wrist in 20-30 degrees extension assess ability to hold fingers in flexion after passive placement into half fist
Key factors for accurate assessment of TG: drag from stiffness and swelling, trapping with adjacent digits, inefficient activation of muscles, overactive intrinsic, palpate for tension in tendon
Individual tissue response dictates progression of treatment
Each session do thorough eval of TG and monitor flexion lag
Prevent flexion contracture and promote distal TG: composite MP/IP extension
Full IP extension if no tension on repairs or digital nerve repair
Ife tension, do isolated PIP or DIP extension with adjacent joints in flexion
Separate IP extension splints to be worn with DBS for night wear
LMB splint in extreme cases
Early active motion zone I-II weeks 4-???
D/C splint
Base decisions on individual tissue response
Be careful with grip strengthening
If needed, must wait minimum 8-12 weeks but not recommended
Composite wrist and digit extension
Blocking splints as needed
Modified Duran zone I-II weeks 0-¾
Dorsal block splint to wear all the time
Wound care
Edema control
PROM only
A/PROM IP extension (no composite MP/IP)
Evaluate tendon gliding as previously described
If disparity is significant then proceed with hierarchy of exercises; if not, focus on gentle active flexion
extensor tendon injuries
More predictable outcomes
Immobilization and early passive protocols
Active motion
Similar model as flexor tendon
Not as widely used
mallet finger
Mallet finger: zone I extensor tendon injury
Injury to terminal extensor tendon
DIP drops down into flexed position
Custom stack Splint 24/7 for 6-8 weeks
Skin care critical to complete splinting
Can allow MP/PIP flexion right away (DIP extension splint)
closed mallet finger
Zone I
Self management by patient
Initiate AROM at 6-8 weeks beginning with DIp blocking exercises with PIP in slight flexion
Limit DIP flexion to 20-30 degrees initially
Increase about 10 degrees per week if no lag develops
Progression of exercises and splint wear schedule dependent on extension lag (if lag is less than 10 degrees, progress to DIP blocking with full PIP extension, composite flexion)
closed boutonnière
Closed boutonniere: Zone I-III
PIP extension splint 24/7 for 6-8 weeks
DIP flexion blocking to offset hyperextension tendency
After 6-8 weeks, same as mallet
thoracic outlet syndrome
Causes: trauma, poor posture, anatomical defects, repetitive overhead use, scapular dyskinesis, tumor
Symptoms: pain, sensory disturbances, heaviness of arm, fatigue and weakness
Vascular: acute upper extremity swelling, cyanosis, heaviness, pain
Neurogenic confirmed by detailed history and exam
Exam: head/neck, posture, upper limb neural tension test
EAST: elevated arm stress test with shoulders in 90 degrees abduction and ER, elbows flexed to 90 degrees, patient slowly opens and closes hand for 3 minutes
TOS ot management
OT management
Education about positioning to relieve symptoms including sleeping posture
Postural remediation
Scalene stretching
Diaphragmatic breathing
Nerve glides/tensioning
Manage associated conditions
ergonomics
rgonomics: fitting the place station and or environment to the worker to decrease the risk of injury
Traditionally through video display terminal analysis, performance evaluations, workstation modifications, job task analysis
Modify behavior/cognitive functions: change or modify old habits, identify situations that increase stress/anxiety/psychosocial issues, body mechanics
Physical performance: physical fitness level (strength, ROM, endurance), body mechanics, nutritional habits, physical stressors, job rotations, forceful exertions
Positioning: repetitive motions, awkward positioning, prolonged static/dynamic activity
Environment: workstation, temperatures, noise levels, lighting, spaces
ergonomics as a prevention program
Looking at computer work station
What is proper position of body at computer work station
E.g. 90 degrees, wrist in neutral, top of screen no higher then eye level
work conditioning and work hardening
Treatment: medically necessary, developed by team and worker, return to work goals based on job analysis, job simulation, individualized goals, average 8 weeks 2-4 hours 3-5 days per week
work hardening
Work hardening
MD referral, WC insurance authorization, evaluations, treatment plan, discharge, return to work
Strengthening, cardiovascular conditioning, body mechanics training, job simulation of tasks, ergonomic and energy conservation techniques, holistic approach
Appropriate when unable to return to work due to lack of strength, conditioning, confidence, no longer needs skilled PT or progressing in PT
work conditioning
Work conditioning
No longer needing skilled therapy manual treatment
Worker needs to increase strength and conditioning to return to full duty, full work day, or is not ready for work hardening program 5 times per week
Job simulation tasks to transition to work hardening or full duty
Strengthening, conditioning, ergonomic training, body mechanics training
Requires MD referral, worker compensation insurance authorization, initial eval, customized treatment, discharge to work or FCE
functional capacity evaluation
Assortment of standardized and un-standardized tests to assess clients overall physical ability
Encompasses physical demands of work as defined by US department of labor
Purposes: Determine rehab potential, determine return to work status, settlement of case, disability status, pre-employment/post offer testing
Valid and reliable, objective, standardized instructions, clear instructions, practical, safety and wellbeing
Components: full review of medical records and official job description, musculoskeletal screening, physical ability testing, physical effort testing, sincerity of reports regarding pain and disability
Physical ability testing: lifting, standing/sitting tolerance, gait analysis, static/dynamic balance testing, job simulation tasks, functional mobility/positional testing, cardiovascular, dexterity
Physical effort testing: determine if client is providing full effort with testing procedures
Discrepancies with reports of pain and disability: discuss to allow for self correction
Reading and using a report
Think about general impression of client, figure out what questions need to be answered, determine if full effort was given, look at abilities at limitations
psychosocial adjustment model
Process by which individuals can manage psychosocial issues to more fully participate in occupation
Stages: denial, anger, depression, acceptance
cognitive behavioral therapy
Cognitive beliefs can hinder recovery
Public stigma: negative beliefs about people with disabilities, belief that individuals with behavioral health issues and substance use disorders can never recover
Self-stigma: internalized negative beliefs
psychodynamic model
Focus on how memories of past experiences and unconscious processes affect current behavior
Used when conscious ego-focused tx does not produce results
transtheoretical change model
Precontemplation, contemplation, preparation, action, maintenance, termination
evaluation of role loss
Role checklist, activity card sort, leisure interest checklist
Interventions: strengths, altering vocational course, finding leisure activities, re-designing an intimate partnership, rebalancing parenting roles, realistic expectations
SUDs
Evaluation of SUDs
Substance abuse screening test, frequency of use, type of use, history, affect on rehab/work/school/parenting/social supports/other, SU cause of physical condition, physical condition cause SU, predisposing factors, need to refer
Interventions: motivational strategies, 12 step groups, psychoeducation on addiction, relapse prevention, time management, stress management, anger management, occupational engagement, sober leisure skills and friends
PTSD
Assessment
Primary care PTSD screen
Symptoms: hyperarousal, nervousness, fearfulness, flashbacks, ruminations, emotional numbing, dissociation
Intervention: develop a healthy relationship, safety, recalling memories and morning, reconnecting, commonality
depression
Assessments for depression
Beck depression inventory, general self-efficacy scale 6, rosenberg self-esteem scale, suicidality
Interventions: problem solving, coping strategies, healthy expression/release of anger/frustration, cognitive restructuring, planning, social support, referral
breast cancer impact on occupational performance
Weakness, fatigue, body image, pain, lymphedema, limited ROM, brachial plexus injury, cognitive dysfunction
prostate cancer impact on occupational performance
Urinary incontinence, sexual dysfunction, lymphedema, fatigue, bowel problems from radiation therapy
lung cancer impact on occupational performance
Fatigue, dyspnea, weakness, limited ROM, limited endurance
colorectal cancer impact on occupational performance
GI problems, physical and psychosocial changes associated with colostomy or ileostomy, sexual dysfunction after rectal surgery
cancer related fatigue
Cancer related fatigue: distressing, persistent sense of physical, emotional, or cognitive tiredness or exhaustion related to cancer or cancer treatment that is not proportional to recent activity and interferes with usual functioning
Measured through self-report
Results in altered lifestyle, decreased participation, decline in performance capacity due to inefficient use of energy, loss of control and identity, impaired volition and motivation, reduced ability to work, reduced self-efficacy, poor QOL, lack of social interaction, loss of important roles
cancer related fatigue interventions
Interventions:
mental health, LPCs, clinical social workers, psychiatric nurse practitioners
Palliative care: prevent or treat symptoms of cancer and cancer related treatments
Integrative oncology: yoga, acupuncture, meditation, tai chi
Survivorship care: addresses physical, mental, emotional, social, and financial effects of life after cancer diagnosis, care for late effects of treatment and recurrence
Create and promote, prevent, establish and restore, modify, maintain
cancer related cognitive dysfunction
Deficits in memory, executive functioning, attention span, processing speed
30% prior to treatment, up to 75% during or after treatment
May be physiological or psychological
Cognitive behavioral strategies, remediation/restoration, compensatory skills training, meaningful functional activity
lymphedema
Lymphedema: condition caused by inadequate drainage of lymphatic fluid
Most associated with breast cancer after lymph node removal
Can be due to blockage by tumor, scarring/inflammation of lymph node, vessels from radiation therapy, surgical resection of lymph noes, can appear after surgery/radiation or many years later
Interventions
Gentle exercises and diaphragmatic breathing, compression garments, manual drainage, pneumatic compression, complete decongestive therapy
peripheral neuropathy
Peripheral neuropathy: impairment of peripheral nerves caused by neurotoxicity associated with chemotherapy drugs
Motor, sensory, autonomic, mixed
Earliest at fingertips and toes
Pain can be associated with depression
Symptoms: neuropathic pain, allodynia, numbness/tingling/paresthesia, cold intolerance, impaired fine motor skills, mild weakness and decreased reflexes, decreased proprioception of LE
Intervention: prevent or lessen CIPN sensory symptoms, compensatory safety techniques, target fall prevention, ADL training, home modifications to support optimal engagement in daily life roles, energy conservation, home exercise, desensitization, medication
vital signs
Target heart rate 70% of maximum HR
Maximum heart rate calculation: 220-patient’s age
sternal precautions
Careful reaching away from the body
Especially bilaterally
Dress in a tube
No lifting over 10 pounds
no pushing, abducting
MET levels
Met levels: the name for resting metabolic unit, independent of body weight; energy requirement or use
At rest in semireclined position: 1 MET, 3.5 ml of oxygen per minute per kilogram of body weight
What they are, how they correspond to three phases of cardiac rehab
When are they discharged from acute care to home?
3-4: usually at least 3.5
energy conservation techniques
Energy conservation techniques, work simplification
Variables to grade activities
Posture, rest breaks, shoulder inclusion, overhead, total body patterns, repetitions, length of activity, times per day, chaining of activities
When do you take vital signs on someone who just had cardiac injury?
Before, during, after
phase 1 of cardiac rehab
Phase 1: inpatient care
Initiated almost immediately
Duration: 5-14 days
Intensity: 1-4 METs
Patient education: self-monitoring, discussion of fear related resuming daily activities
Risk factors: lifestyle modification and follow up compliance
Progression of activities
Sternal precautions
No lifting, pushing, or pulling greater than 10 pound
No bilateral stretching of UE’s
No propelling of w/c with arms
No UE hyperextension
Limit use of arms during bed mobility/transfers
Resumption of sexual activities
Energy conservation/work simplification
Return to work
BADL training initiated day 2 (1-4 MET), graded progression through more difficult activities encouraged
Engagement in leisure: table top, no resistance, socialization, discussion groups, socialization groups
THEREX
Progressive challenge to cardiovascular system
Low weight/high resistance
Consider sternal precautions
Brief, multiple sessions
Prevent adhesive capsulitis
Progress resistance/MET level/repetition
Phase II: outpatient program
8-12 weeks
Goal: progress to morbid activity level
Resumption of IADL
Upgraded participation in leisure activities
Return to work preparation/job site analysis and adaptation
Therex: strengthening and endurance training, upper body ergometry
Home exercise program
Patient education: stress management, in-depth review of risk factors, integration of education into lifestyle
Phases III and IV: community based
OT as consultant
Work adaptations/modifications
Dealing with residuals of surgical complications
amputation: pre op and preprosthetic
Post op/preprosthetic stage
Healing of surgical wound, minimize pain, protect amputated limb from trauma, preserve and improve ROM of entire body, reduce swelling and begin shaping of residual limb, begin controlled weight bearing, mobility aids for (I), (I) in functional activities, facilitate psychological adjustments to limb loss
Prevention of soft tissue contracture: positioning with pillows in bed, wheelchair, manual activities
Wound healing and limb volume control: reduce pain, edema, foster healing, limb volume control, shape limb
Residual limb shaping: smooth and wrinkle free, angular turns, end bandage with tape, velcro, safety pins
Task specific strengthening: transfers and bed mobility
Generalized conditioning: UE strengthening, LE strengthening of residual limb
Postural control
Desensitization
Phantom sensation/pain, local pain
physical training with and without prosthesis, achieve optimal physical condition
Improve physical conditioning to enhance control and performance
Strength, muscle coordination, physical training exercises
Perform without prosthesis, with prosthesis, before fitting, during rehab
prosthetic training
Controls training: training without objects, get a feeling, passive and active functions, donning and doffing, manual wrist rotator
Active prosthesis functions: optimal use, check for readjustments, voluntary opening and closing, adapt the cabling
Repetitive drills: prosthetic training with objects
Training with objects, grasping, holding, releasing, vary exercises and training; reliably and confidently handle objects using appropriate control
Indirect gasping: passed from sound side to prosthetic hand
Direct grasping
ADL training: transfer to daily routine, adapt to skills, increase independence, carry out functional activities confidently with both hands
to activate terminal device
To activate terminal device
Below elbow: humeral flexon and scapula protraction
Above elbow: humeral flexion and scapula protraction: elbow component-scapula depression, extension, abduction
Issues that may occur when working with someone with an amputation and what to do about them
Flexion contractures; can use limb protector
residual limb wrapping
For edema and shaping
Edema
Figure 8 if its finger and wrist
Measure just proximal to amputation and compare to opposite hand
Other landmarks and compare
Compression: coban
Massage
Elevation
Know how to wrap
Figure 8, tension greater distally, slowly lessens tension as you move proximally
phantom limb pain
Check for phantom limb pain
Pain management: mirror therapy
Phantom limb pain and phantom limb syndrome
Syndrome: person feels that the part that was amputated is still there
Pain: pain in the area where the limb was amputated
other treatment for amputation patients
Change of dominance activities: for indviiduals with full amputations of hand and proximal
Strengthening: focus on strengthening muscles needed to use terminal device
Sensory reeducation, sensory desensitization
Test sensory: ideally monofilament
Use different textures
ROM digits: blocking to joints proximal to amputation and tendon gliding
non-invasive blood press remonitoring
Manual blood pressure cuff
Automatic blood pressure cuff
Cuff remains on patient at all times
Cuff is connected to the monitor via wire
Cuff inflates periodically and displays the reading on the monitor
The monitor stores several readings for comparison throughout the day
invasive blood pressure monitoring
arterial line, CVP, swan-ganz
aline
Arterial line
Most commonly used invasive blood pressure monitoring line
Location: laced
Continuous blood pressure
Frequent blood draws
Clinical implications
Do not bend wrist or hip
Avoid blood pressure on ipsilateral side
Alert nurse if patient was mobilized
If line falls out, apply pressure and call for help
cvp line
Central venous pressure line
Inserted into subclavian vein and threaded into right atrium
Direct measurement of blood pressure in right atrium and vena cava
Assess right ventricular function and systemic fluid status
Sutured into place
Clinical implications
No real activity limitation
Be mindful of line to prevent dislodging
Alert nurse if patient was mobilized during session (re-calibration)
pulmonary artery catheter
Pulmonary artery catheter (swan ganz)
Inserted into subclavian or internal jugular vein and sometimes femoral
Threaded to several locations (pulmonary artery and right atrium)
4-6 lines
BP, cardiac output, medications
Only used for critically ill patients, short-term
moving/dislodging can cause serious complications
No longer held from therapy
pulse oximetry
Pulse oximetry
Measurement of oxygen level in blood
Healthy individuals 98-100%
Aim for above 90 for most patients
Can be measure non invasively and invasively
Displayed on monitor
Non-invasive
Measured using a pulse oximeter
Three types
Probe (finger, earlobe, foot in babies or skin) attached ot monitor for continuous monitoring
Measure oxygen saturation and hr
Can be altered by nail polish, excessive movement, cold hands
intravenous line
Intravenous lines
Inserted into peripheral vein
Short-term venous access for administration of medications and fluids
Can be attached to a pump mechanism for time-controlled release of medication
Clinical implications
Avoid BP on ipsilateral arm, do not pull