Master Set - Clinical Skills
1/105
There's no tags or description
Looks like no tags are added yet.
Name | Mastery | Learn | Test | Matching | Spaced |
|---|
No study sessions yet.
106 Terms
Who does radiation put most at risk?
Under 18s and pregnant people
4 radiation safety policies
controlled area must be used
PPE must be worn is there is no lead shield
Reduce scatter - collimation and grid
Few people involved as possible
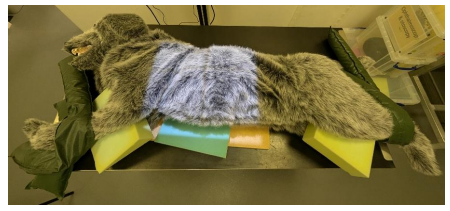
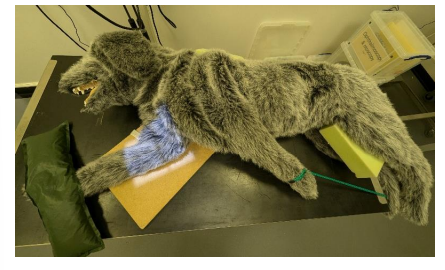
Describe positioning for right Lateral Thorax
Right lateral recumbency.
Forelimbs extended and secured cranially. Hindlimbs can be extended and secured caudally.
A foam wedge can be placed under the sternum and in between the limbs to counteract natural rotation.
Head and neck gently extended
Describe positioning for left Lateral Thorax
Left lateral recumbency.
Forelimbs extended and secured cranially. Hindlimbs can be extended and secured caudally.
A foam wedge can be placed under the sternum and in between the limbs to counteract natural rotation.
Head and neck gently extended.
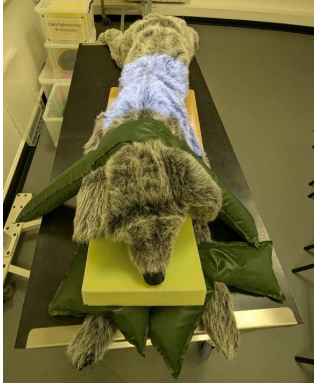
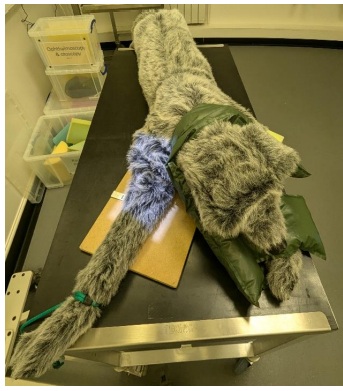
Describe positioning for Ventrodorsal thorax
Dorsal recumbency
Forelimbs extended and secured cranially
Hindlimbs can assumed natural position
Use a trough, sandbags or foam wedges either side of thorax (take care to ensure the edges of the trough or sandbags are not going to obscure your radiographic view) to allow superimposition of sternum
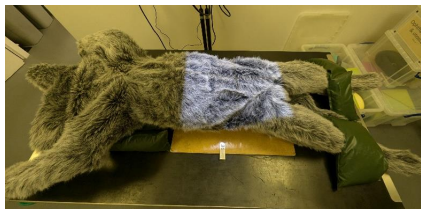
Describe positioning for Dorsoventral thorax
Sternal recumbency.
Forelimbs extended and secured cranially.
Hindlimbs flexed in natural position.
Ensure spine and sternum superimposed to avoid rotation.
Head and neck gently extended, chin placed on a small foam wedge and secured with sandbag over neck (care this is not obscuring key anatomy in the image)
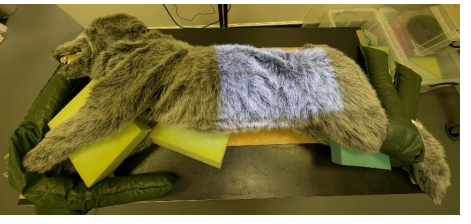
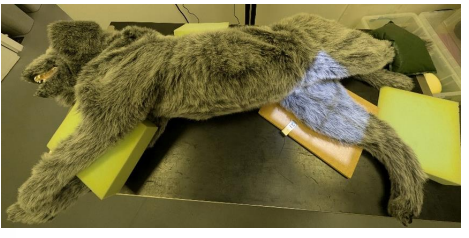
Describe positioning for right Lateral Abdomen
Right lateral recumbency.
Forelimbs can be extended and secured cranially, hindlimbs are extended and secured caudally.
Foam pad can be used under sternum and in between stifles/femurs/elbows/radius and ulna to ensure horizontal alignment and no rotation
Describe positioning for left Lateral Abdomen
Left lateral recumbency.
Forelimbs can be extended and secured cranially, hindlimbs are extended and secured caudally.
Foam pad can be used under sternum and in between stifles/femurs/elbows/radius and ulna to ensure horizontal alignment and no rotation.
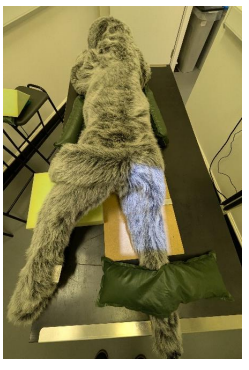
Describe positioning for Ventrodorsal Abdomen
Dorsal recumbency, supported by a trough or sandbags at the level of the thorax as necessary to achieve superimposition of sternebrae and vertebrae, avoiding axial rotation.
Hindlimbs allowed to fall into natural 'frog legged' position or secured in extension with sandbags or ties.
Forelimbs extended and secured with sandbags or ties.
Describe positioning for Dorsoventral Abdomen
Sternal recumbency.
Forelimbs slightly abducted and flexed to stabilise thorax.
Trough or sandbags might be necessary at thorax to prevent axial rotation and to achieve superimposition of sternebrae and vertebrae.
If possible hindlimbs are drawn slightly caudally and laterally away from abdomen, held in position with sandbags.
Describe positioning for Mediolateral Elbow
Lateral recumbency on side of the leg of interest e.g. left lateral recumbency if the left elbow is to be radiographed.
The other forelimb should be retracted away from the area of interest and secured.
Neutral view- joint should be flexed to around 90-100 degrees/left in natural position.
Describe positioning for Craniocaudal Elbow
Sternal recumbency.
Leg of interest extended.
Olecranon aligned with humerus ensures no rotation of the joint, foam wedges placed under contralateral axilla can help with this.
Palpate medial and lateral epicondyles to help ensure they are parallel to plate.
Head and neck should be flexed away from the limb of interest, this can be achieved with sandbag over the neck or foam wedge next to the head
Describe positioning for Mediolateral Stifle
Lateral recumbency on side of the leg of interest e.g. left lateral recumbency if the left stifle is to be radiographed.
The other hindlimb should be retracted away from the limb of interest (Abducted) and secured with a sandbag or tie.
The stifle should be in a neutral position(not over flexed or extended).
The tarsus can be supported with a foam wedge underneath to ensure alignment of the limb.
Care to ensure prepuce and tail are not overlying the stifle.
Describe positioning for Caudocranial Stifle
Sternal recumbency.
Sandbags can be used around the thorax to prevent tilting of the body and therefore axial rotation of the stifle.
The leg of interest is extended caudally with the stifle slightly rotated inwards and secured with a sandbag over the tarsus.
The contralateral limb is flexed and elevated and placed on a foam pad.
A foam pad can also be placed under the caudal abdomen on the contralateral side to assist with stabilisation.
Ensure the tail is secured away from the image.
Describe the steps to interpret a radiograph
identify the species and radiographic view
Check labelling
Assess the positioning
Assess the collimation
Assess the exposure
Identify developmental faults
Identify and other artefacts or faults
Describe the normal anatomy visible within the image
Survey the entire radiograph in a systematic manner to identify any abnormalities
How to Assess the patient for CPR
ABC
Airway
Breathing
Circulation
How can Airway be assessed
ensure airway is patent
Best achieved by endotracheal intubation
How is breathing assessed?
Watch chest
Feel for exhaled breath
If not breathing start CPR
How is circulatuon assessed?
Feel for pulse (femoral artery )
If no pulse start CPR
Cardiac Pump Theory
Ventricles directly compressed
between sternum and and spine (dorsal recumbancy)
between ribs (lateral recumbancy)
Blood forced out of the heart to lungs and periphery
Relaxation of ventricles returns blood to heart from lungs and periphery
Thoracic pump theory
Intra-thoracic pressure increased
compresses the aorta
collapses the vena cava
Blood flow out of the thorax
Elastic recoil of the chest
decreased intra-thoracic pressure
blood flow from the periphery back into the thorax and lungs
Describe Ventilation
performed with chest compressions - two people needed
Endotracheal intubation and intermittent positive pressure ventilation
100% Oxygen used, reservoir bag of an anaesthetic breathing circuit
Can also blow down ET tube
Exhaled air is 15% Oxygen
If not intubated, can apply mouth to snout ventilation
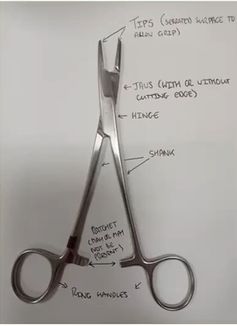
Name the anatomy of an instrument from the functional end to the part you hold
tips
Jaws
Hinge
Shaft/Shank
Ratchet
Ring Handles
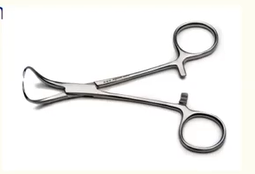
What is this instrument?
Backhaus towel clamp
What is a towel clamp used for?
Attach surgical drapes to skin
Pinpoint tip means blood flow to area is maintained
Apply tips with the curve downwards
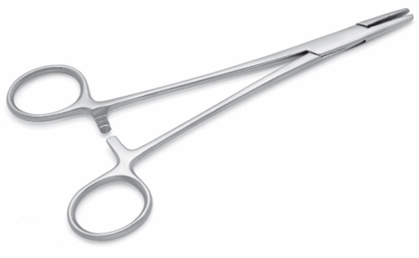
Mayo-Hegar needle holder
Olsen-Hegar needle holder
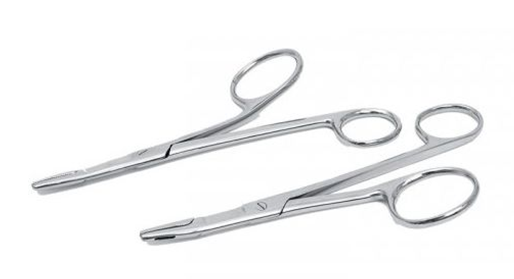
Gillies needle holder
What sizes do scapel handles come in?
Number 3 - for blade sizes beginning with one
Number 4 - for blade sizes beginning with 2
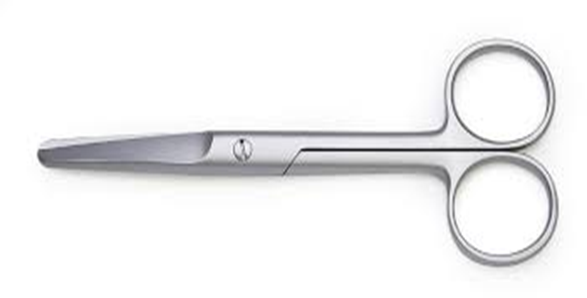
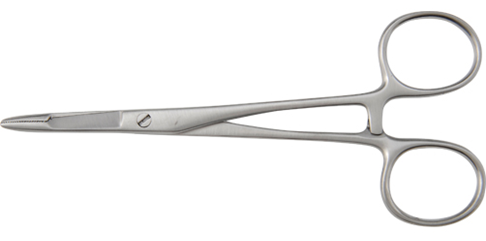
Mayo scissors

Metzenbaum scissors
Describe Mayo Scissors
chunky tips and short shank
used for cutting tough or fibrous tissue
can be used to cut suture material
Describe Metzenbaum Scissors
Slim tips and longer shank
Used for delicate dissection or for sharp cutting of soft tissues
NOT used for suture material
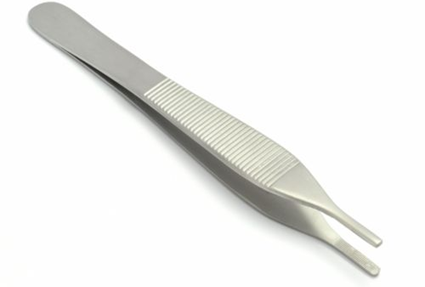
Adson dressing forceps
Describe dressing forceps
used to hold gauze, cotton and other material when dressing wounds
used to remove necrotic tissue or foreign bodies from wounds prior to dressing
Describe tissue forceps
Used for stabalising or holding tissue during surgical procedures
Interlocking teeth which allow for secure grip on tissue
cannot be used on hollow organs due to risk of tissue damage or puncture
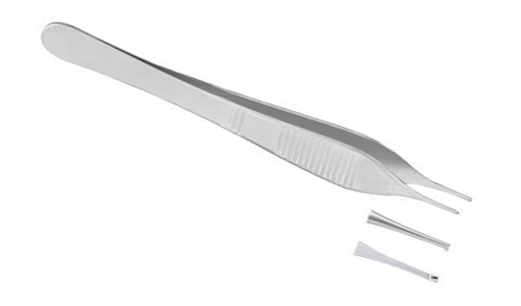
Adson Tissue forceps

Treves tissue forceps
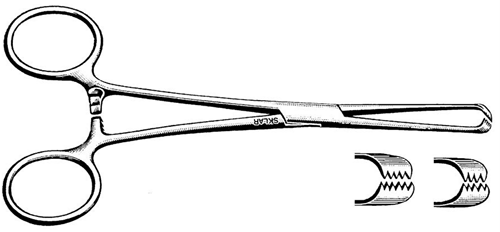
Allis tissue forceps
Describe Artery forceps
used for haemostasis - control of bleeding from a vessel or tissue by occluding blood flow
various sizes, can be curved or straight
have a ratchet so they can remain securely in place once closed
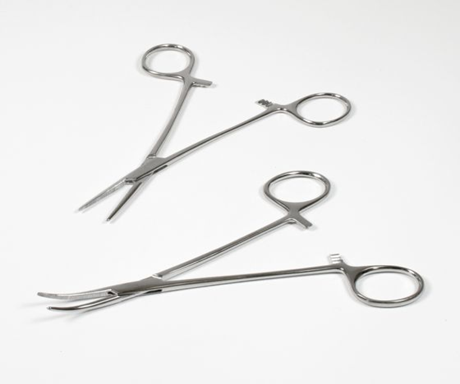
Halstead mosquito artery forceps - small to medium vessels
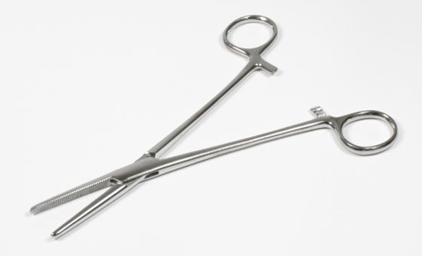
Spencer Wells artery forceps - small to medium vessels
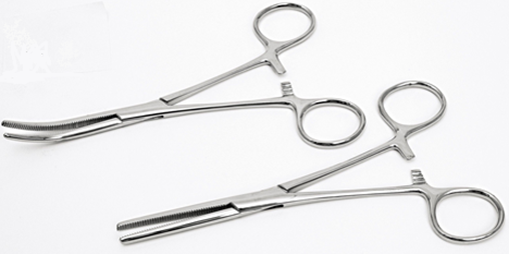
Rochester Pean artery forceps - large vessels

Spay hook
Describe Spay hook
used to help locate and exteriorise the uterine horns during a spay
anything lifted using these should be checked carefully and identified correctly before ligating or cutting
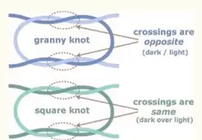
Describe the square knot
Secure knot, using two throws
Can be used in most situations
if tissues you are ligating are under tension, can cause first throw to loosen before the second throw is placed resulting in a loose ligature so surgeons knot should be considered
Describe grooved director
guide probes and scalpels to prevent accidental damage to underlying tissues
Describe Surgeons knot
Secure knot using two throws - first is performed using a double throw, then a single throw on top.
Asymmetrical so not as secure as square knot
double throw creates more friction so first throw is more likely to remain tight while second throw is placed

Square knot
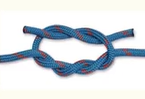
Surgeons Knot
What is the difference between a granny knot and a square knot?
3 Routes of Administration
Topical
Enteral
Parenteral
Describe Topical Administration
Applied to a particular site
Epi-cutaneous
Inhalation
Enema
Describe Enteral Administration
Administration via the gastrointestinal tract
Oral/Gastric
Rectal
Describe Parenteral Administration
Sub-cutaneous
Intra-muscular
Intra-venous
What do you need to know for enteral medication (including equation)
Weight of Animal (Kg)
Dose rate (usually mg/kg)
Drug concentration (usually mg/tablet)
Number of tablets = [ weight of animal (kg) x dose rate (mg/kg) ] / drug concentration (mg/tablet)
What do you need to know for parenteral medication (including equation)
Weight of Animal (Kg)
Dose rate (usually mg/kg)
Drug concentration (usually mg/ml)
Number of tablets = [ weight of animal (kg) x dose rate (mg/kg) ] / drug concentration (mg/ml)
Considerations for parenteral medication
Administration:
Solution : soluble substance dissolved in a solvent
Suspension : insoluble substance suspended in a solvent
Insoluble substances settles out over time
NEVER via intra venous route
Syringe:
Appropriate volume
Volume of syringe must be larger than volume to be injected
Smaller the syringe, more accurate the dose.
Hypodermic Needles:
Appropriate gauge
Appropriate length
6 rights
Right patient
Right drug
Right dose
Right route
Right time
Right frequency
Describe the purpose of aseptic preparation
environment contains micro-organism the body is normally resistant to by innate immunity
Skins also harbours commensal bactreria
Minimise risk of infection
Define Sterilisation
Process of destruction of all forms of microbial life - only inanimate objects can be rendered 100% sterile
Define Antiseptics
Used on living tissue to prevent or reduce the growth or action of pathogenic agents, therefore preventing infection
Define disinfectants
used on inanimate objects such as surgical instruments and surfaces, they aim to destroy most pathogenic organisms
Name three products that are used in hand prep
Chlorhexidine
Povidone iodine
Alcohol based gels
Describe properties of chlorhexidine
Not inactivated by organic matter
Reduces bacterial growth
Describe properties of povidone iodine
inactivated by organic matter
Longer contact time
Can cause skin irritation
Not as effective at preventing bacterial growth
Describe properties of alcohol based gels
not as effective as other antiseptics
Shorter contact time required
Name two pieces of equipment used to preserve asepsis other than gloves
Operating mask
Theatre Cap
When is open gloving used?
Minor procedures as arms are exposed and it is only 70-80% sterile
6 rules for surgeon prep
Your hands are only 70-80% sterile after hand prep
(You need gloves!)
No jewellery
Forearms should not be not covered
(Short sleeves/role the sleeves up)
Scrub forearms
Put mask and hat before you start
If gloves break get a new pair
Reasons for patient prep and steps taken to reduce infection
Skin has commensal bacteria
More hair present so surgical site is clipped (4 hours before for best results)
May require initial clean with soap bath to reduce gross debris and transient flora
Surgical preparation of skin - chlorhexidine common
Different sterile drapes used
Name the two methods of patient prep
Spiral and Crosshatch
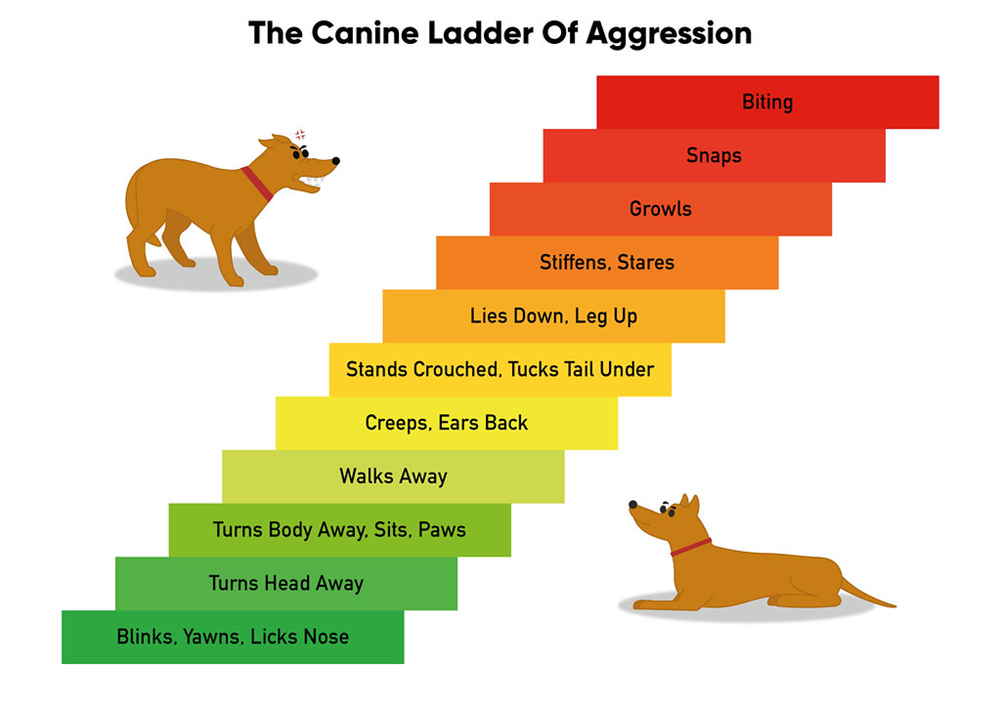
Key behavioural considerations - dogs
Generally used to being handled by humans – tolerance may vary!
Canine ladder of aggression/communication (www.apbc.org)
Use body language to assess how the dog is feeling – they are very communicative if you know what you are looking for….
Be aware though that if these signs have been repeatedly ignored in the past, dogs may elect to go straight to the top of the ladder.
Key behavioural considerations - cats
Most domestic cats will tolerate handling and examination well, but individual tolerance varies and previous bad experiences often result in defensive behaviour at the vets
Body language can be useful, but is sometimes more difficult to interpret – low body position, flattened ears and wide pupils indicate stress, and cats who feel threatened may try to make themselves look bigger and will often hiss or swipe
LESS is more
Let the cat remain where it feels comfortable if at all possible
Don’t tip out of cat basket, let them come out in their own time
Also be aware that the type of basket the cat arrives in has the potential to vastly alter their behaviour, depending on how difficult it is to get them out of it!
Use gentle neck/cheek stroking (if the cat is receptive to this!)
Treats can be useful, as can the use of feline facial pheromones and other calming products (Feliway or Pet Remedy diffusers and sprays for example)
Stop before you reach full on hissing, spitting angry cat stage and consider alternative methods
NEVER SCRUFF CATS
Key behavioural considerations - horses
Rarely overtly aggressive but they are big, and they are prey species. Therefore, their usual reaction to something they don’t appreciate is to try to get away from it.
They may bite or kick if other avoidance measures don’t work.
They appreciate calm, quiet but deliberate handling – don’t creep up on them
Be aware of blind spots (directly in front and behind)
Use body language – ear position and body posture can tell you a lot about their emotional state!
Be aware that most horses are used to being approached and handled mainly from the left hand side.
Take your time - patience and repetition can win round most horses
Key behavioural considerations - cattle
Different breeds/sexes pose different risks: e.g. dairy cow vs beef cow vs bull vs youngstock vs cow with calf at foot!
Handling should be done as quietly as possible, calm cattle are easier to handle!
Safe handling of cattle requires appropriate, well-maintained equipment – pens, races, crushes
Cattle are often best handled and moved as part of a group, where possible
If moving individual animals, be aware that cattle (and sheep) have a ‘point of balance’ which allows us to move animals by stepping in or out of their flight zone (see https://www.grandin.com/behaviour/principles/flight.zone.html for details)
Once safely contained in a suitable environment, a halter can be applied to facilitate head restraint for various procedures
Behavioural considerations - sheep
Not as large as cattle, and with the exception of rams, probably considerably less dangerous. That said getting hold of an individual animal for examination can be challenging.
Some breeds can be very large, and some can be flighty.
Appropriate handling facilities will facilitate this, and as with cattle try to move and handle quietly and calmly. Halters can be used once animals are caught
Restraint
Verbal – simple voice commands may facilitate basic examination
Stand, sit, steady, wait etc
Physical – ranging from hands to equipment
Manual – using hands to steady and animal
Collars, leads, haltis, headcollars, halters – used to facilitate control of the head
Muzzles – prevent biting (Various types: Mikki, Baskerville, Tape, Cat)
Towel wraps and cat bags – useful for swaddling cats, and also for head restraint in brachycephalic breeds where muzzling is impossible
Chemical – not part of this skill
Important to be aware of this option. If handling is impossible or dangerous, it is worth considering the use of sedation or other chemical restraint to facilitate safe handling
Normal parturition
Normal parturition has three stages:
Stage 1 – Onset of uterine contractions/dilation of the cervix
Stage 2 – Delivery of the foetus
Stage 3 – Expulsion of foetal membranes
In polytocus species (those which have multiple foetuses) stage 2 + 3 are indistinguishable
Stage 1. Dilation of the cervix
Time is variable within species and between species
Longer in primiparous
Signs:
Restless, uneasy, trying to isolate herself, pawing the ground
Onset of uterine contractions, cervix dilation, foetal movement (to get into right position) and allantochorion is forced through the canal (water bag, and water bag rupture at the end of stage 1)
Stage 2. Delivery of the foetus
Rupture of allantochorion (water bag) indicates start of stage 2
Expulsion of foetus through uterine and abdominal contractions
Lamb should be out within about one hour after the water bag appears
Twins are usually delivered within 30 minutes of each other
Stage 3. Expulsion of the placenta
Placenta (foetal membranes) expelled through action of uterine contractions (PGF2⍺ and oxytocin)
Placenta retention – serious consequences. Do not forget to check!
In polytocous species (pig, cat, dog), placenta expelled with or just after each foetus
In one or two offspring (cattle, sheep, horse), placenta expelled within three hours of birth
When to intervene
Farmer has tried and failed to deliver foetus
Foetus abnormally positioned
If no progress 30-60 minutes after rupture of foetal membranes (in ewes; intervene sooner in horses)
If polytocous species and more than 30 minutes has elapsed between offspring
If abnormal discharge
If prolapse occurs
Postpartum care
Ensure the lamb has a clear airway and is breathing
Allow the ewe to smell her lamb as soon as possible
Check for more lambs
Check the ewe for any damage
Check the ewe has milk, and that milk let down is occurring
Treat the umbilical cord of the lamb
Ensure the lamb feeds
Longitudinal anterior
Head first
Longitudinal posterior
back legs first
Transverse
Sideways
Dorsal
Spine of foetus in contact with spine of mum
Ventral
Stomach of foetus in contact with spine of mum
Lateral
One of the sides in contact with spine of mum
Extended
Limb out
Flexed
Limb in
Blood smear
Part of the standard haematology analysis
All blood samples where blood cells are of interest should have a blood smear performed.
Best smears are made with fresh blood straight from the animal so must be done in practice before sending to an external lab.
Easy to do
Easy to do badly
Interpretation “in house” is quick and easy
How good is your smear?
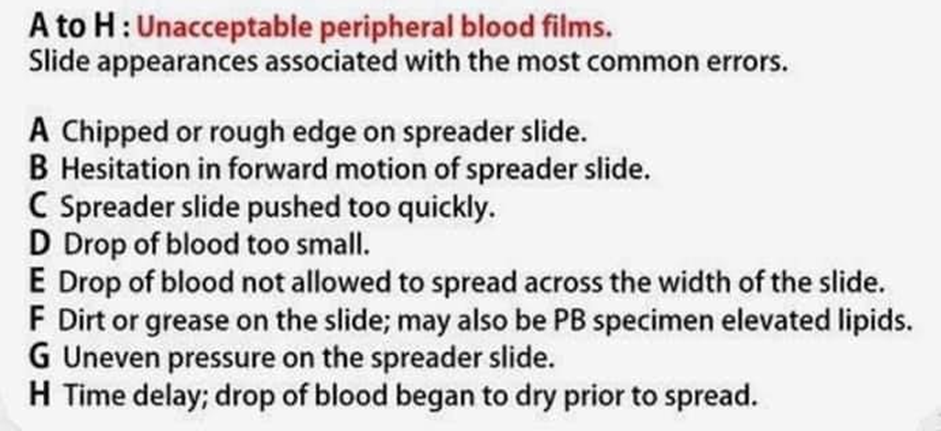
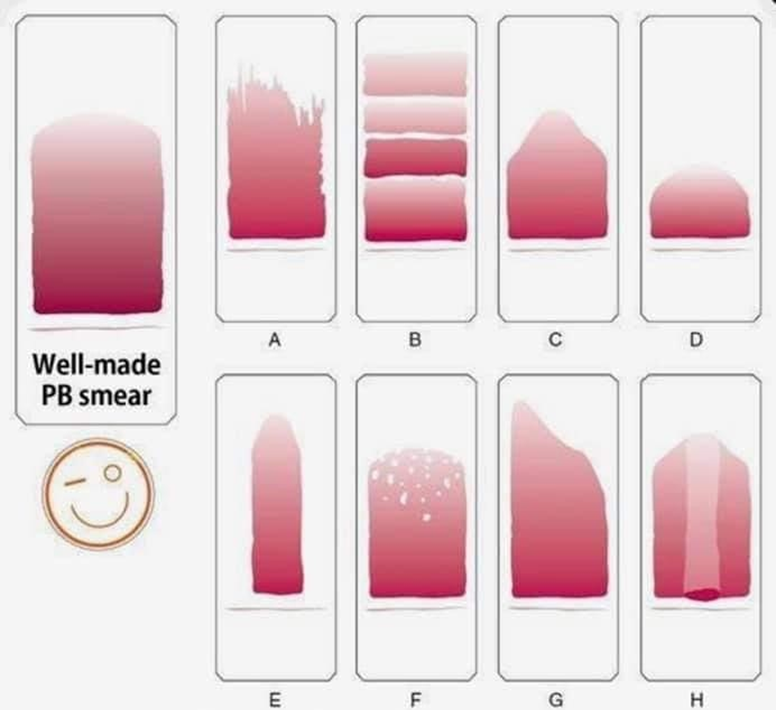
Examine your smear
Start at low power (x10) and scan the smear to check its quality
Examine the feathered edge to check for platelet clumps and large cells
Locate the monolayer: the portion of the smear between the feathered edge and body, where cells are evenly distributed with around 0.5 RBC diameter between them.
Red blood cells
Density
Colour
Variation = polychromasia
Shape
Variation = poikilocytosis
Size
Variation = anisocytosis
Differential WBCC
Monolayer (Zone of morphology)
x100 oil immersion or x40
“Battlement” pattern
10 fields up, one field to right, 10 fields down, one field to right…..
Count 100 WBCs, noting the type of each, to give a percentage
This is NOT an absolute count; just a proportion
Normal ranges for differential WBCC
Neutrophils % | Lymphocytes % | Monocytes % | Eosinophils % | Basophils % | |
CAT | 45 - 64 | 27 - 36 | 0 - 5 | 0 - 4 | 0 - 1 |
DOG | 58 - 85 | 8 - 21 | 3 - 10 | 0 - 9 | 0 - 1 |
COW | 15 - 33 | 40 - 75 | 0 - 8 | 0 - 20 | 0 - 2 |
SHEEP | 10 - 50 | 40 - 75 | 0 - 6 | 0 - 10 | 0 - 3 |
HORSE | 52 - 75 | 21 - 42 | 0 - 6 | 0 - 7 | 0 - 2 |
PIG | 28 - 70 | 35 - 75 | 0 - 10 | 0 - 15 | 0 - 3 |
Platelet count
Count the number of platelets in each of several high-power fields (x100)
Adequate platelet numbers suggested by:
10-30/hpf for dogs, cats and cattle
6-20/hpf for horses
WATCH OUT FOR CLUMPS!
Packed cell volume
Use a capillary tube, a centrifuge and a reader to work out the proportion of red blood cells in the blood = the haematocrit.
- Expressed as a percentage of blood volume
Quick, cheap, easy and useful.
Only need tiny sample of blood.
Use to monitor patients for changes in haematocrit.