RADPOS 1 - Finals pt. 2
1/136
There's no tags or description
Looks like no tags are added yet.
Name | Mastery | Learn | Test | Matching | Spaced |
|---|
No study sessions yet.
137 Terms
Ankylosing spondylitis
Rheumatoid arthritis variant involving the sacroiliac joints and spine
Clay shoveler’s
Avulsion fracture of the spinous process in the lower cervical and upper thoracic region
Compression
Fracture that causes compaction of bone and a decrease in length or width
Hangman’s
Fracture of the anterior arch of C2 owing to hyperextension
Jefferson
Comminuted fracture of the ring of C1
Herniated nucleus pulposus
Rupture or prolapse of the nucleus pulposus into the spinal canal
Kyphosis
Abnormally increased anterior concavity (posterior convexity) in the thoracic curvature
Lordosis
Abnormally increased anterior convexity (posterior concavity) of the cervical and lumbar spine
Metastasis
Transfer of a cancerous lesion from one area to another
Osteoarthritis or degenerative joint disease
Form of arthritis marked by progressive cartilage deterioration in synovial joints
Osteopetrosis
Increased density of atypically soft bone
Osteoporosis
Loss of bone density
Paget disease
Thick, soft bone marked by bowing and fractures
Scheuermann disease or adolescent kyphosis
Kyphosis with onset in adolescence
Scoliosis
Lateral deviation of the spine with possible vertebral rotation
Spina bifida
Failure of the posterior encasement of the spinal cord to close
Spondylolisthesis
Forward displacement of a vertebra over a lower vertebra, usually L5-S1
Spondylolysis
Breaking down of the vertebra
Subluxation
Incomplete or partial dislocation
Multiple myeloma
Malignant neoplasm of plasma cells involving the bone marrow and causing destruction of bone
To show the upper half of the dens when not seen in open-mouth projection
What is the main purpose of the Fuchs Method AP projection?
Perpendicular to the midpoint of the IR, just below the chin
Where should the central ray be directed in the Fuchs Method AP projection?
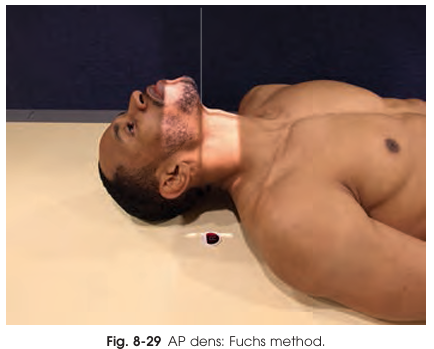
Supine with chin extended until chin and mastoid tips are vertical
What patient position is required for the Fuchs Method?
Suspected upper cervical fracture or degenerative disease
Which contraindication is specifically important for the Fuchs Method?
Dens (odontoid process) within the foramen magnum.
What structure does the Fuchs Method highlight?
It is difficult to position patients, especially with fracture risk.
What is the primary reason the Judd Method PA projection is rarely performed today?
CT
Which imaging technique has replaced the Judd Method for evaluating the upper cervical spine?
Upper cervical spine
Which anatomical region does the Judd Method aim to evaluate?
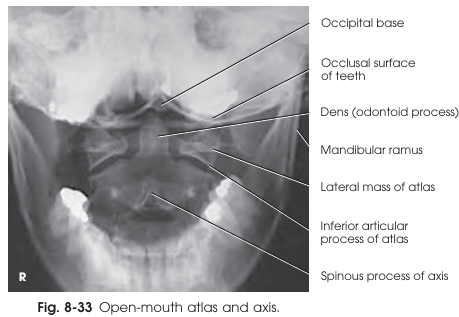
C1, C2
Which vertebrae are best visualized in the open-mouth AP projection?
30 inches (76 cm)
What is the recommended source-to-image distance (SID) for the open-mouth AP projection?
To lower the tongue away from the atlas and axis
What is the purpose of having the patient say 'ah' during the exposure for this projection?
Perpendicular to the midpoint of the open mouth
Where should the central ray be directed in the open-mouth AP projection?
Supine, arms by sides, knees supported
Patient position in the open-mouth AP projection
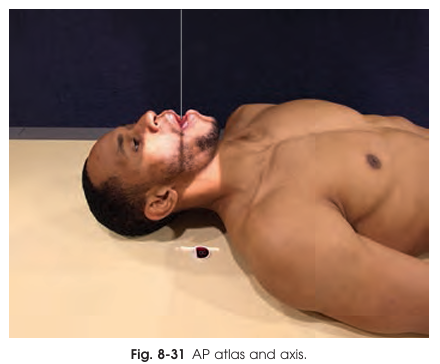
Mouth wide open, occlusal plane perpendicular to IR
Part position in the open-mouth AP projection
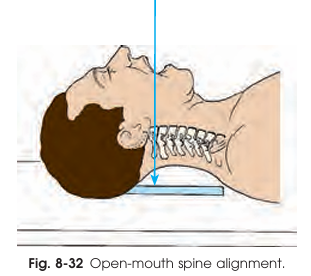
Atlas, axis (esp. dens), superimposed occlusal/incisor/mastoid
Structures shown in the open-mouth AP projection
Albers-Schönberg (1910) and George (1919)
AP Projection — Open-Mouth was developed by?
To assess alignment at the craniovertebral junction and visualize the atlantooccipital and atlantoaxial articulations
What is the main purpose of the lateral projection of the atlas and axis?
1 inch (2.5 cm) below the mastoid tip
Where is the central ray directed for the lateral projection of the atlas and axis?

Slight extension of the neck
What adjustment helps prevent the mandible’s shadow from overlapping the cervical spine?
Supine, side position, head supported if safe
Patient position in the lateral projection of the atlas and axis
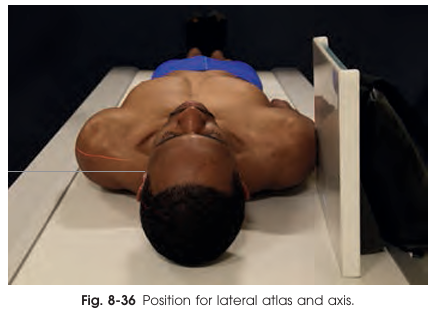
Vertical, upper neck, parallel to neck
IR Position in the lateral projection of the atlas and axis
To prevent the mandible from superimposing the cervical vertebrae
Why should the chin be extended so the occlusal plane is perpendicular to the tabletop in the AP axial cervical projection?
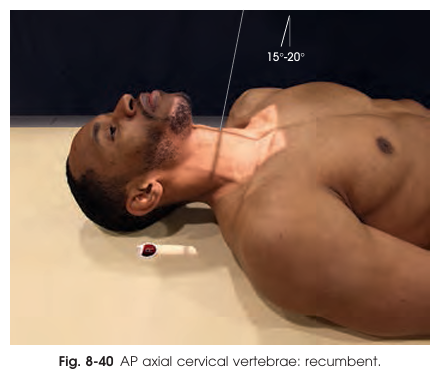
15–20° cephalad through C4 (Adam’s apple)
At what angle and through which vertebral level should the central ray be directed for an AP axial cervical spine projection?
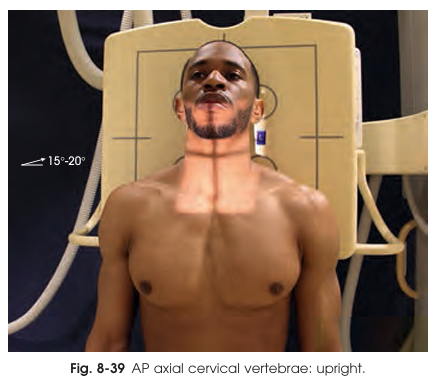
C3–C7, upper thoracic, disk spaces, cervical ribs
Which of the following structures can be visualized on a proper AP axial cervical vertebrae projection?
10 inches (25 cm) lengthwise, 1 inch (2.5 cm) beyond skin shadow side to side
Collimation for AP axial cervical vertebrae projection
60–72 inches (152–183 cm)
What is the recommended SID for the lateral cervical spine projection (Grandy Method) to decreases magnification and helps visualize C7 and T1?
To prevent overlap of the mandibular rami with the cervical spine
Why should the chin be slightly elevated or the mandible protruded in the Grandy Method?
C1–C7 and possibly T1–T2
What cervical vertebral levels must be included on a good lateral projection in the Grandy Method?
At the end of full expiration
When should respiration be suspended for the lateral cervical spine projection Grandy Method?
True lateral (seated or standing), cervical vertebrae axis parallel to IR, shoulders aligned and depressed.
Patient position for the lateral cervical spine projection Grandy Method
Centered at C4; top is about 1 inch (2.5 cm) above the external acoustic meatus (EAM).
IR position for the lateral cervical spine projection Grandy Method
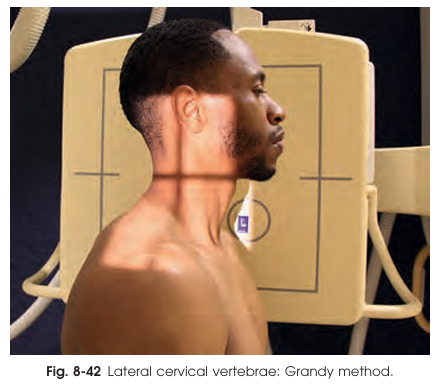
C1–C7 vertebrae, disk spaces, zygapophyseal joints, T1–T2
Key structures in the lateral cervical spine projection Grandy Method
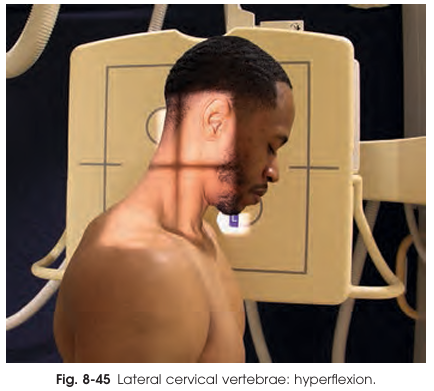
Evaluate normal or restricted AP movement (flexion/extension)
Help identify injuries, ligament instability, or fusion
Radiologist evaluates posterior vertebral alignment
What is the primary purpose of lateral hyperflexion and hyperextension X-rays of the cervical spine?
Fractures or significant cervical pathology
Before performing hyperflexion or hyperextension projections, what must be ruled out?
Elevated and widely separated
How do the spinous processes appear in the lateral cervical spine hyperflexion projection?
60 − 72 inches (152 − 183 cm)
What is the recommended Source-to-Image Distance (SID) for lateral projections hyperflexion and hyperextension?
True lateral (seated or standing) before a vertical grid; shoulder adjacent to grid
Patient position for lateral projections hyperflexion and hyperextension
At C4 (top about 2 inches [5 cm] above EAM)
Center IR for lateral projections hyperflexion and hyperextension
Lateral Hyperflexion of Cervical Spine
Patient drops head forward, chin toward the chest
Spinous processes appear elevated and widely separated
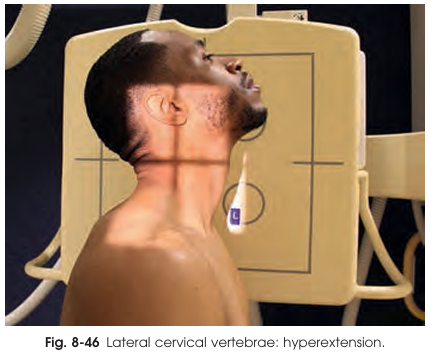
Lateral Hyperextension of Cervical Spine
Patient tilts head backward, elevating chin as much as possible
Spinous processes appear depressed and closely approximated
Horizontal and perpendicular to C4
CR for lateral projections hyperflexion and hyperextension
10 × 12 inches (24 × 30 cm)
Collimation for lateral projections hyperflexion and hyperextension
For hyperflexion: includes EAC anteriorly to C7 spinous process posteriorly
For hyperextension: midmandible anteriorly to C7 spinous process posteriorly
60–72 inches (152–183 cm)
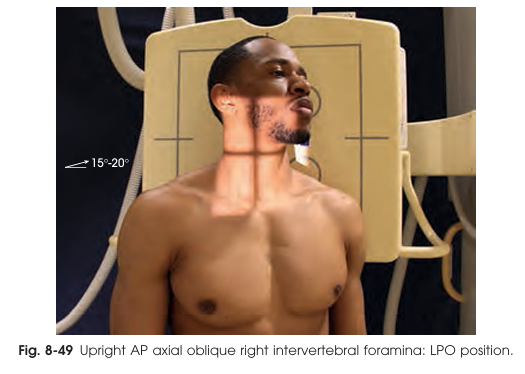
What is the recommended SID for the AP axial oblique projection of the cervical intervertebral foramina?
45°
What is the correct body and head rotation for AP axial oblique projection of the cervical intervertebral foramina?
To C4 with a 15–20° cephalad angle
Where should the central ray be directed for the AP axial oblique projection of the cervical intervertebral foramina?
Intervertebral foramina and pedicles farthest from the IR
Which structures are best demonstrated in the AP axial oblique projection of the cervical intervertebral foramina?
AP Axial Oblique Projection (RPO & LPO)
This projection is designed to clearly visualize the intervertebral foramina of the cervical spine—the passageways for spinal nerves. RPO (right posterior oblique) and LPO (left posterior oblique) positions allow evaluation of both sides for comparison.
Supine or upright facing the x-ray tube; standing/sitting is generally easier and more comfortable for patient.
Patient Position in the AP axial oblique projection of the cervical intervertebral foramina
To the third cervical body (C3), which is about 1 inch (2.5 cm) above the thyroid cartilage to account for the angle of the central ray.
IR Centering in the AP axial oblique projection of the cervical intervertebral foramina
Upright Posterior Oblique
Patient sits/stands straight, adjacent shoulder firmly against grid for support.
Ensure true 45° body rotation.
Chin elevated/protruded to avoid mandible overlap of spine. Do not turn chin to the side; this could rotate upper vertebrae.
AP axial oblique projection of the cervical intervertebral foramina
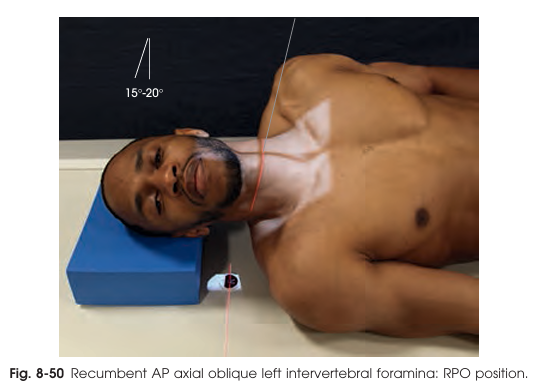
Recumbent Posterior Oblique
Patient rotated 45° (body and head).
Center spine to grid; support lower thorax/hip and head so cervical column is horizontal.
Chin elevated and jaw protruded as in upright.
AP axial oblique projection of the cervical intervertebral foramina
Barsóny and Koppenstein
Oblique projections for showing the cervical intervertebral foramina were first described by?
Show fractures of articular processes and obscure dislocations/subluxations
What is the main purpose of performing AP oblique hyperflexion and hyperextension studies of the cervical intervertebral foramina?
Physician
Who should perform manipulation of the head in AP oblique studies when an acute cervical injury is present?
Rotated maximally to one side
For AP oblique of the cervical intervertebral foramina, how is the head positioned before flexion or extension exposures?
Articular processes
Which cervical structures are best evaluated using AP oblique hyperflexion and hyperextension projections of the cervical intervertebral foramina?
15–20° caudad through C4
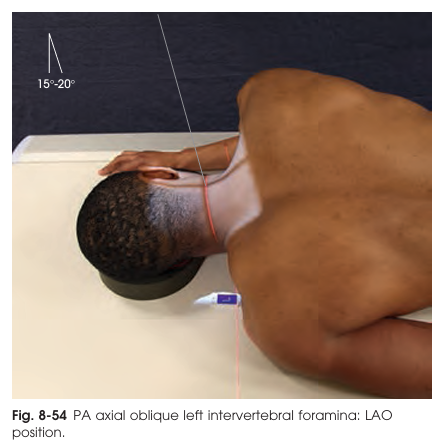
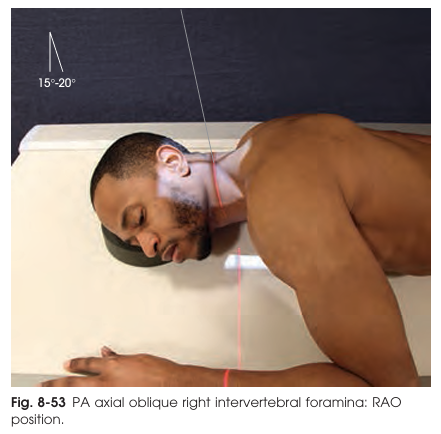
At what angle should the central ray (CR) be directed for a PA axial oblique projection of the cervical intervertebral foramina?
Left foramina, closest to the IR
Which intervertebral foramina are best visualized in an RAO position during a PA axial oblique projection?
Body rotated 45° with cervical spine centered to midline of IR
How should the patient's body and cervical spine be positioned relative to the IR for PA axial oblique projection of the cervical intervertebral foramina?
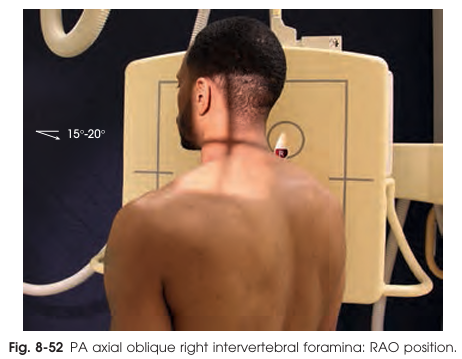
To prevent superimposition of the mandible on the upper cervical vertebrae
Why is it important to elevate and protrude the chin for the PA axial oblique projection?
PA Axial Oblique Projection (RAO & LAO)
This projection clearly demonstrates the intervertebral foramina (IVF) and pedicles of the cervical spine, focusing on those closest to the image receptor (IR). Both RAO (right anterior oblique) and LAO (left anterior oblique) positions are used for full assessment.
at C5 (about 1 inch below thyroid cartilage), to compensate for caudal CR angle
IR Centering for the PA axial oblique projection
60–72 inches (152–183 cm)
SID for the PA axial oblique projection
IVF & pedicles closest to IR
Structures for the PA axial oblique projection
To blur the mandible and clearly image the cervical spine
What is the main purpose of the Ottonello (wagging jaw) method in cervical spine radiography?
By having the patient perform a continuous chewing motion
How is the mandibular shadow blurred in the Ottonello method?
Perpendicular to C4, entering at the thyroid cartilage
Where should the central ray (CR) be directed for an Ottonello method AP cervical spine radiograph?
Low mA, long exposure time (at least 1 second)
What exposure technique is recommended for the Ottonello method?
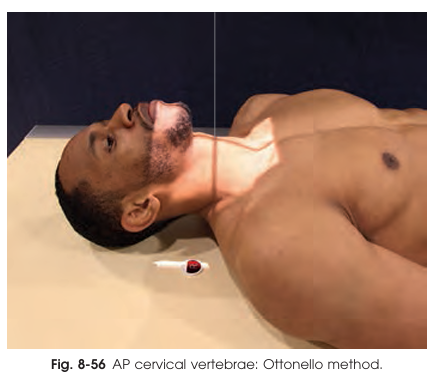
AP Projection (Ottonello Method)
Also known as the “wagging jaw” technique, is used for obtaining an AP projection of the entire cervical spine while blurring out the mandibular shadow. This allows clear visualization of the vertebrae without obstruction from the lower jaw.
Mandibular shadow blurring
Patient performs an even, continuous chewing (up-and-down) motion during a long exposure. The head is immobilized to keep the cervical spine still.
To show the vertebral arches (pillars/lateral masses), laminae, spinous processes of C3–C7 and upper T1–T3/4.
What is the primary purpose of the AP axial pillar projection for cervical and upper thoracic vertebrae?
Hyperextending the neck
Which patient positioning step is critical for separating the posterior elements from the vertebral bodies in AP axial pillar projection?
25° caudad
At what average angle should the central ray be directed caudally for a standard AP axial pillar projection?
Increase the angle
What adjustment should be made to the central ray angle if the patient has an accentuated cervical lordosis?
AP Axial Projection — Vertebral Arch (Pillars)
Used to visualize the posterior elements of the cervical vertebrae (articular processes, facets, laminae, spinous processes), and sometimes the upper thoracic vertebrae. It is valuable especially in whiplash injury assessment.
Technique projects these elements free of vertebral bodies and transverse processes.
Directed to C7 at an average 25° caudad (range 20–30°), entering at thyroid cartilage. More angulation if cervical curve is pronounced, less if reduced.
CR for AP axial pillar projection

40° cephalad (range 35–45°).
CR for PA axial pillar projection
Posterior part of cervical and upper thoracic vertebrae: articular processes, facets, laminae, spinous processes.
The image resembles a "hemisection" of vertebrae—arch displayed free of body/transverse process.
Structures Shown for AP axial pillar projection
Articular pillars and zygapophyseal joints
Which anatomical structures are best visualized with the AP axial oblique pillar projection?
45–50°
What is the typical degree of head rotation for imaging the articular processes from C2 to T1 in AP axial oblique pillar projection?