4️⃣ inside mouth techniques
1/37
There's no tags or description
Looks like no tags are added yet.
Name | Mastery | Learn | Test | Matching | Spaced |
|---|
No study sessions yet.
38 Terms
What is the bisecting technique based on?
It’s based on the rule of isometry, which means two triangles are equal when they share one side and have two equal angles.
How is the X-ray beam directed in the bisecting technique?
90° angle (straight) to the imaginary bisecting line between the tooth’s long axis and the receptor.
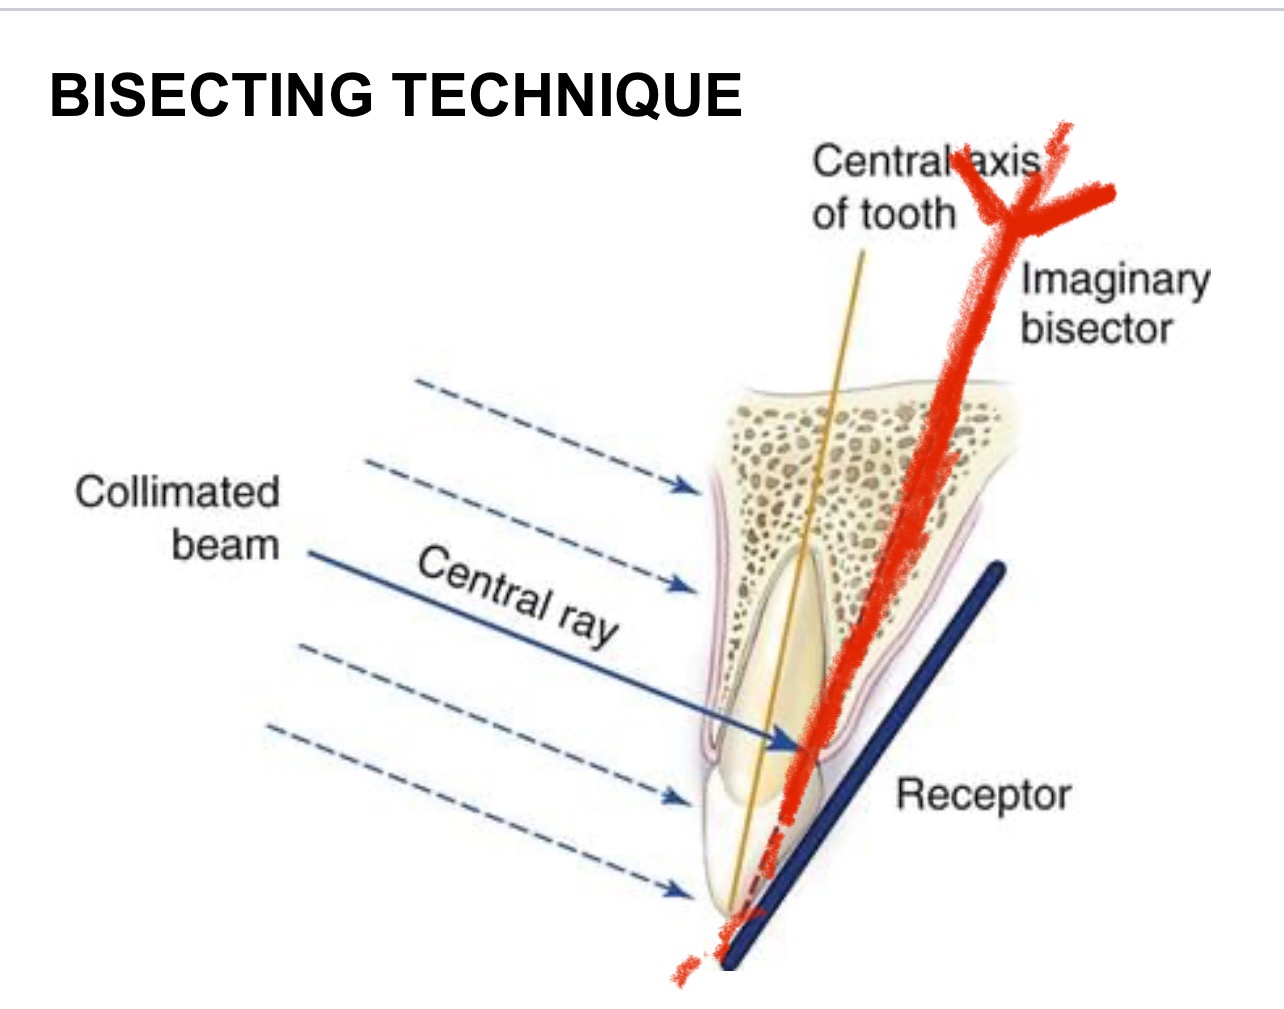
How is the receptor placed in the bisecting technique?
receptor is placed directly against the tooth, which forms an angle between the tooth’s long axis and the receptor — that’s why it needs the bisecting line to aim correctly.
Why does the bisecting technique cause more distortion than the paralleling technique?
harder to line up the X-ray beam exactly at the right angle — the palate shape and imaginary bisecting line
when a patient has a small mouth, shallow palate, or tori (bony growths on the palate or floor of the mouth).
Vertical angulation
tilting the tubehead up or down
Horizontal angulation
turning it left or right (used to avoid overlap)
For
Upper (Maxillary)
teeth → beam points
Down
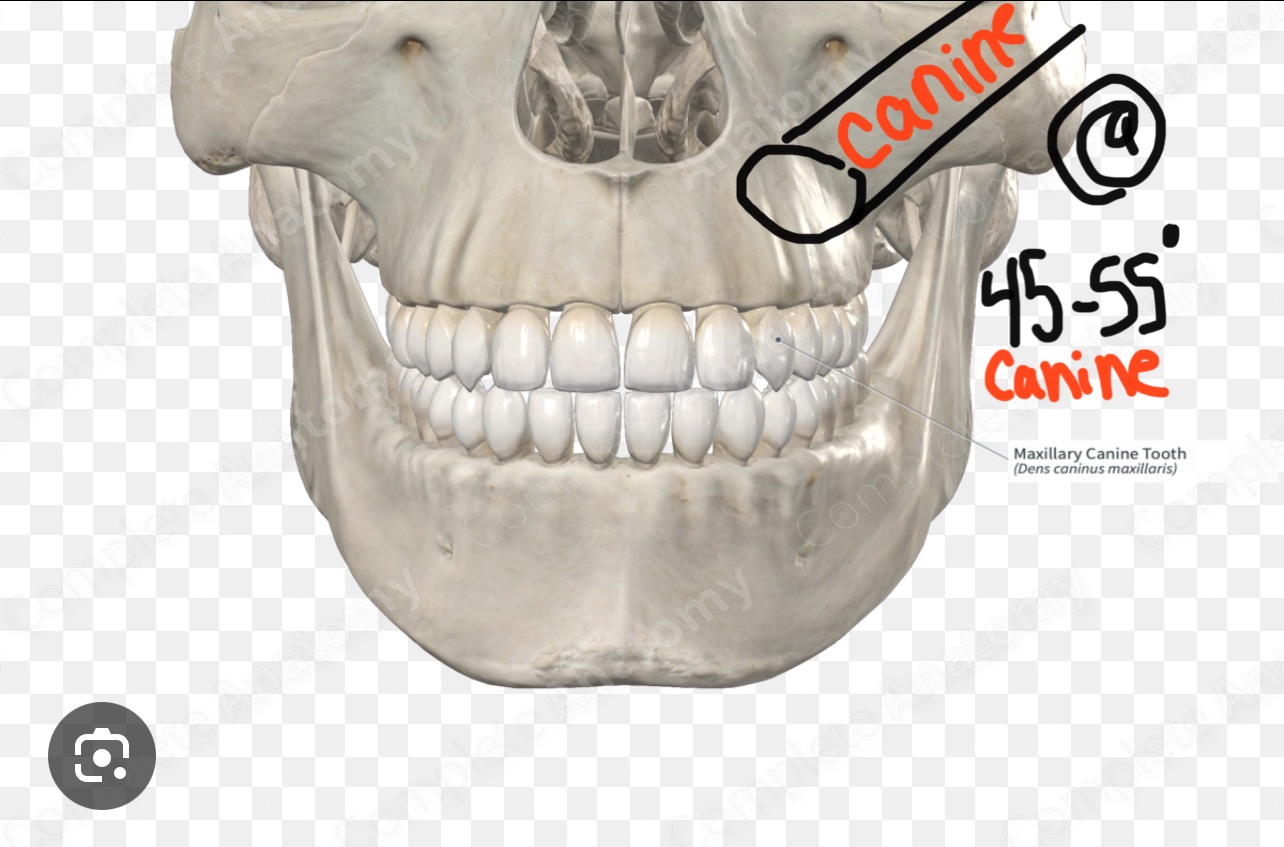
Bisecting
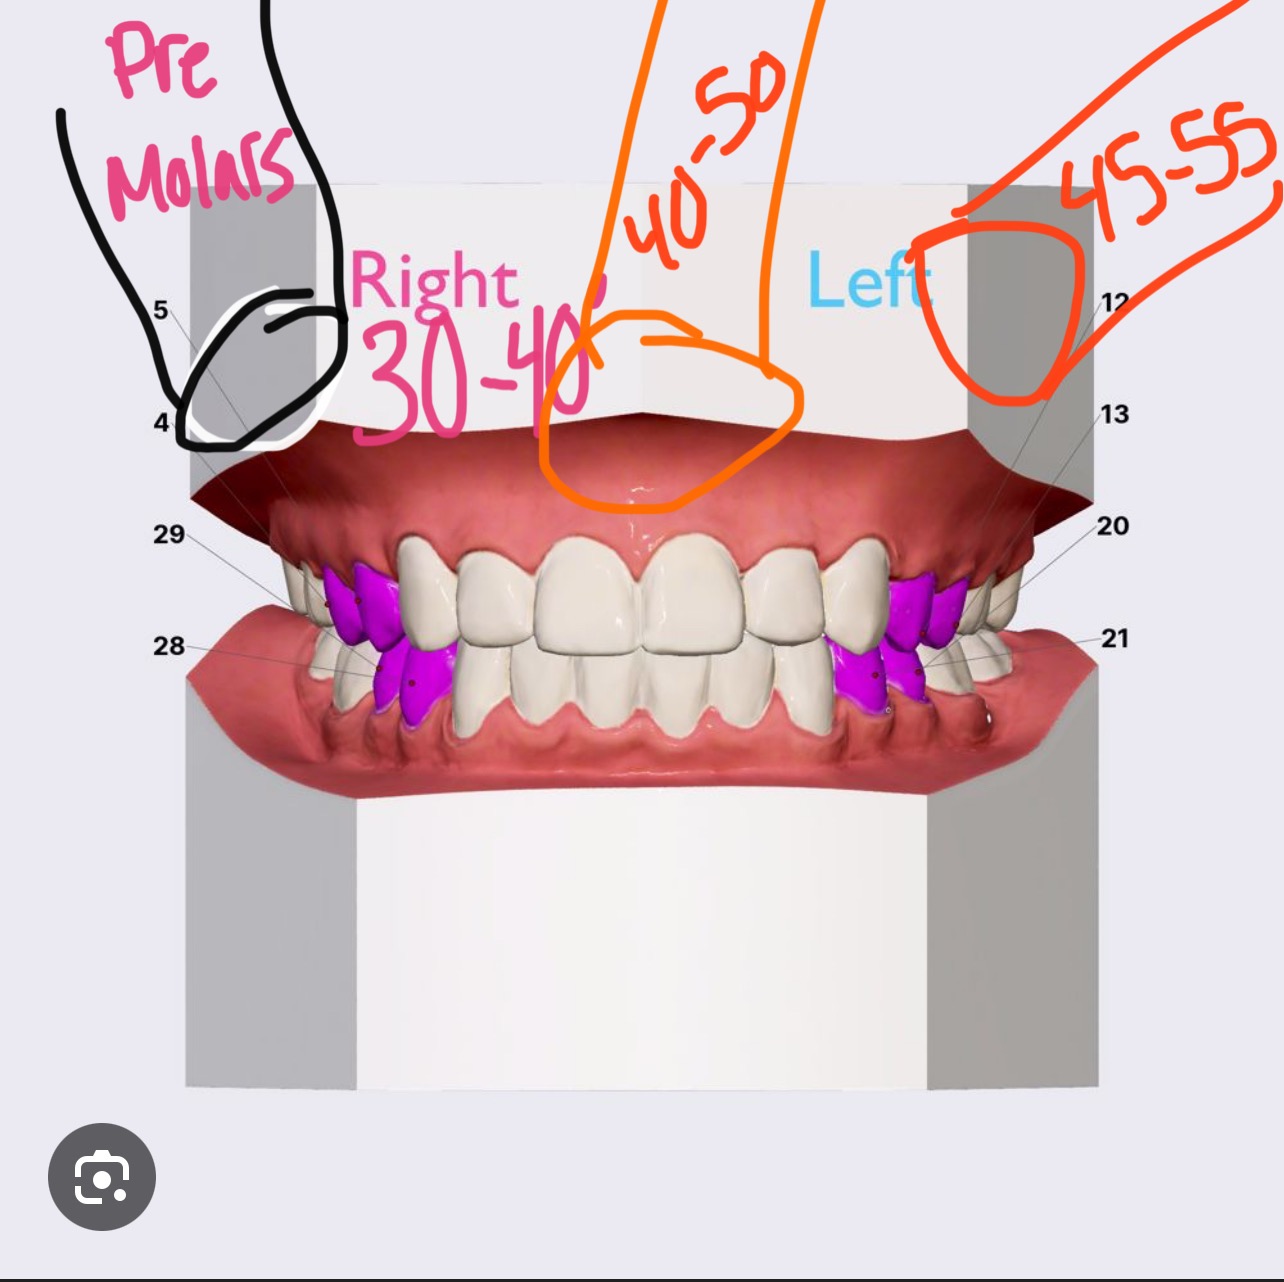
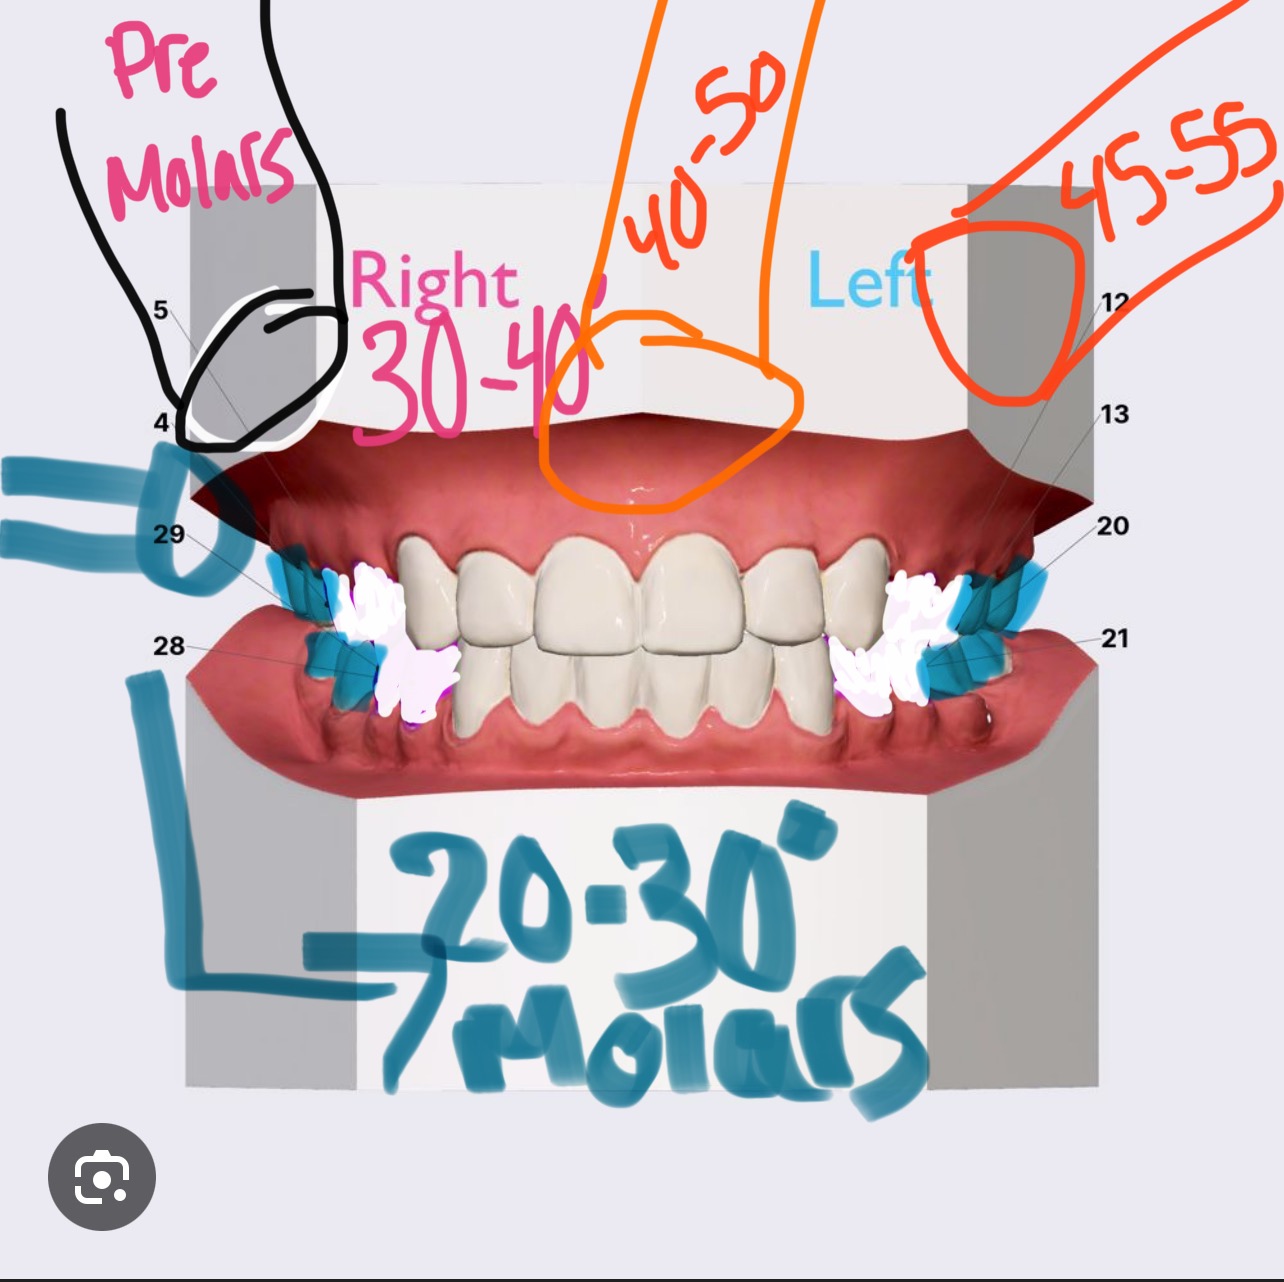
Canines maxillary
beam tilts down a lot → +45° to +55°

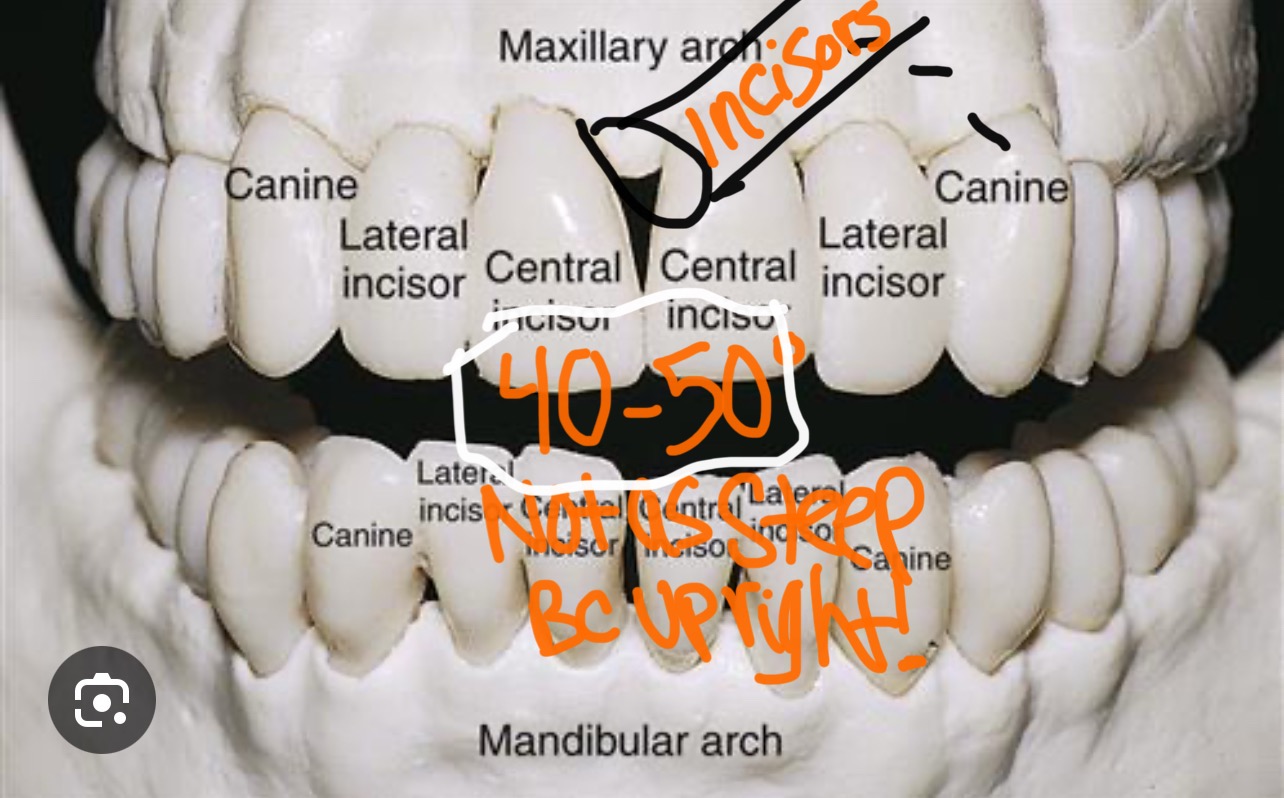
Insicors for MAXILLARY
40° to +50°

Maxillary (upper) teeth angle
Premolars
30-40 degrees


What is the correct vertical angulation for maxillary molars when using the bisecting technique?
20° to +30° (the PID is tilted downward toward the floor).

What is the correct vertical angulation for mamdibular canines when using the bisecting technique?
-20 degrees- -30 degrees


What is the correct vertical angulation for mandibular (lower) incisors when using the bisecting technique?
15° to −25° (the PID is angled upward toward the ceiling).
helps project the full image of the incisor roots without distortion, since the x-ray source is positioned below the chin pointing upward toward the teeth.


What is the correct vertical angulation for mandibular (lower) premolars when using the bisecting technique?
10° to −15° (the PID is angled upward from below the mandible).
under the jaw, pointing up toward the roots, so the beam is perpendicular to the imaginary bisecting line tat 90 degrees!!! between the tooth and the receptor
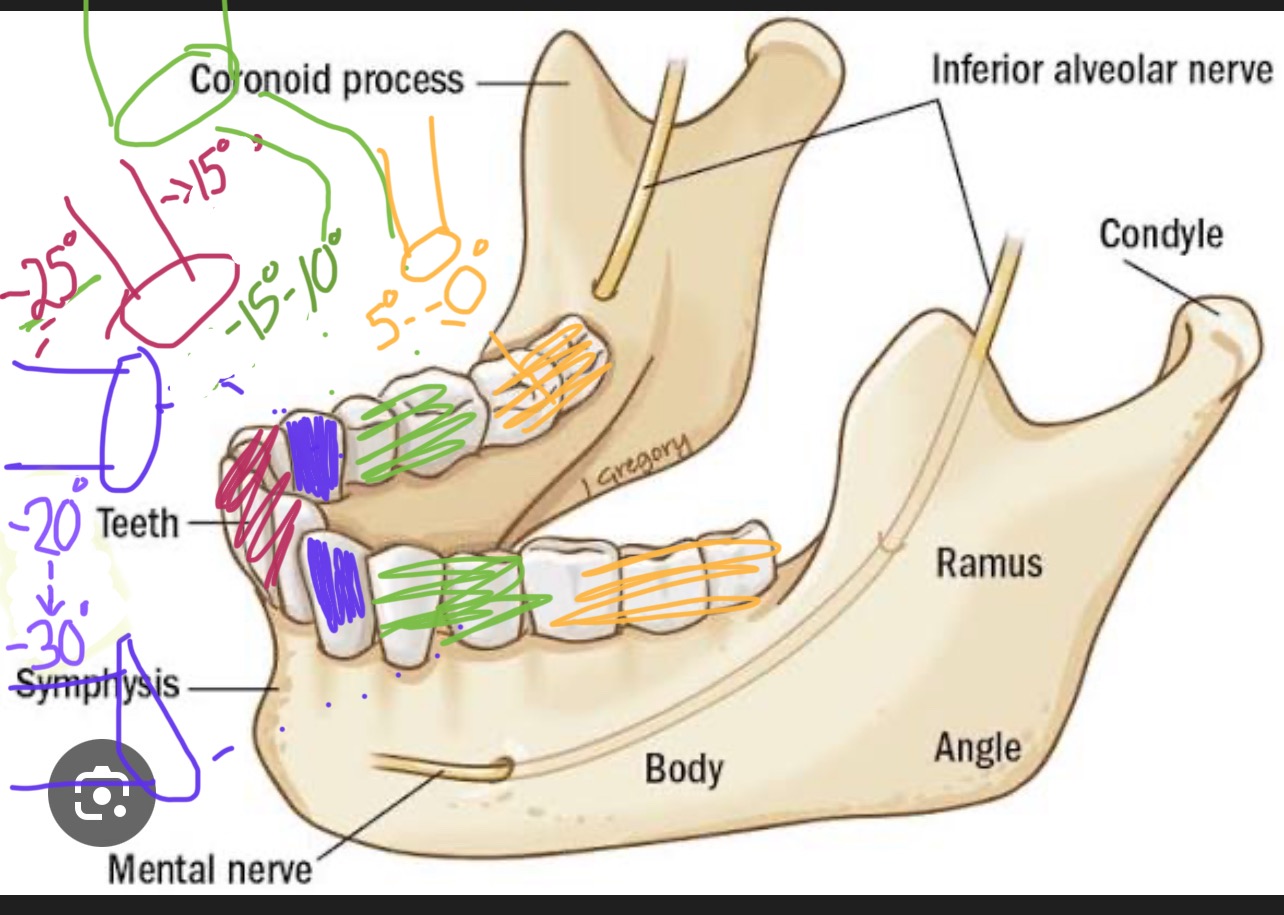

What is the correct vertical angulation for mandibular (lower) molars when using the bisecting technique?
5° to 0° (the PID is positioned below the mandible and the beam is aimed slightly upward or straight toward the bisecting line)
nearly parallel to the receptor.

paralleling technique
Why is the paralleling technique more accurate than the bisecting technique?
Because the receptor and tooth are parallel, it reduces distortion — the image shows the tooth in its true size and shape
What is the paralleling technique also called?
The long-cone or right-angle technique.
How is the receptor positioned in the paralleling technique?
The receptor is parallel to the long axis of the tooth.
Why is the paralleling technique preferred?
It provides a more accurate image with less distortion than the bisecting technique.
What tool is required to use the paralleling technique?
A receptor holder (to keep the film/sensor stable and parallel
Why does this parelleing technique cause some magnification?
Because the receptor is placed farther from the tooth surface
How is magnification reduced in the paralleling technique?
By increasing the tube-to-tooth distance (using a long PID/cone)
At what angle should the x-ray beam strike the tooth and receptor? Parelleing
At a 90° (right) angle to both.
Where should the x-ray beam be directed? For parellelt echbique
Through the contact areas between teeth to prevent overlap.
When might the paralleling technique not be possible?
In patients with a shallow palate, tori, or small mouth.
What is the purpose of an occlusal technique?
To capture a large area of the maxilla or mandible (like entire arch or floor of the mouth) on one image.
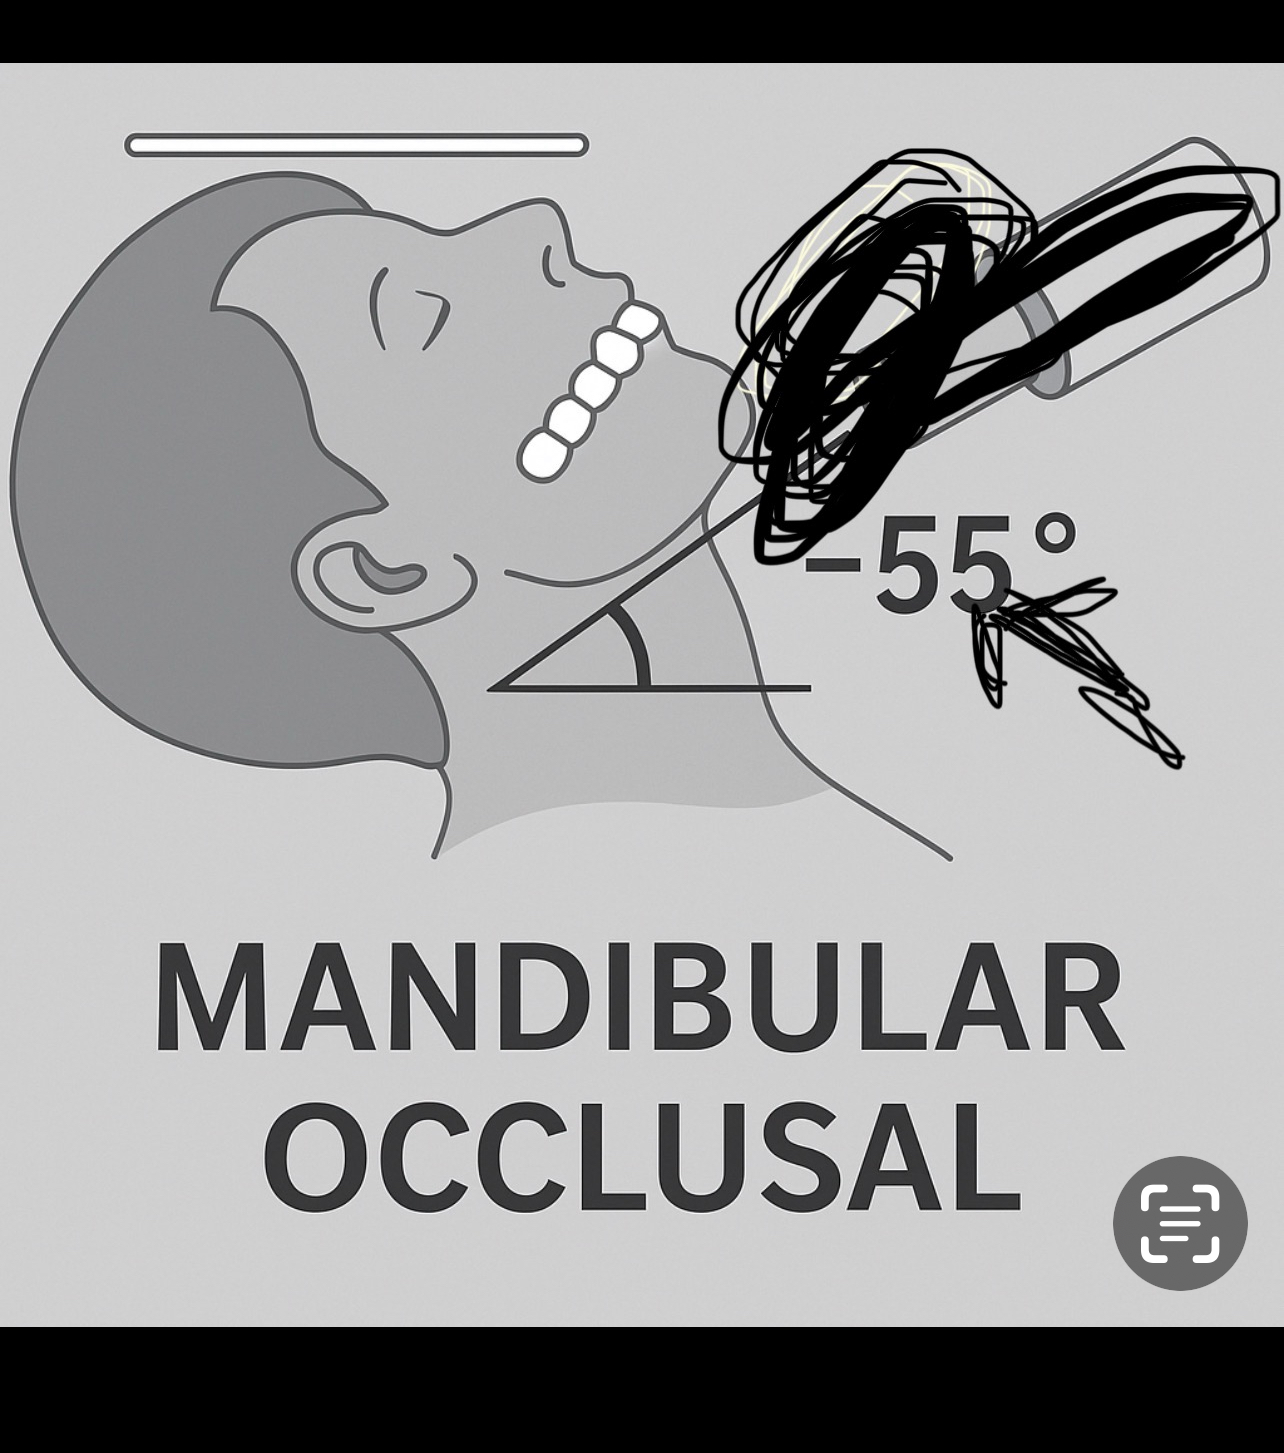
How is the patient’s head positioned for the mandibular occlusal technique?
head is tilted backward.
Negative 55° vertical angulation.
Through the chin
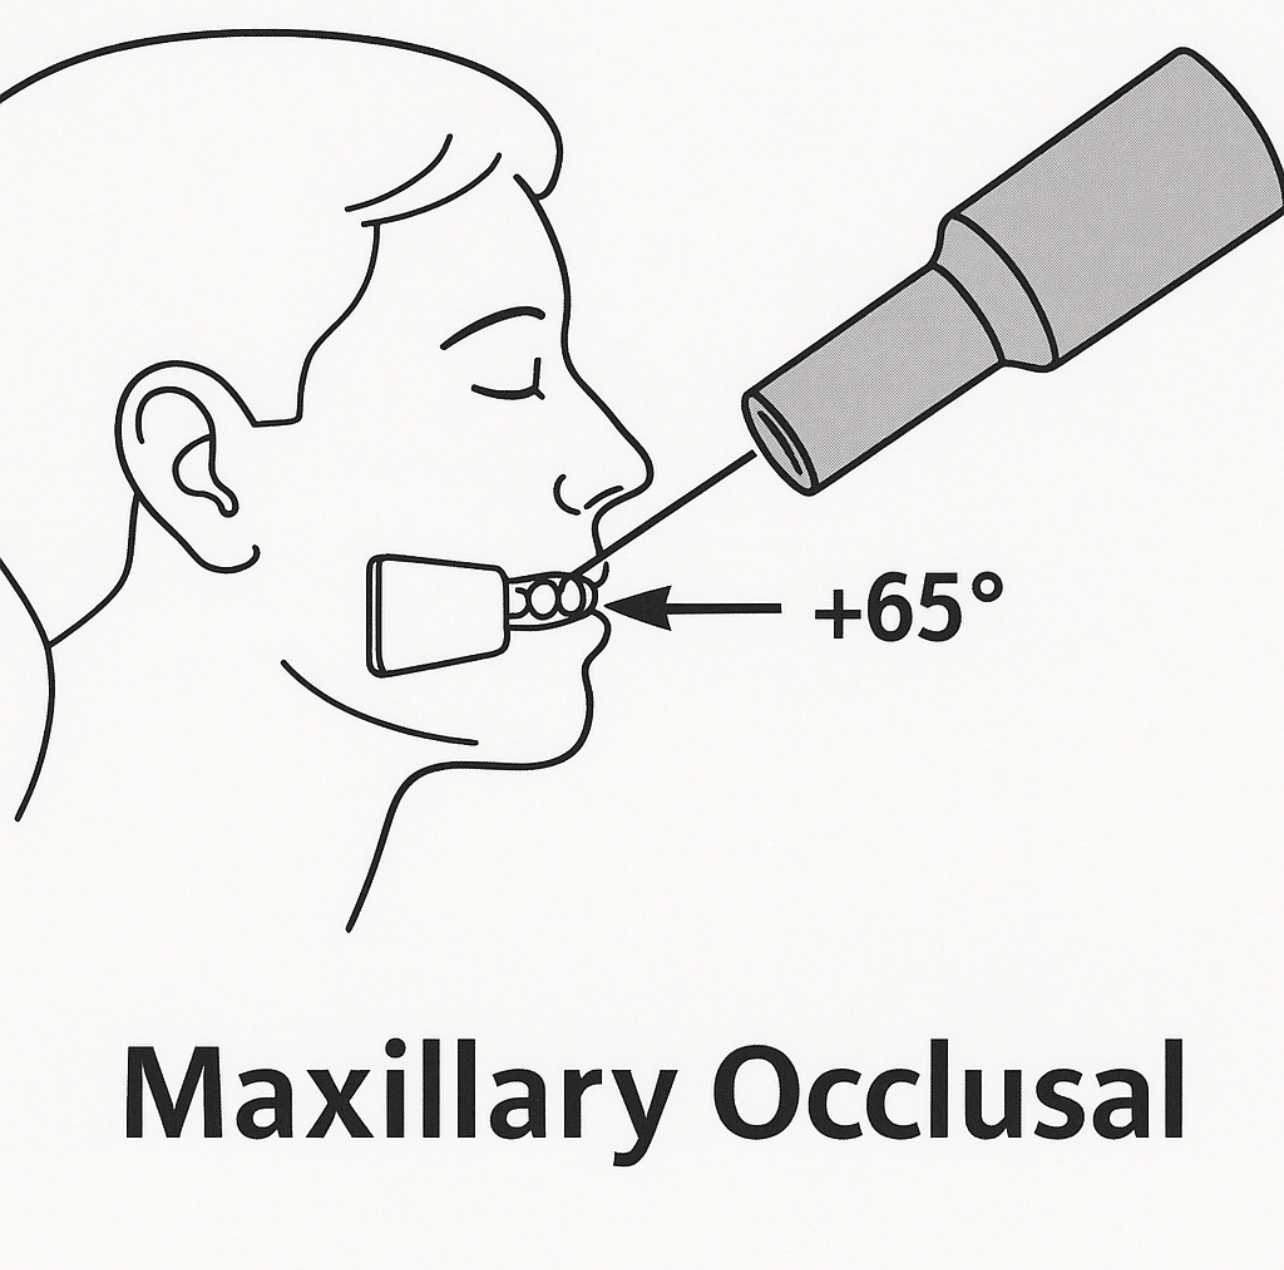
How is the patient’s head positioned for the maxillary occlusal technique?
The occlusal plane is parallel to the floor.
Positive 65° vertical angulation.
Through the tip of the nose.
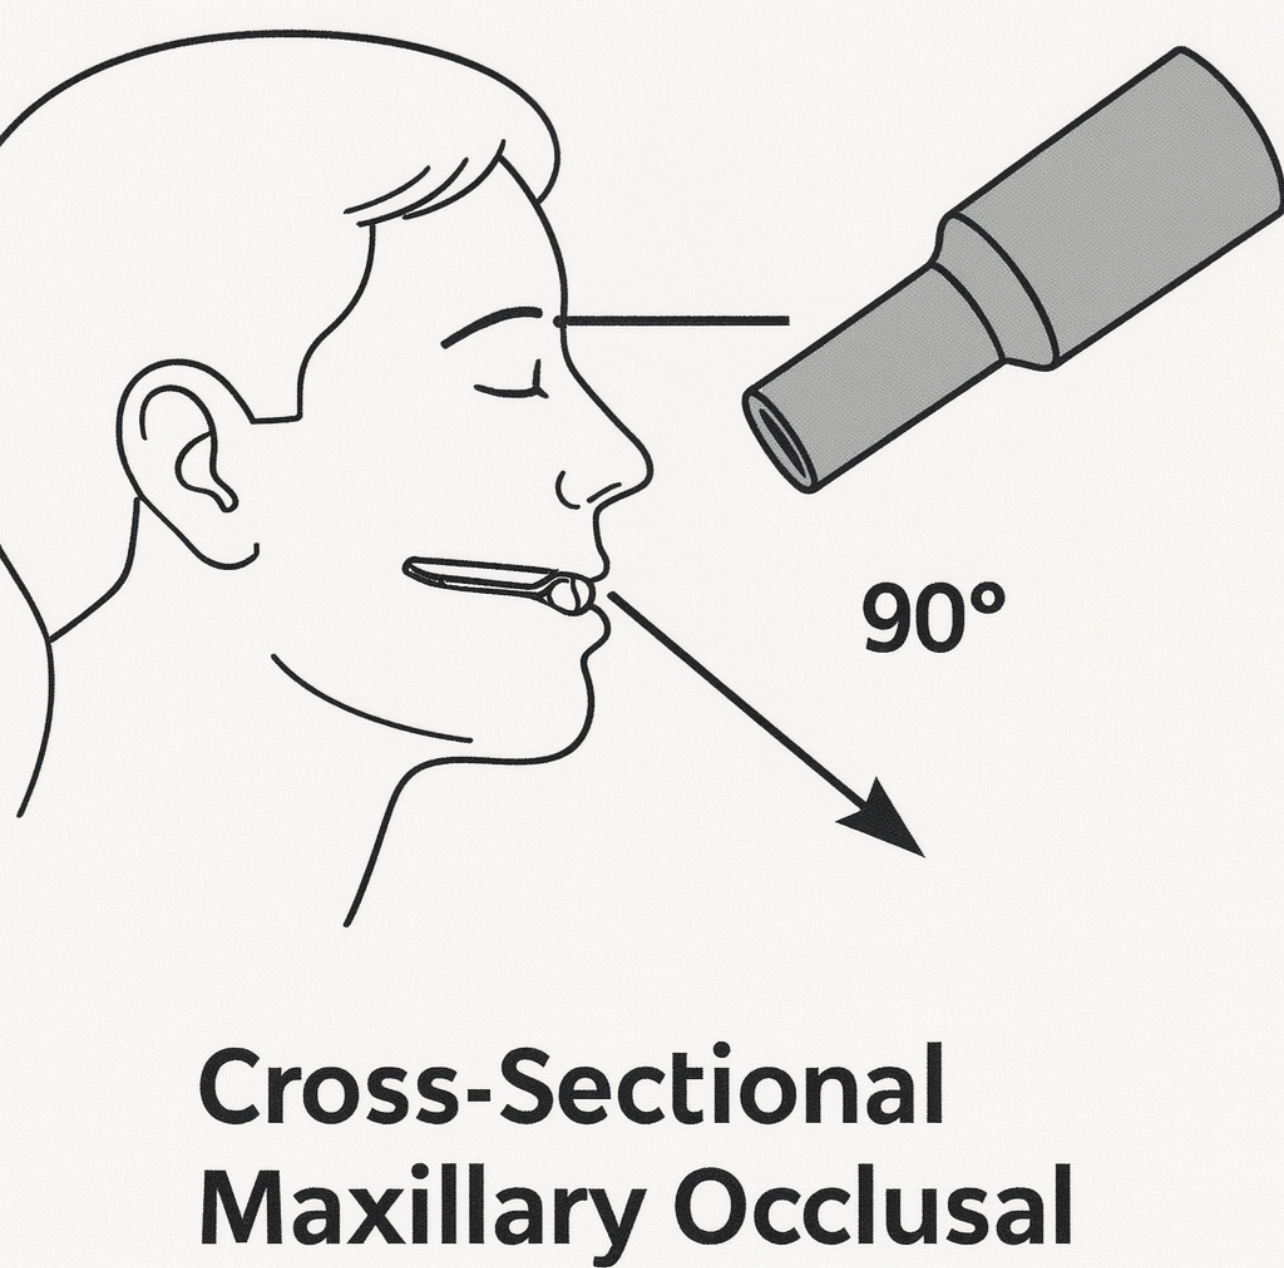
How is the patient’s head positioned for the cross-sectional maxillary occlusal technique?
The occlusal plane is parallel to the floor.
The beams are perpendicular to the receptor and directed between the eyebrows. 90 degree
the beam is perpendicular to the receptor, that means it’s at a 90° angle to it.
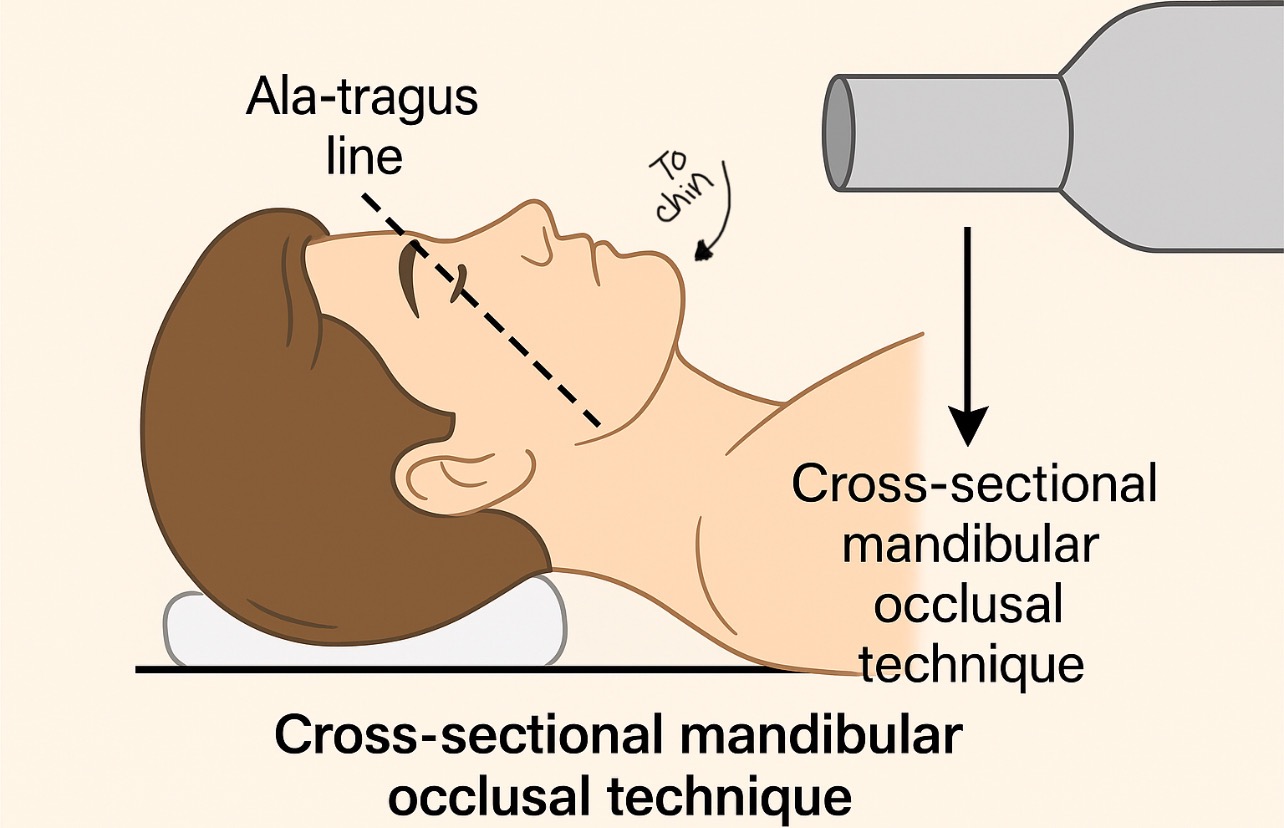
How is the patient’s head positioned for the cross-sectional mandibular occlusal technique?
The head is tilted backward until the ala-tragus line (from the side of the nose to the ear) is almost perpendicular to the floor.
The beams are perpendicular (90°) to the receptor and directed inferior to the chin.
Why is the cross-sectional occlusal technique 90° but the regular occlusal technique isn’t?
Because the cross-sectional view is taken straight down (90°) to see the width or cross-section of the arch,
while the regular occlusal view uses an angled beam (±55° to 65°) to show the entire arch length (anterior–posterior).
What does the Buccal Object Rule (SLOB) help you find?
It helps you tell if something (like a root, filling, or object) is on the lingual (tongue side) or buccal (cheek side) of the tooth.
What does SLOB stand for?
A: Same = Lingual, Opposite = Buccal.
If the object moves the same direction as the tube head → it’s lingual.
➡ If it moves the opposite direction → it’s buccal.
Why do we need the Buccal Object Rule?
Because a bitewing or periapical (PA) x-ray only shows the object front to back (anteroposterior) — it doesn’t show which side it’s on.
SLOB helps us figure out that 3D position.
How many images are needed for
the Buccal Object Rule (SLOB)?
Two images — either PA or BWX.
How is the second image taken?
With a different horizontal or vertical angulation.
changing the angle makes the object shift position on the x-ray
If the tube head and object move in the same direction, where is the object?
On the lingual side. (Same = Lingual)
If the tube head and object move in the opposite direction, where is the object?
On the buccal side. (Opposite = Buccal)