Intro to CODAL
1/18
There's no tags or description
Looks like no tags are added yet.
Name | Mastery | Learn | Test | Matching | Spaced | Call with Kai |
|---|
No analytics yet
Send a link to your students to track their progress
19 Terms
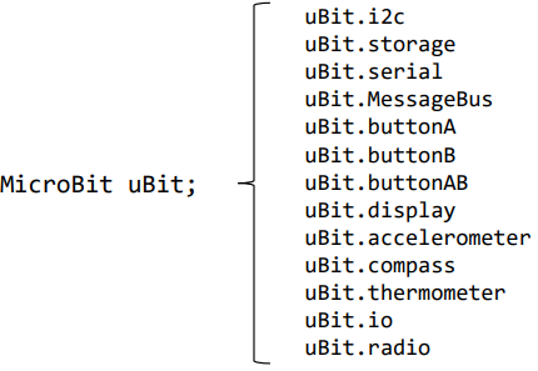
MicroBit Class
Consists of variables and methods (i.e., resources) that operate as drivers to control commonly used features of the micro:bit
Scrolling and Printing Text or Numbers
The scroll function scrolls a string (or number), pixel by pixel, across the display, from right to left
The print function shows the letters of a string (or numbers) in turn on the screen
The delay can also be specified: i.e., the lower the value, the faster the message will be scrolled/printed
If you print a string/number with two or more characters/digits, each will appear in turn, then disappear
If you print a single character/numeric digit, it will stay on screen until you explicitly change the screen

Changing Display Mode
DISPLAY_MODE_BLACK_AND_WHITE: Each pixel can be on or off. The brightness of all pixels is controlled by the setBrightness function, e.g., uBit.display.setBrightness(value between 1 and 255). This mode is the most efficient, in terms of processing time and battery power
DISPLAY_MODE_BLACK_AND_WHITE_LIGHT_SENSE: Each pixel can be on or off, and the display driver will also sense the ambient brightness from the LEDs
DISPLAY_MODE_GREYSCALE: Each pixel can independently have 256 levels of brightness (0-255)

Setting and Getting Pixel Values
The function setPixelValue sets the pixel at the given (x, y) coordinates to a given brightness value. The coordinates are of type int16_t. The brightness is of type uint8_t
The function getPixelValue retrieves the brightness value of the pixel at the given (x, y) co-ordinates
When the display mode is set to DISPLAY_MODE_BLACK_AND_WHITE, setting the brightness value to 1, 2, …, 255, will not make a difference

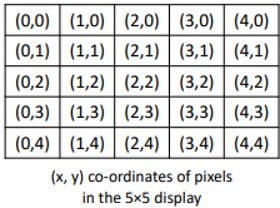
(x, y) coordinates of pixels in 5×5 display
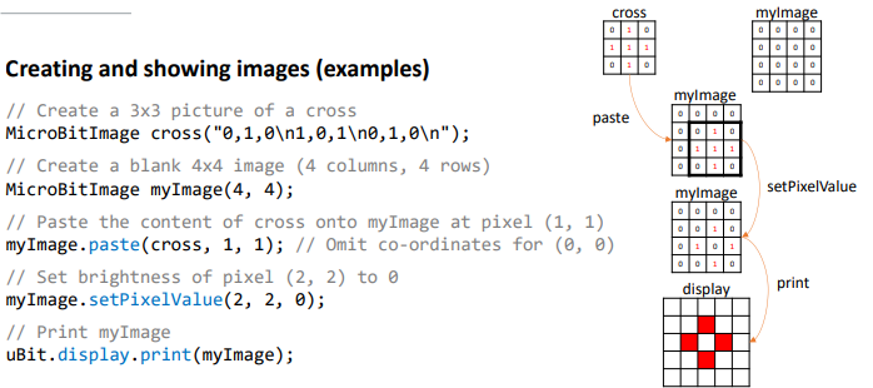
Creating and Showing Images
The MicroBitImage class represents a bitmap picture. It is a managed type (memory will be used and release automatically, as needed)
The string constructor takes the form of a series of comma separated values. Each value is the brightness of a pixel value in the range 0 - 255, starting at the top left of your image and working to the right
Whenever you put a newline character \n in the string, this moves onto a new line of pixels
The class also provides functions to undertake graphical operations on an image (e.g., setting pixels, clearing the image, pasting one image onto another at a given position, etc.)

Creating and Showing Images Example
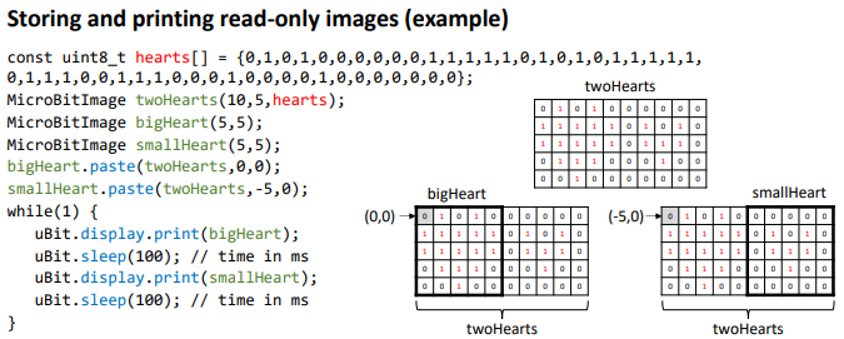
Storing and Printing Read-Only Images
A constant array of unsigned integers can be used to store a read-only picture. Values between 0 and 255 can be used. In this example, we have assumed that micro:bit operates in the black and white mode
The MicroBitImage class offers a constructor that creates a bitmap representation of a given size (i.e., 5×5 in this example), based on a given buffer (i.e., the array smiley in this example)
The dimensions of myImage do not have to be 5×5; any size can be used, provided that the product matches the length of the array

Storing and Printing Read-Only Images Examples
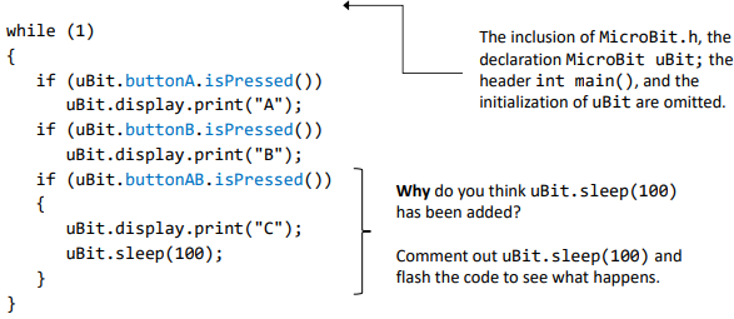
Detecting if Buttons have Been Pressed
The micro:bit has two buttons, either side of the display: A and B
These are exposed on the MicroBit object as uBit.buttonA and uBit.buttonB. They are instances of the MicroBitButton class.
A third button, uBit.buttonAB is used to detect the combined input of buttonA and button. This is an instance of the class MicroBitMultiButton
The method isPressed() returns 1 (i.e., true) if the corresponding button has been pressed; otherwise, it returns 0 (i.e., false)
In synchronous (sequential) programming, detection of pressed buttons and subsequent actions take place in the main() function
Example of Synchronous Button Detection
Asynchronous Programming
Although computer programs execute sequentially, we often want to be able to determine when something has happened, as opposed to if something has happened
Components have been designed to raise events when they sense a change. For example:
The MicroBitAccelerometer class will raise events when the micro:bit has been shaken
The MicroBitButton class will send events if a button has been pressed
A key aim of the MicroBitMessageBus class is to listen to events that our program is interested in, and to deliver MicroBitEvents to our program as they occur
When an event of interest is detected, the MicroBitMessageBus class calls a function linked to that event, known as an event handler
Example of Asynchronous Button Detection
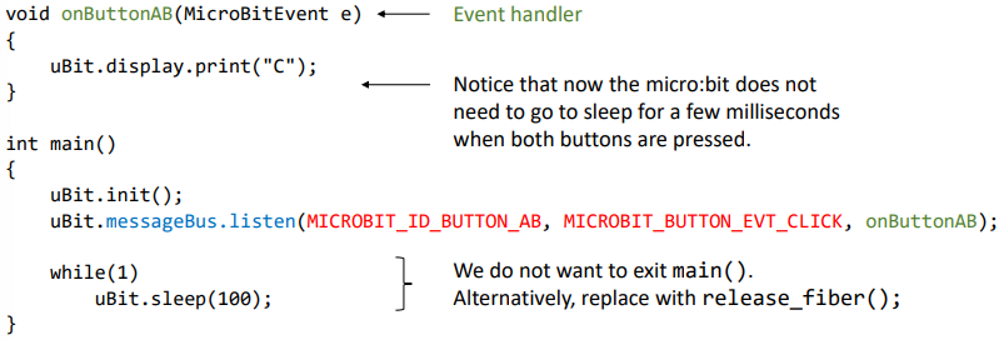
Input Argument of Listeners for Buttons

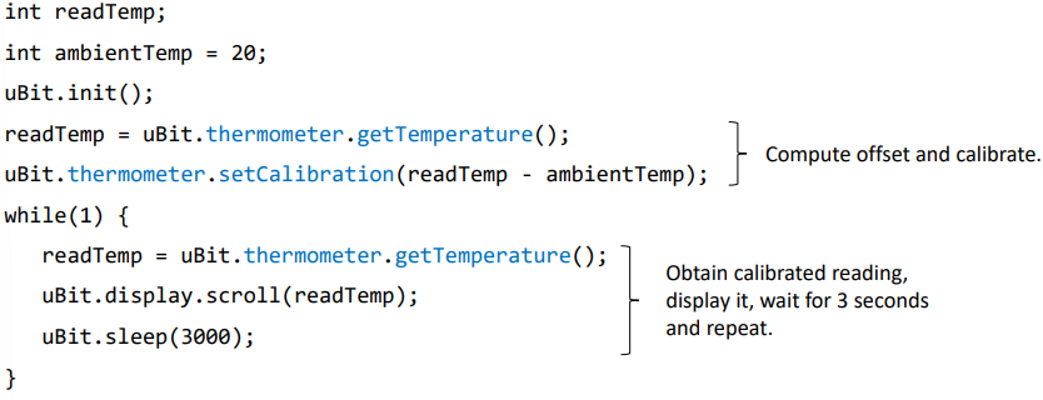
The MicroBit Thermometer Class
The MicroBitThermometer class provides access to the surface temperature of the application MCU
The temperature reading is not representative of the ambient temperature, but of the surface temperature of the application MCU:
readTemp = uBit.thermometer.getTemperature(); //uncalibrated readingWe can make the reading representative of the ambient temperature through “calibrating” the thermometer if we know what the real temperature is:
uBit.thermometer.setCalibration(readTemp-20); //the temperature is 20C
readTemp = uBit.thermometer.getTemperature(); //calibrated readingSynchronous Implementation of Thermometer
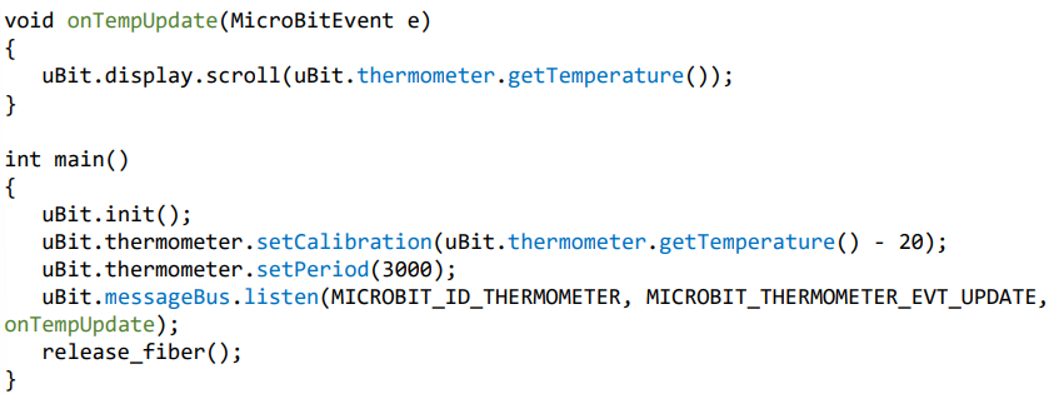
Asynchronous Temperature Reading
As in the case of asynchronous detection of pressed buttons, a listener can be set up and trigger an event whenever the thermometer has an update, i.e., a new reading:
uBit.messageBus.listen(MICROBIT_ID_THERMOMETER, MICROBIT_THERMOMETER_EVT_UPDATE, name of event handler);The sampling period, that is, the time between temperature readings, can be defined using:
uBit.thermometer.setPeriod(time in ms);Asynchronous Implementation of Thermometer
The MicroBitLog Class
This class enables us to store data in a table-like format, containing rows of readings or other types of data
Use beginRow() to open the file and create a new row
Use logData(“label of column”, value to log) to identify the label of the column where a value will be entered in the new row
Use endRow() to complete logging and close the file. For example:
uBit.log.beginRow();
uBit.log.logData("temperature", uBit.thermometer.getTemperature());
uBit.log.endRow();
Before we start collecting and logging data, we often add the following line to initiate the logger:
ubit.log.setTimeStamp(TimeStampFormat::Seconds);Although adding a timestamp is not required for logging to work, it allows us to create a plot of the recorded values
To find the log file (named MY_DATA.HTM) in the micro:bit folder and access it using a browser, we need to include the following line to make it visible:
uBit.log.setVisibility(true);We can carry on logging for as long as uBit.log.isFull() returns 0
To clear the contents of the log file, we use uBit.log.clear()