Looks like no one added any tags here yet for you.
Respiratory exam
- intro and consent
- wash hands
- end of the bed inspection
- ask patient to put hands out in front: tremors could suggest overdose of salbutamol
- check fingers for: tar staining, clubbing, peripheral cyanosis
- check eyes for pallor - anaemia
- check mouth/lips/face/tongue for: central cyanosis, glossitis (swelling of tongue)
- assess respiratory rate by pretending to take pulse
- ask patient to remove clothes to expose chest
- check chest for scars on front and back (eg. thoracotomy, chest drain)
- palpate trachea (say it might be uncomfortable)
- feel chest expansion on back
- percuss lung lobes on back (dull, resonant, hyper-resonant)
- auscultate lung lobes on back (crackles, wheeze, pleural rub)
- repeat on front
- thank patient and ask to redress
- demonstrate findings
Cardio exam
- intro and consent
- wash hands
- position patient and expose chest
- end of the bed inspection
- ask patient to put hands out in front
- check chest for: scars, pacemaker, defib
- check fingers for: tar staining, clubbing, peripheral cyanosis, splinter haemorrhage
- check eyes for: pallor - anaemia, xanthelasma (yellow deposits of cholesterol around the eye), corneal arcus (greyish fatty deposit in eye)
- check mouth/lips/face/tongue for: central cyanosis, glossitis, angular cheilitis, dental hygiene (infective endocarditis risk factor)
- offer to take pulse
- offer to take blood pressure
- check jugular venous pressure
- palpate apex beat (5th intercostal space, midclavicular line)
- examine for right ventricular heave (use palm of hand vertical next to sternum and feel for higher pressure)
- examine for mitral and aortic thrills (vibrations that shouldn't be heard and suggest a heart murmur) (use flat hand)
- auscultate for valve sounds over the mitral, tricuspid, pulmonary and aortic areas (PATM)
- auscultate bilaterally for carotid bruits - ask patient to hold breath (shouldn't hear anything unless stenosis present)
- thank patient and ask to redress
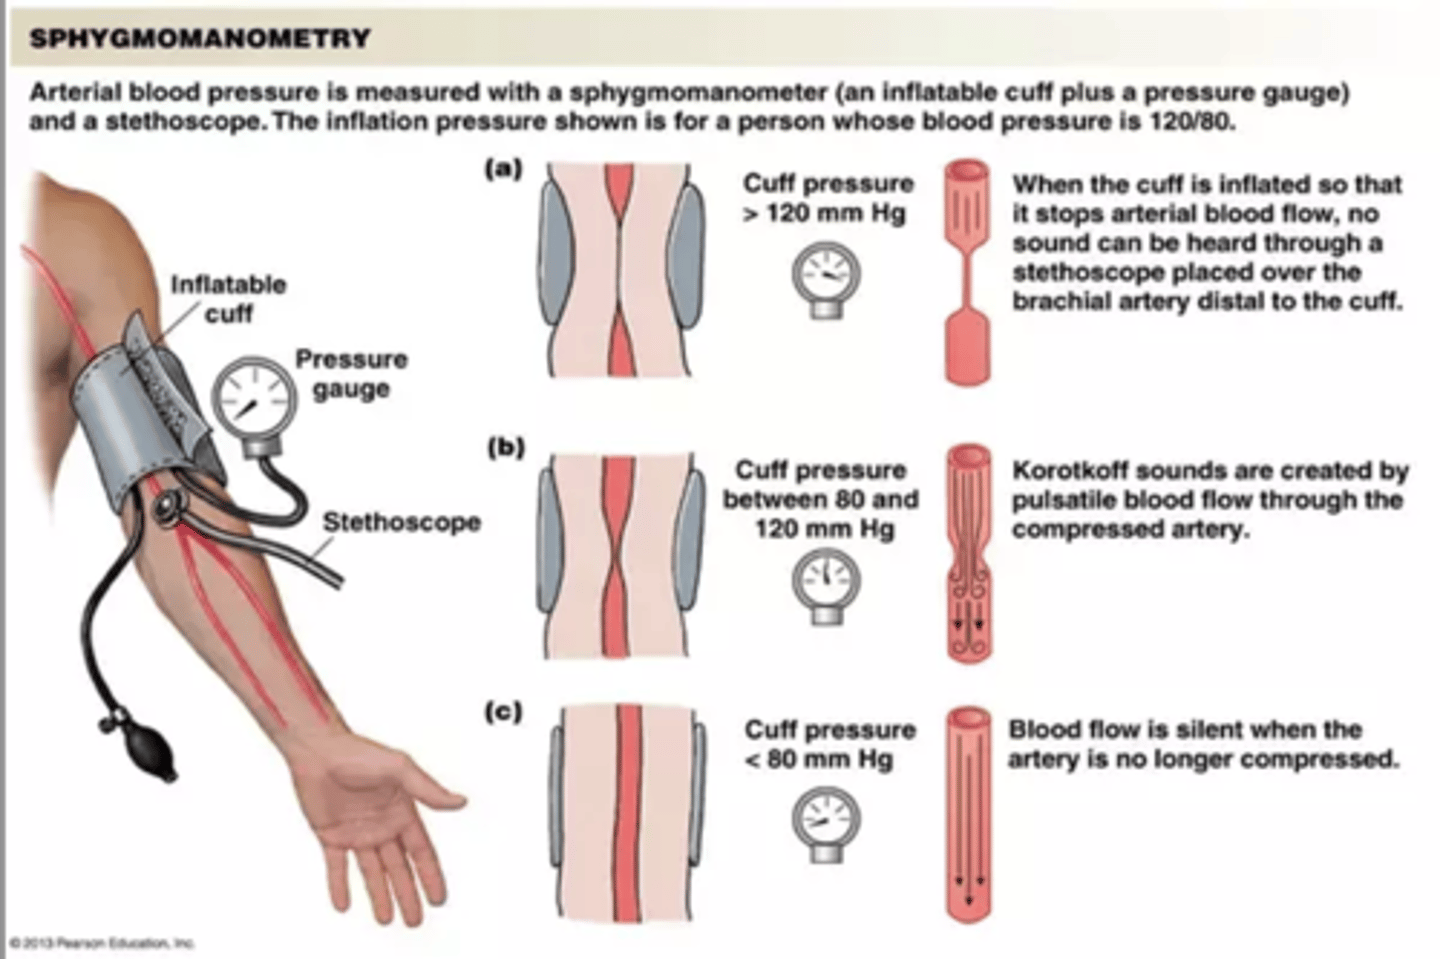
Manual BP (sphygmomanometry)
- intro and consent
- wash hands
- position patient and adequately expose and support the arm
- demonstrate appropriate choice of size cuff and apply firmly to subjects upper arm (make sure artery lines up with line and tube on cuff)
- locate and palpate either brachial or radial pulse and use to estimate systolic pressure by: inflate cuff till cannot feel radial pulse anymore
- release cuff
- place stethoscope over brachial artery and inflate cuff to above estimated systolic pressure
- deflate cuff slowly: systolic pressure is when you hear Korotkoff sounds start and diastolic is when the Korotkoff sounds stop
- fully deflate cuff
- remove cuff
- thank patient and cover or ask to redress
normal bp range is 120/80 - 90/60
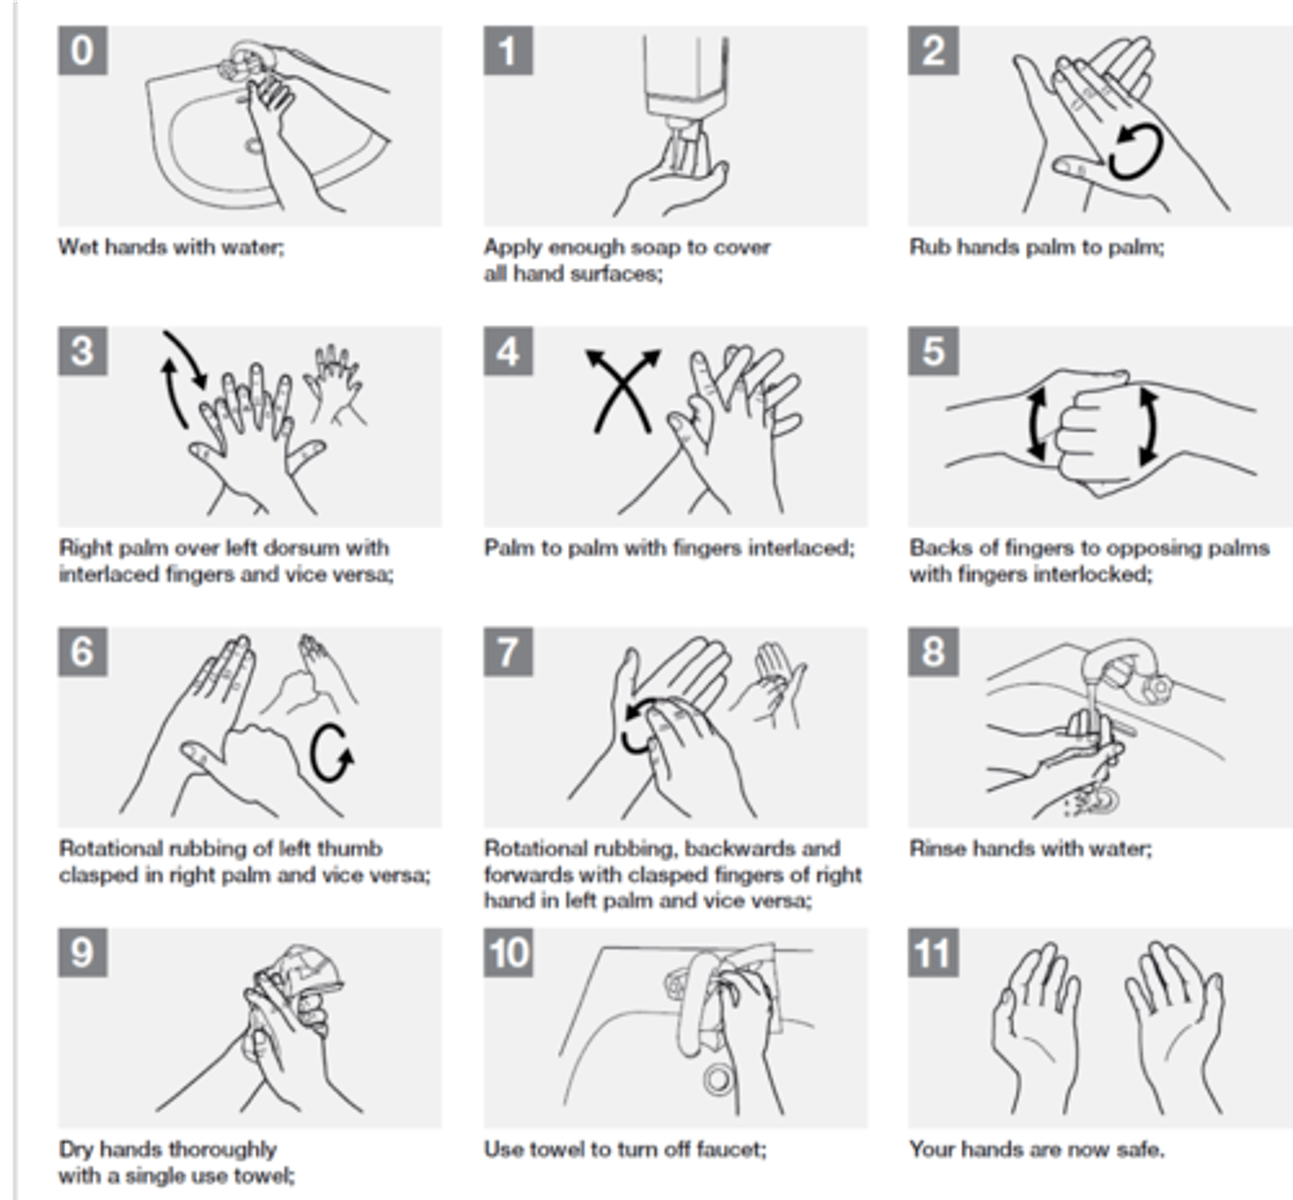
Hand washing
STONED rings and wrist watch not worn. One plain ring or plain bangle may be worn for cultural or religious reasons.
Short clean fingernails with no nail varnish, false nails or nail extensions
Cuts or abrasions (if present) on hands are covered with waterproof dressing
Arms bare below the elbows - sleeves are above the elbow
Opens both taps and adjusts to achieve warm water before starting hand wash and then allows to run continuously until finished rinsing
Hands wet with water prior to applying liquid soap
Rub hands palm to palm to produce visible lather
Effective friction cleansing to ventral (palmar) surface of hand with fingers interlaced
Effective friction cleansing to dorsal (back) surface of hand with fingers interlaced
Effective friction cleansing to fingers and finger tips (if ring worn; moved to clean adequately underneath)
Effective friction cleansing to thumbs and tips
Effective friction cleansing to wrists
Hands and wrists rinsed effectively with warm water
Hands and wrists not recontaminated during the washing process (by e.g. touching the sink, plug, wall etc)
Taps turned off without recontaminating the washed hands / wrists.
Allows excess water to drain from hands to sink (via finger tips)
Avoids excess splashing clothing and floor
All surfaces of hands and wrists dried thoroughly using single use paper towels.
Note: Ensuring water which has run on to non-washed arms has not been ‘dragged’ back over washed areas (i.e. no recontamination)
Disposes of paper towel in an appropriate bin
Hands and wrists not recontaminated before examiner confirms the assessment is completed.
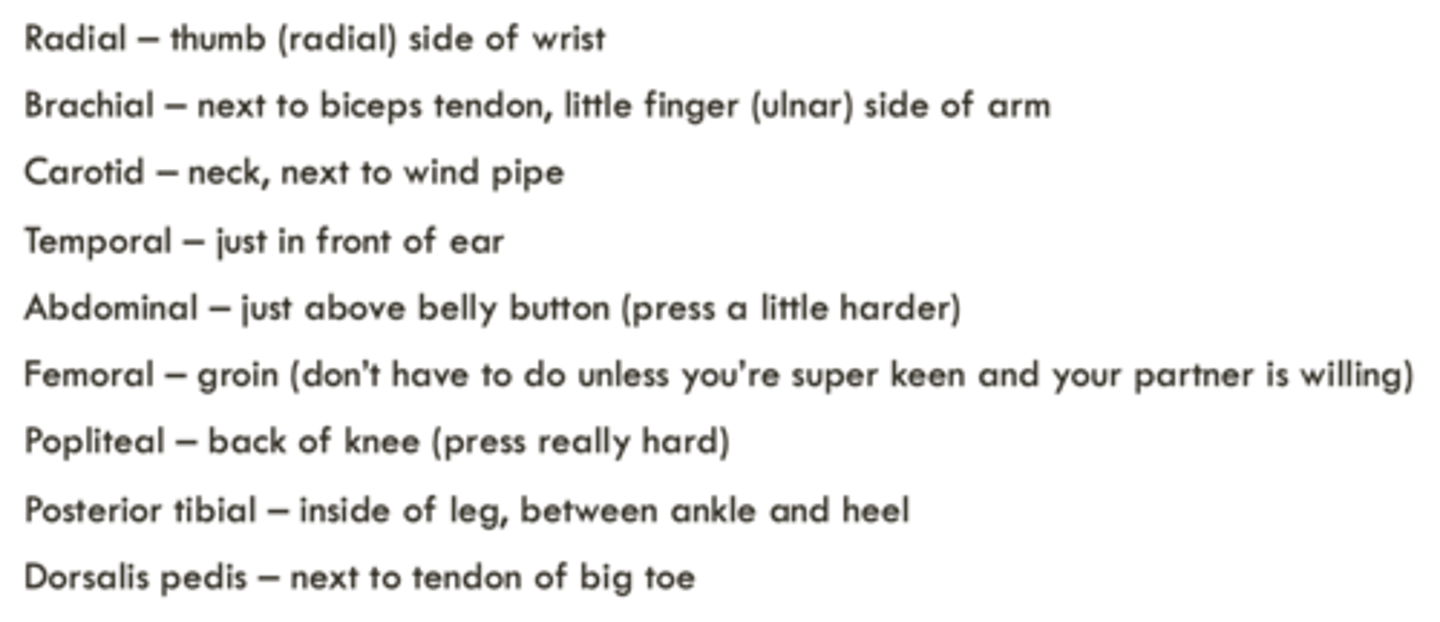
Examination of peripheral pulses
Introduction and consent
Wash hands
Position patient and expose area for examination
Palpation of the radial pulse. Measure the rate and comment on the rhythm.
Palpation of the major peripheral arterial pulses bilaterally (including knowledge of the anatomical landmarks):
Carotid
Superficial temporal
Brachial
Radial
Femoral (description of landmarks only)
Popliteal
Posterior tibial
Dorsalis pedis
Thank and cover the patient or ask to redress
Treat patient with courtesy and respect at all times, maintaining appropriate communication throughout
Report findings either during or at the end the examination
Be able to answer simple questions regarding the examination of peripheral arterial pulses
Assessing and recording vital signs
- Wash your hands
- Introduce yourself
- Identify the patient
- Explain what you want to do
- Get consent from the patient to proceed
- Measure the patient's temperature using an aural thermometer, repeating if required
- Assess the patient's resting heart rate using the radial pulse
- Assess the patient's pulse rhythm and regularity
- Measure the patient's resting respiratory rate
- Thank the patient
- Document the findings (on a hospital chart or other appropriate format)
- Identify any abnormal findings
- Critically evaluate the findings by describing common reasons for measurements being outside of the normal range
- Interpret the results in terms of a hospital 'early warning' score
MSK knee joint exam
- intro and consent (explain what exam will consist of)
- identify patient
- wash hands
- end of bed inspection
- expose area for examination
- ask patient to stand and inspect all aspects of the knee (looking for bakers cysts on back of legs, swelling, inflammation, scars, skin changes, septic joint)
- observe gait (walking of patient) and make note if varus (knees bend out) or valgus (knees bend in)
- position patient on the bed and inspect knees again
- use backs of hands to check temperature of knee
- palpate for effusion
- ask patient to let you know if it is tender anywhere when you touch
- palpate all around each patella and then down the joint lines
- palpate the leg bone tuberosities
- ask patent to bring their ankles up to their bottom to test active flexion and extension of the knee
- ask patient to relax and bring patients ankles up to their bottom to test passive flexion and extension of the knee
- ACL and PCL function test: anterior and posterior draw (sit on patients feet and use two hands grip under knee and pull up in line with thigh and then push down)
- comment on level of movement, any pain, crepitus (grinding/crunching) on draw test
- MCL and ACL function test: hold patients ankle to your own hip and push on the inside of the knee outwards and then from the outside of the knee inwards
- state that would examine ankle and hip joints also as can be cause of knee pain
- thank patient and ask to redress
- present findings
Peripheral nervous system
- intro and consent
- wash hands
- end of bed inspection
- position patient correctly and fully expose limbs
- inspect limbs for asymmetry, atrophy, scarring, abnormal movements, fasciculations (muscle twitching - occurs with increased muscle tone)
- assess muscle tone by moving both limbs (increased tone = rigid, decreased tone = flaccid)
- assessment of muscle power: isolate the joints - one hand above and one hand below (shoulder, elbow wrist, small muscles of hand) (hip, knee, ankle dorsiflexion/plantarflexion)
- assessment of tendon reflexes (biceps, triceps, supinator) (patellar, Achilles tendon, plantar response using tongue depressor)
- assessment of sensation using light touch
- assessment of coordination (finger nose pointing) (heel-shin slide)
- assessment of global function (lifting an object/fastening a button) (observe gait/ask to walk pigeon steps)
- thank patient and cover or ask to redress
- report findings
Abdominal exam
- intro and consent
- check patient identity
- wash hands
- end of the bed inspection (build and stature, facial appearance, skin + complexion, mobility and posture, ill or in pain, surrounding environment)
- position patient and expose abdomen adequately
- check hands for: clubbing, Dupuytren's contracture (fingers stuck), leukonychia (white looking nails - low albumin), palmar erythema (red looking)
- check eyes for: jaundice, anaemia (conjunctival pallor), lipid deposits (under eye), corneal deposits (ring around eye)
- check mouth for: dentition, gums, ulceration, angular cheilitis, glossitis (vit B12 deficiency)
- inspect the abdomen for: fluid, flatus, faeces, fat, foetus, fulminant mass
- inspect skin on abdomen for: scars, spider naevi, petechiae, bruising, dilated veins, striae (stretch marks)
- look for movements: pulsation, peristalsis
- look for contours: swelling, hernias
- palpate each of the 9 abdominal regions superficially and deep, feel for tenderness, guarding, rebound tenderness, masses
Technique for palpation: hand level with abdomen (kneel), warm hand, rest whole hand in relaxed way, start as far away from a tender area as possible, watch the patients face for discomfort, superficial then deep (Rovsings sign in appendicitis = press in L iliac fossa, pain felt in R iliac fossa)
- palpate for the liver (start in R iliac fossa and move up), spleen (start in R iliac fossa + move diagonal), kidneys (hand ontop and under), aorta (one hand on either side of umbilicus - should be pulsitile not expansible) and descending colon (L iliac fossa)
- percuss liver and spleen
- auscultation for bowel sounds -at least 15 secs
- State that it may be relevant to carry out further examinations: inguinal regions, external genitalia, rectal exam, lymphadenopathy
- thank patient and cover/redress
- report findings
Capillary blood glucose
- intro and consent
- ask patient to wash hands (as eg. they may have sugar on hands from eating food)
- check test strips are in date
- check other equipment: lancet/autolet, cotton wool/tissue, sharps disposal bin
- check meter function and instructions if unfamiliar, priming or calibrating if required
- prepare meter by inserting test strip and waiting until prompted to add blood
- consider gloved/barrier protection especially if any cuts or wounds
- take blood: prime lancet (needle), hold side of finger firmly, and release needle
- wait for drop of blood to form (applying gentle pressure and lowering hand if necessary)
- apply sufficient blood to test strip and wait for reading
- correctly dispose of waste - lancet into sharps bin, other contaminated waste in clinical waste bag, non-clinical waste in normal bin
- interpret results in relation to WHO criteria for diabetes (should be between 4-8mmol/L)
- suggest further action if result is raised
- explain result to patient
- clear up including washing hands
Urinalysis
- intro and consent
- give instructions to patient about correct method for collecting urine sample
- confirm/identify urine to be tested (should be labelled)
- check urine test strips for expired date and instructions
- consider glides/barrier protection especially if any cuts or wounds
- inspect urine and comment on colour and turbidity (how see through it is)
- check time at start or immediately after dipping (or start timer)
- dip test strip fully but briefly, tap excess urine back into container, close container
- read test strip with chart on bottle at approximately correct times for each item
- correctly report findings in relation to presence of blood, protein, glucose, ketones and pH (include negative findings)
- prepare a written record (this should include identifying features written on sample bottle [full name and date of birth], date of test, pH result, and positive or negative findings for blood, protein, ketones and glucose, identity of the tester)
- clear up appropriately and wash hands
- identify any abnormal findings
- state a common or major pathological cause of such abnormality
- suggest a possible reason for a misleading or artifactual result/or further investigations
Opthalmoscopy
- intro and consent
- wash hands
- check the ophthalmoscope is working
- position patient appropriately and remove glasses from patient (contact lenses can be worn)
- darken the room, switch on the ophthalmoscope (by pressing green button and turning clockwise) and adjust it to ensure it shows the large round beam of light
- turn the focus (lens disc) to 0 dioptres
- ask patient to focus on distant point to keep eyes still
- use your right and and right eye to examine the patients right eye and vice versa
- hold the ophthalmoscope against your bony orbit and view through the lens
- place your opposite hand gently on the patients head and stretch thumb out (so if you get too close to patient you will hit your own thumb first)
- start to view the subjects eye from a distance of 30cm, and about 15 degrees lateral from the patients line of vision until you see the reflection of the retina (red reflex)
- keeping the red reflex in view, move towards the patient until the ophthalmoscope is almost touching your other thumb
- adjust the focus until you can see the retinal blood vessels and optic disc clearly
- look for the macula
- repeat the process for the opposite eye
- turn ophthalmoscope off
- thank patient and record findings
Visual acuity
- intro and consent
- illuminate Snellen chart and ensure correct distance (6m)
- ask patient to use their contact lenses or glasses if worn
- cover one eye and ask the patient to read the smallest text possible
- record visual acuity for this eye eg. 6/6 or 18/6 or 18/3
- repeat for other eye
- if no text can be read at 6 meters, attempt correction with pinhole
- if no text can be read at 6 metres with a pinhole, perform appropriate assessment of poor vision (eg. counting fingers)
- thank patient and report findings
Otoscopy
- intro and consent
- wash hands
- ask about any ear symptoms
- check that the otoscope is working
- examine the outer ear and check for tragal tenderness
- select an appropriately sized aural speculum
- hold otoscope correctly (correct hand, pencil grip)
- gently pull pinna upwards and backwards (just backwards in children)
- carefully introduce speculum into outer part of external auditory meatus
- look through otoscope and adjust angle (but not depth) until tympanic membrane (ear drum) is seen
- identify key structures
- look for inflammation
- carefully remove speculum
- repeat process for other ear
- turn otoscope off and correctly dispose of single use speculum
- thank patient and record findings
Cranial nerves
- Intro and consent
- Wash hands
- Ask about changes to sense of smell/taste recently
- Inspect eyes - eyelids, symmetry
- Measure pupil diameter using pen torch
- Offer to check visual acuity using Snellen chart
- Offer to perform ophthalmoscopy
- Assess direct and consensual pupillary light reactions (direct = pupil in direct light should constrict) (indirect = pupil not in light should also constrict) -> to assess this, place a hand in between eyes, blocking light between them
- Test visual fields by confrontation (patient covers R eye with R hand + you cover your L eye with L hand and move hand in until patient can see it; repeat for other eye)
- Test for pupil reaction to accommodation (hold finger far away and get patient to focus on it and you move closer)
- Assess principle eye movements (using finger make 'H' pattern) (checking for nystagmus)
- Offer assessment of corneal reflex (but don't carry out) (cotton wool on cornea - should blink)
- Perform light touch of all 3 trigeminal divisions on both sides of the face using cotton wool (check pt can feel it on chest first)
- Test motor function (clench teeth, raise eyebrows, frown, smile, close eyes tightly, puff out cheeks)
- Palpate masseter and temporal muscle
- Inspect facial symmetry
- Whisper test - see if pt can hear you whisper a number in their ear (tuning fork)
- Ask patient to repeat a sentence (listen out for hoarseness)
- Ask about swallowing and test with a sip of water (gag reflex)
- Observe uvula and inspect for symmetrical elevation on phonation (uvula deviates away from a nerve lesion)
- Ask patient to puff out cheeks against resistance
- Ask patient to shrug shoulders against resistance
- Ask patient to turn head against resistance
- Ask patient to stick out tongue (then test power against resistance)
- Thank patient