Large Animal Injections
 Call Kai
 Learn
Learn Practice Test
 Spaced Repetition
 Match
Match Flashcards
 Knowt Play
1/39

There's no tags or description
Looks like no tags are added yet.
Name | Mastery | Learn | Test | Matching | Spaced | Call with Kai | Chat |
|---|
No analytics yet
Send a link to your students to track their progress
40 Terms
what are the most common routes for injections (2) (Equine)
IM and IV
what are the landmarks on the cervical muscles (3) (Equine)
Hands width ventral to the crest of the neck
Hands width dorsal to the cervical spine
Hands width cranial to the shoulder/scapula
procedure for IM injection (5) (Equine)
Direct needle in at 90 degrees and in
Once needle is placed, attach a SLIP TIP 3mL syringe while stabilizing the needle
Aspirate (no blood noted)
No flash, injection volume with minimal needle/syringe movement and once completed, remove needle and syringe together in a smooth motion
Visual check of injection site for bleeding
how many max ml per site (range) (Equine)
5 - 10 mL
Procedure for IV (13) (Equine)
Occlude jugular vein in region in the distal ½ of the jugular vein to raise the jugular vein. Remain occluding the vessel until injection is complete.
Insert a 20G 1-1.5” needle in the cranial ⅓ of the jugular vein.
Needle can be place in and upward (cranial) or downward (caudal) direction parallel to the jugular vein
Enter the skin of the horse at a 20 degree angle, needle bevel facing out
Redirect needle (if needed) until blood is visualized in the hub of the needle
Attach a SLIP TIP syringe (that contains the medication or saline) to the needle without moving the needle!
If you need to stop occluding to free up a hand (to stabilize the needle), go ahead, but then return to occluding the vein once the needle and syringe are attached.
Once the needle and syringe are attached, aspirate to ensure you are still within the jugular vein. A positive aspiration means you will obtain an easy flow of blood back into the syringe, there should be NO bubbles, or negative pressure drawing back on the syringe plunger.
Once a flash of blood is observed, administer ½ the volume of drug, then aspirate, if another flash of blood is observed, administer the remaining volume of drug. Once all of the drug has been administered, aspirate one final time, and inject the aspirated blood back into the vein.
If at any time the horse moves, aspirate to ensure the needle is still within the jugular vein
If any time you aspirate and do not get a flash, then DO NOT INJECT! Redirect the needle and syringe until you get a flash, then continue on with the above protocol.
Once the injection is complete, stop occluding the vessel, remove the needle and syringe from the horse’s vein and place a finger from the “occluding hand” over the injection location and apply pressure for 5-10 seconds.
Remove the “occluding hand”, and check the location for active bleeding.
Procedure for blood collection (Equine)
Set up the vacutainer needle and sleeve appropriately and have vacutainer tubes readily available (including 1-2 extras).
Use a 20G 1.5” vacutainer needle
Ensure injection site is clear of debris
Occlude jugular vein in region in the distal ½ of the jugular vein to raise the jugular vein. Remain occluding the vessel until injection is complete.
Insert vacutainer needle (in the sleeve) in the cranial ⅓ of the jugular vein.
Needle is placed in and upward (cranial) direction parallel to the jugular vein
Enter the skin of the horse at a 20 degree angle, needle bevel facing out
Attach the vacutainer blood tube to the needle without moving the needle. Allow blood to flow until the vacuum draw is complete, or you collected the amount of blood you need.
Multiple types of vacutainers blood tubes needed for different samples
Ensure needle stabilization while changing vacutainer blood tubes. DO NOT remove the needle from the vein between tubes.
Use vacutainers blood tubes in correct order (based on which tubes you are using and their additives)
Once all samples are collected, remove the blood tube from the sleeve, then stop occluding the vessel, remove the needle and vacutainer sleeve from the horse’s vein and place a finger from the “occluding hand” over the injection location and apply pressure for 5-10 seconds.
Remove the “occluding hand”, and check the location for active bleeding.
what to do if The vacutainer blood tube does not start to fill with blood (3) (Equine)
Keep needle and vacutainer blood tube attached and redirect until blood starts to flow
DO NOT come out of the skin with the needle, this will cause you to lose the vacuum in the vacutainer blood tube, and another vacutainer will need to be used.
Properly dispose of the wrecked vacutainer blood tube.
Supplies for IV catheter (25) (Equine)
Cordless clippers
Chlorhexidine scrub, alcohol, betadine solution
6- 3”x3” or 4” x 4” gauze squares
At least 2 catheters should be available
16G 2” (short term lab use)
18 G 5” (if horse is going into lateral or dorsal recumbency)
1 piece of white tape 2-4” in length
2- 18G 1.5” needles loaded with suture
Lidocaine neat
3mL Slip tip syringe
20G 1” needle
Fluid
Saline (100mL or 250mL bag)
Line flush
Saline
1000mL for fluids if running in lab
Heparin
Fluid line
Use 10 drip/ml for animals >10kg
Extension set
PRN
Fluids
Have at least one bag of fluid in incubator
Fluids should be labeled with animal’s name, date bag was opened, and initials of anesthetist for that animal
If fluid bag is less than half full, place a second bag in the incubator as a back up
procedure for IV catheter (25) (Equine)
Clip hair around IV catheter site
Clip a 2”-4” wide square directly over the jugular vein, in the cranial ⅓ of jugular region
Take catheter out of casing and loosen the catheter slightly from the stylet.
Place white tape over hub of the catheter creating a butterfly appearance/tabs on both sides of the catheter, but with enough room to ensure an extension set or PRN can be firmly secured to the catheter
Remove the PRN from the packaging and have it easily accessible OR remove the extension set from the packaging, and flush the line/prep the line with saline.
Perform a modified surgical prep over the jugular region
At least 3 scrubs of the area with a 3”x3” or 4”x4” gauze with chlorhexidine surgical scrub
Next, swipe the area with a 3”x3” or 4”x4” gauze with isopropyl alcohol
Flush IV catheter with saline, and place your thumb or forefinger over the top of the hub, holding the fluid in the catheter
Enter the skin with the catheter in the middle portion of your prepped site. The skin and catheter should make approximately a 20-45 degree angle to each other
Advance the catheter (keeping your thumb or finger over the hole in the hub) through the skin. Once the catheter is through the skin, and hopefully into the vein, you can remove your finger from the hub. Redirect or advance the catheter until you notice blood dripping from the hub of the catheter.
Lower the catheter angle to the patient and advance the catheter with your index finger. The stylet should not move while you are doing this.
Once to the hub, you may stop occluding the jugular vein.
Remove the stylet from the catheter
Quickly attach the catheter PRN, plug, or extension set to the hub of the catheter.
Two sutures are placed using a 18G 1.5” needle, loose suture, and hand ties. The needle will go through the skin and one tab of the butterfly to secure the catheter in place. Repeat this for the second tab.
If using an extension set and IV line, secure extension set to skin using tape tab and suture through the skin.
Check patency of catheter placement
While using catheter, check patency before injecting any medications, and then flush with 3-6mL saline after the injection.
Removal of catheter
Remove sutures
With a gauze (3x3” or 4x4”) place firm pressure over the catheter site while removing the catheter
Hold pressure for 1-2 minutes
Place neck bandage if needed
Check neck for hematoma
procedure for tail restraint (4) (Balling Gun/Stomach Tube)
Reach and grab the tail thumb down with hand closest to the patient, grasp just below the vulva or approx. 6 inches from the anus
As you start to lift the tail step behind the patient facing the same direction, you may need the other hand to help lift the tail
The position of the tail should be as vertical as possible (some patients will be more flexible than others)
This will help distract and restrain if nervous or fidgety
procedure for Stomach Tube/ Frick Speculum (Balling Gun/Stomach Tube) (9)
Hold the protruding part of the speculum firmly with your nondominant hand.
With dominant hand insert the premeasured stomach tube through the Frick speculum
insert until the tube is touching the pharynx at the back of the mouth and into the esophagus
Continue passing tube into the rumen, before administering anything by the stomach tube ensure you are in the rumen and NOT THE LUNGS
Blow on the end of the tube while someone listens with a stethoscope to the rumen (loud bubbling should be audible).
Smell the end of the tube for rumen gas (sulfur, foul odor).
No sign of excessive coughing or respiratory distress.
Once confirmed you are in the rumen, attach your tube to the stomach pump and pump fluids in.
When all medications/fluids have been administered, blow all the fluid remaining in the tube into the rumen, plug the open end of the tube, or kink the tube and pull the tubing out in a smooth motion.
eep DELETE
bpp
noop
beep
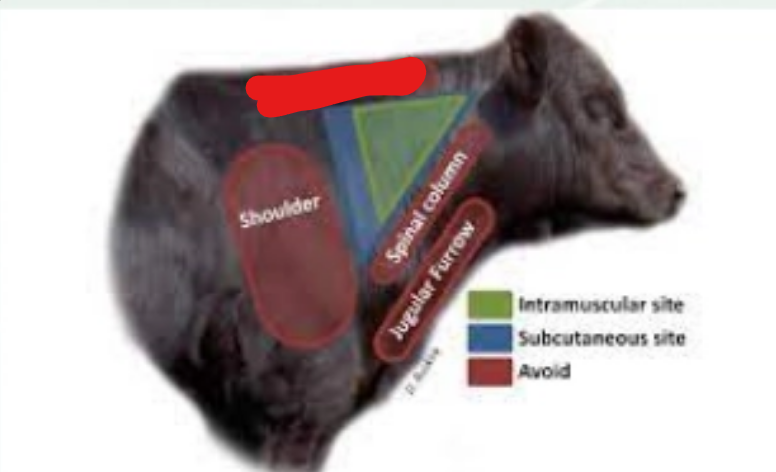
what is it (Bovine Injections)
nuchal ligament
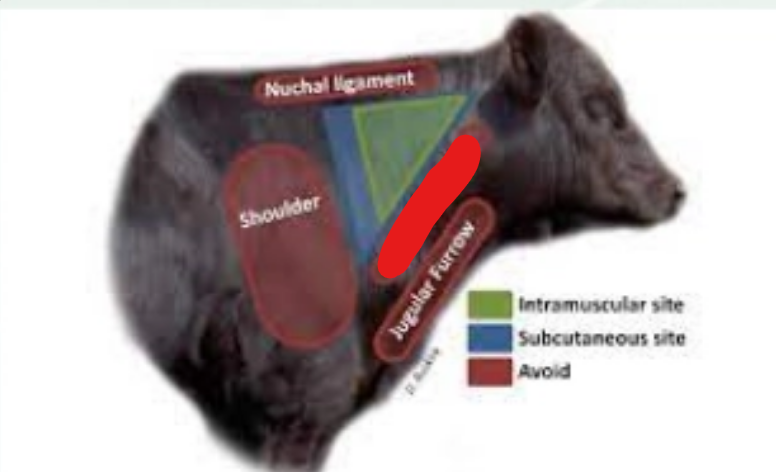
what is it (Bovine Injections)
spinal column
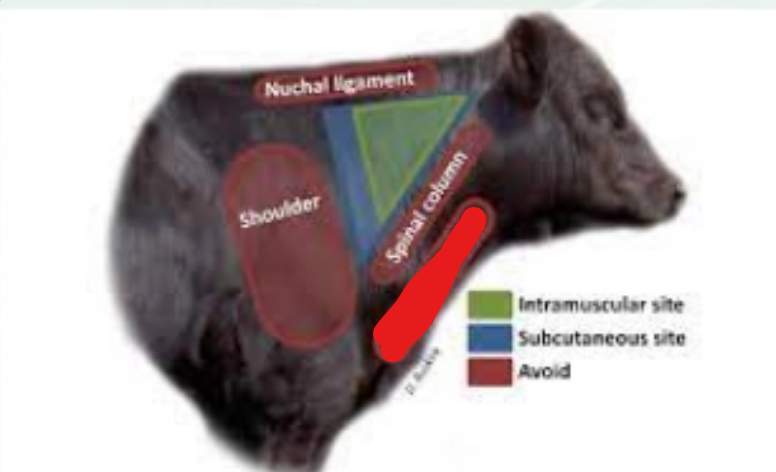
what is it (Bovine Injections)
jugular furrow
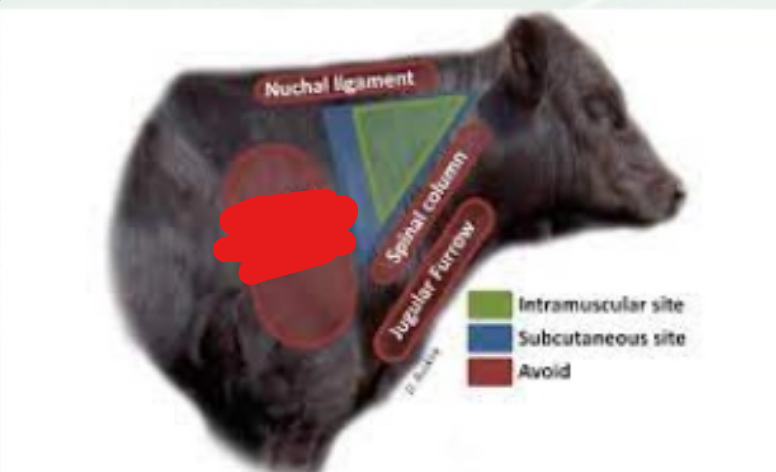
what is it (Bovine Injections)
shoulder
you should never inject more than — - — ml per site or area (Bovine Injections)
10-12 ml
needles should be changed every — - — uses (Bovine Injections)
8 - 10
supplies needed for SQ injection (7) (Bovine Injections)
Alcohol if required*
Paper towel*
16ga or 18ga detectable needle ⅝” to 1” long
Syringe of medication or vaccine if indicated for this route.
Slip tip for two handed technique
Luer lock for one handed technique
Easy Boss E
supplies needed for IM injection (6) (Bovine Injections)
Alcohol if required*
Paper towel*
16ga or 18ga detectable needle 1” - 1 ½” long
Syringe of medication or vaccine if indicated for this route
Slip tip syringe
Easy Boss E
SQ procedure for two handed technique (Bovine Injections)
Tent the skin by pinching with your non-dominant hand to create the tent
Create a landmark on the free aspect of the skin tent with the middle finger of your free hand.
SQ procedure for one handed technique (8) (Bovine Injections)
Used to lessen risk of accidentally injecting yourself
Visually identify location of needle placement.
At angle mostly parallel to the skin, “pop” the needle through the skin (but not so deep that you are in the muscle), while keeping your second hand free and clear of the chute
Once a 16ga or 18ga detectable needle ⅝” to 1” long is placed in an almost parallel angle into the fold of the skin tent, attach a SLIP TIP 3mL syringe while stabilizing the needle
Solution you are administering may be saline, a vaccine, or a medication (as per instructor).
Aspirate to check accuracy of location of needle
Inject given solution (should have little to no resistance)
DO NOT rub the injection site after injection.
IM injection procedure(8) (Bovine Injections)
Place 16-18ga 1”-1.5” needle perpendicular deep into the muscle after desensitizing the region within the anatomical “triangle”.
Once needle is placed, attach a SLIP TIP 3mL syringe while stabilizing the needle
Use a new needle on each animal in lab unless directed otherwise
Solution you are administering may be saline, a vaccine, or a medication (as per instructor).
Aspirate to ensure no flash of blood
DO NOT rub the injection site after injection. Visual check of injection site for bleeding
supplies needed for IV in Jugular (7) (Bovine Injections)
Alcohol if required*
Paper towel*
16ga or 18ga syringe
detectable needle 1 ½” long
Syringe of medication if indicated for this route.
Slip tip syringe
Easy Boss E
procedure for IV in Jugular (18) (Bovine Injections)
Occlude jugular vein in region in the distal ½ of the jugular vein to raise the jugular vein.
Remain occluding the vessel until injection is complete.
Insert an 18ga 1.5” needle in the cranial ⅓ of the jugular vein.
Needle can be place in and upward (cranial) or downward (caudal) direction parallel to the jugular vein
Enter the skin of the animal at a 30-45 degree angle, needle bevel facing out
Redirect needle (if needed) until blood is visualized in the hub of the needle
Attach a SLIP TIP syringe (that contains the medication or saline) to the needle without moving the needle!
If you need to stop occluding to free up a hand (to stabilize the needle), go ahead, but then return to occluding the vein once the needle and syringe are attached.
Once the needle and syringe are attached, aspirate to ensure you are still within the jugular vein.
A positive aspiration means you will obtain an easy flow of blood back into the syringe, there should be NO bubbles, or negative pressure drawing back on the syringe plunger.
administer ½ the volume of drug,
then aspirate,
if another flash of blood is observed,
administer the remaining volume of drug.
Once all of the drug has been administered, aspirate one final time
inject the aspirated blood back into the vein.
Once the injection is complete, stop occluding the vessel, remove the needle and syringe from the bovine’s vein and place a finger from the “occluding hand” over the injection location and apply pressure for 5-10 seconds.
Remove the “occluding hand”, and check the location for active bleeding.
supplies needed for IV in tail vein (7) (Bovine Injections)
Intravenous
Alcohol if required*
Paper towel*
16ga or 18ga detectable needle 1” long
Syringe of medication if indicated for this route.
Slip tip syringe
Easy Boss E
procedure for IV in tail vein(10) (Bovine Injections)
Ensure animal is appropriately restrained (chute and bar)
Tail jack cow using non dominant hand
Clean underside of tail where blood is being collected. Wipe in direction from base to switch
Use 18-20G 1” needle
Place needle midline of tail about ⅓ from base of tail, or just below where caudal tail folds seem to make a triangle. If you hit bone pull needle back slightly
Attach a SLIP TIP syringe (that contains the medication or saline) to the needle without moving the needle!
Once the needle and syringe are attached, aspirate to ensure you are still within the vessel. A positive aspiration means you will obtain an easy flow of blood back into the syringe, there should be NO bubbles, or negative pressure drawing back on the syringe plunger.
If no flash is observed you can do MINOR redirection, but this vessel can be easily blown
Once a flash of blood is observed, administer ½ the volume of drug, then aspirate, if another flash of blood is observed, administer the remaining volume of drug. Once all of the drug has been administered, aspirate one final time, and inject the aspirated blood back into the vein.
Once the injection is complete, stop occluding the vessel, remove the needle and syringe from the bovine’s vein and place pressure over the injection location for 5-10 seconds. Then check for bleeding at the injection site.
supplies needed for IV cathetar (15) (Bovine Injections)
Through the needle style catheter
three pieces of 6" non-absorbable suture
16 g by 1½" needle
6cc syringe with fluid for flushing catheter (if necessary)
white tape
scissors
fluid bag
electrolyte solution
IV line from fluids to calf catheter
scrub pail with water
disinfectant
alcohol
scrub brush
clippers
extension cord.
where is an IV cathetar done (Bovine Injections)
jugular vein
procedure for IV cathetor(12) (Bovine Injections)
Restrain the calf in lateral recumbency
Clip and prepare region from the throat latch area to the thoracic inlet area, and from the ventral aspect of neck to midway dorsally
Try to raise the jugular vein as best as possible (difficult in a severely dehydrated calf).
While the jugular is distended, firmly insert the needle into the middle of the vein towards the heart, directly in line with the jugular vein
The Intracath can be inserted in two different ways
With the catheter inside the needle during insertion into the jugular vein
With the needle pulled off the plastic catheter and the needle inserted first and the catheter inserted into the needle secondary to a steady back flow of blood.
When the plastic catheter has been inserted the full length, pull the metal needle out of the vein and out of the skin a couple of millimeters
The next step is to snap the plastic needle holder around the exposed needle (may take a couple of attempts for it to stay snapped).
Next, suture the plastic needle holder clamp to the calf’s neck through the two holes in the plastic clamp.
Remove the wire stylet from the catheter and firmly attach the catheter hub to the IV line. Do not allow the IV line to twist the catheter (make sure that you have let any bubbles run out of the IV line before attaching it to the catheter).
Then secure the IV line to the calf’s cheek and ear using tape and suture.
what knot is used to attach IV cathetar (Bovine Injections)
square knot
what is the best restraining position to give an SQ injection (Ovine)
tipped sheep
why is a tipped sheep best for SQ injection (Ovine)
can see the axillary area better
what size needle should be used for SQ (2ish) (Ovine)
20 G x ½ or 3/4“
what size needle should be used for IM (2ish) (Ovine)
20 G x ¾ to 1“
what are are landmarks for IM (3) (Ovine)
In front of the shoulder area (cranial to)
Below the nuchal ligament
Above the cephalic vertebrae / jugular groove
how often should needles be changed on a multi-dose syringe (range) (Ovine)
8 - 10 animals
when using a multi-dose syringe you should always … vaccine at all time (Ovine)
leave one clean/ sterile needle in the
how to maintain multi purpose syringe (4 (2 + sub 2) (Ovine)
after each use
take apart the syringe
clean appropriately.
Use hot, soapy water to rinse away any leftover vaccine oils.
Allow to air dry then put back together