Periodontology C0nfinotes- Chapter 7 (surgical procedure)
 Call Kai
 Learn
Learn Practice Test
 Spaced Repetition
 Match
Match Flashcards
 Knowt Play
1/137

There's no tags or description
Looks like no tags are added yet.
Name | Mastery | Learn | Test | Matching | Spaced | Call with Kai | Chat |
|---|
No analytics yet
Send a link to your students to track their progress
138 Terms
Flap thickness required for dental implant placement:
Full-thickness (mucoperiosteal) flap.
Indications for 1-stage (nonsubmerged) implant placement:
Adequate primary stability or use of tissue-level implants (no second uncovering surgery needed).
Indications for 2-stage (submerged) implant placement:
Poor primary stability or simultaneous bone grafting/GBR requiring undisturbed, load-free healing.
Implant dimension modification that increases BIC most effectively:
Increasing implant diameter by 1 mm increases BIC significantly more than increasing length.
Requirements for performing flapless implant surgery:
Ideal ridge form and adequate keratinized tissue over the site.
What are the two configurations for performing a 1-stage (nonsubmerged) implant surgery?
A tissue-level implant where the coronal portion extends through the gingiva, or 2) a bone-level implant connected directly to a healing abutment during initial placement.
Key feature of 2-stage implant surgery:
Top of the implant is completely submerged under the gingiva (requires a second stage to uncover).
Indications and benefit of flapless implant surgery:
Indications: Adequate keratinized tissue + ideal ridge form.
Benefit: Least tissue trauma.
Incision types used in surgical flap elevation for implant placement:
Sulcular, mid-crestal, and vertical-releasing incisions.
Flap extension requirement for vertical releasing incisions:
Must extend apically beyond the mucogingival junction (MGJ) for complete, tension-free flap release.
Standard osteotomy drilling speed and irrigation protocol:
Speed: 800–1200 RPM with high torque
Motion: Intermittent pumping motion
Irrigation: Continuous copious saline irrigation
Indications for Countersinking and Bone Tapping:
Dense cortical bone only (Type 1 / D1 bone, usually mandible).
Osteotomy modification for poor bone quality (D3 / D4):
Under-drilling the osteotomy site (e.g., 3.8 mm drill for 4.5 mm implant) or use implants with very aggressive threads e.g, BLX, TLX
Standard drill sequence for a 4.0 mm implant osteotomy:
Round bur → 2.0 mm twist drill → Pilot drill → 3.0 mm twist drill → Countersink → Optional Bone Tap.
Insertion torque threshold for 1-stage protocol vs. 2-stage cover screw placement:
35 Ncm or greater (1-Stage): Strong primary stability →place healing abutment protruding 1–2 mm.
< 35 Ncm (2-Stage): Lower stability → place cover screw and submerge.
Prerequisites required to perform flapless implant placement:
CBCT scan + Surgical Guide (plus adequate keratinized tissue).
Correct suturing sequence for implant flap closure:
Anterior papilla
Vertical release
Mesial & distal sides of the abutment
These are simple interrupted sutures
What are the postoperative medication and oral hygiene protocols following implant placement?
Analgesics for mild-to-moderate pain
prophylactic pre-operative antibiotics (rarely needed postoperatively)
0.12% Chlorhexidine gluconate rinses for 2 weeks.
Typical osseointegration healing time & acceptable 1st-year crestal bone loss:
Healing Time: 3 to 6 months
1st-Year Bone Loss: 1–2 mm (acceptable remodeling)
General height rule for selecting a healing abutment:
2 mm longer than soft tissue thickness (protrudes 1–2 mm supragingivally).
2 mm longer than soft tissue thickness (protrudes 1–2 mm supragingivally).
Requires a longer/taller collar (4–6+ mm) to span the transmucosal tunnel and prevent tissue overgrowth.
Healing abutment collar selection for thin biotype or crestal implant placement:
Requires a shorter collar (2–3 mm) to avoid excessive supragingival height and occlusal trauma.
Indication for anatomic/conical healing abutment collars:
Esthetic zone (anterior maxilla) placement to shape the peri-implant soft tissue emergence profile.
What depth of apical bone engagement is required for an immediate implant, and why?
The osteotomy must extend 3–4 mm beyond the root apex into undisturbed native bone to achieve adequate primary mechanical stability ( ≥35 Ncm)
What is the "jumping distance"?
The gap b/w buccal surface of implant and buccal plate/bone
3D positioning rule for immediate anterior implant placement:
Position 1 mm palatal to the center of the former root axis (prevents facial dehiscence) → anticipated facial bone resorption post-extraction
Jumping distance grafting rules (Immediate implants):
Gap ≤1.5–2 mm: Leave empty (spontaneous bone healing).
Gap > 1.5–2 mm: Graft with bone substitute.
Platform depth requirement for immediate fresh socket implants:
3–4 mm apical to the adjacent CEJ (or countersunk slightly below crestal bone).
Occlusal management for immediate provisional restorations:
Complete clearance out of occlusion (non-functional loading to prevent micromotion).
Main clinical contraindications for immediate implant placement:
Acute infection/periapical lesion, severe facial wall loss, or lack of apical bone for primary stability.
Primary cell type excluded in GTR vs. GBR:
GTR: Junctional epithelium (around natural teeth).
GBR: Fibrous connective tissue and epithelium at implant/ridge sites).
Graft placement site in Maxillary Sinus Augmentation (Sinus Lift):
Inside the sinus cavity, beneath (external to) the elevated Schneiderian membrane.
Predictability of horizontal vs. vertical Guided Bone Regeneration:
Horizontal GBR is highly predictable. Vertical GBR is technically demanding with lower predictability due to flap tension and longer vascularization distances.
Primary intraoral donor sites for autogenous block bone grafts:
Mandibular ramus and mandibular symphysis (genial region).
Absolute surgical contraindication for sinus lift augmentation:
Active sinus infection day of surgery
History of recurrent sinusitis
Uncontrolled diabetes
Cystic fibrosis
Maxillary sinus hyperplasia
Neoplasms
Indirect (Crestal) Sinus Lift: Native RBH & Vertical Gain limits
• Native RBH: 5–7 mm (moderate RBH)
• Vertical Gain: 2–4 mm
• Timing: Simultaneous implant placement
RBH decision rule: Simultaneous vs. Staged Lateral Window Sinus Lift
• RBH 4–5 mm: Simultaneous implant placement (adequate primary stability).
• RBH < 4 mm: Staged implant placement (heal graft for 3 - 6 months).
Primary clinical risk of attempting simultaneous implant placement with < 4 mm RBH:
Inability to achieve primary mechanical stability (≥ 30 Ncm) and risk of implant displacement into the sinus cavity.
Indication cutoff for Lateral Window Sinus Lift (vertical height increase):
Indicated when > 4 mm of vertical bone height increase is required.
Anatomical location of bone graft in Sinus Lift:
Inferior sinus cavity, external to (beneath) the elevated sinus membrane.
Graft healing timeline for staged Lateral Window Sinus Lift (insufficient initial stability):
3–6 months of graft healing prior to implant placement.
Native bone height needed for simultaneous implant placement in Lateral Window:
4–5 mm (provides initial primary stability).
Most common intraoperative vs. postoperative complication of sinus lift:
• Intraoperative: Schneiderian membrane perforation (20–30%).
• Postoperative: Acute/chronic graft infection or sinusitis.
Management threshold for Schneiderian membrane perforations:
• ≤ 5 mm (Small): Further elevate to fold membrane on itself.
• 5–10 mm (Medium): Cover with resorbable collagen membrane.
• > 10 mm (Large): Abort surgery; wait 6–8 weeks to re-enter.
Antibiotic timing protocol for Sinus Augmentation:
• First-Line: Amoxicillin-clavulanate (Augmentin).
• Non-Anaphylactic PCN Allergy: Cefuroxime axetil (Ceftin).
• Anaphylactic PCN Allergy: Levofloxacin.
Primary bacterial trio in Acute Sinusitis:
• Streptococcus pneumoniae
• Haemophilus influenzae
• Moraxella catarrhalis
Primary bacterial profile in Chronic Rhinosinusitis:
• Staphylococcus aureus
• Anaerobic bacteria (Peptostreptococcus, Fusobacterium, Prevotella)
Primary organisms causing Allograft / Bone Graft Infections:
• Alpha-hemolytic streptococci & S. viridans
• Staphylococcus aureus
• Bacteroides spp. & endogenous oral anaerobes
Microbiological rationale for Augmentin in Sinus Lifts:
Provides clavulanate to overcome beta-lactamase resistance in H. influenzae, M. catarrhalis, and Bacteroides spp.
Interdental Papilla Height limits: Tooth-to-Implant vs. Implant-to-Implant
• Tooth-to-Tooth / Tooth-to-Implant: 5 mm max height (from contact point to bone).
• Implant-to-Implant: 3 mm max height (due to microgap crestal bone loss).
Minimum required spatial distances: Implant-to-Tooth vs. Implant-to-Implant
• Implant-to-Tooth: Minimum 1.5 mm
• Implant-to-Implant: Minimum 3.0 mm
Where should an implant platform be positioned apico-coronally in the anterior maxilla to establish a proper emergence profile?
The implant platform should be placed at least 3 mm (ideally 3 to 4 mm) apical to the prospective free gingival margin.
Ideal apico-coronal depth for anterior implants & soft tissue thickness requirement
• Depth: 3 to 4 mm apical to the free gingival margin.
• Tissue Thickness: Minimum 2 to 3 mm (prevents crestal bone loss).
Definition of Implant Emergence Profile:
The axial contour of a tooth or crown as it relates to and emerges from the adjacent soft tissue.
Clinical significance of a High Smile Line vs. Low Smile Line:
• High Smile Line: High esthetic risk (full gingival margin display).
• Low Smile Line: Low esthetic risk (gingival margins hidden by lip).
Most common esthetic complication of two adjacent anterior implants:
Lack of interdental papilla resulting in an open interproximal "black triangle".
Biological reason why inter-implant papilla height is limited to 3 mm:
Absence of PDL attachment and overlapping horizontal crestal bone loss around adjacent implant microgaps.
Ideal exit point for an anterior screw-retained implant access channel:
Cingulum or lingual fossa (achieved via palatal implant placement).
Prosthetic solutions for a central implant exit opening on the facial surface or incisal edge:
• Angulated abutment (corrects up to 25°)
• Cement-retained crown over custom abutment
Primary biological risks of placing an implant too far buccally:
Labial bone dehiscence, mucosal recession, titanium thread exposure, and dark shadow show-through.
Labial bone dehiscence, mucosal recession, titanium thread exposure, and dark shadow show-through.
Up to 25° off-axis correction.
Three major complications of shallow implant placement (< 3 mm apical to FGM):
Inadequate emergence profile (abrupt contours / plaque traps)
Decreased retention & component/screw fracture
Poor esthetics (cervical darkness / metal show-through)
Premaxilla angulation off long axis of load & surgical compensation:
• Angulation: 12° to 15° off-axis
• Compensation: Increase implant body diameter (reduces strain from angled loads)
Minimum width of attached keratinized gingiva required around an implant:
Minimum 2 mm of keratinized tissue (improves stability, plaque control, and esthetics).
Lack of emergence profile leads to:
Aesthetic
hygienic
soft tissue complications
leading to increased implant morbidity
Four diagnostic requirements for peri-implant health
Absence of clinical signs of inflammation.
Absence of bleeding and/or suppuration on gentle probing.
No increase in probing depth compared to previous examinations.
Absence of bone loss beyond crestal bone level changes resulting from initial bone remodeling.
Contraindicated vs. Acceptable instruments for implant debridement
• Avoid: Stainless steel instruments & conventional metal ultrasonic tips (cause significant damage to titanium components).
• Acceptable: Plastic, titanium, gold, carbon, or Teflon coating curettes; air polishing devices and rotary rubber cups with fine pumice.
Implant maintenance appointment:
implant maintenance appointments is every three to six months for cleaning of the surfaces and inspection.
Follow-up periapical radiographs are generally taken 1 year after loading.
Average inter-implant papilla height (Tarnow) & primary biological limit
• Average Height: 3.4 mm (determined by supracrestal fibers from adjacent natural teeth).
• Key Limit: Lack of PDL attachment limits soft tissue height between 2 implants.
First-year crestal bone loss & determining anatomical factor
• Amount: Usually around 1-2 mm in the first year.
• Determining Factor: The location of the implant-abutment interface (microgap).
Safe polishing tools to remove plaque and smooth implant collars
Air polishing devices and rotary rubber cups with fine pumice
Safe mouth rinses for titanium implants
Chlorhexidine mouth rinses
• Phenolic compound mouth rinses
Safe oral irrigation adjunct for titanium implants
Water jet irrigators
Primary clinical indicator & etiology of peri-implant mucositis
• Main Finding: Bleeding on gentle probing
• Etiological Factor: Plaque
Three diagnostic criteria thresholds for peri-implantitis
Bleeding and/or suppuration on gentle probing
Probing depths ≥ 6 mm
Bone levels ≥3 mm apical to intraosseous part of implant
Histological boundary of peri-implant mucositis
Inflammatory infiltrate does not extend apical of the junctional/pocket epithelium into the supracrestal connective tissue zone (confined laterally to JE).
Main causes of occlusal overload on implants
• Excessive cantilevering
• Off-axis loading (lateral forces)Most important indicator of implant failure & definitive management protocol
Most important indicator of implant failure & definitive management protocol
• Indicator: Mobility (Clinical note: Pain on function/tapping, infection, or suppuration may accompany failure, but mobility indicates complete loss of osseointegration).
• Management: Must be removed (explanted) - Implants judged to be a failure because of infection, bone loss, and/or mobility must be removed
Primary causes of Early vs. Late implant failure
• Early: Surgical trauma, lack of initial stability, early loading
• Late: Microbial plaque accumulation (peri-implantitis), excessive occlusal forces
Four complications of splinting a natural tooth to an implant
Breakdown of osseointegration
Cement failure on natural abutments
Screw or abutment loosening
Failure of implant prosthetic components
Histopathological extent of peri-implantitis lesions & rate of progression
• Extent: Extends apical of the junctional/pocket epithelium
• Progression: Faster than that observed in periodontitis
Four guidelines for determining key implant positions
Reduce/eliminate cantilevers (terminal abutments are key positions)
No 3 adjacent pontics
Canine and 1st molar sites are key positions
Arch divided into 5 segments (at least 1 implant per replaced segment)
Splinting Implants
Enhances force distribution, especially in soft bone or short implants.
Key implant positions when missing 1st premolar, canine, and lateral incisor
• Positions: 1st premolar and canine
• Reason for lateral cantilever: Lateral is smallest tooth, lower anterior bite force, and canine implant can be larger for aesthetics.
Rule regarding 3 vs. 4 adjacent missing posterior teeth
• 3 missing teeth: 2 terminal implants adequate if low force factors & good bone density.
• 4 missing teeth: 2 terminal implants are rarely sufficient for 4 posterior teeth.
Key implant positions when missing canine, lateral, and central incisors
Central and canine positions
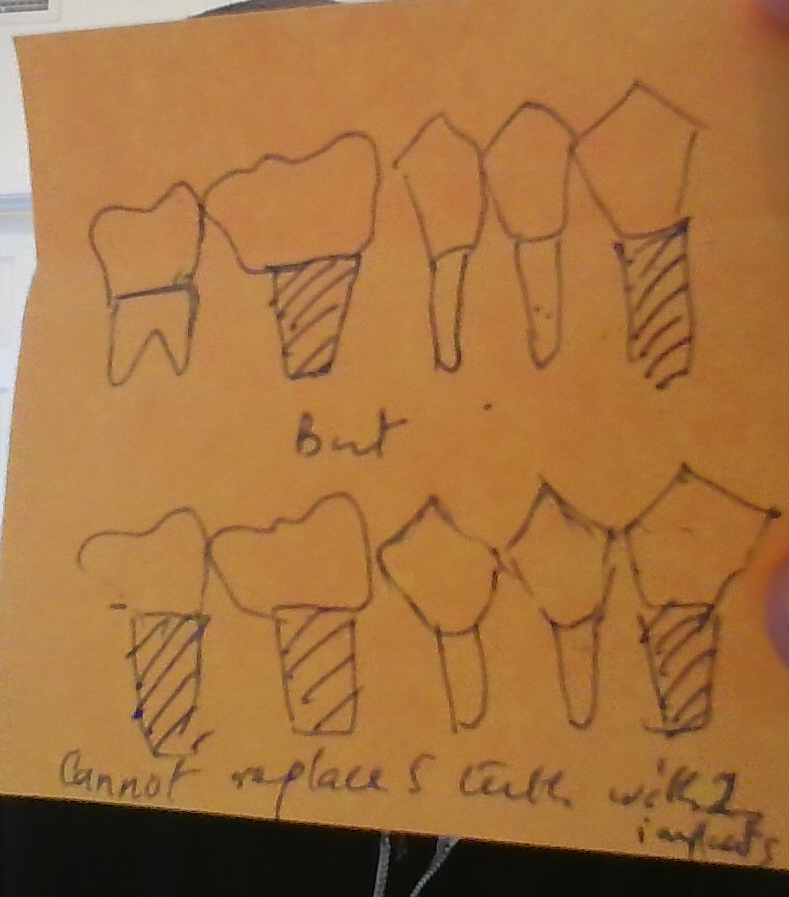
How can we replace 5 missing teeth from 33 to 37?
We can use Canine, 1st molar and 2nd molar
(if only 4 missing we can use 2 implant at 33 and 36)
Key implant positions for missing Central Incisor, Lateral Incisor, Canine, and 1st Premolar (4 teeth total)
• Central Incisor site (terminal abutment)
• Canine site (key anatomical position)
• 1st Premolar site (terminal abutment)
Key implant positions for missing Central Incisor through 2nd Premolar (5 teeth)
• Central Incisor
• Canine
• 2nd Premolar
Key implant positions for missing Central Incisor through 1st Molar (6 teeth)
• Central Incisor
• Canine
• 1st Molar
Key implant positions for missing 1st Premolar through 2nd Molar (4 posterior teeth)
• 1st Premolar site
• 2nd Molar site
(Requires high bone density & low patient force factors)
Key implant positions for missing Canine to 2nd Molar (6 adjacent teeth on one side)
• Primary Sites: Canine, 1st Molar, 2nd Molar
• Modifier: Additional implant placed in canine/premolar region if bone density is low or patient force factors are high
Key implant positions for 6 missing teeth (Central Incisor to 1st Molar)
• Central Incisor site (Rule 1)
• 1st Molar site (Rule 1 & Rule 3)
• Canine site (Rule 2 & Rule 3)
Key implant positions for 8 missing teeth (2nd Premolar to opposite Canine)
• 2nd Premolar site (Rule 1)
• Opposite Canine site (Rule 1 & Rule 3)
• Ipsilateral Canine site (Rule 3)
• One Central Incisor site (Rule 2)
Key implant positions for 10 missing teeth (2nd Premolar to 2nd Premolar across arch)
• Both 2nd Premolar sites (Rule 1)
• Both Canine sites (Rule 3)
• One Central Incisor site (Rule 2)
Key implant positions for missing 1st Premolar to 2nd Molar (4 posterior teeth)
• 1st Premolar site (Rule 1)
• 2nd Molar site (Rule 1)
• 1st Molar site (Rule 3)
Scenario B modifier: Central Incisor to 1st Molar missing span when a large molar implant CANNOT be used
An additional implant is required to follow Rule 2 (limits pontic length and reduces bending moments).
Implant indication for 2nd Premolar sites in full arch (1st molar to 1st molar) reconstruction
Indicated when force factors are moderate or bone density is D3
Even more implant support is suggested when force factors are severe or bone density is D4.
Ideal access channel exit point for anterior screw-retained implant crowns
Through the cingulum (achieved by placing the implant slightly palatally).
Occlusal contact design rule for implant cantilevers
NO OCCLUSION in centric or eccentric movements.