Midterm practical
 Call Kai
 Learn
Learn Practice Test
 Spaced Repetition
 Match
Match Flashcards
 Knowt Play
1/49

There's no tags or description
Looks like no tags are added yet.
Name | Mastery | Learn | Test | Matching | Spaced | Call with Kai | Chat |
|---|
No analytics yet
Send a link to your students to track their progress
50 Terms
PA chest
IR:
breathing instructions
KVP
MAs
SID
CR:
marker:
IR: portrait for women and landscape for men, erect
breathing instructions: expose at end of second full inspiration
technique: 110-125, 2-4 (120,3)
SID: 72
CR: T7
marker: top of left side

Lateral chest
IR
breathing instructions
KVP
MAS
SID
CR
IR: portrait, erect
breathing instructions: expose at end of second full inspiration
technique: 110-125,2-8 (120,9)
SID: 72
CR: centered mid thorax at the level of T7
marker: left marker on the anterior side

lateral decubitus chest:
position
IR:
breathing instructions
technique
SID
CR
marker:
position: lateral recumbent, chin extended and both arms raised above head, AP.
IR: landscape
breathing instructions: end of second full inspiration
technique: 110-125, 3,10
SID: 72
CR: T7. use sponges if CR does not reach T7
marker: always mark the side that is up. this lady is laying on her left side, so you put the right marker.

AP soft tissue neck (upper airway)
Position
IR
breathing instructions
technique
SID
CR
marker:
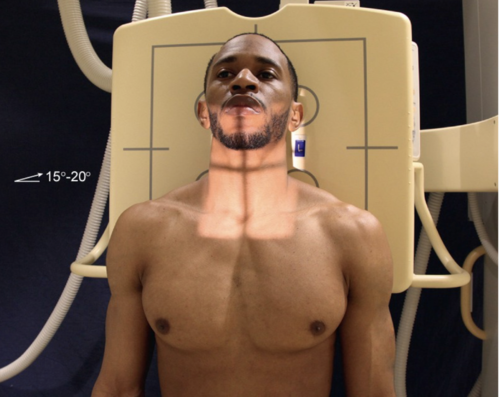
position: Erect or seated, arms down, elevate mandible to level of base of skull, pull shoulders back
IR: 10 × 12 portrait
breathing instructions: exposure during slow, deep inspiration
technique: 75-85, 8-12
SID: 40 (handbook says 72 tho)
CR: level of C6-C7, midway between jugular notch and adams apple
marker: right marker on the right side (can be left)
Lateral soft tissue neck (upper airway)
position:
IR:
breathing instructions:
technique
SID
CR
marker:
position: Erect or seated, arms down, elevate mandible to level of base of skull, pull shoulders back. place patient on their right side.
IR: 10 × 12, portrait
breathing instructions: exposure during slow, deep inspiration
technique: 75-85, 8-16
SID: 72
CR: level of C6-C7, midway between jugular notch and adams apple
marker: right marker on the right side (place anterior, in front of face)(can be left)

KUB 2 images (1st image)
position
IR
breathing instructions
technique
SID
CR
marker:
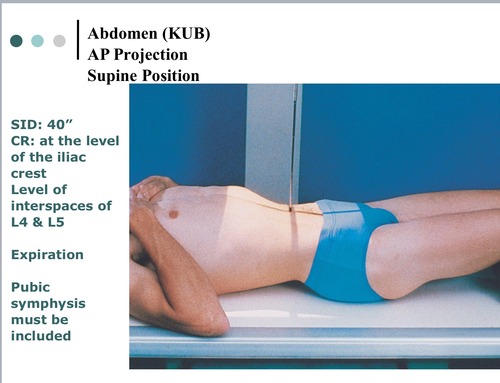
position: supine, legs extended and arms to the side, MSP should be centered to midline of IR
IR: portrait 14 × 17
breathing instructions: exposure at end of expiration
technique: 70-85, 22-25
SID: 40
CR: level of iliac crests
marker: right marker on bottom ride side
KUB 2 images (2nd image)
A hypersthenic patient may require the IR be placed in landscape position with a second exposure centered higher. before switching IR, place marker at top of light, then slide patient down so the light goes towards the diaphragm while still leaving room for overlap.

lateral decubitus abdomen
position:
IR:
breathing instructions:
technique:
SID:
CR:
marker:
position: patient should be lateral recumbent against against IR. knees should be partially flexed, arms up near head. patient should be lying for 5 min
IR: landscape 17 × 14
breathing instructions: exposure at end of expiration
technique: 70-85, 30-120 (i would prob do 75 at 30-45 mas)
SID: 40
CR: centered 2 inches above the iliac crest
marker: always place marker indicating the side that is up. this person is on their left side, so you place the right marker

upright abdomen
position:
IR:
breathing instructions:
technique:
SID:
CR:
marker:
position: erect, arms at side, back against wall bucky. patient should be upright for 5 min
IR: portrait 14 × 17
breathing instructions: exposure at the end of expiration
technique: 70-85, 30-120 (i would do 75 at 22-25)
SID: 40
CR: 2 inches above iliac crest
marker: right marker on bottom right side

PA finger
position:
IR:
breathing instructions:
technique:
SID
CR
marker
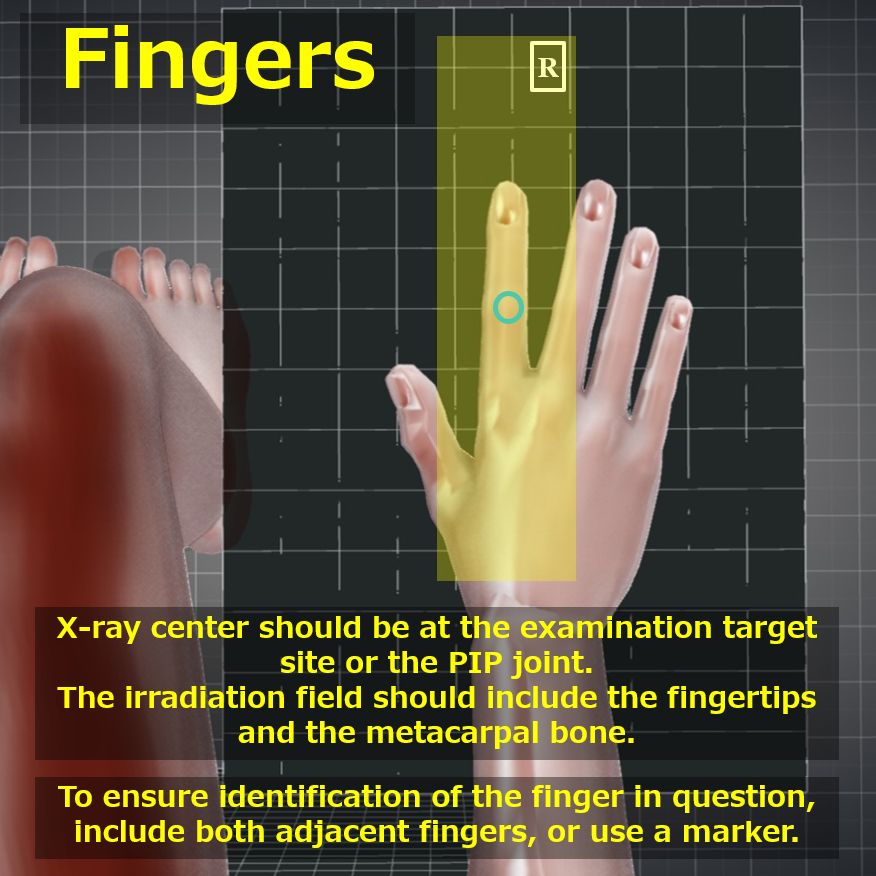
position: patient seated, elbow flexed 90. pronate hand and separate fingers.
IR: portrait (collimate to area of interest on four sides while including distal aspect of metacarpal)
breathing instructions: hold still
technique: 55-65, 1-3
SID: 40
CR: PIP joint
marker: correct marker on side that is more lateral
PA oblique finger
position
IR
breathing instructions
technique
SID
CR
marker
position: patient seated with elbow flexed 90. rotate hand medially 45 degrees. use sponge if patient cannot hold. separate fingers
IR: portrait. collimate to area of interest while including distal metacarpal
breathing instructions: hold still
technique: 55-65, 1-3
SID: 40
CR: PIP
marker: correct marker on side that is more lateral

PA lateral finger
position
IR
breathing instructions
technique
SID
CR
marker
position: patient seated, elbow flexed 90 degrees. hand and wrist in lateral position, thumb side up for 3rd-5th digits, thumb side down for second digit. use sponge
IR: portrait. collimate to area of interest while including distal metacarpal
breathing instructions: hold still
technique: 55-65, 1-3 (increase mas a little for lateral)
SID: 40
CR: PIP joint
marker: correct marker on more lateral side

AP thumb
position:
IR:
breathing instructions:
technique:
SID:
CR:
marker:
position: patient seated, rotate hand internally to supinate thumb, posterior surface of thumb must contact IR. use tape on other fingers if they are in the way.
IR: portrait. collimate to area of interest while including first metacarpal extending to carpals
breathing instructions: hold still
technique: 55-65, 1-3
SID: 40
CR: center at first MCP joint
marker: correct marker on lateral side

Oblique thumb
position:
IR
breathing instructions
SID
CR
marker
position: patient seated, elbow flexed. abduct thumb slight, pronated hand position likely will put the thumb in a natural 45 degree oblique position
IR: portrait. ensure all of the first metacarpal and trapezium is included
breathing instructions: hold still
technique: 55-65, 1-3
SID: 40
CR: first MCP joint
marker: correct marker on lateral side

lateral thumb
position
IR
breathing instructions
technique
SID
CR
marker
position: patient seated, elbow flexed 90. rotate hand medially until thumb is in lateral
IR: portrait. include first metacarpal and trapezium
breathing instructions: hold still
technique: 55-65, 1-3 (increase mas slighty)
SID: 40
CR: first MCP joint
marker: correct marker on lateral side

AP axial thumb: modified roberts method
position
IR
breathing instructions
technique
SID
CR
marker
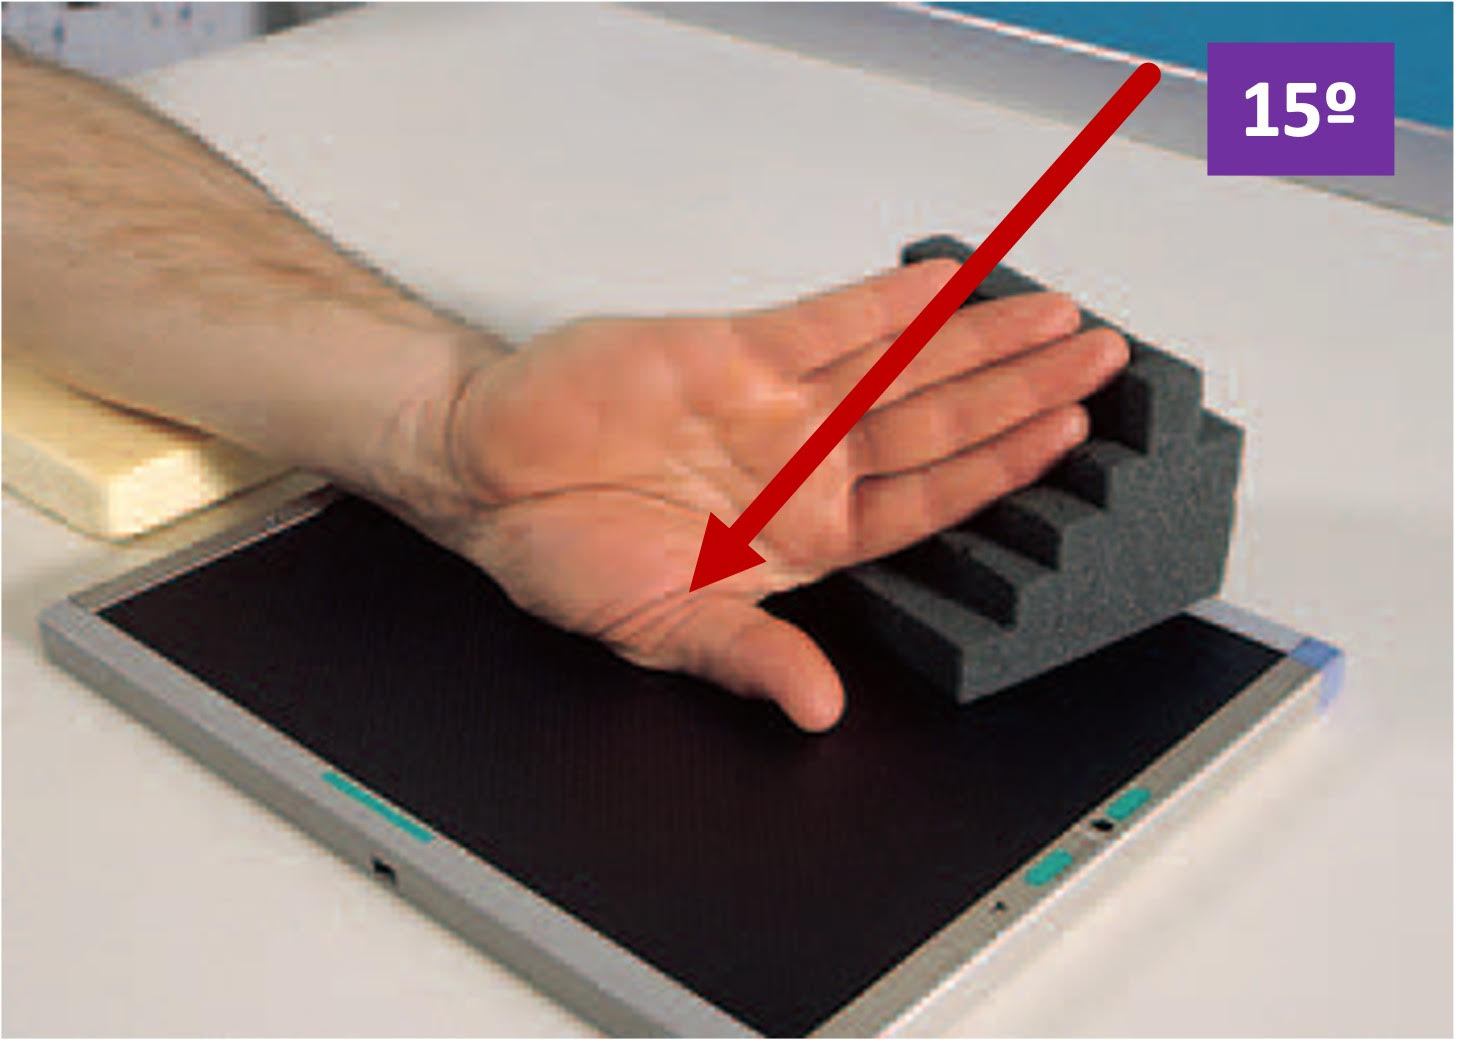
position: same position as AP thumb. internally rotated until lateral side is touching IR
IR: portrait. include first CMC joint
breathing instructions: hold still
technique: 55-65, 1-3
SID: 40
CR: angle 10-15 towards wrist, centered at first MCP joint.
marker: correct marker on correct side
PA hand
position
IR
breathing instructions
technique
SID
CR
marker
position: patient seated, elbow flexed 90 degrees, hand pronated
IR: portrait. include carpals
breathing instructions: hold still
technique: 55-65, 2-5
SID: 40
CR: third MCP joint
marker: correct marker on lateral/ pinky side

PA hand oblique
position
IR
breathing instructions
technique
SID
CR
marker
position: patient seated with elbow flexed. rotate laterally 45. use sponge
breathing instructions: hold still
technique: 55-65, 2-5
SID: 40
CR: third MCP joint
marker: correct marker on lateral side

fan lateral hand
position
breathing instructions
technique
SID
CR
marker
position: patient seated with elbow flexed 90. hand in lateral position
breathing instructions: hold still
technique: 55-65, 2-5 (increase mas slightly)
SID: 40
CR: second MCP joint
marker: correct marker on lateral side

PA wrist
position
IR
breathing instructions
technique
SID
CR
marker
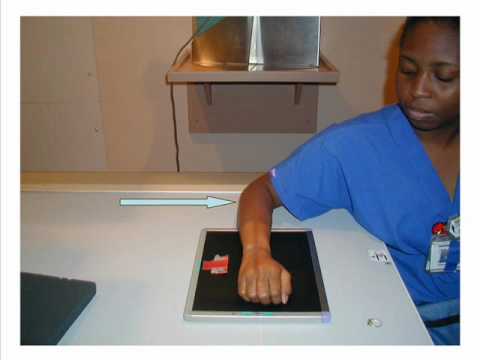
position: patient seated. lower shoulder, elbow, and wrist in the same plane. slightly arch fingers to make wrist in contact to IR
IR: portrait, include metacarpals and distal radius and ulna
breathing instructions: hold still
technique: 55-65, 2-5
SID: 40
CR: mid carpals
markers, correct marker on lateral side
PA oblique wrist
position
IR
breathing instructions
technique
SID
CR
marker
position: patient seated with elbow flexed. rotate wrist 45 laterally. use sponge
IR: portrait, include metacarpals and distal radius and ulna
breathing instructions: hold still
technique: 55-65, 2-5
SID: 40
CR: midcarpals
marker: correct marker on correct side

lateromedial wrist
position:
IR
breathing instructions
technique
SID
CR
marker
position: patient seated with elbow flexed 90. rotate wrist laterally with thumb side up. make sure every part is in same plane
IR: portrait. include metacarpals and distal radius and ulna
breathing instructions: hold still
technique: 60-70, 2-5 (increase mas slightly)
SID: 40
CR: center to midcarpals
marker: correct marker on lateral side

PA axial scaphoid (modified stecher method)
position
IR
breathing instructions
technique
SID
CR
marker
position: patient seated. shoulder, elbow, wrist in the same plane. form PA wrist position, then perform ulnar deviation
IR: portrait. four sides of carpal region
breathing instructions: hold still
technique: 55-65, 2-5
SID: 40
CR: 10-15 angle towards elbow, centered at scaphoid.
marker: correct marker on lateral side

Carpal canal (tunnel) tangential inferosuperior wrist (gaynor hart method)
position
IR
breathing instructions
technique
SID
CR
position: patient seated. hyperextend (dorsiflex) wrist as far as patient can tolerate with patient using other hand/gait belt/tape to hold fingers back. rotate hand and wrist slightly internally.
IR: portrait. collimate on all four sides of the carpal region
breathing instructions: hold still
technique: 55-65, 2-5
SID: 40
CR: angled 25-30 proximally. centered one inch distal to the base of the third metacarpal
marker: correct marker on lateral side

AP forearm
position
IR
breathing instructions
technique
SID
CR
marker
position: patient seated, with hand and arm extended, hand supinated. make sure limbs are in the same plane. make sure epicondyles are parallel
IR: portrait. include a minimum of one inch beyond wrist and elbow joints
breathing instructions: hold still
technique: 65-75, 2-5
SID: 40
CR: midpoint of forearm
marker: correct marker on lateral side, letter facing away from patient

lateral forearm (lateromedial)
position
IR
breathing instructions
technique
SID
CR
marker
position: patient seated with elbow flexed 90. shoulder and entire upper limb on same plane. rotate hand and wrist into a lateral position, thumb up.
IR: portrait, but rotate IR. include a minimum of one inch beyond both wrist and elbow joints
breathing instructions: hold still
technique: 65-75, 2-5 (increase mas slightly)
SID: 40
CR: midpoint of forearm
marker: correct marker on the outside

AP elbow
position
IR
breathing instructions
technique
SID
CR
marker
position: patient seated, elbow fully extended, hand supinated. lean laterally as needed for a true AP
IR: portrait, include proximal radius and ulna, and distal humerus
breathing instructions: hold still
technique: 65-75, 2-5
SID: 40
CR: mid elbow joint
marker: correct marker on lateral side, letter facing towards patient

AP alternative partial flexion elbow (2 images)
position
IR
breathing instructions
technique
SID
CR
marker
position 1: arm extended with hand supinated, humerus lying on IR while forearm lies on a sponge
position 2: arm extended with hand supinated, forearm lies on IR while humerus is arched up
breathing instructions: hold still
technique: 65-75, 2-5
SID: 40
CR 1: perpendicular to distal humerus
CR 2: perpendicular to proximal forearm
marker: correct marker on lateral side, letter facing towards patient

Acute flexion elbow (2 images)
position
IR
breathing instructions
technique
SID
CR
marker
position: align and center humerus to long axis of IR, with forearm acutely flexed and fingertips resting on shoulder. check epicondyles are not rotated
IR: portrait
breathing instructions: hold still
technique: 70-80, 2-5 (slightly higher mas)
SID: 40
CR 1: CR perpendicular to IR and humerus, directed to a point midway between epicondyles
CR2: CR perpendicular to forearm, angling CR as needed. directed to a point 2 inches proximal or superior to olecranon process
marker: correct marker on lateral side, letter facing towards patient

AP oblique lateral (external) rotation elbow
position
IR
breathing technique
technique
SID
CR
Marker
position: extend elbow, supinate hand, rotate elbow 45 externally. lean body laterally as needed. check epicondyles for 45 rotation
IR: portrait. include proximal radius and ulna and distal humerus
breathing technique: hold still
technique: 65-75, 4-8
SID: 40
CR: midelbow joint
marker: correct marker on lateral side, letter facing away from patient

AP oblique medial (internal) rotation elbow
position
IR
breathing technique
technique
SID
CR
marker
position: extend elbow, pronate hand, 45 internal rotation. check epicondyles are rotated.
IR: portrait. include proximal radius and ulna and distal humerus
breathing technique: hold still
technique: 65-75, 4-8
SID: 40
CR: mid elbow joint
marker: correct marker on lateral side, letter facing away from patient

lateromedial elbow
position
IR
breathing technique
technique
SID
CR
marker
position: patient seated, elbow flexed 90. shoulder and forearm in the same plane. place hand and wrist in true lateral with thumb side up.
IR: rotate IR so that long axis is parallel with forearm
breathing technique: hold still
technique: 65-75, 4-8 (increase mas slightly)
SID: 40
CR: mid elbow joint
marker: correct marker on lateral side, letter facing towards fingers and away from elbow joint

trauma axial lateromedial elbow (coyle method) for radial head
position
IR
breathing technique
technique
SID
CR
marker
position: patient seated, flex arm 90 degrees, with hand supinated
IR: portrait
breathing technique: hold still
technique: 70-80, 3-6
SID: 40
CR: angle CR 45 towards shoulder, centered to radial head (mid elbow joint)
marker: correct marker on lateral side, letter facing towards fingers

trauma axial mediolateral method (coyle method) for coronoid process
position
IR
breathing technique
technique
SID
CR
marker
position: patient seated, elbow flexed 80 with hand pronated.
IR: portrait
breathing technique: hold still
technique: 70-80, 3-6
SID: 40
CR: angle CR 45 away from shoulder, center at mid elbow joint
marker: correct marker on lateral side, letter facing towards finger

AP humerus
position
IR
breathing technique
technique
SID
CR
marker
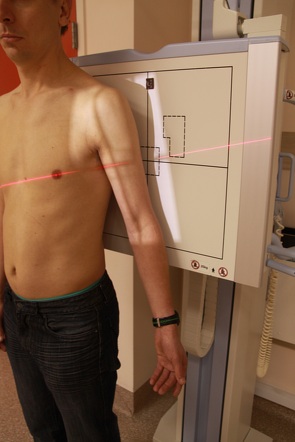
position: erect or supine, arm slightly abducted, supinate hand, epicondyles parallel to IR
IR: portrait. should include elbow joint and one inch of proximal forearm
breathing technique: hold still
technique: 70-85, 7-15
SID: 40
CR: midpoint of humerus
marker: correct marker on correct side
lateral humerus (mediolateral)
position
IR
breathing technique
technique
SID
CR
marker
position: may be erect or supine. flex elbow 90, patient rotated 15-20 from PA, or as needed to bring humerus in contact with IR. epicondyles perpendicular for a true lateral
IR: portrait. shoulder and elbow joints included
breathing technique: hold still
technique: 70-85, 7-15 (slightly higher mas)
SID: 40
CR: midpoint of humerus
marker: correct marker on correct side

AP external rotation shoulder
position
IR
breathing technique
technique
SID
CR
marker
position: erect, abduct extended arm slightly, externally rotate arm, supinate hand until epicondyles are parallel to IR
IR: portrait
breathing technique: suspend during exposure
technique: 70-85, 10-20
SID: 40
CR: one inch inferior to coracoid process
marker: correct marker on correct side

AP shoulder with internal rotation
position
IR
breathing technique
technique
SID
CR
marker
position: abduct extended arm slightly, internally rotate/pronate hand until epicondyles are parallel to IR
IR: portrait
breathing technique: suspend during exposure
technique: 70-85, 10-20
SID: 40
CR: one inch inferior to coracoid process
marker: correct marker on correct side

inferosuperior axial shoulder (Lawrence method)
position
IR
breathing technique
technique
SID
CR
marker
position: patient supine with shoulder raised 2 inches from table top (put sponge underneath arm) shoulder should be center to IR. turn head away from IR. arm should be abducted 90 degrees from body, arm externally rotated with hand supinated
IR: landscape
breathing technique: suspend during exposure
technique: 70-85, 5-12
SID: 40
CR: 25 to 30 medially to axilla and humeral head, less angle if arm cannot abduct 90.
marker: correct marker on correct side

inferosuperior axial shoulder (clements modification)
position
IR
breathing technique
technique
SID
CR
marker
position: patient in lateral recumbent, lying on unaffected side, affected arm up, abduct arm 90 degrees from body if possible
IR: portrait 8 × 10
breathing technique: suspend during exposure
technique: 70-85, 5-12
SID: 40
CR: CR perpendicular to IR, angle tube 5-15 toward axilla if patient cannot abduct arm 90
marker: correct marker on outside

PA axial transaxillary shoulder (modified bernageau method)
position
IR
breathing technique
technique
SID
CR
marker
position: patient is erect, positioned 60-70 from PA, rotating toward the affected side, affected arm is raised superiorly 160 to 180 flexion. head is turned away from affected arm
IR: portrait
breathing technique: suspend during exposure
technique: 70-85, 5-12
SID: 40
CR: directed 30 degrees caudally and centered at the level of the scapular spine to pass through the scapulohumeral joint
marker: correct marker on correct side

superioinferior transaxillary shoulder
position
IR
breathing technique
technique
SID
CR
marker:
position: elbow flexed 90, patient leans laterally towards IR, make sure humerus, shoulder, and forearm are in the same plane. tilt head away from affected shoulder
IR: landscape
breathing technique: suspend during exposure
technique: 70-85, 5-12
SID: 40
CR: CR centered perpendicular to glenoid fossa (line that forms when you abduct humerus), angle 5-15 distally towards elbow
marker: correct marker on outside

AP oblique glenoid cavity (grashey method)
position
IR
breathing technique
technique
SID
CR
marker
position: patient erect, rotate body 35-45 toward affected side (body of scapula should be parallel with IR), abduct arm slightly with arm flexed and in neutral rotation.
IR: portrait
breathing technique: suspend during exposure
technique: 70-85, 5-12
SID: 40
CR: CR perpendicular to scapulohumeral joint, 2 inches inferior and 2 inches medial from the superolateral border of shoulder.
marker: correct marker on correct side

Apical AP axial projection
position
IR
breathing instructions
technique
SID
CR
marker
position: patient should be erect, extend and slightly abduct arm, hand is placed in neutral rotation
IR: landscape 8 × 10
breathing instructions: expose upon suspended inspiration
technique: 70-85, 5-12
SID: 40
CR: angle CR 30 caudad entering ½ inch above coracoid process
marker: correct marker on correct side
Tangential intertubercular (bicipital) sulcus shoulder (fisk modification)
position
IR
breathing instructions
technique
SID
CR
marker
position: patient standing, leaning over the end of the table to place humerus 10-15 from vertical. hand supinated holding IR, head turned away from affected side
IR: landscape
breathing instructions: suspend during exposure
technique: 70-80, 3-7
SID: 40
CR: CR perpendicular to IR, directed to groove area at mid anterior margin of humeral head

AP neutral shoulder
position
IR
breathing instructions
technique
SID
CR
marker
position: patient should be erect, arm slighted abducted, rotate body slightly towards affected side, palm facing towards thigh (natural position), epicondyles 45 degrees to plane of IR
IR: landscape or portrait
breathing instructions: suspend during exposure
technique: 70-85, 5-12
SID: 40
CR: slightly inferior to coracoid process
marker: correct marker on correct side

Transthoracic lateral proximal humerus (lawrence method)
position
IR
breathing technique
technique
SID
CR
marker
position: patient erect, affected arm against IR in neutral position, raise unaffected arm above head or angle CR 10-15 cephalad to prevent superimposition of unaffected shoulder.
IR: portrait
breathing technique: expose on full inspiration: orthostatic breathing preferred
technique: 70-80, 20-30
SID: 40
CR: CR perpendicular through thorax to level of affected surgical neck
marker: use marker of affected side

PA oblique scapular Y lateral shoulder
position
IR
breathing technique
technique
SID
CR
marker
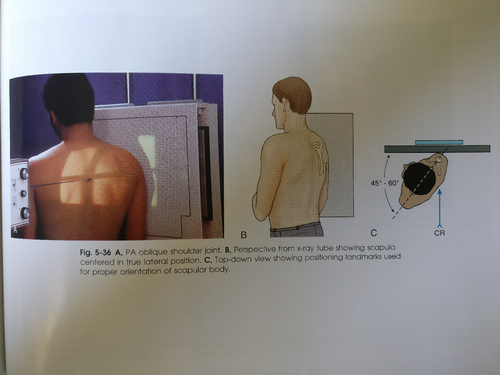
position: patient should be erect, patient PA, then rotate affected shoulder into a 45-60 posterior oblique. unaffected arm should be up in front of patient, affected arm down
IR: portrait
breathing technique: suspend during exposure
technique: 70-85, 15-25 mas
SID: 40
CR: perpendicular to scapulohumeral joint
marker: correct marker on correct side
AP oblique scapular Y shoulder
position
IR
breathing technique
technique
SID
CR
marker
position:
IR: portrait
breathing technique: suspend during exposure
SID: 40
CR:
marker: correct marker on correct side
Tangential projection supraspinatus outlet shoulder (neer method)
position
IR
breathing technique
technique
SID
CR
position: patient should be erect, patient PA, then rotate affected shoulder into a 45-60 posterior oblique. unaffected arm should be up in front of patient, affected arm down
IR: portrait
breathing technique: suspend during exposure
technique: 70-85, 15-20
SID: 40
CR: angle CR 10-15 caudad to scapulohumeral joint
