Ultrasound Abdominal and Cartoid Protocol Test (21st of August)
 Call Kai
 Learn
Learn Practice Test
 Spaced Repetition
 Match
Match Flashcards
 Knowt Play
1/21

There's no tags or description
Looks like no tags are added yet.
Name | Mastery | Learn | Test | Matching | Spaced | Call with Kai | Chat |
|---|
No analytics yet
Send a link to your students to track their progress
22 Terms
Aorta Transverse Survey
Start in transverse plane place the probe under the xiphisternum and slightly to the right (and apply downward pressure to the illiac crest)
Identify the semicircular echogenic spine in order to locate the aorta as the largest central anechoic round structure anterior to the spine
To ensure its the correct structure locate the IVC to the left of the patient
angle superiorly under the sternum towards the diaphragm ensure proximal portion of aorta is assessed, angle inferiorly again to starting position. Slide caudally again until you reach the sternum and then angle under the sternum the stream once more toward the heart
Try to identify the coeliac axis and SMA watching signs of plaque or thrombosis or anyrsum
Aorta Longitudinal Survey
Turn the probe 90 degrees into the longtudinal plane, identify the long axis of the proximal aorta with the diaphragm visable on the screen.
Sweep to the patients left of the aorta until clear of the structure by about 2 cm and return to the starting postion on the left side of the aorta.
Slide the probe more inferior and repeat until you ensure you have passes the bifurcation of the aorta by 2 cm
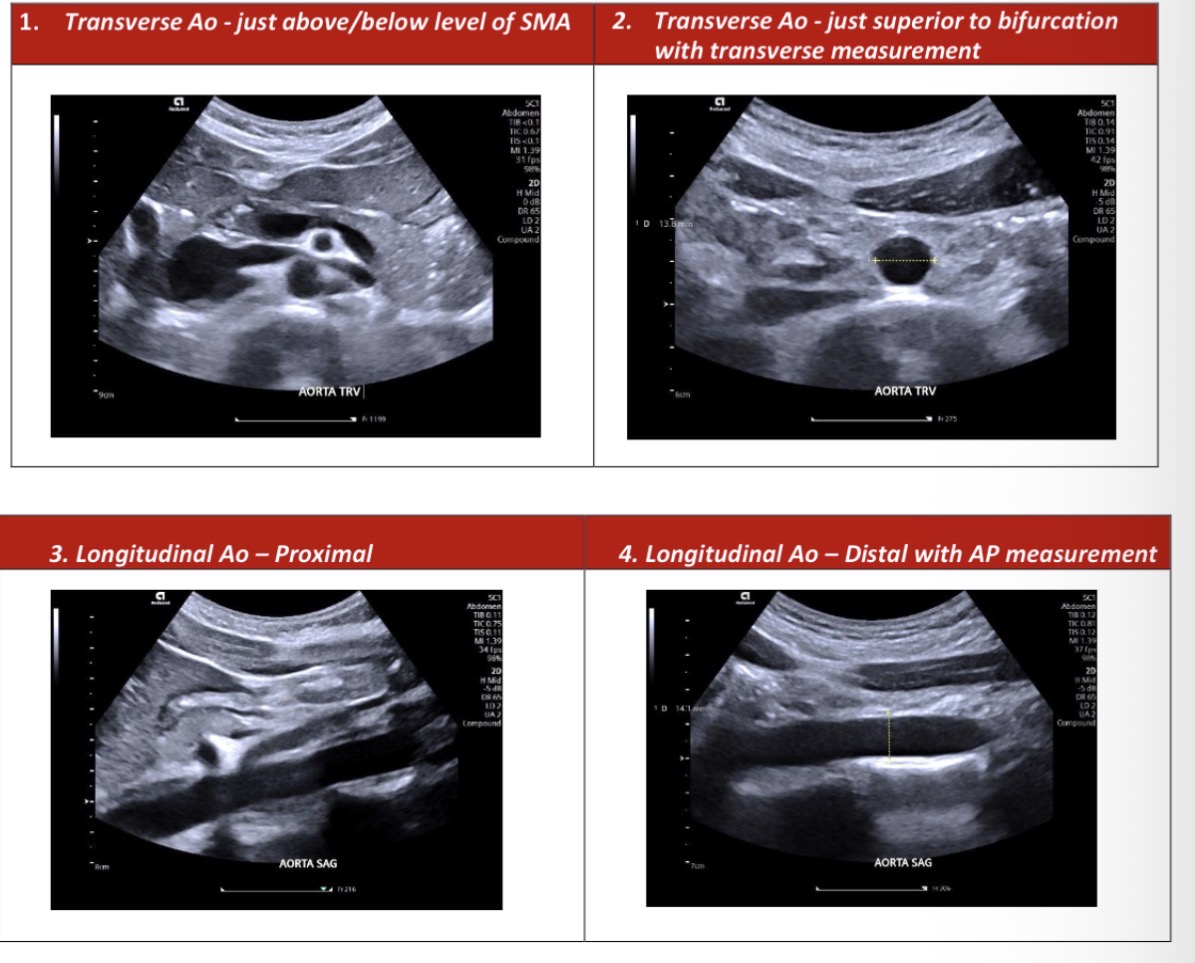
Aorta survey images
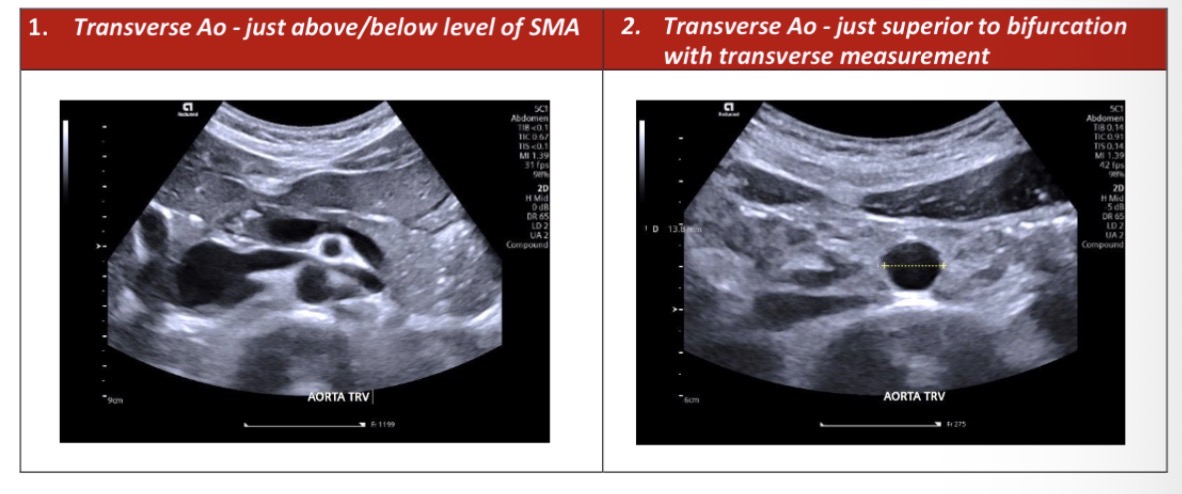
Rotate 90 degrees back to the transverse plane beginning again at the xiphisternum slide down the proximal portion of the aorta and take image of the aorta and IVC just proximal or distal to the level of the SMA (image 1)
Slide inferiorly from there and image the distal arota just above the level of the bifurcation include a transverse measurement. (Image 2)
Turn to the longtudinal plane to visualise the proximal aorta demonstrating coeliac axis or SMA (Image 3)
Slide the transducer inferiorly to obtain a longtudinal image of the aorta in the distal segment just above the bifurcation.
Add an AP measurement in the distal image only (image 4)
DEPTH GAIN FOCUS BUTTONS AND PURPOSE
Depth
places the main structure of intrest in the middle of the screen, preventing image quality loss from scanning too deep
Gain
controls overall brightness of the image and amplifies weak signals from deep tissue (can reduce or add image noise)
Focus
narrows ultrasound beam width, sharpens image clarity and spatial resolution at the focal zone
Left Liver Longitudinal Survey
Patient is supine. Start at the proximal IVC in the longtudinal plane. Sweep to the patients right about 2 cm past past the IVC. Survey the superior portion of the left lobe by sweeping to the patients left KEEP THE PATIENTS DIAPHRAGM ON THE SCREEN at all times until 2 cm past lateral tip of the liver. Sweep back to starting postion 2 cm past the IVC.
Slide the probe inferiorly and starting 2 cm to the right of the IVC, again survey out laterally about 2 cm past the tip of the liver KEEPING THE INFERIOR MARGIN OF THE LIVER ON THE SCREEN AT ALL TIMES. Sweep back to the starting postion 2 cm past the IVC.
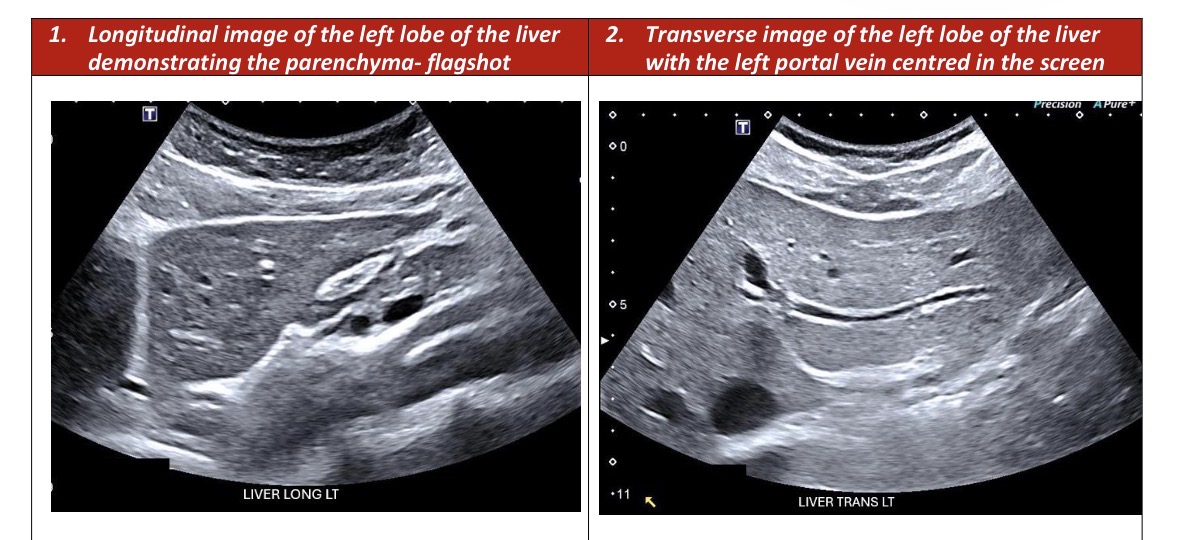
Left Liver Transverse Survey
Turn to transverse now and place the probe at the lateral edge of the liver. Keeping the lateral edge of the left lobe on the screen at all times, slide inferiorly until about 2 cm below the liver and begin survey by sweeping superiorly past the level of the diaphragm, and returning inferiorly to the starting postion below the liver.
Slide the probe towards the patients the patients midline and ensure the great vessels (Ao/IVC) are centred in the screen. Move the probe inferiorly until about 2 cm below the level of the liver. Sweep superiorly keeping the great vessels centred on the screen, until above the level of the diaphragm and then inferiorly to starting postion 2 cm below the liver.
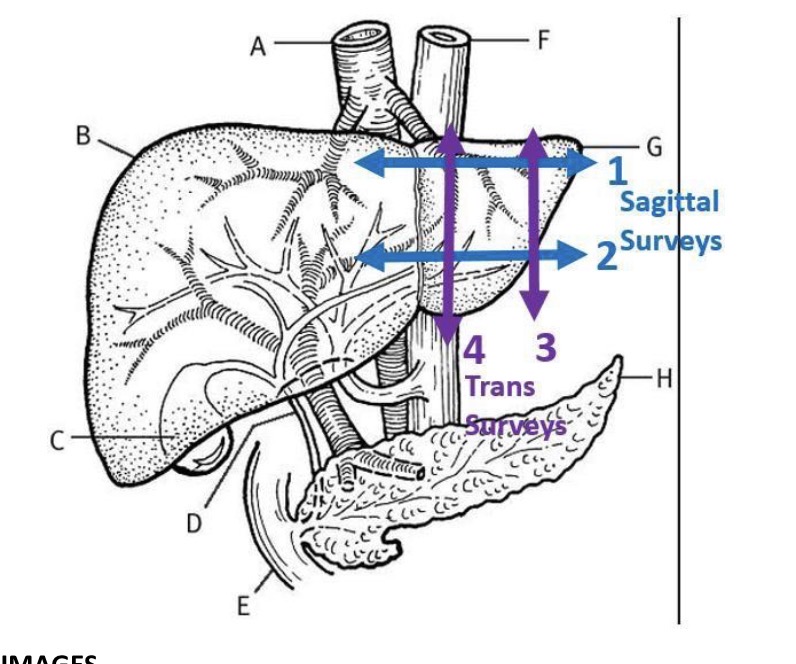
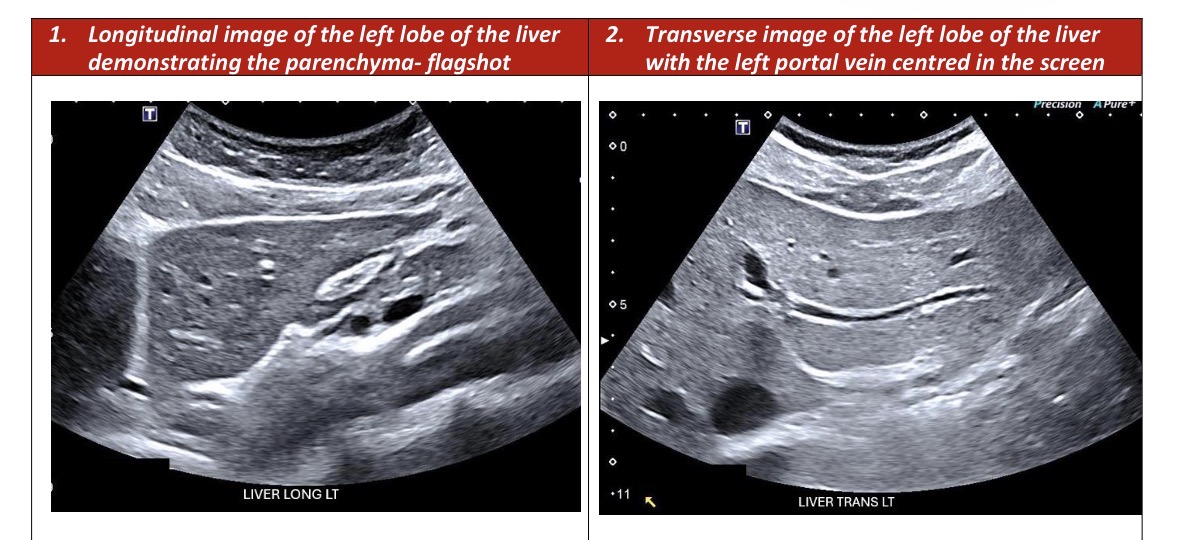
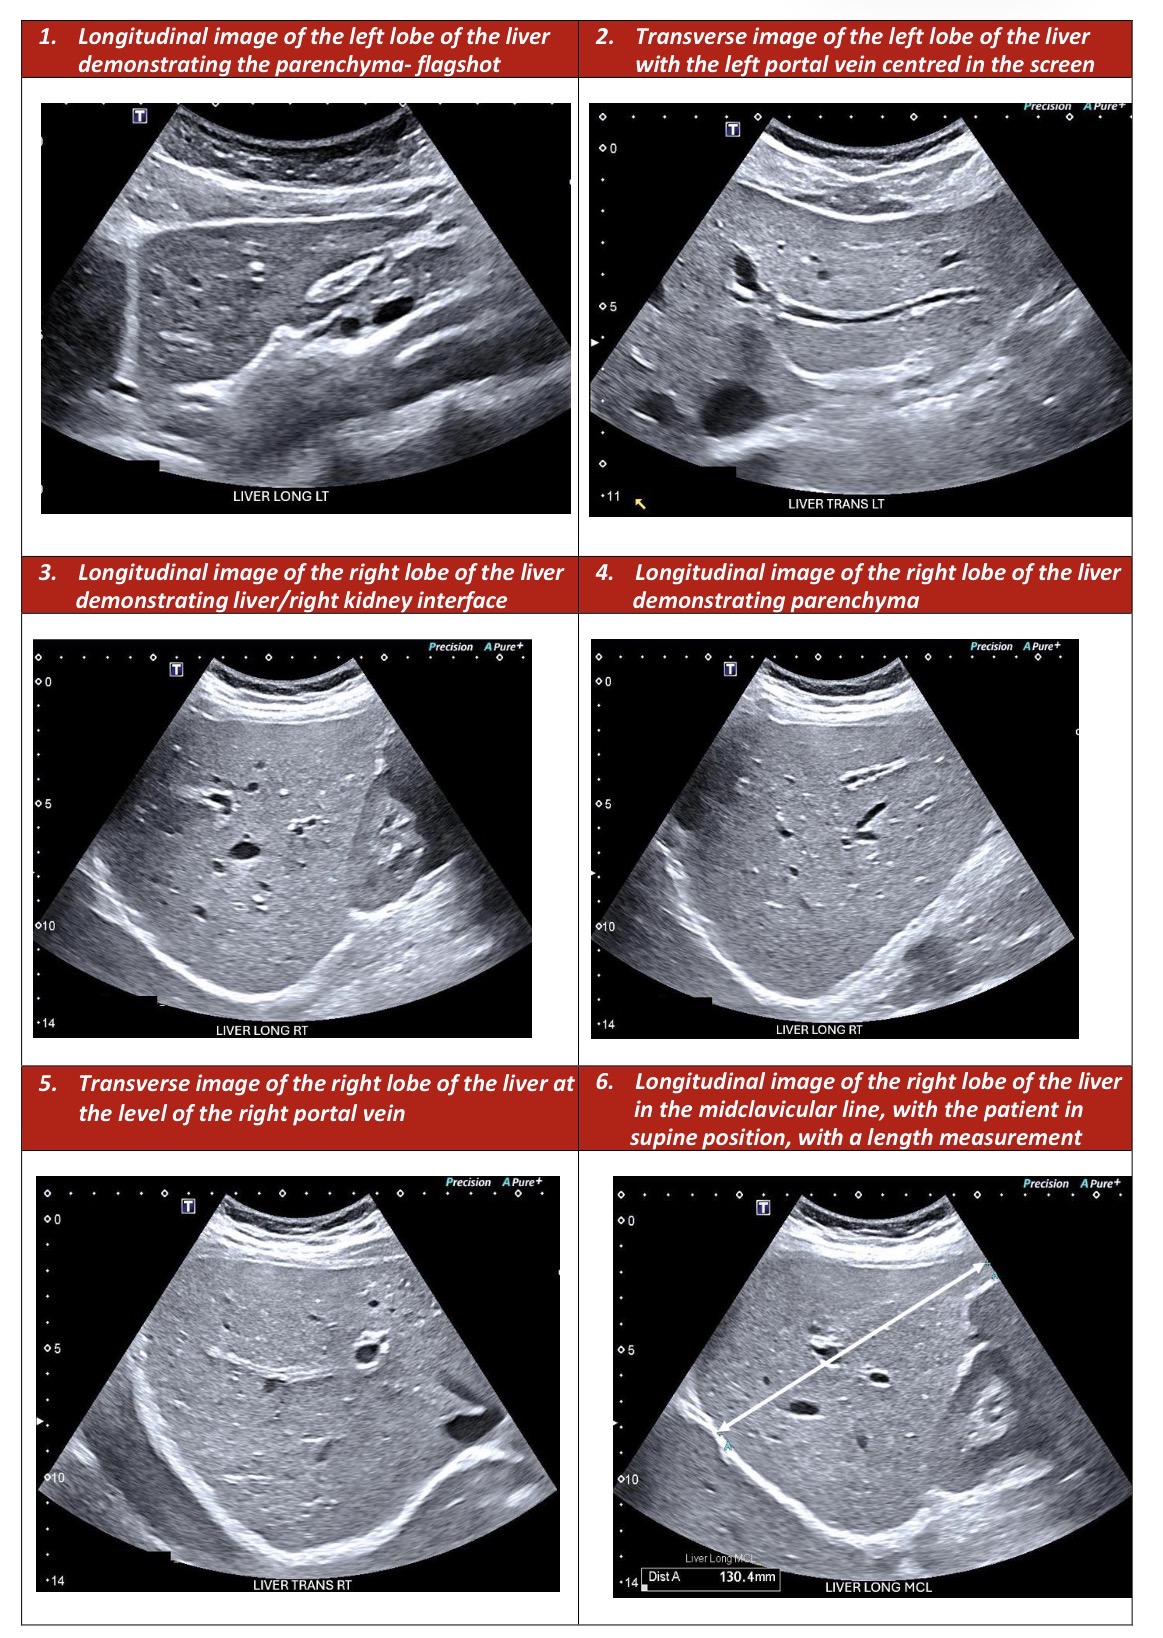
Image of the Left liver
Once you have surveyed the entire liver
In longtudinal obtain an image of the left lobe of the liver parenchyma just to the left Hand side of the aorta (image 1)
In transverse obtain an image of the liver adjacent to the left main portal vein (image 2) the aorta and IVC should be displayed in the bottom left hand content of the image
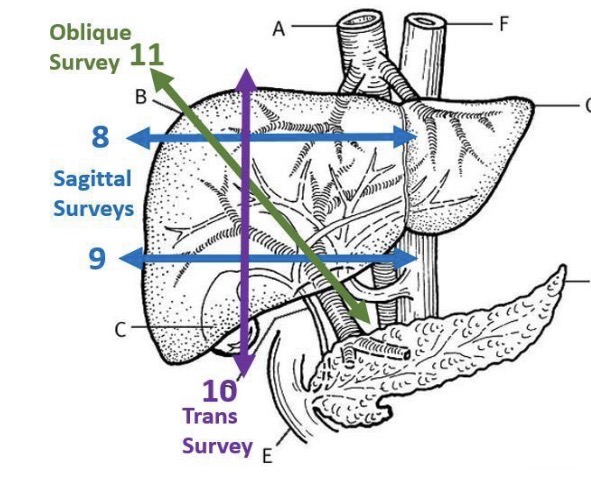
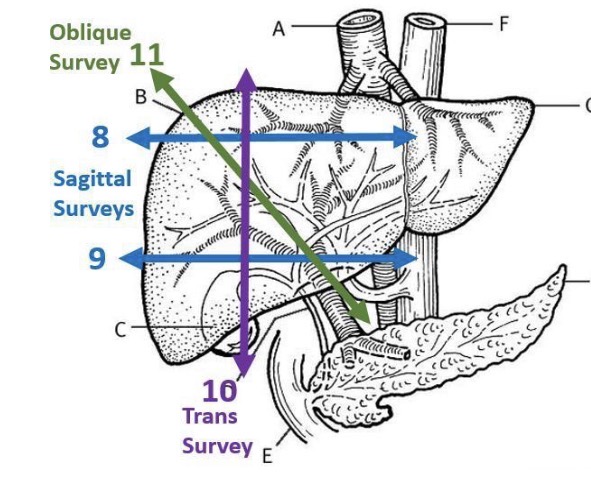
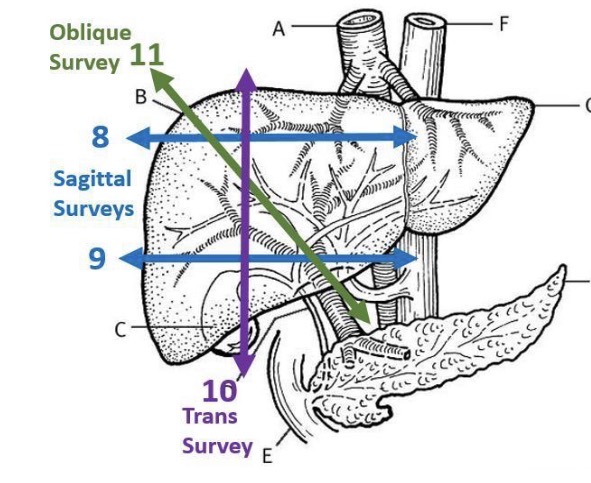
Right Liver Longitudinal Survey
Roll patient into LPO
Starting in the longitudinal plane at the proximal IVC, sweep to the patients left about 2 cm past the IVC. Now survey the superior portion of the right lobe by sweeping to the patients right keep the diaphragm on the screen ***** ar all times until clear of the right edge of the liver. Sweep back to the starting position 2 cm past the IVC.
Slide the probe inferiorly down the IVC so that the inferior portion of the right lobe by sweeping to the patients right keep the inferior edge on the screen******* until clear of the right lateral edge of the liver sweep back to the starting position 2 cm past the IVC.
Right Liver Transverse Survey
Turn 90 degrees into transverse plane. Slide probe inferiorly until at least 2 cm below the liver parenchyma. Slide the probe superiorly through the inferior portion of the liver until you reach the rib cage and cannot slide any further. Now keep going by angling the transducer up underneath the rib cage superiorly until you have surveyed right up to the diagrapham. Angle inferiorly again until probe is perpendicular to skin line and then slide back down to starting position about 2 cm below inferior tip of liver
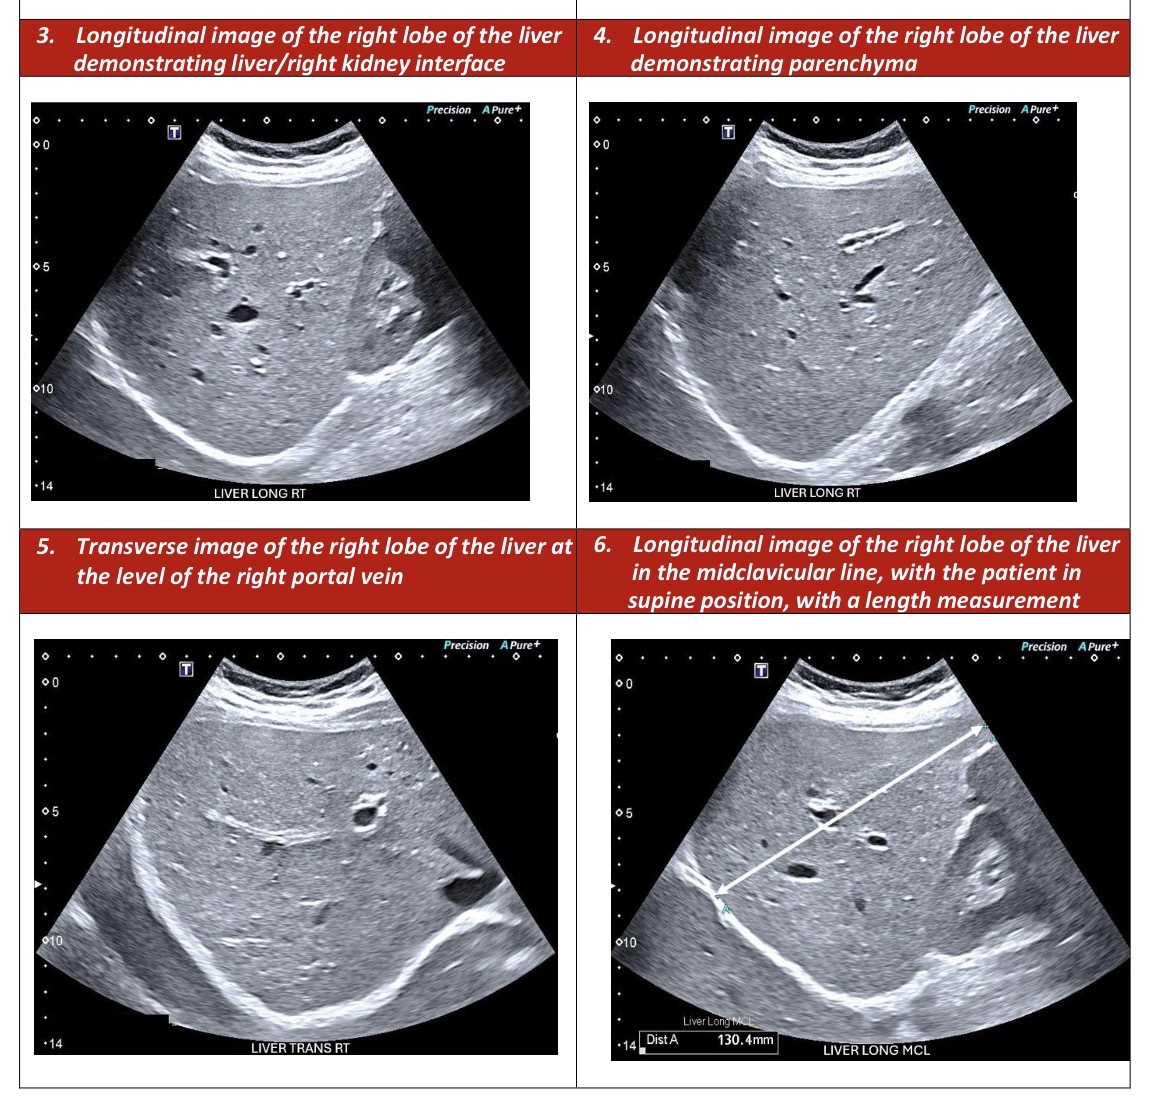
Images for Right Liver
After the survey
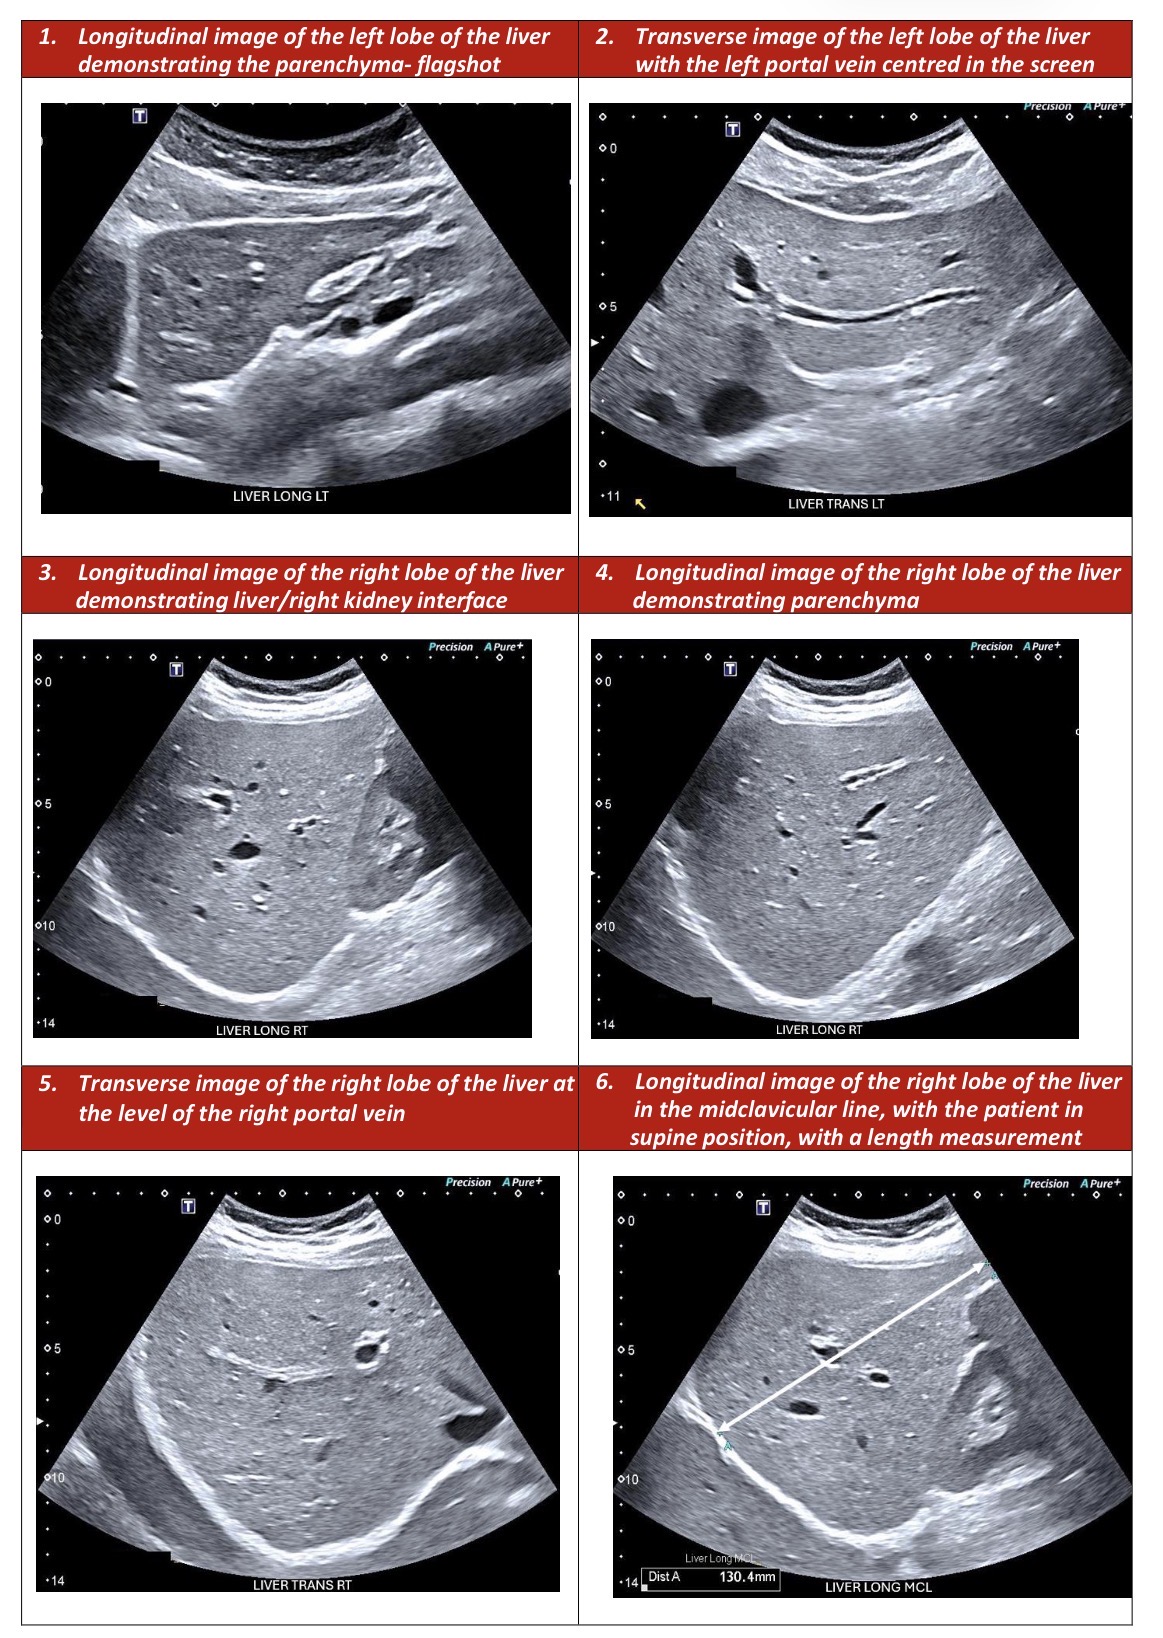
Starting in the longitudinal plane obtain a longitudinal image of the right lobe of the liver and the right kidney demonstrating a clear interface and echogenicty of each organ (image 1)
Angle (slightly) laterally (or sometimes medially) in the right lobe and obtain an image of the liver parenchyma (image 4)
Turn to transverse and obtain an image of the liver at about the level of the right portal vein (image 5)
Do u need oblique ?
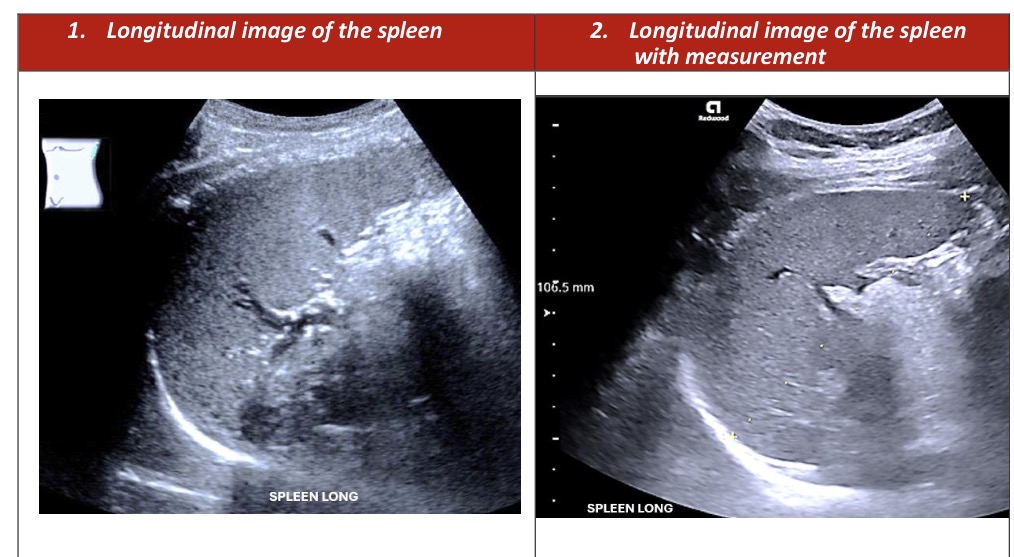
Spleen Longitudinal Survey
Patient RPO
Locate an intercostal window in the posterior-lateral mid axillary line and place probe along the line of rib space.
Once this Longtudinal axis of the spleen is located angle anteriorly in the rib space until clear of the spleen by about 2 cm.
From there angle posteriorly until clear the posterior aspect of the spleen by about 2 cm and then anteriorly again to the starting position anterior to spleen.
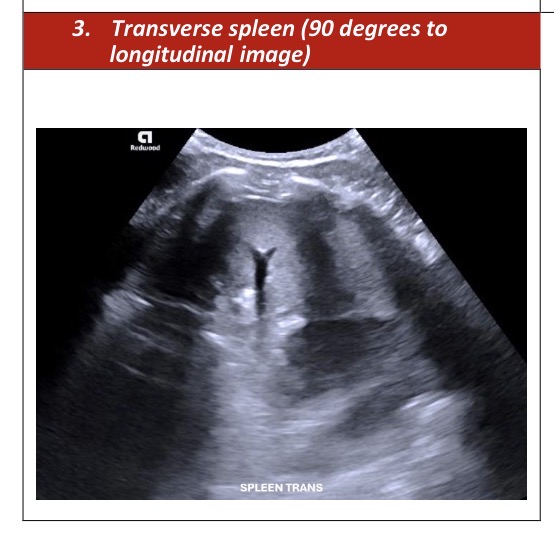
Spleen Transverse Survey
Rotate the probe 90 degrees into transverse position you will have some rib shadow.
It is unlikely you will be able to visualise the entire spleen transversely in one rib space using the above technique begin in a rib space until clear of spleen and angle superiorly again to your starting position.
Images for a Spleen Survey
After surveying the spleen.
Obtain a longtudinal image of the spleen (image 1)
Obtain a longtudinal image of the spleen with longtudinal measurement (image 2)
Obtain transverse image of the spleen (image 3)
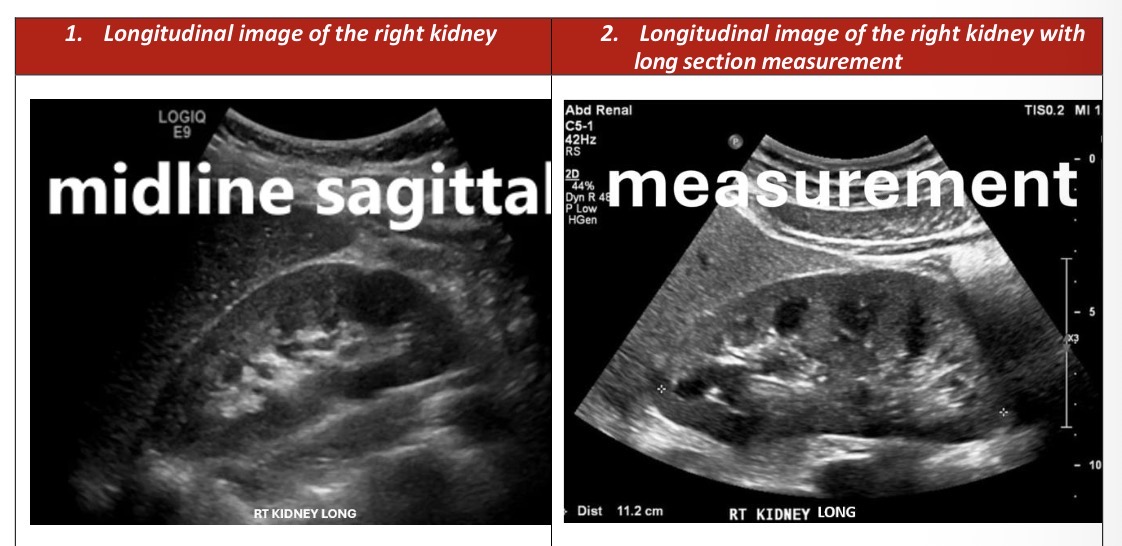
Right Kidney Longitudinal Survey
Start patient in LPO position. Start in longitudinal / coronal plane on the right side and find the longest axis of the right kidney this will be the longitudinal axis.
When you have established the longitudinal axis, begin the survey by angling the probe 2cm past lateral edge of the renal parenchyma. Angle medially until clear of the medial border of the kidney by about 2 cm and return to starting postion lateral to the kidney.
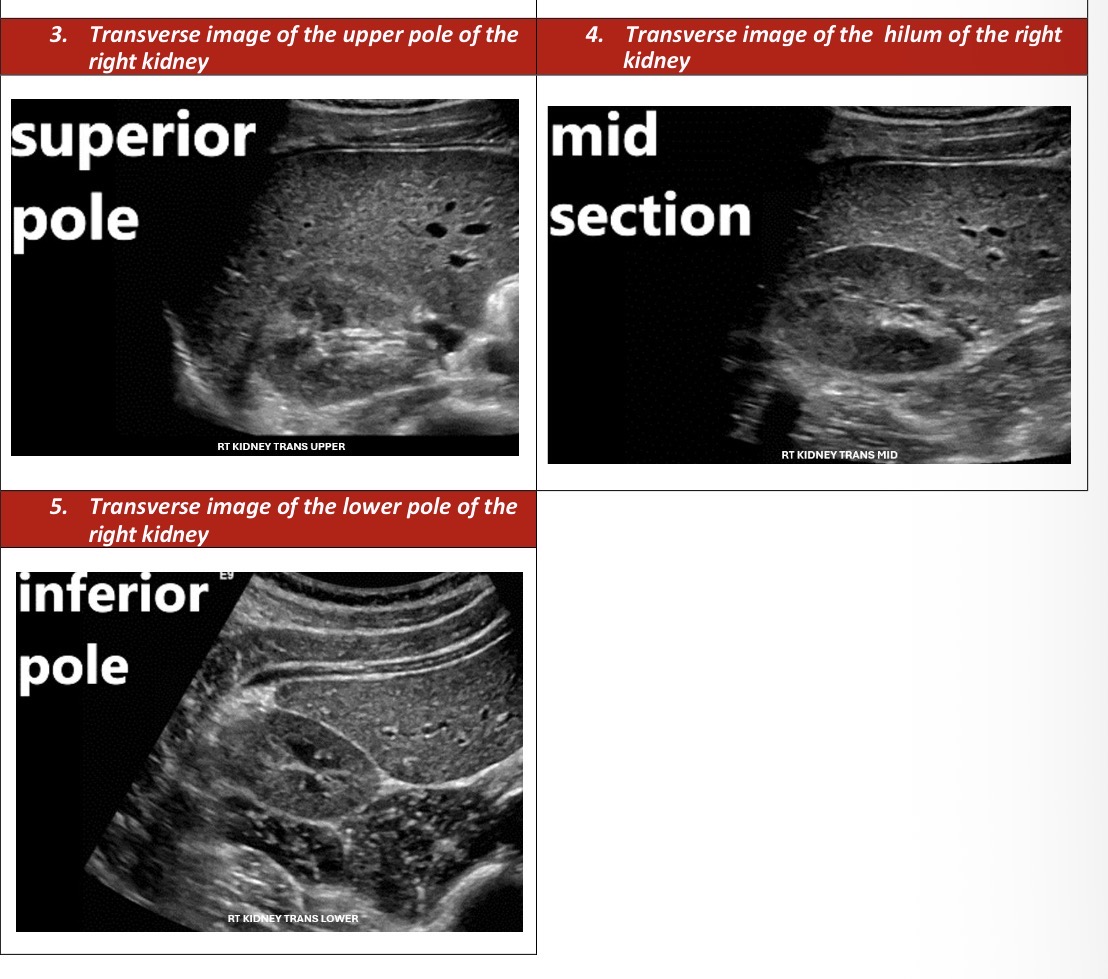
Right Kidney Transverse Survey
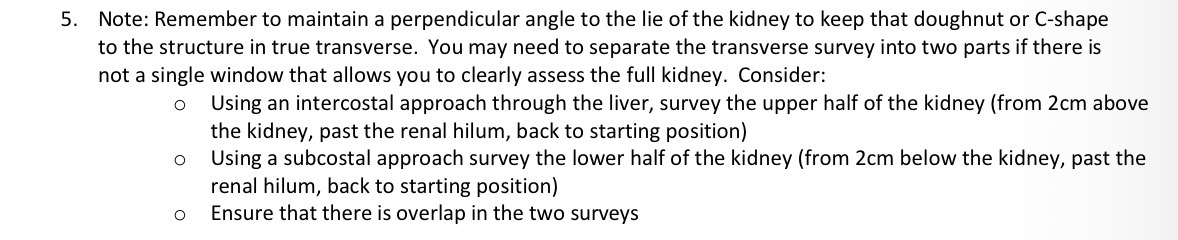
Turn the probe 90 degrees to the longtudinal axis of the kidney and begin the transverse survey. Angle the probe approximately 2 cm above the level of the upper pole of the kidney. Survey inferiorly until clear of the kidney by about 2 cm, then survey back up to starting position above the kidney.
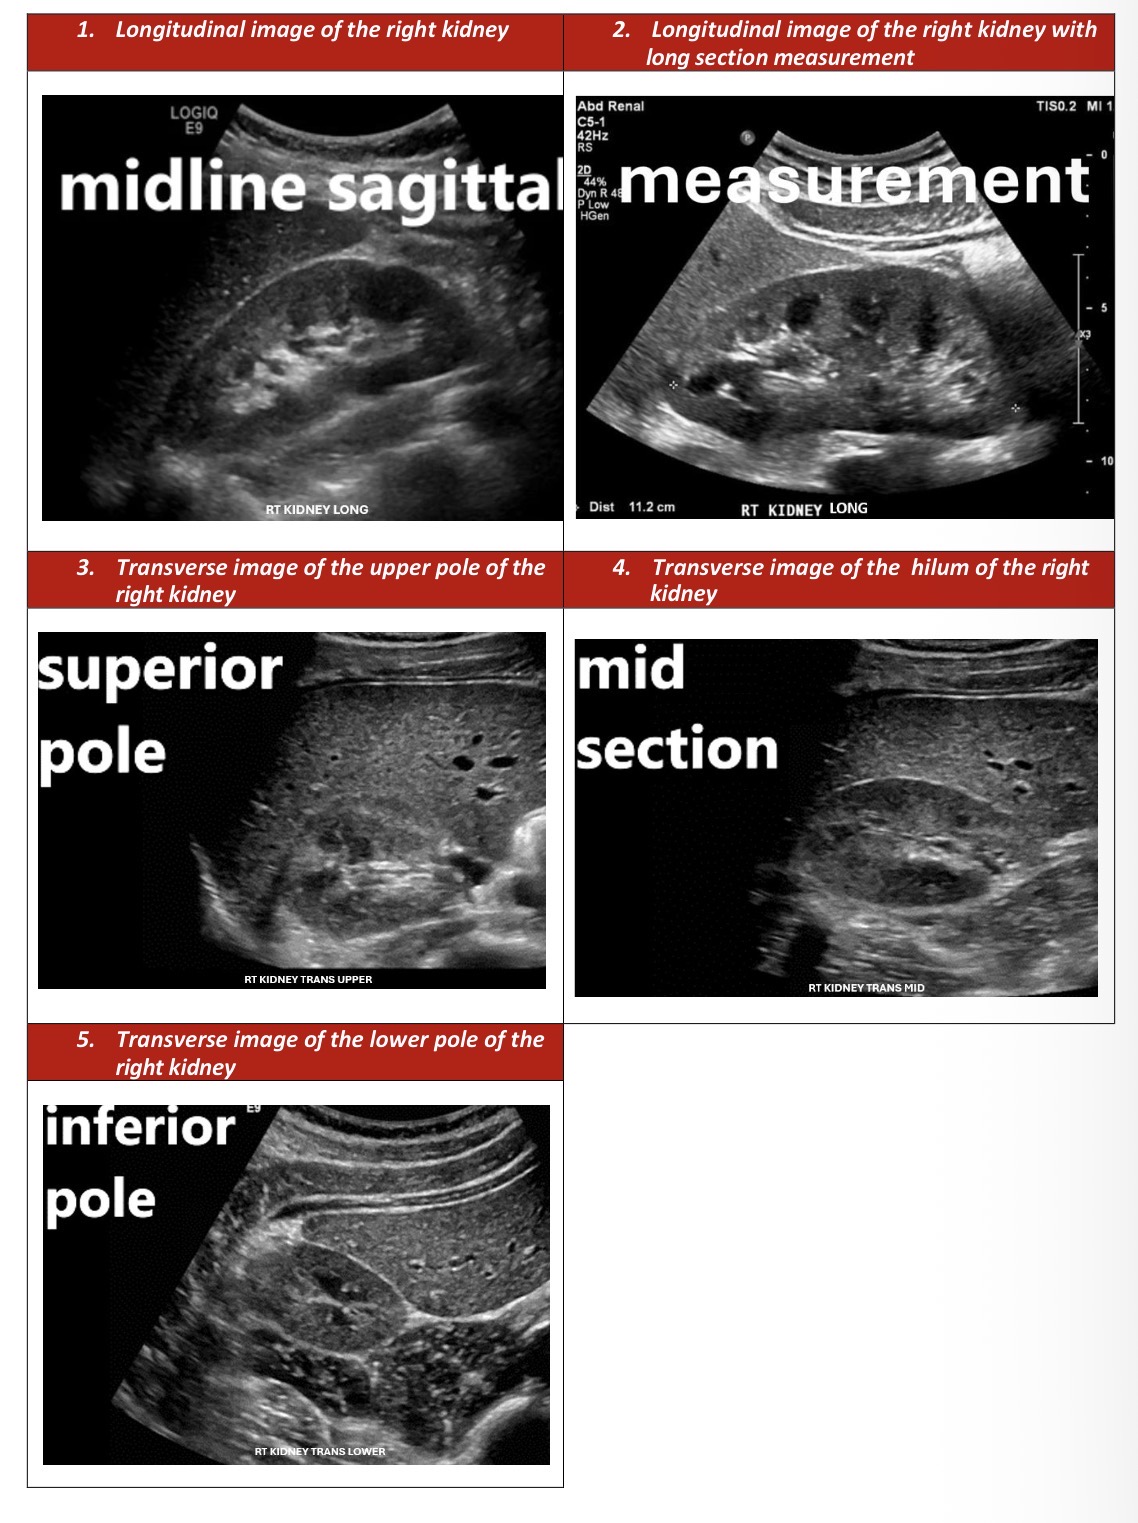
Images for Right Kidney Survey
After surveying the entire kidney.
Find the longitudinal axis once more, ensure you have the longest length of the kidney (image one)
Now do a measurement (image two)
Turn into a transverse plane and identify the upper pole of the kidney, obtain an image demonstrating the round doughnut shape of the parenchyma above the hilium (Image three)
Slide inferiorly and obtain a transverse image of the hilum showing the C shaped parenchyma around the renal pelvis (image four)
Slide further inferiorly and obtain a transverse image of the lower pole of the kidney demonstrating the round doughnut shape of the parenchyma below the hilum. (Image 5)
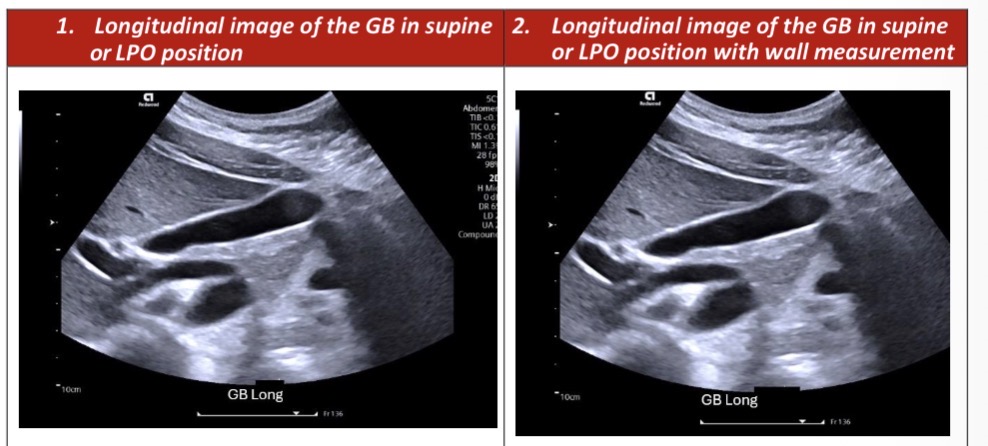
Longitudinal Gallbladdder
Patient in LPO position with their left side down.
Locate the gallbladder in the transverse plane by placing your probe in the RUQ about midway between the xiphisternum and lower costal magrin.
Slide / angle the transducer superiorly and inferiorly through the right lobe of the liver until you find it.
Use deep suspended inspiration.
Once the GB is located rotate your transducer to elongate it out to its longest length, this will be the longtudinal plane.
To survey the GB begin begin by sweeping laterally until clear of the GB by about 2 cm. Then sweep medially until Lear of the GB by about 2 cm, and return to the starting position on the lateral side of the GB assessing the contour and symmetry of the walls.
Transverse Gallbladder
Rotate 90 degrees to a transverse plane. Begi 2 cm above the GB neck and survey inferiorly until clear of the fungus by about 2 cm and sweep back to the starting position.
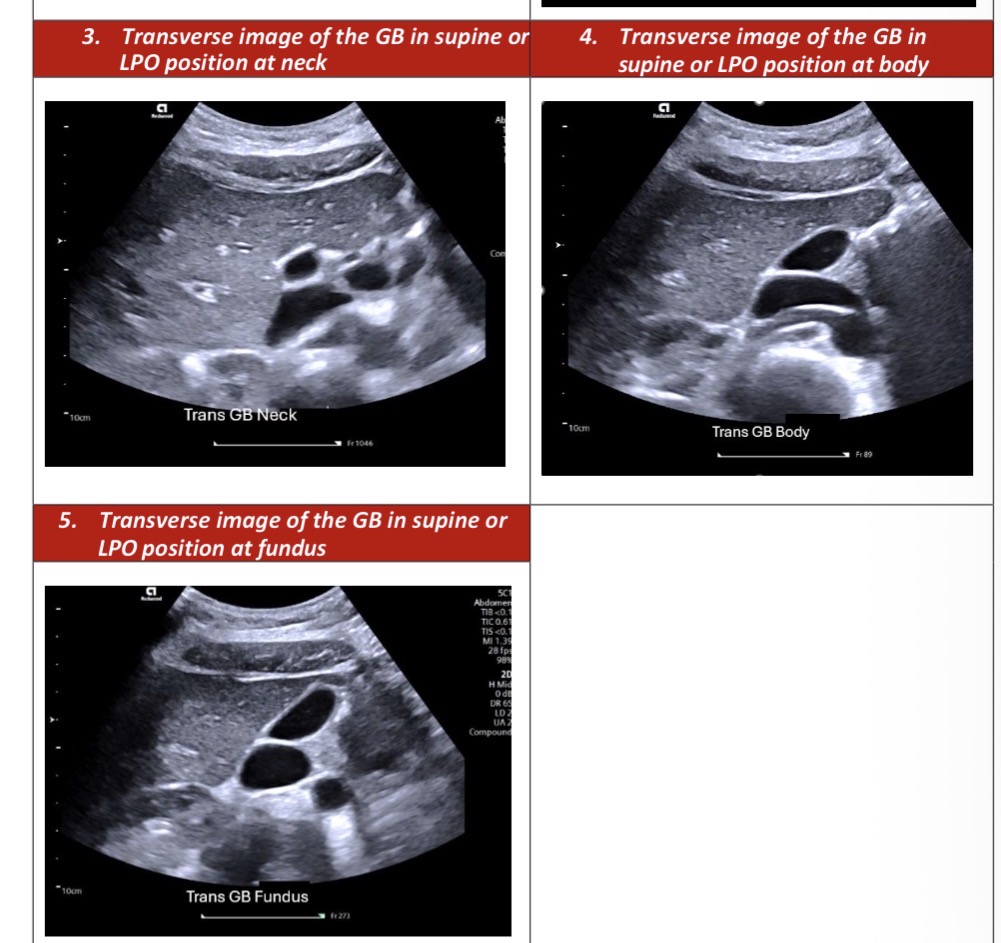
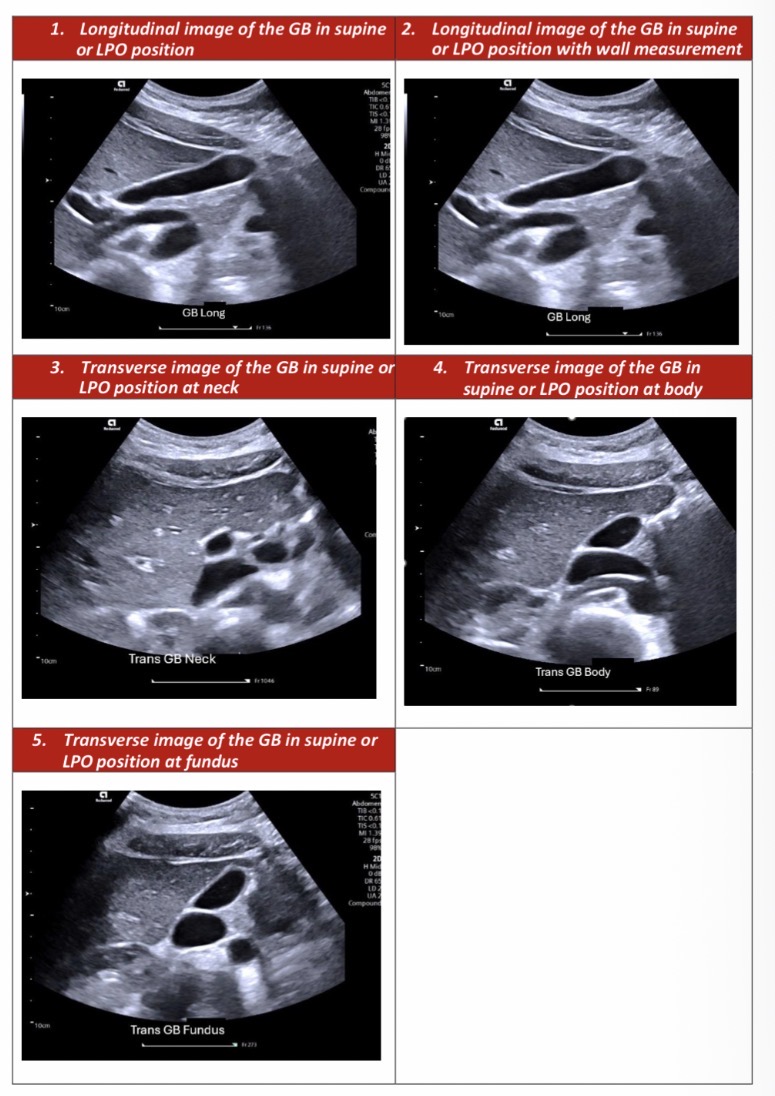
Image for Gallbladder US
Obtain a long section image of the GB (image 1)
Measure the AP wall thickness (image 2)
Obtain transverse image of the GB one at the neck one at the body and one at the fungus
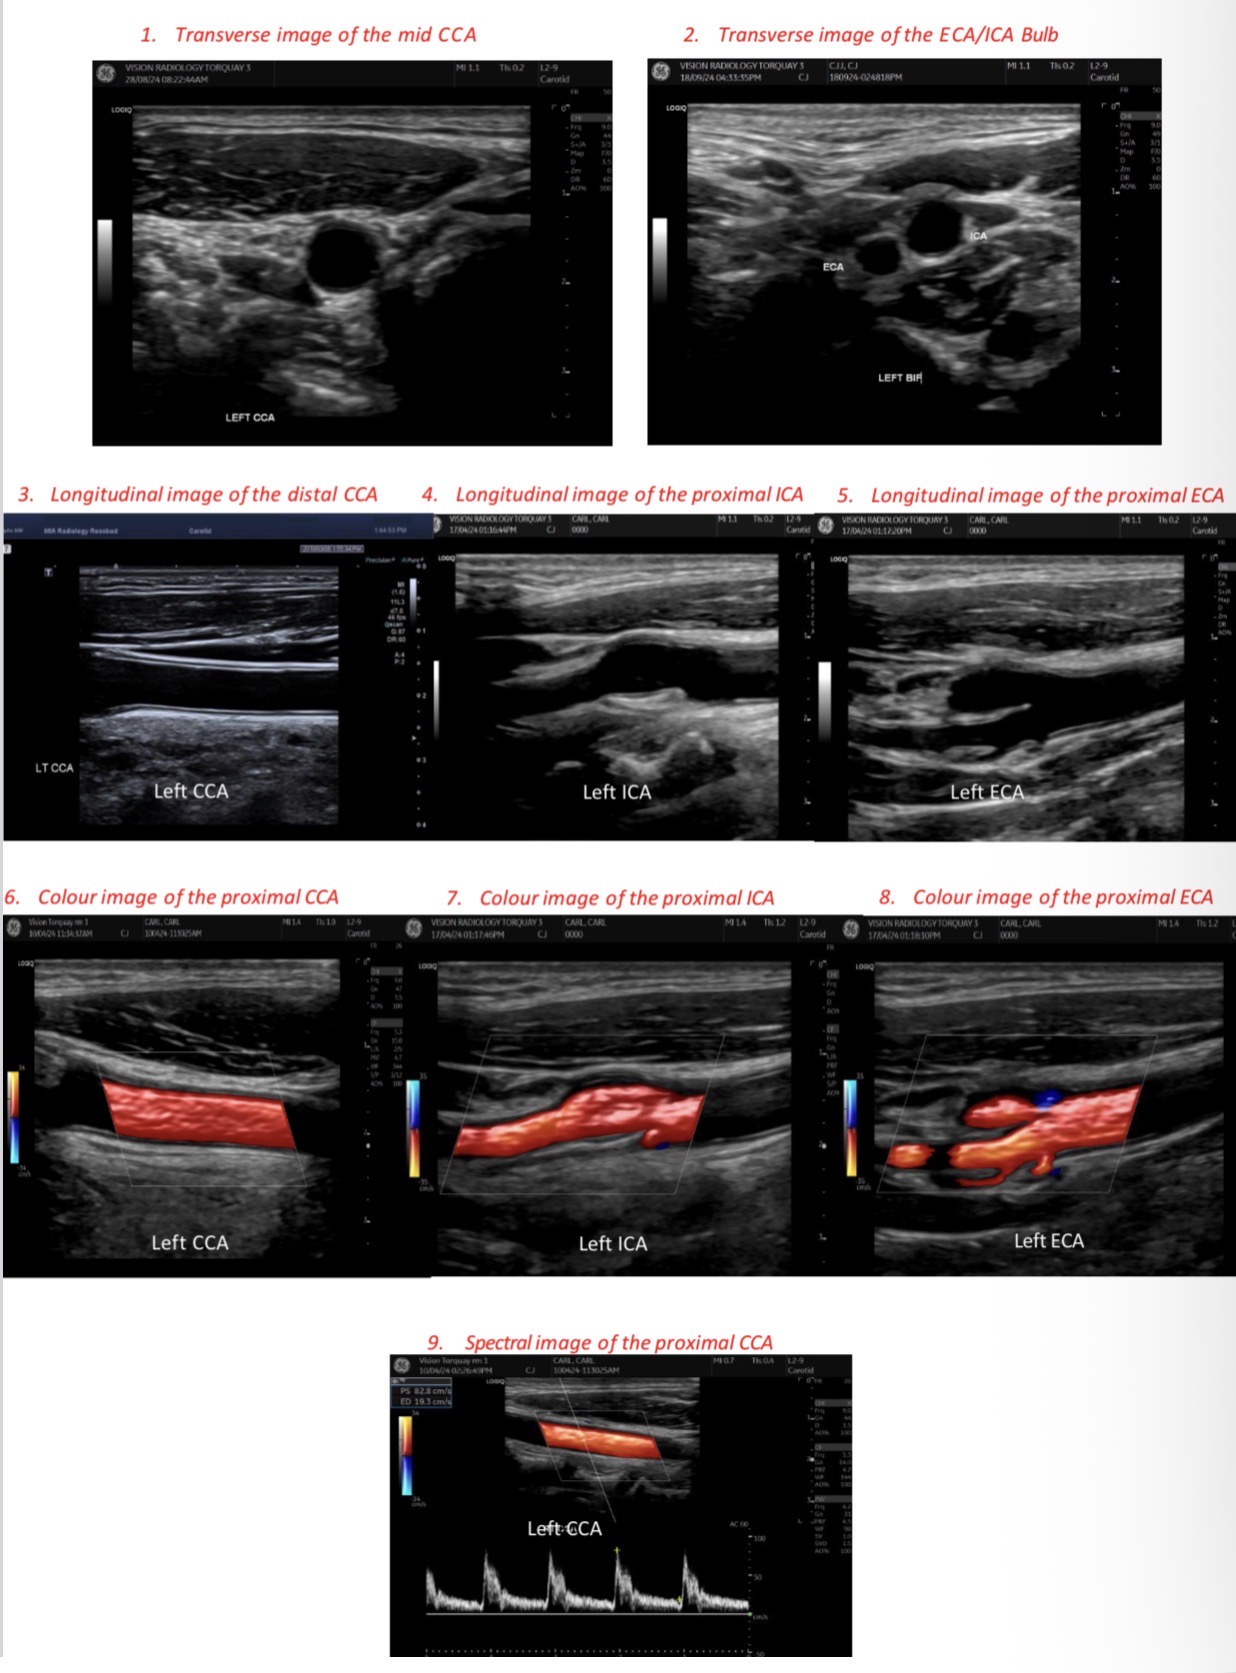
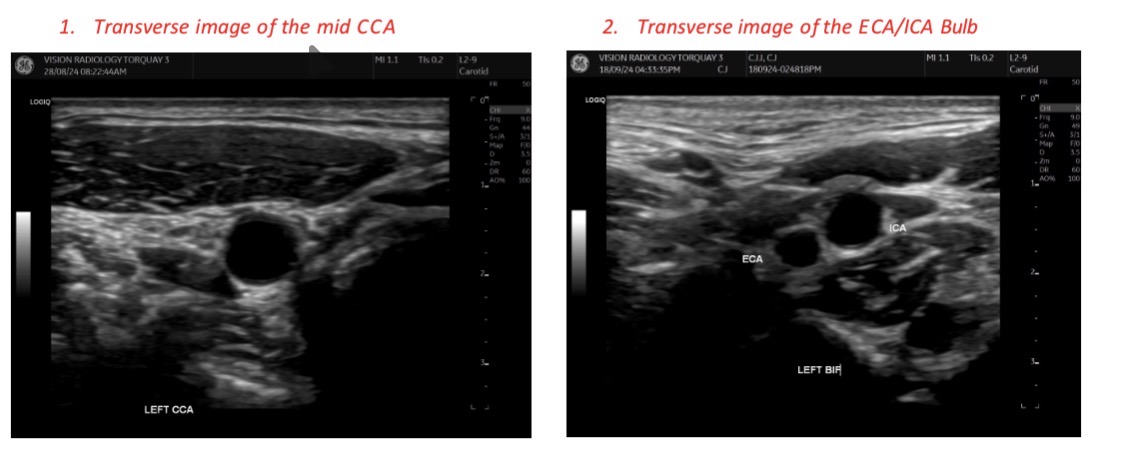
Transverse carotid survey
Begin at the patients clavicle adjust depth gain and focus (you want the vessel to be anechoic)
Work your way up surveying the common carotid artery until the bifcuation and back down.
Take your first transverse image of the common carotid artery then bring the transducer up and scan the patients ICA and ECA.
ICA (lateral) ECA (medial)
Longitudinal Carotid
Begin at the clavicle make sure your at the CCA by applying pressure survey the CCA then move up to the bifurcation of the ECA and ICA and survey the vessels.
Image for Carotid Doppler
1) Image of transverse CCA
2) Image of transverse ECA / ICA bulb
3) Image of longitudinal distal CCA
4) Image of proximal CCA with colour
5) Image of Spectral Doppler and measurement of peak of proximal CCA
6) Image of longitudinal proximal ICA
7) Image of longitudinal proximal ICA with colour
8) Image of longitudinal proximal ECA
9) Image of longitudinal proximal ECA with Colour