Module 8 - Instrument Design and classification
1/33
There's no tags or description
Looks like no tags are added yet.
Name | Mastery | Learn | Test | Matching | Spaced | Call with Kai | Chat |
|---|
No analytics yet
Send a link to your students to track their progress
34 Terms
Design characteristics of instrument handle
Some instruments have ergonomic design to prevent musculoskeletal injury
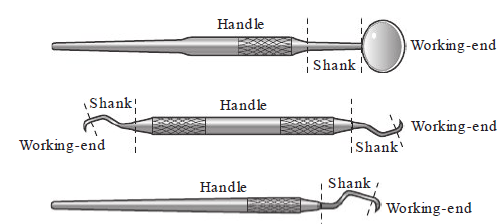
Handle, shank, working end
Significance of handle design
Effect of handle shape on muscle load and pinch force
Carpal tunnel syndrome & dental hygiene
Dental hygiene ranks highest for carpal tunnel syndrome cases
Risk factor: repetitive forceful pinching during periodontal instrumentation and non—neutral wrist positions
Pinch force in the grasp
Average pinch force exerted during instrumentation is 11%—20% of clinician’s max pinch strength
Relaxing fingers of grasp between instrumentation strokes reduces pinch force required during instrumentation
Variation in handle design
Design vary greatment according to manufacturers. Ergonomic designs may help reduce carpal tunnel syndrome.
Weight and diameter of instrument handle has significant effect on hand muscle load and pinch form of clinician’s performing periodontal instrumentation
Handle selection criteria
Weight
Diameter
Taper
Texture
Recommended
Large handle diameter (10 mm)
Lightweight hollow handle (≥15 g)
Handle tapers near shank
Raised texturing
Avoid
Small handle diameter (6 mm)
Heavy, solid metal handle
Non—tapered handle
No texturing or nonraised texturing
Instrument handle criteria — Weight
Instrument weight
Lightweight instrument is 15 grams or less — optimal
Less stress on hand during periodontal instrumentation. Heavy = more muscle activity
Instrument handle criteria — Diameter and taper
Large diameter (10 mm) requires least amount of pinch force
Traditional handle (7 mm) have greater pinch force = muscle cramping
Round instrument handle (instead of hexagon), reduce muscle force and compression
Tapered handle
Gradualy narrows where fingers grasp the instrument
Improves finger grip/ contact w/ the handle
Reduce slipping of fingers in wet environment
Reduce average pinch force by 11% compared to non—tapered instrument handle
Round tapered and large diameter = least pinch force
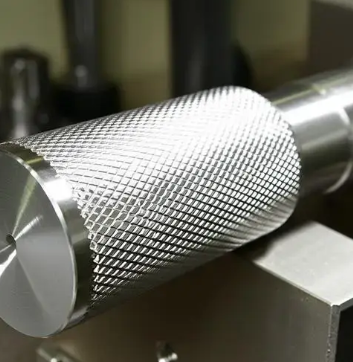
Instrument handle criteria — Handle texture
Knurling pattern
Texturing — increase static friction between fingers and handle resulting in reduced pinch force in grasp
Texture = more control, and reduce muscle fatigue
No texture = decrease control in wet environment = increase muscle fatigue
Raised texturing = easier to hold
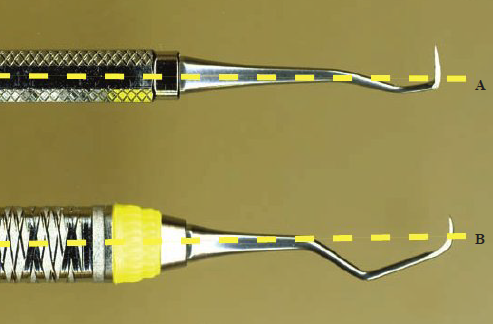
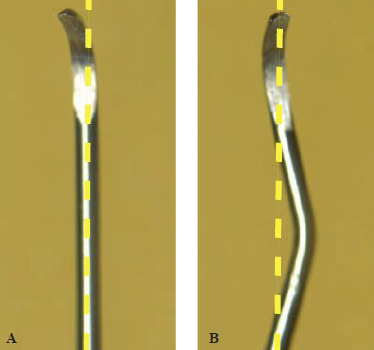
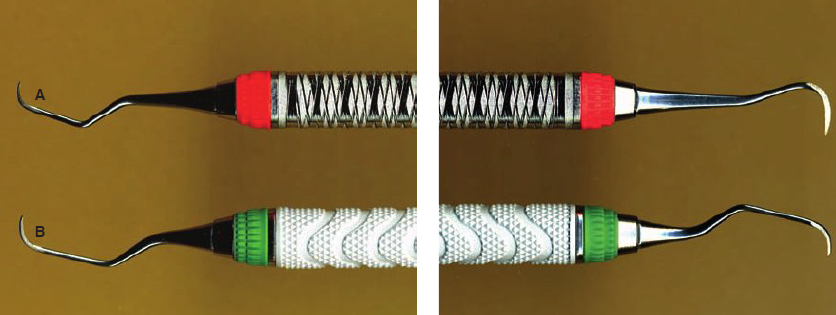
Instrument handle criteria — Instrument balance
Instrument is balanced if its working ends are aligned with an imaginary line that runs vertically through the center of the handle lengthwise
Not balanced instrument = difficult to use & stress muscles of hand and arm
A is NOT balanced
B is balanced
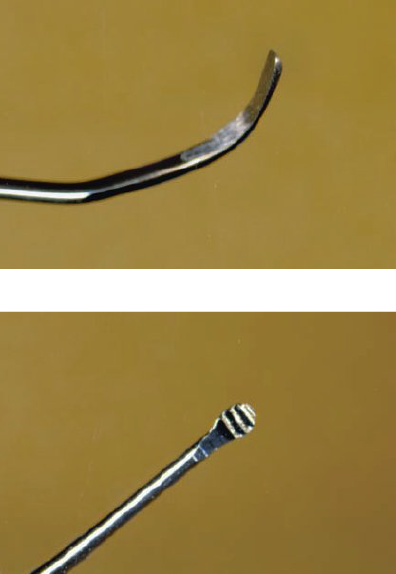
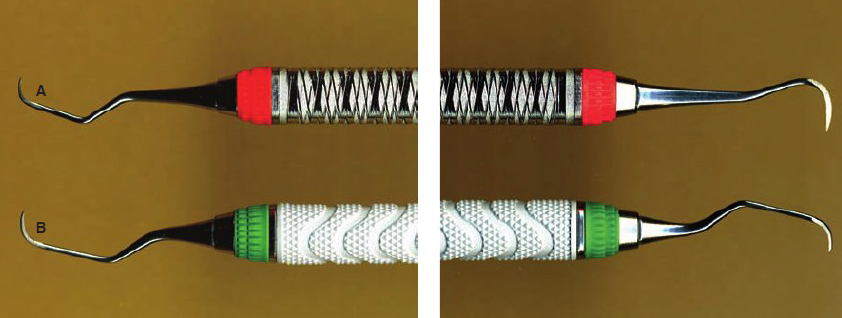
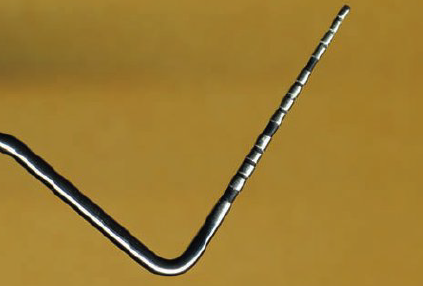
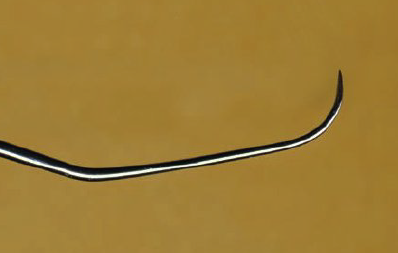
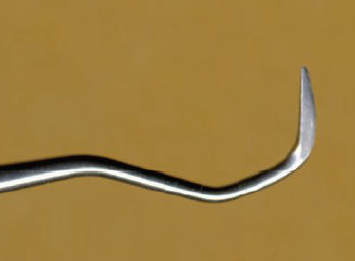
Design characteristics of instrument shank
Simple shank design (A)
aka straight shank
Use on anterior teeth
Complex shank design (B)
Bent in 2 planes (front to back or side to side) to facilitate instrumentation of posterior teeth
Aka angled or curved shank
Crowns of posterior teeth are rounded or overhand their roots. Complex shank is needed to reach around posterior crown onto root surface.
How to determine if shank is simple or complex?
Hold working end towards you
Simple shank on anterior tooth
Anterior tooth = wedge shaped
Simple shanks can reach crown and root surface
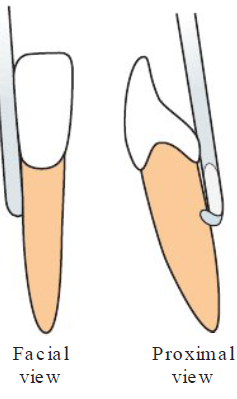
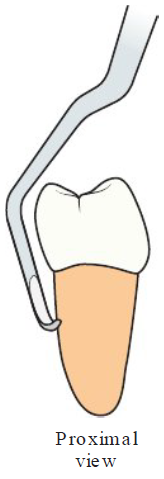
Complex shank on lingual and proximal surface
Lingual surface w/ proximal view
Front to back shank — working ends reach around crown and onto lingual and facial surfaces of the root
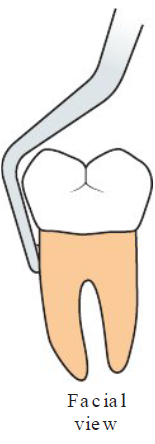
Proximal surface w/ facial view
Side to side shank — working end reach around crown and onto proximal (mesial and distale) surfaces of the tooth
Shank’s strength
Clinician applies pressure to handle and shank
Type and diameter of metal used in a shank determines its strength
Rigid shank
Withstand pressure needed to remove large heavy calculus deposits
Removed more quickly w/ less effort
Flexible shank
Can’t withstand pressure to remove heavy calculus
Will bend or flex
Removes small— medium sized calculus deposits
Better tactile sensation
Used to locate hidden calculus beneath gingival margin (Ex: Explorers)
How to detect calculus beneath gingival margin?
Visual information
Limited vision — can’t see working end subgingivally
Must rely on touch
Tactile sensitivity
Feel vibrations transmitted through instrument or finger resting on shank and handle
Vibrations
Made when working ends move over irregularities on surface of the tooth
Vibrations transmited from working end, through shank, into handle
Instrument identification (big picture)
Handle > functional shank > lower shank (terminal) > working end
Functional shank identification
Functional shank
Portion of shank that allows working end to be adapted to the tooth surface
Adaptation = instrument hugging tooth
(Last straight segment of shank nearest to working end)
Begins below working end
Ends at last bend nearest to handle
Lower/ terminal shank = section of functional shank nearest to working end
Lower shank = allows you to select correct working end
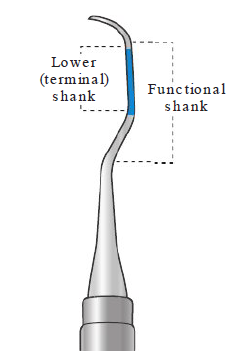
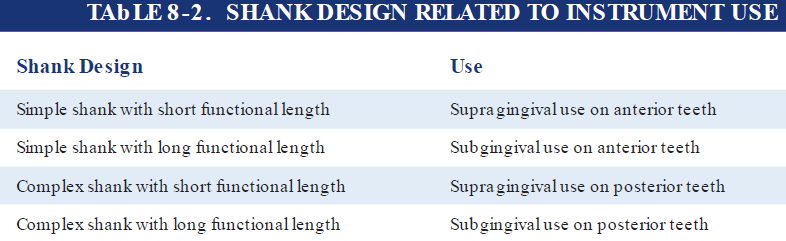
Functional shank length
Short Functional shank
Used on…
Tooth crowns
Supragingival area (above gumline)
Ex: Removing supragingival calculus
Long Functional shanks
Used on…
Tooth crowns
Roots
Subgingival (below the gumline)
Ex: Detecting calculus below gingival margin

Lower shank importance
Portion of functional shank nearest to the working end
Lower shank tells you….
Select the correct working end
If instrument angulation is correct
How to select working end
Lower shank should be parallel to tooth surface being instrumented — mesial, distal, facial, or lingual
If not parallel = wrong angulation, adaptation, and working end
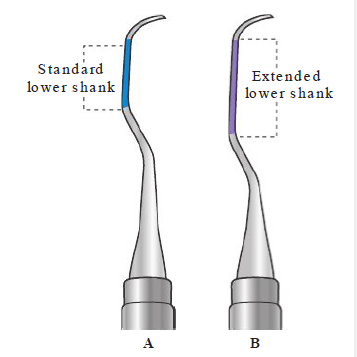
Standard vs Extended lower shank
Standard lower shank
Normal length
Extended lower shank
3 mm or longer than standard
Used for:
Deep periodontal pockets
Reaching below gingival
Simple & complex Shank design overview
refer to photo
Functional and lower (terminal) shank overview
Functional shank
Part of shank that allows working end to adapt to tooth
Below working end, ends at last bend near handle
Short functional shank — crowns/ supragingival
Long functional shank — crowns, roots, subgingival
Long (terminal) shank
Part of functional shank closest to working end
Visual guide for working end selection
Parallel to tooth surface
Standard or extended length
Extended lower shank = 3 mm longer, used in deep periodontal pockets
Working end instrument design
Single ended instrument
One working end
Periodontal probes
Double ended instrument
Two working ends
Curets
Types of double ended instrument
Unpaired working end (Dissimilar) — A
2 different working ends
Example: Explorer and probe combination
Paired working end (MIrror images) — B
Working ends are mirror images of each other
Example: Gracey 11/12 curet
Design name and number
Design name
Identifies designer or institution that developed instrument
Ex: Gracey
Named after Dr. Clayton H. Gracey
Number
Exact identification of working end
Ex: Gracey 11
Gracey = design name
11 = design number
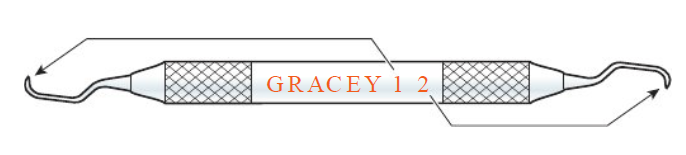
Gracey 11/12
One end = 11
Other end = 12
Rule:
Each working end is identified by number closest to it
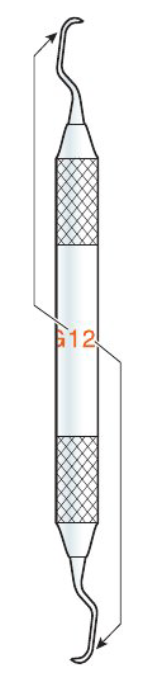
Gracey 11/12 vertical
Name and number marked around handle
First number on the left = top end of handle
Second number on right = bottom end of handle
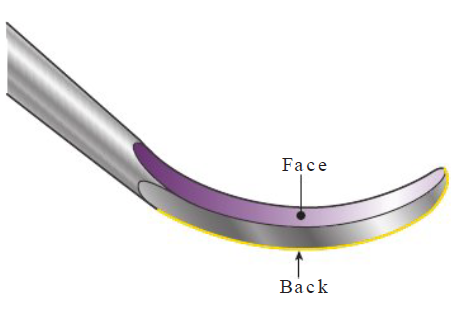
Parts of the working end
Used to assess teeth, soft tissues, remove calculus.
Be able to identify the face, back, lateral surface, cutting edge, and toe or tip of working ends
Face and back of working ends
Face
Concave purple area
Back
Convex gold line
Laterla surface of working end
Side surfaces of working end (2 on either side)
Green shaded area

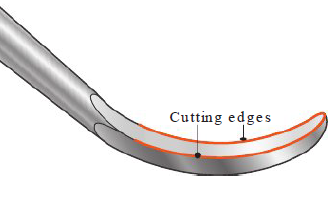
Cutting edge of working end
Edge where face and lateral surface meets
Orange line
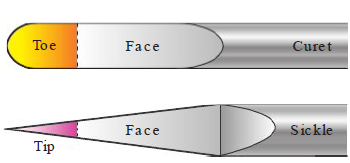
Toe or tip of working end
Look directly down the instrument’s face
Curet
Rounded end
Called a toe
Sickle scaler
Pointed end
Called a tip
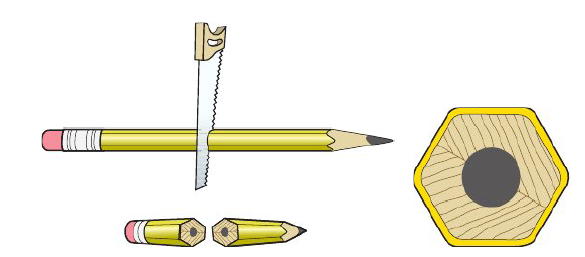
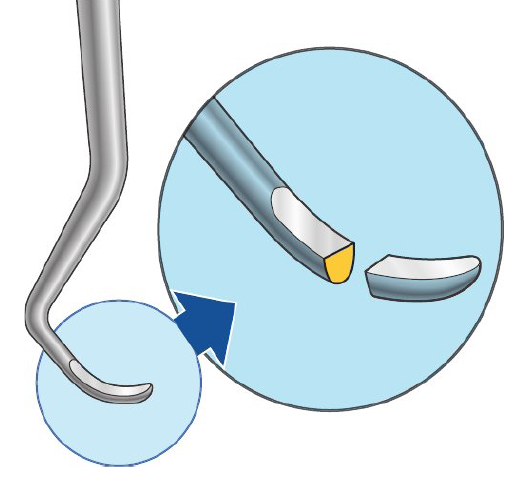
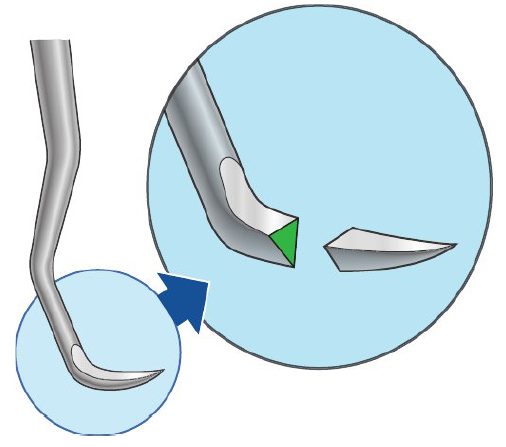
Working end in cross section
Explains why curets and sickles are different
Cross section
View obtained by cutting instrument perpendicular to its length
Ex: Cutting a pencil in half or cutting tree to see growth rings
Cross section of pencil = hexagon shaped
Cross section of working ends = determins if it can be used subgingivally or supragingivally
A. Imagine cutting working ends of periodontal instruments
B. After cut is made — cross sections visible
Top = semi—circular
Bottom = triangular
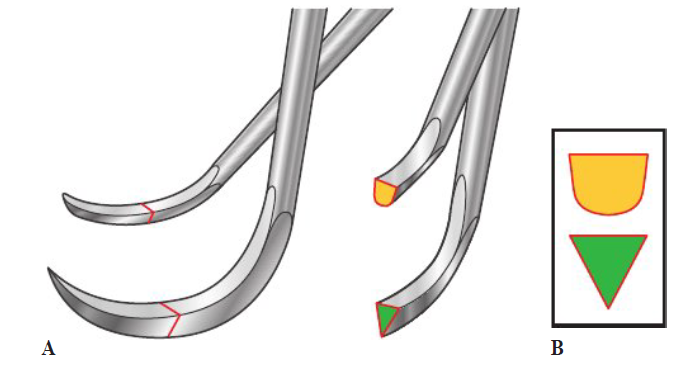
Curets cross section
Semicircular
Round back
Round toe
Use
Remove calculus
Crowns
Roots
Subgingivally
Sickle scaler cross section
Triangualr
Pointed back
Pointed tip
Use
Primarily supragingival calculus
Instrument classification chart
2 types of periodontal instruments
Assessment instruments
Calculus removal instruments
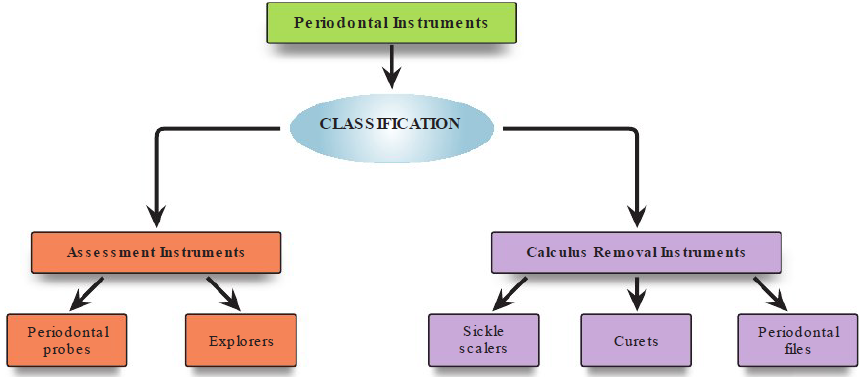
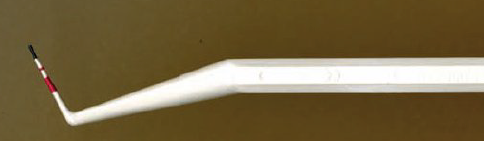
Assessment instruments
Periodontal probes
Measures periodontal tissues
Blunt rod shaped working end
Circular or rectangular cross section
Explorer
Detects
Calculus
Tooth surface irregularities
Defective margins on restorations
Flexible shank
Circular cross section
Calculus removal instruments
Sickle scalers
Removes calculus deposits from crowns of teeth
Pointed back
Pointed tip
Triangle cross section
Curets
Removes calculus deposits from crowns and roots of teeth
Rounded back
Rounded toe
Semicircular cross section
Subtypes
Universal curet
Area—specific curet
Periodontal files
Crush large calculus deposits
Multiple cutting edge on working end