osce final
1/71
There's no tags or description
Looks like no tags are added yet.
Name | Mastery | Learn | Test | Matching | Spaced | Call with Kai |
|---|
No analytics yet
Send a link to your students to track their progress
72 Terms
inspection GI tract - end of bed
patient is LYING DOWN
on patient
well/ unwell
Distressed/in pain/breathless versus comfortable/no obvious pain
Any jaundice or pallor
Obviously under or overweight (you can refer to patient’s body mass index or body habitus here)
any abdominal masses or scars and if the abdomen is moving normally with respiration
Surroundings/Bedside clues:
Medication
Intravenous cannulation
Parenteral nutrition
Sick bowl/vomiting bag
inspection GI tract - bedside, hands
patient is sat
leuconychia/ opacification of nail bed (liver disease)
palmar erythema (liver disease)
palmar crease pallor (anemia)
dupuytrens contracture (thickening palmar fascia)
clubbing (palpate/ vs each other)
hepatic flap/ asterixis - Ask patient to stretch out the arms in front separate the fingers and extend the wrists for 15 seconds
inspection GI tract - bedside, upper limbs
patient is sat
bruising
ecchymoses
petechiae
muscle wasting
scratch marks
spider naevi (central arteriole from which radiate small vessels like spider’s legs)
gynecomastia
tattoos
Found on arms, neck and chest.
Greater than 2 or 3 is abnormal and may be caused by chronic liver disease.
inspection head and neck - GI tract
patient is sat
eyes
jaundice
conjuctival pallor (press down)
fatty deposits skin around eyes
mouth (use flashlight)
ulcers
white patches tongue (candida infection)
cracking mouth corners
glossitis
lymph nodes
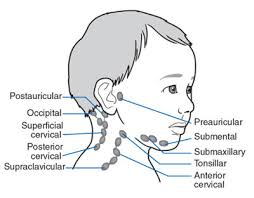
lymph node palpation neck
2 fingers walking
behind patient
1. Submental
2. Submandibular
3. Parotid
4. Preauricular
5. Postauricular
6. Occipital
7. Anterior cervical
8. Supraclavicular
9. Posterior cervical

GI inspection- GI exam
patient lies flat
comment on exposure - ideally i want no pants to check for hernias
scars
gynecomastia
mass
distention
striae
stoma
GI exam - general abdomen palpation
patient lies flat
palpate area of pain last
9 areas
light palpation first- one hand/ 2 “push down without removing hands”
deep palpations - 2 hands, same technique
describe
soft/ hard
tender/ non tender
guarding
mass
Gi exam; liver palpation
patient lies flat
Begin in the right iliac fossa with the examining hand aligned parallel to the right costal margin. Ask the patient to breathe in and out slowly through the mouth. move up from there in a straight line
During inspiration the hand is held still and the lateral margin of the forefinger waits for the liver edge to strike it.
On expiration the hand is advanced by 1-2cms closer to the right costal margin.
If the liver edge is identified the surface of the liver should be felt. It may be hard or soft, tender or non-tender, regular or irregular and pulsatile or non-pulsatile. The normal liver edge may just be palpable below the coastal margin on deep palpation especially in thin people.
GI exam- spleen palpation
patient lying down
The spleen enlarges inferiorly and medially. Begin with the examining hand in the right iliac fossa and with the same technique used to examine for the liver slowly move the hand towards the left costal margin.
press on inhale, move on exhale - DIAGONAL
If the spleen is not palpable a two-handed technique is recommended. The left hand is placed posterolaterally over the left lower ribs and the right hand is placed on the abdomen parallel to the left costal margin (midline). As the right hand is advanced towards the left coastal margin the left hand compresses firmly over the rib cage. This enables a slightly enlarged soft spleen to be felt as it moves down towards the right iliac fossa.
If the spleen is still not palpable the patient is rolled onto the right side towards the examiner and palpation is repeated. Begin palpation close to the left costal margin (midline). Splenomegaly becomes just detectable if the spleen is one-and-a-half to two times enlarged.
GI exam- kidney palpation
patient lies down
To palpate the right kidney the examiners left hand slides underneath the back to rest with the heel of the hand under the right loin.
The fingers remain free to flex at the metacarpophalangeal joints in the area of the renal angle.
The examiner’s right hand is placed over the right upper quadrant.
Press over the renal angle by flexing the fingers of the posterior hand. The kidney can be felt to float upward and strike the anterior hand.
The left kidney is examined in the same way. Keep the right hand on the anterior aspect of the abdomen, placing it in the left upper quadrant, while the left hand is placed in the left renal angle, flexing at the MCP joint.
It is unusual to feel a normal kidney, although the lower pole of the right kidney may be palpable in thin people, without renal pathology.

aaa palpation - gi exam
patient lies down
Arterial pulsation from the abdominal aorta may be felt in the epigastric area of thin people, without aortic pathology. Check for an abdominal aortic aneurysm (AAA) at the midpoint between the xiphisternum and the umbilicus using the technique shown in the video. You are checking for an expansile pulsation found when a AAA is present.
hands 10cm apart, above imbillicus
inch closer slowly
say when feel pulse/ distance, comment if fell mass
percussion liver- GI exam
patient lies down
The liver borders should be percussed to determine the liver span.
Start percussing from the right iliac fossa to the right costal margin along the midclavicular line.
Dullness defines the liver’s lower border- ask patient to keep a finger there
Define the upper border of the liver by percussing along the midclavicular line from above. Normally the upper level of liver dullness is the sixth rib in the right midclavicular line.
Determine the liver span by measuring the distance between the two borders with a ruler. The normal liver span is usually between 12 and 15cms.
percussion spleen- GI exam
patient lies down
Percuss from the right iliac fossa to the left costal margin
move diagonally
should be resonant throughout
ascites assessment - GI exam
usually only done if distended
patient lies down flat
percuss across abdomen- dullness is an ABNORMAL finding
shifting dullness
patient turns towards you
wait 30 sec
percuss side of abdomen→ if change from dull to resonant → SHIFTING DULLNESS
fluid thrill
patient lies flat
patient pushes down on their abdomen midline, with their fingertips pointing at pubic bone
i press down on side of abdomen
tap other side of abdomen with back of fingers
no thrill should be felt
GI exam- abdomen auscultation
patient lies flat
disinfect stethoscope
Place the diaphragm of the stethoscope just below the umbilicus. Bowel sounds can be heard intermittently. They should be described as either present or absent.
ideally wait 30 sec
additional tests GI exam
ankle- pitting oedema
hernias groin
rectal exam
general inspection thyroid exam
patient is sat
neck and arms exposed
legs bare below knee
at end of bed
equipement (IVs, oxygen, walking aids, meds…)
tremor
sweating
neck swelling
scars
colour
body habitus
thyroid exam- upper limbs observation
bedside
clubbing
acropachy (general hand swelling)
palmar erythema
take pulse- comment on rhythm and take rate
tremor- piece of paper
goitre
plamar crease pallor
thyroid exam - eyes
exophtalmos
in front and above patient
lid lag
arch above head to below nose
H
double vision
pain
thyroid neck inspection
front and side
scars
masses
symmetry
movement of thyroid/ mass with swallowing/ tongue sticking out
palpation thyroid
behind patient , both hands
immobile
swallows/ tongue sticking out
lymph nodes
cervical
supraclavicular
percussion thyroid
· Percusses for retrosternal extension – should strike middle phalanx of third finger with other third finger |
auscultation thyroid
both lobes
look for bruit
pemberton’s sign
thyroid exam
• Asks patient to hold arms
above head assessing for
facial plethora
o Asks patient elevate both
arms until they touch
sides of face, observes
for facial congestion
and cyanosis, as well as
respiratory distress after
approximately one minute
lower limb exam- thyroid
• Observes distal legs for
swelling & skin changes
(pretibial myxoedema)
• Proximal Myopathy – asks
patient to stand from a
seated position with arms
crossed.
• Checks ankle jerks
how to give IM injection
explain possible side effects (bruising, pain…)
check
dose
route
patient
time
allergies
reason
drug
wash hands
check expiry dates
wash hands and put on gloves
make sure site does not have bruising/ irritation
clean site with acohol swab
circular motion inside out
wait to dry
draw up meds
replace needle with 23g injection needle
uncap, make sure no air
retract skin
90 degree angle
retract needle
administer meds
remove needle and apply pressure to site
put safety cover on needle/ DO NOT RECAP
put needle in sharps bin
bandaid
thank patient- ask them to wait around
discard equipement
wash hands
document
NG tube insertion
explain procedure gain consent
wash hands
measure tube
from nostril - ear lobe - xiphoid sternum
look for number you arrive at
wash hands again and put on gloves
make sure patient comfy and nasal passage clear
lubricate tube inside bag 2-4cm
instruct patient to sip water/ swallow when feel tube back of throat
insert tube- stay floor nostril
tape tube when inserted to estimated stop lenght
on nose
on tubing
check tube is in place
xray
aspirate from tube and test with test strip
insert syringe into port
close port
once confirmed in right place - can start feeding
thank patient and make sure comfy
discard equipment
wash hands
document
urinalysis
ask patient to pee in cup
prep equipment, wash hands and put on gloves
check urine dipstick expiry date
dip test strip in urine
wait 2 minutes
compare colours vs references
thank patient
dispose of equipement
wash hands
document
pregnancy test
make sure test is not expired
wash hands, put on gloves
pipette urine, put 3-4 drops on cassette
wait
one line - neg
2 lines - positive
no lines- invalid test
blood glucose
normal range;
4-5.9 fasting
>7.8 non fasting
introduce self, gain consent
prep equipment, make sure not expired
wash hands, put on gloves
make sure fingertip clean and dry
equipment turned on- strip in
prick side of finger
squeeze finger- wipe first drop
bring strip to drop
thank patient
discard equipment
wash hands
document
warfarin pros and cons
pros
once daily
cons
delayed onset → prescribe at least 3 months (DVT, PE…)
monitor ++
drug interactions
cant take during pregnancy/ within 6 months GI/ CNS bleed/ 2 days post op
warfarin moa
inhibits protein factor 2, 7, 9 and 10
antagonist; vitamin k
test; INR (1 week)
doac pros and cons
pros
rapid onset
less drug interactions
less monitoring required
cons
multiple doses throughout day may be required
cant take if renal/ liver disease
cant take pregnancy
doacs moa
factor Xa/ thrombin competitive receptor
many reversal agents, i.e charcoal, heamodialysis
need to consider age, weight and liver/ kidney pathology when prescribing
warfarin dosages
1mg; brown
3mg; blue
5mg; pink
dosages available doac
5mg
20mg
60mg
150mg
apixaban
5mg doac BD
2.5= renal dose OR if 2/3 of the following
if over 80
below 60kg
creatinine over 133
crcl 15-29
dagibatran
150mg doac BD
110 if renal OR
over 80
75 and increased bleeding risj
on verapamil
crcl 30-50
edoxaban
60mg daily doac
renal; 30mg or
below 60kg
ciclosporin/ erythromycin/ dronedarone/ ketoconazole
crcl 15-50
rivaroxaban
20mg daily
renal dose; 15mg
crcl 15-50
signs and symptoms of bleeding
low hb
blood in urine/ stool/ sputum
lightheaded/ weakness
intracranial bleed (confusion/ seizure/ vision loss)
what to do if life threatening bleed on warfarin
stop warfarin
give vitamin k IV slowly
give PCC - depends on weight
what to do if INR not in 5 range
lower; stop warfarin and wait
higher; stop warfarin; give 1mg vitamin k PO and recheck levels at 24h
bleeding with patient on DOAC
imaging (angio/ endo)
arterial blood gas
balance crystalloids/ vasopressors and maintain Hb >7
give PCC or antidote (i.e Idarucizumab)
charcoal if recent injection
education doac
•Indication for treatment
•Duration of treatment (lifelong for AF)
•How to take their medication i.e. once/twice daily, at the same time each day, with food for rivaroxaban
•Importance of strict adherence
•How to manage missed doses
•Signs and symptoms of bleeding to look out for
•Medications to avoid (incl. OTC)
•Inform all doctors and dentists that you are taking a DOAC if having any surgical or dental procedures
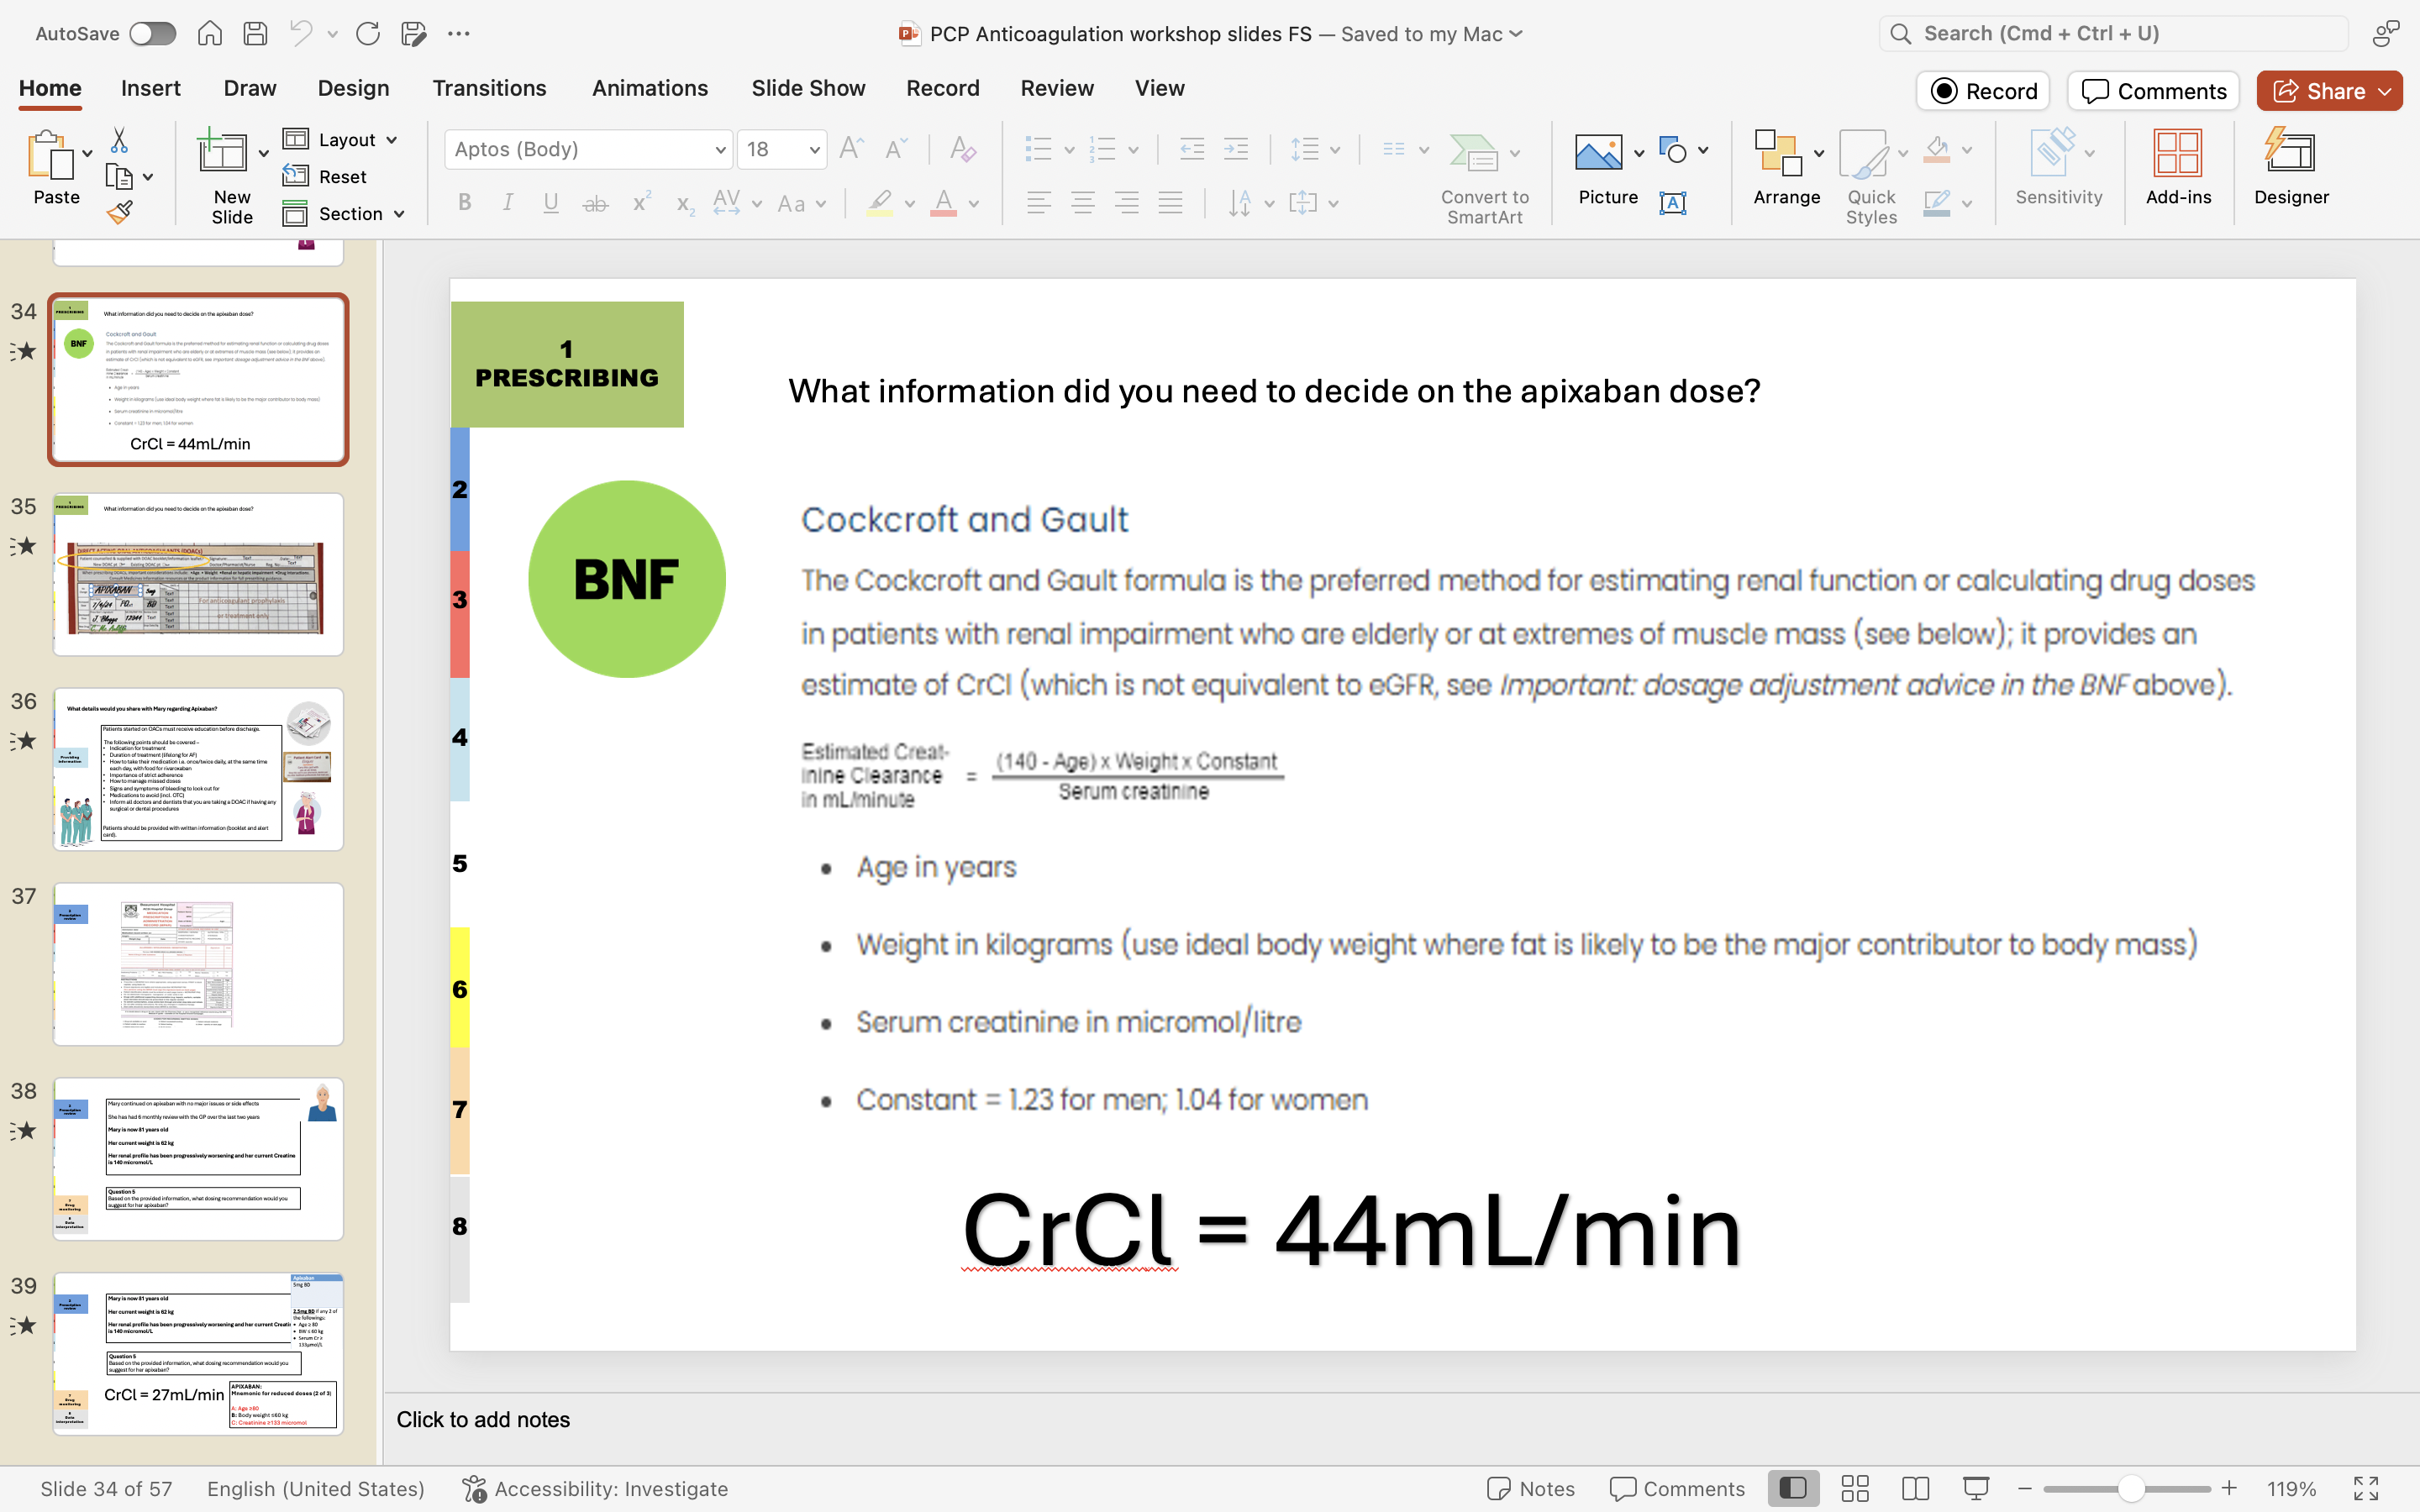
CrCl calculation
for doacs
education warfarin
keep consistant food with vitamin k intake week to week (chickpeas, leafy greens, avocado, olive oil, blue cheese…)
check in with doctor before starting new supplements
no more than 2 units of alcohol daily

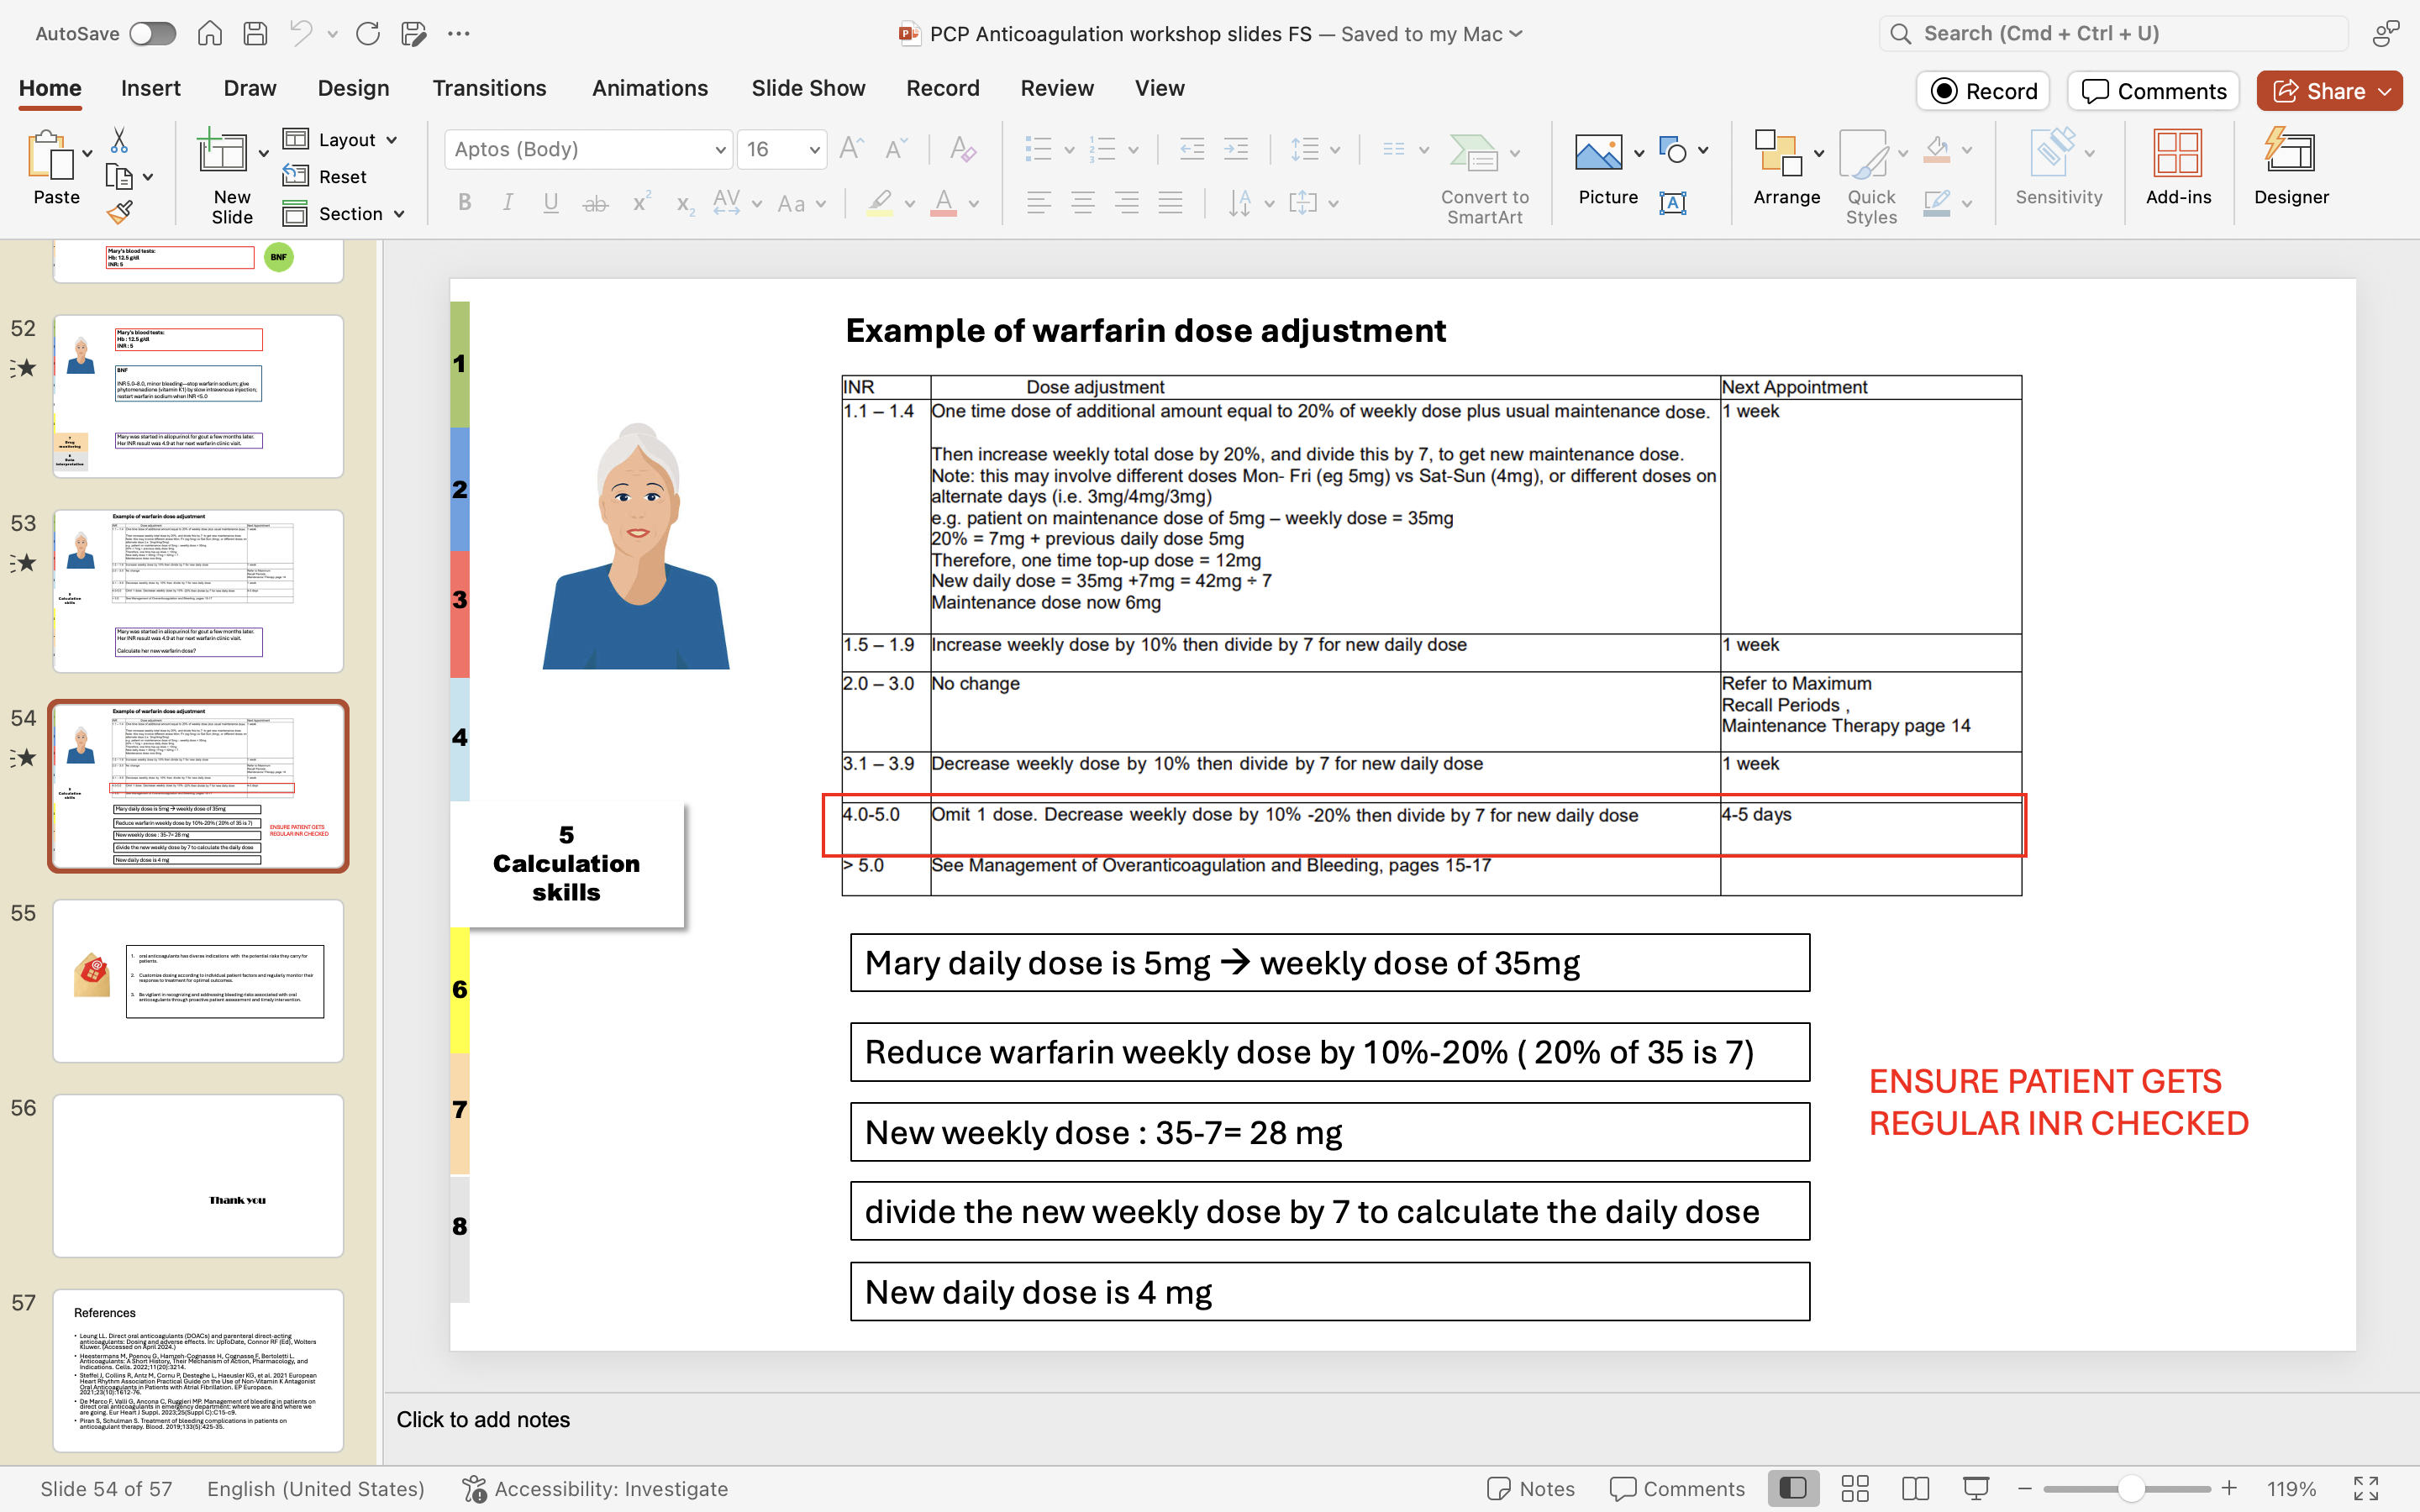
example warfarin dose adjustment
considerations of prescribing insulin
right insulin
right device
right dose (IN UNITS)
right strength
right time (to meals/ regimen; GIVE BOLUS 30 MINUTES OR LESS BEFORE MEAL)
BRAND NAME ONLY (i.e novorapid flexpen)
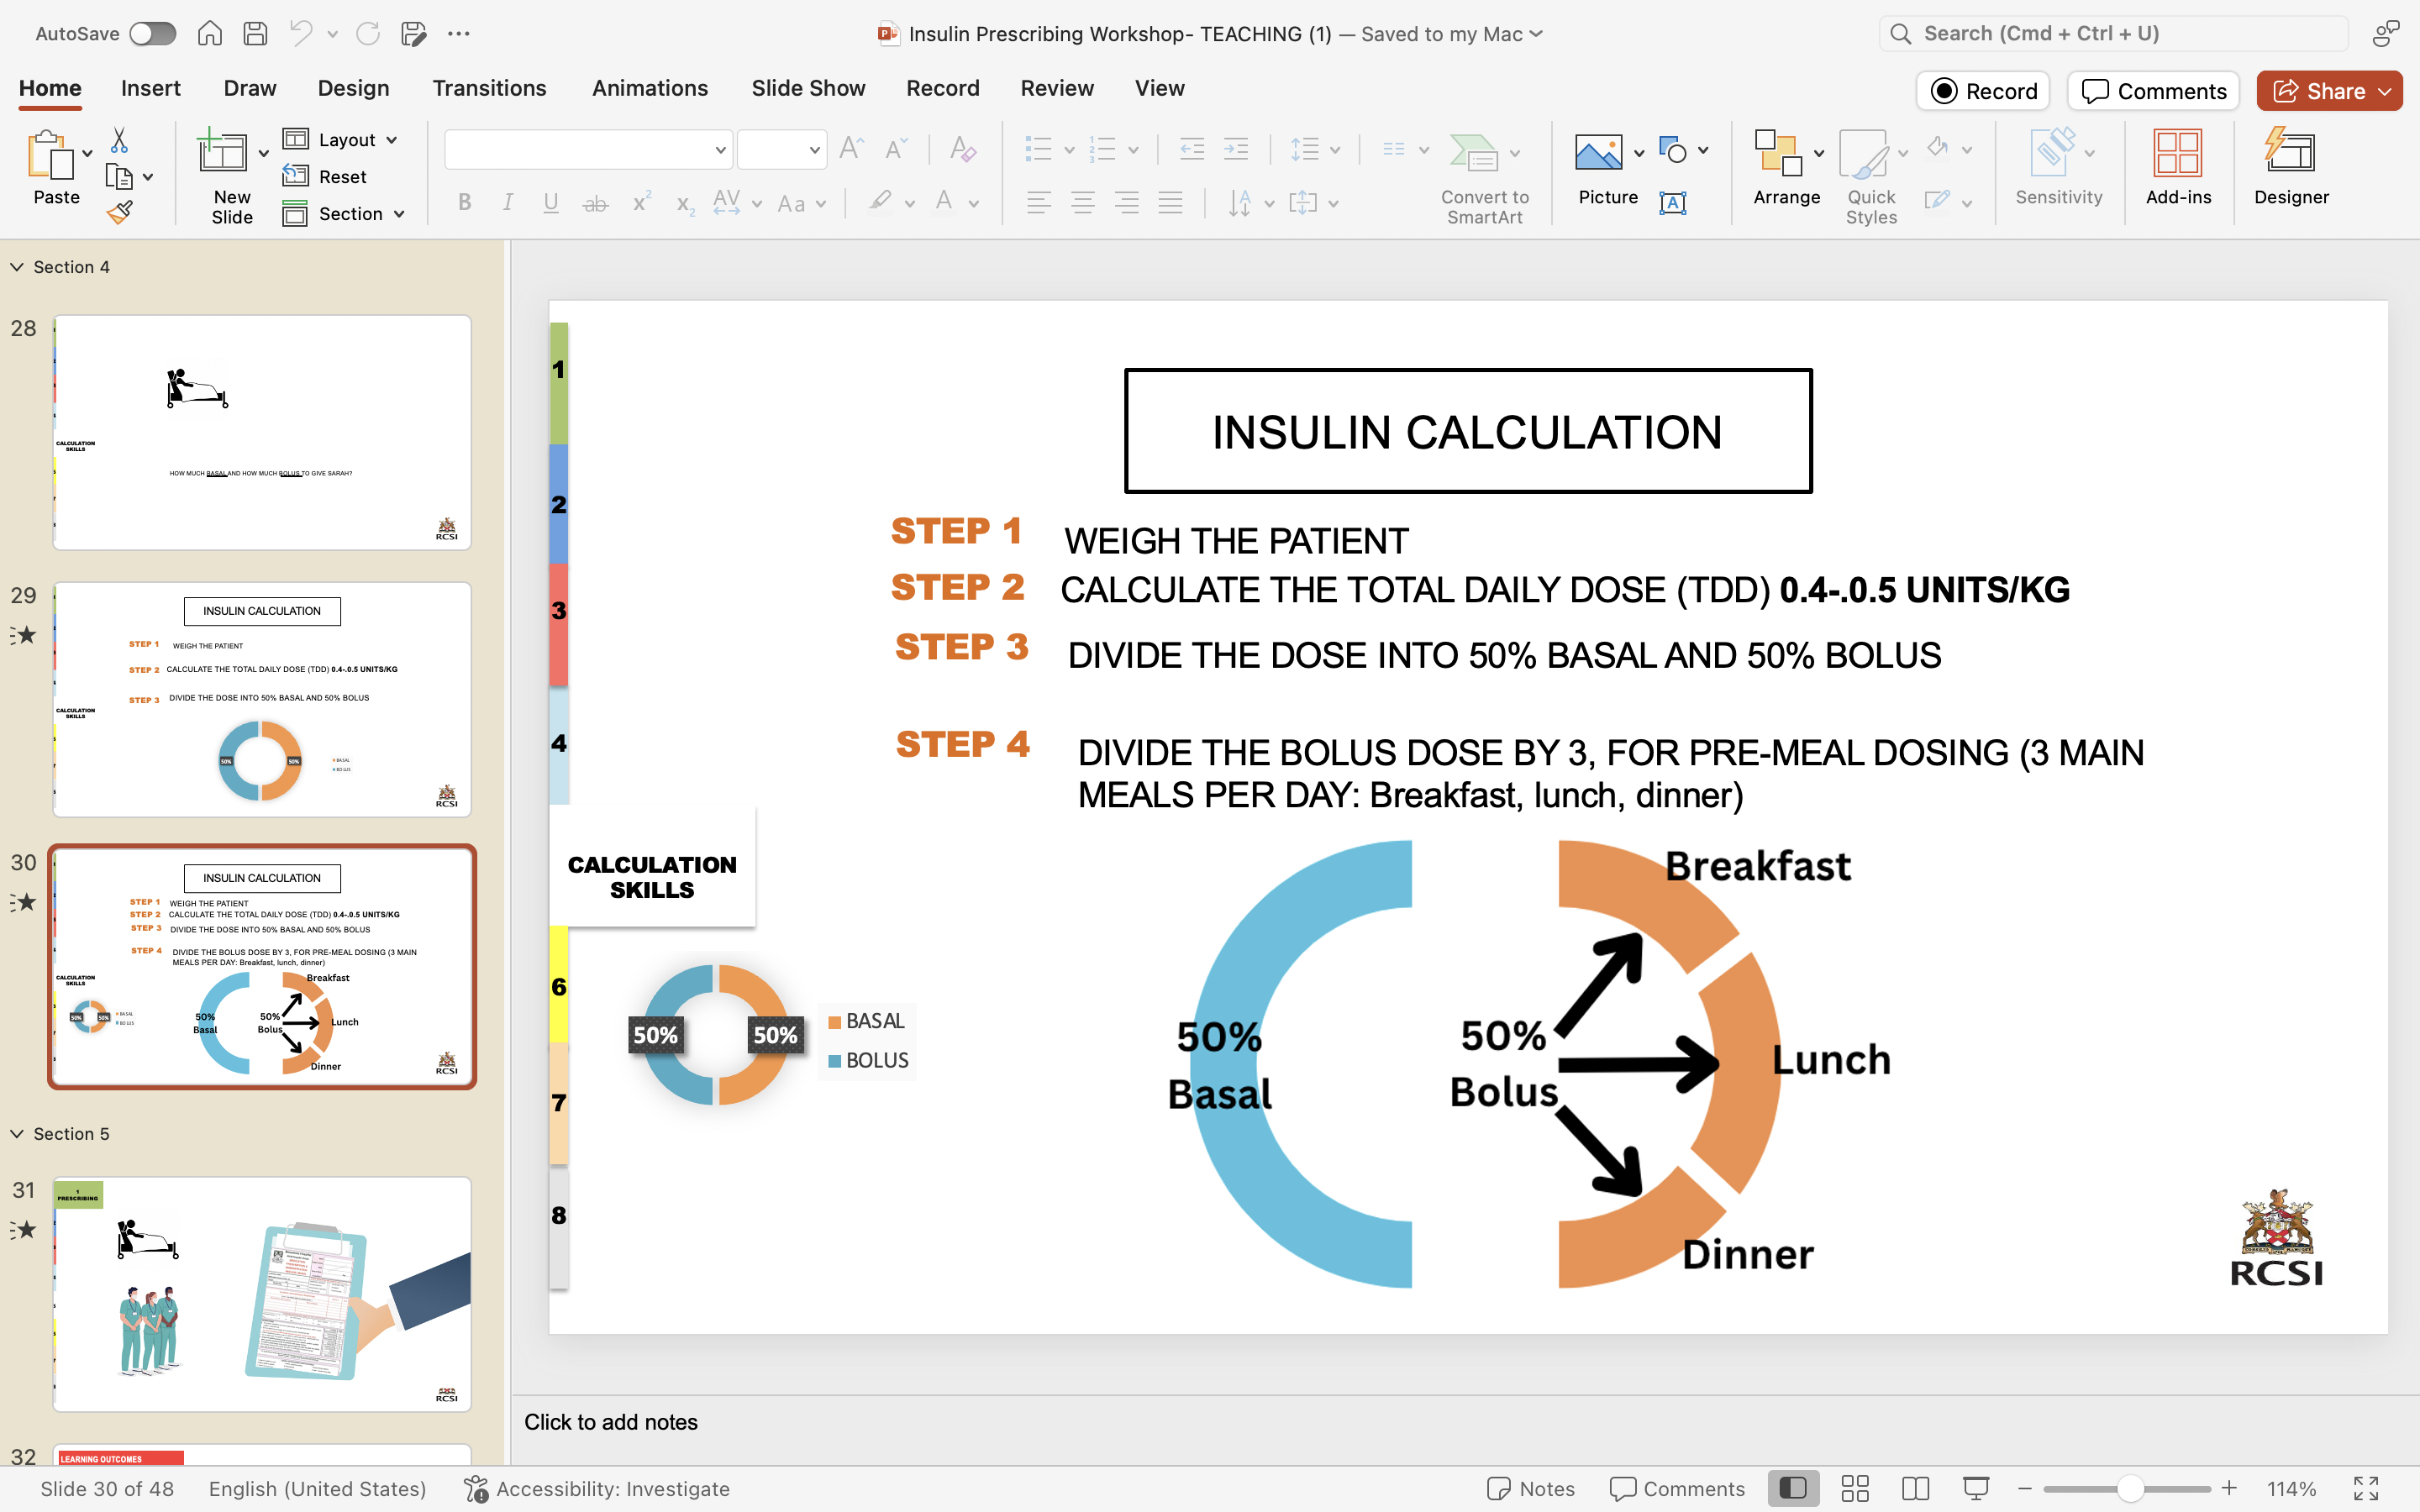
basic management type 1 DM
1 basal
3 bolus before meals
hypoglycemia symptoms

injection sites insulin
how should diabetes patient monitor drug
4 is the floor
if this randomly happens/ no factor like skipping meals/ drinking; reduce basal by 20%

general inspection CNS exam
Craniotomy scars
Skin lesions
Ptosis – drooping of the upper eyelid.
Proptosis/exophthalmos – abnormal protrusion of the eyeball
Asymmetry
CN I assessment
Purely sensory nerve.
This nerve is not tested routinely, ask patient if they have any difficulty with their sense of smell?
If the answer is no, move to the second cranial nerve.
If patient complains of loss of smell [anosmia] test each nostril separately with bottles containing essences of familiar smells such as coffee.
CN II- visual acuity
Visual acuity is tested with the patient wearing his or her glasses.
Ask patient if they have any difficulty with their vision.
“Can you see the clock on the wall?”
“Can you read the newspaper?”
Each eye should be tested separately.
A portable Snellen’s chart will enable you to perform a more formal test.
Formal testing with a standard Snellen’s chart requires the patient to be 6 metres from the chart. Unless the room is very large, this is done using a mirror or a modified chart (3 metres). Normal visual acuity is present when the line marked 6 can be read with each eye (6/6 acuity).
A patient who is having visual problems should be asked to count fingers held up in front of each eye in turn, and if this is not possible then perception of hand movement should be assessed.
Failing this light perception only may be present.
CN II visual fields
Visual fields are assessed by positioning yourself in visual confrontation about a metre away from the patient. Always remove the patient’s glasses. Test the visual fields of your patient against your own. To test the patient’s left eye visual fields:
Ask patient to cover their right eye with their right hand and close your left eye.
Ask patient to “keep looking at my eye”.
Test their left temporal vision against your right temporal vision by moving your right wagging finger from the periphery towards the centre.
“Tell me when you see my finger move”
The temporal field should be tested in the horizontal plane and in the upper and lower temporal quadrants.
Change your hands and repeat on the nasal side, tell the patient to keep their hand where it is
Any areas of field defect are mapped out.
The visual fields of the right eye are assessed using the same approach.
CN III, IV and VI - light reflex
glasses off- patient looks ahead
With a pocket torch, shine the light from the side [so the patient does not focus on the light and accommodate] into one of the pupils to assess its reaction to light.
Normally the pupil into which the light is shone constricts briskly. This is the direct light reflex.
Simultaneously the other pupil constricts in the same way. This is the consensual light reflex and occurs if the associated nerves are functioning correctly.
Repeat this procedure on the other side.
CN III, IV and VI - accomodation
Ask the patient to look into the distance and then to focus on your finger held near the patient’s nose. There is normally constriction and convergence of both pupils. This is called the accommodation response.
glasses off
CN III, IV and VI- eye movement
Assess for eye movement, diplopia [double vision] and nystagmus [abnormal jerky eye movements].
“Look at my finger and follow it with your eyes”
Ask the patient to look laterally left and right, continue moving the finger to complete a H PATTERN (while keeping their head steady i.e. not moving head).
no glasses, 1m away
check neutral gaze (ptosis)→ starting point
CN V- sensory
Test in the three divisions of the nerve comparing each side with the other
Forehead - Ophthalmic
Maxilla - Maxillary
Lower jaw – Mandibular
Test for light touch using cotton wool. Test this on the patient’s sternum first so they know what kind of sensation to expect.
eyes closed
The patient should be instructed to say “yes” each time the touch of the cotton wool is felt. Do not stroke the skin, touch it.
Test for pain (sharp touch) using neurotip. Test this on the patient’s sternum first so they know what kind of sensation to expect.
The patient should be instructed to say whether it feels “sharp” or “dull” each time the neurotip is applied.
We do not routinely test corneal reflex.
ASK if feel same on both sides
CN V- motor
Inspect for wasting of the temporal and masseter muscles.
Ask patient to clench their teeth and palpate for contraction of the masseter muscles. Then get them to open the mouth (pterygoid muscles) and hold it open while the examiner attempts to force shut. (a unilateral lesion of the motor division causes the jaw to deviate towards the weak or affected- side). The jaw jerk reflex is not routinely tested.
CN VII
look for symmetry- rest and actions below
open eyes wide and up and raise brows
blow cheeks
squit eyes shut - try and force open them
show teeth
tense neck muscles
CN VIII
Ask the patient if they have any problems with their hearing?
Cover one of the patient’s ears with your hand and whisper into the other ear.
If deafness is suspected perform Rinne’s test and Weber’s test
rinne test
A vibrating tuning fork (256 Hertz) is placed on the mastoid process behind the ear. When the sound is no longer heard it is placed in line with the external meatus. Normally the sound is audible at the external meatus (as air conduction > bone conduction). This is termed Rinne-positive.
With conduction [middle ear] deafness, no note is audible at the external meatus. This is termed Rinne-negative.
With nerve deafness the note is audible at the external meatus, as air and bone conduction are reduced equally, so that air conduction is better as is normal i.e. Rinne-positive.
put fork by ear after- should hear better when by ear
![<p></p><p> <span style="font-family: Calibri, sans-serif">A vibrating tuning fork (256 Hertz) is placed on the mastoid process behind the ear. <strong>When the sound is no longer heard it is placed in line with the external meatus. </strong>Normally the sound is audible at the external meatus (as air conduction > bone conduction). This is termed <em>Rinne-positive.</em></span></p><p class="MsoNormal"><span style="font-family: Calibri, sans-serif"> </span></p><p class="MsoNormal"><span style="font-family: Calibri, sans-serif"><strong>With conduction [middle ear] deafness, no note is audible at the external meatus. This is termed <em>Rinne-negative.</em></strong></span></p><p class="MsoNormal"><span style="font-family: Calibri, sans-serif"> </span></p><p class="MsoNormal"><span style="font-family: Calibri, sans-serif">With nerve deafness the note is audible at the external meatus, as air and bone conduction are reduced equally, so that air conduction is better as is normal i.e. <em>Rinne-positive.</em></span></p><p></p><p>put fork by ear after- should hear better when by ear</p>](https://knowt-user-attachments.s3.amazonaws.com/bbf96f3a-c85c-4f65-9188-3f47b5918b9c.png)
weber test
A vibrating tuning fork is placed on the centre of the forehead. Normally the sound is heard in the centre of the forehead. With nerve deafness the sound is transmitted to the normal ear. With conduction deafness the sound is heard louder in the abnormal ear.
CONDUCTIVE/ NEURAL
CN IX and X
Ask the patient to open their mouth and inspect the palate with a torch. Note any displacement of the uvula. Ask the patient to say ‘Ah’. If the uvula is drawn to one side, this indicates a unilateral tenth nerve palsy. The uvula is pulled towards the normal side.
CN XI
patients remove shirt
look for muscle wasting
Ask the patient to shrug their shoulders and feel the bulk of the trapezius muscles and attempt to push the shoulders down.
· Ask the patient to turn their head against resistance and feel the bulk of the sternocleidomastoids. Feel for the sternocleidomastoid on the side opposite to the turned head. There will be weakness on turning the head away from the side of a muscle whose strength is impaired.
CN XII
1- look for fascicuitations of tongue in mouth
2- stickj tongue out immbile
3- move
It is the motor nerve for the tongue
· Ask the patient to stick out their tongue and then move it from side to side. It will deviate towards the weaker side if there is a unilateral lower motor neuron lesion.
6 medication rights
patient
drug
time
route
dose
documentation
ports IVs/ installation
IV;
meds; shorter
insert IV spike into longer port
make sure roller clamp is closed/ roll down towards narrower end
flip bag over and squeze chamber until halfway full
open roller clamp to make sure line has no air
attach line to IV and hang bag

how to prep IV medication
Make sure the working surface is clean
Observe hand hygiene
Uncap the drug vial and clean top with an alcohol square. Allow to dry.
Remove the needle and syringe from the packaging. Attach the needle to the syringe
Remove the cap from the needle. Insert the needle into the water vial and withdraw the required amount.
Insert the water into the drug vial via the needle add the required amount to the drug. This is done by holding the vial on its side and adding the water
Keeping the needle inserted in the vial. Gently mix the water and drug until there is no powder left
If the needle is removed please reinsert syringe with a fresh needle. Pull back on the plunger of the syringe, withdrawing the fluid into it. Make sure the needle remains in the fluid
This medication can then be added to the infusion bag
To add fluid to an infusion bag
Make sure you have the correct fluid
Clean the port on the fluid bag used for adding medication
Insert the needle with the syringe attached and push the fluid forward
Observe hand hygiene after completion of procedure
Aftercare
Dispose of equipment according to hospital policy
Document procedure
Observe patient for adverse reaction