BPM202: Digital Music Production II - Quiz #2: Mixing!
1/41
There's no tags or description
Looks like no tags are added yet.
Name | Mastery | Learn | Test | Matching | Spaced | Call with Kai |
|---|
No study sessions yet.
42 Terms
MIX WINDOW
Like a traditional mixing console
Can adjust and monitor tracks
Can add plugin effects, bus sends, adjust volume, mute & solo tracks
TRACK TYPES
Audio Tracks
Aux Tracks
Instrument Tracks
MIDI Tracks
Master Fader
Videos Tracks
VCA Tracks
TRACK TYPES
AUDIO TRACKS
mono, stereo up to 7.1 surround (surround HD/HDX only)
recording Input can be assigned to hardware input or bus
playback is via track playlist unless input monitoring is enabled
output can be assigned bus or hardware output
10 Inserts are PRE fader
10 Sends available
TRACK TYPES
AUX TRACKS
mono, stereo up to 7.1 surround (surround HD/HDX only)
Input can be assigned bus or plug-in
output can be assigned bus or hardware output
10 Inserts are PRE fader
10 Sends available
TRACK TYPES
INSTRUMENT TRACKS
These run 'virtual instruments' or commonly called "VI's"
mono, stereo up to 7.1 surround
Recording Input is external MIDI controller
Playback is from track MIDI playlist
Output is AUDIO can be assigned bus or hardware output
9 Inserts are PRE fader (1st insert houses the virtual inst.)
10 Sends available
TRACK TYPES
MIDI TRACKS
Recording Input is MIDI data
Playback is from track MIDI playlist
Output can be assigned to a Instrument track input or external MIDI device
TRACK TYPES
MASTER FADER
Control the master level of a bus or output
5 Inserts are POST Fader
no sends, pan, mute, solo controls
TRACK TYPES
VIDEOS TRACKS
only visible in the edit video
no audio controls
TRACK TYPES
VCA TRACKS
not covered in RECA-339 course
information within Pro Tools Help
not available in Pro Tools | First
Bypassing
You can bypass a plug-in by ⌘ clicking it
Bypassing removes any audio processing of that
plugin from the trackIt will keep the plug-in and
internal settings available and use CPU
resources so you can re-engage the plug-in at
any moment
“All” Track Options
use “option”
while adding an INSERT or SEND will apply to ALL tracks in a session on the same row
while selecting input and output assignments will change all assignments in the session (careful!)
during bypass/disable will affect ALL sends or plug-ins on that row
BUSES
the internal "behind the scenes" pathways that Protools uses for moving audio throughout the mixer
can be created to accommodate standard channel sizes of audio: mono, stereo, 5.1, 7.1, etc
also required to access hardware outputs. These dedicated busses are "Mapped to Hardware outputs" and MUST be assigned to hear any sound from Protools
bussing configuration for your Protools session is found at: Menu: Setup → I/O (Input/Output)
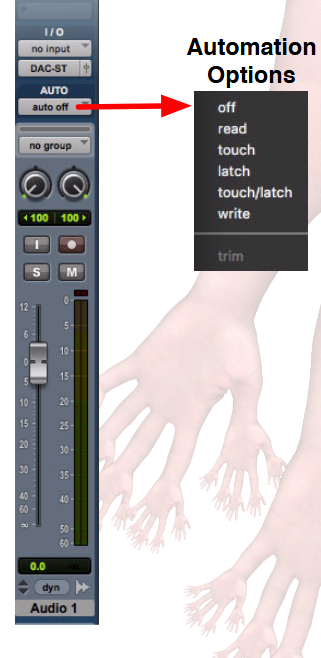
AUTOMATION
Allows one to quickly and easily automate the mixer's most common functions at the click of the mouse
Includes Volume, Pan, Mutes and Sends
MODES:
(1) OFF
(2) READ
(3) TOUCH
(4) LATCH
(5) WRITE
Any automation created for a track will be displayed as a line across the track in the Edit Window
AUTOMATION
(1) OFF
The track will not read any pre-existing automation data

AUTOMATION
(2) READ
The track will read any pre-existing
automation and the mixer will
automatically follow

AUTOMATION
(3) TOUCH
During playback, the track will add
automation data the moment you touch a control, and stop the moment you release (or 'un-touch') the controlThe control will return to the previous value

AUTOMATION
(4) LATCH
During playback, the track will add
automation data the moment you touch a control, and continue updating automation for that control even if you un-touch until you stop playbackThe control will then return to the previous value

AUTOMATION
(5) WRITE
During playback, the track will overwrite automation data the moment you press play, and continue overwriting automation until you stop playback
AUTOSITE PLUGINS
are a non-realtime effect
means you have to select a clip (or multiple clips)
Select multiple clips
Open Audiosuit Plugin (Audiosuite Menu)
MIX GROUPS
allow you customize the control of mix parameters across many tracks simultaneously
If a Mix group is controlling a parameter with an on/off function, all tracks with that parameter will operate in unison
To temporarily bypass a track's parameter from a mix group to independently change the value, hold down control
while making the adjustment
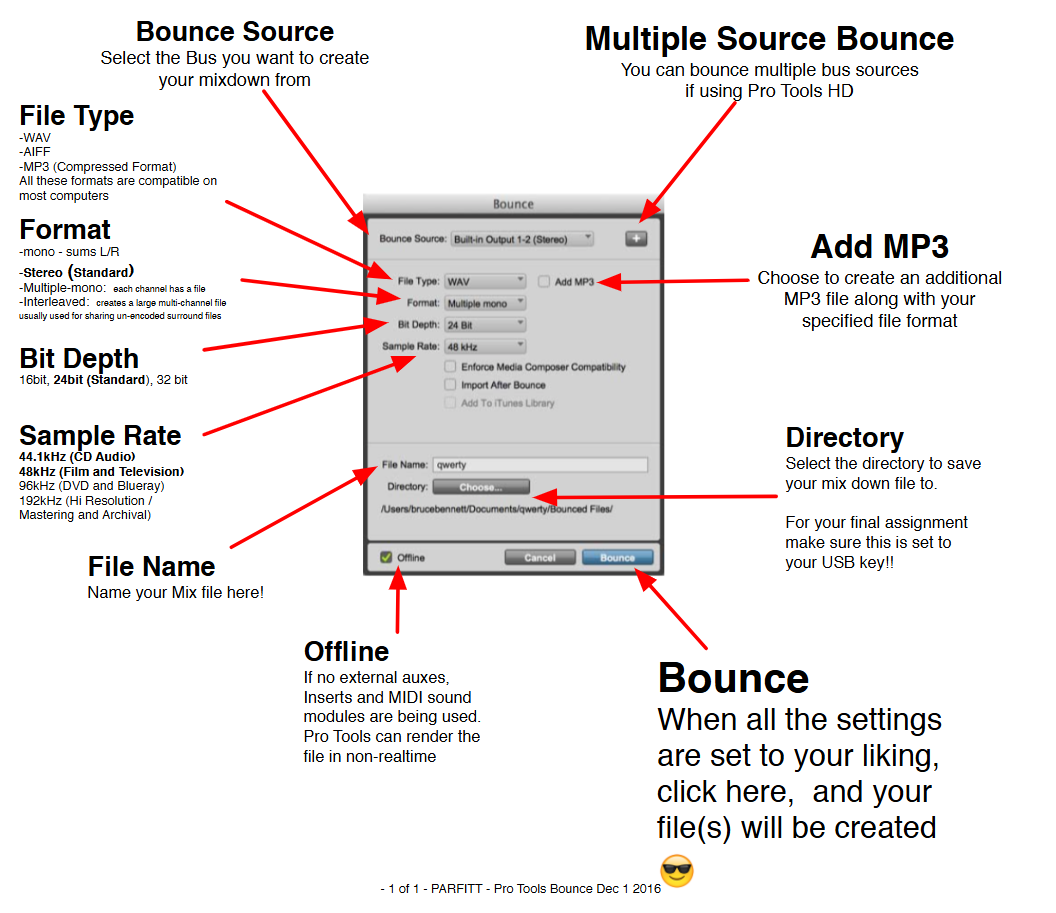
“BOUNCING” TO DISK
Highlight a range of your session
To Bounce an Audio file: File → Bounce To… → Disk
How to Show/Hide Tracks
Pro Tools allows you to keep these tracks functioning, while hiding them from the edit and mix windows

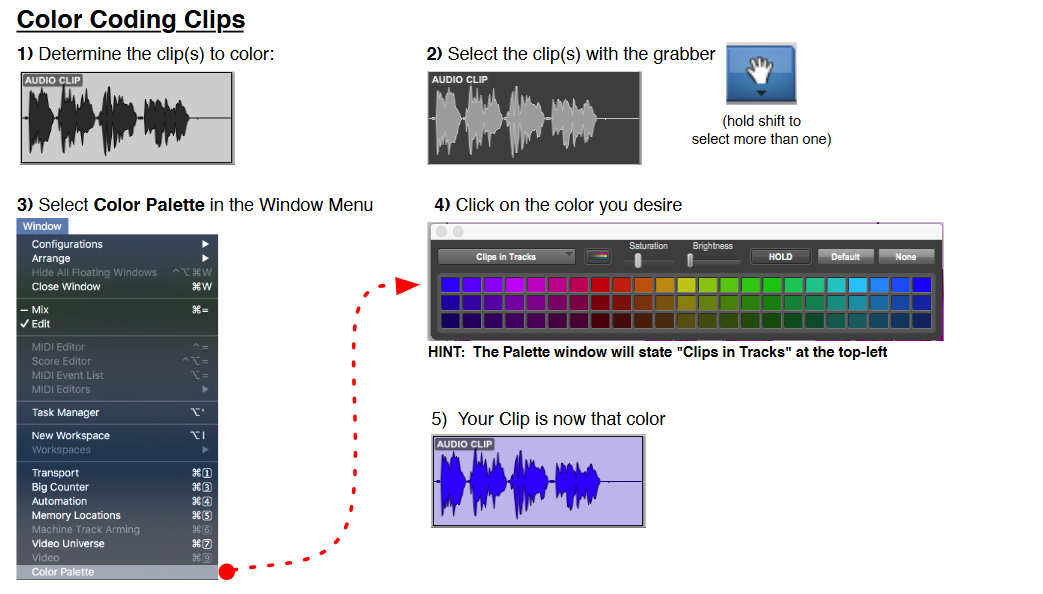
COLOR PALETTE
allows you to color code clips to your liking for further organization
You can use these colors as an additional visual indicator on large sessions to differentiate between
various type of clips 'at a glance
CLIP GROUPS
allow you to bundle all these edits together into a single "Super Clip”
You can then easily copy and move it around like a big piece of LEGO
option + ⌘ (command/ctrl) + G

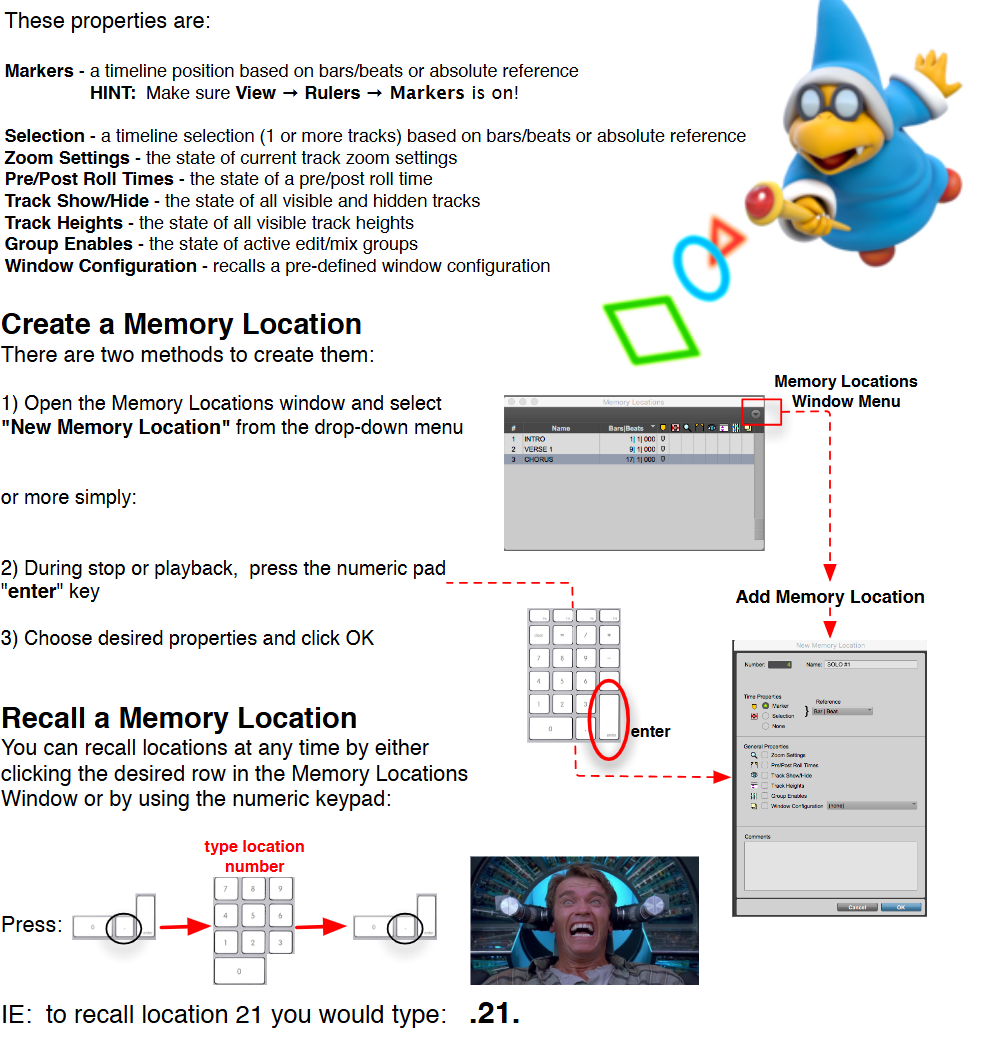
MEMORY LOCATIONS
Are a powerful feature allowing you further organize your session
These locations can keep track of important song positions in the form of "Markers", which you can customize with your own labels such as: Verse 1, Chorus, Intro etc
WINDOW CONFIGURATIONS
allow you to save snapshots of all window positions on the screen
setup the visuals you require for the task at hand
This includes floating windows such as Transport, Counters, Plugins, Colour Palette et
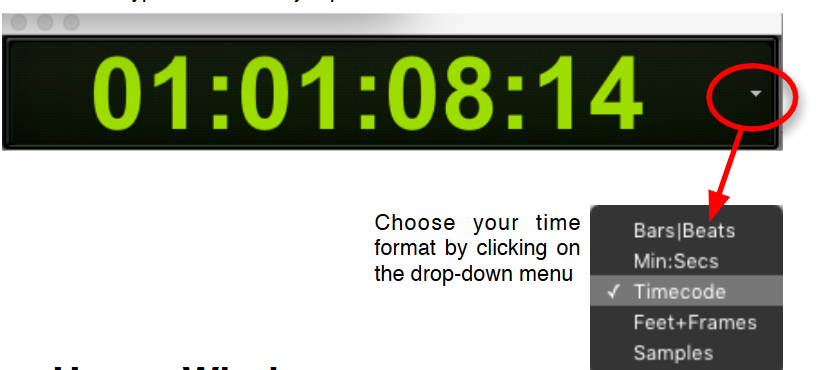
BIG COUNTER WINDOW
large 'floating' window that you can position anywhere on the screen
to have a better view of the timeline format
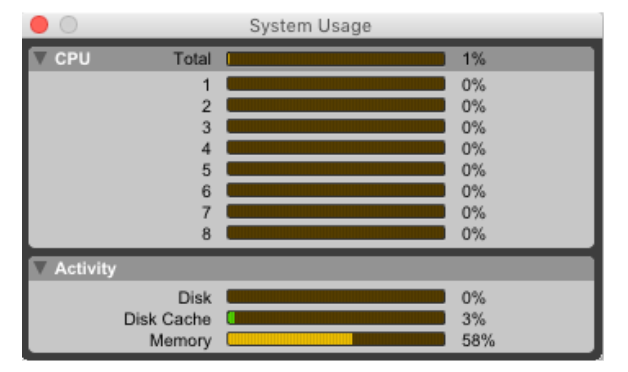
SYSTEM USAGE WINDOW
a 'floating' window that displays how much demand Pro Tools is
placing on your computer
TRACK FOLDERS
Select tracks you want in folder
Right-Click on any Track’s name & select “Move to…” “New Folder…”
Give Basic Folder a name
Click, Create
TYPES:
Nesting Folder: A folder within a folder!
Basic Folder
Routing Folder: A folder that looks similar to a Basic Folder → difference is that the Routing Folder has an audio functionality: Inserts, Sends Input & Output
COMPRESSION
Useful tool that allows us to reduce the dynamic range of an audio signal
Can make loud parts quieter, loud parts louder
Evens out signals → EX: Vocals with odd dynamics
Bring down peaks of audio
COMPRESSION
Threshold
The level at which compression starts to take place
Anything quieter than the dB level of threshold will remain unaffected
But anything beyond will be compressed
COMPRESSION
Ratio
Determines how much compression occurs once the signal rises above the threshold
STANDARD: 3:1, 1 dB for every 3dB
COMPRESSION
Attack Time
How long it takes to reach full compression
How steep is a reflection of attack time
COMPRESSION
Release Time
Opposite of attack, how quickly the compressor will allow the signal to return to normal after compression has taken place
COMPRESSION
Knee
Affects how a compressor behaves with signals that are very near the threshold
Narrows transition
Soft Knee: Smooths transition
Hard Knee: Difference in tone
COMPRESSION
Makeup Gain
Brings the signal back up again after compression has taken place
LIMITERS
Best way for engineers and producers to stop peaks from reaching beyond a ceiling limit
Helps avoid clipping, stops any audio from going beyond
Limits the dynamic range
Serves as a ceiling which signal cannot pass above
Essentially a compressor but with a very high ratio
USES:
Mastering: Helps bring track up to commercial level
LIMITERS
Parameter Gain
Used to boost signals until it hits the ceiling and is compressed
NOISE GATE
A more extreme version of an expander
Provides a threshold/floor level, which a signal must cross in order to be heard
If too quiet, it will be silent!
Tells low level sounds that they’re not loud enough, so they can’t get through
USES:
To attenuate when quiet or unneeded noises appear
For live-recording
NOISE GATE
Three Parameters of a Gate
THRESHOLD: the point at which sound is allowed to pass through the gate
ATTACK TIME: how fast the gate opens once the sound passes the set threshold
RELEASE TIME: similar qualities to the attack, but occurs after the transient has breached the threshold
EXPANDERS
Expands dynamic range
Louder and quieter parts become relatively louder and quieter parts, respectively
Opposite of compressor
“Upward Expanders”: amplify the signals that pass the threshold
“Downard Expanders:” similar to gates
USES:
Brings life to vocals
Can help create isolation to a drum recorder
Can decrease the relative volume of a hi-hat
EXPANDERS
Three Parameters of a Gate
THRESHOLD: determines the input level at which the expander will activate
ATTACK TIME: time it takes to reach full expansion
RELEASE: how long it stops expanding after the threshold is no longer being reached