Equine Lameness and External Coaptation Flashcards
1/35
Earn XP
Description and Tags
Flashcards covering the key concepts of equine lameness evaluation and external coaptation techniques.
Name | Mastery | Learn | Test | Matching | Spaced | Call with Kai |
|---|
No analytics yet
Send a link to your students to track their progress
36 Terms
Lameness
A clinical sign, not a disease. (like colic)
Three reasons for lameness
Pain (inflammation), mechanical interference such as scar tissue (no pain), neurologic lameness
Five basic steps to a lameness exam
History, Observation, Palpation, Local Anesthesia (“Nerve blocks” or “joint blocks”), Special Diagnostics
History
Signalment – age, breed, sex, use/sport
Any previous lameness problems?
How long has the horse been lame?
Was the onset sudden or gradual?
Does the lameness get better or worse with exercise?
Is there known trauma or reason for lameness?
Has any treatment or medication been intiated?
Any pattern to the lameness? Associated with certain surfaces/gait?
When was the last shoeing done?
Response to medications?
+-Blood panels
Observation AT REST:
Obvious swelling or muscle atrophy; symmetry; obvious injury
Conformation of the horse
How the horse stands can give an idea of where the leg is hurting
“Start at the bottom”- many lameness issues occur in the foot
Observation IN MOTION:
Observe at walk and trot
Usually observe moving directly away and then towards the clinician, and then from the side and from both directions
Harder surfaces can exacerbate the lameness, making it easier to diagnose
Removal of shoes may be necessary
Smooth surfaces (avoid gravel, you try walking on it and not limping occasionally)
Observation- Flexion tests
Joints isolated and flexed for 1-2 minutes, then horse is immediately trotted off in straight line
Test both the suspect limb(s) and the sound limb(s)
Using lunge line to accentuate lameness when on inside of circle. Lameness of either front or rear legs is often more pronounced when the horse is circled via lunge
Palpation
Palpation done in weight-bearing stance and with leg elevated; check all legs (use sound legs for comparison)
Knowledge of normal anatomy is essential
The wear pattern on the shoe or hoof wall can be helpful
Thorough palpation of neck, back and hips is also essential
Local Anesthesia
Used to confirm the location of specific problem IF NEEDED. Can be used to localize the problem to a smaller region of a leg
•Lameness improved = source of pain found
•Lameness same = block higher on leg
Special Diagnostics
Radiographs, Diagnostic Ultrasound, Thermography, Nuclear scintigraphy, Magnetic Resonance Imaging (MRI), Computed Tomography (CT), Arthrocentesis, Biopsy (muscle, bone, tendons)
Grading the Lameness


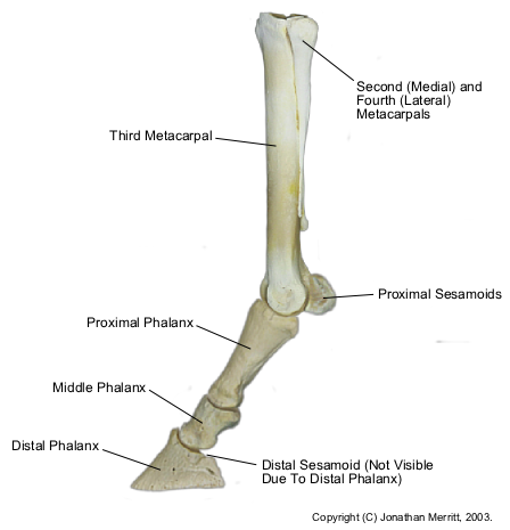
Relevant Anatomy of Distal Limb
Treatment for Lameness
“Time heals all things”- stall rest, proper farrier care, and slowly returning to exercise can help many patients
Anti-Inflammatories
Corticosteroids- systemically or locally (joint injections)
NSAID’s
phenylbutazone (“bute”)
firocoxib (Equioxx)
Other modalities- nutritional/joint supplements, PT, therapy laser, massage, acupuncture, chiropractor?
Indications for External Coaptation
Refers to the use of bandages, splints, and casts
Apply pressure to control hemorrhage, reduce (compress) dead space during the treatment of surgical or traumatic wounds, reduce skin motion around wounds, minimize wound contamination, hold medications against a wound
Key to good bandages
Padding is the most important part of a bandage
Check bandage at least once daily for:
Tightness, Soiling, Strikethrough, Swelling-above or below
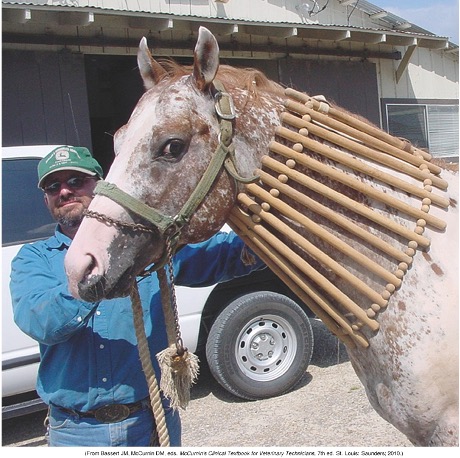
Neck cradles can be used (the large animal version of an E-collar)
What type of Bandage is Appropriate?
Depends on several factors:
Purpose of the bandage-injury, performance, transport, post-surgical, breeding/foaling
Anatomical location of bandage- head, neck, abdomen, tail, extremities
Patient factors- environment, temperament, training
Available materials- sometimes have to be resourceful- diapers and duct tape!
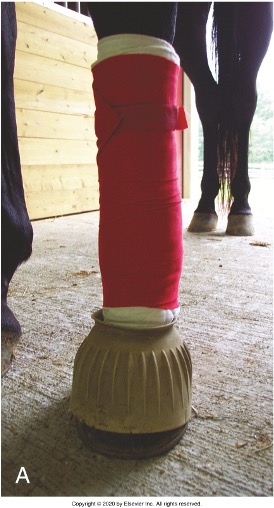
Exercise Wraps (a.k.a. Polo Wraps)
Usually only worn during exercise or turnout
Based on horse’s profession and by horse’s tendency to strike its own legs accidentally
Start Medial and Unroll Cranially
Note that 1 inch of padding is exposed at the top and bottom of the bandage. Bell Boots can be added to protect the hoof and heel bulbs
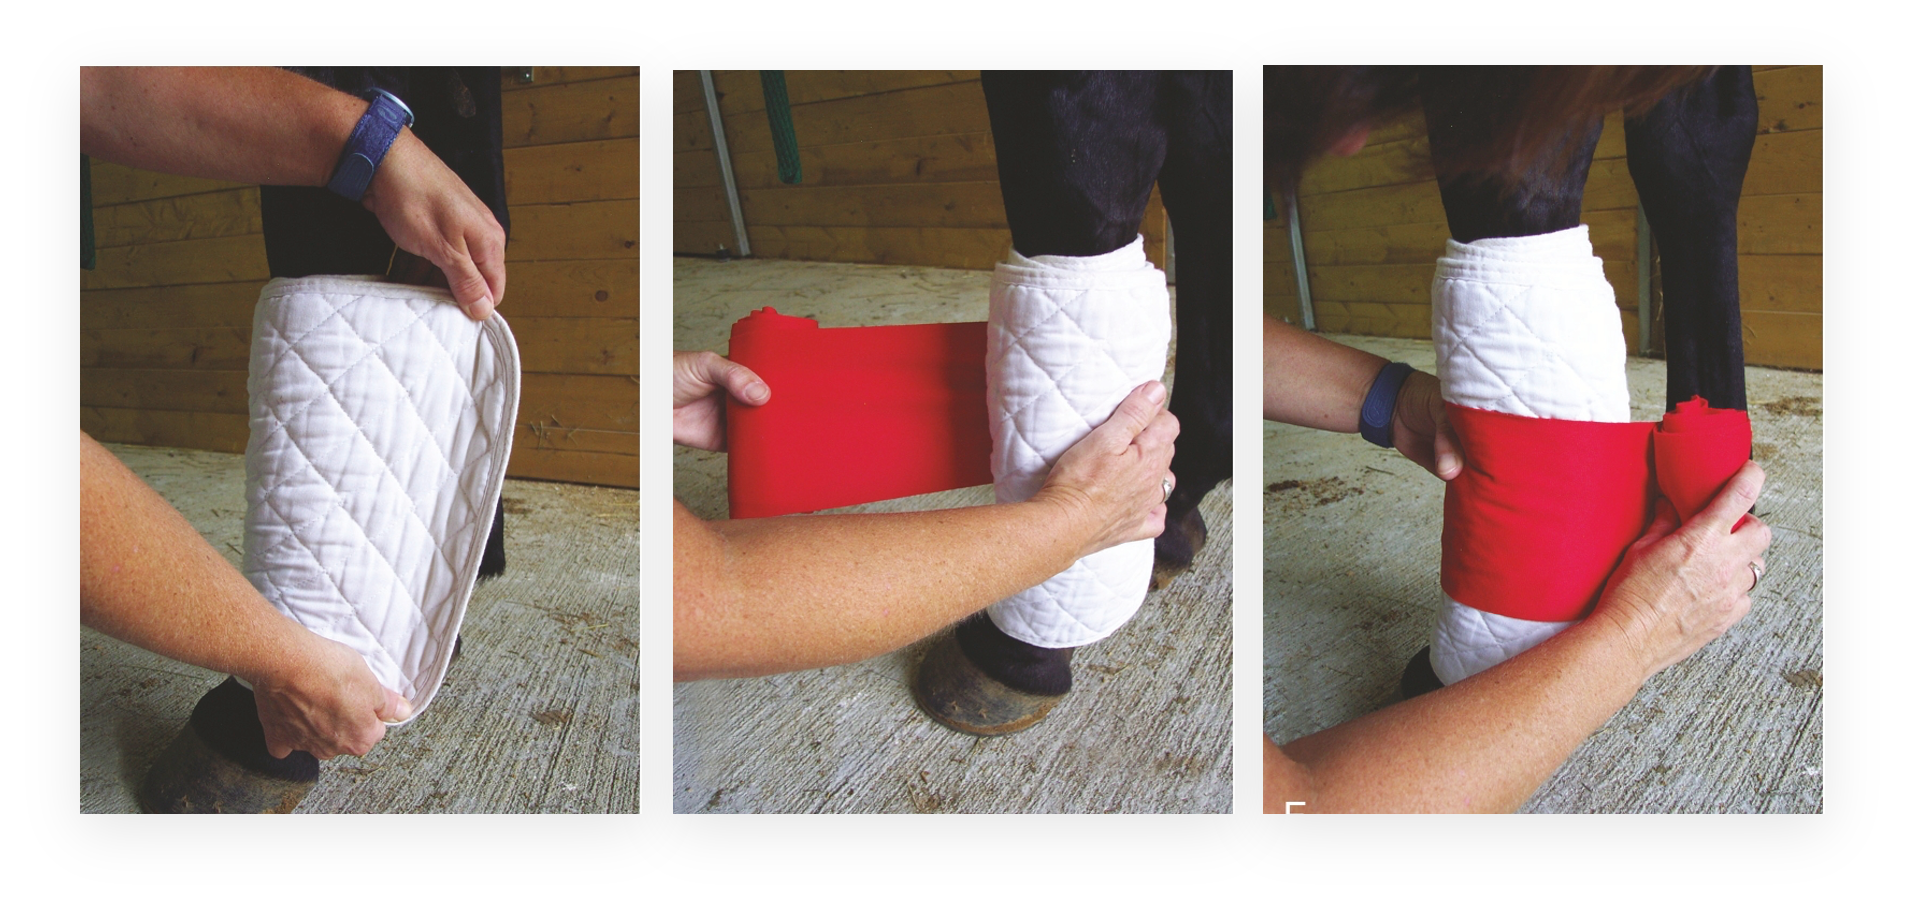
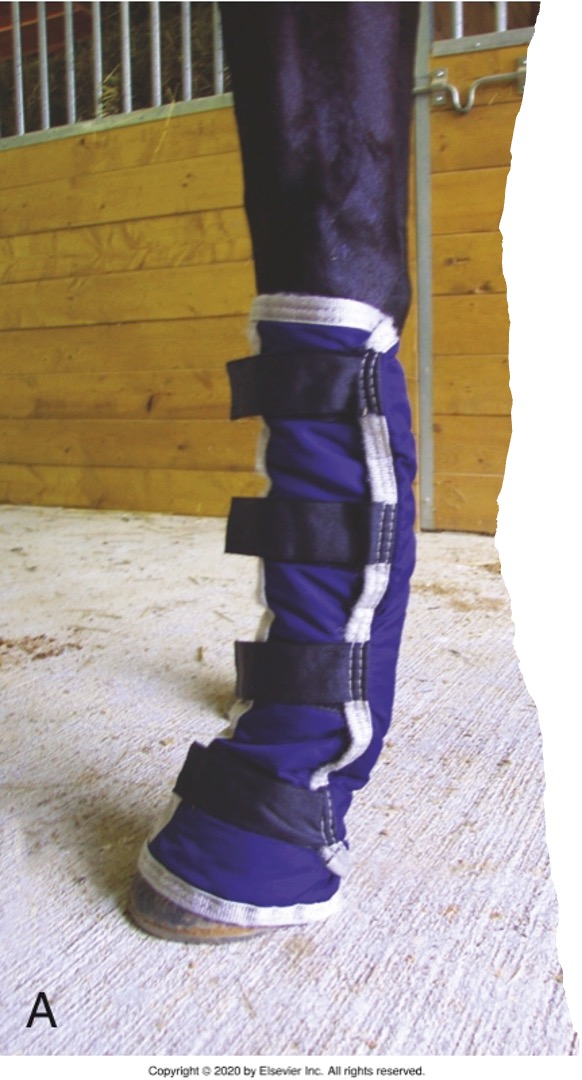
Shipping Boots
Subjected to sudden stops, starts, and turns. Thrown off balance and slip or step on themselves
Some kick during transport or struggle when loading
Proper protection should at minimum cover the lower leg completely
Commercially shipping wraps available
Distal Limb Bandages
Most common bandage for medical purposes
Should include top of metacarpus/metatarsus to just below coronary band (swelling of the fetlock will occur if just cover the cannon bone)
Have proper patient restraint and all bandaging materials ready
Clean and dry limb (wounds cleaned appropriately prior to wrap)
Primary Layer
If a wound present, this includes wound dressing and the layer to hold the wound dressing
Secondary Layer
Padding
Tertiary Layer
Securing layer – ONLY layer used to apply compression
Finishing Layer
Optional depending on the underlying condition, prevent bedding and other debris from entering the bandage
Unrolling bandage material
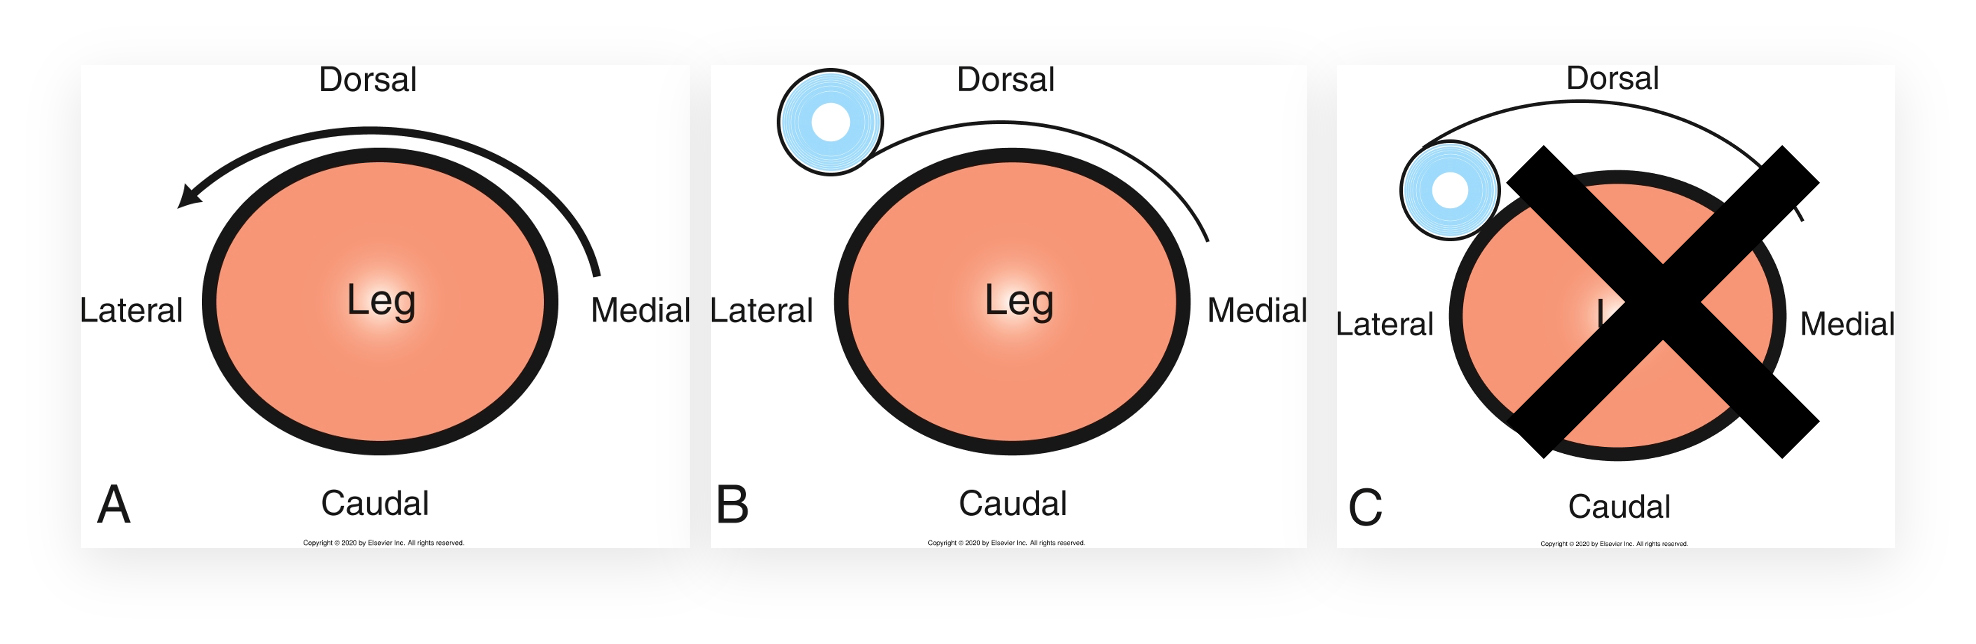
Primary Layer - NO compression
Wound dressing
Choice of material depends on nature of wound exudate/bleeding expected, sutures present, need for granulation
Also need a layer to keep wound dressing in place (elastic materials generally used to hold wound dressing in place)
If no wound, then this layer can be eliminated
Any bandage for large animals should use no less than 3 in width (4-6 preferred)
Secondary Layer (padding)
Minimum 3 sheets of sheet cotton used
(when folded over = 6 layers)
Should cover the coronary band
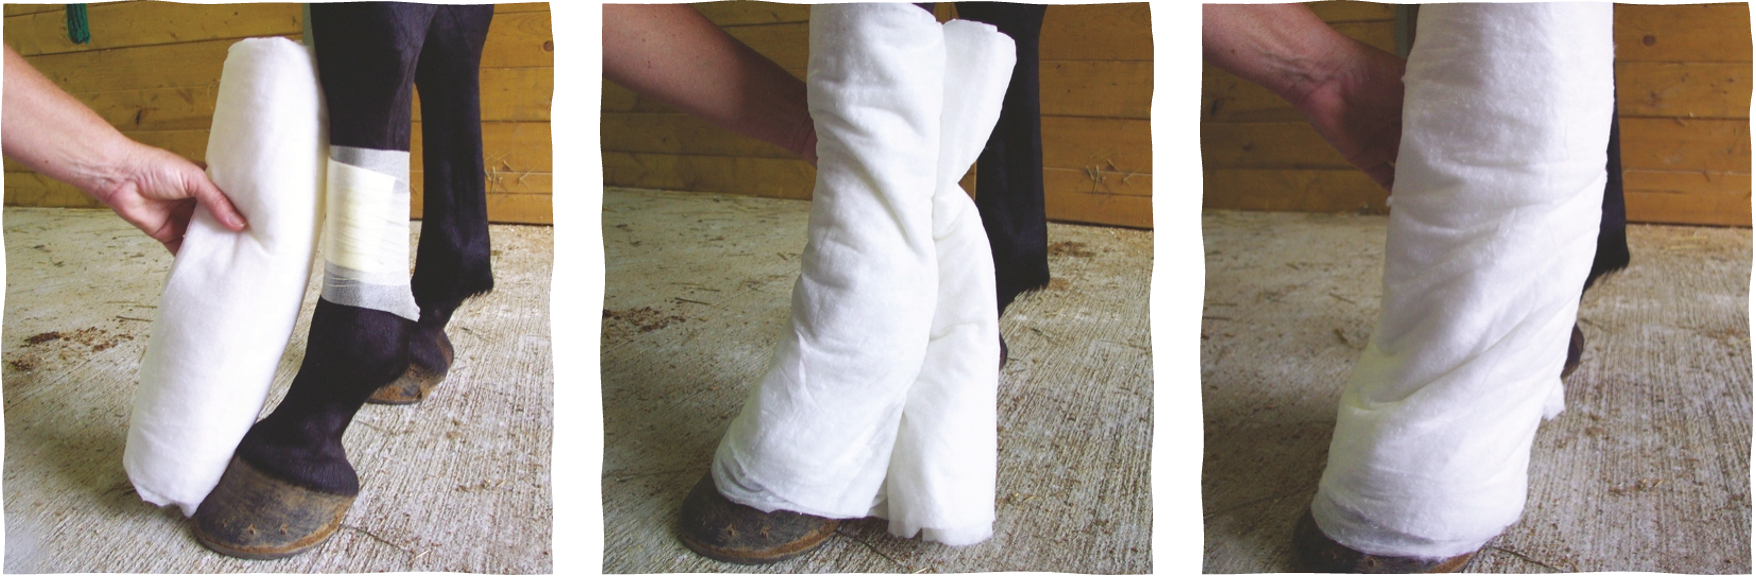
Tertiary Layer – Securing Layer
The securing layer must be “seated” before it can be pulled tight
Circle the padding layer several times
Start in the middle and proceed distally with minimal tension
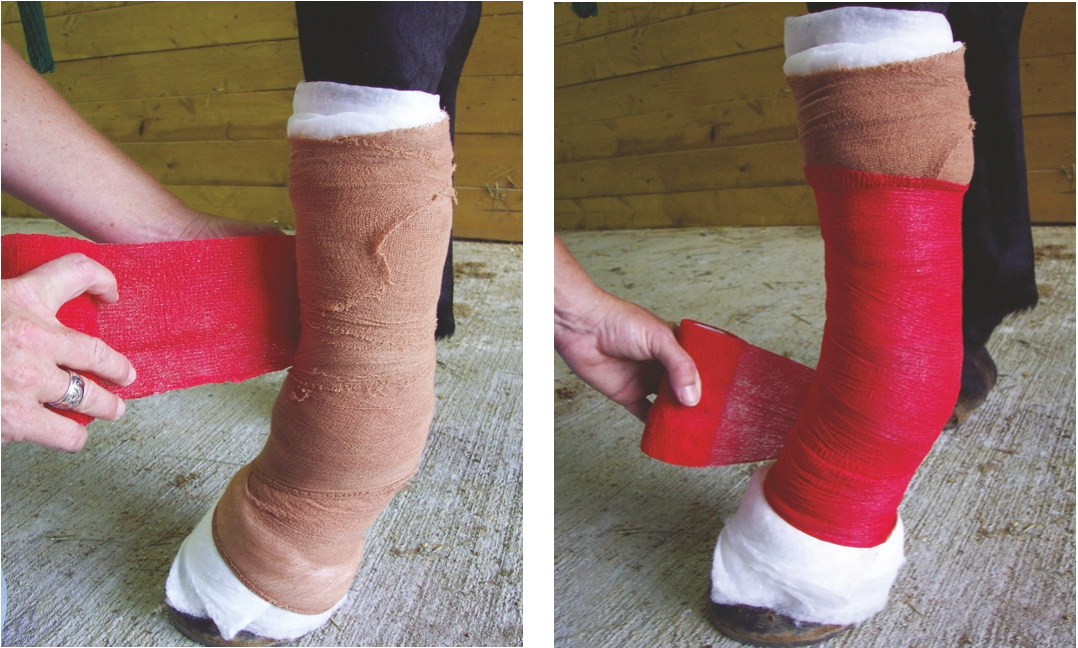
Brown gauze can be used to further conform padding so that the compression layer “bites” better
Securing layer is seated by applying the material with minimal tension around the middle
Then the material is applied distally
1 inch of padding visible above and below
Compression is applied in a distal-to-proximal direction
50% overlap
Proper tension is indicated when the waffle pattern is not visible
Avoid bunching of padding
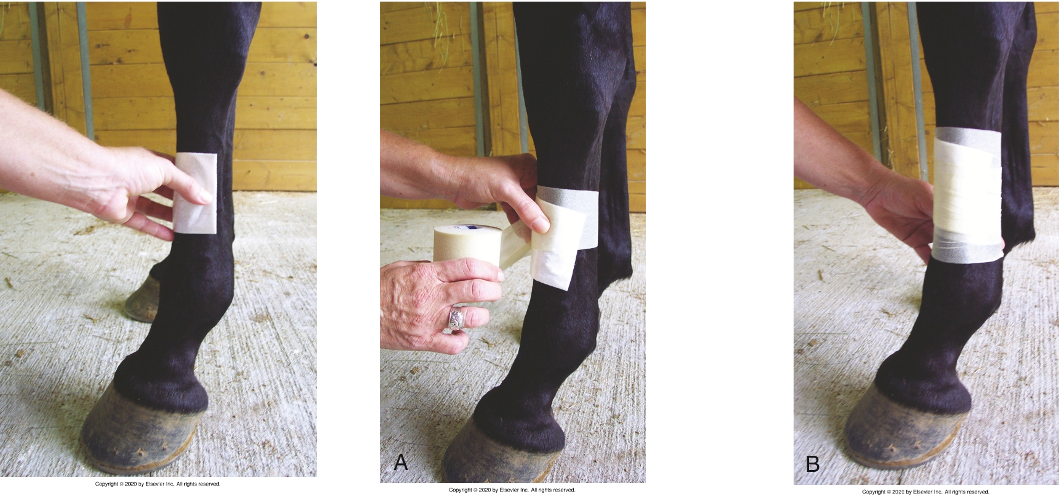
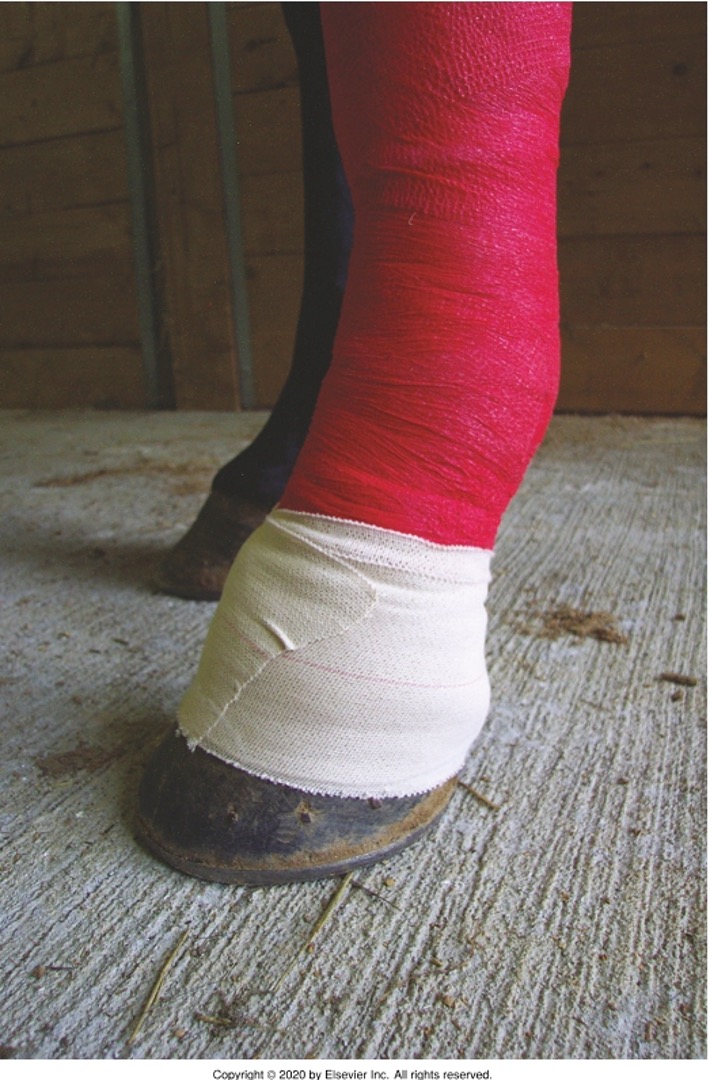
Finishing layer
Prevent slippage
Prevent bedding and debris from entering the bandage
Finishing can be applied to top, bottom or both
Elastic adhesive tape (Elastikon usually)
Wrapped 2-3 times around the bandage, overlapping the bandage and adjacent skin or hoof wall
Should NOT apply compression
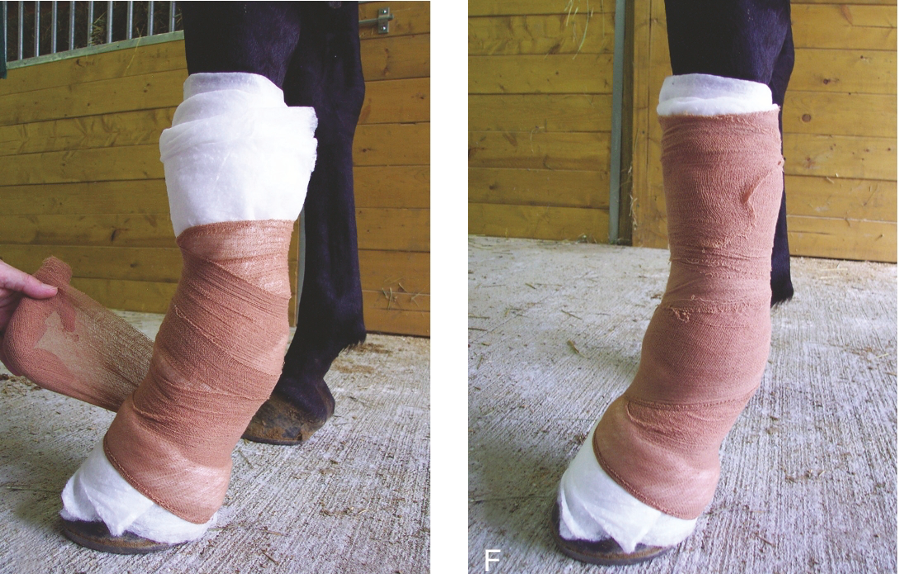
Common error for full limb bandage – Trying to bandage upper leg without bandaging lower leg
Can lead to edema/swelling of distal limb or slippage
Doomed to slide down, even WITH adhesive
To prevent this, the bandage is applied in two parts
"Double Decker" Bandage
Distal limb is bandaged first, then upper bandage is applied in same manner
Pressure sores are likely to form over the point of the accessory carpal bone and point of the calcaneus

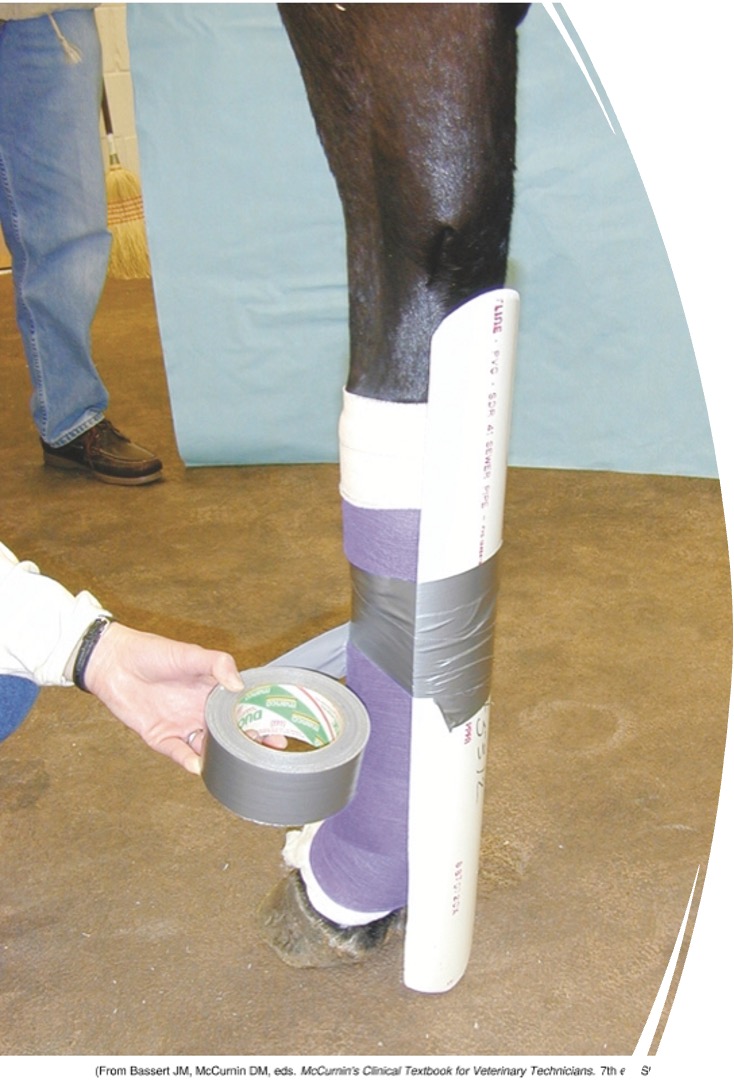
Limb Splints
Used to immobilize a joint after severe trauma
Can be temporary (for transport) or used long term
Standard distal limb support applied first
Robert Jones Splint Bandage is the simplest
Additional padding as needed
Strut (wood, PVC, metal) is cut to the length of the bandage and smooth surfaces (immobilize a joint above and below if possible)
Position strut on the cranial or caudal surface to prevent movement
Secure with NON-ELASTIC TAPE (duct tape works great)
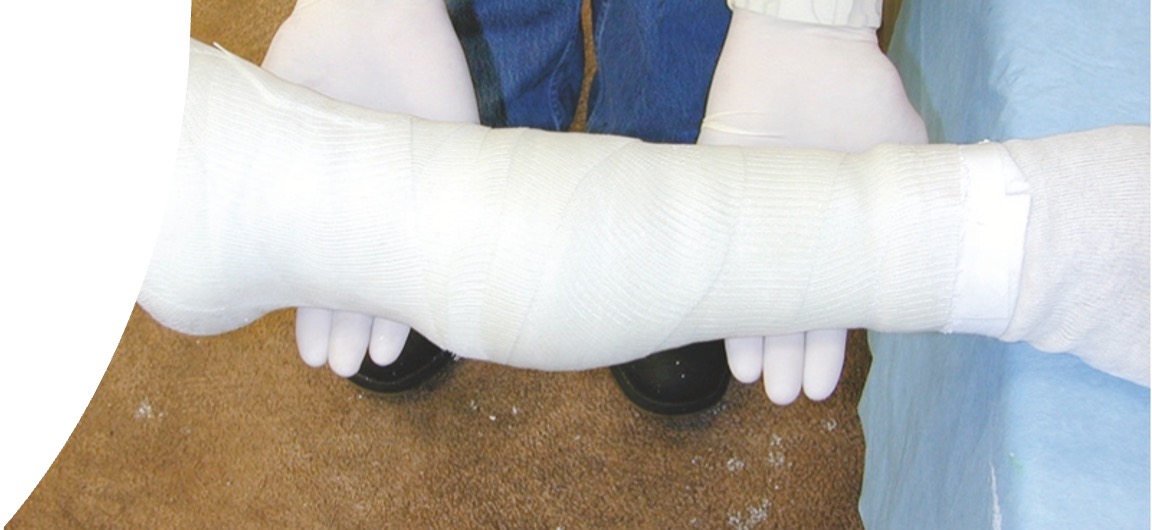
Limb Casts
Foot cast, Lower limb cast, Full limb cast, Tube cast (sleeve cast)
Normally applied under general anesthesia
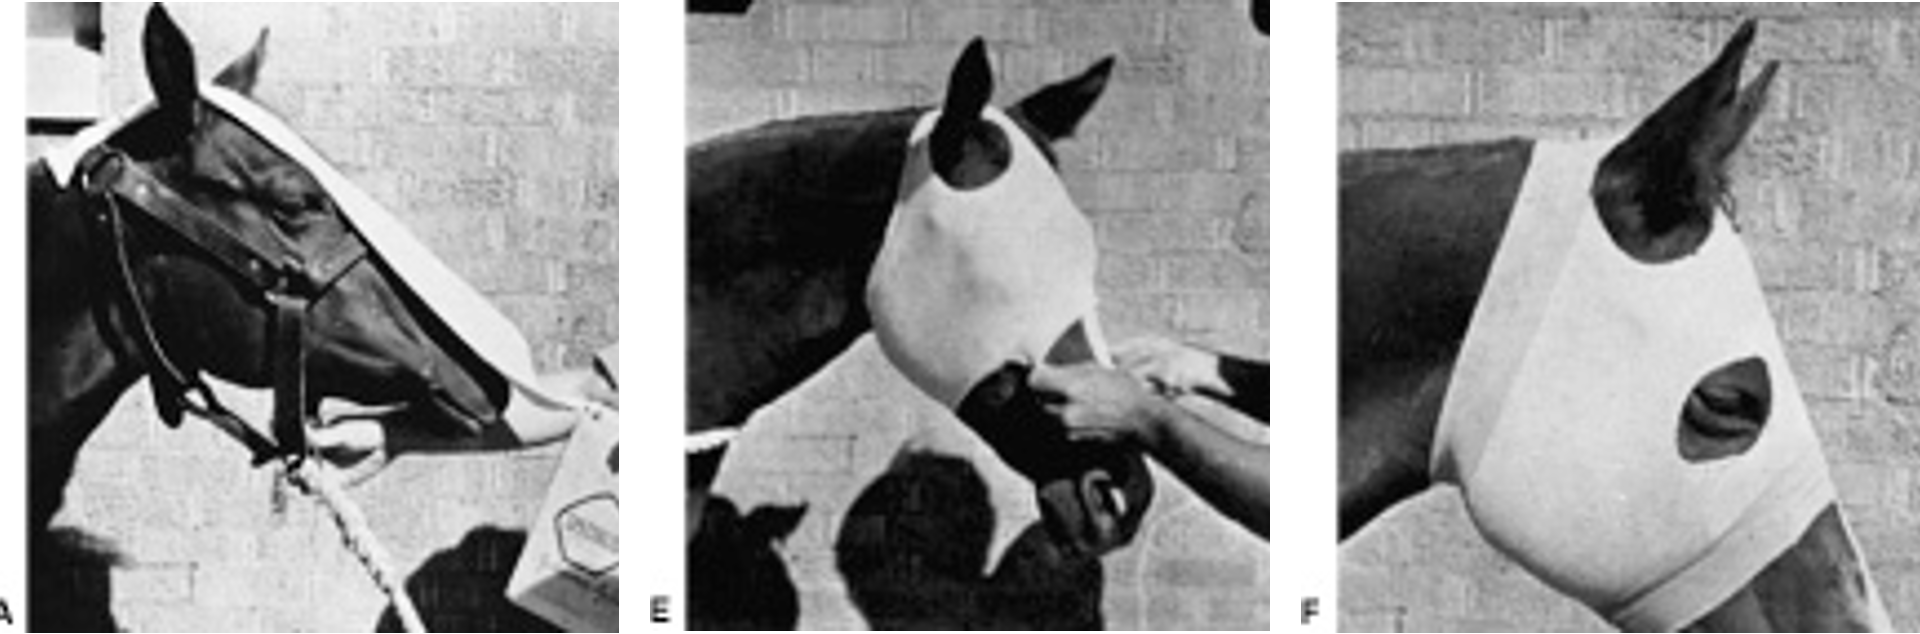
Head and Face Bandages
Use 6-inch stockinette for adult horses
Cut twice as long as head
Mark eye and ear hole locations with marker and remove to cut
Secure with elastic tape
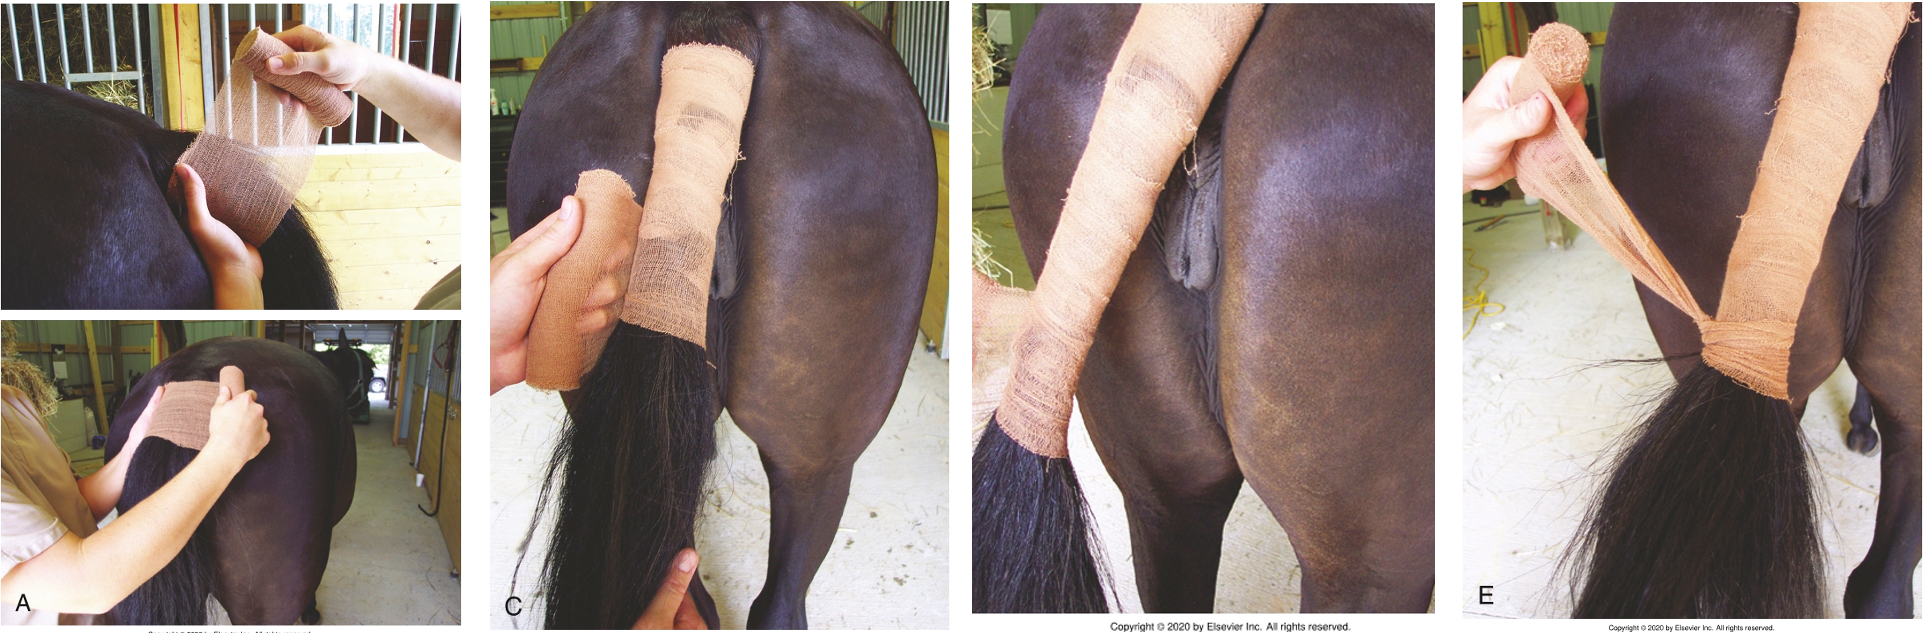
Tail Bandages and Wraps
Protection during shipping, Protection from feces, urine, or fetal fluids, Prevention of contamination of the vulva or perineum during reproductive procedures
Arterial supply to tail is a single major artery located on the ventral midline
Avoid nonelastic materials on the living portion of the tail
6-inch roll gauze is a useful material for tail wrap and can then be passed around the neck and tied to remove the need for an assistant
Commonly used for breeding/foaling
Seat at base of tail
Can place locking loops of tail hair to help prevent sliding
Tie simple knot at base
Use a quick-release knot to tie around the neck
If left in place for more than few minutes, alleviate pressure on jugular by pulling tie away from the neck