PRACTICAL PART - SURGERY
1/38
Earn XP
Description and Tags
EXAM
Name | Mastery | Learn | Test | Matching | Spaced | Call with Kai |
|---|
No analytics yet
Send a link to your students to track their progress
39 Terms
Antisepsis, asepsis
Antisepsis: process of removing pathogenic organism from skin or mm, but with some resident flora remaining
Antiseptic: agent used in this process (any inhibiting bacterial growth)
Asepsis: state of absence of pathogenic microbes on living tissue.
All surgical wounds are contaminated with bacteria, but mostly to level with no clinical infection as a result = described as state of asepsis, or aseptic.
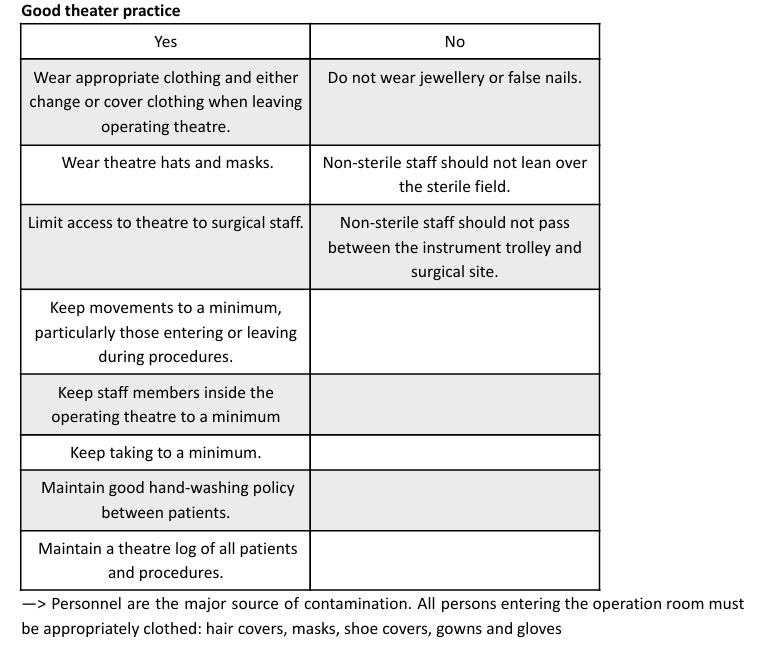
Some asepsis rules: Maintain sterile area, minimize movement/talking, non-scrubbed people avoid reaching over sterile fields. Sterilize equipment, sterile-gloved personnel handle sterile items only. Sterile tables are sterile only at table height. Use moisture-proof drapes. Contaminated wrappers indicate contaminated items. Keep hands out of the armpit area.
Operating Site Preparation
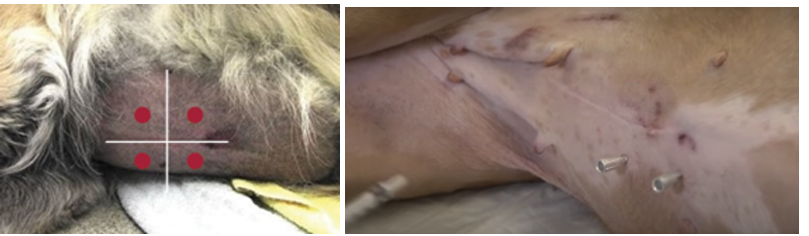
Hair Removal: Clip hair 20 cm around the incision area, and remove any loose hair with a vacuum.
For limb procedures, place a glove over the distal extremity and secure it with tape.
Prepuce Flushing: Flush the prepuce of male dogs with an antiseptic solution before sterile preparation.
Draping: Secure the sterile field at the corners using sterile towel clamps. Remember that the tips of these clamps, once they've pierced the skin, are no longer sterile. If the drape doesn't have a fenestration, cut an appropriately sized one, but do not make holes through the outer drape.
Scrubbing:
Gather scrub brushes, antibacterial soap, and nail cleaners.
Remove watches and rings.
Apply 2-3 pumps of antimicrobial soap to your hands and wash under clean nails.
Rinse your hands and forearms thoroughly.
Apply another 2-3 pumps of antimicrobial soap to your hand and forearm.
Antiseptic Prep & Application:
Prepare the antiseptic solution (e.g., chlorhexidine, iodine) according to the manufacturer's instructions and pour it into a sterile container or applicator.
Carefully open the sterile pack containing the antiseptic applicator and sterile gloves, ensuring you don't touch non-sterile surfaces.
If necessary, put on sterile gloves.
Clean Site: Use a sterile gauze or sponge with a water and soap solution to clean the surgical site, working from the center outward in a circular motion, avoiding non-sterile areas.
Apply Antiseptic: Apply the prepared antiseptic solution to the surgical site using a sterile applicator or gauze, again starting at the center and moving outward in a circular motion, covering the entire area.
Allow to Dry: Let the antiseptic solution dry completely before proceeding with the surgical procedure.
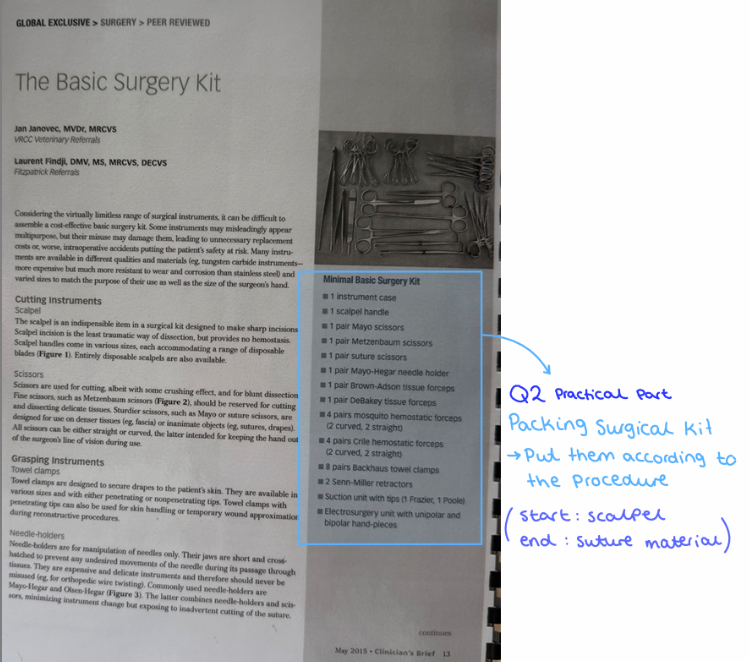
Preparing surgery procedure pack and accessories
Preparing Surgical Items (Packs)
Identify and Assemble: Determine all necessary instruments, equipment, and supplies for the procedure, then gather and organize them into a pack. Include additional items like drapes or dressings.
Sterilize: Sterilize the assembled pack using an appropriate method (e.g., steam sterilization, ethylene oxide sterilization), following manufacturer instructions. Allow it to cool completely.
Label: Label the sterilized pack with its contents, sterilization date, and expiration date.
Prepare Accessories: Prepare any additional accessories like surgical gloves or gowns according to manufacturer instructions, by sterile technique and changed as needed.
Verify Contents: Before the procedure, double-check that the pack is complete and all items are functional, replacing any missing or damaged components.
Preparing Surgical Facilities
A) Cleanliness
Sterility is most important in an operating theatre.
Disinfect all equipment (surfaces, microscopes, lights, anesthesia machine, instrument trays) with 70% alcohol or a quaternary ammonium compound just before surgery, allowing them to dry.
Equipment not used within 10 minutes after sterilization should be draped, and surfaces should also be covered.
B) Comfort:
Arrange equipment to suit the surgeon and surgery type, adjusting table heights and lights.
Ensure all potentially used equipment, including those for anesthetic emergencies, is readily accessible.
C) Supplies
Maintain an ample supply of commonly used materials such as syringes, needles, gauze, drapes, gloves, analgesics, antibiotics, respiratory/cardiac stimulants, anesthetics, infusions, lavage solutions, and blood/plasma if needed.
Surgical Instruments
Need to be thoroughly cleaned, assembled, inspected, tested, packed, sterilized.
Processing: Always obtain, follow written instructions for device-instrument processing.
Decontamination: Use recommended detergents for cleaning to remove both visible and invisible microorganisms, following detergent manufacturer instructions.
Examination:
Cleanliness: especially in joints (box lock), serrations, and ratchets.
Completeness
Functionality: Test for stiffness in joints, sharpness, approximation of finger forceps tips, ratchet hold, needle holder jaw hold, condition of marking tape/covering, and insulation integrity.
Disinfection Method: wet heat + steam sterilization
Wet heat (steam sterilization): kills by denaturation and coagulation of cellular contents.
for cotton materials, instruments, plastics. 30 min at 100 degrees.
Autoclave: steam introduced in 1 chamber at high pressure (2 atm 121 degrees) where no living organism can survive for more than 10 min.
Preparation and sterilization of instruments
Preparation of Instruments
Cleaning: remove debris and organic material, either by hand or using an ultrasonic cleaner, then rinsed and dried.
Sterilization: eliminate all microorganisms.
Packaging: Sterilized instruments should be packaged (e.g., in sterilization wrap or pouches) to maintain their sterility until use.
Labeling: Each package needs to be labeled with the instrument type, sterilization date, and expiration date.
Spaulding's Classification of Medical Items (based on risk of infection transmission):
High-risk (Critical): Items that penetrate the skin or contact sterile tissue/bloodstream (e.g., surgical instruments, needles, catheters). These require sterilization.
Intermediate-risk (Semi-critical): Items that contact mucous membranes but do not penetrate them (e.g., flexible endoscopes, endotracheal tubes, laryngoscope blades). These ideally require sterilization, but high-level disinfection is acceptable.
Low-risk (Non-critical): Items that only contact intact skin (e.g., stethoscopes, washing bowls). These require cleaning with detergent.
Sterilization
Sterilization is the complete destruction of all forms of microbial life, bacteria, virus, fungi including highly resistant bacterial spores.
Types of Sterilization:
Steam Sterilization: steam under pressure to kill microbes by coagulation and protein degradation. Requires precise control of temperature, pressure, and exposure time. Types include gravity displacement, pre-vacuum, and flash sterilization.
Gas Sterilization (Ethylene Oxide): A flammable, explosive gas that kills microbes by altering their DNA. Useful for items that cannot withstand high temperatures or pressure, like endoscopes.
Plasma Sterilization: A low-temperature method for heat-sensitive items, utilizing UV photons.
Ionizing Radiation
Cold Chemical Sterilization: Uses non-corrosive chemicals like glutaraldehyde.
Dry and Wet Heat
Sterilization indicators:
Stainless steel instruments: sterilized by steam.
Endoscopic instruments: Sterilized with ethylene oxide.
Glass: sterilized using ethylene oxide or steam.
Preparation of the operating site
General (look at q. 6, part A)
The preparation of an operating site is essential for minimizing infection risk and establishing a sterile environment for surgery. This process involves several key steps:
Shaving of surgical site - 20cm
cleaning the site - removing debris with gauze soaked in betadine-iodine povidone soap until no debris remain on skin.
foreskin of dogs + vulva in females - flushed with 0.05% solution of chlorhexidine or betadine.
Use gauze soaked in chlorhexidine gluconate 4% or alcohol and repeat movement from center towards edge in circular motion.
spray area with alcohol, cover with sterile cloth.
When patient is positioned in surgical room
fix on table, connect anesthesia machine and monitoring devices → then aseptic cleaning can be performed.
alcohol or chlorhexidine gluconate 4% are applied directly to skin.
Draping the animal: sterile surgical drapes are used to cover animal, isolating the site from surroundings.
grab the corners of cloth, let it float over the patient`s body, attach to the patient using clips
Wearing Sterile Attire: The surgical team wears sterile gloves and gowns to avoid transferring contaminants from their skin and clothing to the surgical field.
Using Sterile Instruments and Supplies: must be sterile and maintained within a sterile field to prevent any contamination.
Preparation of the surgical team for the surgery
Surgical Scrub: aims to mechanically remove dirt and oil and reduce the transient microbial population on hands.
Most common: 5-10 min scrub (first case) with chlorhexidine.
Subsequent scrubs: 2-3 minutes.
Keep hands higher than elbows all the time.
Preparation: Locate scrub brushes, antibacterial soap, and nail cleaners. Remove watches and rings.
Initial Wash: Apply 2-3 pumps of antimicrobial soap to hands and wash thoroughly. Clean nails under running water.
First Scrub: Rinse arms and forearms. Apply 2-3 pumps of antimicrobial soap to a hand and forearm, as well as the brush. Rinse the brush and transfer it to the scrubbed hand. Do not rinse scrubbed hand.
anatomical timed method: scrub each arm for 2-3 minutes
Counted brush stroke: apply 30 strokes to finger tips, divide fingers into four parts, apply 20 stroked to each hand surface and finger webs. Divide forearm into 4, apply 20 to each.
Repeat & Rinse: Repeat the scrubbing process for the other hand/arm. Once both are complete, drop the brush in the sink. Rinse hands under running water, starting from the fingertips, allowing water to run from the elbows without shaking.
Drying: Dry hands with a sterile towel.
Gloving
Gloves act as a barrier between hands and sterile surfaces. Methods for gloving:
Closed Method: Performed without exposing the hands outside the gown sleeves. The glove is picked up through the gown sleeve, aid over the cuff, and then manipulated over the hand and gown cuff using the opposite hand (still inside its gown sleeve).
Open Method: Used when only hands need to be covered (e.g., for catheterization). The glove is picked up by the cuff, slid onto the opposite hand, and then the sterile gloved hand helps adjust the cuff of the second glove. (sterile on sterile).
Assisted Gloving: A sterile assistant picks up and opens the glove by the cuff, allowing the individual to slide their hand in. The assistant then pulls the cuff up and over the gown.
Gowning
Surgical gowns are folded with the inside facing out to maintain sterility.
Grasp the gown on the inside, pull it away from the table, and allow it to unfold without shaking. Identify armholes and place arms through, but do not push hands through the cuffs.
Securing: An assistant ties the back of the gown. If a sterile back gown is used, the front ties are secured by the wearer with the help of an assistant after gloves have been donned.
Positioning for Anesthesia and surgery
Positioning for Anesthesia
Airway Management: Support the animal's head during induction to keep the airway open and prevent obstruction from pharyngeal tissue collapse.
Comfort: Place a Vetbed under the animal.
Limb Restraints: when using limb restraints (like ropes), avoid overtightening, which could compromise blood circulation.
Heat Sources: Ensure any heat sources used for temperature maintenance are not excessively hot to prevent dermal burns from prolonged exposure.
Repositioning: Temporarily disconnect the anesthetic circuit from the endotracheal tube (ETT) when repositioning the patient to prevent twisting or pulling that could cause tracheal damage.
Positioning During Surgery
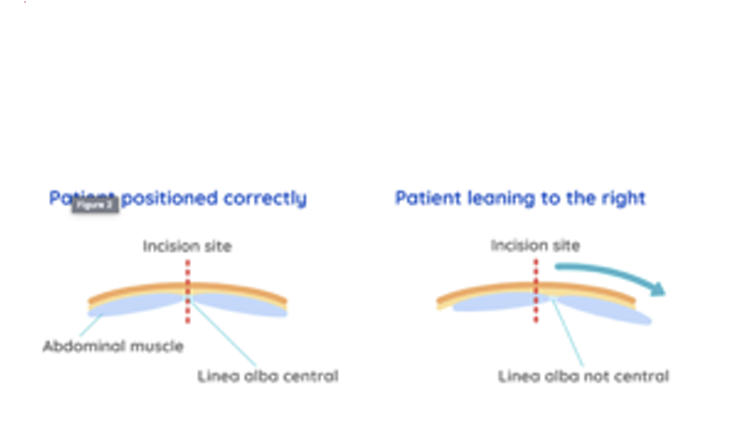
Procedure-Dependent: Patients are positioned based on the surgical procedure. Dorsal recumbency is common for abdominal surgeries (e.g., ovariohysterectomy, castration, foreign body removal, cystotomy).
Bladder Management: Palpate and express the bladder if full before any abdominal procedure.
Straight Positioning (Especially for Spays): It's critical to position the patient straight on the table, especially for a spay. This aligns the skin midline with the linea alba (midline of the muscle layer), making the surgical approach easier, reducing hemorrhage, postoperative pain, and the risk of complications.
Positioning Aids
Types: Leg ties, sandbags, or cradles can be used to maintain the patient's position.
Safety: Ensure these aids allow the animal to remain comfortable and do not impede respiration, circulation, or interfere with the surgical field.
Monitoring: essential to continuously monitor the patient's vital parameters.
Injections - intramuscular, intravenous, subcutaneous, infusion therapy
Used to administer meds, fluids + other substances to dogs/cats. 3 main types: IM, IV and subcutaneous. Infusion therapy is the fluids given/meds through IV catheter.
Intramuscular (IM) Injection: Given into muscle tissue for slower absorption + longer duration of action.
Site: Typically the lateral thigh or trapezius muscle.
Steps:
Clean the site with antiseptic.
Withdraw medication with a sterile syringe and needle.
Hold syringe like a dart, Insert the needle into the muscle at a 90-degree angle.
Aspirate the plunger to ensure that the needle is not in a blood vessel.
Inject slowly, smoothly.
Withdraw needle and dispose in a sharps container.
Intravenous (IV) Injection (Without Catheter)
Administered directly into a vein for rapid onset and short duration of action.
Site: Typically a peripheral vein in the forelimb or hindlimb.
Steps:
Clean the site with antiseptic.
Apply pressure above the injection site.
Withdraw medication with a sterile syringe and needle.
Hold syringe like a dart, Insert the needle into the vein at a 30 - to 45-degree angle.
Aspirate the plunger to confirm vein entry.
Inject medication slowly, smoothly.
Withdraw needle and apply pressure to prevent bleeding.
Usually we put a catheter → fix it → apply drugs by catheter. Technique with catheter → explain in infusion therapy.
Subcutaneous (SC) Injection
Administered into the tissue just under the skin for slow absorption and longer duration of action.
Site: Typically the scruff of the neck or the flank.
Steps:
Clean the site with antiseptic.
Withdraw medication with a sterile syringe and needle.
Pinch the skin to create a tent-like structure.
Hold syringe like dart, Insert the needle into the tissue at a 45-degree angle.
Inject medication slowly, smoothly.
Withdraw needle and release the skin.
Infusion Therapy (Via IV Catheter)
Involves continuous administration of fluids or medications through an IV catheter to maintain hydration, provide electrolyte support, or deliver drugs.
Site: A peripheral vein in the forelimb or hindlimb.
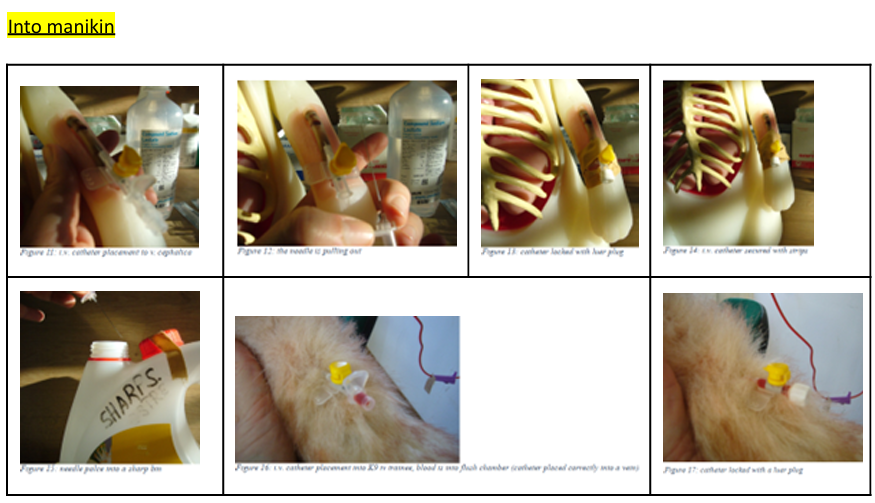
Steps for Catheter Placement:
Clean the site with antiseptic.
Place a tourniquet above the site to occlude the vein.
Insert a sterile needle (with catheter) into the vein at a 10- to 15-degree angle.
Advance the catheter until the hub is flush with the skin.
Remove the needle.
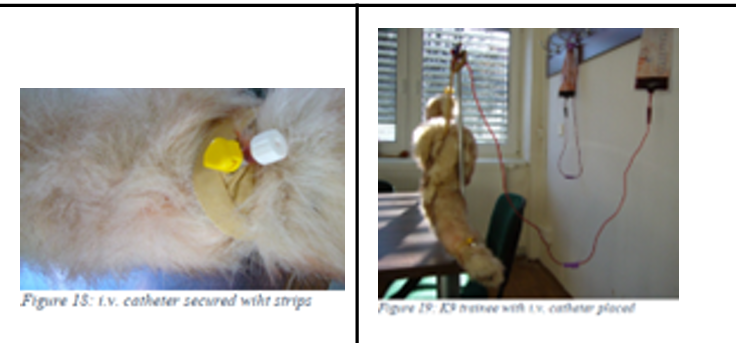
Secure the catheter with tape or a bandage.
Connect the IV line to the catheter and administer fluids or medications
Local anesthesia in small animals - Superficial, infiltrative and lead
Local anesthesia: managing pain during procedures, incl. surgeries, dental work, other. Function by blocking nerve impulses in a specific area, giving targeted pain relief. Thee main techniques for administering it: superficial, infiltrative and nerve block/lead block.
1. Superficial Anesthesia: This involves applying a topical anesthetic (cream or gel) directly to the surface of the skin or mucous membrane. Typical for minor procedures, wound repair or biopsies.
Procedure:
Clean the area with an antiseptic solution.
Apply the topical anesthetic.
Allow the anesthetic to take effect for the recommended time.
2. Infiltrative Anesthesia: This technique involves injecting the local anesthetic into the tissue directly surrounding the surgical site. Typical for procedures involving a small tissue area, like a digit or a small skin lesion.
Procedure:
Clean the area with an antiseptic solution.
Use a sterile syringe and needle to draw the local anesthetic from vial.
Inject the anesthetic into the tissue surrounding the surgical site.
Wait for the anesthetic to take effect before starting the procedure.
For lidocaine, a general dose is 2–5 mg/kg. If adrenaline is combined with lidocaine, the total dose can be increased to 5–8 mg/kg.
Important Caution: Local anesthetics containing adrenaline should not be injected into tissues supplied by end arteries (like the ears or tail) and should be used with caution in dogs with thin skin. - due to it causing vasoconstriction → compromise blood flow.
3. Nerve Block/Lead Block Anesthesia: This technique involves injecting local anesthetic around a specific nerve or group of nerves to provide complete anesthesia to a larger region of tissue. Used in more extensive procedures, like orthopedic surgery.
Procedure:
Identify the precise location of the nerve or nerve group supplying the surgical site.
Clean the area with an antiseptic solution.
Use a sterile syringe and needle to draw the local anesthetic from vial.
Inject the anesthetic around the target nerve(s).
Wait for the anesthetic to take effect before proceeding with the procedure.
Local anesthesia in small animals - limbs
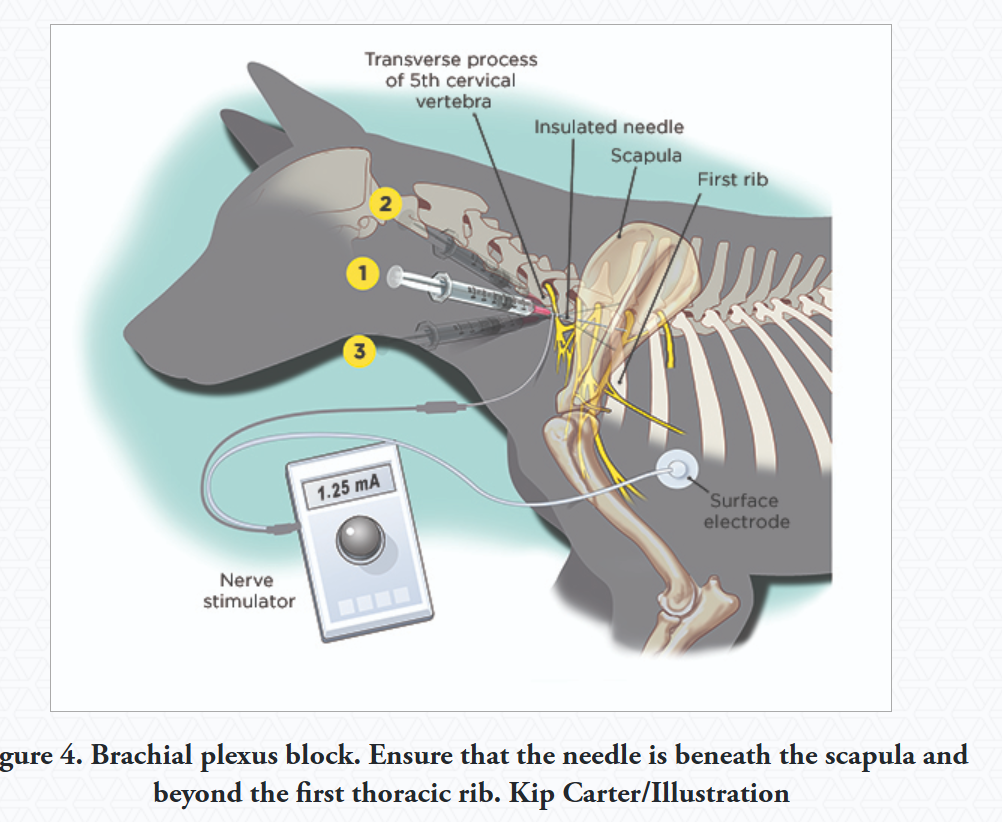
Local anesthesia: role in pain relief - limb surgeries. Aspiration is done before injection to make sure we have not hit a vein. Blocks can be done by anatomical landmarks, ultrasound or nerve stimulator. Common nerve block techniques for the forelimbs and hind limbs:
Forelimb Blocks
Brachial Plexus Block:
Provides Analgesia: Limb from elbow and down.
Technique: 7.5 cm, 20 or 22G spinal or insulated needle is inserted near shoulder joint, parallel to vertebral column, point towards costo-chondral junction.
inject larger volume to increase success - bupivacaine 1-2mg/kg, lidocaine 4mg/kg
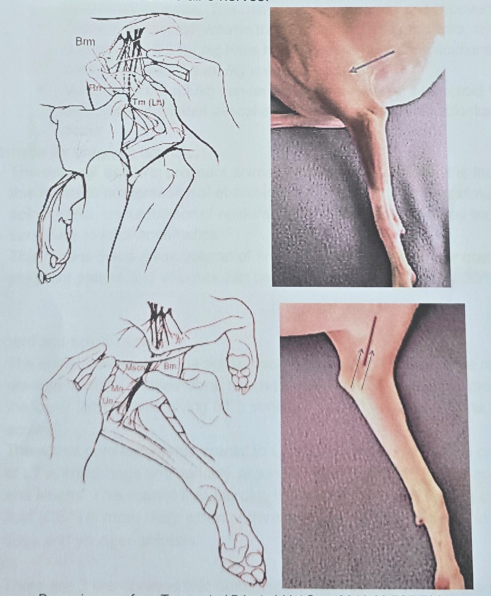
Proximal Radial/Ulnar/Median/Musculocutaneous Block
Provides Analgesia: Areas below elbow.
Injections: made on both the inner and outer sides of the mid-humerus (upper arm bone).
Radial Nerve: Bw. heads of triceps and brachialis muscle.
Musculocutaneous, Median, Ulnar Nerves: palpating brachial pulse helps guide needle around brachial artery.
Volume: Approximately 0.5–2.0 ml of local anesthetic is deposited at each site, depending on animal size.
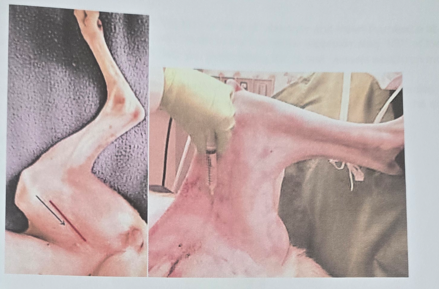
Distal Radial/Ulnar/Median Block (Carpal Area)
Use: For procedures on the lower forelimb, around wrist (carpus)
Technique: injection is done around the carpal joint.
Hindlimb Blocks:
Blocking the femoral and sciatic nerves can provide pain relief for entire pelvic limb from mid-thigh and down, including stifle joint (knee).
Femoral Nerve Block
Injection: found in the femoral triangle area on inner thigh. Abduct limb to 90 degrees, extend, palpate femoral artery, identify caudal border of sartorius muscle. Inject needle towards the iliopsoas muscle.
The nerve is superficial, so deep injections are not required.
Sciatic Nerve Block
Location: bw. trochanter major and ischiatic tuberosity. Nerve lies bw. biceps femoris and semimembranosus muscle.
Provides Analgesia: Partial pain relief of stifle (knee) and areas below. When combined with femoral block, it numbs out the entire limb from mid-thigh down.
Injection Point: bw. two bony points on upper outer thigh.
Tibial and Common Peroneal Nerve Blocks
For procedures on lower hindlimb.
Technique:
Tibial Nerve: injecting needle bw. heads of the gastrocnemius muscle,caudal on tibia.
Common Peroneal Nerve: Blocked near the top of calf bone (fibula)
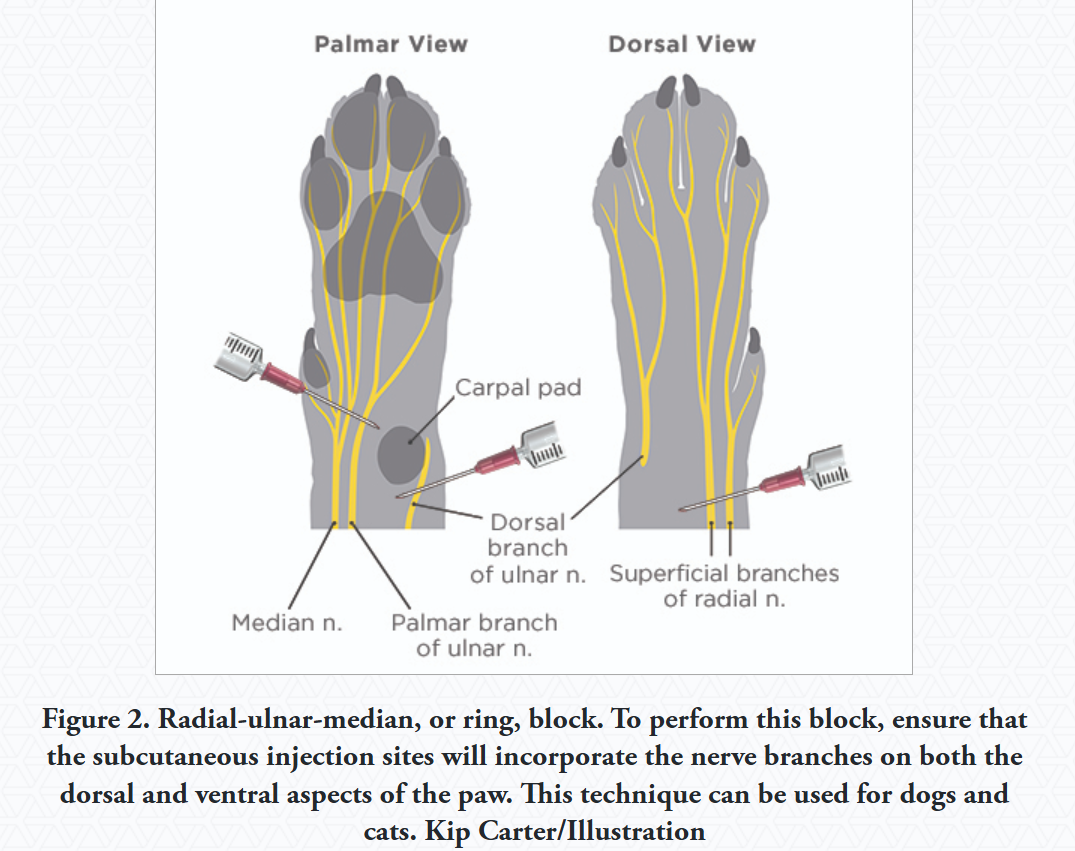
Blocks Applicable to Both Forelimbs and Hindlimbs
Digital Nerve Block
Gives anaesthesia to Individual digits or all digits.
Technique: injecting along sides of each digit or into the webbing bw. the toes where the nerves split.
Local anesthesia in small animals - intra-articular
Intra-articular Anesthesia: technique that gives localized pain relief to a specific joint in small animals, by injecting anesthetic agents directly into a joint space.
Technique:
injecting anesthetic agents into joint cavity to numb the joint and surrounding tissues
needs proper animal restraint and aseptic preparation of injection site
joint should not be over-distended during injection
Anesthetic Agents: chosen based on specific needs + procedure. Dosage depends on animal size and specific joint being treated.
Lidocaine
Bupivacaine
Mepivacaine
Clinical Applications - intra-articular is commonly used for:
Joint injections
Arthrocentesis (joint fluid sampling)
Arthroscopy
Pain management for joint procedures
general: gives effective pain relief, improved visualization, manipulation of joint during procedure.
Important Considerations
Potential for joint damage by administration of local anesthetic
Preservative-free morphine can be used alone in the joint for up to 24 hours of analgesia.
Injection volume must be appropriate for the specific joint's capacity
Strict aseptic technique is essential to prevent infection
Local anesthesia in small animals - Intercostal
Thoracic pain, whether from trauma or surgery, can significantly impair respiratory function, leading to hypoventilation, delayed recovery, increased morbidity, and extended hospitalization. Local anesthesia at the level of intercostal spaces offer several advantages over thoracic epidural anesthesia, including:
Less sympathetic blockade
Pain control closer to the pain pathway origin
Complete blockade of all pain fibers
Minimal effect on ventilation
ICS nerve blocks - improve pulmonary function in the post-operative period.
Local anesthetics agents: Bupivacaine, lidocaine.
Procedure for Performing ICS Nerve Blocks for Rib Fractures:
Patient Preparation: Sedate or anesthetize the patient using an opioid combined with either a benzodiazepine or alpha2-agonist (selection based on cardiovascular and systemic health)
Take thoracic radiographs to confirm fracture location(s)
Provide supplemental oxygen throughout the procedure
Block Planning: Block at least 2 intercostal spaces cranial and caudal to the fracture site for complete analgesia.
Clip hair if necessary and clean the area.
Position patient in lateral recumbency with the injured side up.
Needle Placement and Injection:
Insert a small spinal needle dorsally at the caudal border of the rib cranial to the target intercostal space.
Carefully "walk off" the rib surface in a caudal direction.
Aspirate with a syringe containing sterile saline to verify proper needle placement (not in a vessel or thoracic cavity)
Test inject a small amount of saline to check for resistance
If no resistance, connect the local anesthetic syringe and slowly inject the calculated dose over 2 minutes
Repeat for each additional site
Post-Procedure Monitoring:
Continue supplemental oxygen
Monitor for changes in respiratory rate/character or signs of respiratory distress that might indicate pneumothorax
Be prepared to perform thoracocentesis if pneumothorax is suspected
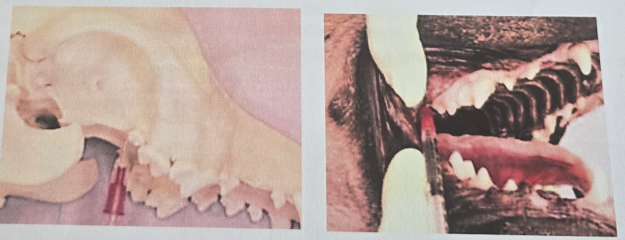
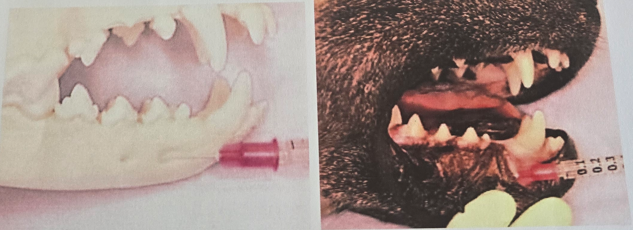
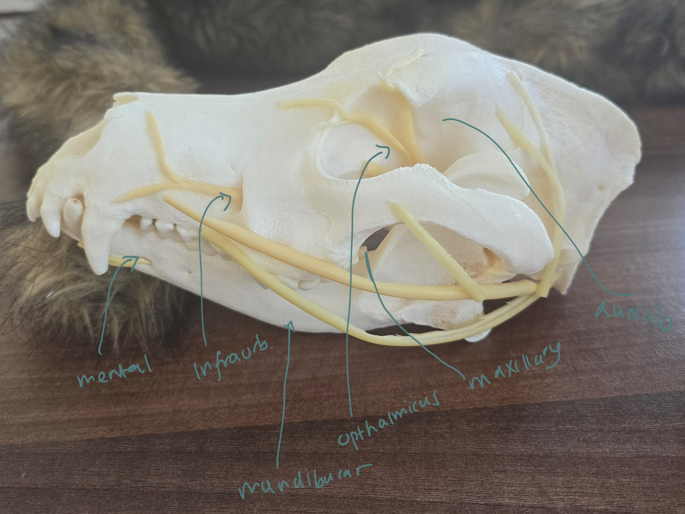
Local anesthesia in small animals – n. maxillaris, n. infraorbitalis, n. mandibularis, n. mentalis, n. auriculopalpebralis, n. ophtalmicus
Regional Nerve Blocks/all: injecting 1-2 ml of local anesthetic agents (lidocaine, bupivacaine, mepivacaine) near specific nerves to block pain.
often used in opthalmology + dentistry, while patient is under general anesthesia or sedation. Lasts for several hours. Injected after a negative aspiration.
Nerve blocks:
Caudal Maxillary Nerve Block (n. maxillaris)
Insert needle into skin just ventral to the zygomatic arch at its rostral border
Area anesthetized: Maxilla, upper teeth, nose, upper lip, hard palate
Rostral Maxillary (Infraorbital) Nerve Block (n. infraorbitalis)
Place needle in the infraorbital foramen, located beside maxillary third premolar. Confirm needle placement by it passing freely into canal without bony resistance.
Area anesthetized: Maxillary teeth, upper lip, nose
Caudal Mandibular (Inferior Alveolar) Nerve Block (n. mandibularis)
Insert needle dorsally through skin to contact ventral border of ramus, then walk off medial edge and advance to the foramen.
Area anesthetized: Mandible, lower lip, canine, incisors
Rostral Mandibular (Mental) Nerve Block (n. mentalis)
Insert needle into mental foramen at level of second premolar
Area anesthetized: Canine teeth and incisors
Auricular Block (n. auriculopalpebralis)
Insert needle subcutaneously + slightly deeper into tissue, above the most caudal aspect of zygomatic arch, slightly rostral to vertical ear canal
Area anesthetized: Cheek teeth, canines, incisors, skin and mucosa of chin and lower lip
Retrobulbar Block (n. ophthalmicus)
Insert needle through lower eyelid or corner of eye, advancing slowly into retrobulbar space
Area anesthetized: Eye, orbit, conjunctiva, eyelids, forehead skin
Epidural Anesthesia in dogs
Epidural Anesthesia Techniques for Hindlimb Procedures
Drug Options
Local Anesthetics (1 ml/5 kg, max 6 ml):
2% lidocaine (duration ~1 hour)
2% mepivacaine
0.5% bupivacaine (duration 2-4 hours, most commonly used epidurally)
0.75% ropivacaine (may cause more hypotension but potentially less post-recovery ataxia)
Combination Options:
Local anesthetics can be combined with opioids or alpha-2 agonists for enhanced analgesia
Preservative-free morphine sulfate (0.1-0.2 mg/kg) is commonly added
Combined volume should not exceed 1 ml/5 kg (max 6 ml)
Procedure Technique of Epidural Injection:
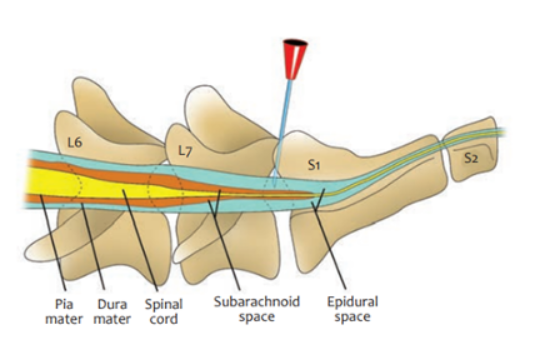
Patient Positioning: Sternal recumbency with hindlimbs pulled forward (easiest position) or lateral recumbency.
Landmark Identification:
Palpate dorsocranial points of ilium by thumbs + middle-finger of non-dominant hand → Locate L7 spinous process just caudal to imaginary line between iliac crests
Find lumbosacral junction by index finger (depression caudal to L7 spinous process)
Needle Insertion:
Use 2.5-7.5 cm, 20-22G spinal needle
Insert perpendicular to dorsum
A "popping" sensation may indicate entry into epidural space (not always felt)
Resistance will be felt when needle reaches floor of spinal canal
Confirm Placement:
Remove stylet and check for blood or CSF in hub
If blood appears, remove, clean, and retry
Test with 0.25-0.5 ml of saline (should inject without resistance)
Injection Technique:
Inject slowly over 30-60 seconds into epidural space
Monitor for heart rate changes or lightening of anesthesia
Epidural catheters can be placed for long-term analgesic administration
Potential Side Effects
Local Anesthetics:
Hypotension (if lumbar sympathetic outflow is blocked)
With cranial extension (overdose): severe hypotension, respiratory insufficiency, paralysis, convulsions
Opioids:
Urine retention (monitor urination; may require naloxone or catheterization)
No spinal hypotension
Patient Monitoring
Anesthetic Monitoring: Monitoring an anesthetized patient is a continual process from pre-medication to full recovery. Vital signs + other parameters are recorded to the surgery record every 5 minutes:
1. Respiratory Monitoring
Airway - ensure proper endotracheal tube placement
Respiratory rate (normal range: 8-16/min for dog, 12-24/min for cat)
depth and character (chest wall movement, pattern)
Oxygen saturation (SpO₂)
2. Cardiovascular Monitoring
Heart rate and rhythm: Evaluate using auscultation or ECG monitoring (normal: 60-120 bpm for dogs, 120-160 bpm for cats)
Pulse rate and strength
Mucous membrane color: Pink indicates adequate oxygenation; pale, blue, or gray membranes suggest problems
Capillary refill time: Should be <2 seconds; prolonged times indicate poor perfusion
Arterial blood pressure
3. Body Temperature Monitoring
Hypothermia is common during anesthesia and can lead to: prolonged drug metabolism and recovery, cardiac arrhythmias, impaired wound healing, coagulopathies.
Normal range: 36.7-38.3°C
4. Anesthetic Depth/Patient Status
Reflexes and muscle tone
Eye position and pupillary reflex activity
Heart and respiratory rates
Surgical procedure status
5. Equipment Function
Anesthetic level
Vaporizer settings
Oxygen flowmeter settings
Pressure relief (pop-off) valve: Must remain open except during manual ventilation to prevent dangerous pressure buildup in the circuit
15. Preoperative examination
Pre-Anesthetic Patient Evaluation: critical step for ensuring patient safety, identifying individual risk factors and underlying conditions that could impact the anesthetic plan.
Pre-anesthetic questions to ask to owner:
Current Health Status:
Energy level and exercise tolerance of pet
Respiratory changes (breathing patterns, coughing, sneezing)
Bowel movement patterns
Vomiting frequency
Food and water intake in the past 24 hours
Anesthetic Risk Assessment:
Previous anesthesia experiences
Any past medical complications
Medications administered in the last 24 hours
Understanding of today's procedure
Additional concerns
Factors for Clinical Evaluation
Complete History/Anamnesis: Identification of known medical conditions and previous adverse drug responses
Physical Examination: Must be completed within 12-24 hours before anesthesia and repeated immediately before the procedure
Patient-Specific Factors:
Age (neonatal, pediatric, adult, geriatric)
Breed/size (breed-specific sensitivities)
Temperament (stress level, need for pre-medication)
Existing diagnoses
Procedure Considerations:
Invasiveness
Expected duration
Anticipated pain level
Essential Pre-Anesthetic Assessment - vitals:
General Status: Overall appearance and demeanor
Vitals: Temperature, pulse, respiration (TPR)
Mucous Membrane Color: perfusion and oxygenation
Hydration Status: Skin turgor, moisture of mucous membranes
Accurate Weight
Laboratory Testing: Pre-operative blood analysis may be recommended based on patient factors and procedure - evaluating organ function (liver, kidney), hydration status, anemia/blood abnormalities, or other conditions that may pose a risk.
Veterinary Anesthesia Record
Anesthesia Monitoring Chart: for documenting a patient's condition before, during, and after anesthesia. Serves as medical records and legal documents. Includes:
Patient and Procedure Identification
Date
Owner information
Type of procedure
Personnel - vet, surgeon, anesthetist
Patient Data
ID
Species
Weight
Sex
Age
Housing site
Body Condition Score (BCS): 1-5 scale (1=emaciated, 5=obese)
Pre-anesthetic Assessment
Anamnesis: Patient history, including previous anesthesia experiences and medical concerns
Consciousness level: Alert, depressed, responsive, etc.
Vital signs (TPR):
Respiratory rate (RR)
Heart rate (HR)
Temperature
Mucous membrane color
Capillary refill time (CRT)
Packed cell volume (PCV): Percentage of red blood cells in blood
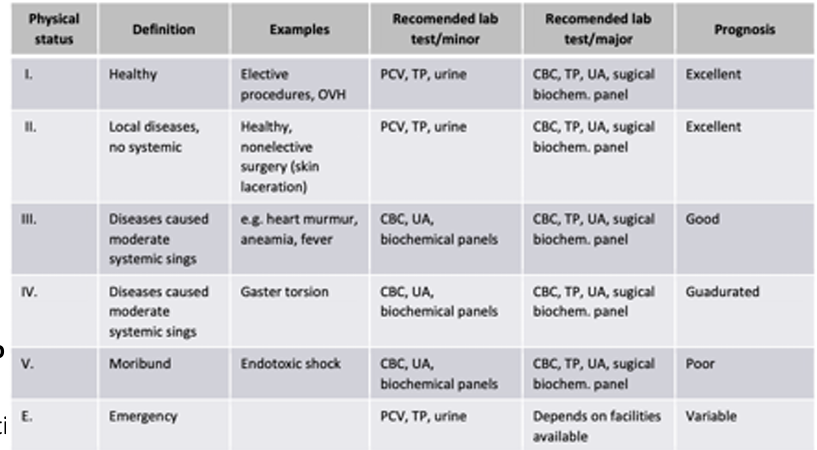
ASA Physical Status Classification: Risk assessment scale from 1-4
ASA I: Healthy patient with no systemic disease
ASA II: Mild systemic disease
ASA III: Severe systemic disease
ASA IV: Severe systemic disease that is a constant threat to life
Anesthetic Protocol
Premedication: Drugs administered before induction (sedatives, analgesics)
Induction drugs: used to induce anesthesia
Maintenance anesthetics
Anesthetic machine
Intubation details: Endotracheal tube size and time of placement
Fluid therapy: Type of fluids and administration rate in ml/min
Intraoperative Monitoring Parameters
Oxygen (O₂): Oxygen flow rate or FiO₂ (fraction of inspired oxygen)
Oxygen saturation (SpO₂): Percentage of hemoglobin saturated with oxygen
End-tidal CO₂ (ETCO₂): Concentration of CO₂ at the end of exhalation
Blood pressure (BP): Systolic, diastolic, and mean arterial pressure
Respiratory rate (RR): Monitored throughout procedure
Additional Medications
Antibiotics: Type and timing of administration
Analgesics: Pain management medications administered
Purpose and Importance of Anesthesia Monitoring Charts:
Purpose: patient safety, documentation, communication, quality improvement and for research.
record at regular intervals (typ. every 5 minutes)
Document all interventions, adjustments to anesthetic depth, patient responses, note any complications/events, record start and end times of anesthesia, surgery and recovery phases.
Include post-anesthetic monitoring data + recovery notes
ensure all entries are correct, dated, signed
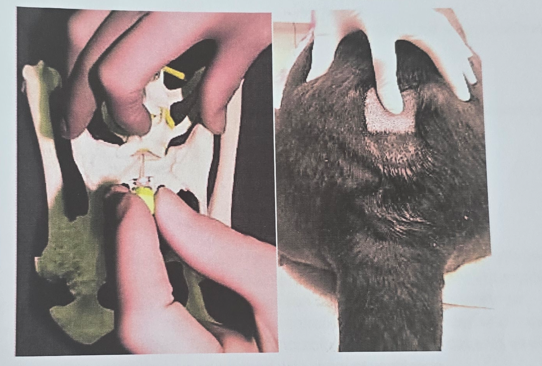
Intubation, intravenous cannulation
Intubation: procedure during anesthesia/surgery/other to maintain an open airway, allowing for delivery of O2 and anesthetic gases while protecting the airway from aspiration.
Laryngoscope is used to visualize the larynx, and place an endotracheal tube into trachea. The ET tube is then attached to ventilator/anesthetic machine to give O2/anesthesia. Monitor vitals throughout procedure. ET is removed once animal is awake and able to breathe on their own.
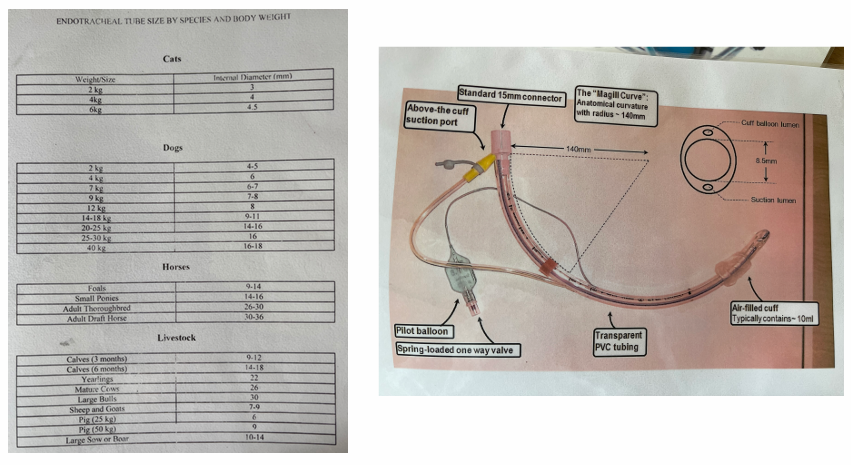
Equipment Needed
Appropriately sized endotracheal tubes (ET) - good to have one size smaller and larger available.
5 mL syringe for cuff inflation
Sterile lubricant
Gauze pads
Mouth gag
Gauze to tie in ET
Laryngoscope
Topical anesthetic solution (for cats)
Cotton applicator sticks (for topical anesthetic application)
Stylet (for small ET tubes)
Procedure
Select and prepare the ET tube:
Measure appropriate length and diameter
Check cuff inflation and tube cleanliness
Apply minimal sterile lubricant to the tip
Position the patient (typically in sternal recumbency)
Insert the tube:
Place mouth gag
Gently extend the tongue with gauze pad
Depress the epiglottis with laryngoscope or tube tip
Pass the ET tube through the glottis until the tip is before the thoracic inlet
Verify placement: Auscultate both sides of the chest for bilateral breath sounds, palpate the neck to confirm tube position.
Secure the tube:
Tie gauze around the tube behind the adapter (midway on the gauze), place gauze behind canine teeth, then tie around patient`s head, behind hears, to upper jaw.
Connect and inflate: (lie patient on its side)
Connect to anesthesia machine or ventilator
Inflate cuff with air (≤3 mL for cats, ≤6 mL for dogs) If it takes more air, then consider replacing with larger tube.
Intravenous Cannulation: provides direct access to the bloodstream for giving fluids, meds and emergency drugs.
Equipment Needed
IV catheter
Clippers
Heparinized saline
Chlorhexidine surgical scrub
Alcohol
Swabs/cotton wool
Adhesive tape
Padding bandage
Cohesive bandage
Procedure of placing IV cannulation (real life):
Prepare the site:
Restrain the patient appropriately
Clip hair over the selected vein
Clean with chlorhexidine followed by alcohol
Maintain strict aseptic technique throughout - poor can lead to phlebitis (irritation)
Insert the catheter:
Have an assistant raise the vein
Insert the catheter through the skin and into the vein
Confirm placement by observing blood return in the catheter hub
Advance and secure: hold stylet stationary while advancing the catheter into the vein
Ask assistant to stop raising and press over the vein a few cm above catheter entry site (prevents contamination of the leg with blood when stylet is removed).
Remove the stylet and cap the catheter
Flush with heparinized saline to confirm placement
Bandage securely:
Apply adhesive tape to stabilize the catheter
Place a protective bandage using padding and cohesive materials
Patient monitoring - equipment
Monitoring vital signs and other parameters is essential for patient safety throughout the entire anesthetic process.
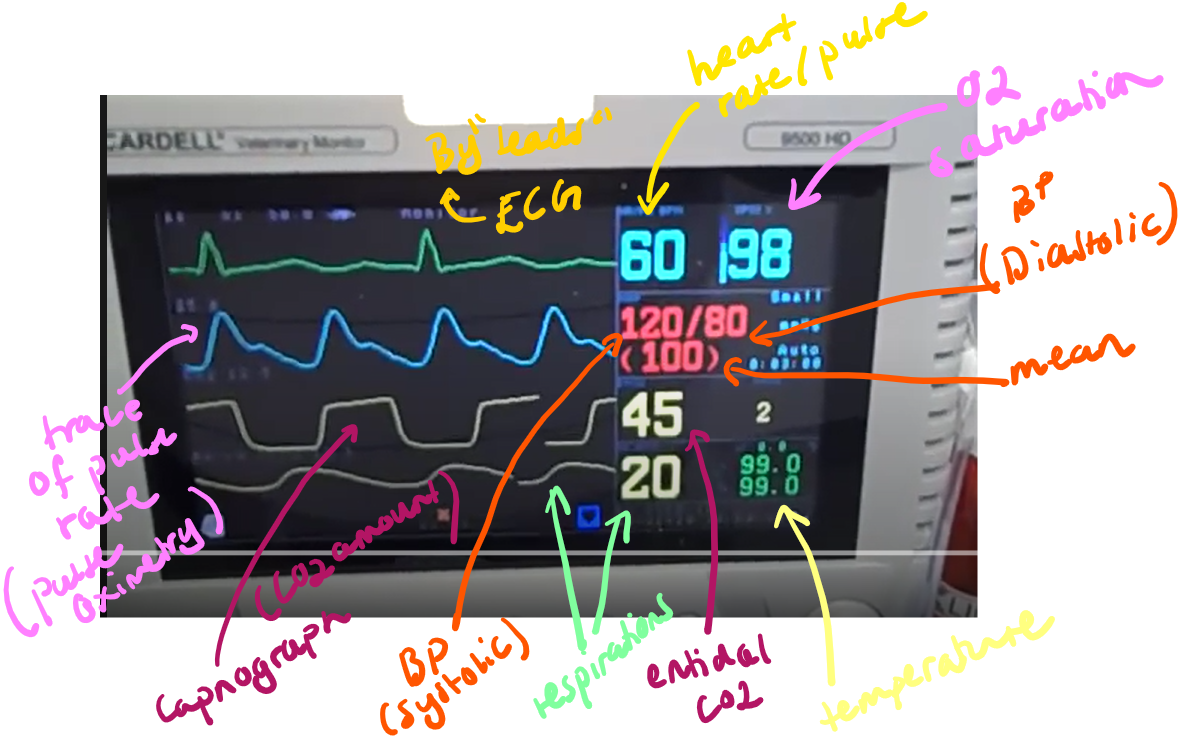
Capnometry and Capnography
Capnometry real time info on respiratory rate, end-tidal carbon dioxide (ETCO₂) and inspired CO2.
Capnography is the continuous graphic representation of these measurements, showing the CO₂ concentration throughout the respiratory cycle. (amount of CO2 expired, sampled)
Waveform Phases:
Phase 1 (Inspiratory Baseline): beginning of exhalation, usually at 0 mmHg CO₂ as it's dead space air from the airways.
Phase 2 (Expiratory Upstroke): As more alveolar air is exhaled, CO₂ levels rapidly increase.
Phase 3 (Expiratory Plateau): Represents the even expiration of CO₂ from the alveoli, 30-40 mmHg.
Phase 0 (Inspiratory Downstroke): A rapid decrease in CO₂ as the patient inhales fresh gas containing no CO₂.
Significance: Changes in the capnogram waveform or ETCO₂ values can indicate problems such as airway obstruction, rebreathing of CO₂, leaks in the breathing circuit or endotracheal tube cuff, respiratory arrest, or even issues with cardiac output.
Pulse Oximetry
non-invasive technique that provides real-time determination of oxygen saturation in arterial blood (SpO₂).
What it Measures: The percentage of hemoglobin saturated with oxygen (SpO₂), and often also provides the heart rate.
Normal SpO₂ in an anesthetized patient breathing 100% oxygen should be 98-100%.
An SpO₂ of 90% corresponds to a PaO₂ of 60 mmHg, indicating hypoxemia.
How it Works: The machine sends infrared light at two wavelengths (660 nm for deoxygenated blood and 940 nm for oxygenated blood) through the blood and tissues.
By measuring the absorption at each wavelength, it calculates the percentage of oxygen in the blood.
Significance: Ensures the patient is receiving adequate oxygen and that oxygen is effectively reaching the tissues.
The probe requires a warm, motionless, non-pigmented, and lightly haired site for accurate readings, such as the tongue, ear, prepuce, or toe web.
Blood Gas Analysis
for assessing the patient's acid-base status, the adequacy of ventilation (through PaCO₂), and the level of oxygenation (through PaO₂).
Arterial Blood Pressure
one of the most important measures of cardiovascular function, indicating the adequacy of blood flow to the patient's tissues and organs.
Normal Ranges During Surgery: BP - 120/80 mm Hg.
Systolic: 90-120 mmHg
Diastolic: 55-90 mmHg
Mean Arterial Pressure (MAP): 60-100 mmHg
How it's Measured:
Invasively: by catheter
Non-invasively: Doppler technique or Oscillometer
Electrocardiography (ECG)
monitoring of the electrical activity of the heart. The electrocardiogram (ECG) is a graphic representation of the sum of electrical potentials generated by the heart during a cardiac cycle.
What it Measures: Heart rate and rhythm.
Components:
P-wave: Represents depolarization (contraction) of the atrial tissue.
QRS Complex: Represents depolarization (contraction) of the ventricles.
T-wave: Represents repolarization (relaxation) of the ventricles.
P-Q Interval: Represents the time it takes for electrical impulses to travel from the atria through the AV node and His bundle to the ventricles.
Body Temperature
The core body temperature of the patient, measured by rectal thermometer or more continuosly with an esophageal or nasopharyngeal probe.
During anesthesia, the body temperature usually decreases due to muscle inactivity, reduced metabolic rate, drug induced vasodilation + depression of thermoreg. centre.
hypothermia: prolonged drug metabolism + recovery, cardiac dysfunction, impaired perfusion, risk of infection.
Hyperthermia (less common): neurological damage.
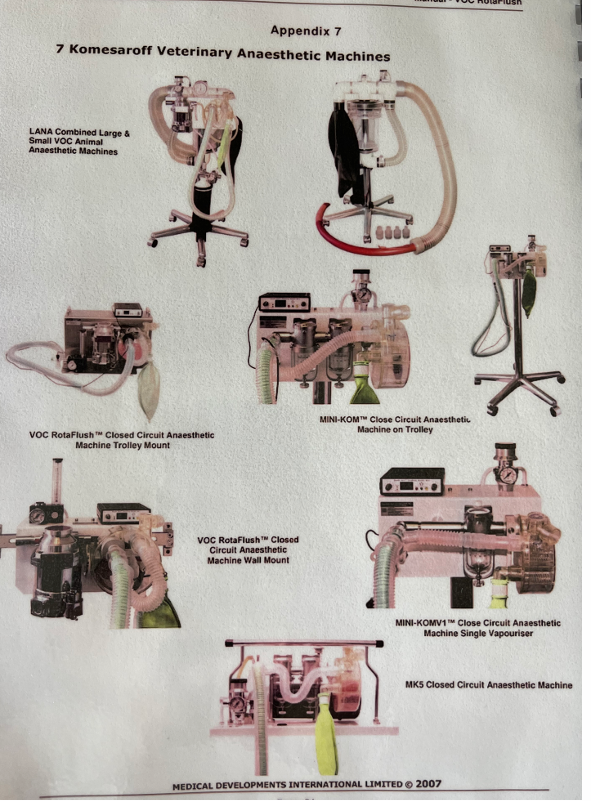
Handling of the anaesthetic machine and ancillary equipment
The Anesthetic Machine: vital piece of equipment for the administration of inhalation anesthetics to animals during surgical procedures.
needs proper handling, maintenance + its ancillary equipment - for well being.
1) “Pre-Use Safety Checklist”
Before using an anesthetic machine, perform these essential checks:
Complete visual inspection of all components
Verify gas supplies (oxygen and anesthetic gas levels)
Test the scavenging system to ensure proper waste gas removal
Check all connections, verify monitoring equipment function
2) Proper Setup and Positioning
Place the machine in a well-ventilated area to minimize staff exposure to waste gases
Position the machine to allow the anesthetist easy access to both the patient and controls
Ensure the patient is on a firm, padded surface to prevent pressure injuries
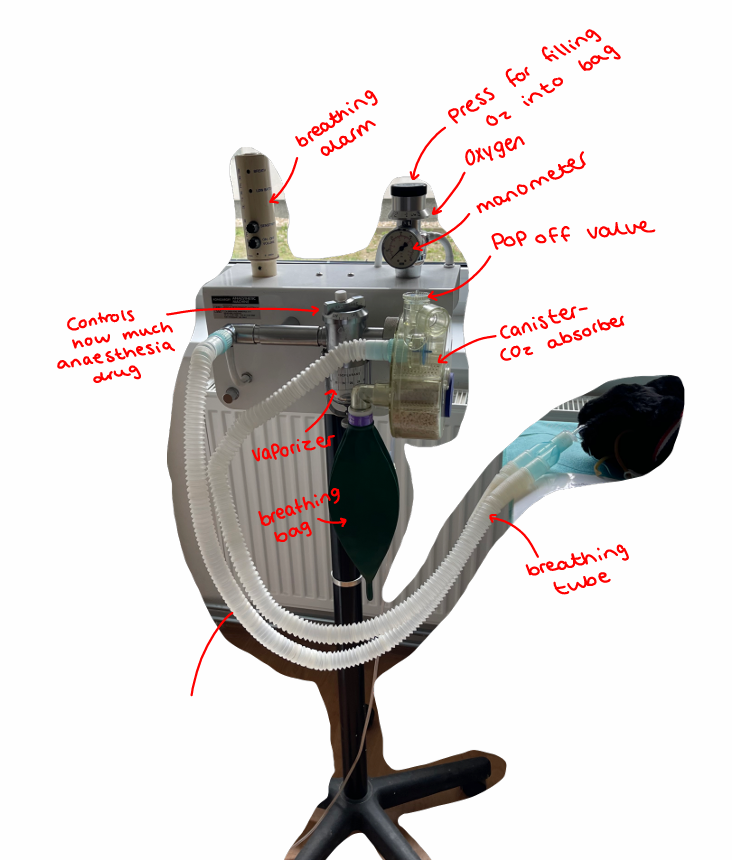
3) Gas Delivery Management
The machine should be set to deliver the needed concentration of gas + O2 to the animal. Concentration is adjusted by vaporizer, which is set to the appropriate level for the specific agent being used.
Vaporizer Settings: component that controls anesthetic gas concentration, but its setting alone doesn't determine anesthetic depth. Settings needs to be continually adjusted according to the depth of anesthesia + status of procedure.
Initial induction: Higher settings (2.5-3%) typically needed
Maintenance phase: Lower settings once stable plane is achieved
Procedure completion: Gradual reduction as surgery concludes
Safety limit: Never exceed 3% for isoflurane to prevent overdose
Deeper anesthesia: Instead of exceeding 3%, increase oxygen flow and provide manual ventilation to enhance uptake
Oxygen Flow Meter Management
Standard: 0.5-2 L/min for most procedures
Reservoir bag assessment: If overfilling while patient breathes normally, check that pop-off valve is open and reduce flow rate
Pop-Off Valve Function
This critical safety valve prevents dangerous pressure buildup, as it releases excess pressure:
Normal: Open or mostly open during routine anesthesia
Temporary closure: Only when manually ventilating ("bagging") the patient
Need to: Regular check to ensure proper position
4) Continuous Monitoring by:
Pulse oximeter: Measures oxygen saturation
Capnograph: Monitors carbon dioxide levels in exhaled breath
Blood pressure monitor: Tracks cardiovascular status
5) Maintenance Protocols - should be maintained + serviced regularly
Regular cleaning, calibration of vaporizer, replacement of any damaged components, documentation, servicing
6) Safety Considerations
should be used with safety precautions, by:
scavenging system to remove waste gas
personal protective equipment - gloves and mask
Postoperative care and monitoring
The recovery period following anesthesia need monitoring and care to ensure patients transition safely from unconsciousness to normal function.
Recovery Room Setup
separate area and be located adjacent to the operating room, patient is monitored + stabilized before returning to ward area.
Provide species-specific separation
Allow easy observation of all animals
good ventilation
Keep temperature between 23-25°C
Essential equipment needed in the room:
Anesthetic machine
Oxygen flow meters
Induction equipment
Management of cardiopulmonary arrest
Warming devices + fluid therapy equipment
Portable suction apparatus
Postoperative Monitoring Priorities
Patients should be monitored with the same manner as during surgery until vital signs normalize. Key monitoring areas include:
1. Airway Management (most common problem in post-operative)
Intubated patients require continuous monitoring
Extubation should occur when swallowing reflexes return
After extubation, extend the neck and draw the tongue forward to ease the breathing
Watch for signs of obstruction (causes: soft tissue, foreign, spasms)
Stertorous (snoring) breathing
Stridorous (labored) breathing
Unsynchronized movement of abdomen and thorax
Absence of airflow indicates complete obstruction
2. Breathing and Gas Exchange
Adequate ventilation ensures oxygen uptake and elimination of anesthetic gases and CO₂
Pulse oximetry helps assess oxygen saturation but may be compromised by movement
Hypoxemia may result from:
Decreased inspired oxygen
Hypoventilation
Impaired respiratory mechanics (obstruction, bronchospasm, chest wall issues)
Treatment may include intubation, positive pressure ventilation, or respiratory stimulants like doxapram
3. Circulation
Regularly monitor heart and pulse rate, pulse quality, mucous membrane color, capillary refill time, and limb temperature
Common circulatory issues include:
Hypotension - caused by decreased preload (blood loss, reduced venous return), decreased contractility (drugs, hypoxia), or decreased afterload (sepsis, vasodilation); treat with fluid support
Hypertension - typically caused by pain, hypoxia, hypercapnia; treat with oxygen and analgesia
Arrhythmias - assess effect on tissue perfusion; causes include residual anesthetic effects, pre-existing cardiac disease, hypoxemia/hypercapnia, pain, and hypothermia
4. Level of Consciousness
Recovery duration depends on drugs used, anesthesia duration, pre-existing conditions, and surgical complications
Assess by: ocular and cough reflexes, jaw tone, and response to gentle manipulation at the same frequency as during surgery
5. Body Temperature
Hypothermia is common and may cause hypoventilation, arrhythmias, delayed drug metabolism, hypoxemia, and CNS dysfunction
Contributing factors include impaired thermoregulation, cold surfaces/environment, and radiant/evaporative heat loss
Pain Management
Pre-preemptive analgesia with opioids and NSAIDs is common.
Postoperative pain assessment involves observing:
Attitude and behavior changes
Vocalization (more common in dogs than cats)
Responses to stroking and gentle manipulation
Reaction to wound examination
Willingness to eat, drink, move, and interact
Patient Comfort
Maintaining patient comfort is essential during recovery:
Check dressings, IV access points, and drains to prevent excessive tightness
Turn recumbent patients every 1-2 hours to prevent limb compression and venous drainage issues
Provide warm, dry bedding with sufficient texture and depth to prevent pressure sores
Care Handover - If patient care transfers between staff members, comprehensive information should be communicated to ensure continuity of monitoring and treatment.
Preparation of the operation site - skin, mucous membranes
1. Preparation of the Operation Site
Clipping Fur: min. 20 cm from each planned incision. Large enough to accommodate incisions and possible drain sites.
Removal of loose hair: by vacuum.
Limb Procedures: paw/distal extremity should be covered with a glove wrapped with tape to maintain cleanliness.
Male Dogs: The prepuce should be flushed with an antiseptic solution before the sterile skin preparation.
2. Sterile Skin Preparation
Goal: remove dirt and transient microorganisms from skin and reduce resident microflora to sub-pathogenic level in short period of time with minimal tissue irritation.
Materials:
2 bowls (one with hibiscrub - surgical soap and lukewarm water, then the second with 20 gauze pads divided into two piles.
One pile of gauze is covered with colored chlorhexidin sprite, and the other with clear chlorhexidine.
Povidone iodine (PVI) solution is also needed for the final step.
Procedure:
Start scrubbing at the planned incision site.
Use a circular scrubbing motion, working outwards from the center to the periphery.
Alternate between the colored and clear chlorhexidine solutions, performing this sequence three times. This ensures a total contact time of at least 5 minutes, allowing the antiseptic to be effective.
The colored chlorhexidine can serve as a visual indicator, changing color if the area isn't properly scrubbed.
After the final scrub, a 10% Povidone iodine (PVI) solution should be sprayed onto the prepared site.
Chlorhexidine Gluconate (CHG): If used, it can remain in contact at end of procedure or can we washed with sterile saline, because it binds to keratin. Contact time is less critical than with PVI. Two 30-second scrubs are okay.
3. Draping: final step in preparing site, creates + maintain a sterile field around the operating site.
Drapes: secure at their corners by using sterile Backhaus towel clamps. The tips of the towel clamps are considered non-sterile the movement they are placed on skin.
Fenestration: if drape does not come with pre-cut opening (fenestration), we will need to cut one of needed size over surgcial site. Do not cut through outermost drape layer.
22. Suture of skin and subcutaneous tissue
Surgical sutures: medical devices used to bring body tissues together after injury/surgical procedure. Involves typ. a needle with attached thread. .
Ideal Suture is:
Easy to handle
Minimal tissue reaction (no irritation)
Inhibits bacterial growth
Holds securely in tissue
Non-capillary
Non-allergic
Non-cardiogenic
Non-ferromagnetic
Suture Patterns Classification
By Continuity:
Interrupted: stitches are tied individually
Continuous
By Tissue Apposition:
Appositional: tissue edges neatly together.
Everting: tissue edges outwards.
Inverting: tissue edges inwards.
By Primary Tissue Application:
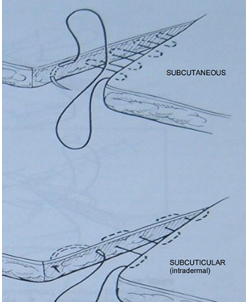
Subcutaneous or Subcuticular: patterns placed beneath the skin surface to eliminate “dead space” + give some initial apposition of the skin layers, reducing tension.
Suture Patterns for Different Procedures
Skin closure:
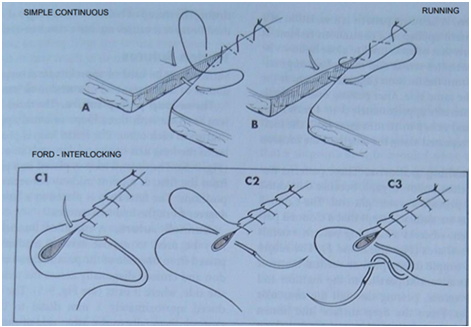
Appositional: Simple interrupted, simple continuous, Ford-interlocking.
Tension relief: Horizontal mattress, vertical mattress, near and far patterns.
Subcutaneous closure: Interrupted intradermal, simple interrupted, simple continuous, continuous intradermal, horizontal mattress, near and far patterns.
Fascia, Linea Alba: Simple interrupted, simple continuous, Lambert, horizontal mattress, near and far patterns.
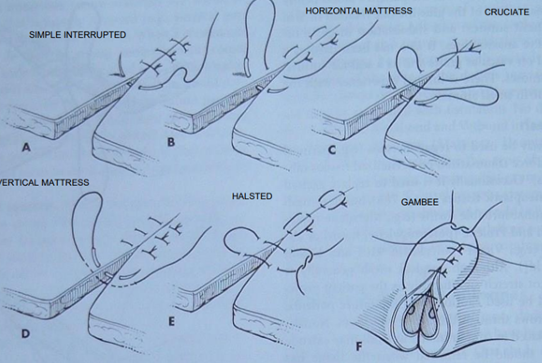
Interrupted Suture Patterns (each stitch is independent)
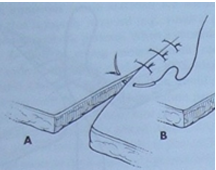
Simple Interrupted:
Placed 2-3 mm from the skin edge.
Quick to place, but the overall time for a long incision might be greater due to individual tying.
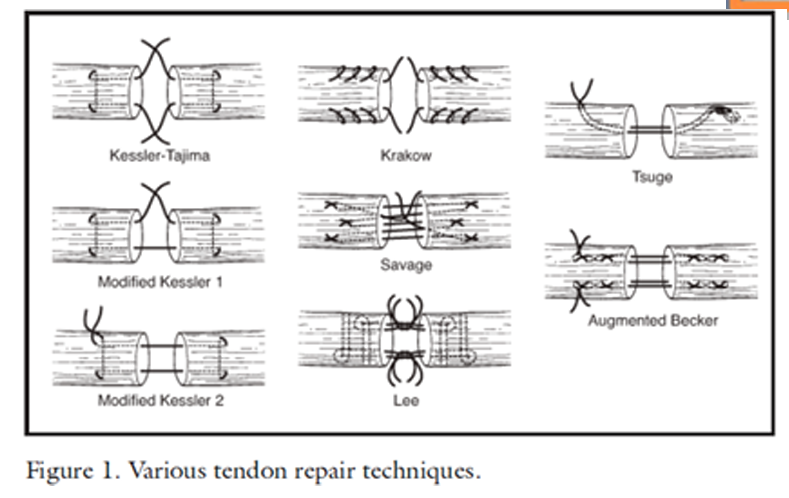
Horizontal Mattress:
Used where tension is present. Can be placed quickly. Can be modified into a cruciate (or "cross-over") suture.
Tends to cause tissue eversion (turning outwards), so careful apposition is needed.
Vertical Mattress:
Stronger than horizontal mattress in areas of tension. Time-consuming application.
Pros: Less eversion of the skin edges
When two vertical mattress sutures are placed parallel before being tied, it forms a "Halsted suture."
Continuous Suture Patterns (single strand through entire)
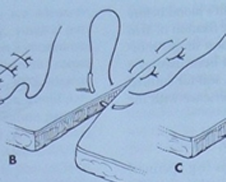
Simple Continuous:
Pros: Provides maximum tissue apposition, relatively airtight, fluid-tight with series of simple interrupted sutures, to close linea alba + subcutaneous tissues.
If the suture material is tightened too much, it can create a "purse-string" effect, potentially causing tissue strangulation. Care must be taken.
Ford Interlocking:
A modification of the simple continuous pattern, where each loop of suture passes under the previous loop.
Pros: Placed quickly, offers better apposition.
Cons: Can be more difficult to remove than other patterns.
Suture of internal organs
When suturing internal organs, choice of sutures involved the type of material + pattern used. Important to know, for successful wound healing + tissue type, location + expected tension on wound.
Suture Materials for Internal Organs:
Monofilament sutures: Made of a single strand (e.g., nylon, polypropylene), these offer excellent strength and minimal tissue reactivity. They are ideal for organs under tension and are less likely to harbor bacteria.
Braided sutures: Composed of multiple twisted strands, these provide better tissue adherence and are less likely to cause tissue damage. They are typically used for organs not under tension.
Absorbable sutures: These dissolve over time (weeks to months) and are perfect for internal organs where suture removal is not possible, such as the uterus or intestines.
Non-absorbable sutures: These do not dissolve and require manual removal after healing. They are chosen for organs needing long-term support or under constant tension.
Types of Suture Patterns (Interrupted + continuous)
Interrupted Suture Patterns (each individually)
Simple Interrupted Suture: The most basic pattern, involving a single pass through tissue on both sides of the wound, secured with a knot. It's used for short incisions or lacerations.
Horizontal Mattress Suture: The suture material passes horizontally through the tissue on both sides before tying. It's effective for closing wounds under tension, like those in skin or hollow organs (e.g., bladder).
Vertical Mattress Suture: Similar to the horizontal, but the suture material is placed vertically through the tissue on both sides. Also used for wounds or incisions under tension.
Gambee Pattern: Primarily used in intestinal surgery, this pattern helps reduce mucosal eversion and wicking of material from lumen to the exterior. It involves a simple interrupted suture at start, followed by a double-layered continuous closure with a continuous suture, providing excellent strength for intestinal anastomoses and abdominal wall closures.
Continuous Suture Patterns (Single strand used top close longer incision)
Simple Continuous Suture: The needle passes through the tissue in a running fashion along the wound, with knots only at the beginning and end. Ideal for longer incisions or wounds.
Ford Interlocking Suture: This pattern combines a simple interrupted stitch on one side with a modified horizontal mattress pattern on the other, then tied. It's used for wounds or incisions under tension.
Lembert Pattern: A variation of a vertical mattress applied continuously, this inverting pattern is commonly used for hollow viscera (e.g., bowel). It's a non-penetrating suture, meaning it does not enter the organ's lumen.
Connell and Cushing Patterns: Both are used for closing hollow organs to achieve tissue inversion and a watertight seal. The key difference is that the Connell pattern enters the lumen (penetrating), while the Cushing pattern extends only to the submucosal area (non-penetrating).

Parker-Kerr: A modification of the Cushing and Lembert patterns, this technique is occasionally advocated for closing the stump of hollow viscera, though it's less common due to potential for excessive tissue inversion.
Note: these are just a few examples of patterns used in vet surgery.
VIDEOS FOR QUESTION 23
Suture of tendons and Vessels
Surgery on tendons + blood vessels - need specific patterns, materials based on tissue type, vessel size + surgical needs.
Tendon Sutures:
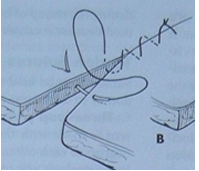
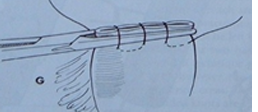
Bunnell suture: A type of locking suture pattern primarily used in hand surgery to appose severed tendons. It creates series of interlocking loops for stability, tied with a square knot.
it can be difficult to place and may disrupt microcirculation (less used)
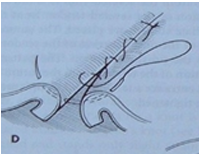
Three-loop pulley suture: Type of locking suture used in orthopedic surgery for tendon or ligament injuries. It forms three loops around, then interlocked, tied with square knot.
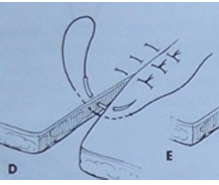
Far-near near-far suture: A simple interrupted pattern used for flat tendons, known for minimizing blood flow disruption and providing good resistance to tension. We bring needle at a distance from wound edge then bringing it back through tissue near wound edge, then near wound edge, far from edge, repeated.
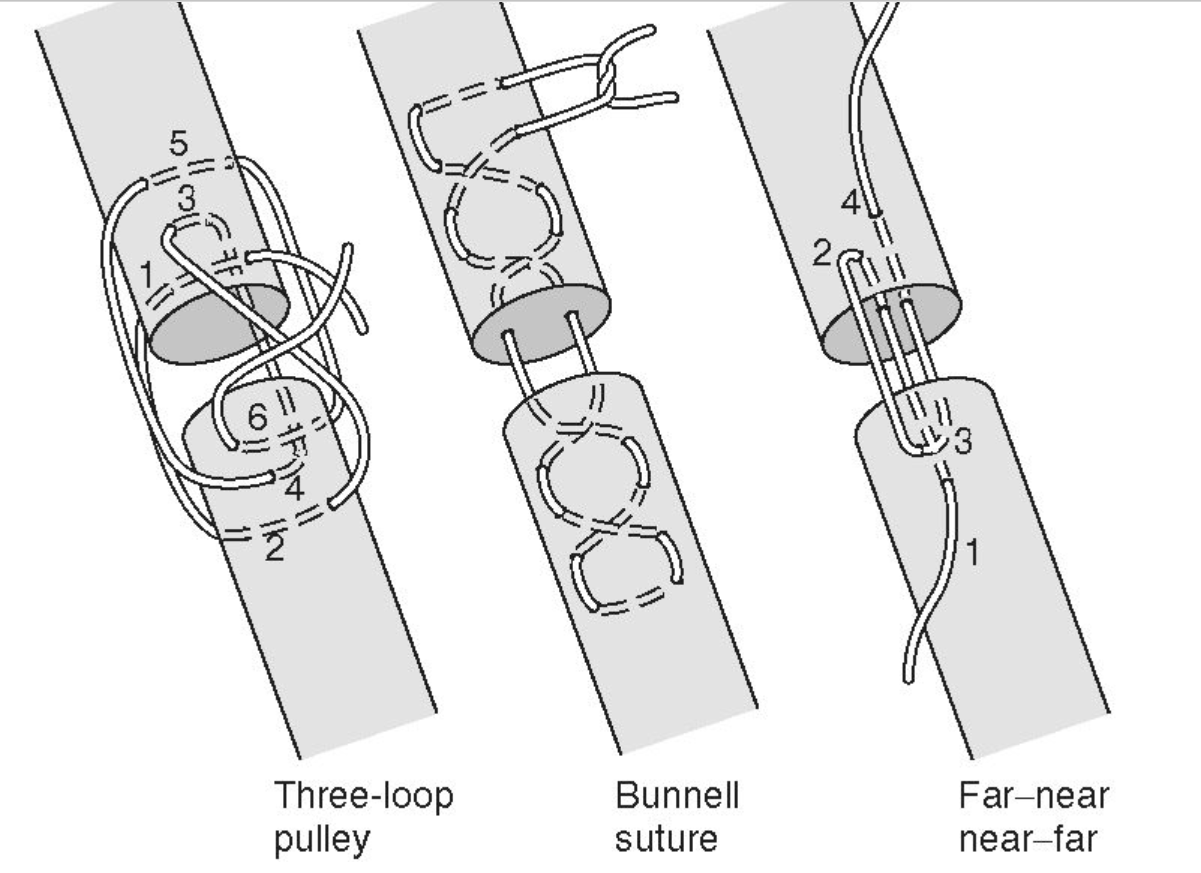
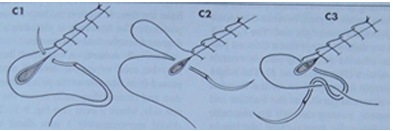
Kessler grasping suture (Tajima, Modified Kessler 1 & 2): A locking suture used in hand surgery for tendon repair. It uses a figure-eight pattern to hold the tendon in place and prevent gapping, tied with square knot.
Krakow suture: A locking suture pattern for tendon or ligament injuries in orthopedic surgery. It uses a zigzag pattern to evenly distribute tension and provide a strong repair, tied with square knot.
Vessel Sutures:
Suturing blood vessels is a delicate procedure, with material and pattern selection dependent on vessel size and location. Generally, fine absorbable sutures are used for smaller vessels, while larger vessels may require non-absorbable sutures.
Common Suture Patterns for Blood Vessels:
Simple interrupted suture: Used for closing small blood vessels, involving a single pass through the tissue on each side of the vessel, then tied.
End-to-end anastomosis suture: Used to re-join severed blood vessels by approximating their cut ends and suturing them together with a continuous pattern.
End-to-side anastomosis suture: Connects a smaller blood vessel to the side of a larger one, using a continuous suture pattern.
Stay sutures: Temporary sutures placed on either side of a blood vessel to hold it in place during surgery, removed once the primary repair is complete.
Suture Materials for Blood Vessels:
Monofilament non-absorbable sutures (e.g., nylon or polypropylene) are often preferred for larger vessels.
Absorbable sutures (e.g., polyglycolic acid or polylactic acid) may be used for smaller vessels.
VIDEOS FOR QUESTION 24 slay
25. Surgical treatment of wounds
Surgical Wound Treatment: range of techniques for cleaning and close wound. promotes healing, prevent infection, minimize scarring through:
1) Debridement: removal of dead tissue, foreign objects, and debris to create a clean wound bed that facilitates healing and reduces infection risk. We can use scalpel, scissors or surgical laser. Methods include:
Sharp debridement: Using scalpels or scissors to precisely cut away damaged tissue while preserving healthy tissue.
Enzymatic debridement: Applying enzymes that break down and dissolve dead tissue, particularly useful for wounds that are difficult to access or very large.
Mechanical debridement: Flushing the wound with irrigation systems using saline solution or specialized devices to remove debris.
Autolytic debridement: Using dressings that promote the body's natural processes to break down and remove dead tissue, typically for less severe wounds.
2) Lavage: flushing the wound with a sterile solution (ideally Hartmann's solution) to remove remaining debris and bacteria, further reducing infection risk. The procedure typically involves:
Placing the animal under general anesthesia
Initial cleaning and debridement of the wound
Preparing and warming a sterile solution to body temperature
Gently introducing the solution into the wound using a syringe or irrigation device
Allowing the solution to flow through and exit the wound
Repeating as needed based on wound severity
Proceeding to wound closure once thoroughly cleaned
3) Closure: After cleaning, the wound edges are approximated using sutures, staples, or tissue adhesives to promote healing. The closure method depends on the wound's location, size, and the animal's overall health.
4) Drainage: Some wounds require drains to remove excess fluid and prevent bacterial buildup. These drainage tubes are placed during surgery and typically removed after several days. ex. abscesses, bite wounds.
5) Bandaging: Post-surgery, bandages or dressings are applied to protect the wound and support healing. Regular bandage changes help prevent infection and promote proper healing.
Surgical treatment of wounds - Drains (active and passive drainage)
Surgical drains: used to facilitate fluid drainage and manage dead space in surgical wounds, prevent seroma formation. They are either passive or active.
Passive Drains: rely on gravity and capillary action to remove fluid from wounds without applying external suction. They include:
Penrose drains: Soft latex tubes that create a pathway for fluid drainage. These are secured in the wound's dead space and exit through a separate small incision, ideally at the lowest possible point to maximize “the power of gravity”
Open-ended drains: Simple tubes or catheters made of silicone or other flexible materials that can remain in place (wound/body cavity - for fluid to drain out) for days to weeks depending on drainage requirements.
Wicks: Small pieces of sterile gauze or sponge placed in wounds to absorb fluid and promote drainage, and can be removed after several days.
Passive suction drains: Flexible tubes with perforated end inserted into the wound, while the other is attached to a collection device that creates mild negative pressure - draws fluid out.
Active Drains: feature rigid walls and connect to mechanisms that apply suction to actively remove fluid. Drain is placed through separate stab incision + tunneled under skin into the dead space. These include:
Jackson-Pratt drains: Bulb-shaped drain that create negative pressure when compressed, drawing fluid from wounds. Consist of soft, flexible tube inserted into wound + attached to bulb-shaped reservoir.
Hemovac drains: Similar to Jackson-Pratt drains but using a spring mechanism instead of a bulb to generate negative pressure.
Active suction drains: Devices using pumps or mechanical mechanisms to create stronger negative pressure, particularly useful for larger wounds or body cavities.
Negative pressure wound therapy (NPWT) systems: Advanced wound care systems combining active suction with specialized dressings to promote healing in complex wounds.
Securing Drains with Sutures
Proper securing of drains is crucial to prevent dislodgement. Common suturing techniques include:
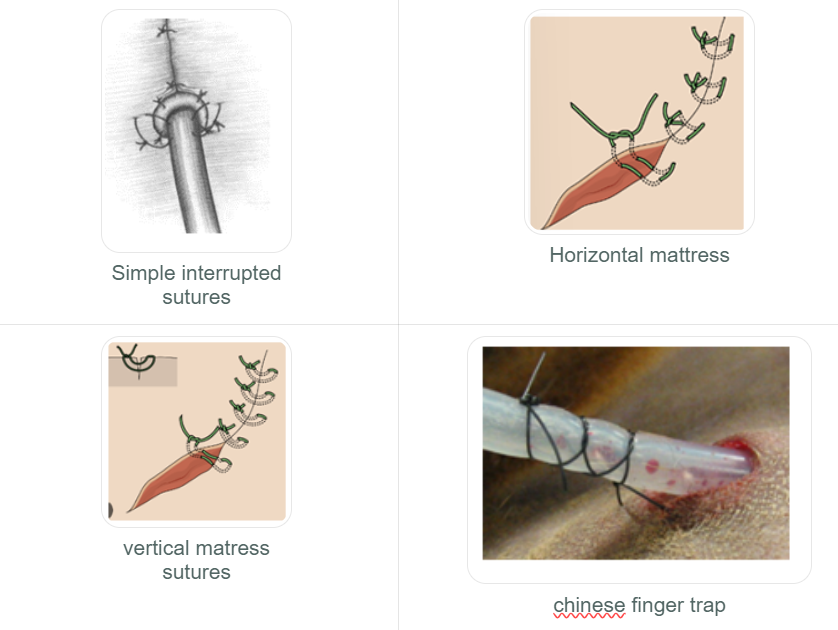
Simple interrupted sutures: Individual sutures and tied off, placed at strategic positions (typically at 12 and 6 o'clock or at 12, 3, 6, and 9 o'clock positions) to secure the drain to the skin.
Horizontal mattress sutures: Placed on either side of the drain to secure it at two points on each side.
Vertical mattress sutures: Placed above and below the drain to secure it at two points on each side.
Chinese finger trap series: series of knots tied along the tube to secure it to the skin.
All drains will trigger some degree of foreign body reaction in tissue, which should be considered in their placement and management.
Basics of plastic surgery
Plastic surgery in animals: specialized field developed in recent years, dedicated to repairing, reconstructing and sometimes enhancing animal tissue that has been damaged by injury, disease or congenital deformities. Focuses on functional restoration and pain relief.
Types of Veterinary Plastic Surgery
1) Reconstructive Surgery: used to rebuild or repair tissue from trauma, injury or disease. It can involve the use of:
Skin grafts: Transplanting healthy skin to cover wounds
Tissue flaps: Relocating adjacent tissue with its blood supply to repair defects
2) Cosmetic Surgery: performed for appearance, many are controversial.
Ear cropping and tail docking
Declawing: Highly controversial and banned in many regions as it removes part of the digit, not just the claw
3) Orthopedic Surgery (musculoskeletal system)
Fracture repair: Using pins, plates, screws, and other hardware
Ligament reconstruction
Joint stabilization
Surgical Methods and Techniques
Anesthesia protocols: Carefully selected based on species, age, health status, and procedure length
Precision incisions: Strategic placement to minimize scarring and preserve function
Suturing techniques: chosen based on tissue type and location.
Benefits for Animal Patients
Functional restoration: Returning animals to normal activity and mobility
Pain reduction: Alleviating discomfort from injuries or deformities
Improved healing outcomes: Specialized closure techniques can prevent complications
Enhanced quality of life: Particularly important for companion animals and working animals
Suture techniques Eliminating tension (acc. to book) sian hu skreiv null her
Sutures releasing (decomposing) tension:
Horizontal mattress suture pattern
position of wound edges is against each other with risk of their inversion, which increases risk of strangulation of vascular supply, depending on tension of the suture material in the tissue.
use when closing wound edges of tissues with less traction, flat fascia, or muscles with a minimum of fascia.
Vertical mattress suture pattern
by applying the wound edges, suture distributes the tension on the tissue more than horizontal type. Use in closing the skin with a lower probability of compressing the wound edges, thereby reducing vascular nutrition in the tissue.
Suture pattern far-far near-near
variation of the vertical mattress suture, by attaching the wound edges providing suture strength without tension in the wound edges. Use when bringing the edges of the fascia closer together, closing the skin and subcutaneous tissue under certain circumstances.
Tendon suture patterns
interlocking loop
three loop pulley
sandal suture pattern
Suture Techniques for irregular wounds
Triangular Lesion Closure
Assessment begins by evaluating the available skin at the defect edges
The defect is closed in a Y-pattern formation, beginning at each point and suturing towards the center.
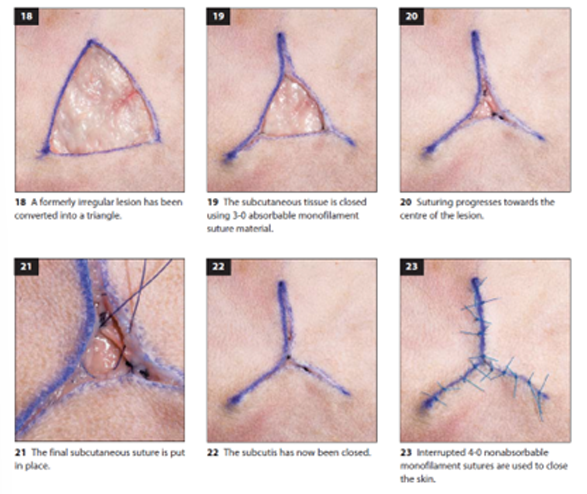
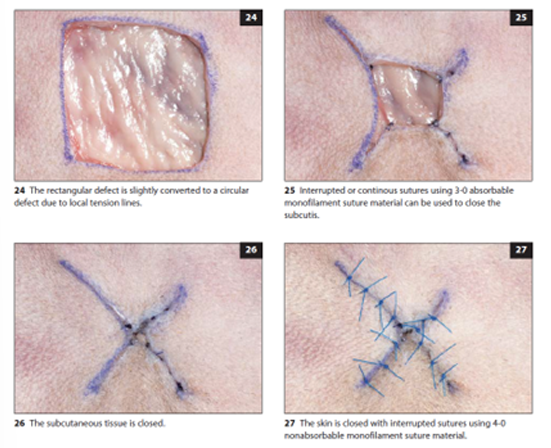
Square Lesion Closure
Initial assessment of skin availability at the defect margins
start from the corners of the square, suturing towards the center
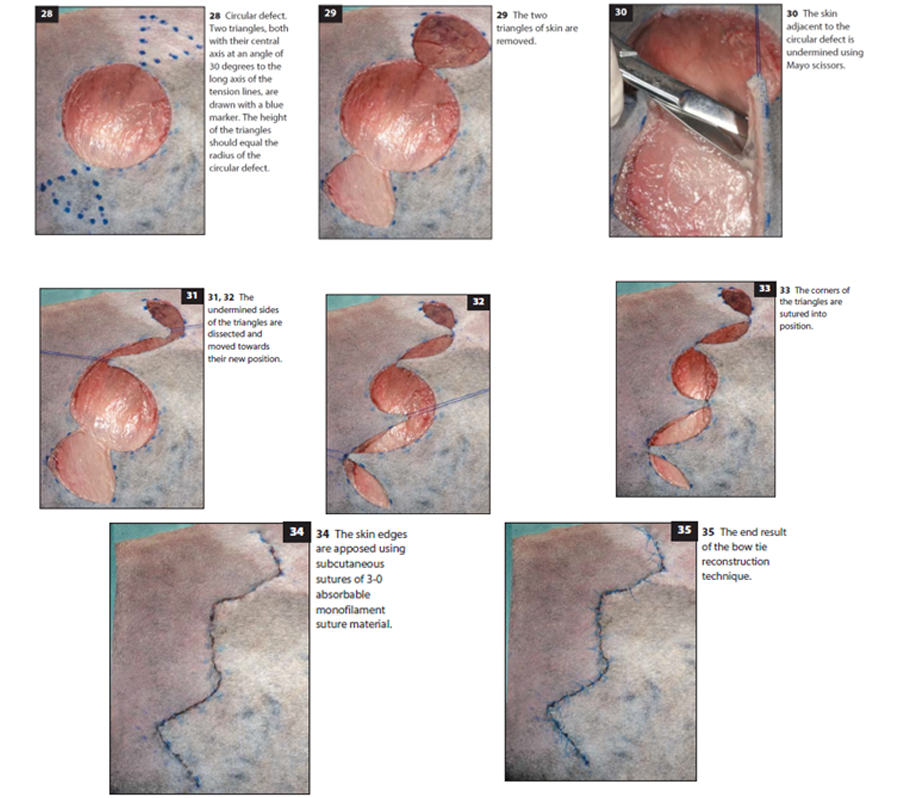
Bow Tie Technique (for Circular Defects)
Preparation: Area around the circular defect is clipped and shaved in a wide quadrangular pattern. Defect is cleaned as needed.
Surgical Procedure:
Incisions are made along predrawn lines to create triangular flaps
The triangular areas are bluntly undermined to create mobility
The skin between the circular defect and triangles is also undermined
Suturing Process:
Stay sutures (2-0 nonabsorbable monofilament) are placed to facilitate skin transposition
The triangular flaps are transposed and secured with 3-0 monofilament absorbable subcutaneous sutures
Additional subcutaneous sutures are placed to minimize tension
Final skin closure is completed with 4-0 nonabsorbable monofilament interrupted sutures
This bow tie technique is particularly valuable for circular defects, which are traditionally challenging to close without creating "dog ears" (excess tissue bunching) at the edges.
Basics of plastic surgery - grafts and skin flaps
Skin Grafts and Flaps: When closing wounds, surgeons often use advanced techniques including skin grafts and various types of flaps. These methods allow for closure of larger defects and provide better cosmetic and functional outcomes than simple primary closure in many cases.
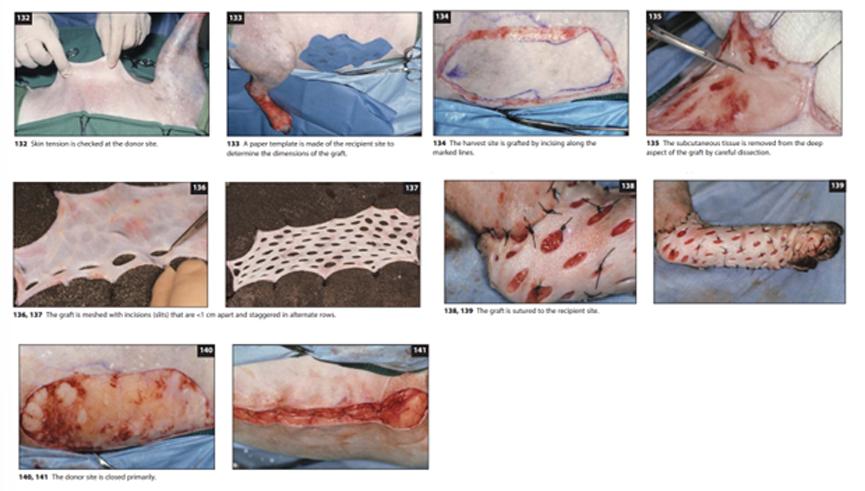
Skin Grafts: involve completely removing a section of skin from a donor site and transferring it to cover a wound at a recipient site. Considerations:
The graft must remain moistened throughout the procedure
Proper preparation includes removing subcutaneous tissue until hair follicles are visible
The graft can be attached to a sterile bandage roll for easier handling and fat removal
Creating a "mesh" pattern with small slits (less than 1cm apart) in staggered rows allows the graft to cover a larger area
The graft edges should be sutured or stapled to the recipient site
Few sutures within the graft itself are typically needed, though they may help prevent dead space in larger grafts
The donor site is then closed
Skin Flaps: maintain blood supply from their base, unlike grafts. They can be classified based on blood supply:
Subdermal plexus flaps: Rely on local skin vasculature from the flap base
Axial pattern flaps: Based on a direct cutaneous artery and vein
Principle: local skin in an area with relative abundance/elasticity is sued to close primary wound. The created secondary can then be closed relatively tension free.
Common Flap Techniques:
Advancement Flaps: formed in adjacent skin by making incisions from wound to flap`s base, parallel to tension lines, allowing advancement into the wound.
U-flap (French flap): Created by parallel incisions, mobilized by undermining and advancing skin in the direction of the wound axis
Best for square wounds/oval with tension-free skin nearby
Closed with subcutaneous and skin sutures
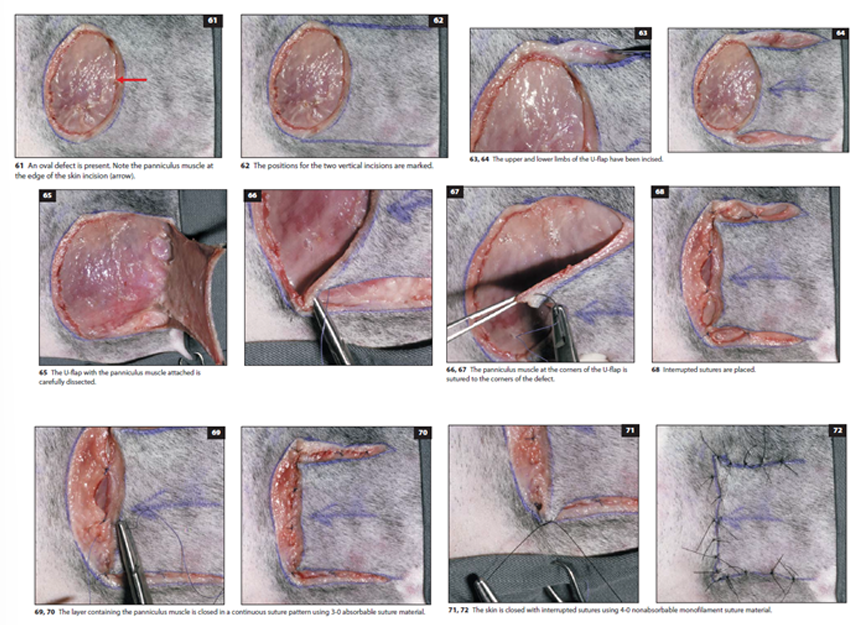
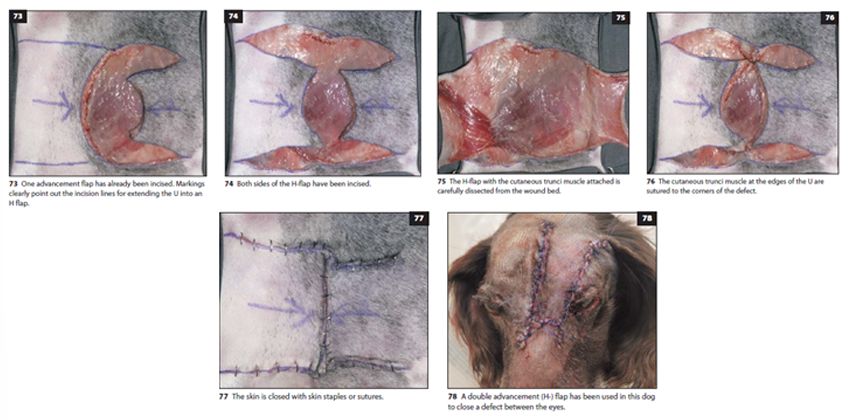
H-flap: Essentially bilateral U-flaps, reducing tension and improving viability. Used in oval defect.
Created by parallel incisions on both sides of the defect
The cutaneous trunci muscle is often included for better vascularity
place a couple of interrupted stay sutures, continuous suture pattern is used to close the subcutaneous layer with muscle. Skin is closed with skin staples/interrupted sutures.
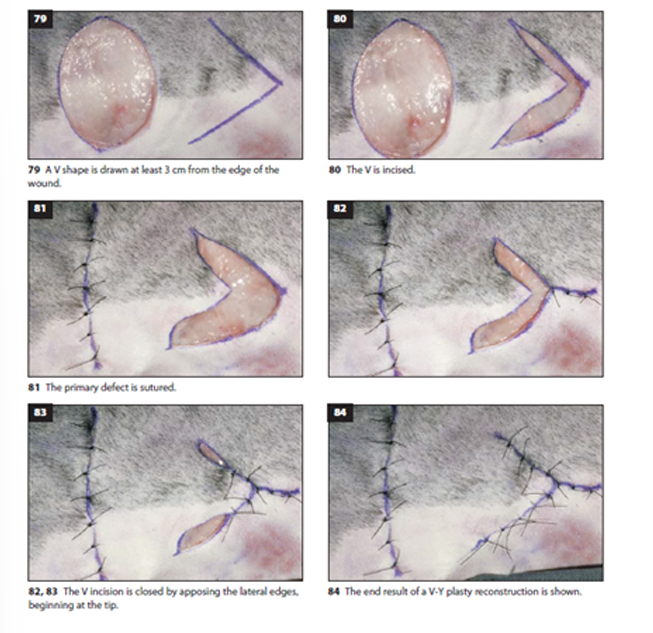
V-Y Flap
A V-shaped incision is made at least 3cm from the wound edge
After undermining the subcutis, the primary defect is sutured
The incision is closed beginning at the tip of the V
Final closure creates a Y-shaped configuration
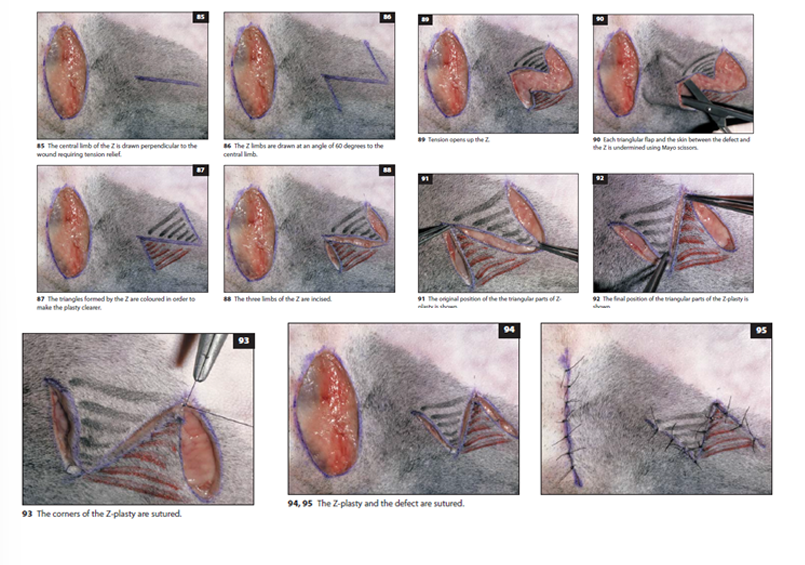
Z-Flap
Used to redistribute tension along a linear defect
Consists of a central limb parallel to the tension line with two side limbs at 45-60° angles
The triangular flaps are undermined and transposed
Particularly useful for releasing contractures and redistributing tension
Other Flap Types
Rotation flaps: Pivoted over a defect with which they share a common border. (local subdermal flap)
Transposition flaps: Rectangular flaps that bring additional skin into defects when transposed (local subdermal)
Interpolation flaps: Rotated into a defect with the pedicle passing over intact skin, usually sutured into a tube
Thoracocentesis, Abdominocentesis, Cystocentesis. Catheterization of surgical patients.
Catheterization: Urinary catheterization is performed to collect diagnostic samples, conduct imaging procedures, or relieve urinary retention. The procedure requires careful technique and appropriate materials:
Catheters: Available in various sizes (measured in French gauge units, where 1FG = 1/3 mm), typically made of nylon or polyvinyl chloride (PVC)
Preparation: Requires restraint (often sedation or general anesthesia), cleaning of external genitalia, and sometimes local analgesic gel, avoid lubricant (if needed use water soluble), have dish + container. Don`t use force, once urine appears dont put it longer in.
Technique: Varies by species and sex:
Male dogs: Reflect the prepuce, grasp the root of the penis until the tip appears, then gently introduce the catheter
Female dogs: May be positioned standing, in dorsal or sternal recumbency; requires a speculum to visualize the urethral opening on the floor of the vestibule
Male cats: Typically requires general anesthesia due to the narrow urethra and risk of damage.
Cystocentesis: safe but invasive procedure to collect uncontaminated urine samples directly from the bladder:
Technique: Insertion of a needle (typically 22-23G) through the abdominal wall into the urinary bladder
Guidance: Ultrasound-guided is the preferred method for safety and accuracy
Risks: Minimal risk of urine leakage into the peritoneal cavity unless there's bladder wall compromise or patient movement during the procedure
Abdominocentesis: Performed to sample or drain fluid in cases of suspected ascites:
Indications: Trauma, metabolic disease, cardiac disease, or neoplasia
Technique: Using aseptic technique, a four-quadrant tap approach around the umbilicus with a 22G needle (stop when you get fluid)
Methods:
Closed technique: Needle attached to a syringe
Open technique: Needle alone
Two-tap technique: Secondary needle inserted nearby if no fluid is obtained initially
Thoracocentesis: A potentially life-saving procedure for removing fluid or air from the pleural space:
Indications: Dyspneic patients with suspected pleural effusion or pneumothorax
Equipment: Three-way stopcock, extension tubing, and appropriately sized needle/catheter (22G for cats, 18-22G for dogs)
Technique: prepare patient aseptically, Performed at the 7th to 9th intercostal space, cranial to the rib
Needle placement: Directed toward the ventral third of the chest for fluid, dorsal third for air
Appropriate collection tubes should be available for fluid analysis, cytology, or culture
Nutritional support – tube feeding in dogs and cats
Nasoesophageal Feeding Tubes: ideal for short-term nutritional support (3-7 days). They provide a simple, minimally invasive method to deliver nutrition without requiring anesthesia for placement.
Advantages
Can be placed quickly without requiring general anesthesia
Minimal risk of adverse effects when properly placed
No permanent consequences if the patient removes the tube
Disadvantages
Not suitable for long-term feeding
Easily dislodged
Limited to very liquid diets due to small tube diameter
Required Supplies
Topical anesthetic (proparacaine eye drops or lidocaine)
Water-soluble lubrication jelly
feeding tube
Scissors for trimming the tube
White tape for marking measurements
Suture material or tissue glue for securing
Elizabethan collar
Measuring and Preparing the Tube
Measure from the tube anchor point on dorsal midline to the external nares
Mark this point with white tape
Measure from the tip of the nose to just caudal to the heart base (7-8th intercostal space)
Trim the distal end if needed to achieve proper length
Important: The tube should not extend into the stomach as this can cause gastroesophageal reflux and ulceration when passing through the gastroesophageal sphincter.
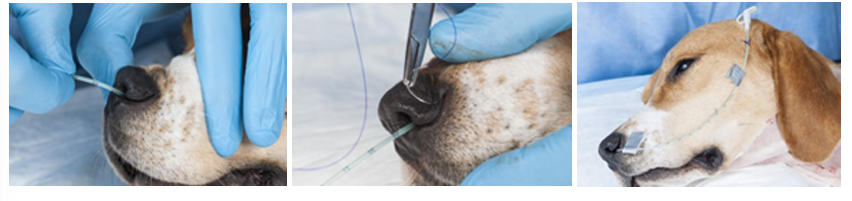
Placement Procedure
Position the patient's nose upward and instill 4-5 drops of ophthalmic anesthetic (proparacaine) or lidocaine in each nostril, wait a few minutes, repeat.
Lubricate the end of the tube with sterile water-soluble lubricant or 2-5% lidocaine jelly
Hold the patient's nose in a normal position (avoid extension or flexion)
Direct the tube tip medially and ventrally into one external naris until it enters the ventral meatus
Lift the nasal planum dorsally while lifting the proximal end of the tube
Slow insertion as you reach the oropharynx to allow the animal to swallow the tube into the esophagus
Insert until you reach the pre-marked white tape
Confirming Proper Placement
Test by injecting a small amount of sterile water or saline
If coughing occurs, remove and reinsert the tube
A lateral cervical radiograph can confirm proper positioning (optional but recommended)
Securing the Tube
Secure to the nasal planum just lateral to the external naris using tissue glue or sutures
Anchor at the dorsal bridge of the nose
Place additional anchoring points on the dorsal midline of the head (may require trimming hair)
For cats, ensure the tube doesn't contact the whiskers to prevent irritation
Tracheostomy - Temporary and Permanent
1) Temporary tracheostomy is an emergency procedure that creates an opening through the trachea to establish an alternative airway when an animal experiences respiratory distress. This procedure allows air to bypass upper respiratory tract blockages caused by swelling, obstruction, trauma, foreign objects, or tumors.
Materials Required
Surgical instruments (scalpel, forceps, needle holder, scissors, curved hemostat)
3-way stopcock
Sterile drapes and gloves
Syringes
Suture material
Endotracheal and tracheostomy tubes
Procedure
Anesthesia
Positioning: The neck is extended to make the trachea accessible
Preparation: Surgical site is cleaned and sterilized
Incision: A small incision is made at the ventral midline of the neck
Tracheostomy:
A transverse incision is made between the 3rd-4th or 4th-5th tracheal rings
The incision is opened with a hemostat, tracheostomy tube is inserted
Traction sutures are placed cranial and caudal to the incision
The tube is secured around the neck
Post-procedure: Oxygen support and continuous monitoring are provided
2) Permanent Tracheostomy
Permanent tracheostomy creates a lasting opening in the trachea for animals with severe, irresolvable respiratory obstruction. This major surgical procedure can significantly improve quality of life but requires careful consideration.
Procedure
Anesthesia and Positioning, preparation (cleaned, sterilized)
Incision: A larger incision is made through the skin and tissues overlying the trachea
Tracheostomy Creation:
An incision is made through the trachea
The edges of the tracheal incision are sutured to the skin to create a permanent stoma
A permanent tracheostomy tube/cannula is inserted and secured
Post-procedure Care:
Oxygen administration as needed
Special care to prevent tube blockage or dislodgment
Prevention of infection
Permanent tracheostomy requires lifelong management.
Bandaging techniques - Covering bandages
Primary Functions of Bandages
Maintain wound cleanliness
Control the wound environment
Reduce edema and hemorrhage
Eliminate dead space
Immobilize injured tissue
Minimize scar tissue formation
Provide comfort
Absorb secretions
Bandages should always be comfortable and kept clean. When the outer layer becomes wet, bacteria can rapidly pass through to the wound.
Types of Bandages
1) Robert Jones Bandage
A heavy bandage used to immobilize a limb after fractures, surgery, sprains, or soft tissue injuries. It reduces movement and provides support to reduce pain, swelling, and further injury.
Application process:
Clean and dry the affected limb; treat any wounds
Apply adhesive tape strips (stirrups) on medial and lateral aspects of the limb, put cotton between paw and tape.
Wrap cotton padding around the limb, starting distally and working upward
Apply cast padding over the cotton (2 layers)
Attach the stirrups, twisting the tape around and adhering it to the conforming layer
Apply cohesive bandage over cast padding, starting distally and working upward (check that it's not too tight by placing two fingers at the top)
2) Paw Bandages
Used for injuries or problems on toes, covering the entire paw.
Application process:
Place cotton padding between each toe to separate them and absorb sweat
Apply cast padding around the foot, from front to back, covering it completely
Apply a second layer of conforming bandage with slight tension, cover all toes
Finish with a layer of self-adhesive bandage, extending above the carpus to prevent slipping
3) Head Bandages
Applied after surgery or injuries to the head area, particularly ears.
Materials needed:
Bandaging scissors
Cotton wool
Conforming bandage
Self-adhesive elastic bandage
Application process:
Apply appropriate dressing on the wound; position the ear on top of the head
Wrap bandage around the head, going under the head and behind the opposite ear
For the second round, pass under the head and in front of the opposite ear
Apply padding layer in the same pattern
Secure with conforming bandage, checking that it's neither too tight nor too loose
Finish with self-adhesive bandage
4) Body Bandage
Used for chest wounds or other trunk injuries.
Materials needed:
Bandage scissors
Wound dressings
Bandages
Gauze
2 Tapes
Application process:
With the animal standing, place appropriate wound dressing
Wrap bandage around the chest with ⅓ overlap
Create a harness by passing the bandage between the front legs and over the pectorals
Apply 2-3 overlapping layers and secure with tape
Apply outer layer of elastic bandage and secure with tape
For male animals, special care must be taken to ensure the bandage doesn't interfere with urination.
Videos for question 34 - covering bandages
Bandage Techniques - Fixation and flexion
Flexion bandage is for preventing weight bearing, while maintaining passive motion of shoulder and elbow joints. Useful after lateral shoulder luxation, supraspinatus + biceps brachii surgery.
1) Carpal Flexion Bandage: bandage that keeps the wrist (carpus) slightly bent while allowing some movement. We apply 2-3 layers of cast padding, elastic gauze, then white tape from distal third of radius/ulna to metacarpal.
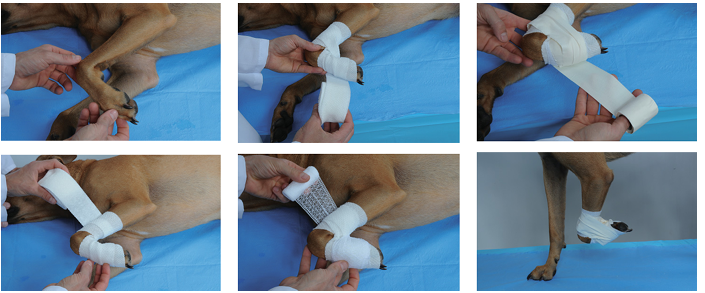
2) Velpeau Sling: This bandage secures the entire front leg against the chest wall. It's good for:
Shoulder and shoulder blade injuries
Preventing weight bearing on the front leg
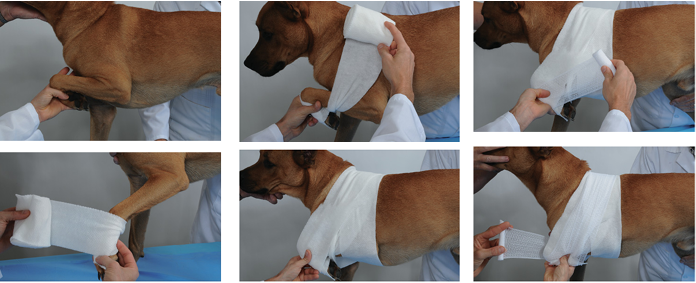
3) Ehmer Sling
This sling is primarily used for hip problems, especially after a dislocated hip has been put back in place. It:
Keeps the hip joint stable
Prevents weight bearing on the back leg
However, it can be uncomfortable for some animals to wear for extended periods.
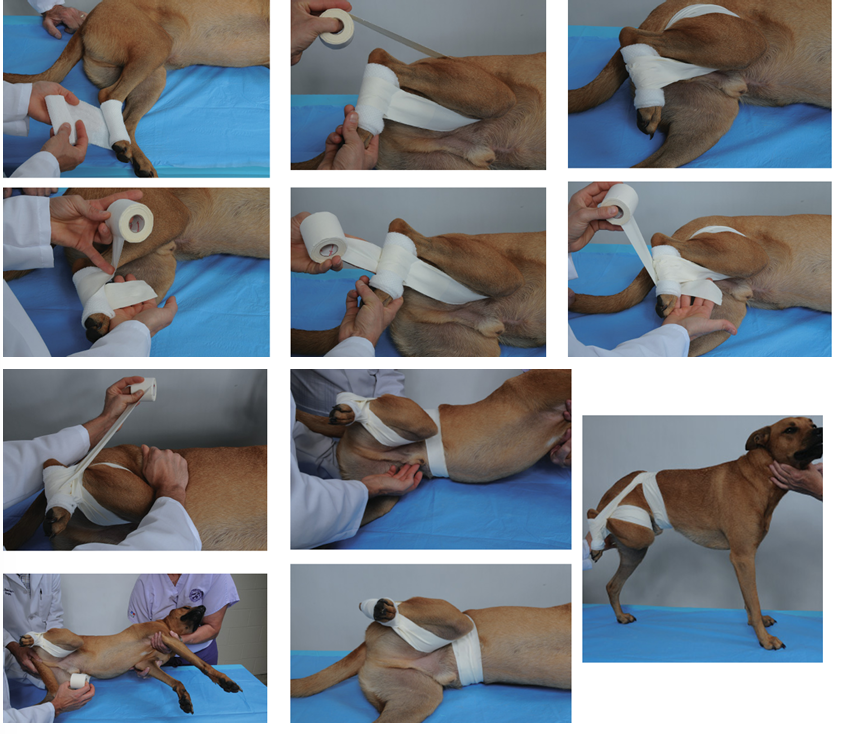
4) Robinson/ASPCA Sling
Prevents weight bearing on the back leg, Allows some passive movement of the hip and knee joints
Is generally more comfortable for the animal, though not as effective as Ehmer sling for immobilization of reduced hip luxation.
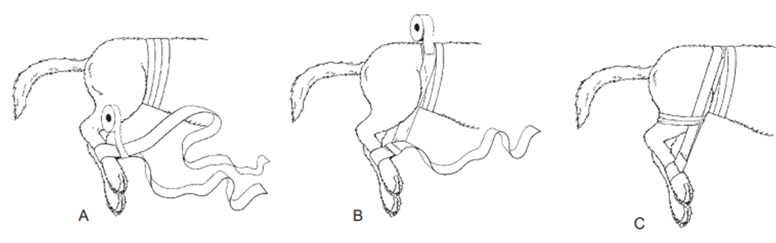
5) Hobble Bandage
This bandage connects both hind legs together to limit their movement. It's used for:
Certain hip dislocations (ventral type)
After pelvic fracture surgery
After certain femur fracture repairs
"Swimmer puppy syndrome" (puppies with splayed legs)
Supervised physical therapy for neurological issues
Muscle weakness in the hind legs
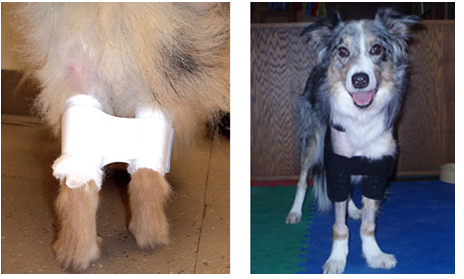
VIDEOS FOR Q. 35 hihi