1750 Thoracic Viscera IA
 Call Kai
 Learn
Learn Practice Test
 Spaced Repetition
 Match
Match Flashcards
 Knowt Play
1/36

There's no tags or description
Looks like no tags are added yet.
Name | Mastery | Learn | Test | Matching | Spaced | Call with Kai | Chat |
|---|
No analytics yet
Send a link to your students to track their progress
37 Terms
PA Projection; Chest; Lungs and Heart (CR & SS)
Perpendicular to the center of the IR. The central ray should enter at the level of T7 (Inferior angle of the scapula)
PA Projection of the thoracic viscera shows the air-filled trachea, the lungs, the diaphragmatic domes, the heart and aortic knob, and if enlarged laterally, the thyroid or thymus gland. The vascular markings are much more prominent on the projection made at the end of expiration. The bronchial tree is shown from an oblique angle. The esophagus is well shown when it is filled with a barium sulfate suspension.
(Respiration: Second FULL inspiration)
PA Projection; Chest; Lungs and Heart (Eval Criteria)
• Evidence of proper collimation
• Entire lung fields from the apices to the costophrenic angles
• No rotation
o Sternal ends of the clavicles equidistant from the vertebral column
o Trachea visible in the midline
o Equal distance from the vertebral column to the lateral border of the ribs on each side
• Proper shoulder rotation demonstrated by scapulae projected outside the lung fields
• Proper inspiration demonstrated by ten posterior ribs visible above the diaphragm. At least one less rib visible on expiration
• Sharp outlines of heart and diaphragm
• Faint shadows of the ribs and superior thoracic vertebrae visible through the heart shadow
• Lung markings visible from the hilum to the periphery of the lung
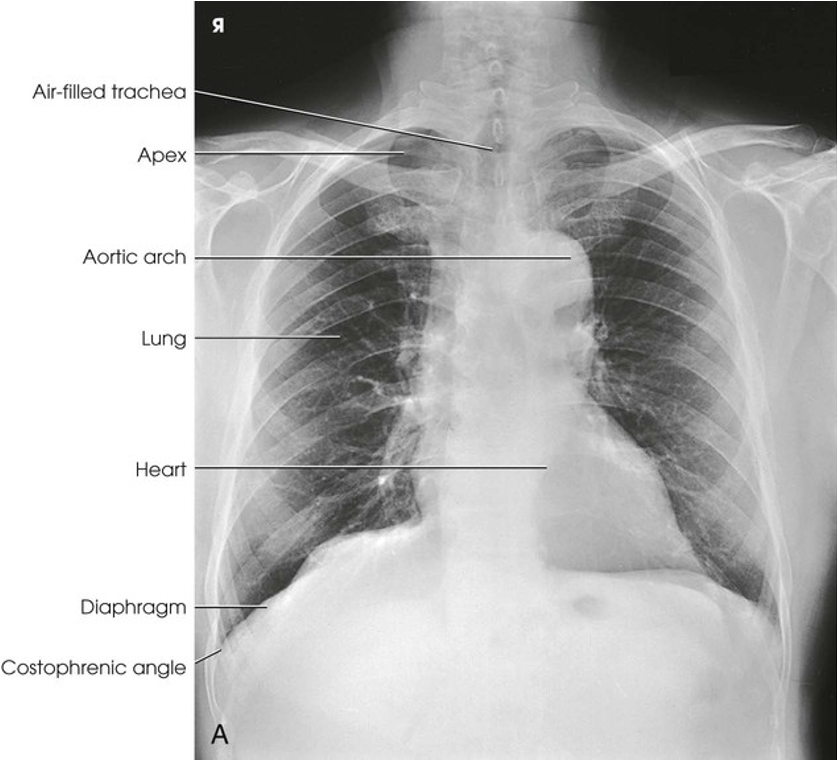
PA Projection; Chest; Lungs and Heart
Lateral Projection; Chest; Lungs and Heart; R or L Position (CR & SS)
Perpendicular to the center of the IR. The central ray enters the patient on the midcoronal plane at the level of T7
The preliminary left lateral chest position is used to show the heart, the aorta, and left-sided pulmonary lesions. The right lateral chest position is used to show right-sided pulmonary lesions. (These lateral projections are employed extensively to show the interlobar fissures, to differentiate the lobes, and to localize pulmonary lesions)
(Respiration: Second FULL inspiration)
Lateral Projection; Chest; Lungs and Heart; R or L Position (Eval Criteria)
• Evidence of proper collimation
• Arm or its soft tissues not overlapping the superior lung field
• Costophrenic angles and the lower apices of the lungs
• Hilum in the approximate center of the radiograph
• Superimposition of the ribs posterior to the vertebral column
• Lateral sternum with no rotation
• Long axis of the lung fields shown in vertical position, without forward or backward leaning
• Open thoracic intervertebral spaces and intervertebral foramina except in patients with scoliosis
• Penetration of the lung fields and heart
• Sharp outlines of heart and diaphragm
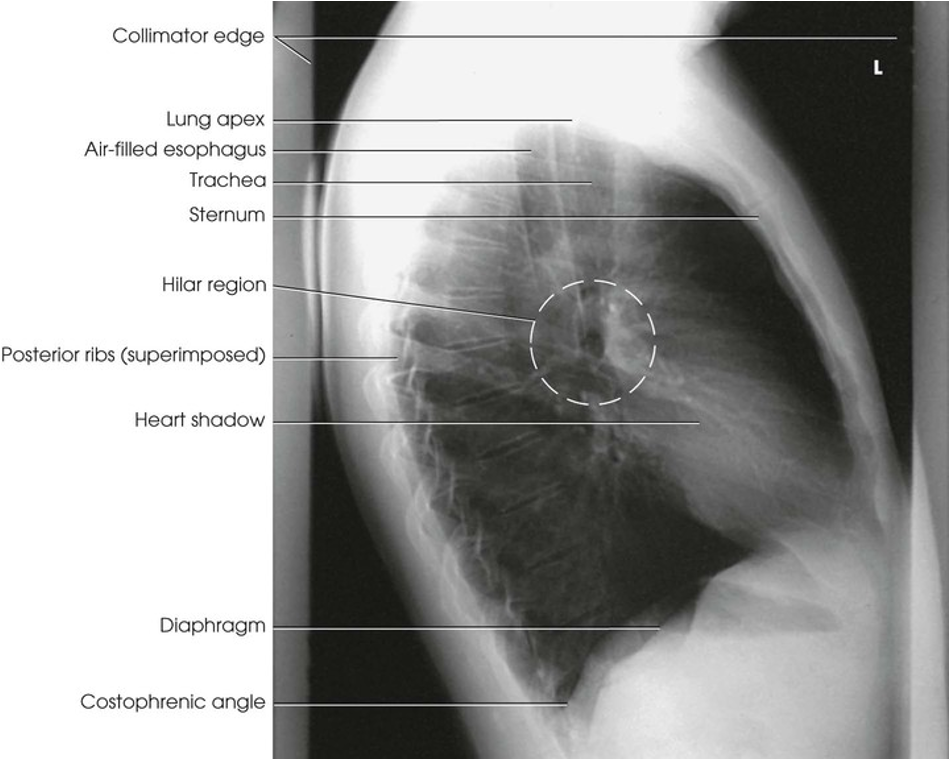
Lateral Projection; Chest; Lungs and Heart; R or L Position
AP Projection; Chest; Supine or Upright (CR & SS)
Perpendicular to the long axis of the sternum and the center of the IR. The central ray should enter about 3 inches below the jugular notch
An AP projection of the thoracic viscera shows an image similar to the PA projection. Being farther from the IR, the heart and great vessels are magnified and engorged and the lung fields appear shorter because abdominal compression moves the diaphragm to a higher level. The clavicles are projected higher, and the ribs assume a more horizontal appearance.
(Respiration: Second FULL inspiration, Supine CXR is used when pt is too ill to stand)
AP Projection; Chest; Supine or Upright (Eval Criteria)
• Evidence of proper collimation
• Entire lung fields, from the apices to the costophrenic angles
• No rotation
o Sternal ends of the clavicles equidistant from the vertebral column
o Trachea visible in the midline
o Equal distance from the vertebral column to the lateral border of the ribs on each side
• Clavicles lying more horizontally and obscuring more of the apices than in the PA projection
• Faint image of the ribs and thoracic vertebrae visible through the heart shadow
• Pleural vascular markings visible from the hilar regions to the periphery of the lungs
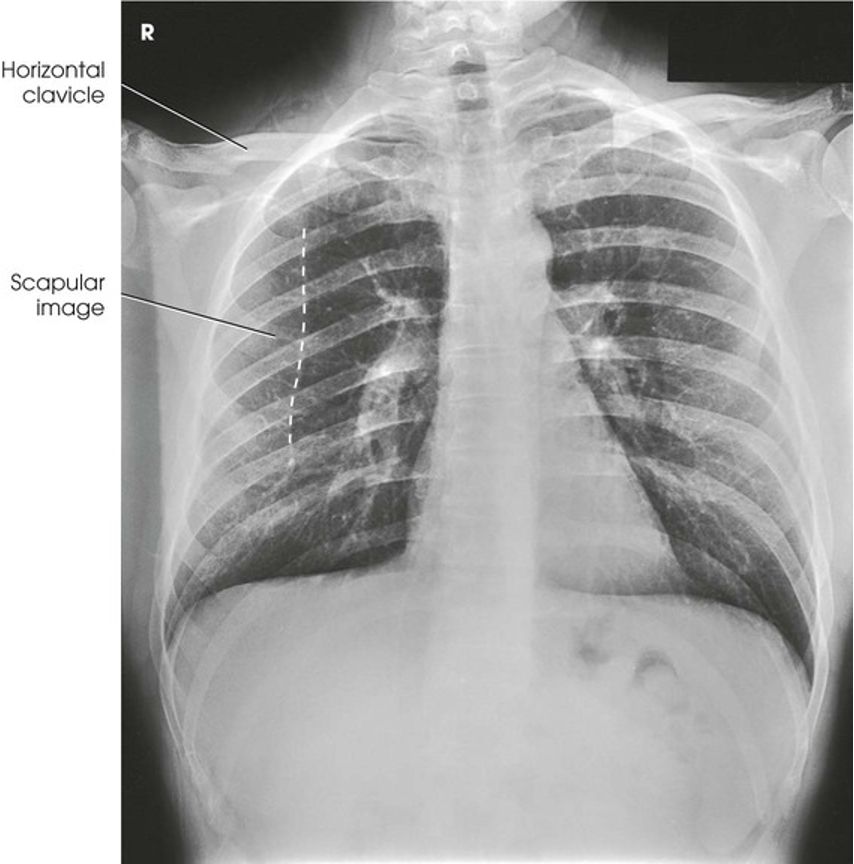
AP Projection; Chest; Supine or Upright
AP Axial Projection; Pulmonary Apices; Lindblom Method; Lordotic Position (CR & SS)
Perpendicular to the center of the IR at the level of the midsternum
AP Axial and AP Axial oblique images of the lungs show the apices and conditions such as interlobar effusions
(Have pt step 1 foot away from upright IR and lean back, placing the coronal plane 15-20 degrees from vertical.)
AP Axial Projection; Pulmonary Apices; Lindblom Method; Lordotic Position (Eval Criteria)
• Evidence of proper collimation
• Entire apices and appropriate portion of lungs
• Clavicles located superior to the apices
• Sternal ends of the clavicles equidistant from the vertebral column
• Clavicles lying horizontally with their sternal ends overlapping only the first or second ribs
• Ribs distorted with their anterior and posterior portions superimposed
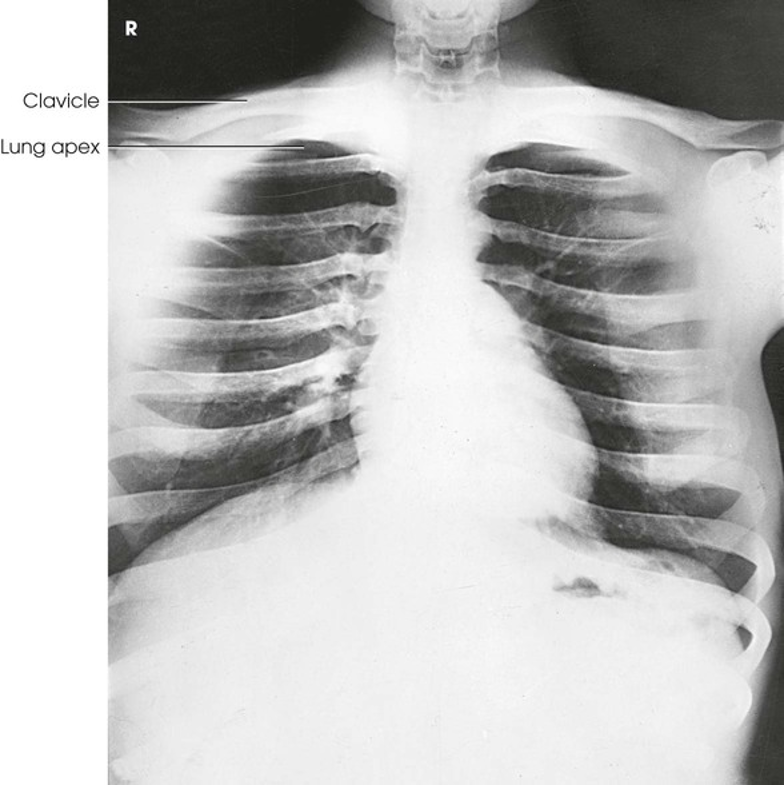
AP Axial Projection; Pulmonary Apices; Lindblom Method; Lordotic Position
PA Oblique Projection; Chest; RAO and LAO Positions (CR & SS)
Perpendicular to the center of the IR. The central ray should be at the level of T7
LAO Position: The maximum area of the right lung field (Side farther from the IR) is shown along with the thoracic viscera
RAO Position: The maximum area of the left lung field (Side farther from the IR) is shown along with the thoracic viscera
(Rotate pt 45 degrees *55-60 degree oblique position is used for barium cardiac series. Exposure made on 2nd full inspiration)
PA Oblique Projection; Chest; RAO and LAO Positions (Eval Criteria)
• Evidence of proper collimation
• Both lungs in their entirety
• Trachea filled with air
• Visible identification markers
• Heart and mediastinal structures within the lung field of the elevated side in oblique images of 45 degrees
• Maximum area of the right lung on LAO
• Maximum area of the left lung on RAO
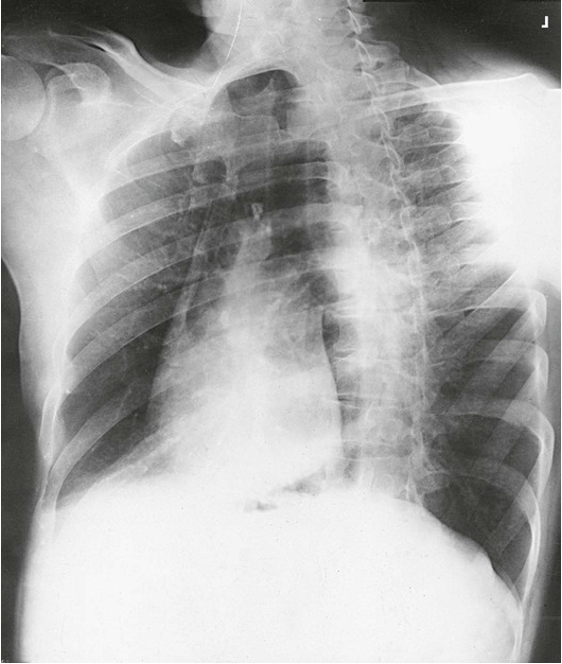
PA Oblique Projection; Chest; RAO and LAO Positions (LAO Position)
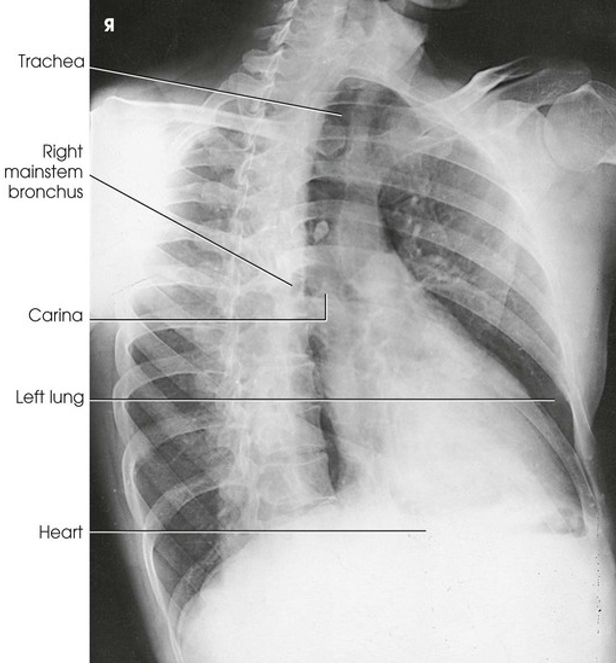
PA Oblique Projection; Chest; RAO and LAO Positions (RAO Position)
AP Oblique Projection; Chest; RPO and LPO Positions (CR & SS)
Perpendicular to the center of the IR at a level 3 inches below the jugular notch (central ray exits at T7)
This radiograph presents an AP Oblique projection of the thoracic viscera similar to the corresponding PA Oblique Projection
(The RPO position is comparable with the LAO position. The lung field of the elevated side usually appears shorter, however, because of magnification of the diaphragm. The heart and great vessels also cast magnified shadows as a result of being farther from the IR)
AP Oblique Projection; Chest; RPO and LPO Positions (Eval Criteria)
• Evidence of proper collimation
• Both lungs in their entirety
• Trachea filled with air
• Visible identification markers
• Lung fields and mediastinal structures
• Maximum area of the left lung on LPO
• Maximum area of the right lung on RPO
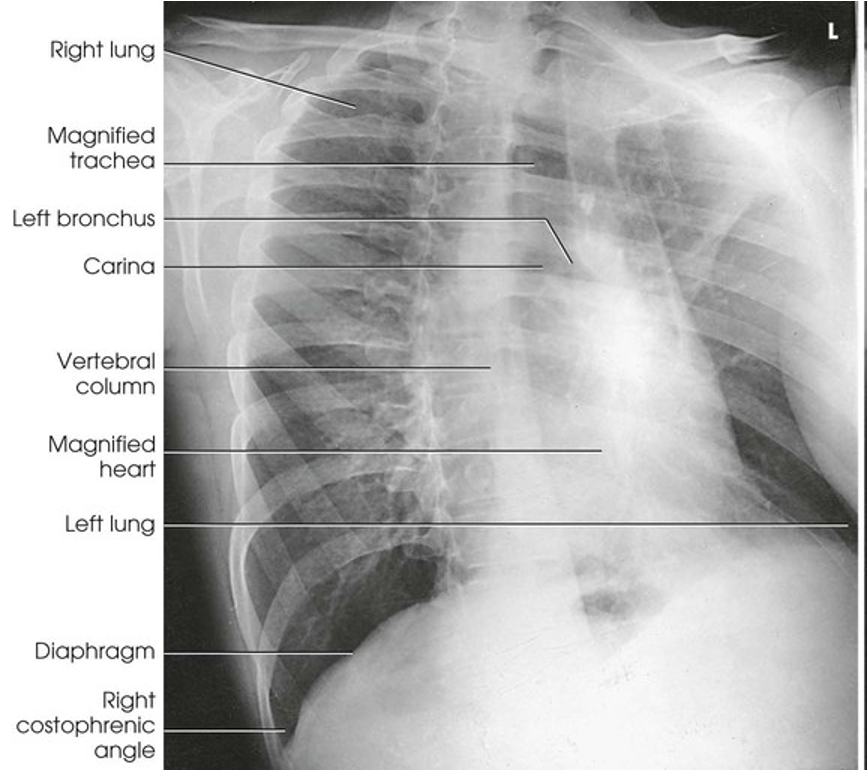
AP Oblique Projection; Chest; RPO and LPO Positions (LPO Position)
AP or PA Projection; Chest; R or L Lateral Decubitus Position (CR & SS)
Horizontal and perpendicular to the center of the IR at a level 3 inches below the jugular notch for AP and T7 for PA
AP or PA projection obtained using the lateral decubitus position shows the change in fluid position and reveals any previously obscured pulmonary areas or, in the case of suspected pneumothorax, the presence of any free air
(It is best to elevate body 5-8 cm if lying on affected side. Pt is in true lateral without rotation. Extend arms over head. Anterior or posterior surface of chest against grid device. Keep patient in this position for 5 minutes for optimal pathology visualization)
AP or PA Projection; Chest; R or L Lateral Decubitus Position (Eval Criteria)
• Evidence of proper collimation
• Affected side in its entirety, from apex to costophrenic angle
• No rotation of the patient from a true frontal position, as demonstrated by the sternal ends of the clavicles equidistant from the spine
• Patient's arms not visible in the field of interest
• Proper identification visible to indicate that the decubitus position was performed
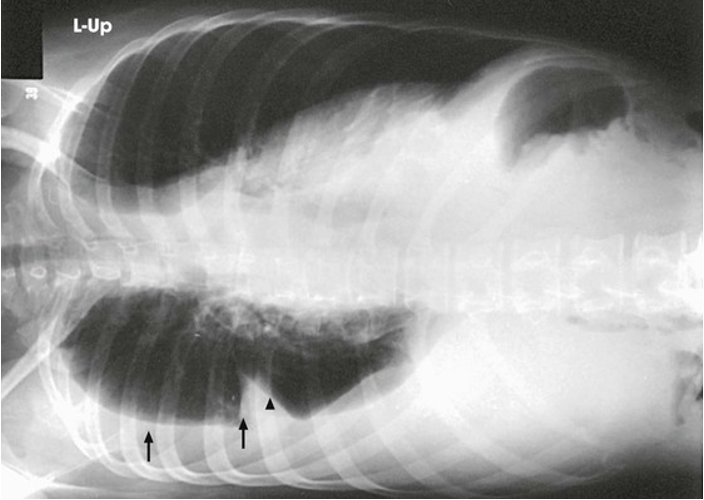
AP or PA Projection; Chest; R or L Lateral Decubitus Position (Right lateral decub)
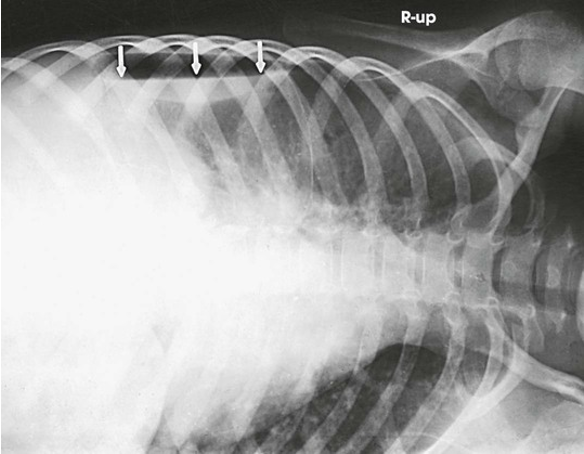
AP or PA Projection; Chest; R or L Lateral Decubitus Position (Left Lateral decub)
To demonstrate fluid
Patient should lie on affected side
To demonstrate free air
Patient should be positioned on unaffected side
Lateral Projection; Chest; Ventral or Dorsal Decubitus Position; R or L Position (CR & SS)
Horizontal and centered to the IR. The central ray enters at the level of the midcoronal plane and 3-4 inches below the jugular notch for the dorsal decubitus and at T7 for the ventral decubitus
A lateral projection in the decubitus position shows a change in the position of fluid and reveal pulmonary areas that are obscured by the fluid in standard projections
(Body elevated 2-3”. True prone no rotation. Wait 5 min with pt in this position to take exposure. Exposure after second full inspiration)
Lateral Projection; Chest; Ventral or Dorsal Decubitus Position; R or L Position (Eval Criteria)
• Evidence of proper collimation
• Entire lung fields, including the anterior and posterior surfaces
• Upper lung field not obscured by the arms
• No rotation of the thorax from a true lateral position
• T7 in the center of the IR
• Proper marker identification visible to indicate that the decubitus position was performed
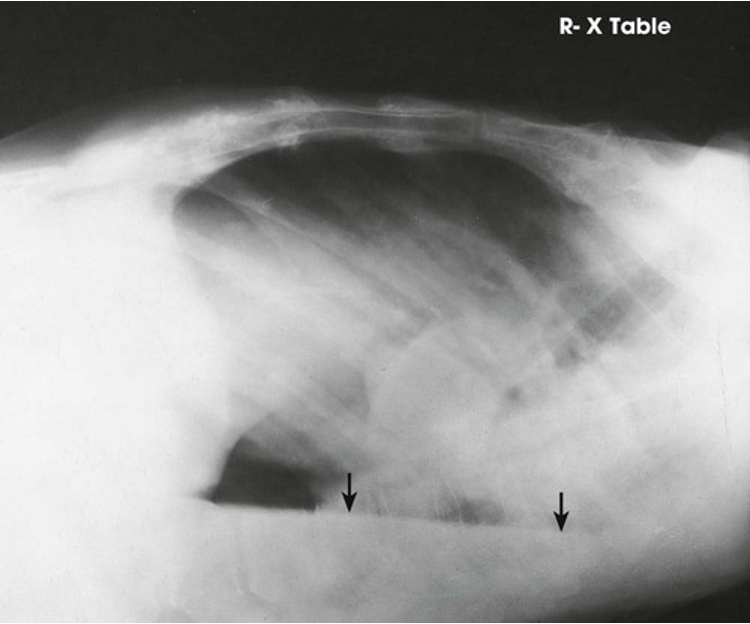
Lateral Projection; Chest; Ventral or Dorsal Decubitus Position; R or L Position (Right lateral projection)
AP Projection; Soft Tissue Neck (CR & SS)
Perpendicular to the laryngeal prominence (Upper airway) or manubrium (larynx and superior mediastinum)
The resulting image shows the air filled upper airway or the trachea and superior mediastinum. Under normal conditions, the airway is SI on the shadow of the cervical vertebrae
(These images are taken when pt is suspected of foreign body, inflammation, masses, and fractures of the larynx and hyoid bone. Pt either upright or recumbent for AP and lateral. Respiration - slow inspiration (To fill trachea with air)
AP Projection; Soft Tissue Neck (Eval Criteria)
• Evidence of proper collimation and presence of side marker placed clear of anatomy of interest.
• Air filled upper airway, from the pharynx to the proximal trachea (for upper airway)
• Air filled airway, from the midcervical to the mid thoracic region (for trachea and superior mediastinum)
• No rotation, with spinous processes equidistant to the pedicles and aligned with the midline of the cervical bodies.
• Bony trabecular detail and surrounding soft tissue
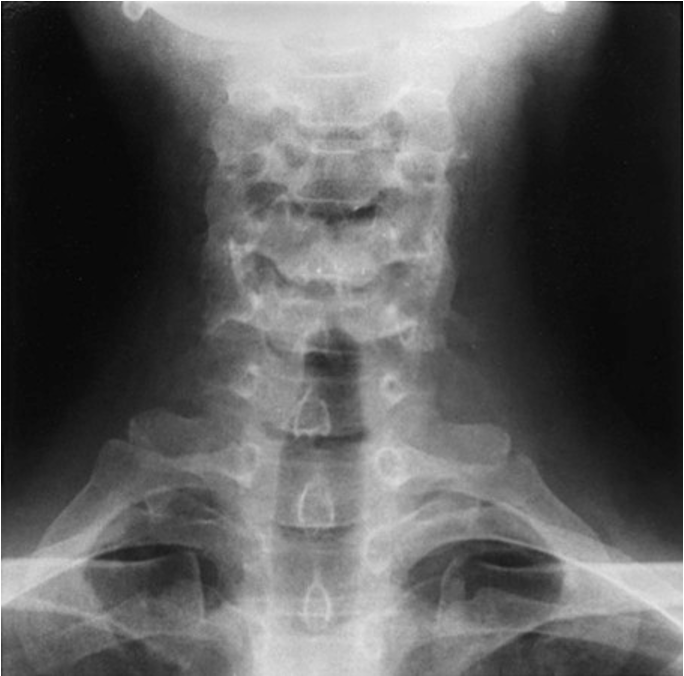
AP Projection; Soft Tissue Neck
Lateral Projection; Soft Tissue Neck; R or L Position (CR & SS)
Horizontal through midcoronal plane at the level of the laryngeal prominence (for upper airway) or at the level of the jugular notch through a point midway between the jugular notch and the midcoronal plane (for trachea and mediastinum)
The resulting image shows the air filled upper airway or the trachea and superior mediastinum
(Extend head slightly; depress shoulders. Respiration: Exposure made just before the chest comes to rest at the end of one of its inspiratory expansions)
Lateral Projection; Soft Tissue Neck; R or L Position (Eval Criteria)
• Evidence of proper collimation and presence of side marker placed clear of anatomy of interest.
• Air filled upper airway, from the pharynx to the proximal trachea (for upper airway)
• Air filled airway, from the midcervical to the mid thoracic region (for trachea and superior mediastinum)
• No rotation or tilt of the cervical spine
o SI zygapophyseal jts and open intervertebral joints
o SI or nearly SI mandibular rami
• Bony trabecular detail and surrounding soft tissue
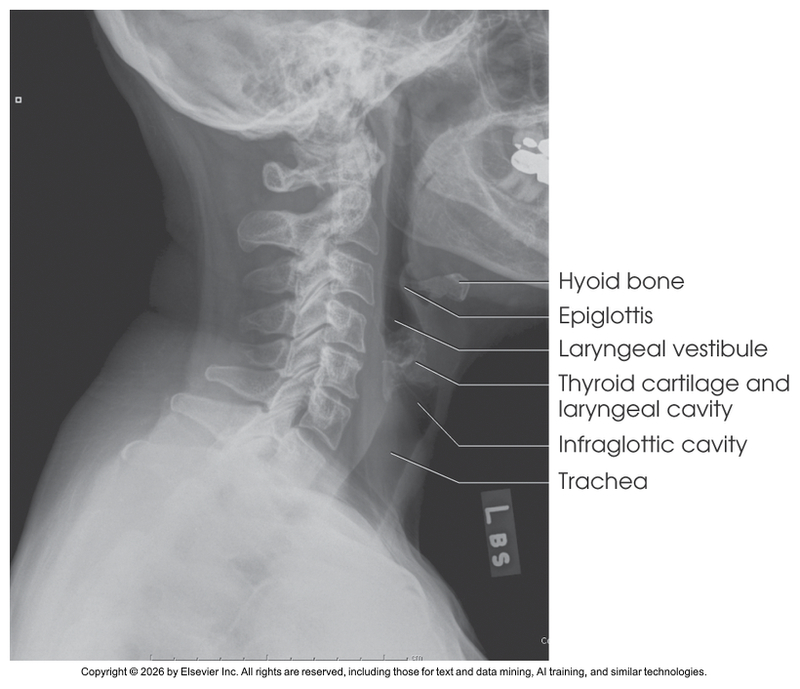
Lateral Projection; Soft Tissue Neck; R or L Position (Upper View)
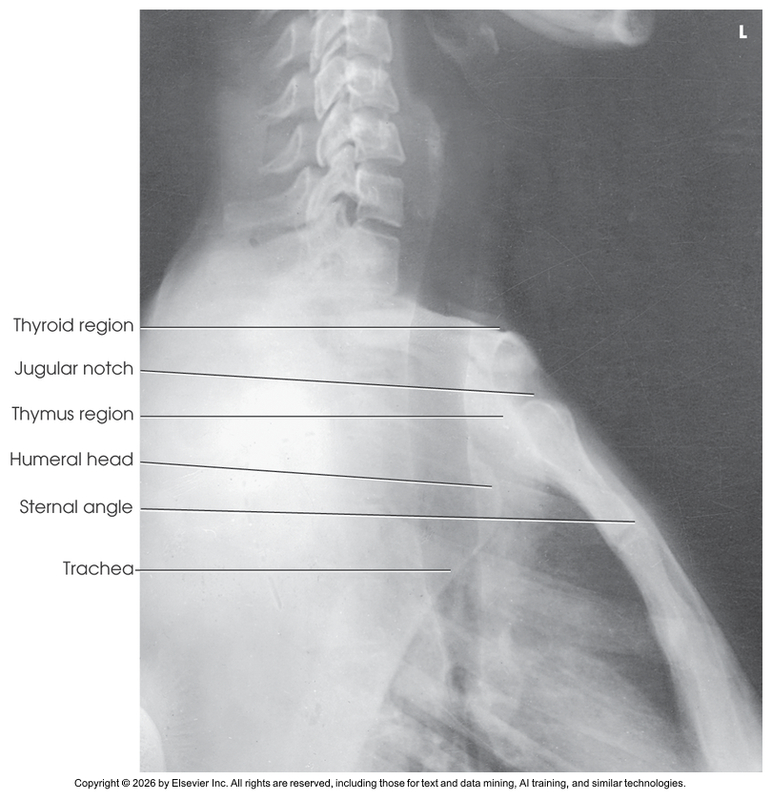
Lateral Projection; Soft Tissue Neck; R or L Position (Lower View)
Oblique Positions to view Right Ribs and Chest
LAO (PA) RPO (AP)
Oblique Positions to view Left Ribs and Chest
RAO (PA) LPO (AP)