3. Class IV Restorations
1/14
There's no tags or description
Looks like no tags are added yet.
Name | Mastery | Learn | Test | Matching | Spaced | Call with Kai |
|---|
No analytics yet
Send a link to your students to track their progress
15 Terms
Define a Class IV
Affects a proximal surface on an anterior tooth that involves the incisal edge
Etiology of Class II
Caries, Trauma, defective restorations
Coronal fractures of permanent ________ represent 18-22% of all traumas to dental hard tissues, of these 96% involve ________ ________.
Caries- induced Class IV are usually the result of a large class ___ that has reached the _______ ______.
Coronal fractures of permanent incisors represent 18-22% of all traumas to dental hard tissues, of these 96% involve maxillary incisors.
Caries- induced Class IV are usually the result of a large class III that has reached the incisal edge.
Disadvantages of Composite Resin
Polymerization shrinkage
Isolation and proper bonding required
Less resistant to wear than ceramics
Marginal staining
Edge chipping on high stress areas
Advantages of Resin Composite
Instant gratification
Minimally invasive
Good esthetics
Acceptable longevity
Easy to repair
Low cost
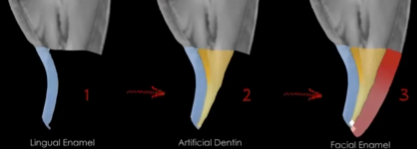
Explain the Layering technique
Technique used for restoring a class IV where you layer enamel, then dentin, then enamel to restore the natural look of the tooth
Used for a more natural look
Fluorescence and Opalescence
Fluorescence is the brightness while opalescence is the white/blue translucency of a material
Silicone Matrix
Used before to get a mold to use to shape the restoration
Facilitates layering technique
Minimal finishing needed
Provides framework
Color selection
Very important for these cases due to restoration being facial
Patient must be wearing neutral colors
Teeth must be cleaned
Shade should be taken before rubber dam is on
Point light away from patient
Put a bit of composite on the tooth and cure it to know the true shade
When mixing base and catalyst of putty, do not wear what kind of gloves because they prevent hardening
latex gloves
Steps for the silicone matrix
1. Mix one scoop of base with one scoop of catalyst
Mold putty to the tooth, making sure it does not cover the incisal edge
When cutting the tooth for the restoration, you are gonna cut where
Above the gingival contact to 2/3rd of the incisal edge
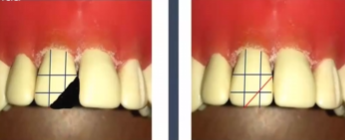
Beveling
Purpose
How is it done
For aesthetic purposes only
In a straight or preferably scalloped wavy motion taking 1-2 mm in thickness gingivo-incisally and 0.5mm facio-lingually
Steps for Restoring
Isolate with rubber dam
Check that silicone matrix fits properly
Etch, prime, bond beyond the prepared/ beveled surface
Place mylar strip to protect the adjacent teeth from the etch
Create lingual shelf by placing composite beyond the fracture so we can attach the matrix to the tooth
CANNOT TOUCH ADJACENT TOOTH!
Place on tooth and cure so your matrix is attached
Add 2 more layers, making sure you are forming the contact on the middle (dentin) layer
Make sure you check from incisal view to make sure you have the right anatomy
Make sure to push against bevel and form anatomy
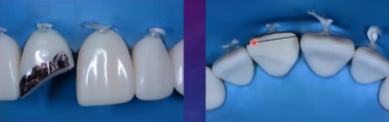
Close contact using pull-through technique if open
Use so-flex strip to polish any roughness on the interproximal area
Finish and polish using carbide burs, enhancer cup and jiffy brush
Round football for lingual and evening out the restoration
Fine pointy burs to give the anatomy of the 3 developmental lobes
Pull-through technique steps
Place mylar strip
Place composite where the contact is supposed to be
Pull mylar strip in the disto-lingual direction