Required Practicals
1/72
There's no tags or description
Looks like no tags are added yet.
Name | Mastery | Learn | Test | Matching | Spaced |
|---|
No study sessions yet.
73 Terms
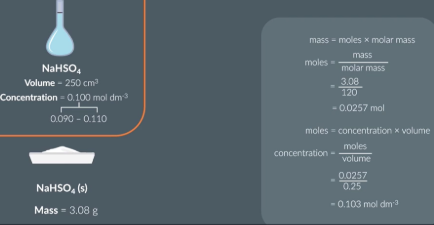
Prepare 250 cm solution of NaHSO4 with a concentration within this range 0.09 -0.110 mol/dm3
using volyme and conncentration calculate moles
From this caculate mass of NaHSO4
Next dissolve our solid in deionised water. Transfer this solution to 250ml volumetric flask.
FIll the rest of the flask up 250ml with deionised water
Add a stopper and turn the beaker upside down to make sure it is thoroughly mised
Running a titration
Set up our titration apparatus. Clamp the burette into a stand.with a funnel add the sodium hydrogen sulfate solution (NaHSO4) to the biuret
Use a pipette and add 25cm of NaOH to a conical flask
Add a few drops of phenolphthalein indicator the conical flask
When the NaOH/sodium hydroxide is neutralised it will go form pink to colourless
Run a rough titration
Add the acid dropwise and record the final reading when the acid changes colour. Calculate the tire
Repeat this titration as many times as is required til we get 2 titre value (0.1cm3 apart). This is concordant values
Use the mean concordant titres to calculate the concentration of sodium hydroxide.

practical considerations when running titrations
1 - a clean biurette might have droplets of water which would dilite the acidic solution
2 - an air bubble will result in an accurate reading (titre value would be inaccurately larger)
3- makes sure acid and base are evenly combines so we are more likely to accurately spot the moment nuetralisation occurs
4- ensures any regent caught on the side of the mixture remain in the flask
5- improves reliability of our titre. Typically we need to run 3 titrations
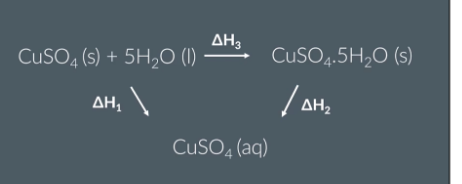
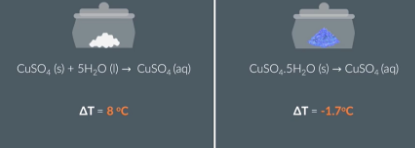
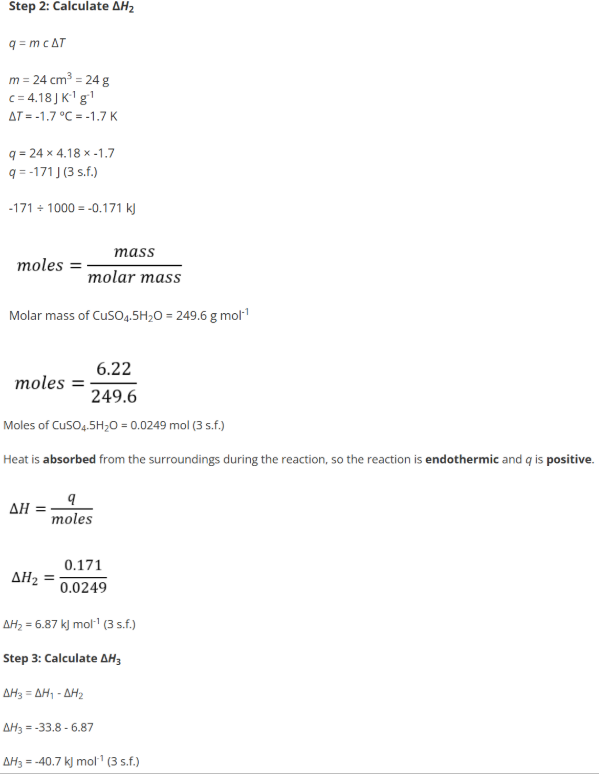
Using calorimetry to measure the temperature change during the following reactions:
1st reaction ------ Dissolving anhydrous copper sulfate in water
Weigh out some anhydrous copper sulfate
Construct a table to record temperatures
Add deionised water to a polystyrene cup and record the water initial temperature
Start a time and record the temperature of the water every minute (make sure to stir the water continuously)
At the 4th minute add anhydrous copper sulfate and continue to stir the solution. =
Record the temperature every minute from the 5th minute to the 15th
2nd reaction -------- Dissolving HYDROUS copper sulfate in water
Weigh out a sample of hydrated copper sulfate
Add water to a polystyrene cup and record the initial temperature
Start the timer and record the temperature every minute
Add the hydrated copper sulfate and at the 4 minute mark
Record the temperature every minute from the 5th minute to the 15th minute
Calorimetery Practcial considerations

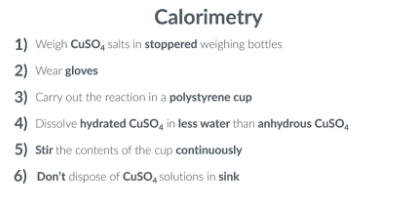
1 - Salt exposed to air would absorb water and increase in mass this would mean the reaction has already started to take place which would reduce the ACCURACY of our measurements
2- anhydrous copper salt is an irritant so wear gloves to protect the skin
3- Use a polystyrene cup (thernal insulator) to minimize heat loss, improving temperature accuracy and enthalpy change calculations.
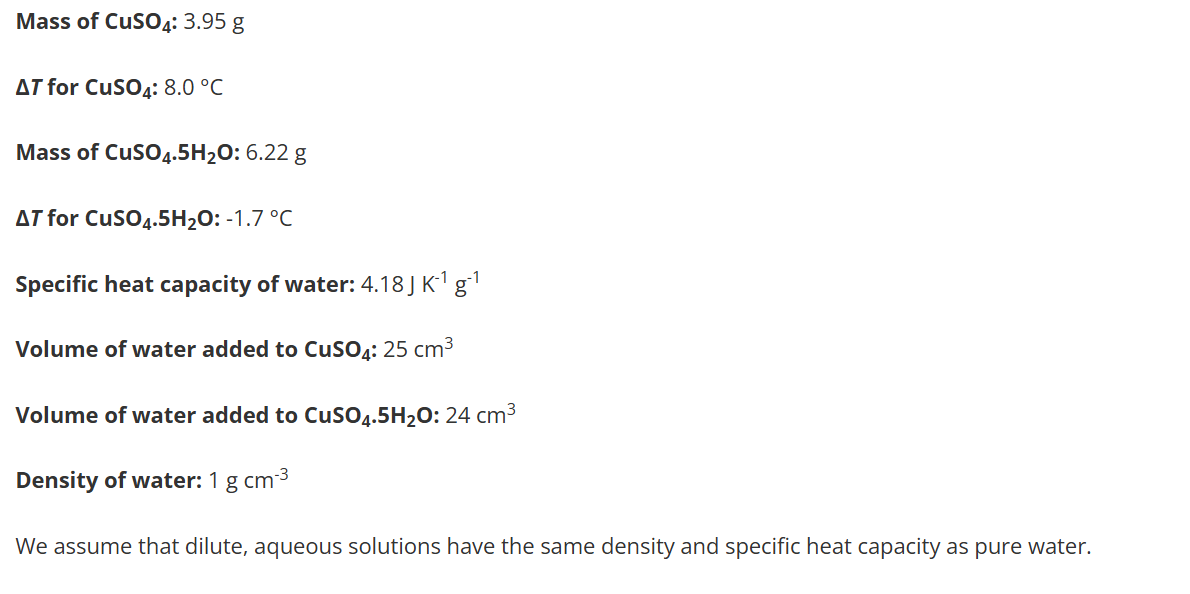
4- e.g., 25 cm³ for anhydrous CuSO₄, 24 cm³ for hydrous CuSO₄. Hydorus salt already contianes water in its lattice so adding less water ensures the volumes for each reaction are the same
5- Ensures all of the liquid is at the same temperature so the temperature is accurate
6- CuSO4 is toxic to aquatic life so we should dispose of it safely
calculating temperature change (calorimetery) using graph
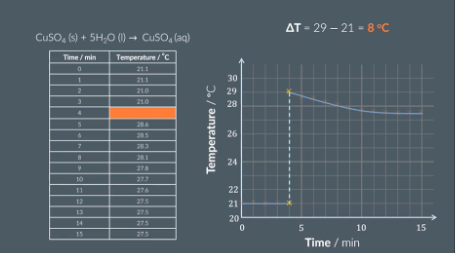
Draw a graph of temperature(y) vs time (x). Plot point and draw 2 lines of best fit (one for our data before we added the salt and one for after we added the salt).
Extend both lines of best fit to the 4 minute mark
Calculate the difference between the two points
Draw 2 graphs (one for anhydrous salt and one for hydorus salt) and for each find the temperature value of the 4 minute mark

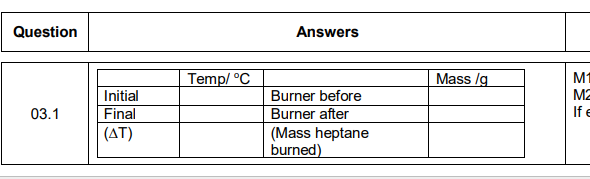
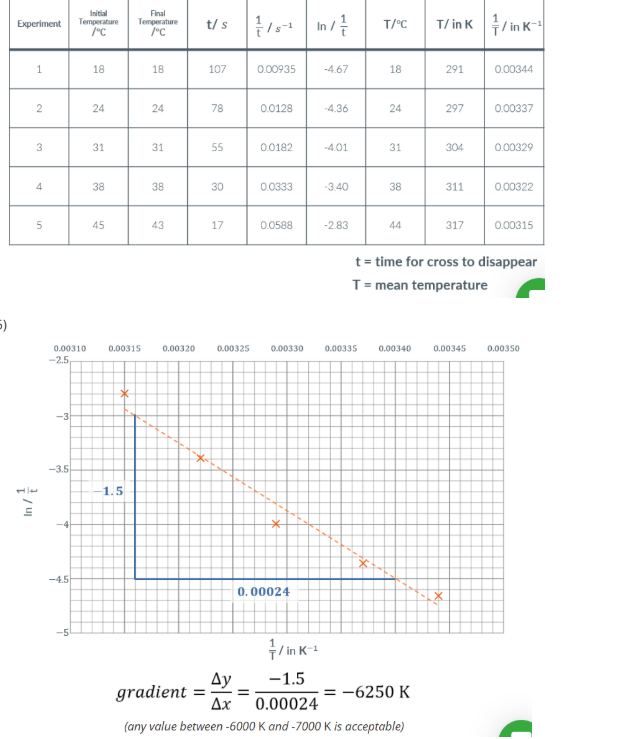
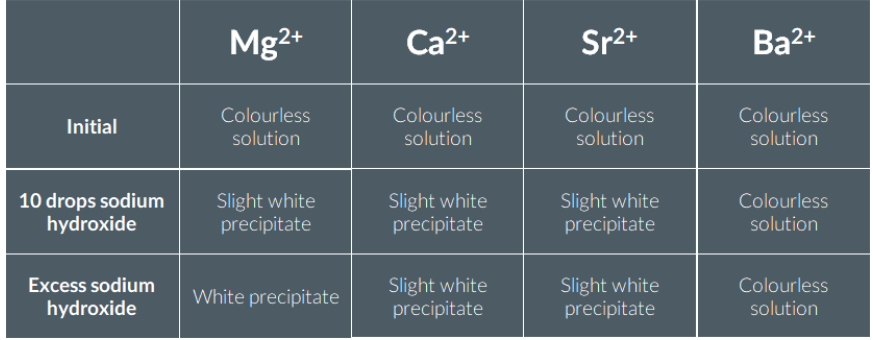
flame calorimetery
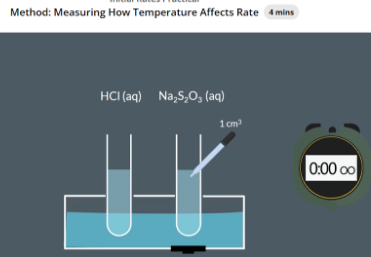
Add water to a plastic container at 25 C
Add 10cm3 of Na2S2O3/sodium thiosulfate solution to a test tube and slide it into the hole in the plastic container with the cross underneath
Add a thermometer to the sodium thiosulfate test tube and record initial temperature
Use a pipette to take 1cm3 of HCl and add it to the Na2S2O3 test tube. Immediately start the stopwatch
When we cannot see the cross stop the stopwatch and note down the time. Also note sown the final temperature
Dispose of the Na2S2O3 safely in Na2CO3 (sodium carbonate)
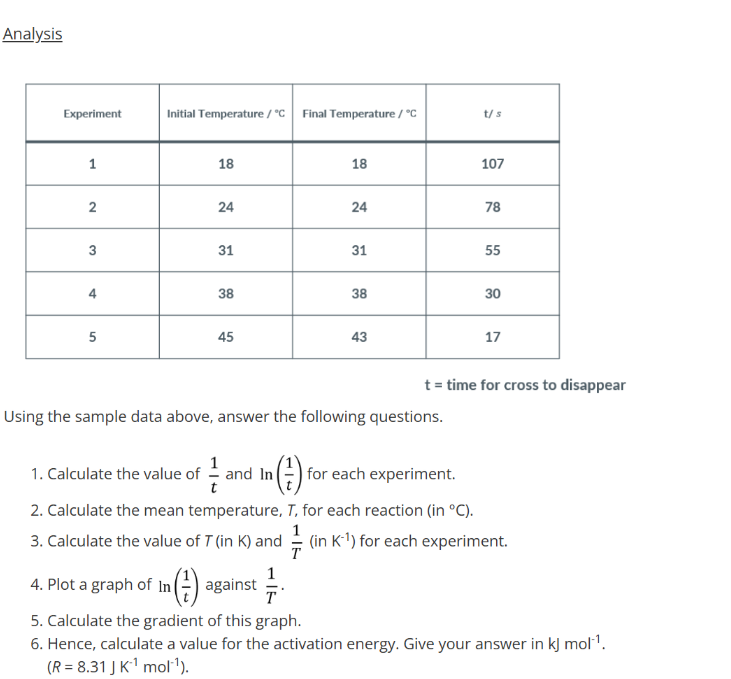
We need to run 5 separate experiments at 5 different temperatures and get 5 sets of results (One of these repeat should be a reaction at 15C (room temperature) with no water in the water bath)
why do we add a cross
the point at which the reaction turns cloudy is subjective.
To avoid this subjective end point, we place a cross underneath the reaction mixture. When the reaction mixture is cloudy enough that we cannot see the cross anymore, that’s when we stop timing.
Why can’t we perform this reaction above 55 °C?
if the reaction takes place at temperatures above 55 °C, this can increase the rate of production of toxic SO2 gas
Why do we dispose of the reaction mixture into sodium carbonate solution?
So, to prevent unnecessary SO2 gas build-up in the lab, we dump the reaction mixture into a beaker of sodium carbonate solution.
Why do we look at the reaction mixture from above the test tube?
the reason we must look down the tube from above is to ensure that we are looking at the tube from the same angle each time. This reduces human error

Testing for Group 2 Cations
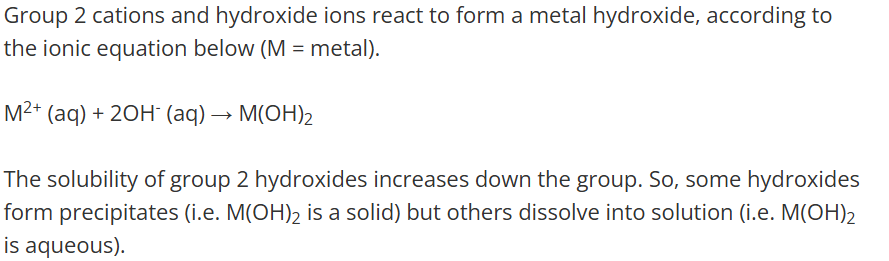
Place 10 drops of magnesium chloride solution in a test tube. Add an equal volume of dilute sodium hydroxide solution and mix well. Continue adding until the sodium hydroxide is in excess.
Repeat with solutions of calcium bromide, strontium chloride and barium chloride.
Testing for Group 2 Cations Observations
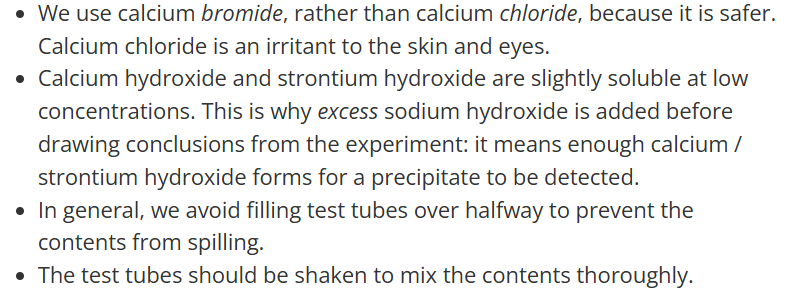
Explanation - Testing for Group 2 Cations Observations
Practical considerations - Testing for Group 2 Cations Observations
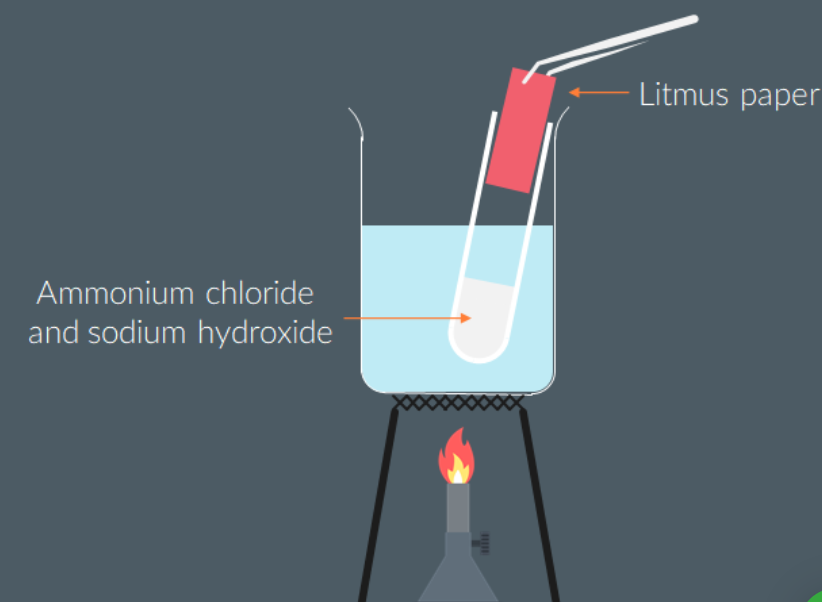
Testing for Ammonium Ions
Place 10 drops of ammonium chloride solution into a test tube. Add an equal volume of dilute sodium hydroxide solution, stir the mixture and warm gently in a water bath.
Using tongs, hold a piece of damp red litmus paper in the mouth of the test tube.
Observation
The damp red litmus paper turns blue.
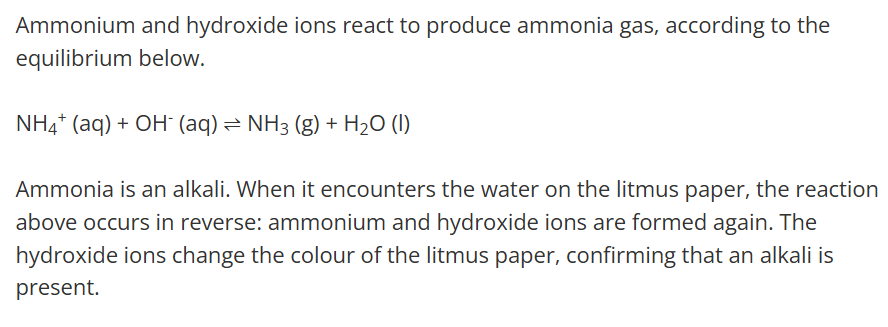
Explanation
Testing for Ammonium Ions
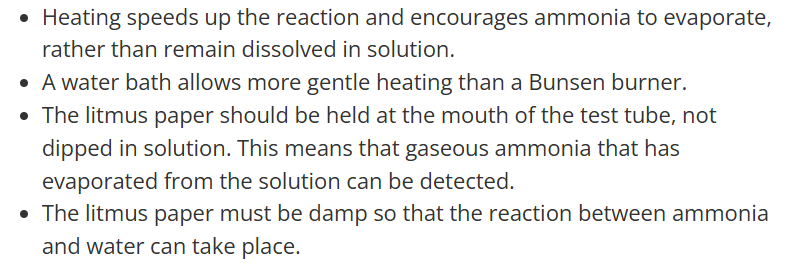
Practical Considerations Testing for Ammonium Ions
Testing for hydroxide ions
Place sodium hydroxide solution in a test tube. Dip universal indicator paper into the liquid.
The universal indicator paper turns dark blue.
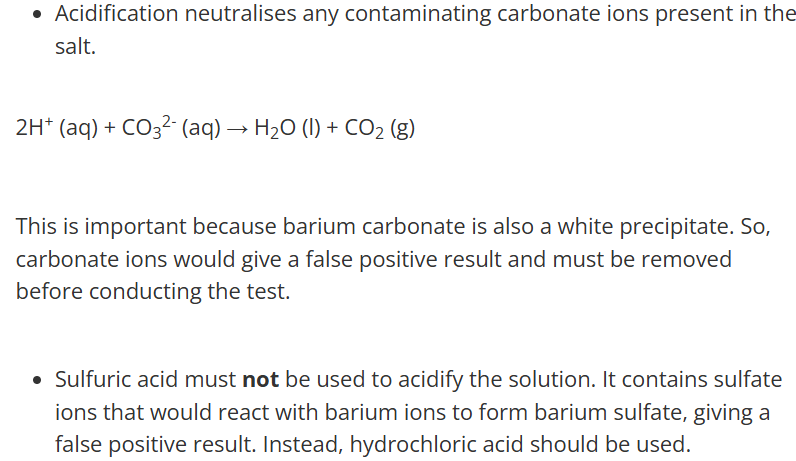
Testing for Carbonate Ions
Method
Place sodium carbonate solution in a test tube. Connect via a delivery tube to a test tube containing calcium hydroxide solution (limewater).
Add dilute hydrochloric acid to the test tube containing sodium carbonate.
Observation
The sodium carbonate solution bubbles (effervescence), and the colourless calcium hydroxide solution turns cloudy
Testing for Carbonate Ions
Explanation

Testing for Carbonate Ions
Practical considerations
The end of the delivery tube must be below the level of calcium hydroxide solution so that CO2 enters the solution rather than escaping into the atmosphere.
Testing for Sulfate Ions
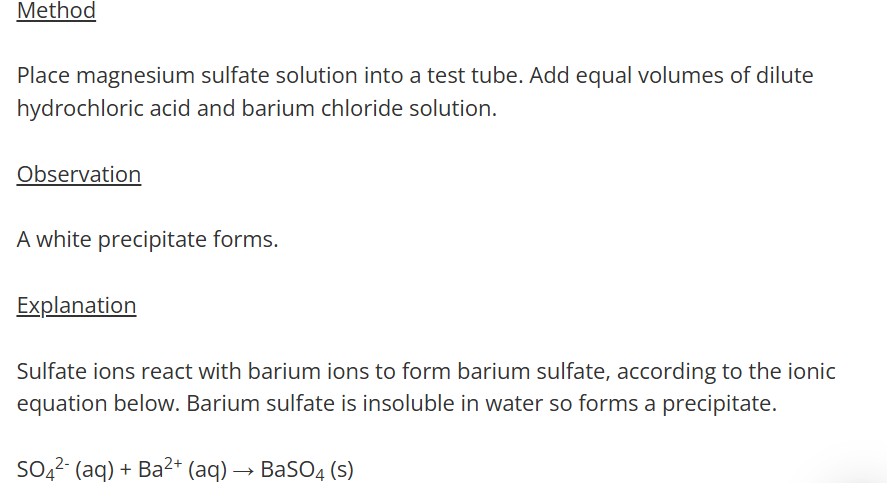
Practical considerations
Testing for Sulfate Ions
Testing for halide ions
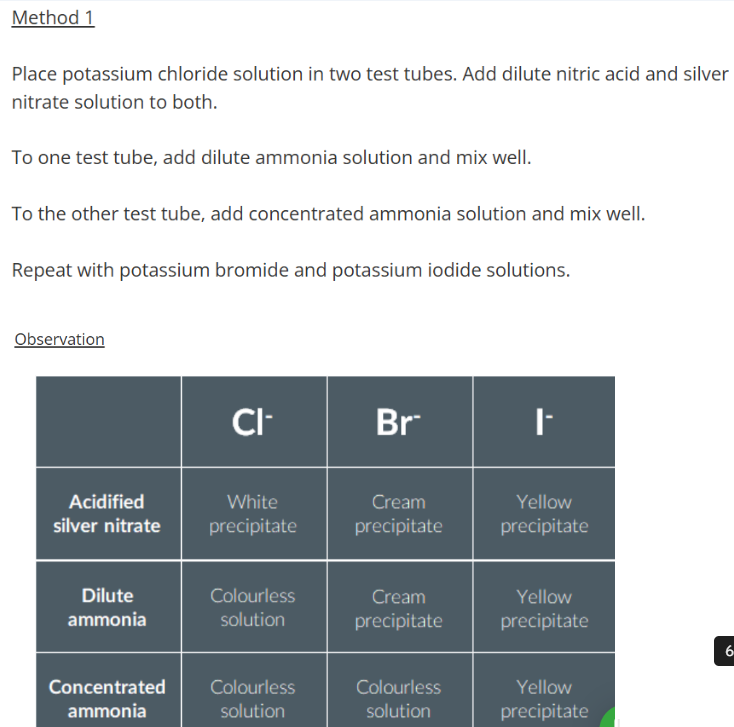
Practical Considerations

However, it can be difficult to differentiate by colour alone. Method 2
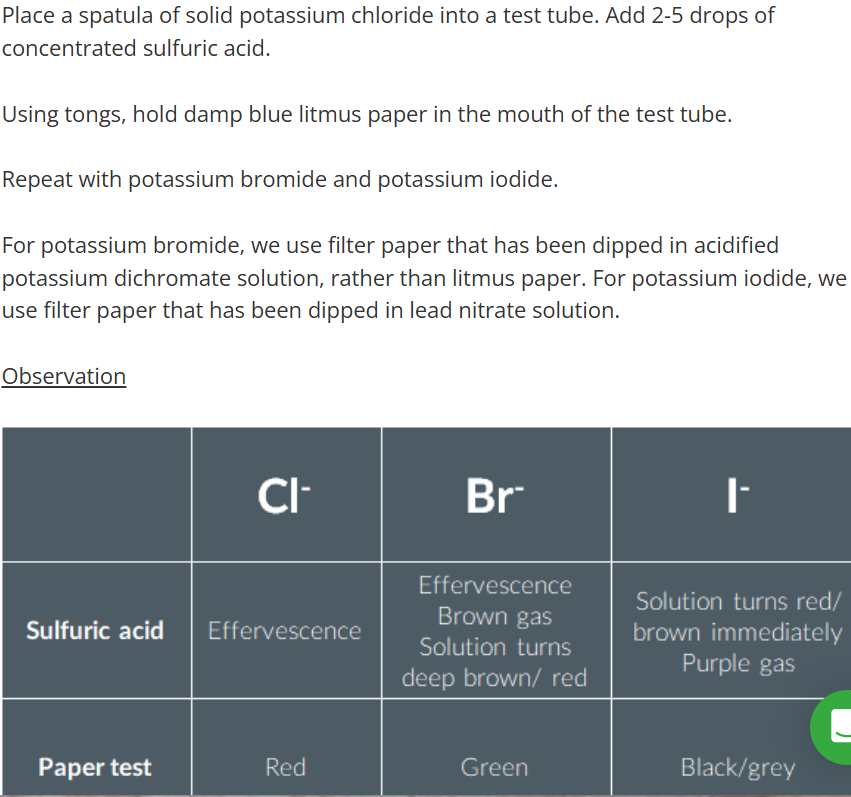
Test 2 Practial Considertions
Required Practical 5 - Distillation
Distillation
Purifyign
Drying
Seperating
Testing

Required Practical 5
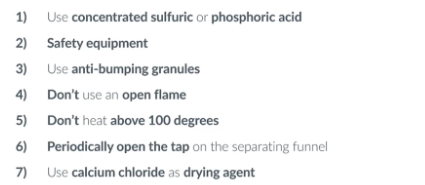
Dehydration – Heat cyclohexanol with concentrated H₃PO₄ and anti-bumping granules under distillation; collect cyclohexene (bp <100°C).
Neutralisation – Extract distillate with Na₂CO₃ to remove acidic impurities; discard aqueous layer.
Salt Wash – Wash with saturated NaCl to help remove water; discard aqueous layer.
Drying – Add anhydrous CaCl₂ to remove residual water; filter or decant to isolate dry product.
Testing – Add acidified KMnO₄; decolourisation (purple → colourless) confirms presence of alkene (cyclohexene).
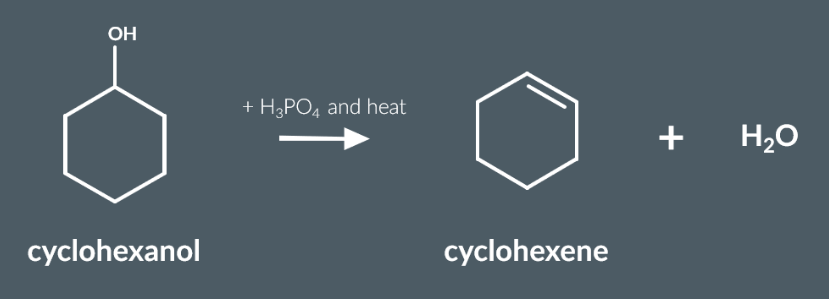


These are the practical consideration we need to consider when we produce cyclohexne from cyclohexanal
Testing for Organic Functional Groups
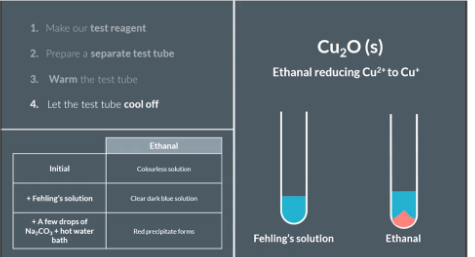
Make our Fehling test regent. Put equal amounts of Fehling's A and Fehling's B into a test tube
Prepare a separate test tube. Add ethanal (aldehyde) a few drops of Fehling's solution and record the observation.
Add anti-bumping granules. Add sodium carbonate solution to make an alkali mixture. Then place the test tube in a water bath and heat it for a few minutes
Let the test tube cool off and record our observations
The red precipitate formed is the result of ethanal reducing Cu2+ to CU+. So our observation confirms the presence of an aldehyde in our test tube.
Testing for an Alcohol
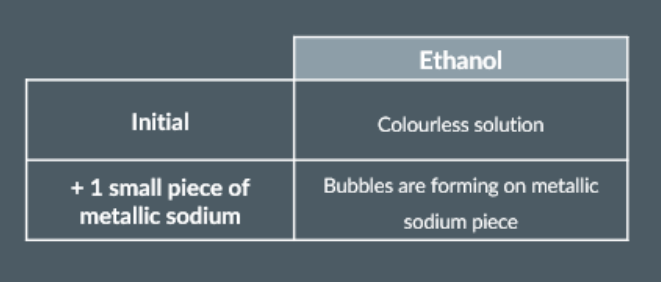
To start, we pour some ethanol into a test tube.
And, since the ethanol solution appears colourless, we record this as part of our initial observation.
Next, we add one small piece of metallic sodium to the same test tube.
The metallic sodium piece will start giving off bubbles immediately into the solution.
The bubbles that form on the metallic sodium piece are hydrogen gas (H2).
Testing for an Alkene
add a few drops of cyclohexene into a test tube (colourless)
Add bromine water to mixture
Next, we give the test tube a strong shake, after which we’re left again with a colourless solution.
Finally, we record our observations in our table, so it looks like this:

Testing for a Carboxylic Acid
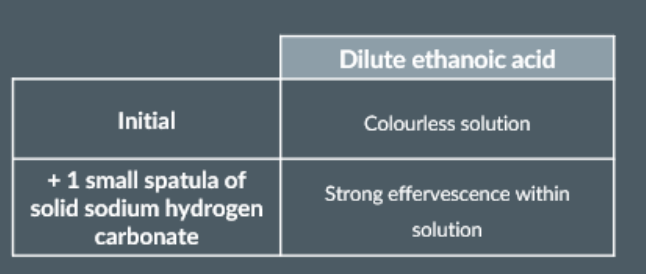
To start, we place one small spatula of solid sodium hydrogen carbonate in a test tube.
Next, we add some dilute ethanoic acid to the test tube.
effervescence suggests the presence of a carboxylic acid
Testing for a Halogenoalkane
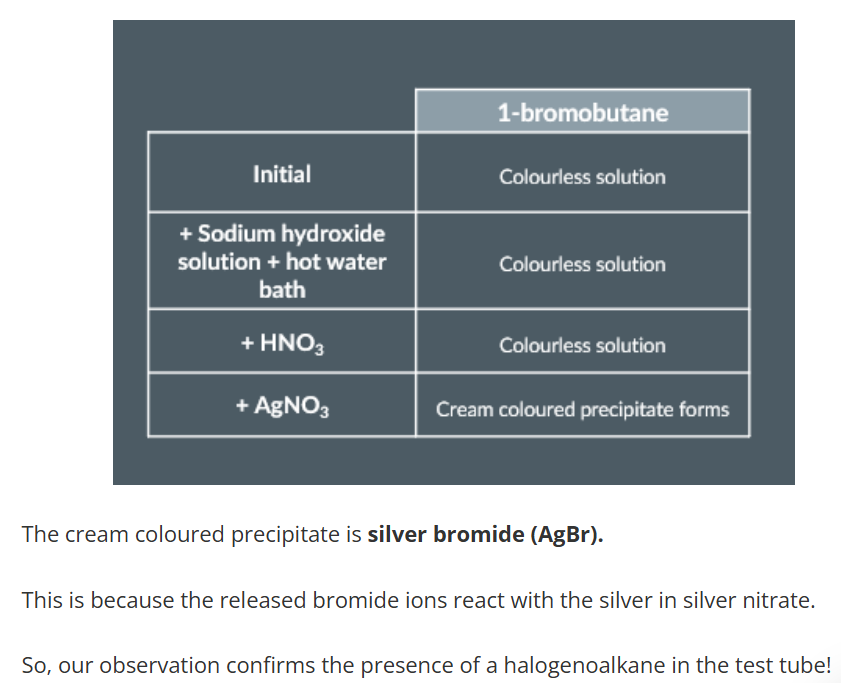
we pour some sodium hydroxide solution into a test tube.
Next, we add some drops of 1-bromobutane.
The reaction releases bromide ions
we place the test tube in a hot water bath for a few minutes in order to increase the rate of reaction.
Next, we add some dilute nitric acid, followed by some silver nitrate solution.
And once we add the silver nitrate, a cream coloured precipitate forms at the bottom of the test tube.
Practical Considerations: Testing for Functional Organic Groups
Wear plastic gloves to protect from toxic, irritant, and corrosive substances like bromine water.
Use a hot water bath, not an open flame, when heating flammable substances like 1-bromobutane.
Work in a fume cupboard to avoid inhaling toxic vapours, such as from dilute nitric acid.
Add anti-bumping granules when boiling mixtures, e.g. in aldehyde tests, to prevent uneven boiling.
Use dilute solutions (e.g. dilute ethanoic acid) to reduce flammability and improve safety.

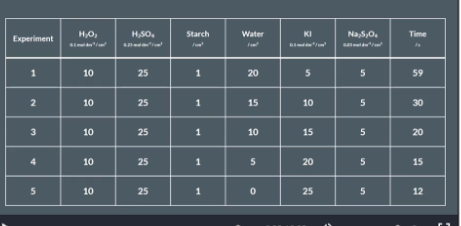
Iodine Clock Reaction
10cm3 of H2O2 (hydrogen peroxide) into a small beaker and everything else into a the big beaker
Specifically:
25cm3 H2SO4/ sulfuric acid
1cm3 starch
20cm3 H2O/water
5cm3 KI/potassium iodise
5cm3 Na2S2O4 / sodium thiosulfate
Pour the hydrogen peroxide into the big beaker and immediately start the stop watch and stir. Wait and watch.
The solution will turn form colourless to blue/black colour. Stop the timer and record it in a table
Repeat this experiment 4x to achieve 5 sets of results. In the repeats vary the amount of water and potassium iodide we put in the big beaker and record the times
practical considerations
Wet equipment
dry apparatus completely to avoid diluting reactants and affecting reaction rates.
Temperature changes
if you were asked in an exam how the results of this experiment could be made more accurate, “ensuring that each reaction takes place at the exact same temperature using a water bath” is an excellent answer.
3) Reaction times and subjective end point
the colour changes very quickly and there is subjectivity so it only really makes sense to record the time taken for the mixture to turn blue-black to the nearest second.
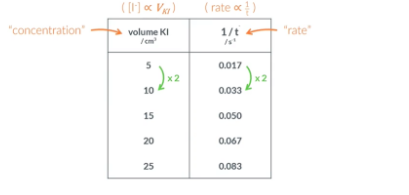
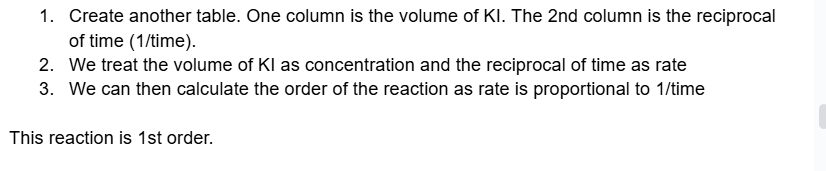
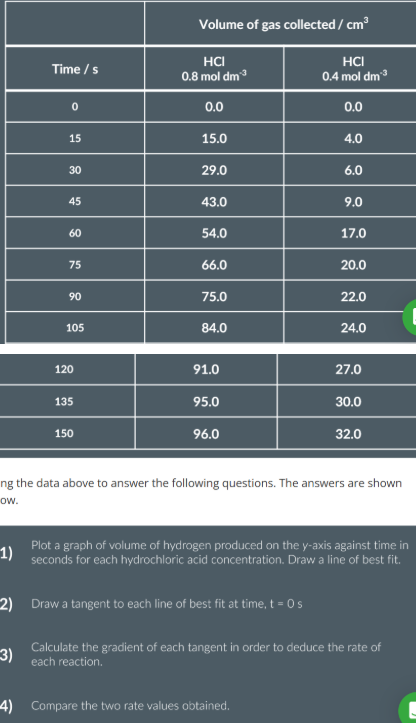
calculating the order of reaction
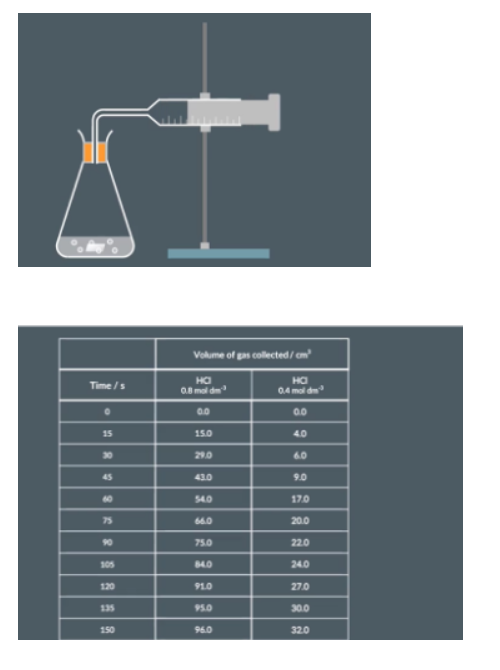
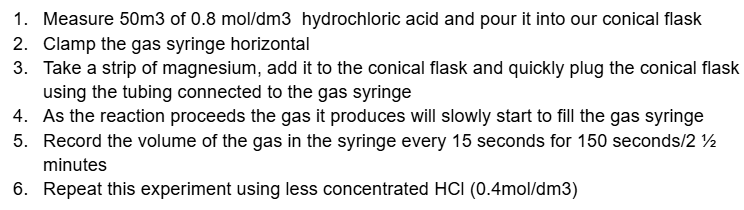
measuring rate using volme of gas

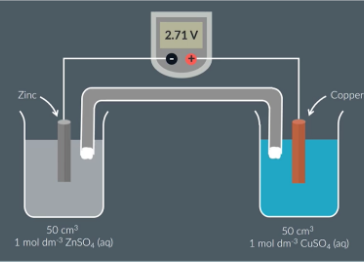
Measuring the EMF of an Electrochemical Cells
Prepare 2 half cells by using 2 beakers. In one beaker add 50cm3 of 1 mol/dm-3 ZnSO4 (Zinc sulfate) as well as a piece of metallic zinc that is partially submerged
In another beaker add 50cm3 of 1mol/dm-3 CuSO4 (copper sulfate) as well as a piece of metallic copper that is partially submerged
Add a salt bridge making sure the ends make contact with the solution in each beaker
Connect a wire from the copper to the positive (red) terminal of the voltmeter and another wire from the zinc to the negative (black) terminal of the voltmeter
The voltmeter should give a reading which should be recorded
Practical considerations when measuring EMF
rub both pieces of metal with sandpaper. This will remove any oxide layers on the surface.
perform our experiment under standard conditions,
calibrating the ph probe
Use a pipette to drop a few drops of a known buffer solution in a beaker. Due the same to the other 2 buffers
Take out the pH probe and rise it thoroughly with distilled water
Place it in the 1st buffer solution and wait for reading to stabilize and write down the pH reading
Rinse the pH probe again and repeat with the other 2 buffer solutions
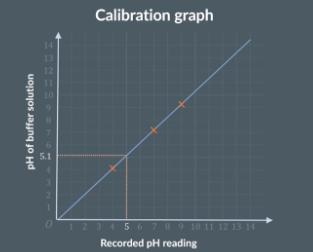
Plot the 3 readings on a graph. The x axis will be recorded pH reading and the y axis is the pH of buffer solution
Plot the point a and draw a line of best fit. This is a calibration graph
So if use the pH probe and get a reading of 5 we can look on the graph and find that the actual pH is close to 5.1 Once we have recorded all of the pH’s in our titration we will use the graph to convert our readings into the correct pH’s

Prepare biurettes by rinsing and filling one with ethanoic acid and the other with sodium hydroxide.
Place a beaker under the acid biurette and release 20 cm³ of ethanoic acid.
Rinse the pH probe, submerge it in the acid, stir, and record the initial pH once stable.
Add NaOH in 2 cm³ increments, stir and record the pH after each addition up to 18 cm³.
Add NaOH in 0.2 cm³ increments from 18 to 22 cm³, then resume 2 cm³ increments up to 40 cm³, recording the pH each time.
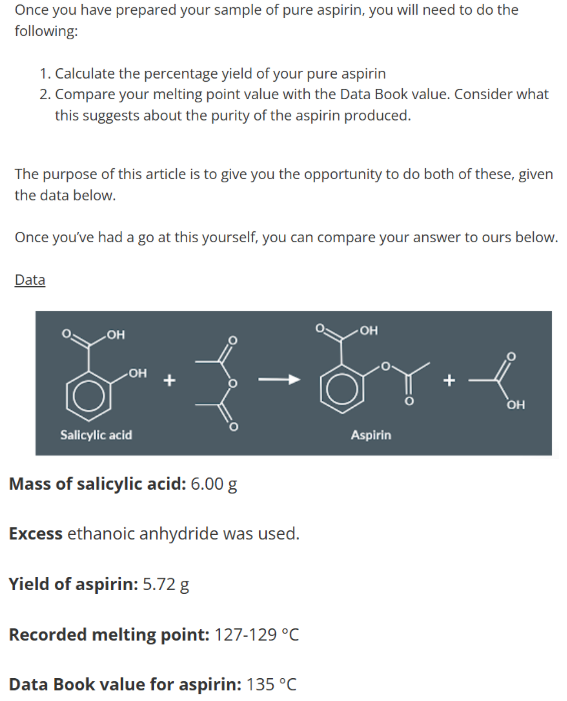
preparing and purifying aspirin

Prepare a sample of crude aspirin
Add a weighed amount of salicylic acid to a conical flask and then add some ethanoic anhydride and mix
Add a few drops of H2SO4 (sulfuric acid) and mix
Warm the mixture for 20 minutes using a water bath
Cool and pour our mixture into a beaker containing water.
Stir the mixture until our crude aspirin forms, filter it under reduced pressure and place it on filter paper to dry
Recrystallization
Dissolve crude aspirin in hot ethanol using a water bath.
Pour the solution into water in a conical flask and let it cool to room temperature.
Place the flask in an ice bath to complete crystallisation.
Filter the crystals under reduced pressure to isolate pure aspirin.
Dry the crystals and record the final mass of the purified sample.
Determine the melting point of our aspirin
Using a melting point apparatus.
practical considerations
Use gloves as salicylic acid, ethanoic acid and sulfuric acid are toxic
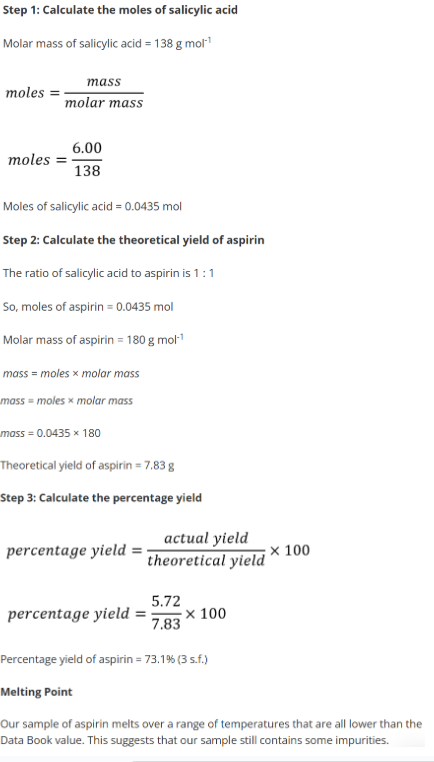
The actual yield of aspirin is always less than the theoretical yield for these reasons
Loss of crystals during filtration
Some of the cold solvent used to wash the crystals could dissolve some of the crystals
Pure aspirin may still remain in solution after recrystallization which can lead to side reaction occuring
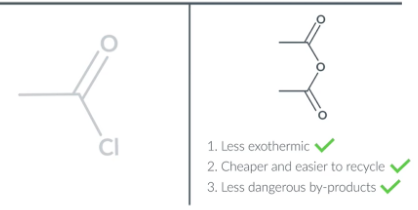
We use ethanoic anhydride rather than ethanoyl chloride because the reaction is less exothermic (easier to control), cheaper and easier to recycle.
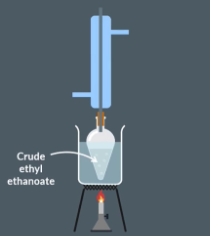
Prepare crude ethyl ethanoate
To a flask and ethanol, concentrated sulfuric acid (H2SO4) and anyhdorus ethanoic acid/glaical ethnic acid.
Add anitbumpiing grnauels and heat mixture for 15 minutes. This produces our sample of crude ethyl ethnoate
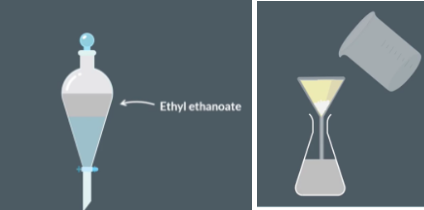
Solvent extraction
Add sodium carbonate solution. The top layer should contain crude ethyl ethnaote and the bottom layer should contain sodium carbonate solution
Separate the two layers abd discard the bottom layer
Add this ethyl ethnaoate to a beaker and dry it using anhydrous Na2SO4/sodium sulfate.
Use gravity filtration to separate out drying agent from the ethyl ethnoate
The ethyl ethnaoate may still contain impurities and we use distillation to remove these
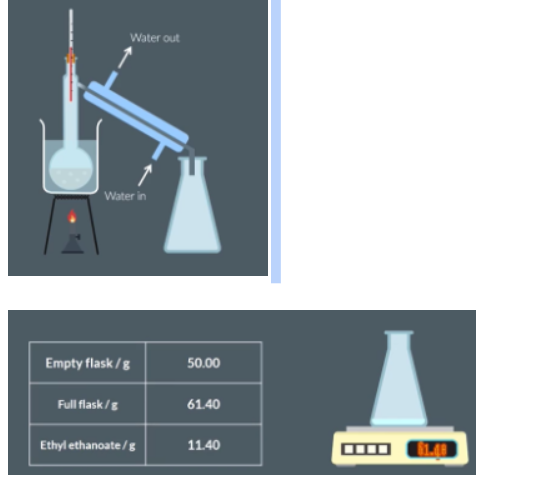
Distillation
Set up distillation apparatus, pouring the liquid into a flask with anti-bumping granules.
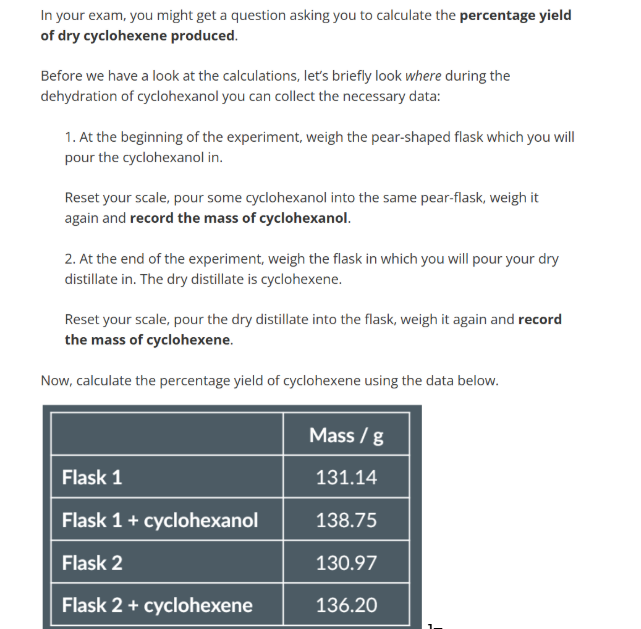
Record the mass of the empty collection flask in a table.
Gently heat the mixture and distil until no more vapour is produced.
Reweigh the collection flask to calculate the mass of ethyl ethanoate collected.
practical considerations
The reaction of Na2CO3 solution with acids produces CO2 gas. So, we should periodically open the stopcock while mixing. This avoid the build of pressure.
When we distil the mixture, we need to make sure that the temperature remains below the boiling point of ethanol and ethanoic acid and above the boiling point of ethyl ethanoate.
We must never distilled to dryness (distill until all the moisture has been distilled) because that would just been transferring the solution for, one flask to another. Also if our distillation left any reactive residue in the flask this could lead to an explosion as teh temperature of a dry heated disitllaiton flask can get very hot
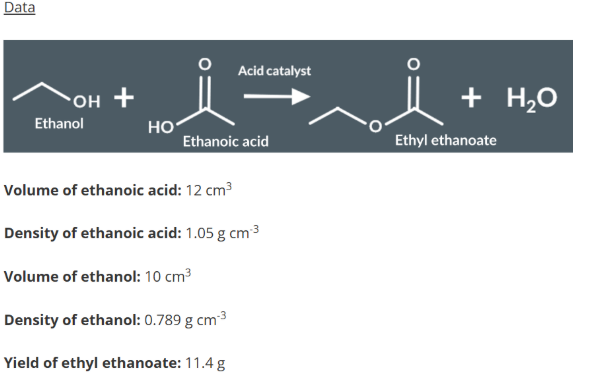
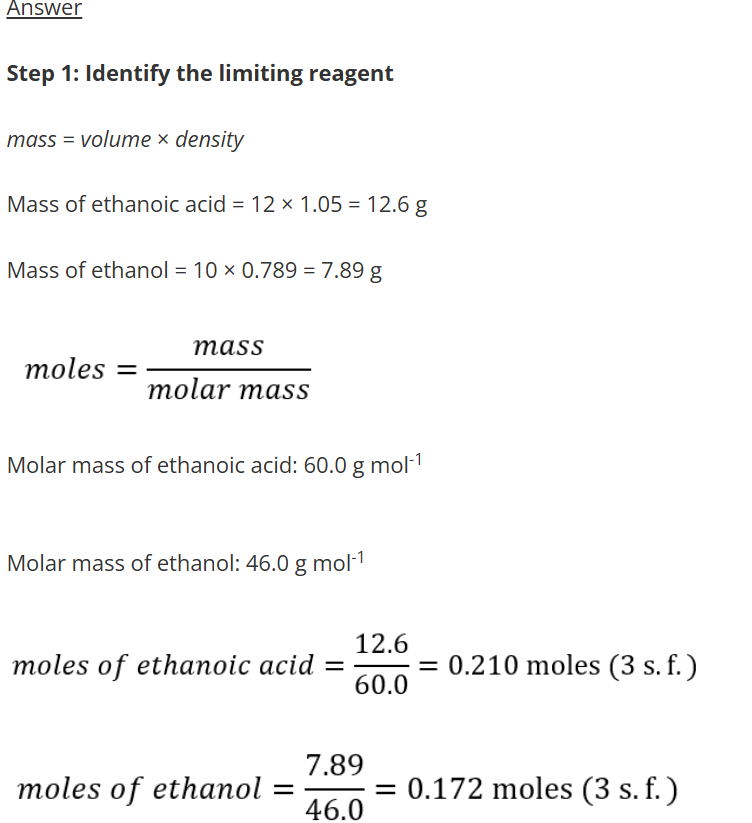
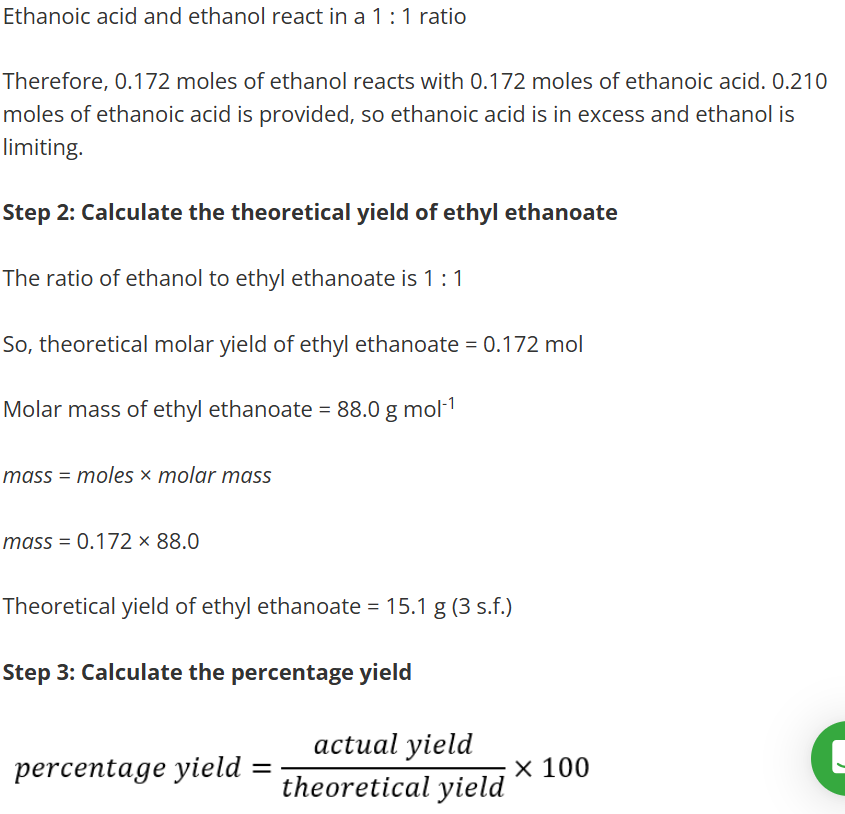
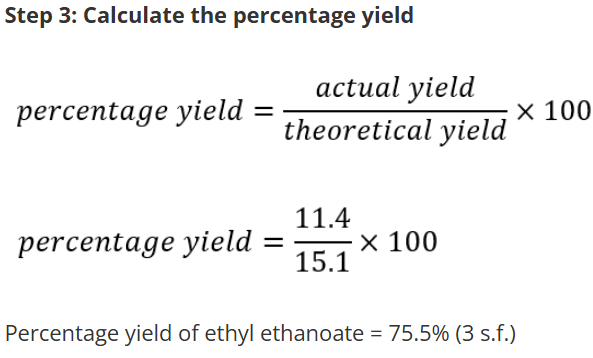
Analysis of Ethyl Ethanoate
Determine whether ethanoic acid or ethanol is the limiting reagent.
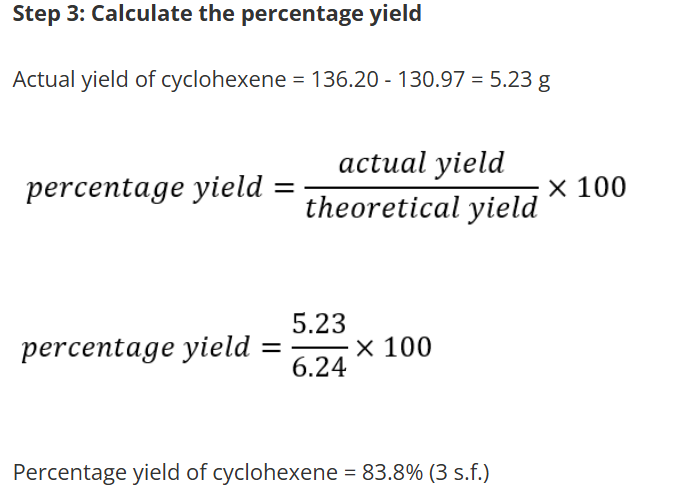
Calculate the percentage yield from the limiting reagent.
Required Practical 11
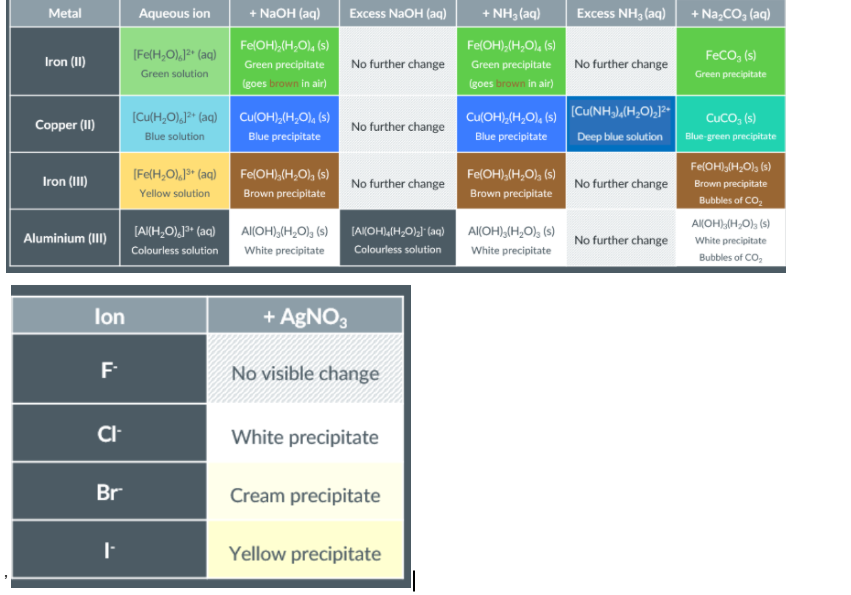
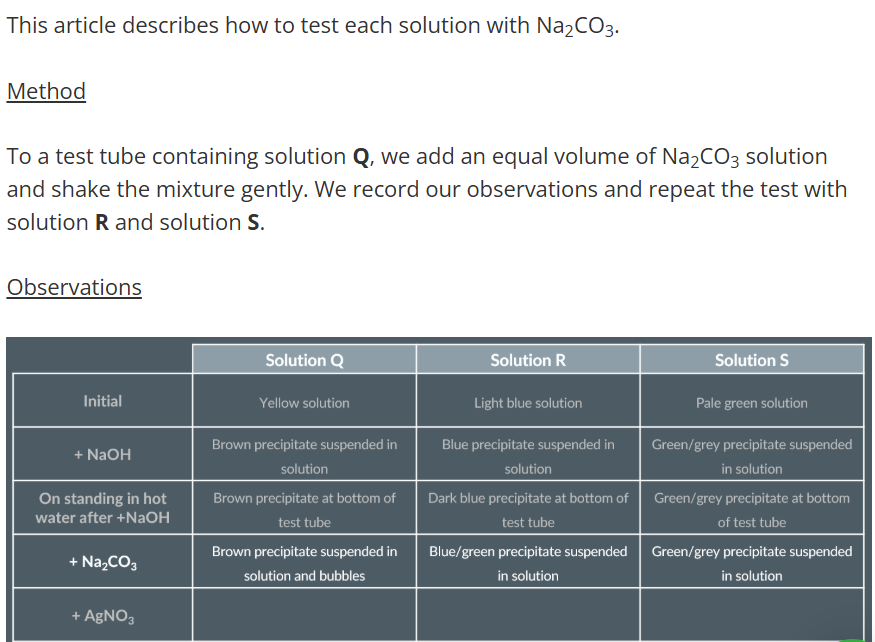
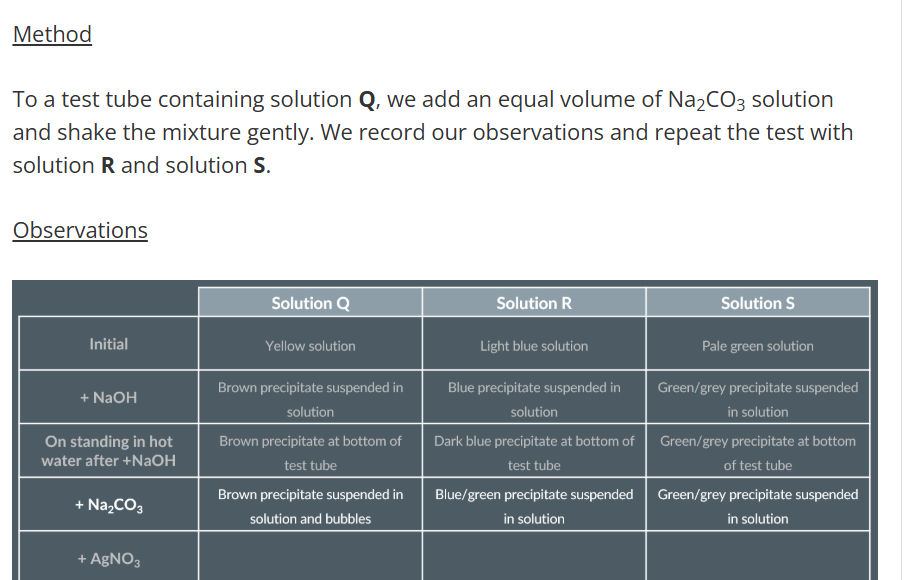
Add NaOH solution
Heat solution with NaOH
Add Na2CO3 solution
Add AgNO3 solution
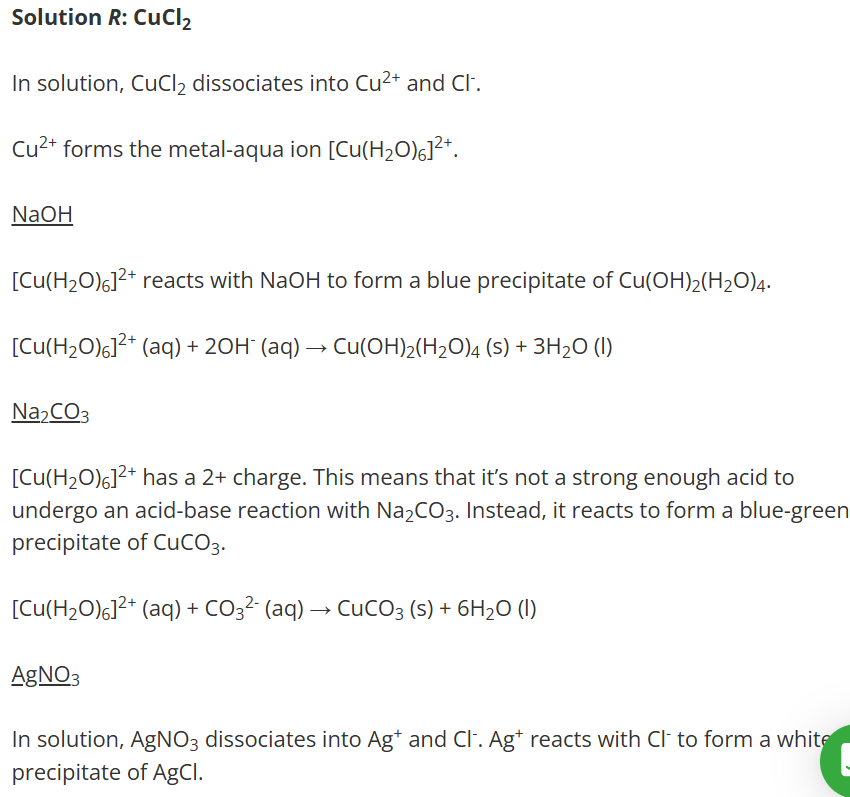
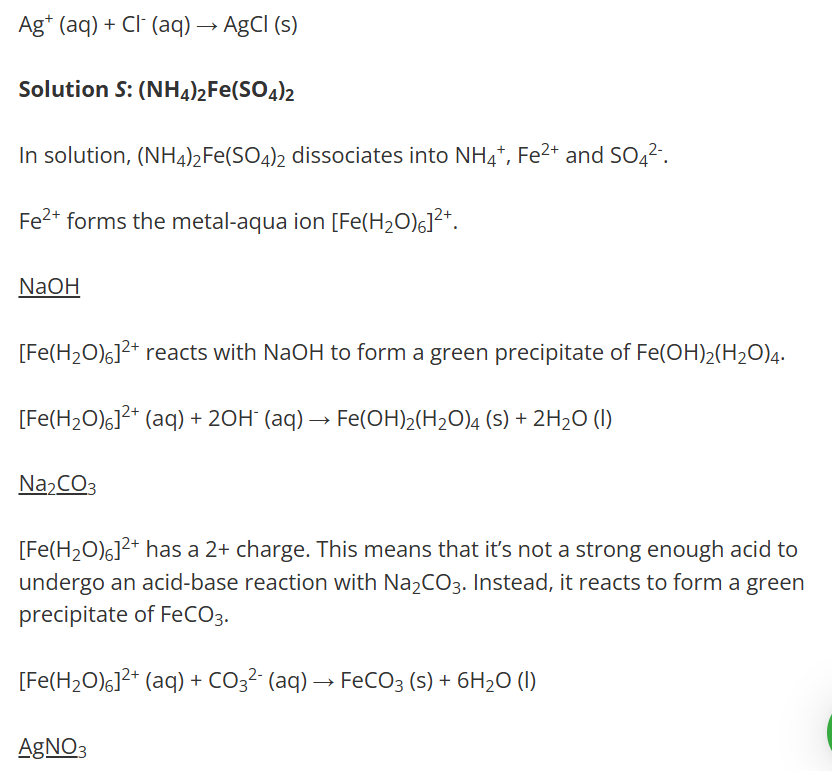
Observations with Sodium Hydroxide
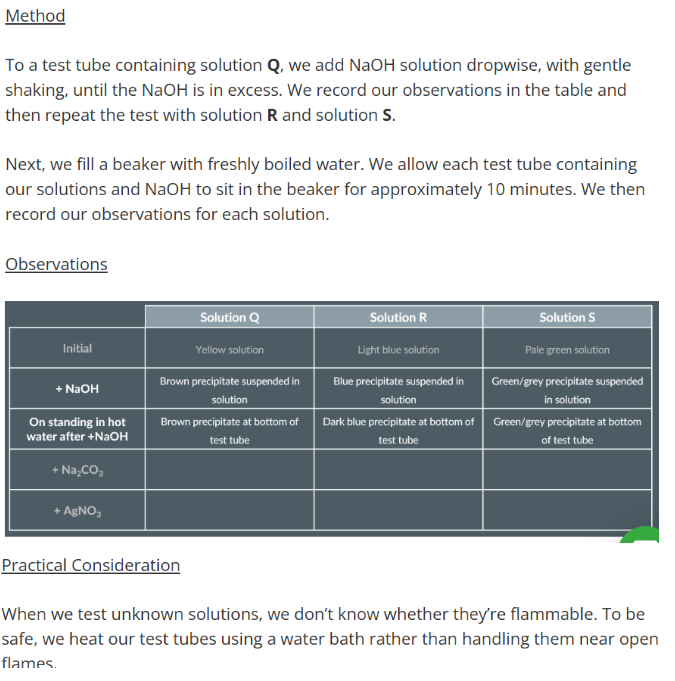
Observations with Sodium Carbonate
Observations with Sodium Carbonate
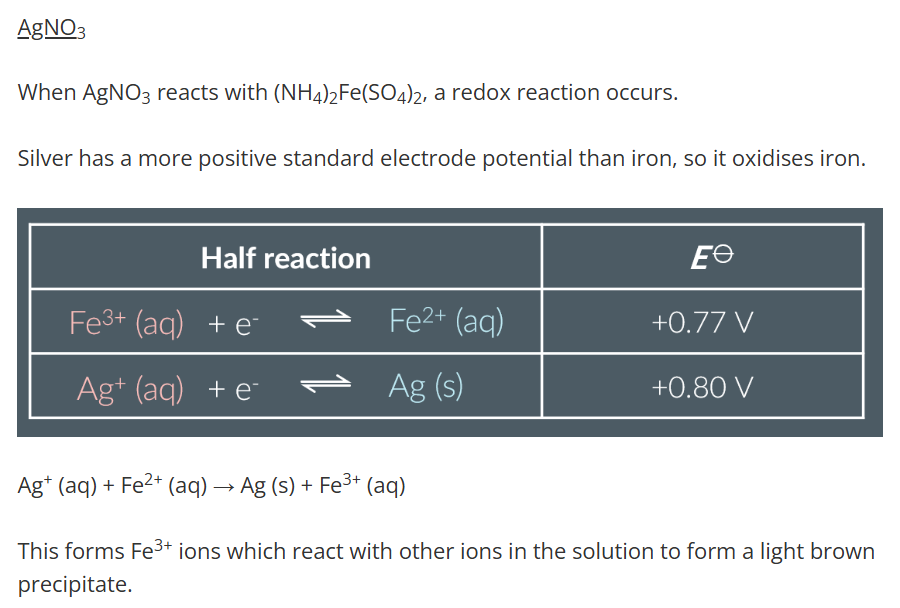
Observations with Silver Nitrate
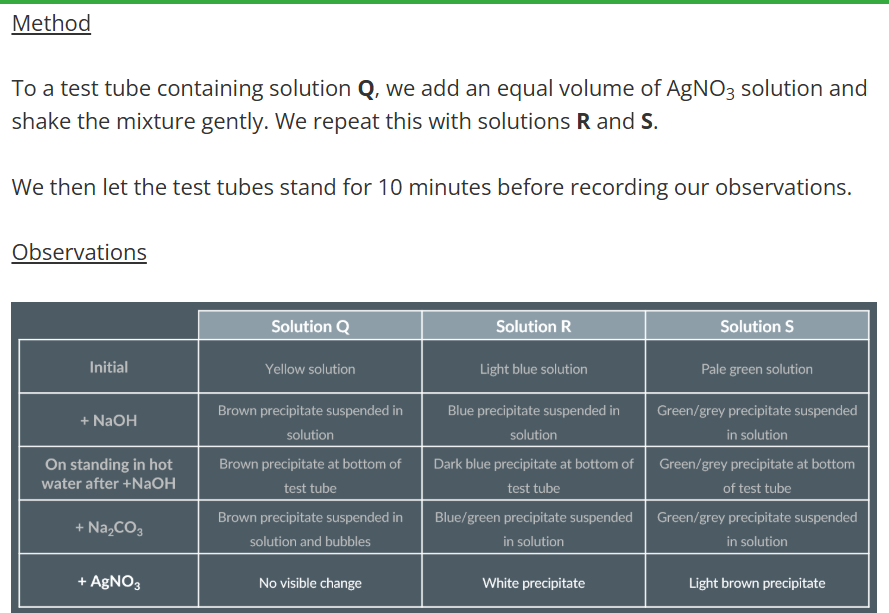
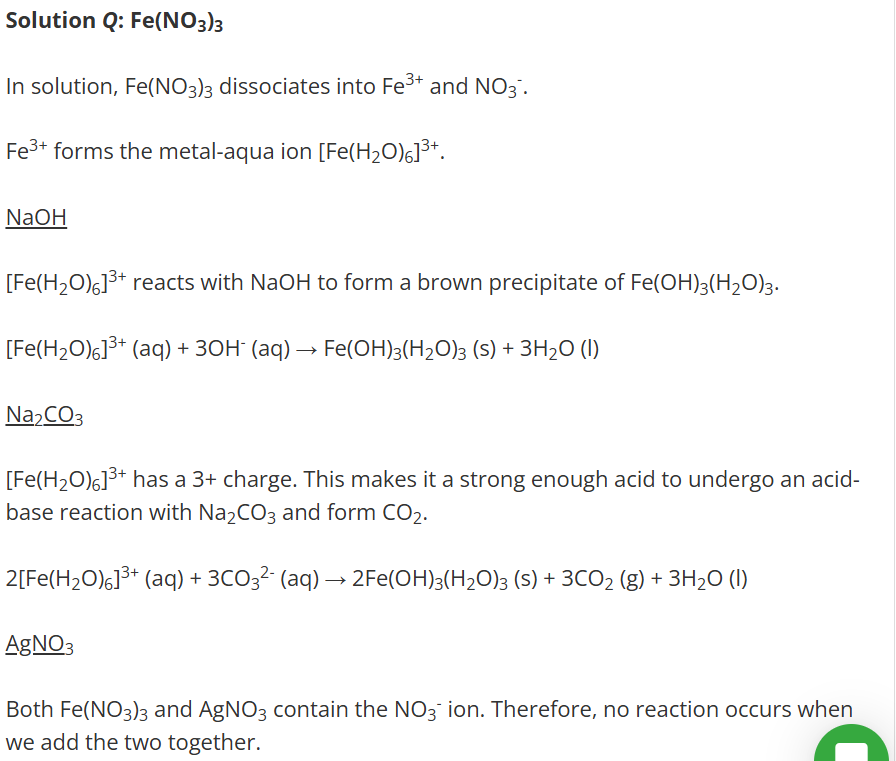
Transition Metal Ions
What are the Solutions?
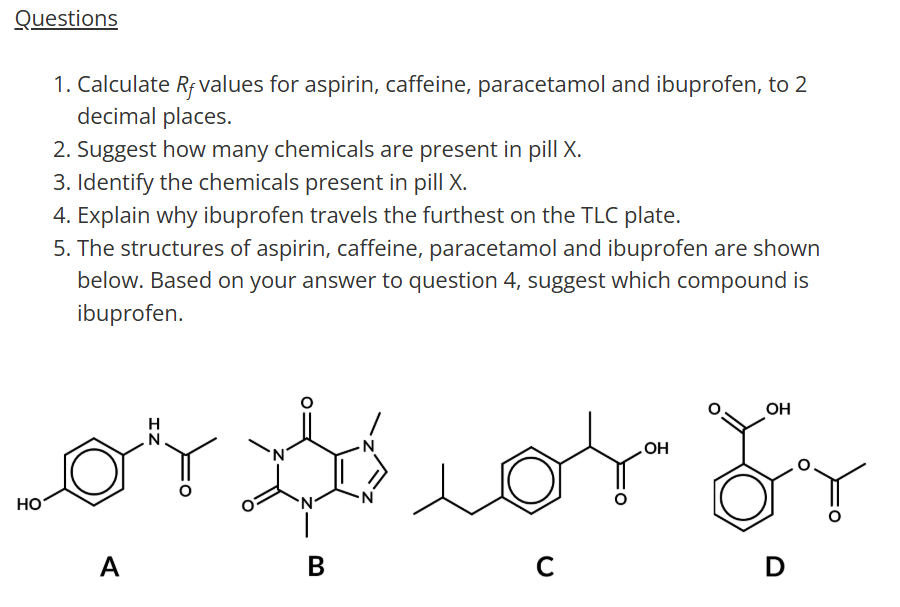
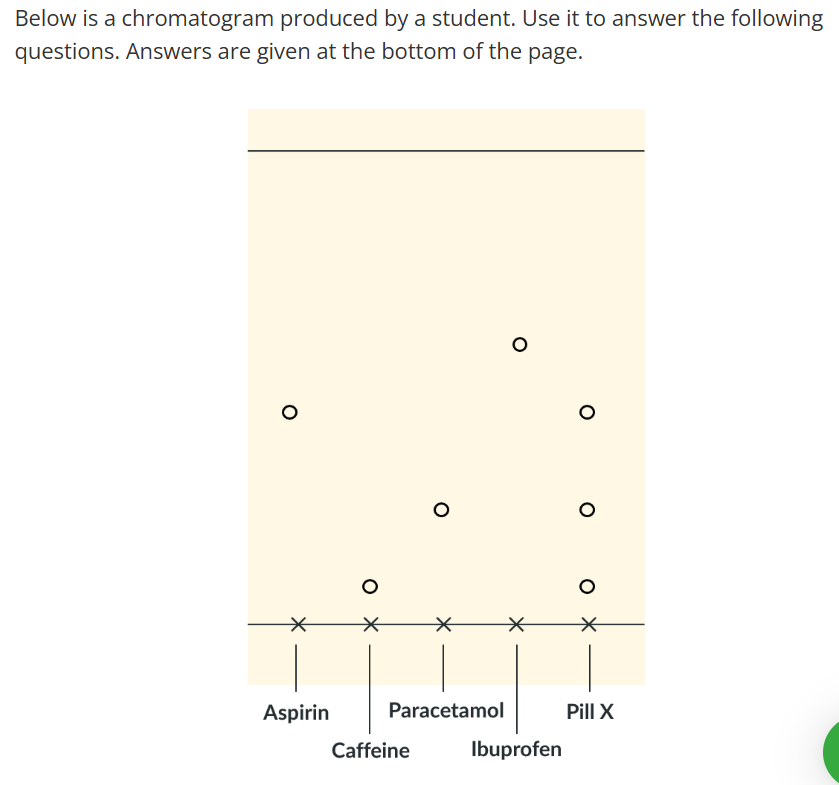
Thin-Layer Chromatography - Required Practical 12
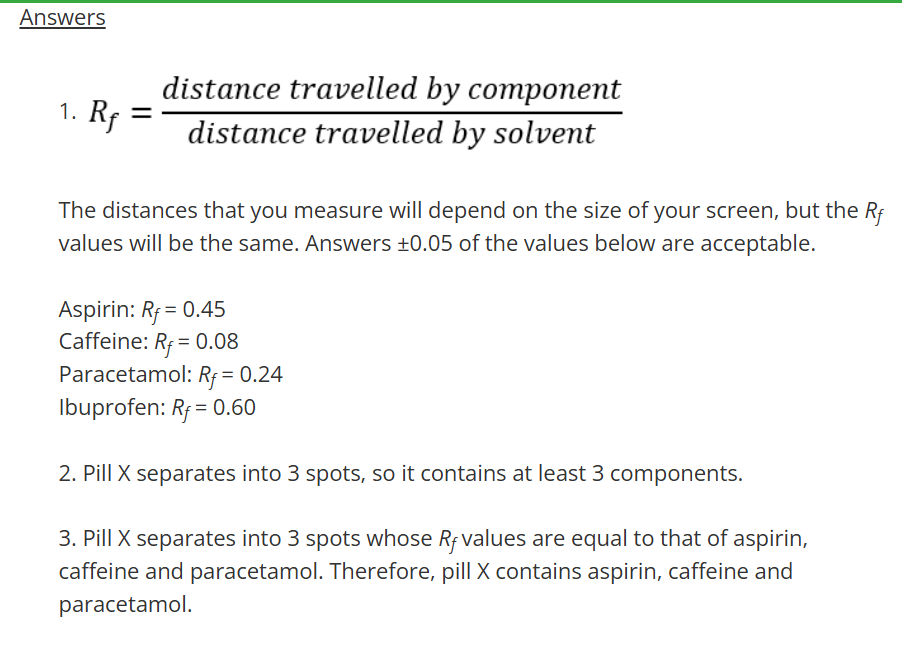
Using TLC chromatography to identify which chemicals our of paracetamol, ibuprofen, caffeine and aspirin are contained in a combination pain killer (pill X)
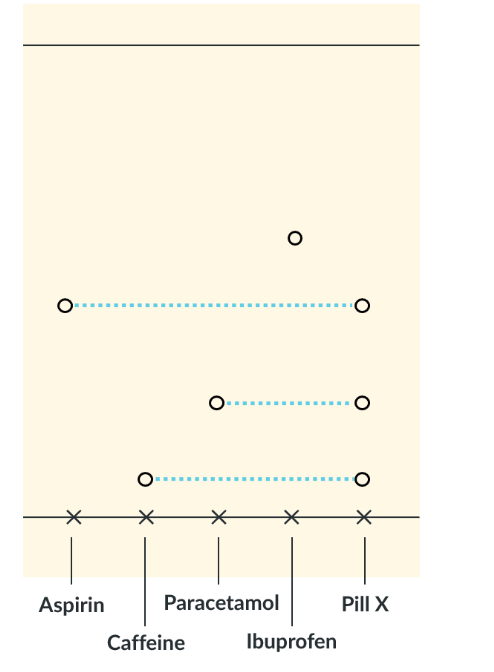
We compare the distances traveled by pure chemicals in TLC to the distances travelled by the components on pill X which tells us what's in the pill
Grind each chemical (paracetamol, ibuprofen, caffeine, aspirin, and pill X) and dissolve in ethanol.
Prepare the TLC plate with a pencil baseline, mark and label five spots.
Apply each solution to the corresponding spot using a capillary tube and allow to air dry.
Place the plate in ethyl ethanoate (mobile phase), cover, and remove when solvent nears the top; mark the solvent front.
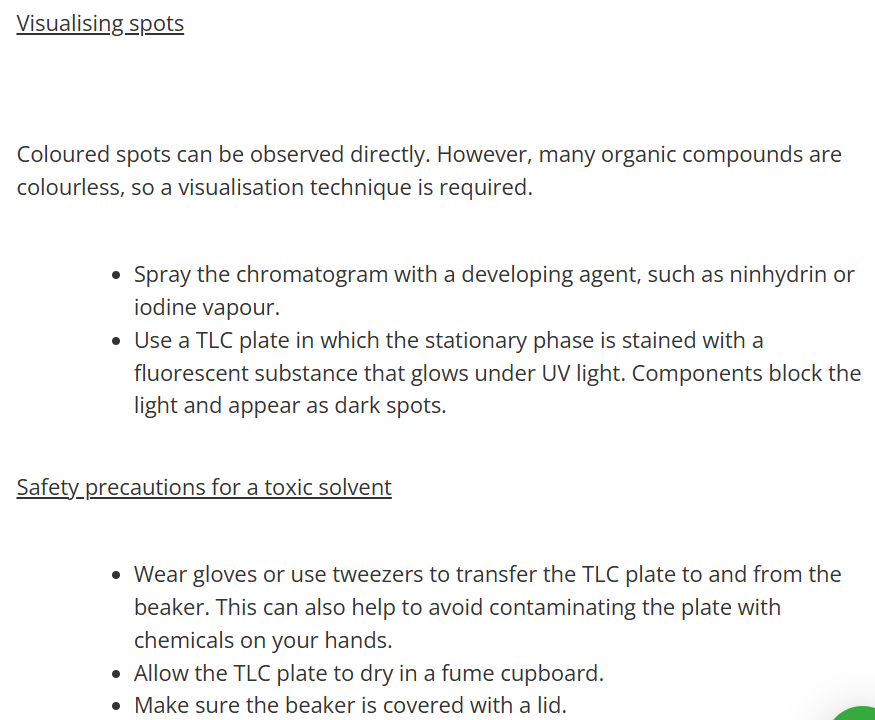
View under UV light, circle the black spots, and analyse the resulting chromatogram.
Practical Considerations - Required Practical 12
Use dilute solutions
If solutions are too concentrated, the spots will appear as long streaks, making it difficult to calculate precise Rf values.
Draw a spotting line
essential that all samples are spotted at the same horizontal level, so that Rf values are accurate and comparable.
Draw the spotting line in pencil, not pen
If ink is used, it will dissolve in the solvent and run up the plate with other components. This would contaminate the plate and produce additional spots.
Spot samples with a capillary tube
Capillary tubes allow accurate application of small amounts of a sample. If large quantities of sample are applied, the spots will appear as long streaks, making it difficult to calculate precise Rf values.
Ensure the level of the solvent is below the spotting line
If the level of the solvent is above the pencil line, the solvent will dissolve all samples and they will not travel up the plate.
Cover the beaker with a lid
The beaker is covered to prevent the solvent from evaporating.
Analysis - Required Practical 12