Radiographic positioning 2 (anatomical boundaries)
1/103
There's no tags or description
Looks like no tags are added yet.
Name | Mastery | Learn | Test | Matching | Spaced |
|---|
No study sessions yet.
104 Terms
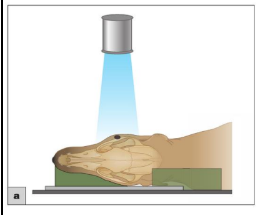
Describe correct rotation of lateral skull view
Place foam wedge under muzzle —> nose remains parallel to plate
Use foam block between forelimbs —> no axial rotation
Consider placing foam wedge under neck if necessary —> maintain straight position of spinal column
Centre point of lateral skull view
Medial canthus of eye
Rostral collimation of lateral skull view
Tip of nose
Caudal collimation for lateral skull view
Wing of atlas
Dorsal/ventral collimation for lateral skull view
Skin edges
Describe correct rotation of dorsoventral skull view
Ensure nose parallel to plate —> use small foam wedge under muzzle
Sandbag over neck (keep out of primary beam)
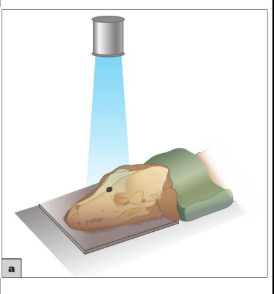
What may be needed for brachycephalic dorsoventral skull view?
Use mandible as rotation marker if muzzle is not long enough for visual check
Centre point for dorsoventral skull view
Midpoint between medial canthi of eyes
Rostral collimation of dorsoventral skull view
Tip of nose
Caudal collimation of dorsoventral skull view
Wings of atlas
Dorsal/ventral collimation of dorsoventral skull view
Skin edges
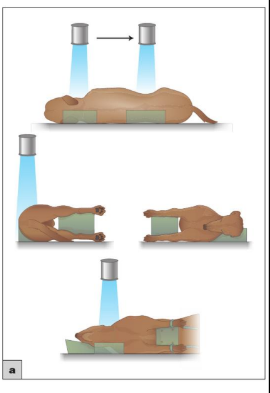
Describe correct rotation of lateral spine view
Entire spinal column straight from nose → pelvis
Place foam block under head & neck to support head
Use form block between throacic limbs —> ensure parallel to table
Support lumbar spine w/ wedge
Use foam block between pelvic limbs —> parallel to table
Place wedge under sternum if needed
Centre point for cranial cervical spine lateral view
C2-C3
Cranial collimation of cranial cervical spine lateral view
Just cranial to wing of atlas
Caudal collimation of cranial cervical spine lateral view
Cranial border of scapula
Centre point for thoracic spine lateral view
Just behind caudal border of scapula
Cranial collimation of thoracic spine lateral view
Cranial border of scapula
Caudal collimation of thoracic spine lateral view
Last rib at T13
Centre point for lumbar spine lateral view
Body of L4
Cranial collimation of lumbar spine lateral view
Thoracolumbar junction
Caudal collimation of lumbar spine lateral view
Wings of ilium
Centre point for caudal cervical spine lateral view
C5-C6
Cranial collimation of caudal cervical spine lateral view
C3
Caudal collimation of caudal cervical spine lateral view
Mid scapula
Centre point for thoracolumbar junction lateral view
Thoracolumbar junction (last rib @ T13)
Cranial collimation of thoracolumbar junction lateral view
T10/11
Caudal collimation of thoracolumbar junction lateral view
L3/4
Centre point for lumbosacral spine lateral view
Lumbosacral junction
Cranial collimation of lumbosacral spine lateral view
L5
Caudal collimation of lumbosacral spine lateral view
S3
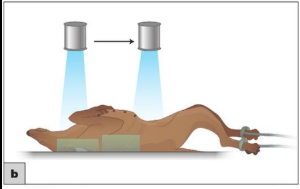
Describe correct rotation for ventrodorsal view of spine
Spinal column straight from nose → pelvis
Rotation will tend to be side to side —> ensure skull, shoulders & pelvis aligned
Use foam blocks/sandbags either side of thorax
Visually check for long axis rotation
Centre point for cranial cervical spine ventrodorsal view
C2-C3
Cranial collimation of cranial cervical spine ventrodorsal view
Just cranial to wing of atlas
Caudal collimation of cranial cervical spine ventrodorsal view
Thoracic inlet
Centre point for thoracic spine ventrodorsal view
Just behind caudal border of scapula
Cranial collimation of thoracic spine ventrodorsal view
Thoracic inlet
Caudal collimation of thoracic spine ventrodorsal view
Last rib @ T13 —> just caudal to xiphisternum as may not be able to palpate T13 with patient in dorsal recum
Centre point for lumbar spine ventrodorsal view
Body of L4
Cranial collimation of lumbar spine ventrodorsal view
Thoracolumbar junction —> just caudal to xiphisternum as may not be able to palpate TL junction with patient in dorsal recum
Caudal collimation of lumbar spine ventrodorsal view
Wings of ilium
Centre point for caudal cervical spine ventrodorsal view
C5-C6
Cranial collimation of caudal cervical spine ventrodorsal view
C3
Caudal collimation of caudal cervical spine ventrodorsal view
2nd or 3rd rib. Aiming to collimate to around T2 but may not be able to palpate with patient positioned
Centre point for caudal thoracolumbar junction ventrodorsal view
Thoracolumbar junction (last rib @T13)
Cranial collimation of throacolumbar junction ventrodorsal view
T10/11 —> just cranial to xiphisternum as may not be able to palpate T10/11 with patient in dorsal recum
Caudal collimation of throacolumbar junction ventrodorsal view
L3/4
Centre point for caudal lumbosacral spine ventrodorsal view
Lumbosacral junction
Cranial collimation of lumbosacral junction ventrodorsal view
L5
Caudal collimation of lumbosacral junction ventrodorsal view
S3
Describe the correct rotation for lateral view of pelvis
Foam wedge under sternum —> prevent axial rotation
Foam block between HLs @ level of stifles —> prevent legs crossing over
Check —> palpate ischiatic tuberosity on both sides —> should be parallel to each other
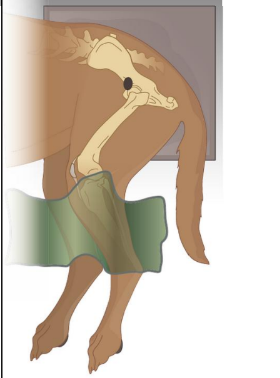
Centre point of pelvis lateral view
Cranial to greater trochanter of femur
Cranial collimation of pelvis lateral view
To include wing of ilium
Caudal collimation of pelvis lateral view
To include ischiatic tuberosity
Dorsal/ventral collimation of pelvis lateral view
Skin edges dorsally, proximal 1/3 of femur
Describe rotation of pelvis in ventrodorsal view
Dorsal recum, supported by trough/sandbags @ level of thorax (trough should not enter primary beam)
Fully extend pelvic limbs & secure with rope ties (if patient under GA)
Medially rotate femurs & secure with vet wrap/bantage/tape just above stifles
Visually check from caudal aspect
Palpate greater trochanters & check they are equidistant from table —> adjust rope ties as necessary
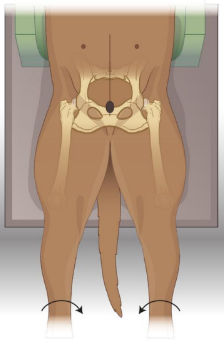
Centre point of pelvis ventrodorsal view
Midline, just caudal to greater trochanter of femurs
Cranial collimation of ventrodorsal view
To include wing of ilium
Caudal collimation of ventrodorsal view
To include stifles
Lateral collimation of pelvis ventrodorsal view
Skin edges
Describe the positioning of the carpus, metacarpals & phalanges in mediolateral view
Contralateral limb drawn caudally & secured with rope tie / sandbag
Foam wedge under shoulder to correct rotation if needed
Carpus in neutral position
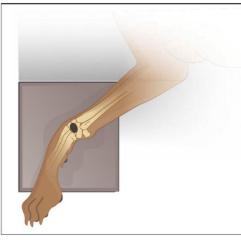
Centre point for carpus mediolateral view
Accessory carpal bone
Proximal collimation for carpus in mediolateral view
Distal 1/3 of radius/ulna
Distal collimation for carpus in mediolateral view
Proximal 1/3 metacarpals
Lateral collimation for carpus in mediolateral view
Skin edges
Centre point for metacarpals & phalanges in mediolateral view
Distal metacarpals
Proximal collimation for metacarpals & phalanges in mediolateral view
Just proximal to carpus
Distal collimation for metacarpals & phalanges in mediolateral view
Beyond distal extremity of digits
Lateral collimation for metacarpals & phalanges in mediolateral view
Skin edges
Describe the positioning of the carpus, metacarpals & phalanges in dorsopalmar view
Sternal recumbency with affected lumb extended forward onto X-ray plate
Turn head away from limb & place on foam block, secure with sandbag over neck
Describe the correct rotation of the carpus, metacarpals & phalanges in dorsopalmar view
Can lift contralateral limb and place on a foam wedge if needed, the carpus should be flat against the x-ray plate
Joint in neutral position

Centre point for carpus in dorsopalmar view
Accessory carpal bone
Proximal collimation for carpus in dorsopalmar view
Distal 1/3 of radius/ulna
Distal collimation for carpus in dorsopalmar view
Proximal 1/3 metacarpals
Lateral collimation for carpus in dorsopalmar view
Skin edges
Centre point for metacarpals & phalanges in dorsopalmar view
Distal metacarpals
Proximal collimation for metacarpals & phalanges in dorsopalmar view
Just proximal to carpus
Distal collimation for metacarpals & phalanges in dorsopalmar view
Beyond distal extremity of digits
Lateral collimation for metacarpals & phalanges in dorsopalmar view
Skin edges
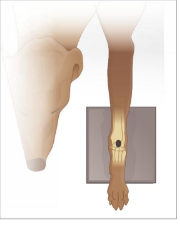
Describe the position of the tarsus, metatarsals & phalanges in mediolateral view
Lateral recumbency with affected limb closest to xray plate
Remove overlying structures
Contralateral limb drawn caudally & secured with rope/sandbag
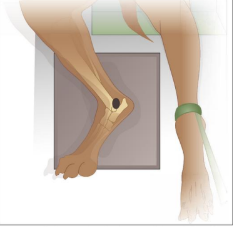
Describe the correct rotation of the tarsus, metatarsals & phalanges in mediolateral view
Foam wedge under stifle to correct rotation of tarsus & keep parallel to xray plate if needed, tarsus in neutral position
Centre point for tarsus in mediolateral view
Medial malleolus of tibia
Proximal collimation of tarsus in mediolateral view
Distal 1/3 of tibia/fibula
Distal collimation of tarsus in mediolateral view
Proximal 1/3 metatarsals
Lateral collimation of tarsus in mediolateral view
Skin edges
Centre point of metatarsals & phalanges in mediolateral view
Distal metatarsals
Proximal collimation of metatarsals & phalanges in mediolateral view
Just proximal to tarsus
Distal collimation of metatarsals & phalanges in mediolateral view
Beyond distal extremity of digits
Lateral collimation of metatarsals & phalanges in mediolateral view
Skin edges
Describe position of the tarsus in dorsoplantar view
Dorsal recumbency with affected limb extended caudally onto xray plate
Secure distal limb with rope tie or sandbag over phalanges
Remove overlying structures, ensure tail & any positioning aids not in primary beam
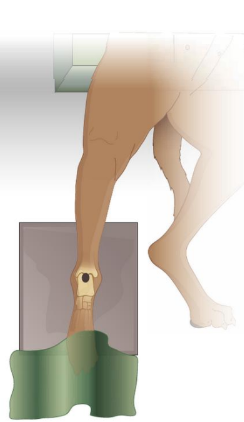
Describe the correct rotation of the tarsus in dorsoplantar view
Sandbag over stifle to maintain tarsal position if needed, palpate medial & lateral tibial malleoli to ensure parallel
Neutral position of tarsus
Centre point of tarsus in dorsoplantar view
Midway between medial & lateral malleoli of tibia
Proximal collimation of tarsus in dorsoplantar view
Distal 1/3 of tibia/fibula
Distal collimation of tarsus in dorsoplantar view
Proximal 1/3 metatarsals
Lateral collimation of tarsus in dorsoplantar view
Skin edges
Describe the patient position of the tarsus, metatarsals & phalanges in plantardorsal view
Sternal recumbency with affected limb extended caudally onto xray plate
Secure distal limb with rope tie (either view) or sandbag over phalanges (tarsal view only)
Remove overlying structures, ensure tail & any positioning aids not in primary beam
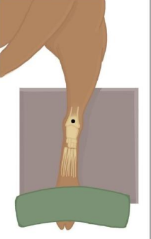
Describe the correct rotation of the tarsus, metatarsals & phalanges in plantardorsal view
Small foam wedge under stifle may be needed to ensure no rotation
Palpate medial & lateral tibial malleoli to ensure parallel
Tarsus in neutral position
Centre point for tarsus in plantardorsal view
Midway between medial & lateral malleoli of tibia
Proximal collimation of tarsus in platardorsal view
Distal 1/3 of tibia/fibula
Distal collimation of tarsus in platardorsal view
Proximal 1/3 metatarsals
Lateral collimation of tarsus in platardorsal view
Skin edges