PreClinic Techniques Equipment OP 1&2
 Call Kai
 Learn
Learn Practice Test
 Spaced Repetition
 Match
Match Flashcards
 Knowt Play
1/73

There's no tags or description
Looks like no tags are added yet.
Name | Mastery | Learn | Test | Matching | Spaced | Call with Kai | Chat |
|---|
No analytics yet
Send a link to your students to track their progress
74 Terms
Air water syringe holder
1

Slow speed handpiece hook-up
2

Electric handpiece hook-up
3

High speed handpiece hook-up
4

Master "on/off" switch located on the right side under touch padd control (I =on O=off)
5
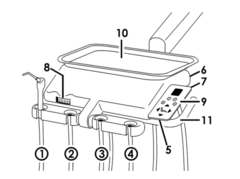
Flush knob (Flush high and low speed for 2 minutes)
6
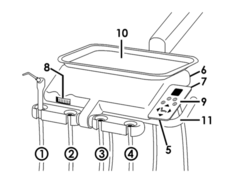
Water coolant for high speed/air polisher
7
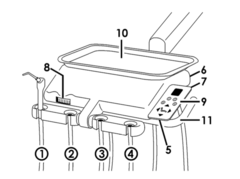
Handpiece pressure gauge
8

Chair control touch pad
9
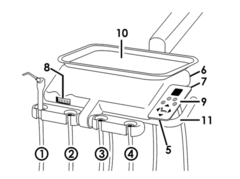
Bracket Table Tray
10

Bracket Table Release
11

Base Down
0
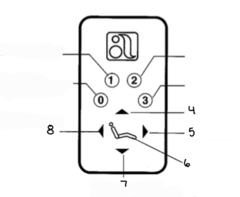
Base Up
1

Back Down
2

Back Up
3

Base Up
4
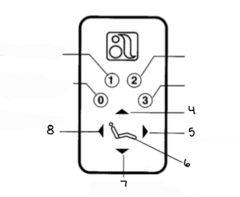
Back Up
5

Program Button
6

Base Down
7
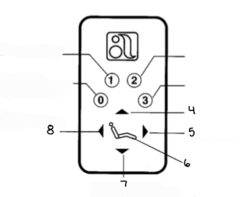
Back Down
8

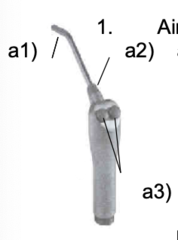
syringe tip
A1

Nut (do not unthread)
A2
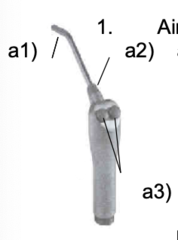
Air button on right; water button on left
A3
on
The master switch must be turned _____ for syringe to operate
push both buttons to activate together
Three-way syringe
right button is pushed
Producing air
left button is pushed
Producing water
autoclavable
Water/ air tip is _____
Insert the clear plastic end of a disposable tip into the connector (push up saliva ejector control lever in an upward direction)
Saliva Ejector

Do not tell patient to close down on suction can cause substance to come back up into mouth
Key Point to Saliva Ejector
push the control lever in an upward direction to activate suction
High Volume Evacuator

identical feature as the chair control touch pad
Touch Pad
Located on the unit under the bracket table arm
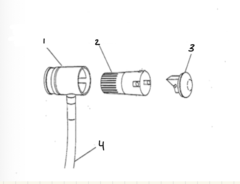
Solids collector
Vacuum Connector
1
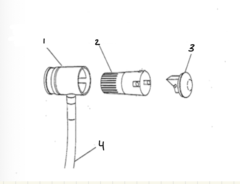
Solids collector Screen
2

Solids collector Cap
3

HVE Hand piece Tubing
4
Monthly
How often is the solids collector cleaned?
1) Turn on HVE tip to release pressure
to solids collector.
2) Remove solids collector cap from
vacuum connector
3) Discard solid collector screen
4) Wash cap and vacuum connector in
soap and water
5) Replace solids collector screen in vacuum
connector
6) Replace cap
7) Turn off HVE
Steps to clean solids connector
Stainless steal removable tray that rests on the bracket table.
Remove for disinfecting
Bracket table tray
Make sure lever is away from blue
Rheostat

Depress
______ the rheostat with either foot to activate the handpiece
Toggle Switch
________ is only used with the high speed handpiece
Toward
Toggle ____ blue dot will provide water to handpiece
Three intensity controls (low,medium,high)
Dental Light
Intensity Control
A

On-off switch
B
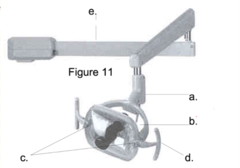
Lens Shield
C

- latches on either side
- DO NOT touch light bulb when lens shield is off
- if need to clean cover use wet water and towel (NO cavi-wipe)
Lens Shield Key points
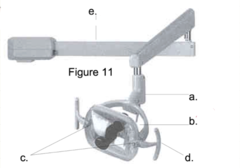
Casement handles
D
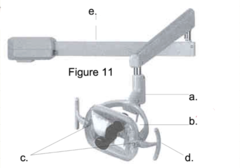
Extension arm
E

Gross
______ adjustments are made by swiveling the long extension arm
Fine
______ adjustments are made by grasping the casement handles on either side of the light
The high intensity
______ should be used for sufficient lighting.
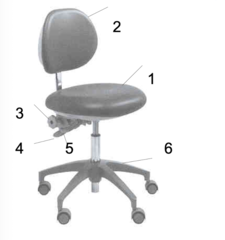
Seat
1

Backrest
2
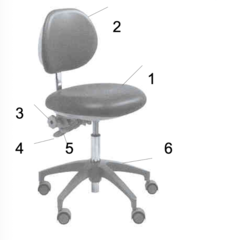
Backrest vertical control knob
3

turn counterclockwise to adjust and clockwise to tighten
Backrest vertical control knob
Backrest horizontal lever (Lower back under seat)
4
push backward on backrest while pulling up on lever to recline backrest
Backrest horizontal lever
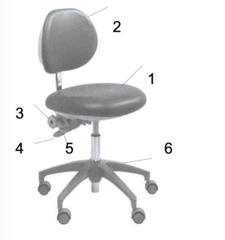
Stool Release lever (higher lever under seat)
5
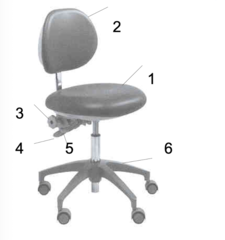
pull up on lever while seated to lower chair, pull up on lever while standing to raise chair
Stool release lever
Base with castor (must have at least 5 to be stable)
6

Unit must be off to release pressure
Water Bottle
1. Turn unit off to release pressure
2. Turn clockwise to remove bottle
3. Drop empty water bottle down chute
4. Obtain filled water bottle from storage cage
5. Turn counter-clock wise to install
Steps to take water bottle off
tell instructor unit needs to be shocked
If you touch the water bottle tubing make sure to ______
Headrest
1

Headrest locking knob
2

Seat (see Chair control touch pad on Bracket Table and Assistant=s Arm - Figures 2 and 7)
3
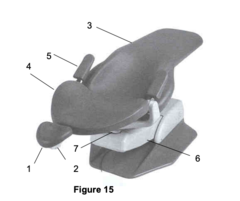
Backrest (see Chair control touch pad on Bracket Table and Assistant's Arm - Figures 2 and 7)
4

Arm rests
5
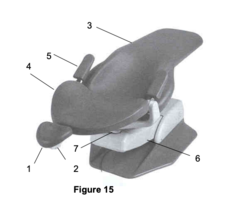
Lift
6

Swivel Lock
7
