Nucleic Acids Part 4
 Call Kai
 Learn
Learn Practice Test
 Spaced Repetition
 Match
Match Flashcards
 Knowt Play
1/16

There's no tags or description
Looks like no tags are added yet.
Name | Mastery | Learn | Test | Matching | Spaced | Call with Kai | Chat |
|---|
No analytics yet
Send a link to your students to track their progress
17 Terms
Info card: what this lecture is about
Lecture 5 Summary: Molecular Cloning Case Study
This lecture walked through the complete workflow of molecular cloning, using a case study approach to illustrate how a human gene of potential therapeutic value could be investigated experimentally. The process begins with mRNA from the human gene, which must first be converted into complementary DNA (cDNA) by reverse transcription. A primer of deoxythymidines (dT15) anneals to the poly(A) tail of the mRNA, and reverse transcriptase synthesizes the DNA copy. The resulting cDNA provides a stable template for downstream work.
The next step is PCR amplification, where primers flank the gene of interest and DNA polymerase generates large quantities of DNA through repeated cycles of denaturation, annealing, and extension. Starting with either single-stranded cDNA or duplex DNA, PCR produces exponential amplification (2n-1 or 2ⁿ products after n cycles), but product size is refined by the primers, which define precise ends of the fragment.
The amplified DNA and a plasmid vector are both digested with the same restriction enzyme (e.g., EcoRI), producing sticky ends that facilitate recombination. DNA fragments are then purified by gel electrophoresis, a method that separates molecules based on size, with smaller DNA migrating faster. Visualization is achieved using DNA-binding dyes, and size standards (“ladders”) provide references for estimating fragment length.
To build a recombinant plasmid, the purified DNA insert and plasmid backbone are mixed and sealed with DNA ligase. The resulting plasmid contains key elements: an origin of replication, a selectable marker (antibiotic resistance gene), and a cloning site with restriction enzyme recognition sequences. A classic vector, pBR322, was highlighted as an example.
The recombinant plasmid is then introduced into E. coli by transformation, typically using Ca²⁺ treatment and heat shock to render cells permeable. Transformed cells are plated on selective agar containing antibiotics, which ensure that only bacteria carrying plasmids survive. In cases where insertion disrupts an antibiotic resistance gene (e.g., tetr in pBR322), screening on different antibiotic plates can distinguish recombinants from non-recombinants.
For gene expression, eukaryotic DNA must be cloned into an expression vector with a bacterial promoter and ribosome-binding site, enabling transcription and translation in E. coli. The recombinant bacteria can then produce the encoded protein, which is recovered and purified for analysis of its therapeutic potential.
Finally, the lecture emphasized the realities of experimental science: sometimes cloning projects fail despite correct technique. Failures may arise from biological limitations. Recognizing these limitations, proposing scientific reasons for failure, and suggesting remedies are essential skills for molecular biologists.
Key message:
Molecular cloning is a stepwise process that transforms genetic information (mRNA) into functional protein expression systems. Each stage—from reverse transcription and PCR, through restriction digestion, ligation, transformation, and expression—requires careful design, verification, and troubleshooting. Beyond technical skills, successful cloning also demands critical thinking to analyze failures and adapt strategies for success.
Assume that you have just joined a biotech company in Hamilton
nYour team wants to investigate whether the protein coded by a human gene has therapeutic value
nYou are given the mRNA of this human gene
nYour task is to produce an expression system (a recombinant plasmid) by molecular cloning
Where do you begin?
You want to study whether a human protein could be useful as a treatment, so you need to produce that protein in the lab. Since you are given mRNA
expression plasmid tells a host cell can produce the protein.
Molecular cloning: a case study
Scenario setup:
Imagine joining a biotech company in Hamilton.
The research team is tasked with evaluating whether a human gene’s protein product could have therapeutic potential.
Starting point:
You are provided with the mRNA of the human gene.
Your assignment is to generate an expression system:
Construct a recombinant plasmid carrying the gene.
Use molecular cloning techniques to enable protein expression.
Key challenge:
Where to begin?
Step 1: Convert the mRNA into complementary DNA (cDNA) via reverse transcription.
Step 2: Insert this cDNA into a plasmid backbone suitable for expression.
Step 3: Design cloning strategy (choice of restriction sites, promoters, selectable markers).
Key points:
Molecular cloning allows researchers to test the therapeutic value of human genes by expressing their protein products in model systems.
The process begins with information (mRNA) and moves toward a functional tool (recombinant plasmid).
The first critical decision is how to convert mRNA into a stable DNA form that can be cloned.
Key message:
Molecular cloning bridges genetic information (mRNA) and experimental testing of proteins, making it a central method in biotechnology and therapeutic discovery.
What is your plan?
Your plan
Step-by-step workflow:
Select a host organism – E. coli is an excellent choice because it is well studied, easy to grow, and supports high-yield protein expression.
Convert the mRNA into DNA by reverse transcription, producing cDNA suitable for cloning.
Amplify the cDNA using polymerase chain reaction (PCR) to generate sufficient material.
Digest the amplified DNA with a restriction enzyme to create compatible ends.
Digest a plasmid cloning vector with the same restriction enzyme to prepare it for insertion.
Insert the gene into the plasmid using DNA ligation, forming a recombinant plasmid.
Introduce the recombinant plasmid into E. coli cells through transformation.
Culture the transformed E. coli cells and isolate plasmid DNA for verification.
Confirm successful insertion of the gene of interest by restriction digestion analysis.
Verify the correctness of the sequence by DNA sequencing.
Express and purify the protein encoded by the cloned gene for downstream testing.
Key points:
This plan outlines the classical workflow of molecular cloning, moving from RNA information to DNA, then into a recombinant plasmid, and finally to protein expression. Each step provides a checkpoint to ensure accuracy and functionality of the construct.
Key message:
Molecular cloning follows a logical sequence of steps that ensure the gene of interest is correctly inserted, verified, and expressed, ultimately enabling protein production for experimental and therapeutic evaluation.

Why E.Coli as a host?
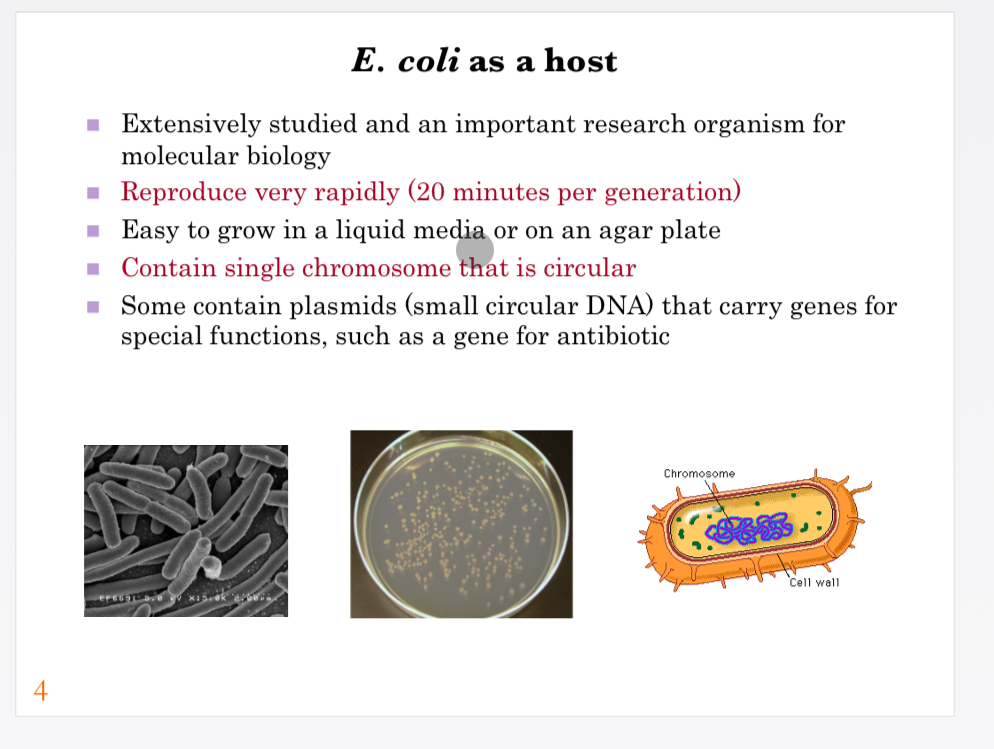
E. coli as a host
Key features of E. coli:
E. coli is one of the most extensively studied organisms and is a cornerstone of molecular biology research.
It reproduces very rapidly, with a generation time of about 20 minutes under optimal conditions.
It is easy to culture either in liquid media or on solid agar plates, making it convenient for laboratory use.
The bacterium contains a single, circular chromosome, which simplifies genetic studies compared to organisms with multiple linear chromosomes.
Many E. coli strains also carry plasmids, which are small circular DNA molecules. These plasmids often contain genes that provide special functions, such as antibiotic resistance, and can be engineered to carry recombinant DNA for cloning and protein expression.
Graphics explanation:
Left: Scanning electron microscope (SEM) image of E. coli cells, showing their rod-shaped morphology.
Middle: Agar plate with E. coli colonies, illustrating ease of growth and visualization on solid medium.
Right: Cartoon diagram of E. coli, highlighting the circular chromosome and cell wall structure.
Key points:
E. coli is an ideal cloning host because it is well understood, grows quickly, and has genetic elements (chromosome and plasmids) that can be manipulated easily.
Key message:
The simplicity, rapid growth, and genetic flexibility of E. coli make it the most widely used organism for recombinant DNA technology and protein production.
How does reverse transcription work?
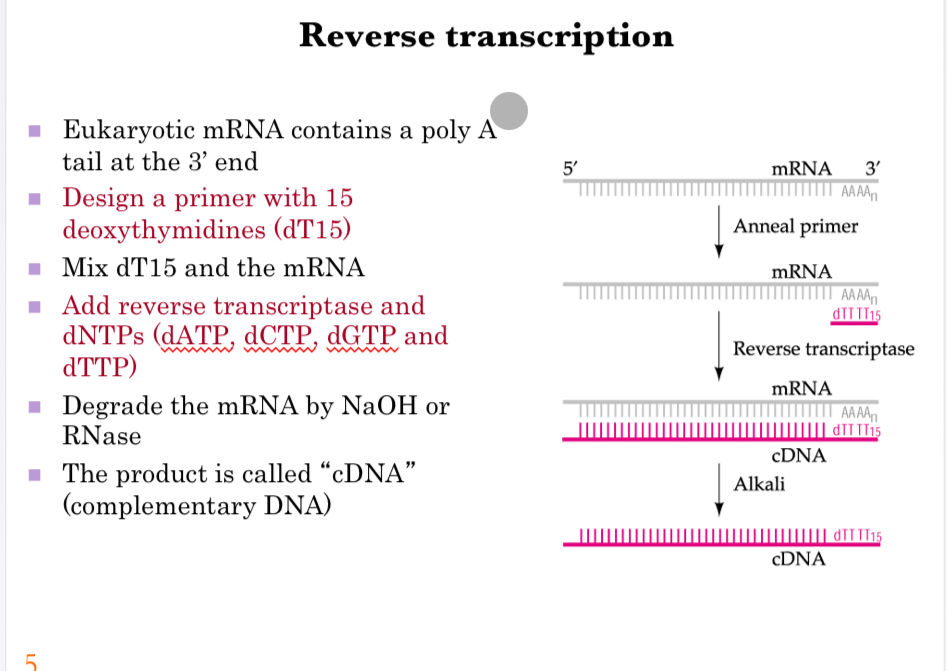
Reverse transcription
Process overview:
Eukaryotic mRNA contains a poly(A) tail at the 3′ end, which provides a convenient priming site.
A primer is designed with 15 deoxythymidines (dT15) that can anneal to this poly(A) tail.
When the dT15 primer is mixed with the mRNA, it binds specifically to the poly(A) region.
Reverse transcriptase is then added along with dNTPs (dATP, dCTP, dGTP, and dTTP) to synthesize a complementary DNA (cDNA) strand using the mRNA as a template.
The original mRNA strand is subsequently degraded, either by treatment with NaOH or by RNase.
The final product is cDNA, a stable DNA version of the original mRNA sequence, suitable for cloning.
Graphics explanation:
The diagram shows mRNA with a poly(A) tail at the 3′ end.
Step 1: dT15 primer anneals to the poly(A) tail.
Step 2: Reverse transcriptase extends the primer, synthesizing the complementary cDNA strand.
Step 3: Treatment with alkali removes the RNA template, leaving a pure single-stranded cDNA molecule.
Key points:
Reverse transcription converts unstable RNA into stable DNA, which can then be amplified and cloned. The poly(A) tail and dT15 primer make the process highly specific for eukaryotic mRNAs.
Key message:
Reverse transcription is the essential first step in molecular cloning when starting from mRNA, as it generates cDNA that preserves the genetic information for further manipulation.
How does the PCR work with your cDNA
🧬 PCR Summary
PCR amplifies a specific DNA sequence from your cDNA. Two primers bind on either side of the target sequence, and DNA polymerase copies the DNA.
The cycle repeats:
1. Denaturation: Heat separates the DNA strands.
2. Annealing: Cool so the primers bind to the DNA.
3. Extension: DNA polymerase adds dNTPs to make new DNA strands.
This cycle repeats many times, roughly doubling the target DNA each cycle, producing millions of copies. A thermostable polymerase such as Taq is used because it can survive the repeated heating.
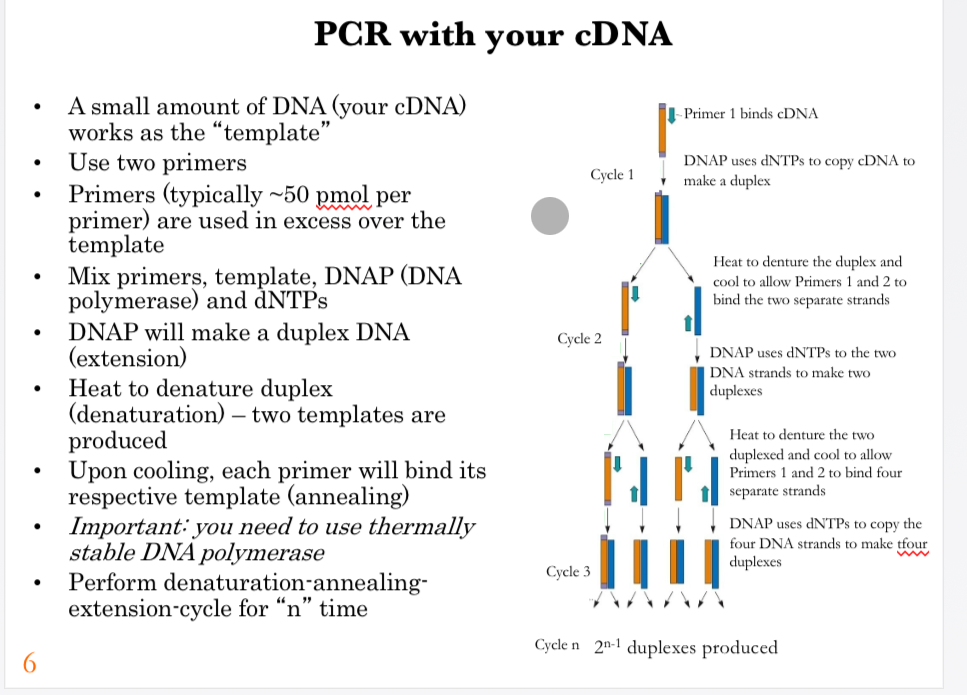
PCR with your cDNA
Process overview:
A small amount of cDNA serves as the template for amplification.
Two primers are required, each designed to flank the target DNA sequence. Primers are added in large excess (about 50 pmol per primer) compared to the template.
The reaction mixture contains primers, template cDNA, DNA polymerase (DNAP), and dNTPs.
DNA polymerase extends from the primers to make a complementary strand, forming duplex DNA.
The mixture is heated to denature the duplex (separating the strands), generating two single-stranded templates.
Upon cooling, primers anneal to the single strands, allowing DNA polymerase to extend again.
This denaturation–annealing–extension cycle is repeated multiple times (“n” cycles).
Importantly, a thermostable DNA polymerase (such as Taq polymerase) must be used to withstand repeated heating.
After many cycles, the target DNA sequence is amplified exponentially.
Graphics explanation:
The diagram shows the PCR amplification cycle.
Cycle 1: Primer 1 binds to cDNA, and DNA polymerase synthesizes the complementary strand to make duplex DNA.
Cycle 2: Heating denatures the duplex into single strands; cooling allows primers 1 and 2 to bind both strands; DNA polymerase synthesizes two new duplexes.
Cycle 3: Denaturation produces four single strands; primers anneal, and DNA polymerase generates four duplexes.
Cycle n: Amplification continues, and after n cycles, 2ⁿ⁻¹ duplexes are produced, demonstrating the exponential nature of PCR.
Key points:
PCR allows the rapid and exponential amplification of a specific DNA sequence starting from very little template. The method relies on cycles of denaturation, annealing, and extension using thermostable DNA polymerase.
Key message:
PCR transforms small amounts of cDNA into abundant DNA for cloning and analysis, making it one of the most powerful techniques in molecular biology.
PCR with duplex DNA as template
PCR with duplex DNA as template
Process overview:
PCR can also begin with double-stranded DNA (duplex DNA) as the template.
The mixture contains primers, duplex DNA, DNA polymerase (DNAP), and dNTPs.
Each cycle consists of three steps:
Denaturation: Heat separates the two DNA strands.
Annealing: Cooling allows primers to bind to complementary sequences.
Extension: DNA polymerase extends from the primers, synthesizing new strands.
After the first cycle, two duplex molecules are produced.
Repeating the cycle leads to exponential amplification, with 2ⁿ duplexes generated after n cycles.
Graphics explanation:
The diagram shows PCR cycles starting from duplex DNA.
Cycle 1: DNA is denatured into single strands; primers anneal; DNA polymerase synthesizes two new duplexes.
Cycle 2: Denaturation produces four single strands; primers anneal to both strands; polymerase generates four duplexes.
Cycle 3: Denaturation again produces more templates; amplification continues, leading to 8 duplexes.
With each cycle, the product size is refined so that the DNA fragments are restricted to the target sequence defined by the primers.
Discussion questions from the slide:
Why is the DNA size reduced? → Because the primers define specific boundaries of amplification, trimming the product to the target region.
What happens if primers contain extra nucleotides at the 5′ end? → They are tolerated and incorporated into the product, which can be useful for adding restriction sites or tags.
What happens if primers contain extra nucleotides at the 3′ end? → Amplification will fail, as the 3′ end must pair exactly for DNA polymerase to extend.
Experimental note:
Real PCR experiments use three specific temperature steps: 95 °C for denaturation, ~50 °C for primer annealing, and 72 °C for extension by thermostable DNA polymerase. These temperatures are chosen to optimize each reaction step.
Key points:
Starting from duplex DNA, PCR cycles exponentially amplify the target region defined by primers. Precision comes from primer design, which determines the final product length.
Key message:
PCR is a highly specific and efficient method that converts defined regions of duplex DNA into billions of identical copies, with primer design being the critical factor.

How to make the Recombinant plasmid containing your gene
The plasmid itself already exists as a circular DNA molecule (the plasmid vector).
You use a restriction enzyme to cut the plasmid at a specific site.
You also cut your PCR-amplified gene with the same enzyme.
Their sticky ends match, allowing the gene to fit into the plasmid.
DNA ligase then permanently joins the gene and plasmid.
So:
Existing plasmid + your gene
↓ restriction enzymes ✂
Compatible sticky ends
↓ ligase 🔗
Recombinant plasmid containing your gene
That's the plasmid your biotech team wants to use to eventually produce the human protein.
What is the process of restriction digestion of DNA
PCR adds the restriction sites → restriction enzyme cuts them → gel purification isolates your gene → sticky ends allow the gene to be inserted into the plasmid.
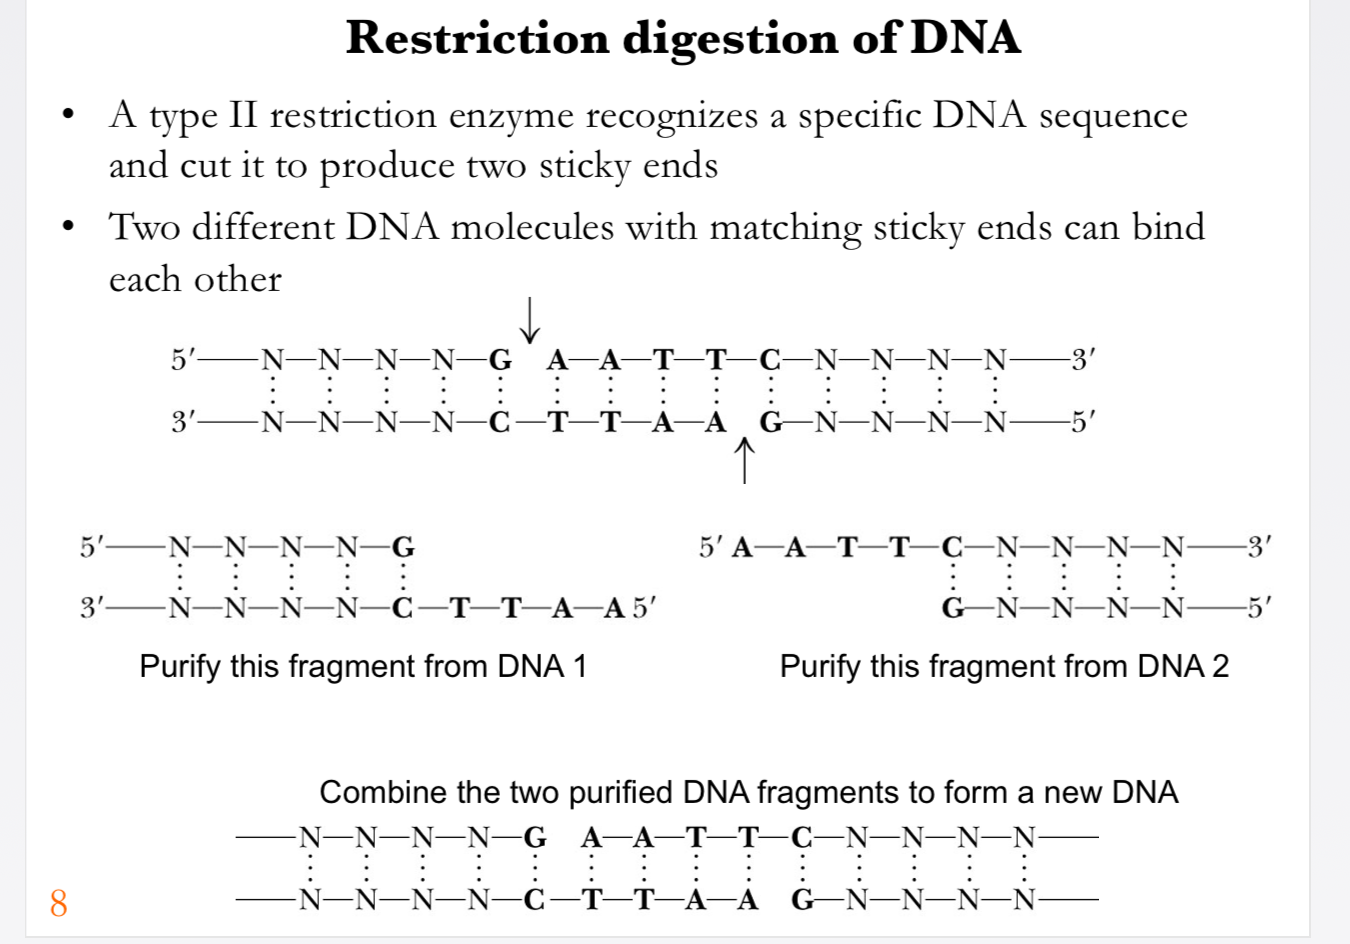
Restriction digestion of DNA
Process overview:
When designing PCR primers, restriction sites can be engineered into both ends of the amplified DNA.
After amplification, the duplex DNA product contains identical restriction enzyme recognition sites (here, EcoRI) at each end.
Digestion with the restriction enzyme cuts at these sites, producing DNA fragments with sticky ends.
The desired fragment can then be purified using gel electrophoresis, which separates DNA fragments by size.
The result is a clean DNA fragment carrying sticky ends, making it ready for ligation into a plasmid vector.
Graphics explanation:
Top diagram: PCR-generated duplex DNA with EcoRI recognition sites at both ends.
Middle diagram: After digestion with EcoRI, the DNA is cut at the GAATTC sites, producing sticky ends.
Bottom diagram: Gel electrophoresis purification step isolates the DNA fragment of interest with sticky ends on both sides, preparing it for cloning.
Key points:
By incorporating restriction sites into PCR products, DNA fragments can be precisely cut and purified for cloning. Gel electrophoresis ensures that only the correct DNA fragment is recovered.
Key message:
Restriction digestion combined with gel purification provides researchers with DNA fragments that are both accurate in sequence and compatible for insertion into cloning vectors.

What are the 3 important parts of a plasmid?
A plasmid is a small circular piece of DNA used as a vehicle to carry a gene into bacteria. It has three important parts: ori, which lets the plasmid be copied inside the bacteria; an antibiotic-resistance gene, which lets us identify bacteria that received the plasmid; and the MCS, where we cut the plasmid and insert our gene of interest.
For restriction digestion, a restriction enzyme cuts the plasmid at a specific site in the MCS, opening the circular plasmid so the gene can be inserted.
Restriction digestion of plasmid
Process overview:
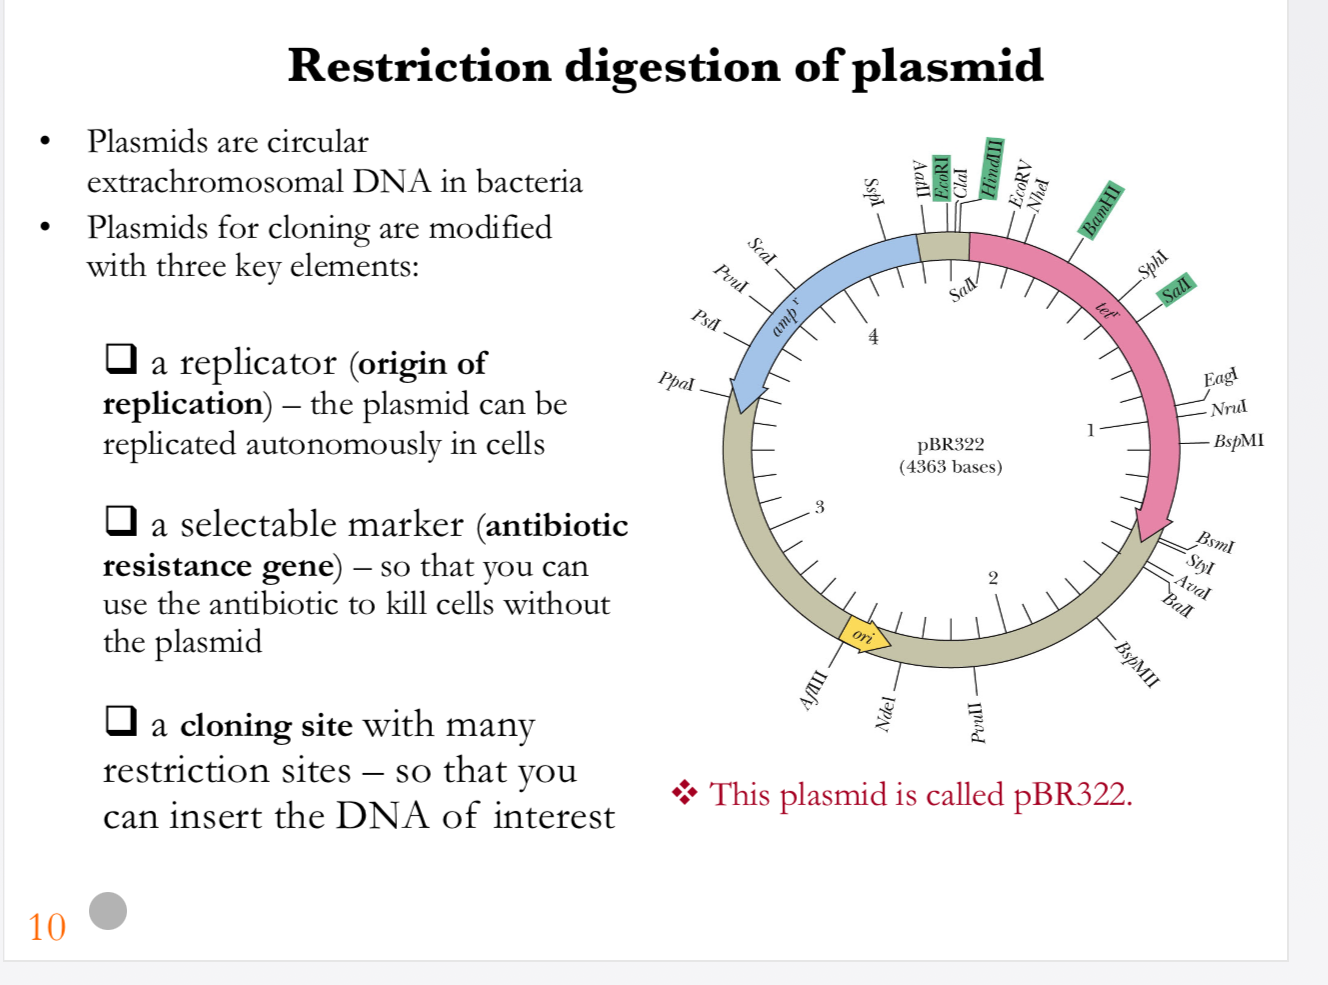
Plasmids are circular extrachromosomal DNA molecules commonly found in bacteria.
For use in cloning, plasmids are engineered with three essential elements:
Origin of replication (ori): Enables the plasmid to replicate autonomously inside bacterial cells, ensuring that daughter cells inherit copies.
Selectable marker (antibiotic resistance gene): Provides resistance to an antibiotic, so only cells carrying the plasmid survive when grown on selective media. This ensures that transformed cells can be distinguished from non-transformed cells.
Multiple cloning site (MCS): A region containing multiple restriction enzyme sites, which allows researchers to insert DNA fragments of interest with precision.
Graphics explanation:
The diagram shows the map of plasmid pBR322, a classic cloning vector.
The plasmid includes an ampicillin resistance gene (ampr), a tetracycline resistance gene (tetr), and an origin of replication (ori).
Several restriction enzyme recognition sites are located in the plasmid, particularly within or near the multiple cloning site, making it easy to insert foreign DNA.
Key points:
Plasmids provide the backbone for cloning experiments, allowing foreign DNA fragments to be inserted, replicated, and expressed in host cells. The presence of antibiotic resistance genes ensures easy selection of plasmid-containing bacteria.
Key message:
Engineered plasmids such as pBR322 are indispensable tools in molecular biology, combining replication ability, selection markers, and cloning sites to enable efficient recombinant DNA construction.
What happens when a plasmid is digested with EcoRI?
Basically, EcoRI cuts the circular plasmid at its specific recognition sequence (GAATTC), opening it up and creating sticky ends. The resulting linear plasmid can then be separated from uncut plasmids using gel electrophoresis and purified so it can be used as the backbone for inserting the gene of interest.
Restriction digestion of plasmid
Process overview:
If the plasmid used for cloning contains a recognition site for the restriction enzyme EcoRI, it can be cut at this site.
Digestion with EcoRI converts the circular plasmid into a linear plasmid with sticky ends.
The linear plasmid can then be separated and purified using gel electrophoresis.
In electrophoresis, linear DNA migrates more slowly than supercoiled DNA, making it easy to distinguish and isolate.
Graphics explanation:
Left diagram: Circular plasmid containing the EcoRI recognition sequence GAATTC/CTTAAG.
Right diagram: After digestion with EcoRI, the plasmid is linearized, with sticky ends exposed at both cut sites.
This linear form can be purified from an agarose gel for use in cloning experiments.
Key points:
Restriction enzymes like EcoRI allow researchers to precisely open circular plasmids, creating linear molecules with sticky ends. Gel electrophoresis ensures that the correct linearized plasmid is purified and separated from undigested or partially digested plasmids.
Key message:
Restriction digestion converts plasmids into linear DNA molecules with sticky ends, providing a ready backbone for inserting DNA fragments of interest.
How is a recombinant plasmid made?
The plasmid and the gene of interest are cut with the same restriction enzyme, giving them matching sticky ends that can base-pair (anneal) with each other. Then DNA ligase seals the sugar-phosphate backbone, permanently joining the gene into the plasmid and creating a recombinant plasmid that can be put into bacteria.
Making a recombinant plasmid
Process overview:
Both the plasmid vector and the DNA fragment of interest are digested with the same restriction enzyme to produce complementary sticky ends, and each is purified.
The digested plasmid and DNA fragment are mixed together, allowing their sticky ends to anneal by base pairing.
DNA ligase is then added to covalently seal the sugar-phosphate backbone, creating a stable recombinant plasmid.
The reaction is typically incubated at a lower temperature, which favors annealing of sticky ends before ligation.
Once sealed, the recombinant plasmid can be introduced into host cells for propagation and expression.
Graphics explanation:
Top diagram: A circular plasmid and foreign DNA fragment are both cut with EcoRI, producing sticky ends.
Middle diagram: The sticky ends of the plasmid and foreign DNA anneal, aligning correctly for ligation.
Bottom diagram: DNA ligase seals the nicks, resulting in a chimeric plasmid containing the inserted DNA fragment.
Key points:
The success of molecular cloning depends on using matching restriction sites in both the vector and the DNA fragment, as well as the efficiency of DNA ligase in sealing the recombinant construct.
Key message:
Recombinant plasmids are created by combining restriction digestion with DNA ligation, enabling researchers to insert and propagate foreign DNA inside a host organism.

How does gel electrophoresis separate DNA?
Gel electrophoresis separates DNA fragments based on size. Because DNA is negatively charged, it moves toward the positive electrode; smaller DNA fragments move through the gel faster and farther, while larger fragments move more slowly, forming separate bands.
We need gel electrophoresis because after cutting DNA, you have a mixture of different DNA fragments, and you need to find and isolate the specific fragment you want.
For example, after restriction digestion, you can run the DNA on a gel → the fragments separate by size → you identify the band containing your gene/plasmid → cut that band out and purify the DNA → use it for cloning/ligation.
In short: Gel electrophoresis helps you separate, identify, and isolate the correct DNA fragment you need.}
DNA separation by electrophoresis
Process overview:
DNA molecules can be separated based on size using gel electrophoresis.
The gel, made of agarose (for larger DNA) or polyacrylamide (for smaller DNA), acts as a molecular sieve.
DNA is negatively charged due to its phosphate backbone, so it migrates toward the positive electrode (anode) when an electric current is applied.
Larger DNA fragments migrate more slowly through the gel matrix, while smaller fragments move faster.
By running a mixture of DNA fragments, the gel separates them into bands according to size.
Graphics explanation:
Left panel: DNA samples of mixed fragment sizes are loaded into wells at the top of the gel. A power source is connected, with the cathode at the top (negative) and the anode at the bottom (positive).
Middle panel: During electrophoresis, DNA fragments migrate downwards at rates determined by size.
Right panel: The completed gel shows separated DNA bands—longer fragments near the top, shorter fragments farther down.
Key points:
Gel electrophoresis is a simple but powerful method for analyzing and purifying DNA fragments. The separation depends on fragment length, with shorter DNA moving faster through the gel’s pores.
Key message:
Gel electrophoresis allows researchers to visualize and isolate DNA fragments by size, providing a critical quality control step in cloning workflows.

Agarose gel of restriction digests
Process overview:
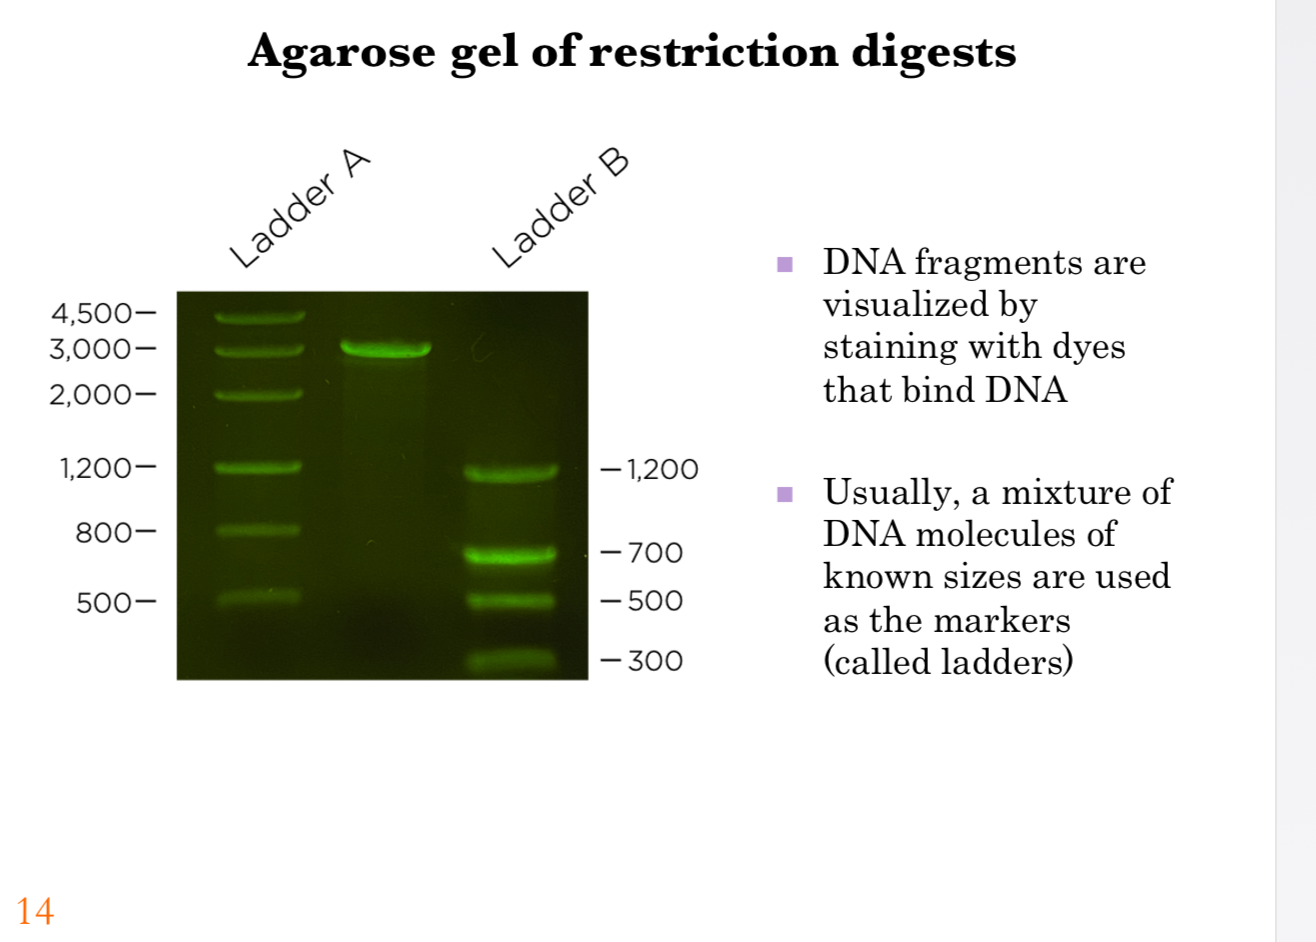
DNA fragments separated by agarose gel electrophoresis can be visualized using dyes that specifically bind DNA (e.g., ethidium bromide or SYBR Green).
Under UV light, these dyes fluoresce, revealing the positions of DNA fragments within the gel.
To determine the sizes of unknown DNA fragments, a DNA ladder (a mixture of DNA fragments of known sizes) is run alongside the samples.
The migration distance of sample fragments can be compared against the ladder to estimate their sizes.
Graphics explanation:
The gel image shows two lanes with DNA ladder samples (Ladder A and Ladder B).
On the left, Ladder A includes fragments ranging from 500 bp to 4,500 bp, serving as reference markers.
On the right, Ladder B includes fragments at 1,200 bp, 700 bp, 500 bp, and 300 bp, serving as reference markers.
By comparing band positions in the middle sample to the ladders, the approximate size of the restriction digest product (~3,000 bp) can be determined.
Key points:
DNA ladders provide essential size standards for interpreting gel electrophoresis results. Visualization by DNA-binding dyes makes it possible to confirm the presence and size of restriction digestion products.
Key message:
Agarose gel electrophoresis combined with DNA ladders and staining dyes allows accurate determination of DNA fragment sizes, a crucial step in verifying cloning experiments.
How do we determine DNA fragment size using an agarose gel?
After DNA is separated on an agarose gel, we need to see the DNA bands and figure out their sizes. A DNA-binding dye makes the bands visible under UV light, while a DNA ladder contains fragments of known sizes, so we can compare our unknown band to the ladder and estimate its size.
Learn more
Why do we need this?
It lets us check whether we got the correct DNA fragment and the expected size before using it for cloning.Agarose gel of restriction digests
Process overview:
DNA fragments separated by agarose gel electrophoresis can be visualized using dyes that specifically bind DNA (e.g., ethidium bromide or SYBR Green).
Under UV light, these dyes fluoresce, revealing the positions of DNA fragments within the gel.
To determine the sizes of unknown DNA fragments, a DNA ladder (a mixture of DNA fragments of known sizes) is run alongside the samples.
The migration distance of sample fragments can be compared against the ladder to estimate their sizes.
Graphics explanation:
The gel image shows two lanes with DNA ladder samples (Ladder A and Ladder B).
On the left, Ladder A includes fragments ranging from 500 bp to 4,500 bp, serving as reference markers.
On the right, Ladder B includes fragments at 1,200 bp, 700 bp, 500 bp, and 300 bp, serving as reference markers.
By comparing band positions in the middle sample to the ladders, the approximate size of the restriction digest product (~3,000 bp) can be determined.
Key points:
DNA ladders provide essential size standards for interpreting gel electrophoresis results. Visualization by DNA-binding dyes makes it possible to confirm the presence and size of restriction digestion products.
Key message:
Agarose gel electrophoresis combined with DNA ladders and staining dyes allows accurate determination of DNA fragment sizes, a crucial step in verifying cloning experiments.

How are recombinant plasmids introduced into bacteria and identified?
Transformation is when we put the recombinant plasmid into E. coli bacteria. Calcium ions and a brief heat shock help the plasmid enter the bacteria, and then the bacteria are grown on ampicillin so only cells containing the plasmid survive. Because the inserted gene disrupts the tetracycline-resistance gene, bacteria with the recombinant plasmid are ampicillin-resistant but tetracycline-sensitive, allowing us to identify them.
Ampicillin and tetracycline are antibiotics that can kill or stop the growth of bacteria.
ampᴿ (ampicillin resistance gene) → gives the bacteria resistance to ampicillin, so bacteria carrying the plasmid can survive on ampicillin plates.
tetᴿ (tetracycline resistance gene) → gives the bacteria resistance to tetracycline, so bacteria carrying an intact tetᴿ gene can survive on tetracycline plates.
In your pBR322 example, the foreign DNA is inserted into the tetᴿ gene, disrupting it. So:
Recombinant plasmid → ampᴿ ✓, tetᴿ ✗
→ survives ampicillin but does not survive tetracycline.
Think of the antibiotic-resistance genes as selection markers that help researchers figure out which bacteria received the plasmid and which plasmids contain the inserted DNA.
Transformation
Process overview:
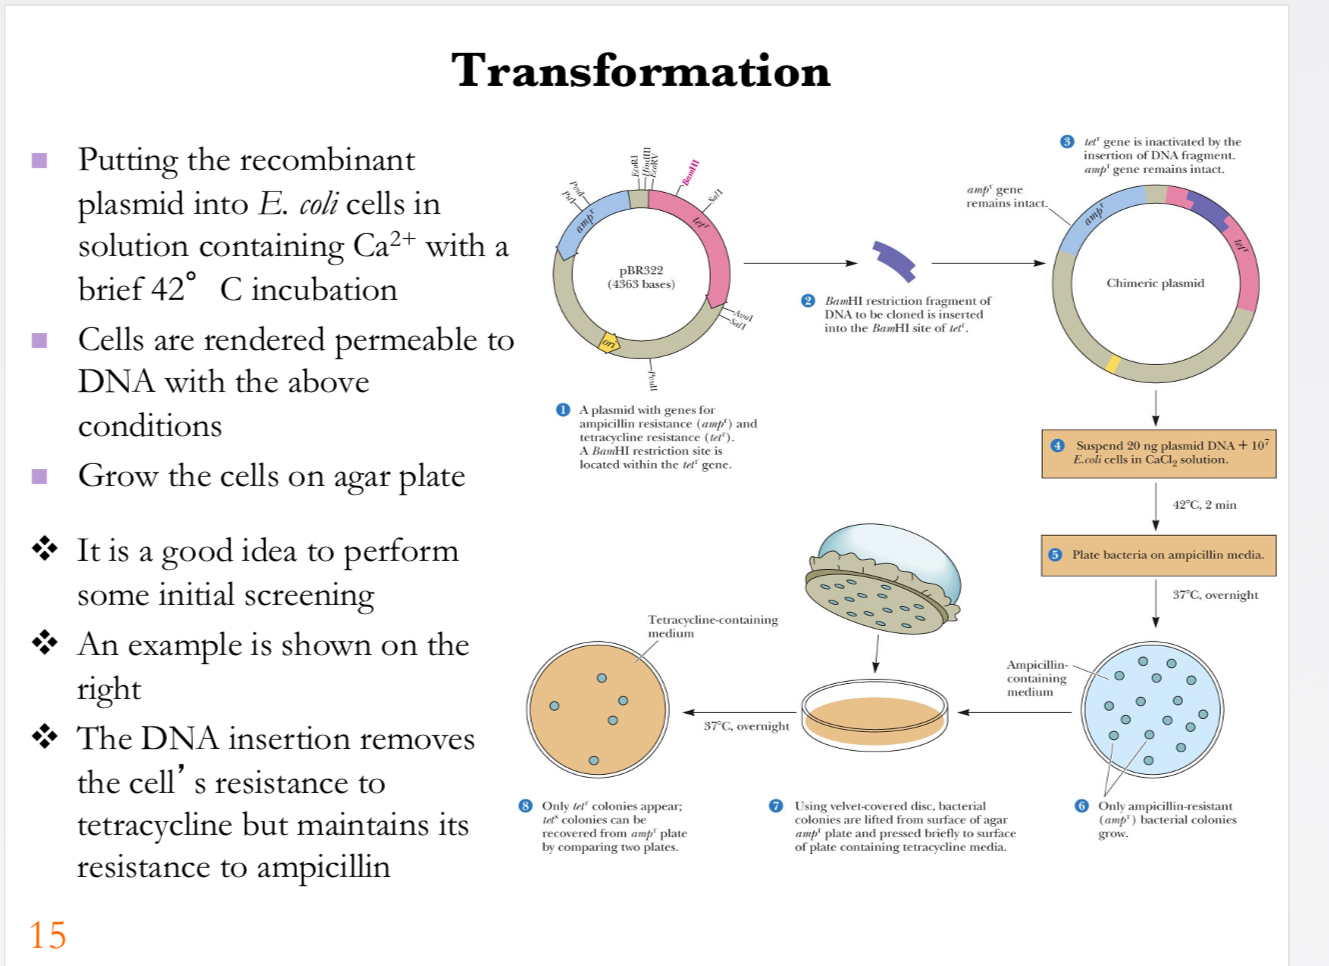
The recombinant plasmid is introduced into E. coli cells by incubating them in a solution containing calcium ions (Ca²⁺), followed by a brief heat shock at 42 °C.
These conditions make bacterial cell membranes more permeable to DNA, allowing plasmids to enter.
After transformation, cells are plated on selective agar medium.
In this example, plasmid pBR322 is used, which carries resistance genes for both ampicillin (ampr) and tetracycline (tetr).
Insertion of foreign DNA disrupts the tetracycline resistance gene, so transformed colonies retain resistance to ampicillin but lose resistance to tetracycline.
Screening involves plating colonies on both ampicillin- and tetracycline-containing media to identify successful recombinants.
Graphics explanation:
Top left: The circular pBR322 plasmid with ampr and tetr genes is shown. The DNA fragment is inserted into the tetr site.
Top right: The resulting chimeric plasmid keeps the ampr gene intact but disrupts tetr.
Middle panels: Transformation protocol—suspension of E. coli with plasmid DNA in CaCl₂ solution, heat shock at 42 °C, then plating on ampicillin agar.
Bottom panels: Colonies growing on ampicillin agar are further screened on tetracycline agar; ampr colonies survive, but recombinants with disrupted tetr fail to grow.
Key points:
Transformation introduces recombinant DNA into bacteria. Selective media and screening strategies confirm the presence of the recombinant plasmid.
Key message:
Transformation combined with selective screening ensures that only bacteria carrying recombinant plasmids are identified and propagated.
How are cloned genes expressed in E. coli?
Simple explanation
To make a human/eukaryotic protein in E. coli, we put the cDNA into a special expression plasmid that has bacterial signals for making proteins. The bacterial promoter tells RNA polymerase to make mRNA from the cDNA, and the ribosome-binding site helps the bacterial ribosome translate that mRNA into the desired protein.
In short:
cDNA + bacterial promoter/RBS → E. coli → mRNA → protein
Expression of cloned genes
Process overview:
To produce a eukaryotic protein in E. coli, the eukaryotic cDNA must be cloned into a specialized expression vector.
This vector contains DNA regulatory elements required for transcription and translation in bacteria.
Key elements include: a bacterial promoter to initiate transcription, a ribosome-binding site to enable translation, and suitable cloning sites for gene insertion.
Once the eukaryotic DNA is fused with these bacterial elements, the recombinant plasmid can be introduced into E. coli.
Inside the bacterial cell, the plasmid directs transcription of the eukaryotic cDNA into mRNA, followed by translation into protein.
The result is the recovery of a eukaryotic protein product synthesized in a bacterial system.
Graphics explanation:
Left: A bacterial plasmid with a promoter, ribosome-binding site, and restriction site.
Middle: The eukaryotic DNA fragment is inserted downstream of the bacterial promoter, creating a gene fusion.
Right: The recombinant plasmid is transformed into E. coli, where it is transcribed into mRNA and translated into protein. The final output is the production of the eukaryotic protein of interest.
Key points:
Expression vectors are designed to bridge the differences between bacterial and eukaryotic systems, ensuring that eukaryotic genes can be properly transcribed and translated in E. coli.
Key message:
By combining eukaryotic DNA with bacterial expression elements, recombinant technology allows efficient production of eukaryotic proteins in prokaryotic hosts.
