clinical methods
 Call Kai
 Learn
Learn Practice Test
 Spaced Repetition
 Match
Match Flashcards
 Knowt Play
1/88

There's no tags or description
Looks like no tags are added yet.
Name | Mastery | Learn | Test | Matching | Spaced | Call with Kai | Chat |
|---|
No analytics yet
Send a link to your students to track their progress
89 Terms
Objective measures of refractive error
Keratometry, retinoscopy, autorefraction
get values without patient providing feedback
Subjective measures of refractive error
Manifest (subjective) refraction
requires subjective responses from patient
Why are both types of measurements of refractive error needed?
Working with children, patient preference, nonverbal patient, language barrier, can’t sit up in phoropter
refractive error
eye’s Rx
refractive correction
glasses Rx
emmetropia
no glasses needed
image point: at retina
far point: infinity

ametropia
myopia, hyperopia, astigmatism
factors that contribute to ametropia: power of optical system and axial length of eye
myopia
near-sighted, minus lenses needed
Image point: in front of the retina/ “in the eye”; Far point:
closer than infinity

hyperopia
far-sighted, plus lenses needed
Image point: behind the retina/ “behind the eye”; Far
point: “beyond” infinity
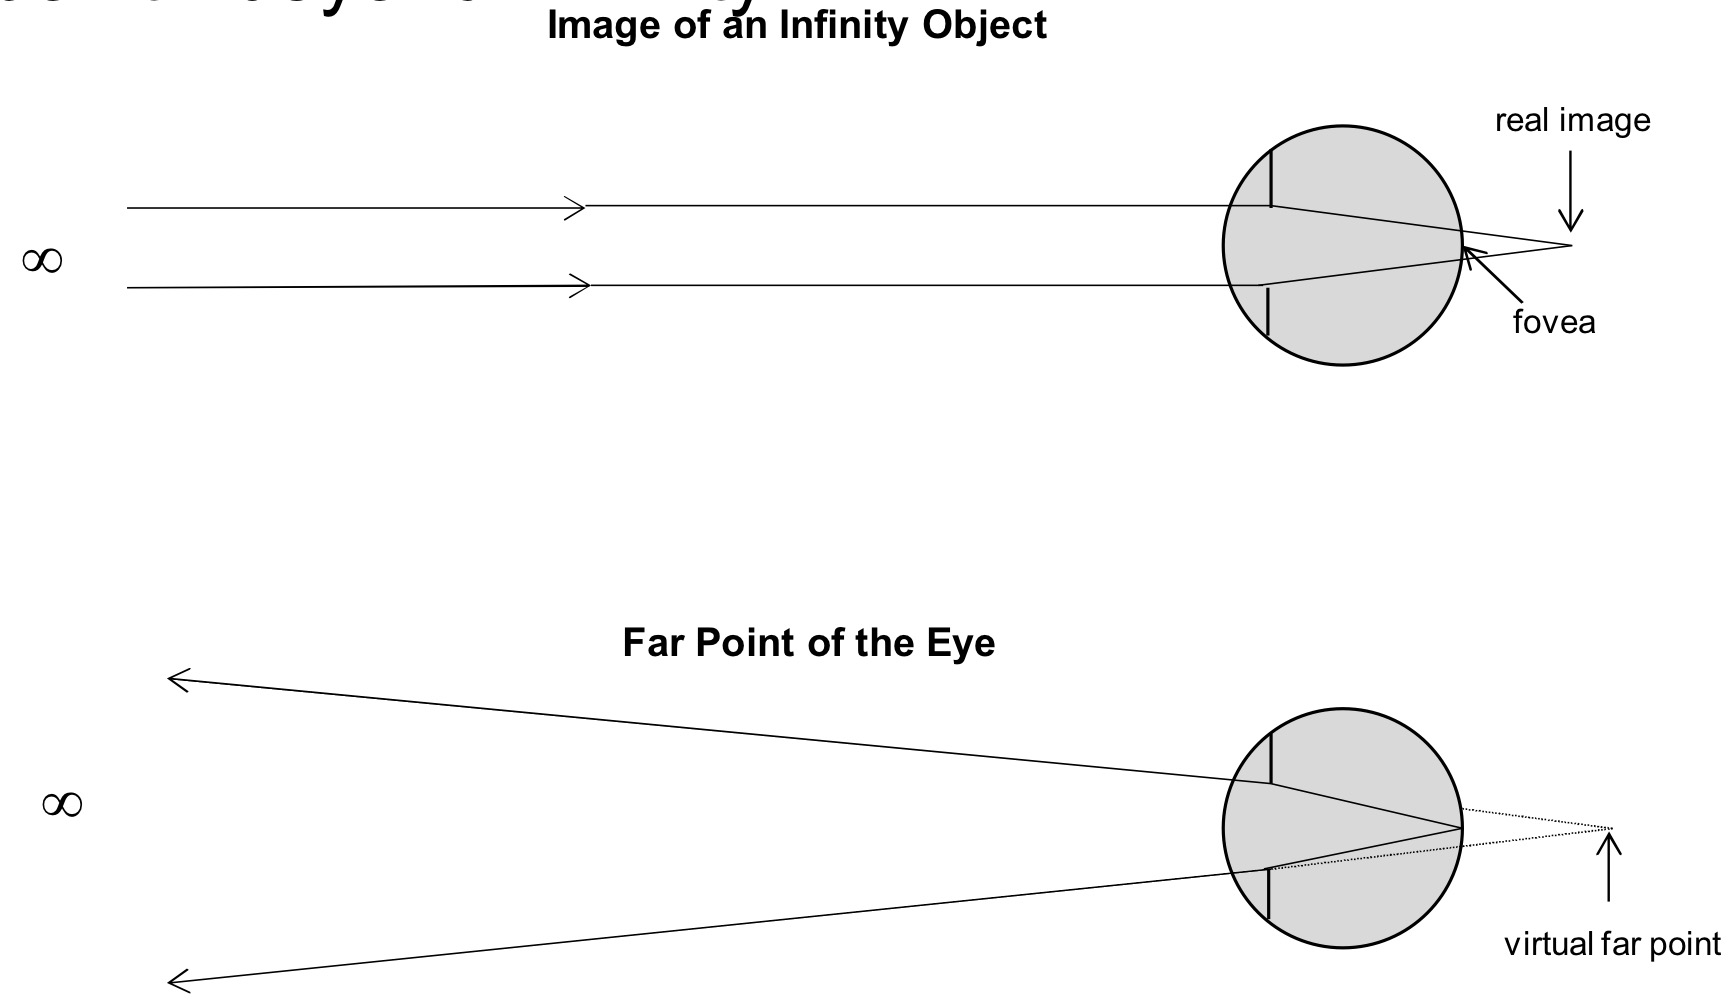
image point
– With an object at infinity, where light rays
converge in the back of the eye
– When light is coming IN to the system
power of optical system
cornea + lens
more plus → more powerful eye → light rays converge sooner
higher power cornea → myopia
power of optical system
cornea + lens
more plus → more powerful eye → light rays converge sooner
higher power cornea → myopia
axial length of eye
distance to retina (screen)
the shorter the distance from the front of the eye to the retina, the less distance rays have to converge and so they may not be fully converged at the retina
shorter eye = hyperopia. longer eye = myopia.
astigmatism
image in two different focus places
power of the eye is not perfectly spherical → two line images with a blur circle (circle of least confusion/CLC) somewhere between
two principle meridians give rise to two image lines (vertical meridian forms horizontal line images while horizontal meridian forms vertical line image)

simple myopic
one at retina one in front of retina
simple hyperopic
one at retina one behind
compound hyperopic
both behind retina
compound myopic
both in front of retina
mixed astigmatism
one in front and one behind
retinoscopy
goal: objectively neutralize patient’s refractive error
place far point of patient’s principle meridian coincident with doctor’s retinoscope, get to infinity by removing amount of lenses equal to working distance
mechanism: move streak across eye produces movement of retinal reflex, add lenses until no movement for neutralization (far point at retinoscope/working distance)
sleeve down for divergent beam
with-motion
far point of eye is behind viewing aperture (between aperture and infinity)
add + lenses
hyperopes, emmetropes, low myopes
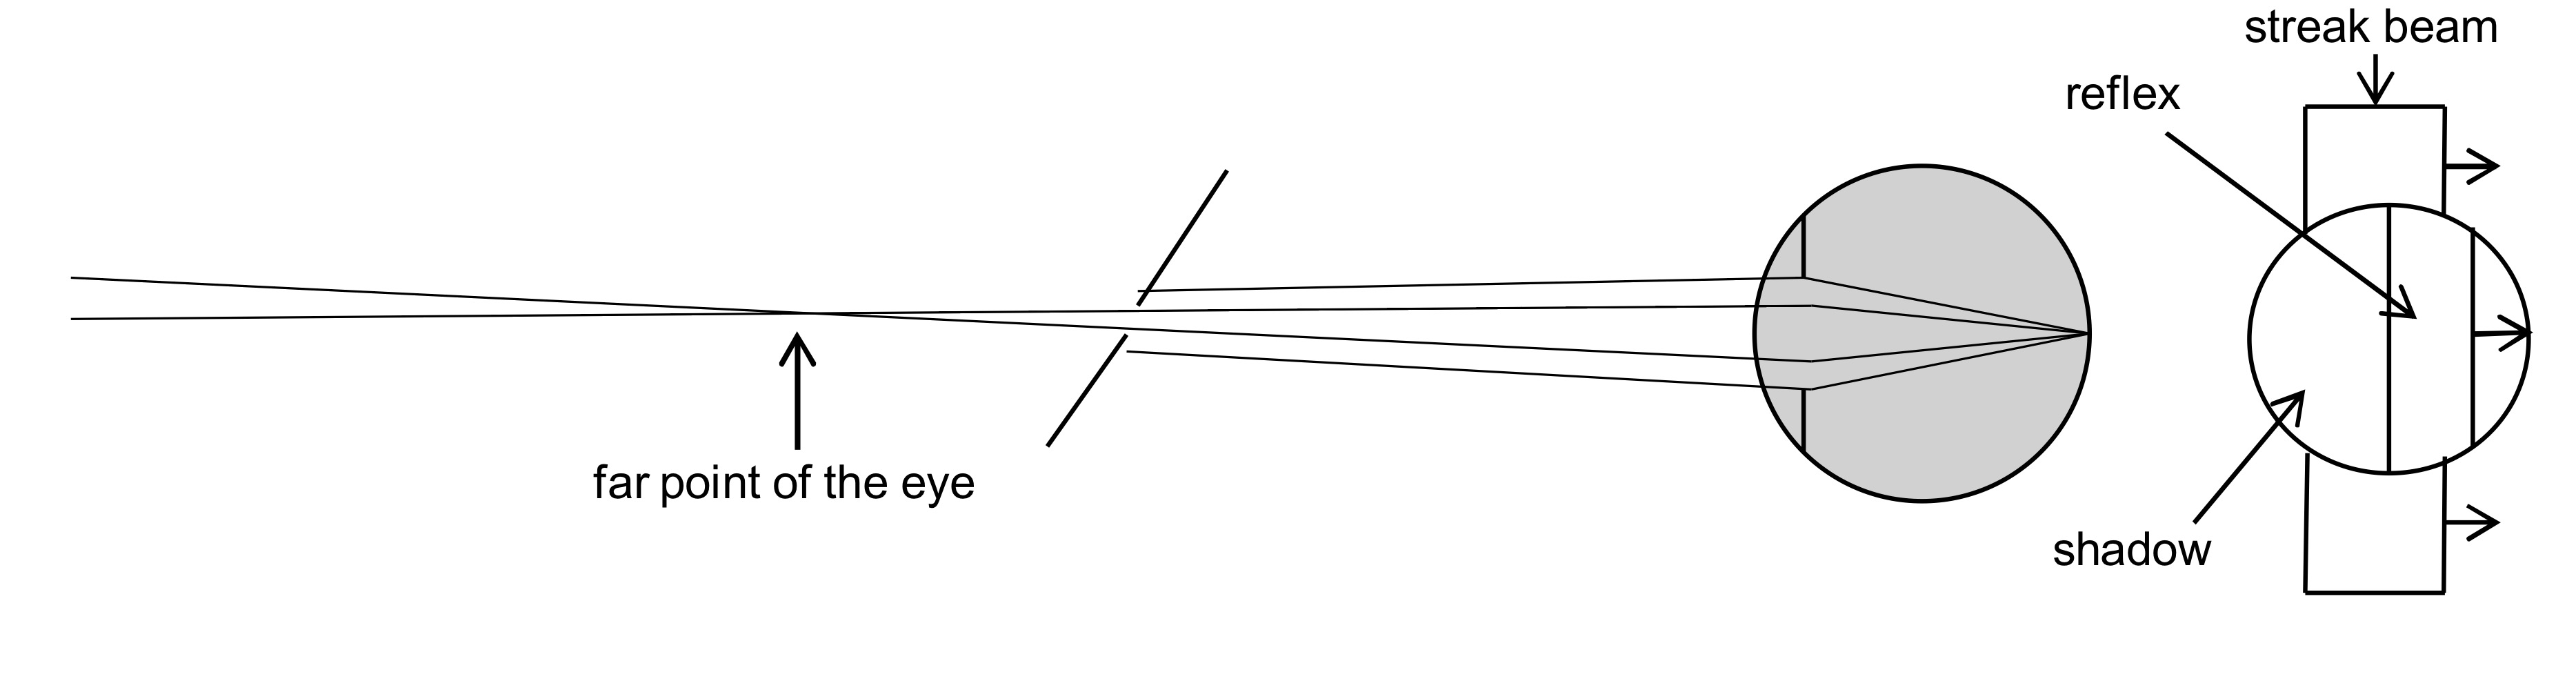
against-motion
far point of the eye is between the eye and the viewing aperture
add - lenses
myopes (but not low myopes)

neutral-motion (neutrality)
retina and aperture of retinoscope in conjugate focus

retinoscopic reflex
affected by location of far point in relation to viewing aperture
far point closer to aperature → width, brightness, and speed of reflex increase
streak orientation and meridians of eye
orientation of retinoscope streak is 90 degrees away (perpendicular) from meridian being evaluated (neutralized)
astigmatic reflex
break: reflex misaligned with streak beam
skew: reflex movement misaligned with streak beam
brightness: reflex dimmer when misaligned with streak beam
width: reflex wider with less defined margins when misaligned with streak beam
working distance
distance from eye you hold retinoscope
50cm=2.00D, 67cm=1.50D

gross retinoscopy findings
when lenses findings for retinoscopy is when lenses are in place that allow “neutral” motion to be seen in all meridians (far point at plane of retinoscope)
net retinoscopy findings
Your working distance (50cm or 67cm) will determine the lens amount that will be removed to find the patient’s refractive correction (net findings) for retinoscopy
gross - working distance = NET
subtract 2.00D for 50cm WD
visual acuity
the ability of the visual system to resolve fine detail
spatial visual acuity
the finest spatial detail that can be detected, discriminated, or resolved
detection
Minimum visible acuity
Detection acuity = angular size of the smallest visible target
recognition/identification
minimum recognizable acuity
task: identify letters by resolving their details
types of acuity
distance visual acuity (DVA)
near visual acuity (NVA)
entering VA
VA presenting to you in clinic (can be with glasses, without)
first test performed at start of almost every eye exam
medical-legal issue
unaided/uncorrected VA
without correction/glasses/contacts
spectacle VA, cc
with correction
best corrected VA (BCVA)
VA after refraction (ideally)
OD
oculus dexter, right eye
OS
oculus sinister, left eye
OU
oculus uterque, both eyes
pinhole optics
reduces effective pupils size, increases depth of field/depth of focus, reduces refractive blur, reduces illuminance of retinal image (dimmer)
pinhole acuity
can help determine if reduction in VA due to uncorrected refractive error or non-refractive conditions (ocular disease, amblyopia)
PH 20/20
PHNI: pinhole no improvement
ambylopia
something preventing retina from getting clear image during development (congenital cataract, uncorrected high prescription, ptosis)
uses of visual acuity
to measure visual function
to prescribe glasses or contact lenses
to track disease progression
to document eligibility standards (insurance, licensing, benefits)
types of charts
Snellen, Bailey-Lovey/logMAR chart, Feinbloom
optotype
font
spacing
space between letters and lines
progression
size progression
Snellen chart
optotype: 5X5 grid, serifs
spacing: irregular
progression: irregular
Snellen notation
numerator = testing distance
denominator = letter size
letter size
distance at which letter height subtends 5 minutes of arc
1° = 60 minutes (‘)
ex. 20 foot letter size subtends 5’ at 20ft, 8.87mm height

test distance
US: in feet (20/20)
Europe: in meters (6/6)
ft to mm conversion
20ft = 6096 mm
1ft = 304.8mm
Bailey-Lovie/ETDRS/logMAR chart
optotype: sloan letters
spacing: between letter and between row spacings equal to lettering size
progression: logarithmic
each line has same number of test letters
minimum angle resolution (MAR)
Angular size of the critical detail of threshold optotype (1/5th of letter height)
Reciprocal of the Snellen fraction
Expressed in minutes of arc
20/20: MAR=1.0, can see 1 minute of arc detail or 1/5 of letter height
LogMAR
Logarithm of the Minimum Angle of Resolution
take log of MAR
decimal notation
Snellen fraction as decimal
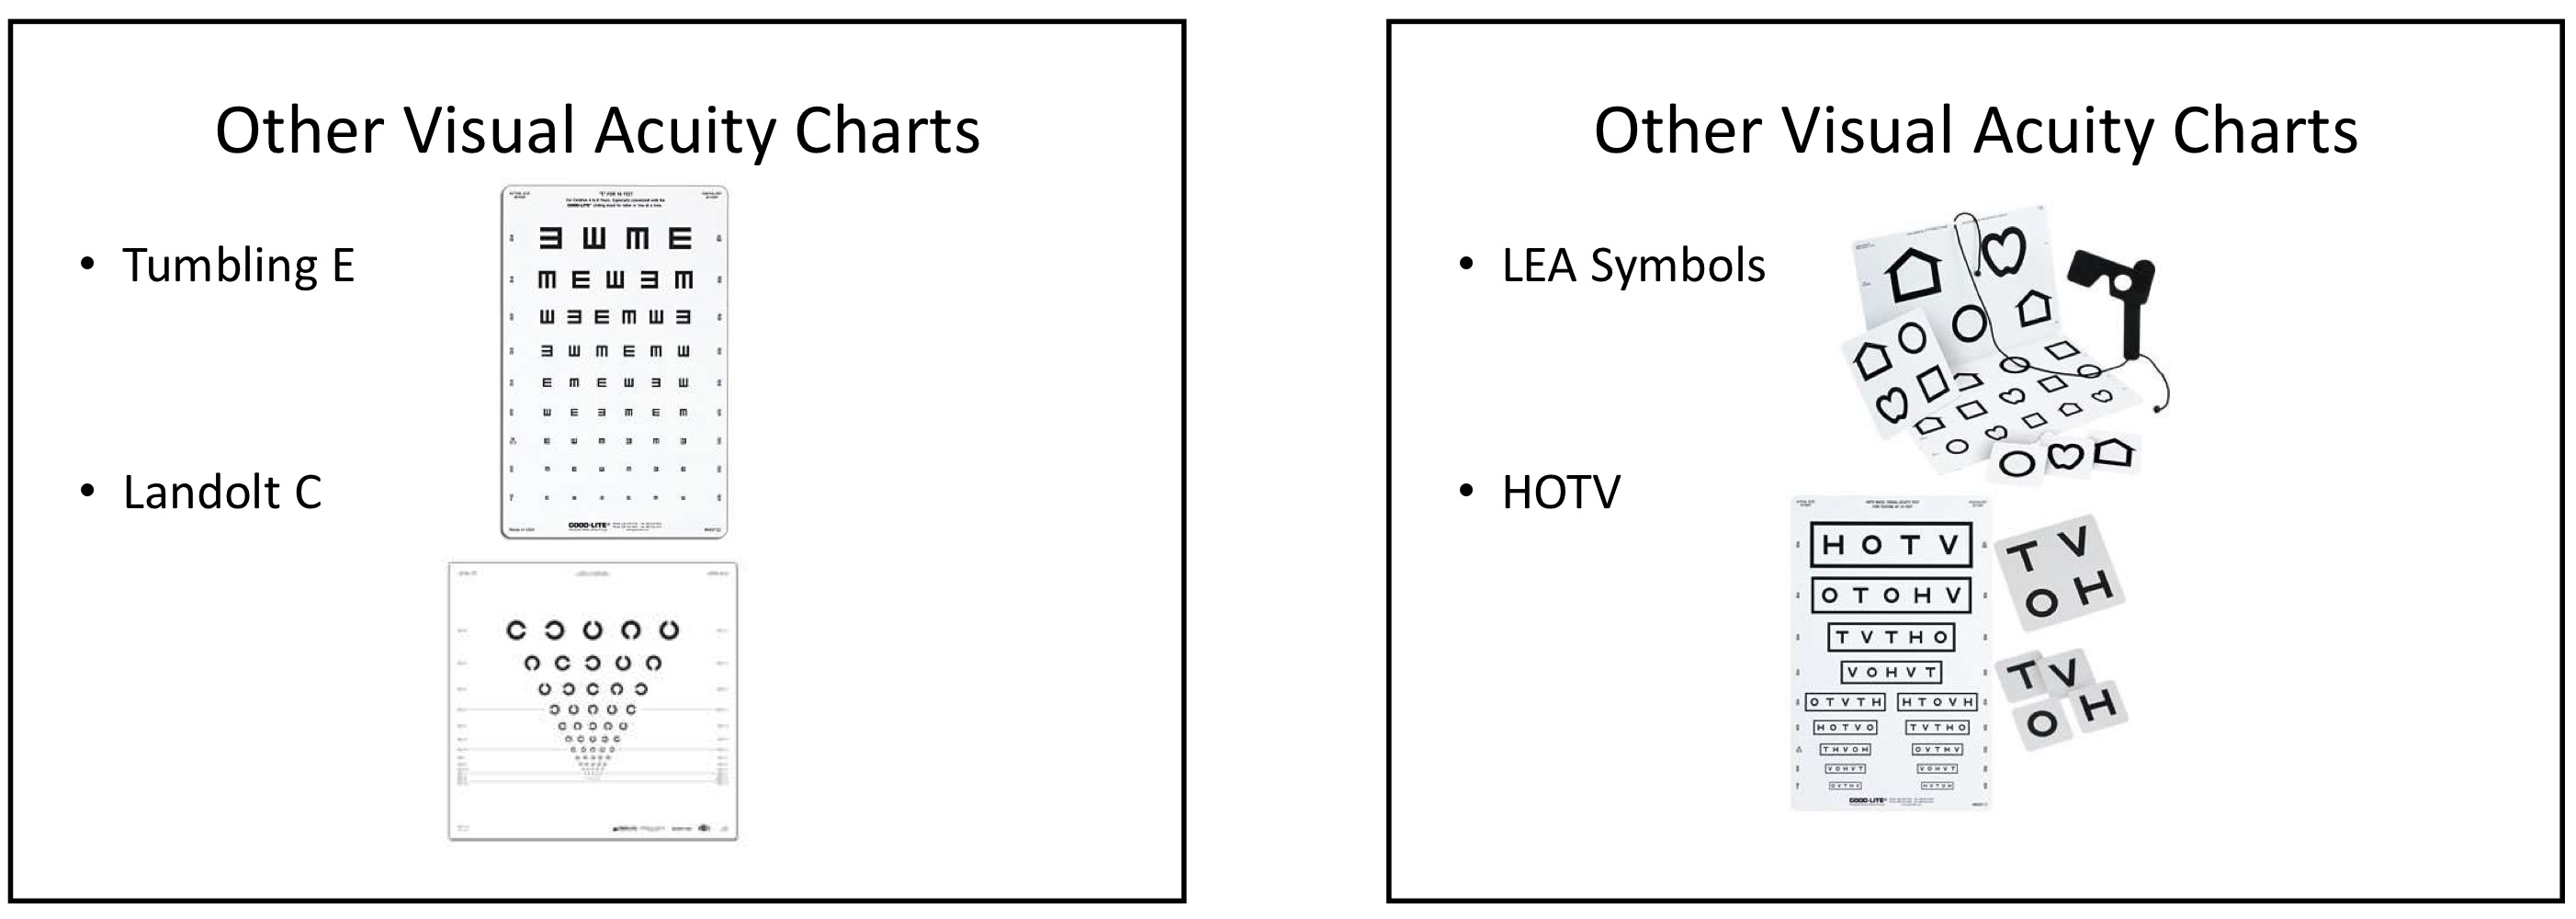
other visual acuity charts
Tumbling E, Landolt C, LEA symbols, HOTV
measuring VA
OD, OS, OU
start at line slightly higher than patient‘s threshold
can do single line/letter presentation
partial credit with + or -
read at least half of the letters on a line correctly for credit
human visual limits
diffraction, aberrations, photoreceptor size and spacing
other factors affecting visual acuity
illumination, contrast
count fingers (CF)
CF @ x feet
not standardized, letters are better
hand motion (HM)
ability to detect movement of a hand
light projection (LP with projection)
able to perceive presence of light + direction of light source
light perception (LP)
able to perceive presence of light, unable to perceive shape or direction
no light perception (NLP)
total absence of vision, unable to perceive presence or absence of light
qualitative notations
best to worst acuity: HM > LP with projection > LP > NLP
move chart closer first
visual impairment
legally blind: 20/200 best corrected

near VA
testing: full room illumination, near reading light, reading add in place for presbyopes
test distance: 40cm
charts: reduced Snellen, M notation, Jaeger
reduced Snellen
print size expressive in equivalent Snellen DVA ratios
must specify near viewing distance (usually 40cm)
recorded as RS 20/20 (@40cm)
difficult to compare acuities at different distances, should really be measured at 40cm
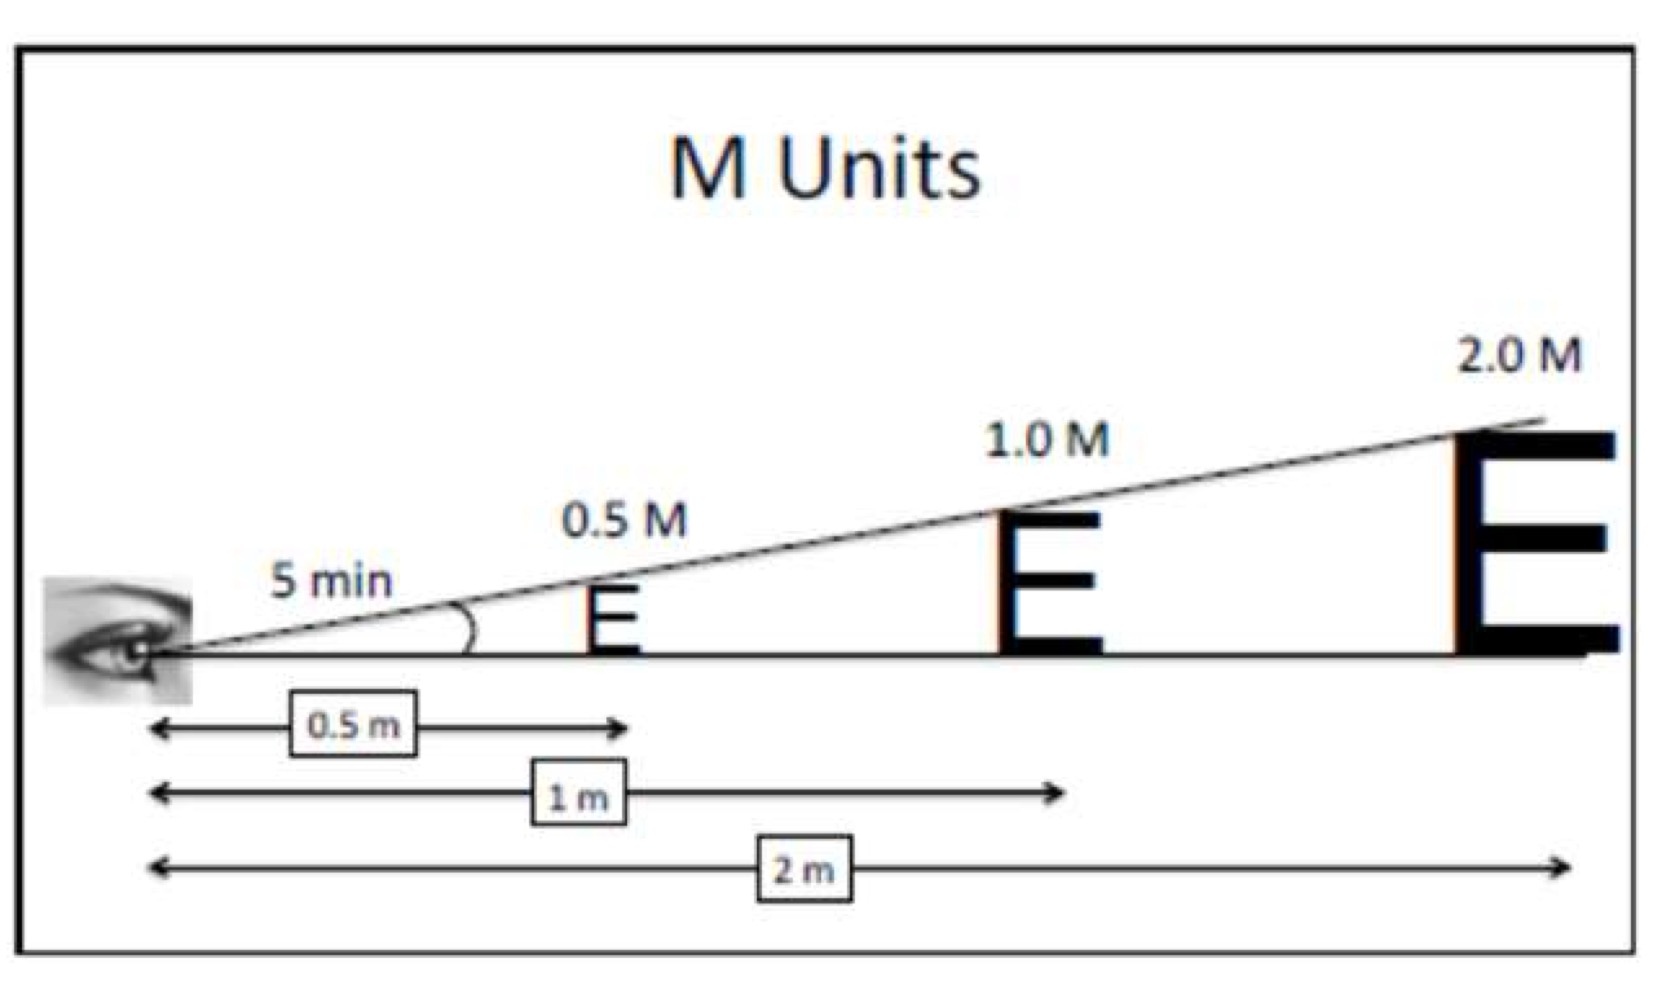
M notation
numerator = testing distance (m)
denominator = letter size (meter-letter)
ex. 0.40/0.4M
M units expressed in meters
distance VA = near VA if
Patient has proper correction and focused
Chart design is the same for dist and near
Lighting level is the same
Pupil not changing optics
How could you get VA worse than the real VA?
dim room
don’t know letters
dry eye
is the patient trying?
is the patient malingering?
Is the patient looking at the chart?
Using glasses correctly?
can’t cognitively recognize letters?
can’t find chart?
didn’t cover eye completely
covering wrong eye
squinting
leaning forward
pushing glasses closer/farther away
patient looking with better eye
interpupillary distance (IPD) / pupillary distance (PD)
the distance between the centers of the pupils for a specific viewing distance
use: place the optical center of phoropter/ trial frame in frame in front of patient’s visual axis, place optical center of glasses in front of the patient’s visual axis
monocular PD
the distance from the center of the pupil to the middle of the bridge
used for PALs and high Rx
PD procedure
full room illumination
remove patient spectacles
testing distance near working distance (40cm)
maintain landmarks: temporal limbus OD, nasal limbus OS
sight with left eye first then right eye
position ruler zero mark at temporal limbus OD
near PD: open OS, find location of nasal limbus
dist PD: don’t move ruler, close OS and open OD for patient to look at, new location of nasal limbus
recording PD
dist PD/near PD in mm
ex. 65/63
near PD average ~3mm less
pupillometer
uses corneal reflex to determine PD, can but used for monocular PDs
real eye vs schematic eye
Pupil access (eyelids in the way)
Smaller pupil (also changes with age)
Patient bored/not paying attention/falling asleep
Accommodation (need to fog eye, need to control accommodation, leaving in WD)
Irregular corneal reflex (“scissoring”)
More realistic! Changes in brightness of reflex
clinical retinoscopy set-up
adjust phoropter: enter distance IPD, position phoropter before patient, adjust level, vertex distance, pantoscopic tilt
low room illumination
fixation target: large (20/400) letter, use reverse contrast, cycle letter
can add ret lenses in Marco
clinical retinoscopy patient education
“i will be using my light to determine an initial starting point for your prescription”
examiner positioning
evaluate patient’s right eye: position yourself so visual axis of your right eye is coincident with visual axis of patient’s right eye
evaluate patient’s left eye: position yourself so visual axis of your left eye is coincident with visual axis of patient’s left eye
don’t block patient’s view of target
lenses in phoropter
turning lens wheel down adds plus lenses, when you see with
turning lens wheel up adds minus lenses, when you see against
sphero-cylinder method
scan all meridians, use break and skew to determine principle meridians
neutralize most “with” meridians with sphere lenses
check that other meridian shows “against” before adding cylinder lenses
set the axis on dial parallel to streak that is scoping “against” meridian (applies power 90 degrees away at the meridian you are scoping)
add minus cyl lenses in quarter diopter steps until you see neutral (add until with reversal and go back down to neutral)

cylinder lens optics
power meridian
axis: other meridian is plano
controlling accommodation
real eyes can accommodate or increase plus power through focusing
Pick a big target (20/400 letter)
Remind the patient to look at the letter, NOT your light
Instruct the patient to tell you if you ever block them (want to make sure they are looking far away)
Ensure both eyes are open and the eye NOT being scoped views the target
Lights are kept low to avoid cues to accommodation
three eye technique: scope first eye, second eye, and first eye a second time
manual vs auto ret
manual phoropter displays gross findings
automated phoropter displays net findings (remove ret lenses to begin refraction)
gross to net
hyperopes (plus): less plus
myopes (minus): more minus
move in more minus/less plus direction