NURS 1145 - Quick skills presentations Exam 1
1/47
There's no tags or description
Looks like no tags are added yet.
Name | Mastery | Learn | Test | Matching | Spaced |
|---|
No study sessions yet.
48 Terms
procedure plus instructions to the patient for whispered pectoriloquy
instructions:
Have your patient sit upright comfortably with feet on the floor. Have your patient whisper "one two three" every time the stethoscope touches them
procedure:
place your stethoscope over the patients trachea and listen. Repeat the same thing over the lungs and listen. Ask your patient to whisper "one two three" multiple times as you auscultate across the chest.
abnormal vs normal whispered pectoriloquy
abnormal:
-results when you can hear the patient whispering
normal:
-you will only hear faint sounds
-you won't hear the whisper or words clearly and most likely won't hear anything
causes of abnormal findings during a whispered pectoriloquy
-Indicate lung consolidation which is caused by something other than air filling the airways in your lungs.
-This could be liquid like pneumonia, or cancer and masses.
instructions plus procedure to patient for fingernail clubbing
instructions:
I am just going to do a quick assessment to check for nail clubbing. If you could just take both of your pointer fingers and put them together, so the tips of your nails are touching
procedure:
I am going to use the Schamroths window test to look at the patient's fingertips. I will look at the nails and make sure they have an angle to them. I will also make sure I can see light between the patient's fingertips, also known as viewing Schamroth's window.
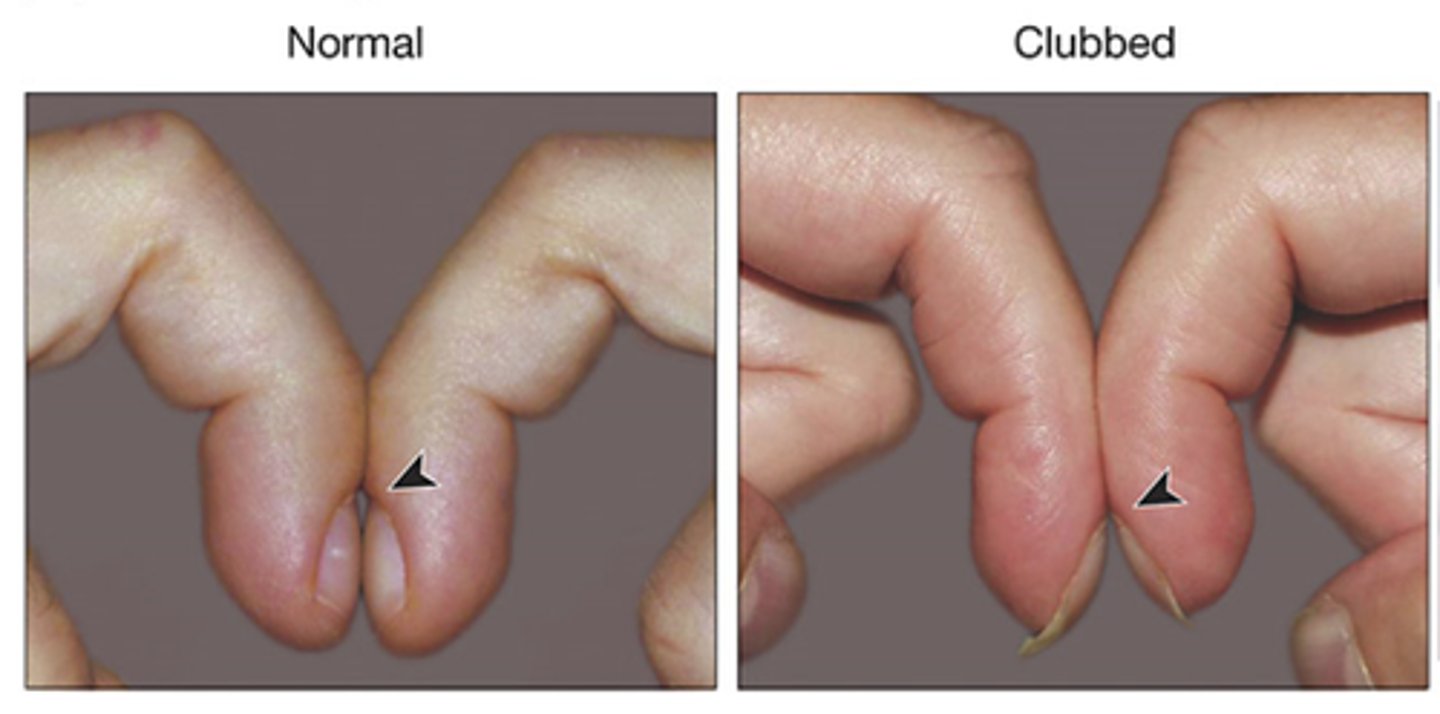
abnormal vs normal findings of fingernail clubbing
abnormal:
the disappearance of an angle to the patient's nails and the angle becoming larger than 160 degrees. Also, nonvisible light through the patient's fingers during the Schamroths window test. Fingers appear to look like upside-down spoons.
normal:
This will show a slight angle to the patient's nails, as well as visible light between the patient's pointer fingers when they are performing the test.
causes of abnormal findings in fingernail clubbing
Chronic hypoxemia, celiac disease, hyperthyroidism, lung cancer, COPD, and heredity can all be causes of clubbing disease.
instructions plus procedure for inspecting thorax for AP diameter
instructions:
I am going to do an assessment that measures the diameter and expansion of your chest. I am going to have you sit straight up in front of me to perform this inspection.
procedure:
I am going to place my hands on either side of your chest anteriorly, taking note of the distance between my hands. Next, I will move to your side, maintaining the distance between my hands to compare the distance between from the front to back of your chest.
abnormal vs normal findings of AP diameter test
abnormal:
The chest wall may appear as a barrel chest because of the increased AP diameter.
normal:
this inspection should show me that the AP diameter of your chest is about one half the lateral diameter. So, from the front to back of your chest should be about half the distance from one side of your chest to the other.
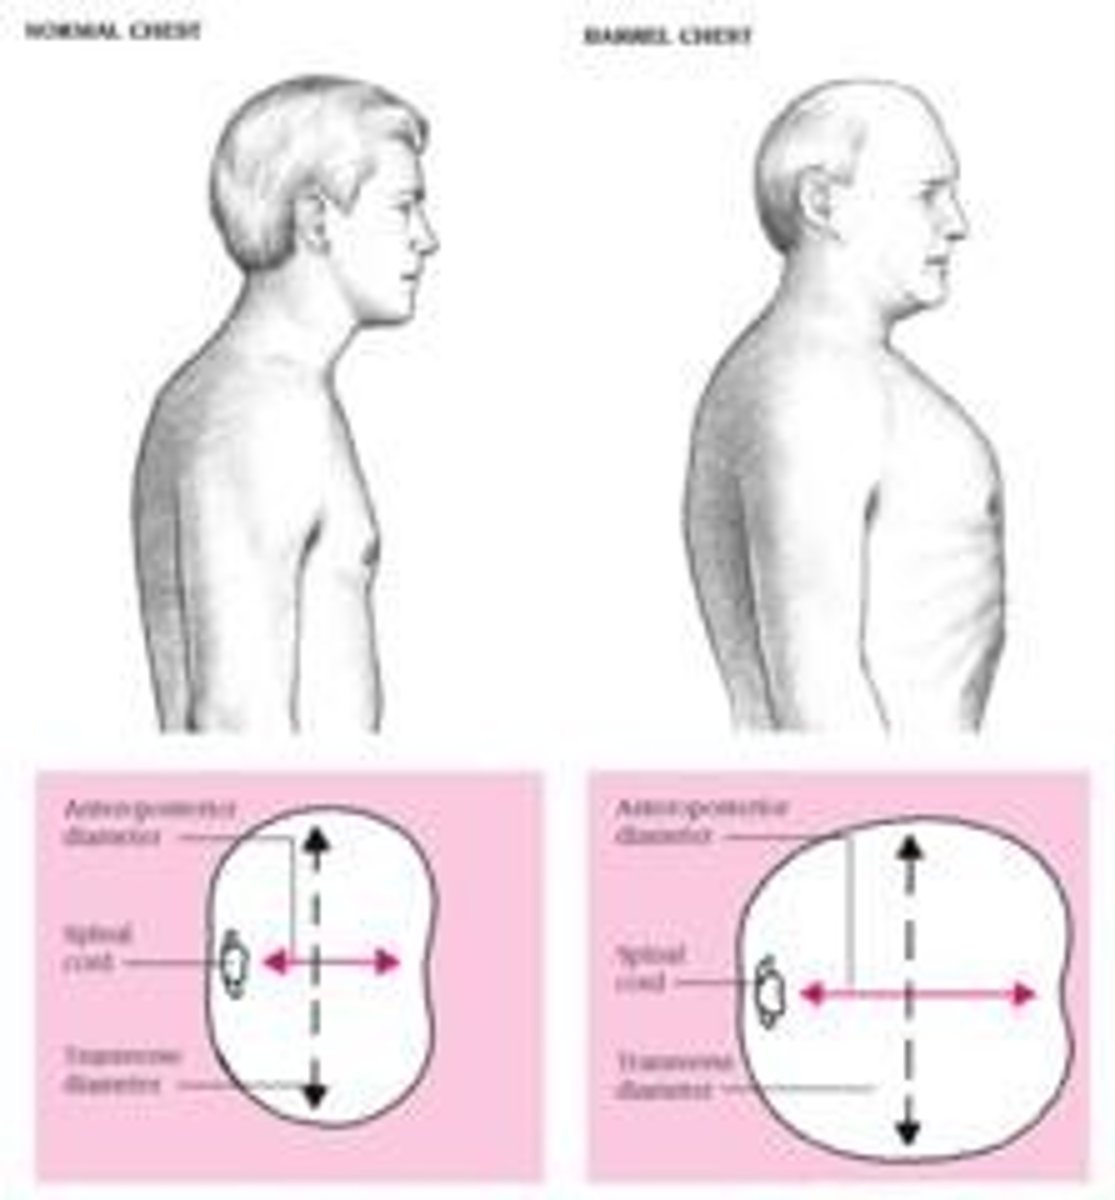
causes of abnormal findings in an abnormal thorax AP diameter
The reason a client may have a barrel chest appearance is because their ribs are more horizontal than normally angled down about 45 degrees. This would physically look like the chest is held in constant inspiration.
-emphysema and chronic bronchitis
-COPD
-chronically overinflated lungs
instructions plus procedure to patient for palpation of posterior thoracic expansion
instructions:
instruct the patient to sit upright on the side of the bed. When assessing patient, tell them to breathe out then continue taking deep breaths.
procedure:
Stand behind the patient and place both thumbs on the spine at around t9 while extending your hands. Then, instruct the patient to take several deep breaths through the mouth. Watch how your thumbs move.
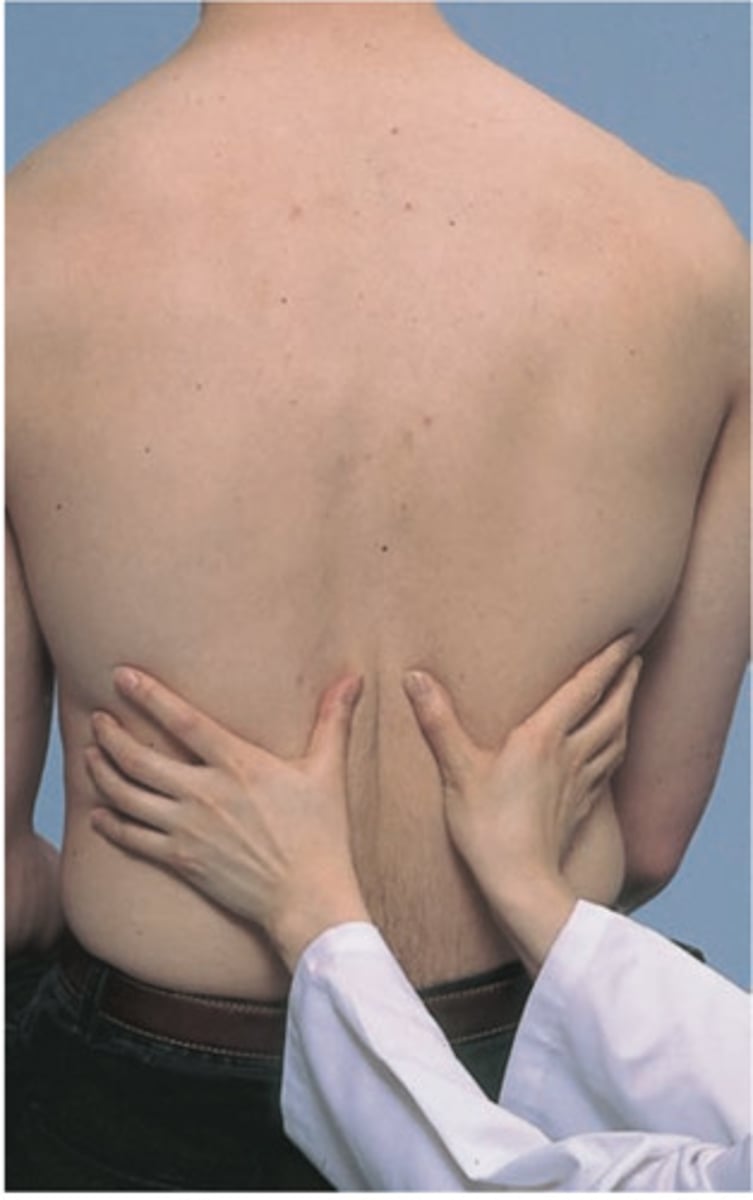
abnormal vs normal finding of posterior thoracic expansion
abnormal:
Unequal or no movement between thumbs
normal findings:
symmetrical movement of the thumbs with each breath is the normal finding.
causes of abnormal findings in a posterior thoracic expansion
Pain, or localized pulmonary disease such as:
-fractured ribs
-chest wall injury
-pneumonia
-collapsed lung or atelectasis.
-Those with a barrel chest may also not see movement due to over inflation.
instructions plus procedure of assessing for bronchophony
instructions:
Patient is to repeat one of three phases:
"ninety-nine"
"e-e-e"
"one, two, three"
procedure:
While patient is repeating one of the phrases, use stethoscope to listen to the posterior thorax, listening for the quality of sound
abnormal vs normal findings while assessing for bronchophony
abnormal:
If the sound of the phrase is loud and clear
normal:
A muffled tone such as, "nin-nin"
A muffled tone such as, "one, two, three"
causes of abnormal findings while assessing for bronchophony
Consolidation of the lungs such as:
-Pneumonia
-Pulmonary embolism
-Lung cancer
aka some type of obstruction
instructions plus procedure while assessing for egophony
instructions:
Have the patient sit upright and ask the patient to say and hold the letter "E" each time the stethoscope touches their skin.
procedure:
Auscultate over the patient's chest and listen to see whether the sound changes depending on where you're auscultating.
abnormal vs normal findings while assessing for egophony
abnormal:
If the patient's "E" sound is either extremely muffled or begins to sound like the letter "A", this is considered to be abnormal.
normal:
If no Egophony is present, the patient's "E" sound will resonate and sound like "E" in every area of the chest you auscultate.
causes for abnormal findings while assessing for egophony
If the sound is muffled or sounds like "A", this could be an indication of consolidation of the lungs (fluid in the lungs) ((could be pus, water, etc.)).
instructions plus procedure while palpating the trachea for postioning
instructions:
Tell your patient to sit in an upright position and to look forward and relax
procedure:
-We perform this when tracheal deviation is suspected.
-Palpate the neck and trachea just above the suprasternal notch.
-Stand facing the patient and use both thumbs to palpate the trachea on anterior aspect of the neck by placing the thumbs on either side.
-Or use your two index fingers and thumb of one hand
abnormal vs normal findings while palpating the trachea for positioning
abnormal:
-The trachea will either be pulled toward the affected side or pushed away from the affected side.
-It will not sit midline.
normal:
The trachea should be
-Palpable
-Midline
-Slightly moveable
causes of abnormal findings while palpating the trachea for positioning
Trachea deviation is associated with problems within the chest.
Trachea pushed away from affected side:
-Thyroid enlargement
-Pleural effusion
-Tension pneumothorax
Trachea pull toward affected side:
-Pulmonary fibrosis
-Atelectasis/Collapsed lung

instructions plus procedure while palpating posterior lung field for tactile fremitus (vibrations from our voice)
instructions:
Instruct patient to sit upright and "hug" self to move scapula out of the area that will be assessed. Then, instruct patient to recite "ninety-nine" (or blue balloon) while back is being palpated.
procedure
Place the palm or ulnar edge of your hand on patients upper back over both right and left lung fields (symmetrically) and feel for discrepancies between vibrations as patient recites "ninety-nine". Repeat process while moving hands down to asses lower areas.
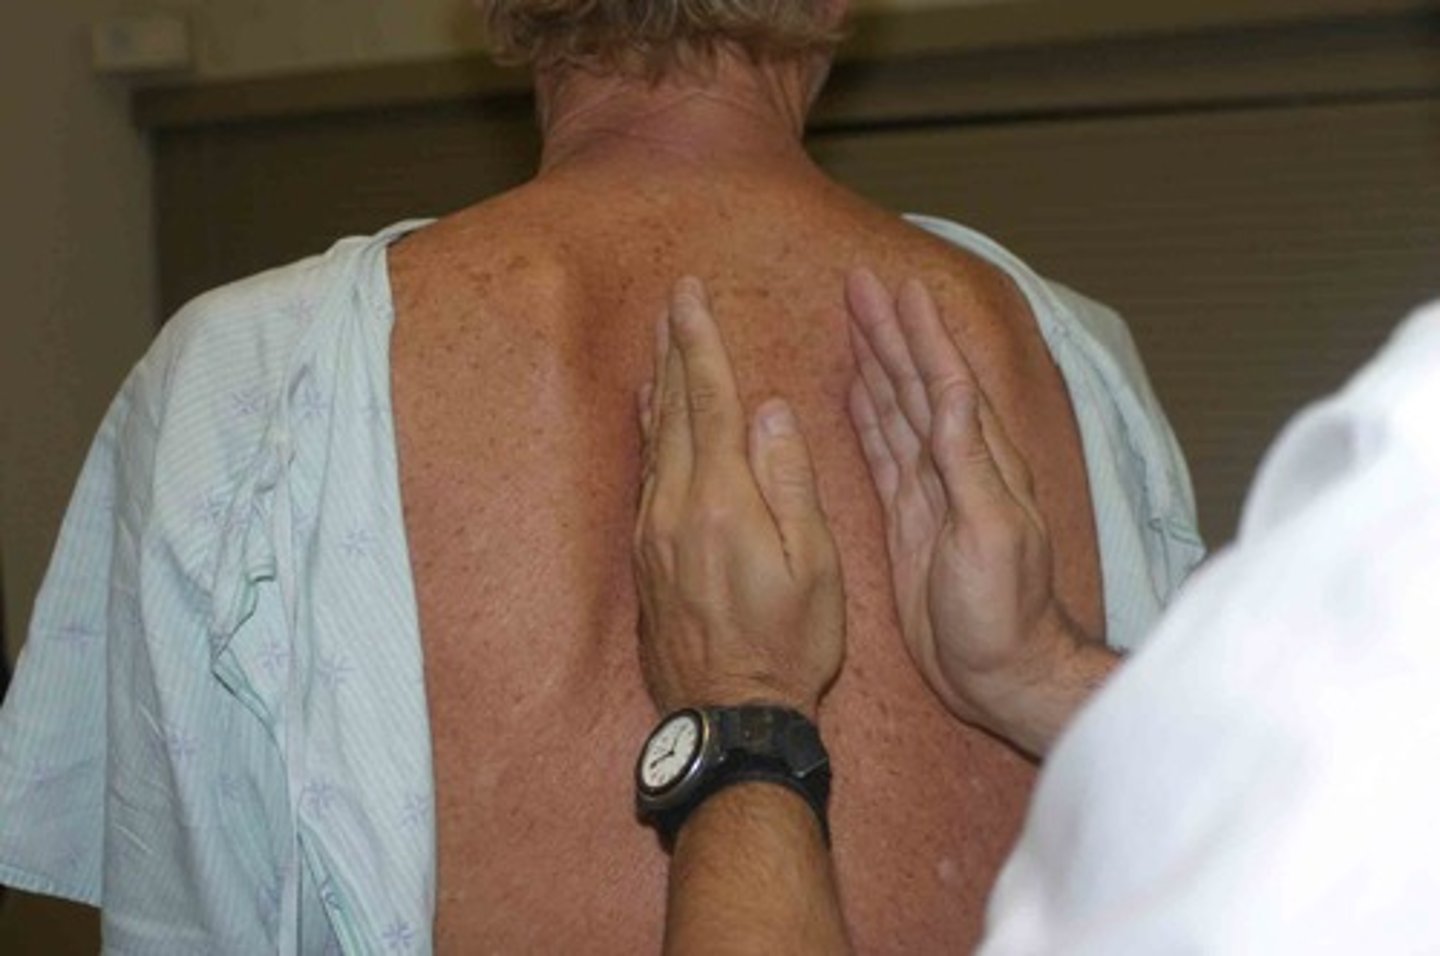
abnormal vs normal findings while palpating posterior lung field for tactile fremitus
abnormal:
vibrations are unequal between sides. (One side's vibrations can be decreased or enhanced)
normal:
Fremitus should feel bilaterally equal.
causes of abnormal findings while palpating posterior lung field for tactile fremitus
Lowered fremitus occurs due to reduced density within the lungs:
-Some causes:
Pneumothorax, pleural effusion, atelectasis, bronchial obstruction, obesity, hemothorax, empysema.
Increased fremitus occurs due to consolidation or congestion.
-Some causes:
pneumonia, tumor, atelectasis.
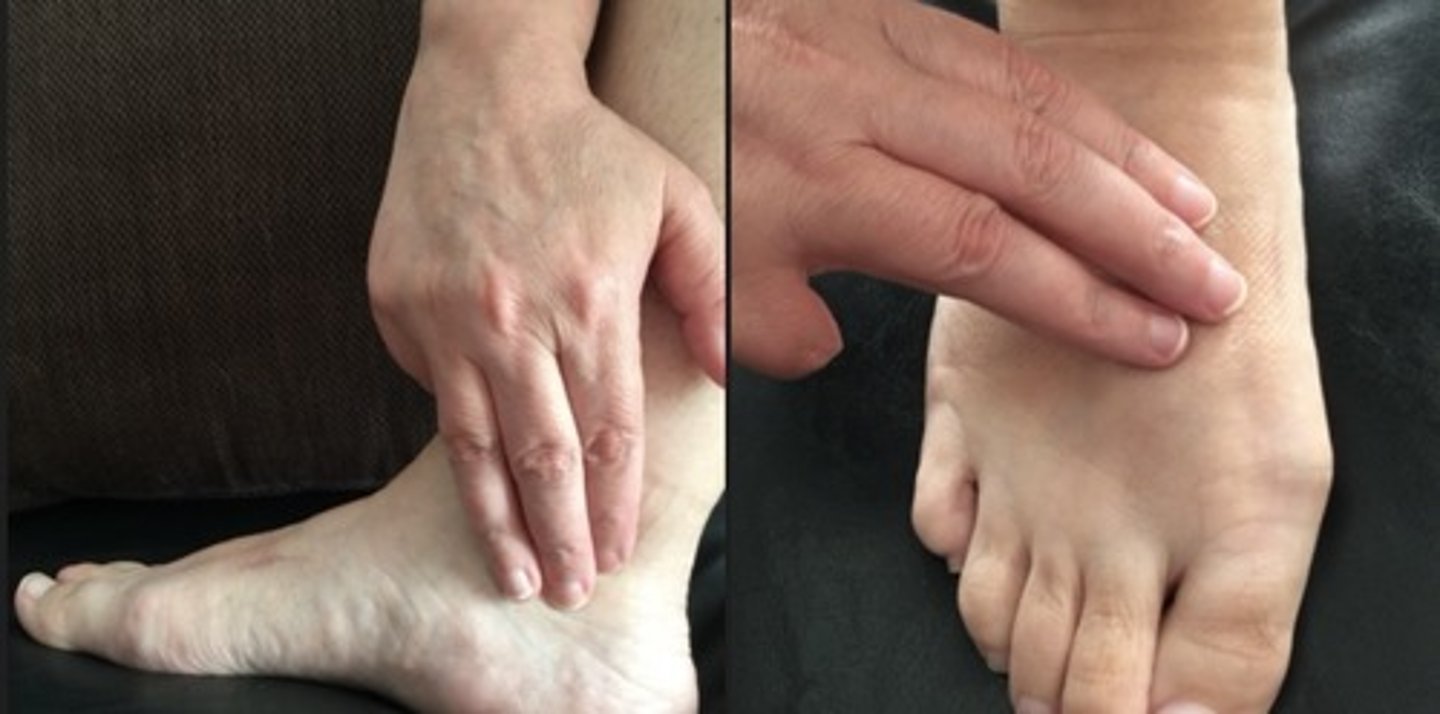
instructions plus procedure for testing for pitting edema
instructions:
Instruct the patient that you're performing an assessment to see if they have pitting edema by applying pressure to the swollen area to see if there is an indentation. The patient can be sitting or standing while the test is being performed.
procedure:
I will press into the swollen area, and an indentation will remain after my fingers are lifted when pitting edema is present.
There is a pitting edema scale:
1+ is a barely perceptible pit (2 mm)
2+ is a deeper pit, rebounds in a few seconds (4 mm)
3+ is a deep pit, rebounds in 10-20 seconds (6 mm)
4+ is a deeper pit, rebounds in >30 seconds (8 mm)
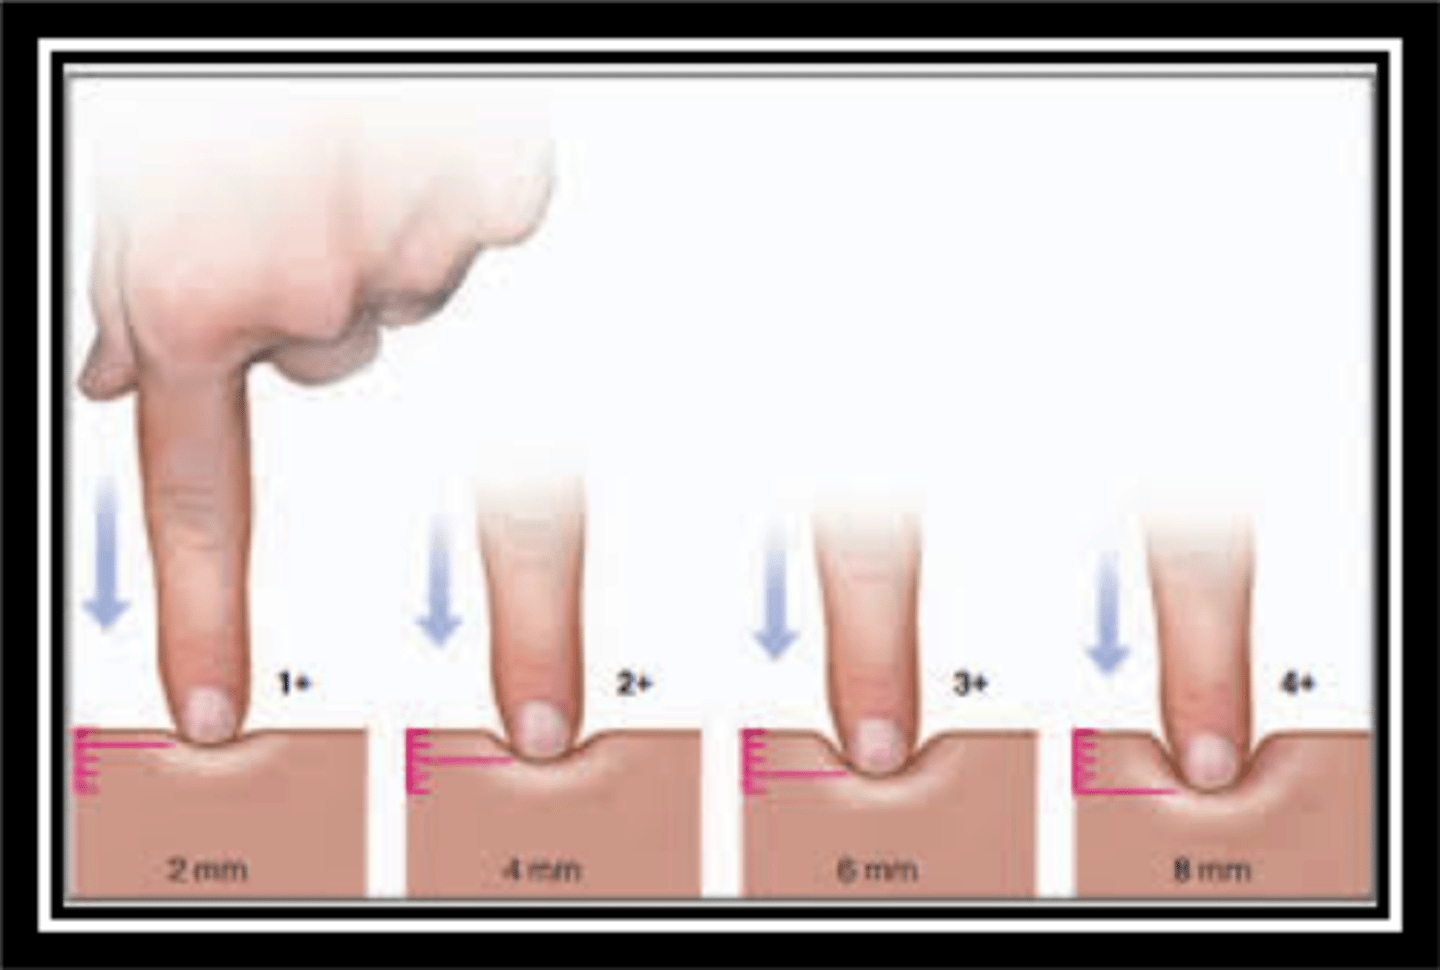
abnormal vs normal for testing for pitting edema
abnormal:
An indentation will remain after the fingers are lifted off the surface. Pitting edema normally occurs in the leg, ankle, or feet.
normal:
If you press on the surface it wouldn't be indented after you lift your finger away.
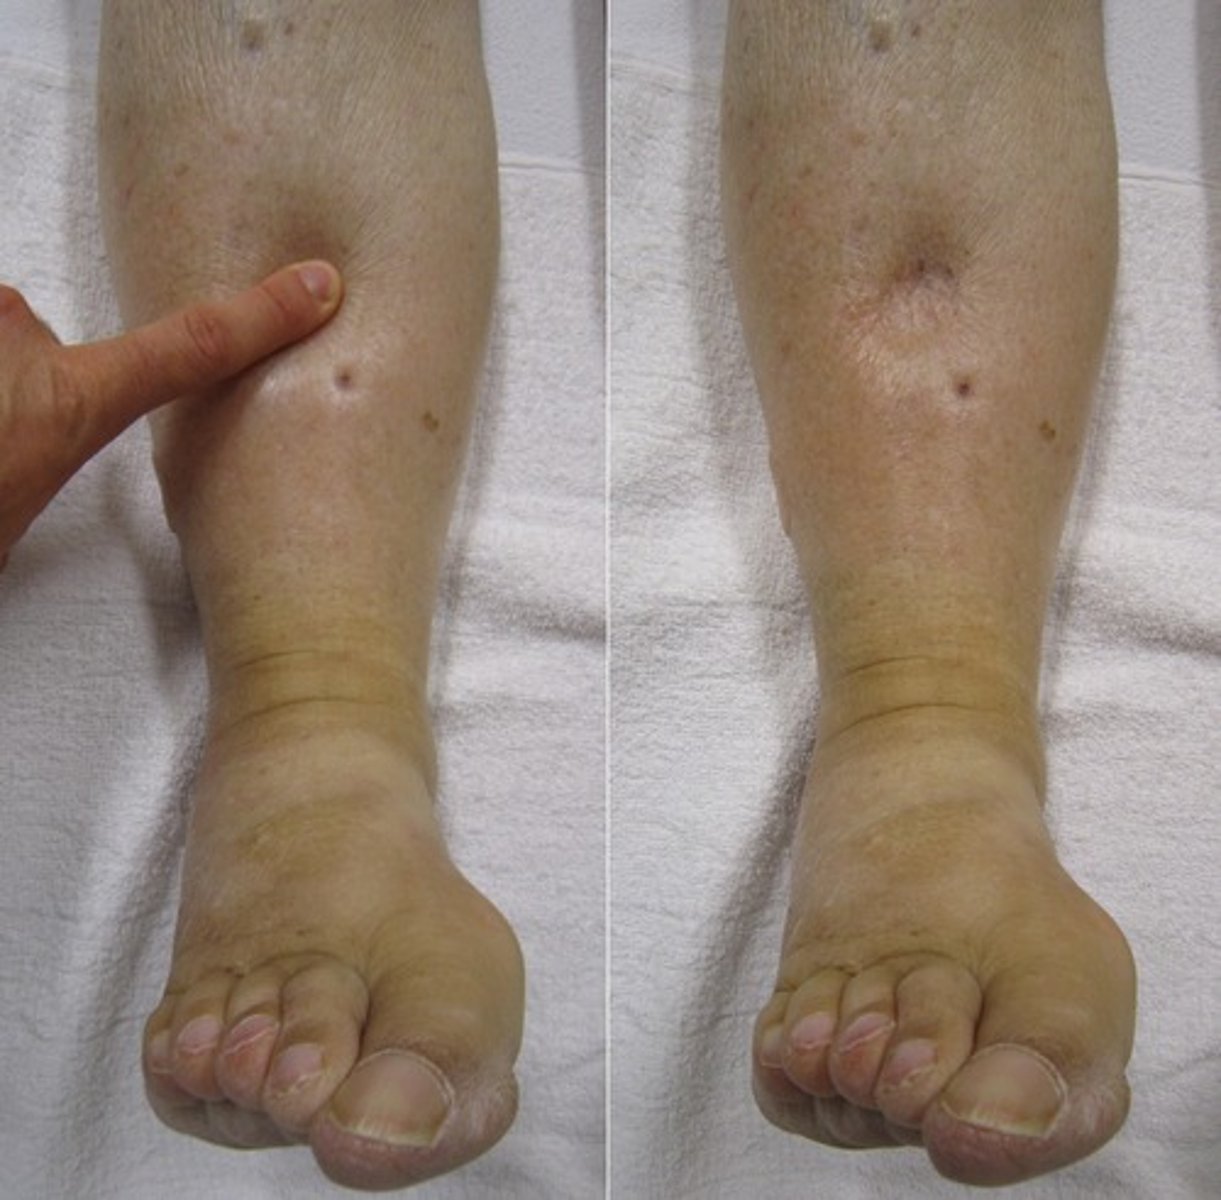
causes of abnormal findings while testing for pitting edema
-excess fluid in the interstitial space
-heart failure
-renal failure
-venous stasis/damaged veins cannot transport blood to the heart
instructions plus procedure for testing for gall bladder for pressure (Murphy's sign)
instructions:
Ask the patient to lay down in a supine position, with their head relaxed and arms to the side.
procedure:
With the main palpating hand, place your hand below the lower rib margin at the midclavicular line in the right upper quadrant. Ask the patient to exhale completely. As the patient exhales, slowly palpate deeply, and then ask the patient to inhale.
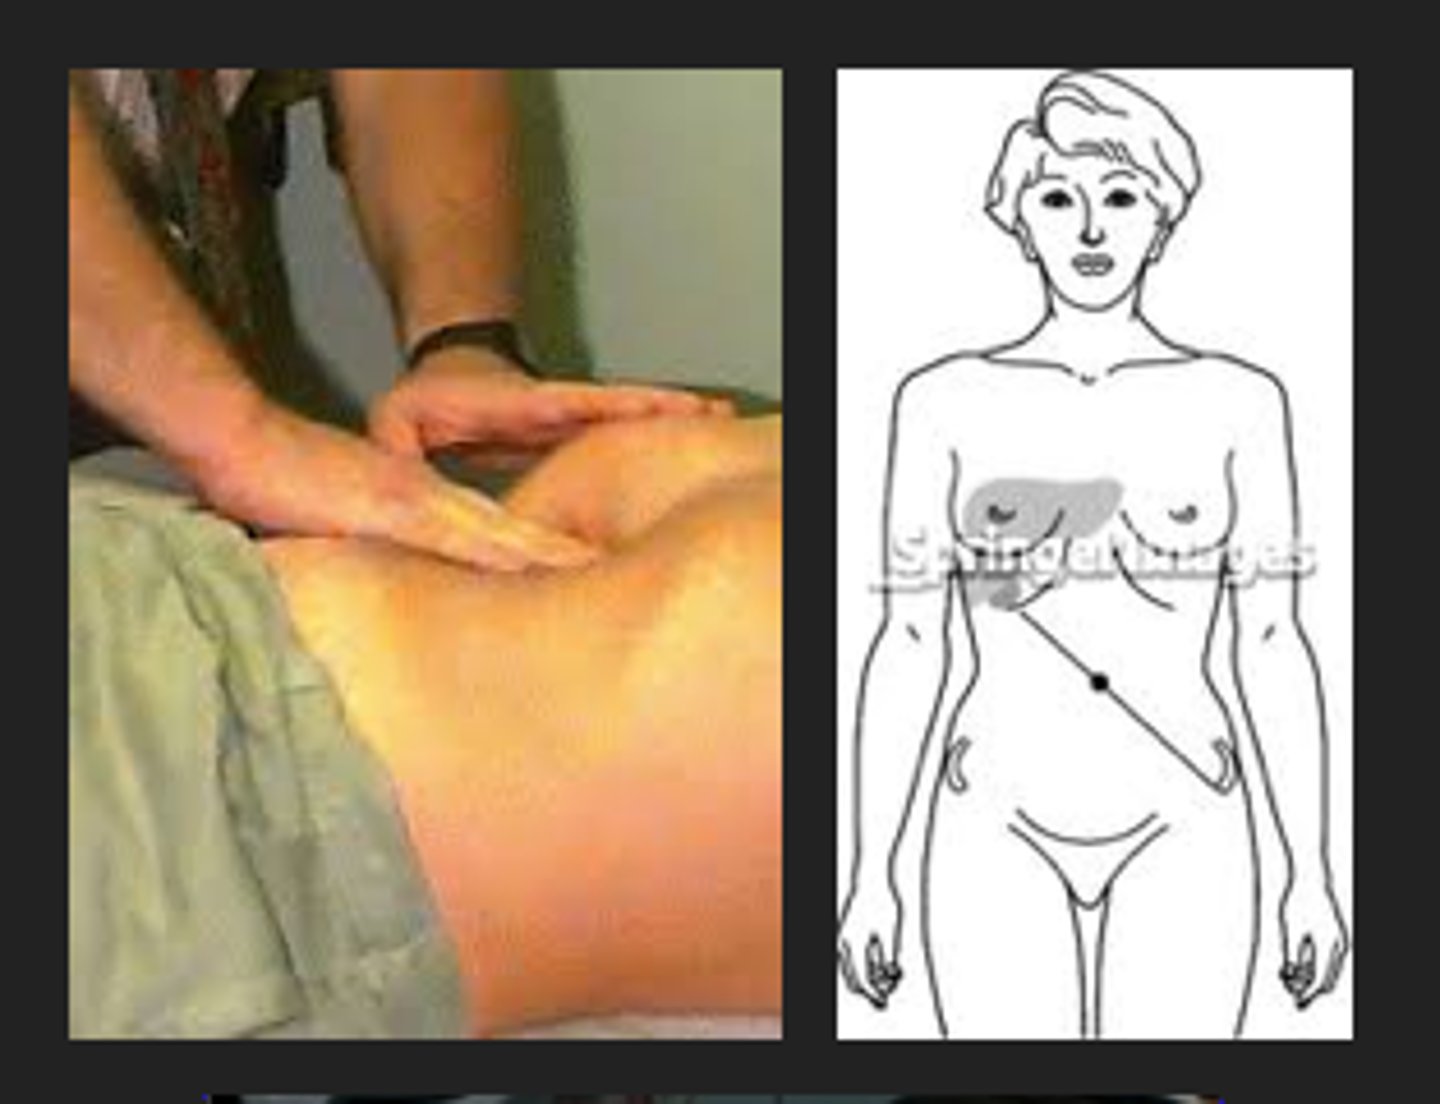
abnormal vs normal findings for Murphy's sign
abnormal:
The patient will abruptly stop inhaling due to the pain when deeply palpating.
normal:
The patient should not experience any pain during inhalation while palpating deeply
causes of abnormal findings in Murphy's sign
•The pain is caused by inflammation of the gallbladder, also known as acute cholecystitis.
-Acute cholecystitis is usually caused when a gallstone blocks the cystic duct, which is the main opening of the gallbladder
instructions for Allen's Test
instructions:
The Allen's test is used to assess collateral blood flow to the hands. This test will take a few minutes to do. First, I will ask you to flex your arm at the elbow, and open and close your hand several times as quickly as possible, and squeeze your hand tightly after. I will compress arteries on both sides of your hand, and will ask you to extend your elbow, and open the hand. We will repeat the same on the other hand.
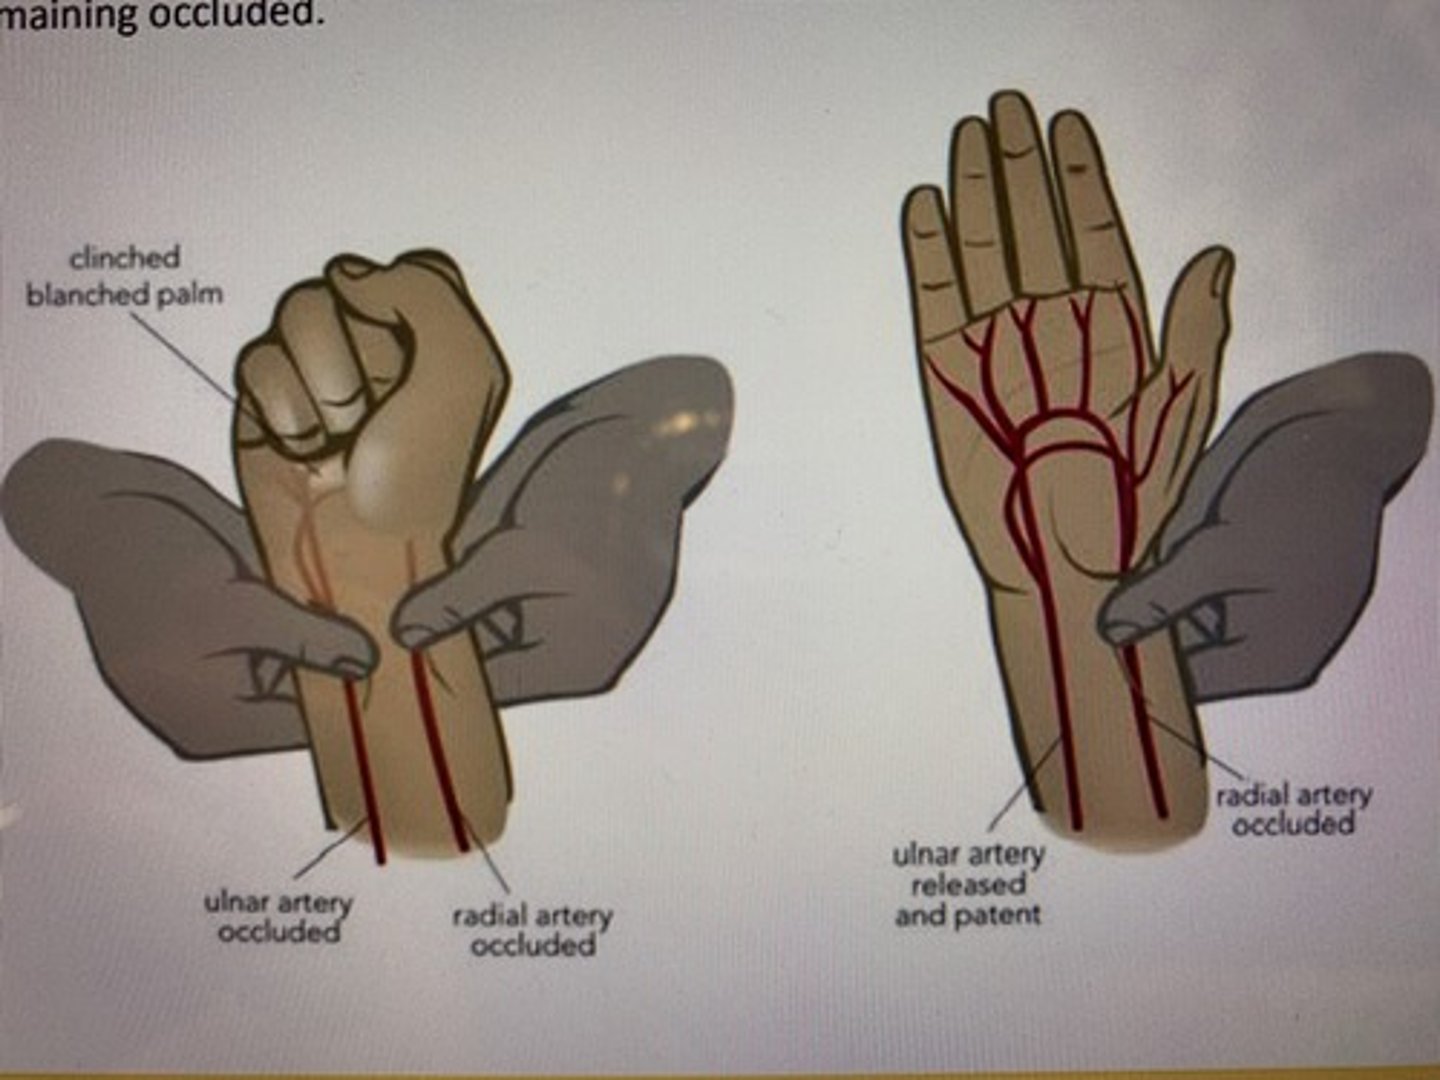
procedure for Allen's test
The modified Allen test differs mainly by examining both radial and ulnar arteries on the one hand and then repeated on the other side. Traditionally, it is performed by first having the patient's arm flexed at the elbow with the fist clenched tightly or by asking the patient first to open and close their fist to help increase the draining of blood from the hand. The ulnar and radial arteries are then compressed by the provider's thumbs simultaneously. The elbow is then extended to no more than 180 degrees, avoiding overextension as that could lead to a false-positive test. The fist is then unclenched, and the palm should appear white. The compression is then released from the ulnar artery while maintaining pressure over the radial artery (see image). Once the compression is released, the color should return to the palm, usually within 10 seconds. The test is repeated on the same hand while releasing the radial artery first and continuing to compress the ulnar artery.
abnormal vs normal findings in Allen's test
abnormal:
-If pallor persists within the palm after the patient unclenches his fist and one of the arteries is released, then the test is positive and indicative of an occlusion within the artery that is being released.
normal:
-In a patient with normal patent arteries, the color should return to the palms relatively quickly (within 10 seconds) after the release of either artery.
causes of abnormal findings in Allen's test
Persistent pallor in the palm indicating no collateral blood flow to the hand. If the radial artery needs to be cannulated or catheterized and there is a risk for thrombosis, then the Allen test can help confirm that the hand will maintain adequate blood flow through the ulnar artery and collaterals in the event it becomes occluded.
instructions plus procedure for assessing for appendicitis via McBurney's point
instructions:
Have the patient lay supine with hands at their sides. Inform the patient that you will be applying pressure and for them to express their level of pain when pressure is released.
procedure:
Locate and palpate McBurney's point, located halfway between the umbilicus and the right anterior iliac crest. Press firmly into the abdomen and release pressure quickly.
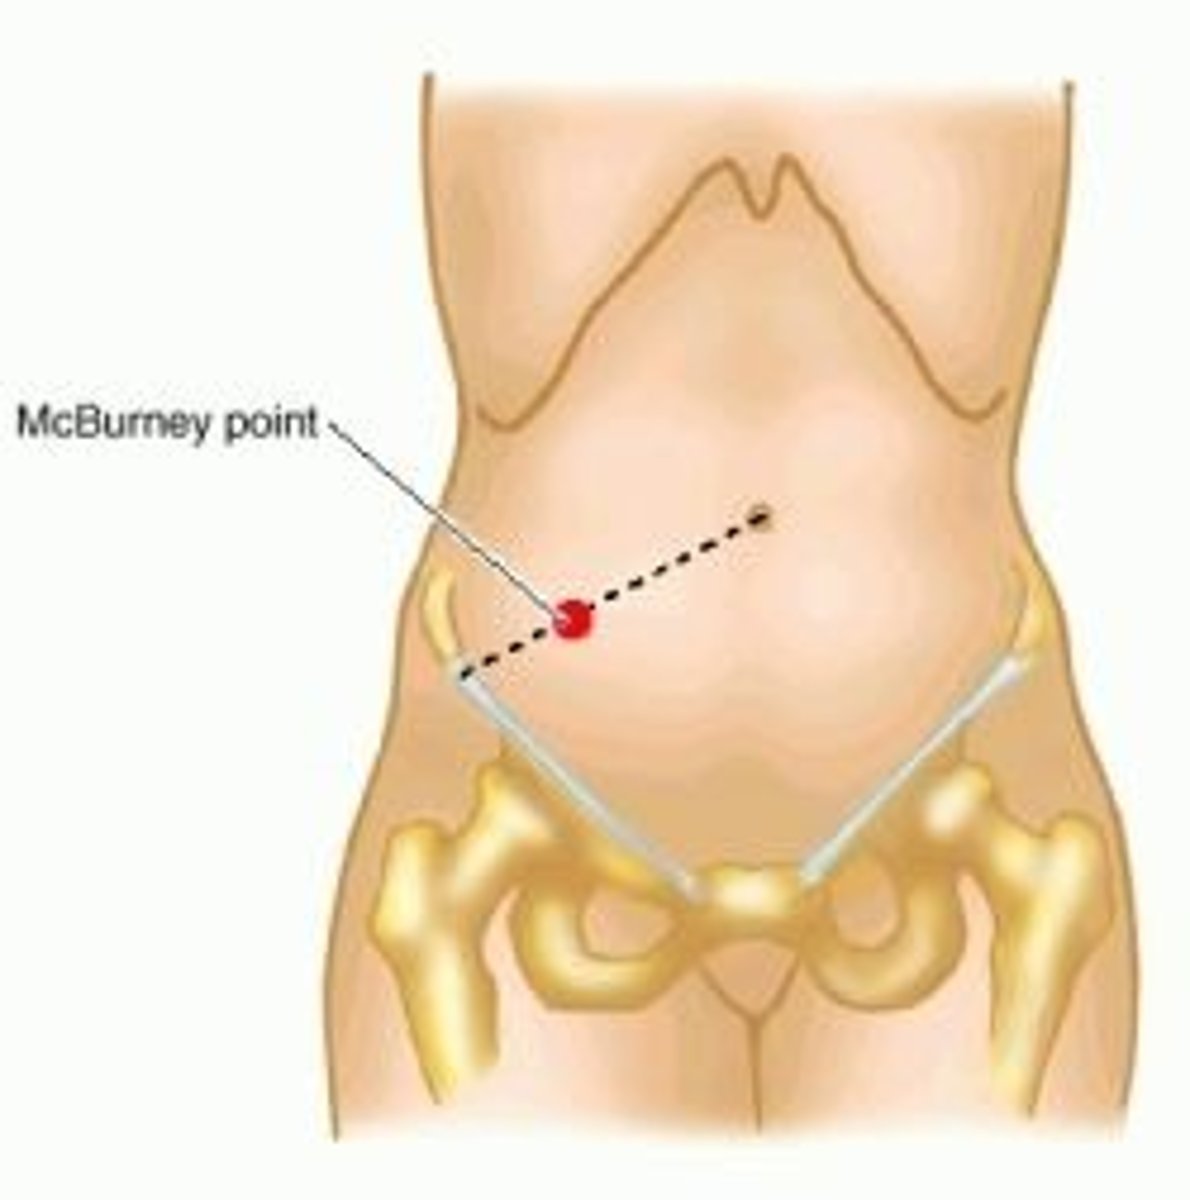
abnormal vs normal findings while assessing for appendicitis via McBurney's point
abnormal:
Rebound tenderness is present if the pain is more severe upon release than when exerted, indicating inflammation.
normal:
Absence of pain indicates no appendicitis.
causes of abnormal findings while assessing for appendicitis via McBurney's point
inflammation of the appendix

instructions plus procedure for palpating doralis pedal and posterior tibial
instructions:
This assessment is used to assess the pulse symmetry and amplitude of each leg vessel. This test will take a few minutes to do. At this time I would ask patient to remove their shoes and socks so I can inspect the lower extremities. Palpating the arteries of the foot while the patient may lay back comfortably.
procedure:
To find the posterior tibial pulse you may find the medial malleolus (ankle bone) and palpating posterior to this bone to find the pulse. Palpating the dorsalis pedis pulse we would place our fingers on the dorsum of the foot about midline up near the ankle.
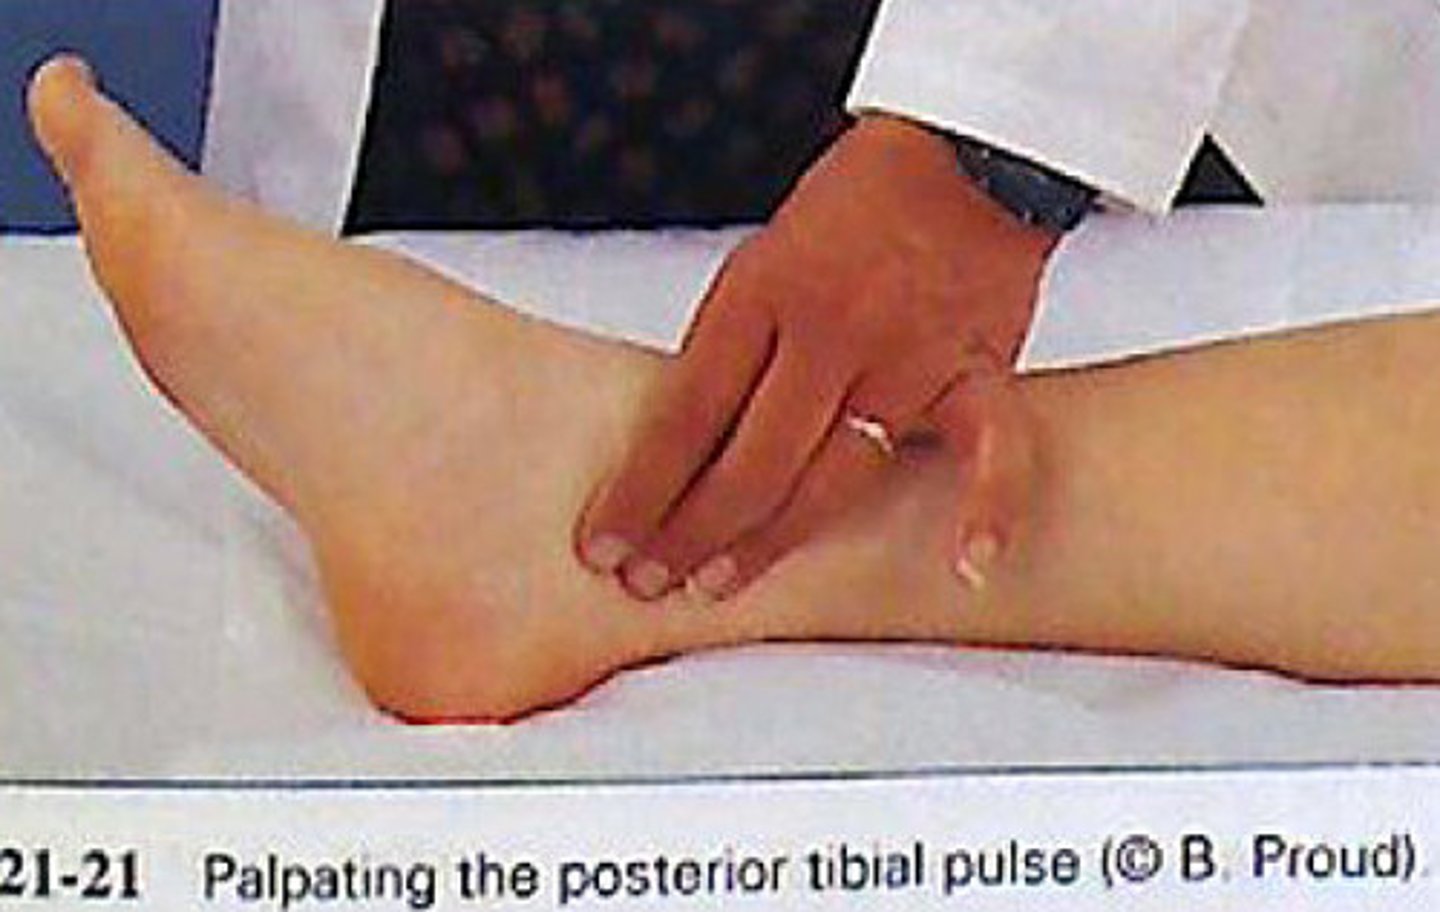
abnormal vs normal findings while palpating the dorsalis pedal and posterior tibial
abnormal:
•Abnormal HR (100bpm+ or 60 bpm-)
•Irregular rhythm should be noted, determining the difference in rate is also helpful.
•The amplitude of the pulse is either bounded or weak.
normal:
•Normal HR 60-100 bpm or lower for athletes)
•Regular rhythm, and smooth and rounded symmetrical pulse strokes.
•The pulse amplitude rate is comparing how easily the arteries were to palpate and the strength of the pulse. Check for bilateral symmetry
causes of abnormal findings while palpating the dorsalis pedal and posterior tibial
•Recently performing exercise, smoking, or having anxiety can raise the pulse
•Patients could have premature ventricular contractions or atrial fibrillation that may affect the rhythm of the pulse.
•Impaired peripheral pulses
•Peripheral vascular disease
•Recent vascular procedure were they had a heart catheter.
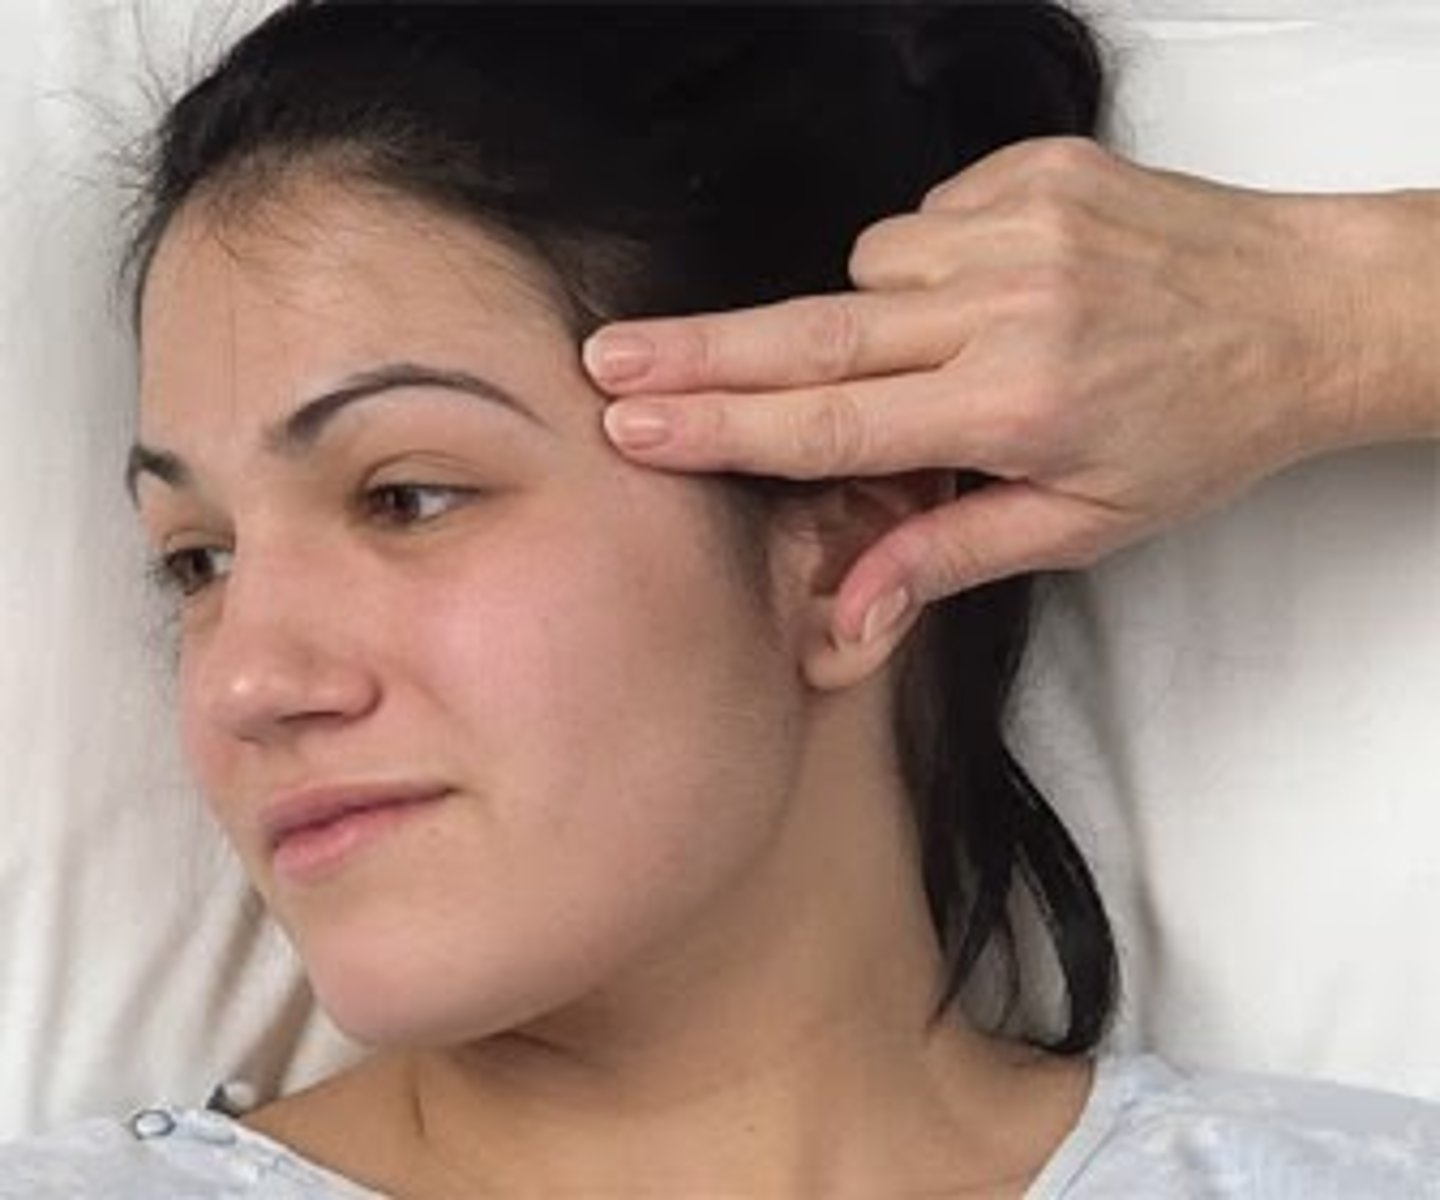
instructions plus procedure while palpating the temporal and carotid arteries
instructions:
The patient is usually in a supine position and the trunk of the patient's body is a little bit elevated. The patient's chin should be slightly elevated. The patient can also be sitting in an upright position with their arms at their sides. Either way, the patient should feel relaxed.
procedure:
•First, observe the patient for their general appearance, skin color, and breathing effort.
•Palpate over the temporal bone on each side of the head lateral to each eyebrow to assess amplitude and pain. Make sure to use the finger pads of the first two fingers and to apply light pressure. To check for any bruit, take your stethoscope and place it over the arteries to check for a swishing noise. For the carotid pulse, palpate along the medial edge of the sternocleidomastoid muscle in the lower third of the neck to assess amplitude. Make sure to palpate one carotid artery at a time to avoid reducing blood flow to the brain. Note the rate, rhythm, amplitude, and contour of each pulse.
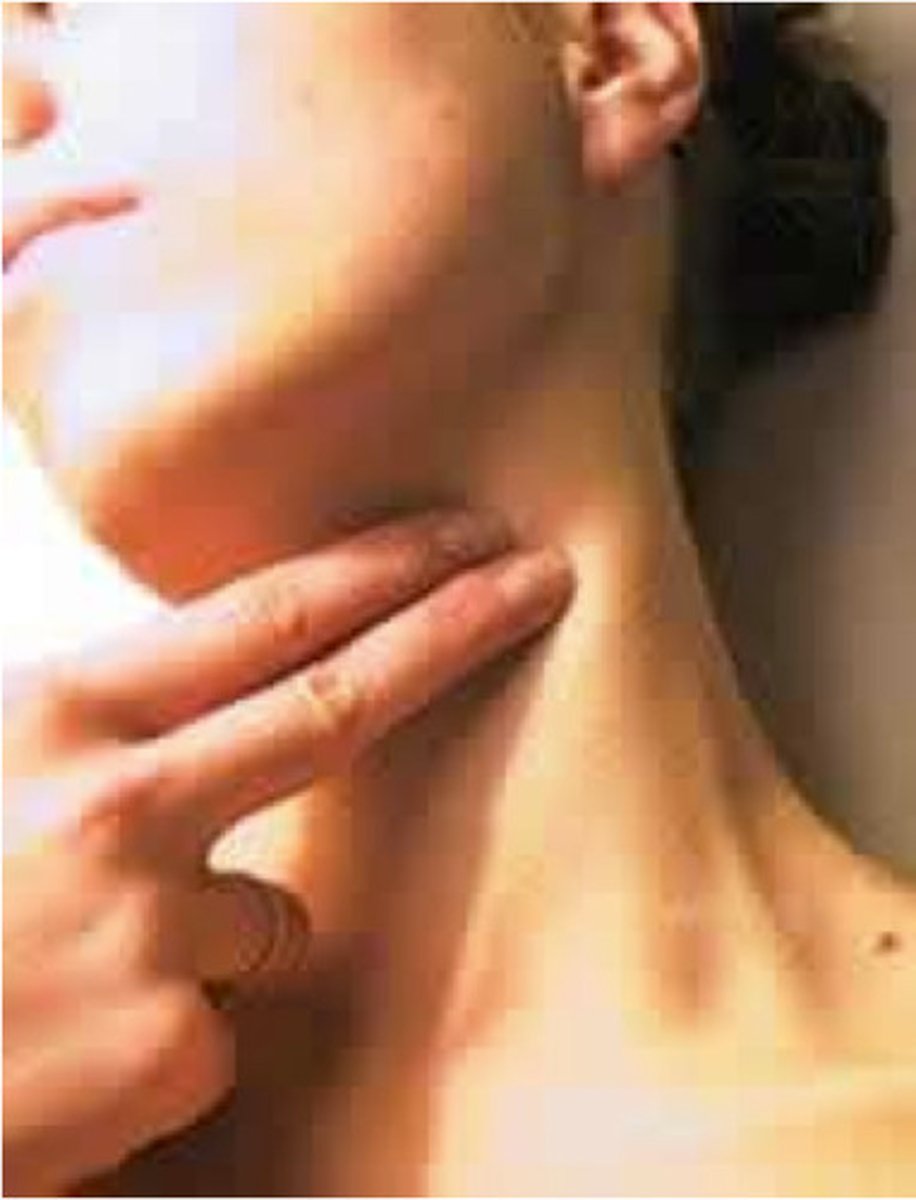
normal and abnormal findings while palpating the temporal and carotid arteries
abnormal:
•Dyspnea
•cyanosis or pallor
•Use of accessory muscles to breathe
•Tachycardia or bradycardia
•Irregular rhythms + coupled beats which are two beats that occur close together.
•weak, small, or thready amplitude
•Upstrokes should not vary, and the force of the beat should not be reduced during inspiration
normal:
•proper skin color for ethnicity
•Regular RR
•Normal HR
•The rhythm should be regular
•amplitude should be easily palpable and smooth.
•Lastly, the contour, the outline of the pulse that's felt, should be smooth and rounded
causes of abnormal findings while palpating the temporal and carotid arteries
•Raised RR — recent exercise, smoking, stress, and anxiety
•Temporal arteritis — pain and edema
•Atherosclerosis if there is an irregularity between the pulse amplitude in the two carotid arteries
•Peripheral vascular disease.
•Thyrotoxicosis, hypertension, aortic regurgitation, arterio-venous fistula, or patent ductus arteriosus — A hyperkinetic pulse
•Arrhythmia
instructions plus procedure while percussing the costovertebral angle
instructions:
I am going to be gently tapping on your back. Please tell if you any discomfort
procedure:
Find the costovertebral angle by feeling down the patient's back to the last rib.
After finding the CVA place a hand flat on the patient's back just under their last rib. Make a fist with your other hand and gently tap on your flat hand.
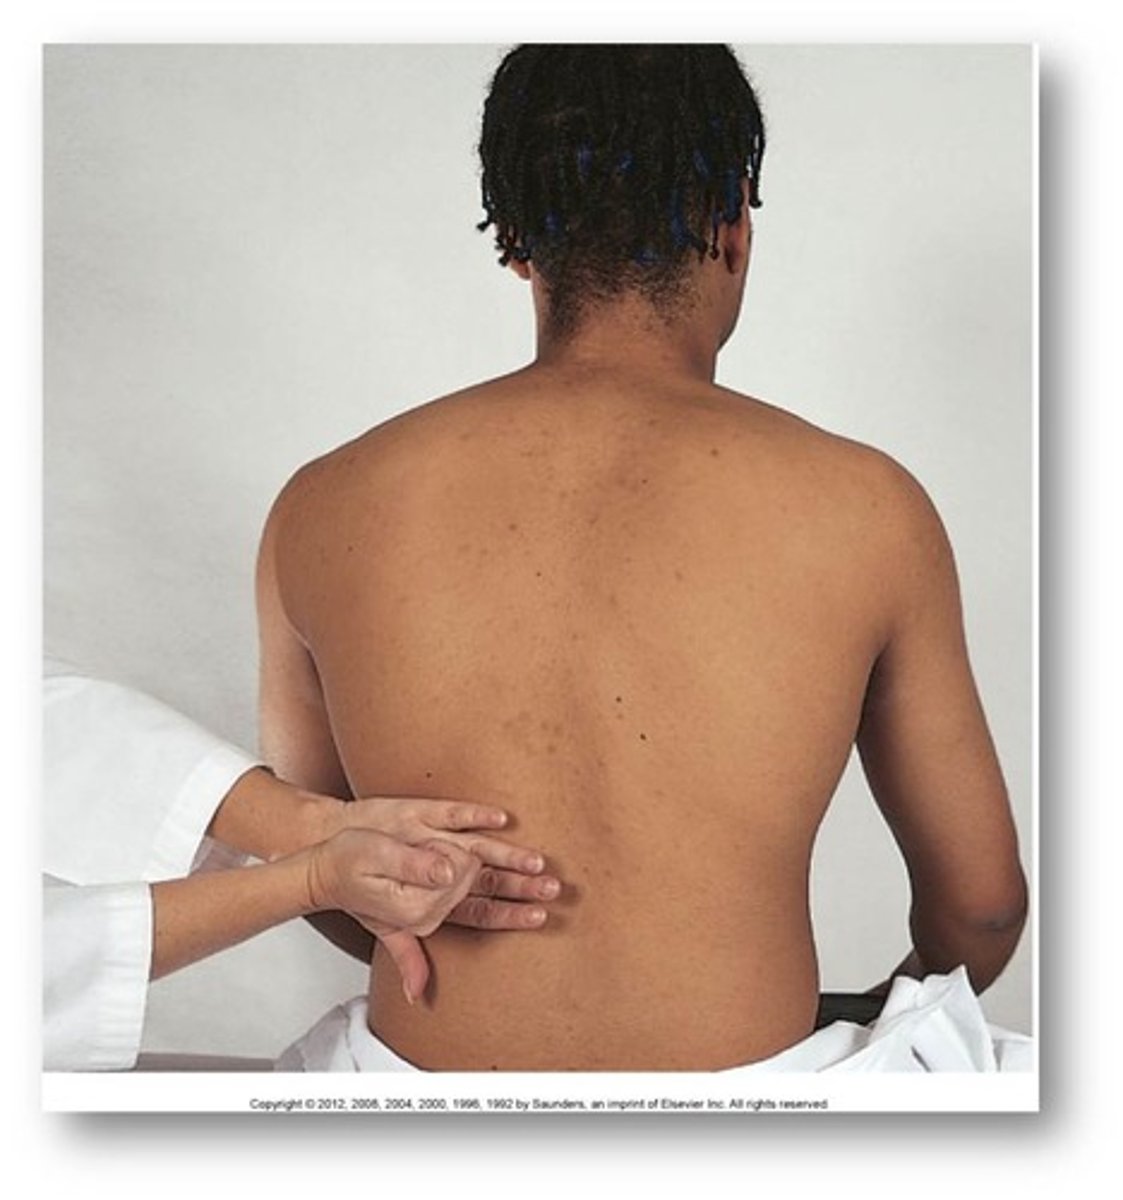
abnormal vs normal findings while percussing the costovertebral angle
abnormal:
Any pain felt in that area upon percussion of the CVA would be an abnormal finding
normal:
No pain or discomfort should be felt by the patient when performing this procedure.
causes of abnormal findings in percussing the CVA
Pyelonephritis (kidney infection)
Glomerulonephritis (damaged glomeri)
nephrolithiasis (kidney stones)
instructions plus procedure while assessing for capillary refill
instructions:
-Make sure all rings and nail polish are off the finger you are using
-Position the patient's hand at the same level as their heart or above their heart, this can also be done on feet
-Make sure the patient is either laying down or sitting comfortably so they can elevate their extremities above their heart
procedure:
-Compress the nail bed, or toenail bed until the color of the bed turns white
-Record the time it takes for the capillaries to fill with blood, this happens when the nail turns a red color
abnormal vs normal findings while assessing for capillary refill plus cause
abnormal:
-If the nail bed takes longer than three seconds, you do not have good blood flow
Causes of Abnormal findings
-Hypothermia
-Old age
normal:
-It should take no more than three seconds for the capillaries to fill back with blood many people recommend 2
-If the nail turns red in 3 seconds or less you have good blood flow