principles of exodontia 1
 Call Kai
 Learn
Learn Practice Test
 Spaced Repetition
 Match
Match Flashcards
 Knowt Play
1/68

There's no tags or description
Looks like no tags are added yet.
Name | Mastery | Learn | Test | Matching | Spaced | Call with Kai | Chat |
|---|
No analytics yet
Send a link to your students to track their progress
69 Terms
Indications for extraction
Unrestorable - ie gross caries
Periodontal disease - grade 3 mobility
Pericoronitis - affects partially erupted teeth usually 8s lower - food gets caught under the gum - inflammation
Associated pathology (e.g. cysts, tumour)
Orthodontics - usually premolars
Trauma - Enamel dentine fracture involving the whole tooth
Interfere with construction of a prosthesis
Tooth within fracture line - ie if you have a fracture of the mandible - and the tooth was in that line - you may decide to remove it
Teeth in a fracture line
Abnormal/ supplemental teeth - odontomes
Impeding eruption of other tooth - deciduous teeth
Financial / phobia - pt decides
Do no harm!
what is the best treatment option for this patient ? must explore all options that are available to the pt - even if you don’t specialise it - inform the pros and cons - informed consent
Informed consent
Discuss alternative options
Restore to function - ie fillings, crowns, RCT, apical microsurgery
Restore but not functional - doning off retained route
Prognosis - how successful is the treatment? Give them a timeline - restorations usually last approx 10 years
Safe to perform extraction?
Aware of medical history?
Contra-indications?
Know limitations (surgeons capabilities) - when to refer
cross infection protocol
Protect your patients
Protect yourselves
Factors affecting difficulty of extraction 4
Tooth - crown and roots
Supporting structures - pdl and bone
Proximity to adjacent structures - nerves and other teeth - maxillary antrum
Access - how easy is the access to the surgical site?
tooth factors - crown morphology
Grossly carious?
Restorations?
Large/ subgingival
Crowns/ post & cores
Endodontic treated - necrotic teeth are weaker - more likely to fracture during extraction
Bulbous crown - difficult to apply forceps
tooth factors - root morphology
Single vs multiple - single is easier to remove
Long/short, wide/thin/ bulbous - thin more likely to fracture, bulbous - more difficult to remove
Curved/ conical/ divergent/ convergent
Supporting structures - gingival soft tissues
– Gingival overgrowth
Medication
Chronic inflammation
Subgingival carious cavity
supporting structures - pdl
Periodontal ligament
supporting structures - bone
periodntal disease
density -age/gender/ethnicity
Assessment
Medical history assessment
Under care of medical/surgical specialist
Regular medication
Previous operations
do a systems review
Clinical examination - extra orally, intra-orally
Radiographic assessment – Asses surgical difficulty – tooth, root, adjacent structures
blood tests, sensibility tests may be needed
Working diagnosis - explore treatment options - though that you will understand if oral surgery is required - have an idea of surgical complexity - is this in your remit
Planning
Essential planning prior to commencement of procedure
will have a standard surgical equipment tray

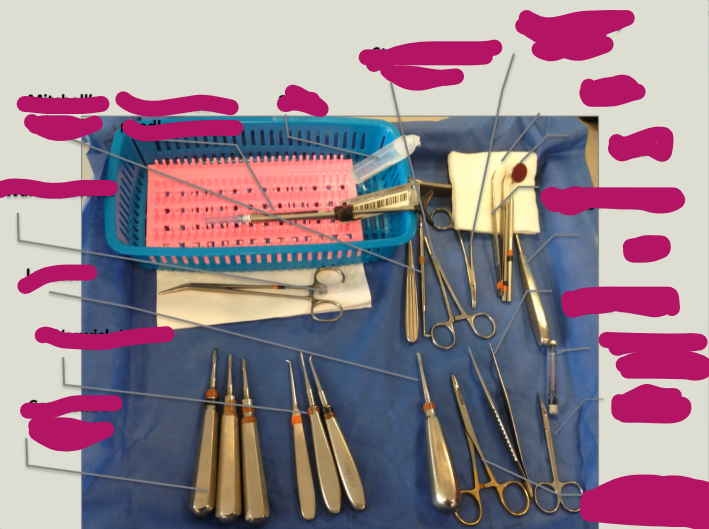

Proximity to adjacent structures - teeth
Impacted
Restorations of adjacent teeth (crowns/ amalgams) - particularly if they have overhangs
Mobile adjacent teeth
Distal teeth
Proximity to adjacent structures - vital structures
Inferior alveolar nerve
mental nerve
Infra-orbital nerve
Maxillary antrum - where apices of teeth may be situated
access - Limited mouth opening
anterior teeth have relatively easy access - but the difficulty comes when the patient has limited mouth opening
limited mouth opening may be due to:
Spread of infection - pus or cellulitis or very guarded due to pain
Disk displacement TMJ
Small mouth
Rare conditions (oral submucous fibrosis)
access - position of the teeth
Impacted / unerupted - more difficult access as they are coverd with bone and mucosa
Crowding - will have a lot of teeth buccal and lingual to the tooth in question
methods of tooth extraction 2
routine tooth extraction
surgical tooth extraction
routine tooth extraction
Forcep extraction
Elevation extraction
Surgical tooth extraction
Sectioning of tooth +/-
Raising a mucoperiosteal flap

Overview mechanisms of extraction
1. Sever periodontal ligament & dilate socket
Elevators, luxators and/or forceps
Force along long-axis of tooth (apical pressure)
Position beaks apically along roots
2. Complete dilation of socket and withdraw tooth
Lateral movement of tooth
Buccal and palatal directions
Figure of eight / circle movement
Rotational movement for round, single rooted teeth
Applied force should be controlled and slow to avoid injury
Support of jaw/ alveolar bone with other hand
direction/path of tooth removal is determined by the
Morphology of root (curvature, shape, how many roots there are)
Impaction (level and position of bone, adjacent tooth)
Routine, non-surgical extraction path
Routine, non-surgical extraction removes tooth by path of removal determined by the natural root morphology and bone
Surgical extractions path
Surgical extractions remove bone and section teeth in order to alter the tooth determined path of removal. However, this natural path of removal is not removed altogether - natural root morphology will have an impact.

Forceps
Blades in long axis of handle (upper teeth)
Right angles to handle (lower teeth)
Wedged shaped blades – dilate socket break PDL
“Beak to cheek” – upper molar forceps
lever principle - long handle attached to the blade - blades hold onto the tooth during removal

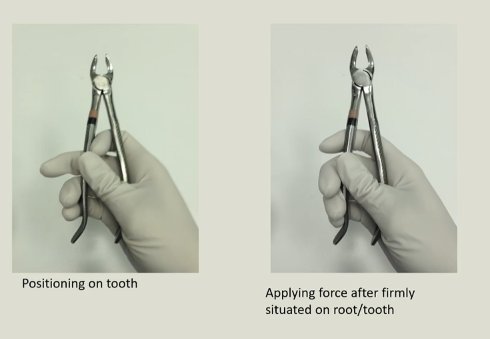
holding forceps
when positioning - put your fingers between the handles - so the surgeon can open the forceps so the blades are open
forceps engage the tooth at the CEJ - ie the coronal portion of the root
once the tooth is engaged, the surgeon will remove their forefingers from between the handles in order to apply apical pressure in order to remove the tooth

curvature and blades
Blades need to fit tooth curvature for effective extraction
blades of the forceps will be in contact with the coronal portion of the root - the rest will be encased in bone
Hollow inner surface to fit roots for maximum contact
If forceps appear not to have sufficient tooth contact/‘grip’ tooth well- try another pair of forceps with different sized blades or curve of blades

there are 3 main methods of routine forcep extraction:
elevation, luxation and forcep extraction
we can remove teeth just with forcep extracation but that is slightly more difficult
Forceps
Elevation ➔ Forceps
Elevation ➔ Luxation ➔ Forceps - most common Elevation and luxation helps severe the pdl and dilate the tooth socket
Luxation ➔Forceps
the foreceps help to severe the pdl and dilate the tooth socket - theyre sat on the CEJ - the blade will sit into that and damage the pdl cornally - severing it - wedge effect - will dilate the pdl space socket most coronally. In summary - the forceps will severe and dilate the socket coronally
Disrupt PDL & dilation of bony socket – Forcep blades wedge in PDL space
Blade tips engage root of tooth (not crown)
because they engage the tooth properly, they can move the tooth laterally in order to dilate the socket as well
teeth are delivered both in the maxilla and mandible buccally - why?
buccal bone is Thinner compared to hard palate/ lingual bone
Thinner compared to lingual bone (except lower 8s)
you will be moving the tooth much more buccally - then withdrawing the tooth buccally for removal
forcep extraction - order
application
apical force
lateral movement
rotational movement
delivery
forcep extraction - application
Separate coronal PDL from tooth:
Probe around the gingival margin of tooth (also tests anaesthesia)
Place blades under gingivae with minimal soft tissue damage at CEJ
Align forcep beaks along long axis of tooth
Push very hard forceps apically along root surface (cowhorns to engage furcation)
Engage root surface (grip root) with beaks by closing forceps
apical pressure
throughout the whole extraction it is very important to maintain apical pressure throughout

upper premolar
upper premolar being help with premolar forceps on the left
hold in alignment with the long axis of the tooth - correct = left
holding a lower molar with forceps
both correct images
lower cowhorn forceps
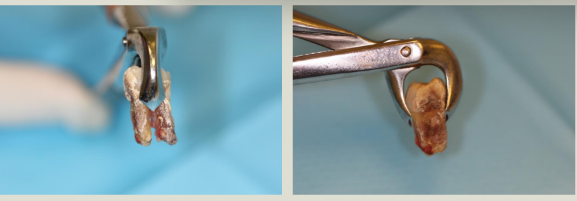
what is special about these forceps?
lower cowhorn forceps - engaging the furcation of the molar
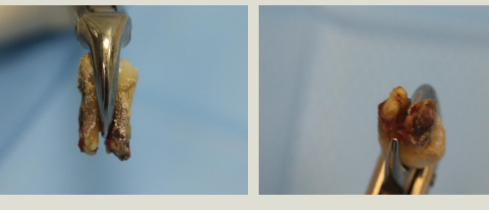
upper left molar forceps
notice how the tips of the blade go underneath the gingival cuff

lateral movement
Expansion of socket
buccal & palatal/lingual movement
Figure of ‘8’/ circular movement
Maintaining apical pressure throughout
ensures the tooth socket has expanded in a bucco-lingual direction - but then try to expand in all directions ie circular/figure of 8 movements
rotational movement
Tear soft tissue attachment (apical granuloma/ gingival mucosa)
Removal of circular, single rooted teeth (upper incisors, lower premolars)
delivery
after tooth is mobilised traction forces remove the tooth from socket
why do we apply apical pressure?
Prevents beaks sliding off root
Expands socket by positioning coronal, wider root apically
Centre of rotation of tooth displaced apically
Alters angle of force on roots
Centre of rotation of tooth displaced apically - wat dat mean?
this also helps to prevent tooth fracture

centre of rotation - with respect to apical pressure
when you also apply lateral pressure, eg moving the tooth buccal - the apical portion will move the other way - eg palatally - with the centre of rotation halfway up the rooth surface
if teh forceps are placed on the crown and there is limited apical pressure on the tooth - then your centre of rotation would also move coronally - a larger proportion of the rooth will move palatally - causing a root fracture

buccal pressure alone
Buccal force alone- rotation of tooth – root fracture - you also need to dilate the socket
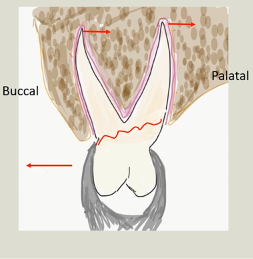
Apical & lateral pressure
Simultaneous apical force + buccal movement rotation
Centre rotation closer to buccal root apices
Expansion of buccal root socket
Palatal root delivered along curvature of root

Bone expansion through lateral movement

Pressure
Develop ‘feeling’ through the forceps (biofeedback)
Excessive force
Tooth/ jaw fracture
Discomfort for patient (TMJ pain)
Increased patient overall discomfort & anxiety
Limited force
Extended extraction time
Inability to extract tooth
Steady movements (not short, jerky)
Lateral excursions
Lateral excursions
hold pressure buccally to allow time for bone to expand
Recognise resistance to movement by feel
Tooth will move in line of least resistance pre-determined by root morphology – not always buccal! if roots want to be removed lingually - remove crwon and allow that to happen
Lower cowhorns
Pointy blades
Engage furcation
Position on root surface & close forceps firm until blades engage birfurcation
Handles will close when bifircation is completely engaged
Apical & bucco-lingual movement
Tooth is ‘lifted out’ of socket as handles close & tooth is delivered finally with traction.
these engage the bucco-lingual furcation

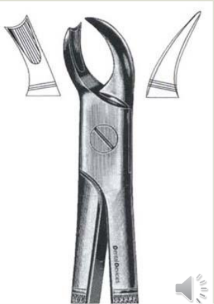
Upper cowhorns
Grip around palatal root and engage buccal furcation - horn
Useful for heavily broken down/ fractured upper molars.
Used in similar manner to upper molar forceps
Positioning
Optimal access & applied force
Access to occlusal planes: good visualisation whilst maintaining good posture
Chair position - inclination and height
Inclination (maxillary extraction chair is more reclined than mandibular extraction)
Height (maxillary extraction-chair higher than mandibular extraction)
Head position
Mandibular extraction-chin down
Maxillary extraction – chin up
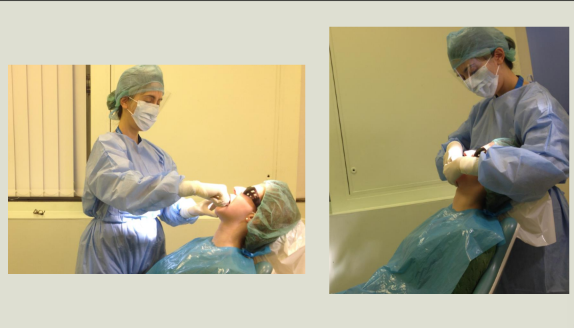
Mandibular extractions
guide - you want to see the occlusal surfaces of the teeth
image one - lower left quadrant - infront
lower right - standing behind the patient
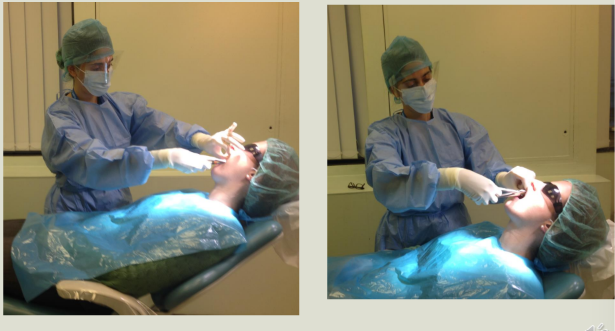
Maxillary extractions
lhs - removing upper left tooth
rhs -
The other hand
Supporting hand
Support the jaw - counteract force from forceps/ elevators to stabilize jaw.
Finger rest
Retraction of soft tissue
Thumb and forefinger either side of arch adjacent to tooth
Holds retractor
Feel adjacent tooth
Check adjacent tooth not mobilising during extraction/ elevation
she is using her forefinger and middle finger on either side of the alveolus and thumb underneath the mandible
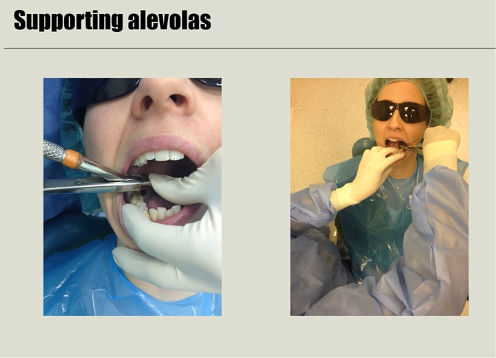
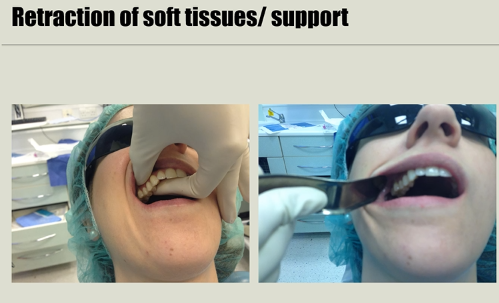
notice thumb and forefinger on either side of the alveolar when removing the upper right second premolar
on the rhs - the minnasota retractor is retracting the right cheek for good visualisation
elevators
elevators can severe the pdl and can dilate the socket
Positioned horizontally (90° to long axis tooth) - contrary to luxators
Applied to root surface (mesial, buccal or distal) - basically on pdl space
Applied between root surface and alveolar crest (i.e. in PDL space).
Alveolar crest (not adjacent tooth) provides fulcrum
Accidental elevation against adjacent tooth can mobilise adjacent tooth and even extract it (especially if adjacent tooth is last standing)
Rotation movement
Elevate buccally not lingually due to access
what are the types of elevator?
Couplands 1, 2 & 3
Warwick James’ right, left and Straight
Cryers right and left
handle, shaft, working tip/blade - which engages the tooth

holding elevators
Firm grasp of elevator, forefinger up shaft to prevent slipping.


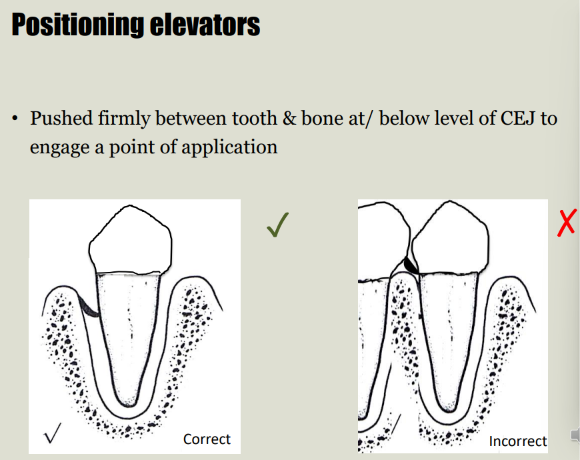
Positioning elevators
Pushed firmly between tooth & bone at/ below level of CEJ to engage a point of application
see cross section of the couplands
rotating of the instrument - lateral movement of the tooth and widening of the socket
rhs - bad as it move the adjaent tooth in opposite direction
reember, its used 90 degrees to long axis of the tooth - used mesial to LR6 to move it distally - widens the mesial socket but also distal as the tooth is moving that way, and severs the pdl
Couplands
3 sizes (start with couplands I then move to 2 then 3) - with I having the smallest cross section of the blade
Larger handle than blade gives lever advantage
Inserted horizontally (90 degrees to tooth long axis) between tooth & bone
best to use mesial to the tooth you want to remove
Sharp blade engages point of application on root, with alveolar bone as fulcrum.
Rotation of instrument lifts tooth out of socket along its line of withdrawl (path of removal)
Diagram representing correct elevation technique for extraction of retained roots
need correct cross section size

Warwick James & Cryers
90 degree blade to shank/handle
Positioned between root and bone
good for removing retained roots and interfurcal bone
Right angled blade allows root to be levered out


Warwick James & Cryers
Particularly useful for retained roots;
elevator inserted in adjacent empty socket
blade tip engages inter-radicular bone & removes it until access to root
blade then engages root to lift it out of socket with a rotation
sometimes the inter furcal bone must be nibbled away using creyers / WJ
Also useful for elevation upper 8s
Contra-angled tip can engage mesial upper 8
good for removing conical rooted upper third molars - but shouln’t be removed entirely as there is an aero risk to patients


Luxators
Blade flatter and sharper
Inserted in PDL space by application between root and bone
Applied vertically, along the long-axis of tooth (not horizontally like couplands)
functions as a sharp wedge
worked from mesiobuccal to distobuccal - widening the socket so it can be deliverde with forceps
Sharp blade disrupts PDL
Gentle rotating of handle and advancement of blade towards apex of the root to mobilise tooth

tooth out - what now?
Check apices intact
Smooth, round
No sharp edges
may have sharp silver points
Check socket (flush with saline)
Retained roots
Soft tissue
Fragments of tooth/debris
Hole in antrum (oral antral communication) for maxillary teeth - dark hole
use high volume suction
‘curatage’
Tips
Comfortable patient positioning
Mouth-prop- may reduce myalgia post op
Effective anaesthetic
Continually checking-in with patient