FM lab exam 1
 Call Kai
 Learn
Learn Practice Test
 Spaced Repetition
 Match
Match Flashcards
 Knowt Play
1/17

There's no tags or description
Looks like no tags are added yet.
Name | Mastery | Learn | Test | Matching | Spaced | Call with Kai | Chat |
|---|
No analytics yet
Send a link to your students to track their progress
18 Terms
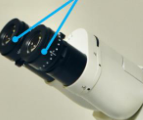
What are these called?
eyepieces (ocular lenses)

what is this?
viewing body
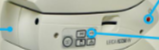
what are these?
the camera module, power button and camera connection

what are these?
the analyzer module with the bertrand lens control and the analyzer control

what are these?
the revolving nosepiece, the objective lenses and the stage
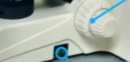
what are these?
Stage height controls and the lamp power switch

what are these?
abbe condenser, condenser height control, condenser aperture diaphragm control, condenser centering screws, polarizer
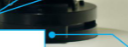
what is this?
field diaphragm control

what are these?
fine stage height control, coarse satge height control, brightness control, the light source is inside the body
Steps to dismantaling microscope
remove two srews and disk in back
remove right eyepeice
slightly unscrew the screw loacted between the viewing body and the camera module, when lose gently slide out the viewing body
do the same to the screw between the camera module and the analyzer module, and slide out camera module
repeat with the screw located between the analyzer module and the arm, slide out analyzer module
while holding the revolving nosepiece unscrew ecah objective
use the coarse stage height control to raise it all the way up. push the polarizer to the left out of the path of light
use the condeser height control to lower the abbe condenser to the lowest position. loosen the condenser centering screws, when loose pull the condenser towards you.
steps to installing microscope
make sure the stage is at the highest position with the coarse knob and the condenser mount is at the lowest position with the condenser control knob. with the screws loosens slide the abbe condenser into the fork mount aligning the positioning pin into the slot of the back.
raise the condenser to the highest position, use the screws to center the condenser
screw the objectives back into the rotating nosepiece starting from the lowest to the highest magnification
slide the analyzer into positin and use the allen key to screw it back in, repeat with the camera module and the viewing body
insert the right eyepiece into the tubes and place the eyegaurds
put two screws and disk back in
cleaning the microscope
locate dirt
inspect dirt
remove
if possible, blow air to remove dust, if still there wet a cotton stick with DI and clean from the center to the edge in a circular motion
if still there, use 70% ethanol and repeat
dry mounting
the easiest
place the sample on teh slide, cover with coverslip (will have to cut to 1/8ths)
wet mounting
a specififc type, the mounting medium is a liquid that could either be water of refractive index oils
place coverslip, using paperclip apply 2-3 drops of oil on the corners of the cover slip, remove excess if needed with cotton tip
Koehler illumination
. Open fully the condenser and field diaphragms
2. Obtain an in-focus image of a sample (e.g. your calibration slide)
3. Close the field diaphragm and make sure this is focused by using the
knob of the condenser
4. Make sure this is centered by using the x-y adjusting screws of the
condenser
5. Open the field diaphragm so that its diameter matches the field of view
6. Insert the Bertrand Lens (BL) in the optical path
7. Adjust the condenser diaphragm so that its diameter matches the field
of view of the objective back focal plane
8. Remove the Bertrand Lens from the optical path
Centering of objective
use a slide where you can find a punctual detail and position at the intersection of the crosshairs
obtain an in-focus image
rotate the stage and check that the detail doesn’t move
if it does, characterize the circle it makes, its diameter and its center
with the centering screws, position the center of that circle with the intersection of the crosshairs
repeat steps 3-5 until the punctual detail, if in the center of FOV, does not move
callibrating software
Place the calibration slide, with proper illumination and at focus
Open the software and make sure the image is sharp and clear, keep live
Open Options, then Preferences
select the magnification tab
each row represents an objective, double click in the length column to display a scale bar on the live image
move the ends to fit the whole length
enter a length if its the full length its 1000, if you need to count its that number x 10
press ok to save and repeat for other objectives
aquiring a calibrated image
obtain a good image in the aquire tab, make sure the calibrate button is checked
select the proper magnifictaion when it pops up
click aquire, and have the image in the process tab
use the menu on the left, go to line, click show and change to distance line
left-click and drag the mouse on the image to draw a line b/w two points of interest
if you wanna move the box, use edit in the drop down in line
go to scale bar box, and click show
lastly click merge at the bottom left