Required Practical 1 - Microscopy
1/59
Earn XP
Description and Tags
Name | Mastery | Learn | Test | Matching | Spaced |
|---|
No study sessions yet.
60 Terms
Preparing a microscope slide using onion tissue: Step 1
Peel off epidermal layer using forceps
Preparing a microscope slide using onion tissue: Step 2
Place the sample on drop of water on microscope slide
Preparing a microscope slide using onion tissue: Step 3
Add drops of iodine solution to sample
Preparing a microscope slide using onion tissue: Step 4
Lower cover slip onto sample using mounting needle
Why is a thin sample of tissue required?
Allows light to pass through so internal structures can be observed
Why is water added to the slide before the sample is mounted?
Allows the sample to be suspended between the slide and the cover slip, and ensures the cover slip stays in place.
Why is iodine solution added to stain the cells?
Iodine solution adds contrast - reacts with starch in plant cells and turns blue-black; allows internal structures (e.g. nucleus) to become more visible
Why is the cover slip lowered using a mounting needle?
Ensures that no air bubbles are trapped
How would you measure the length of a cell viewed under the microscope?
Measure using eyepiece graticule and calibrate with stage micrometer.
What safety precautions should be taken during this experiment?
Wear safety goggles when handling iodine solution
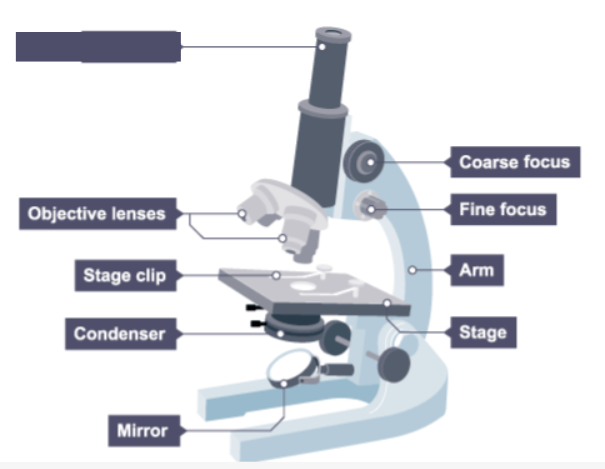
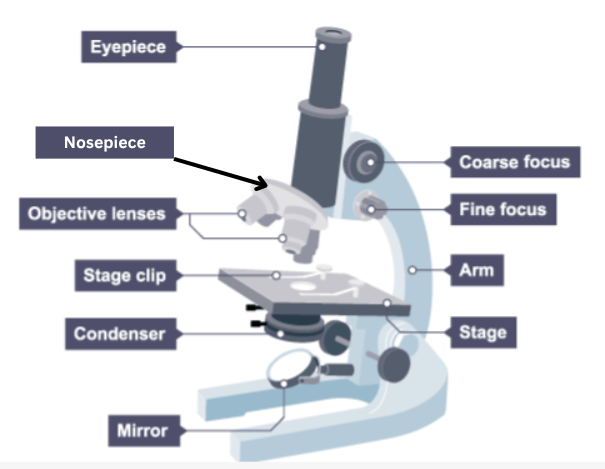
Name the missing label on the microscope.
Eyepiece
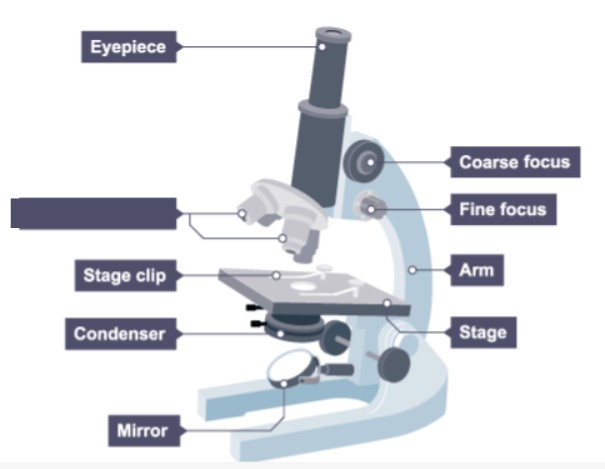
Name the missing label on the microscope.
Objective lenses
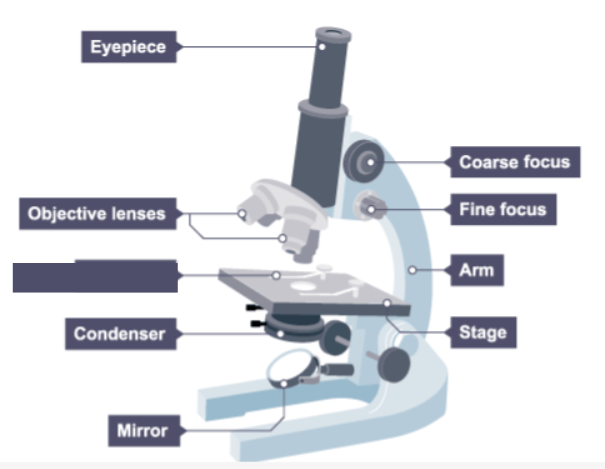
Name the missing label on the microscope.
Stage clip
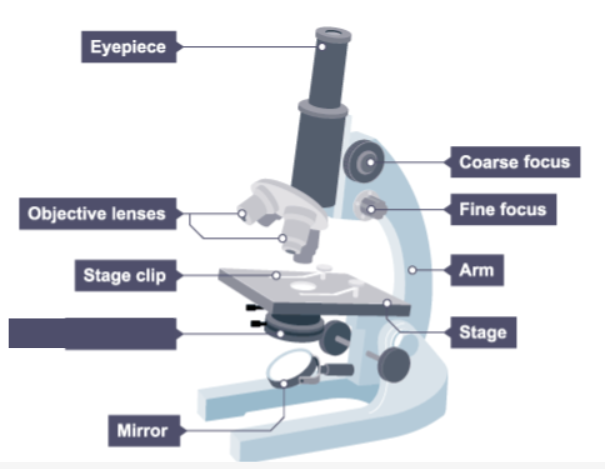
Name the missing label on the microscope.
Condenser
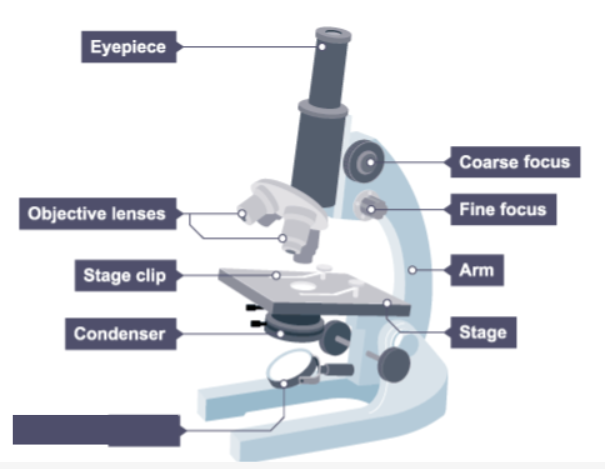
Name the missing label on the microscope.
Mirror
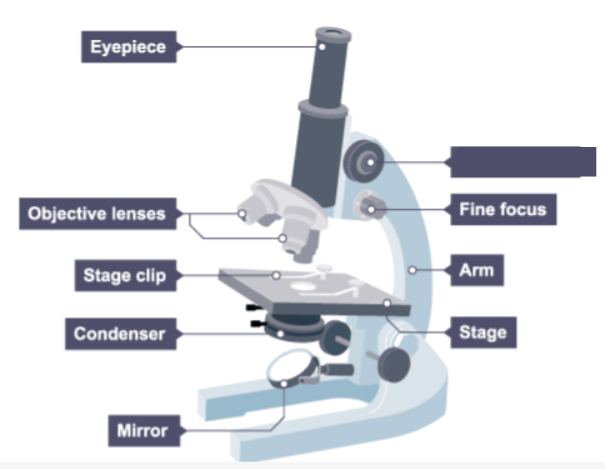
Name the missing label on the microscope.
Course focus
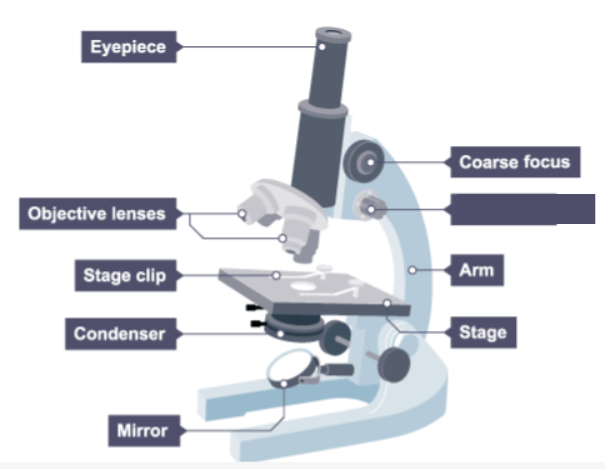
Name the missing label on the microscope.
Fine focus
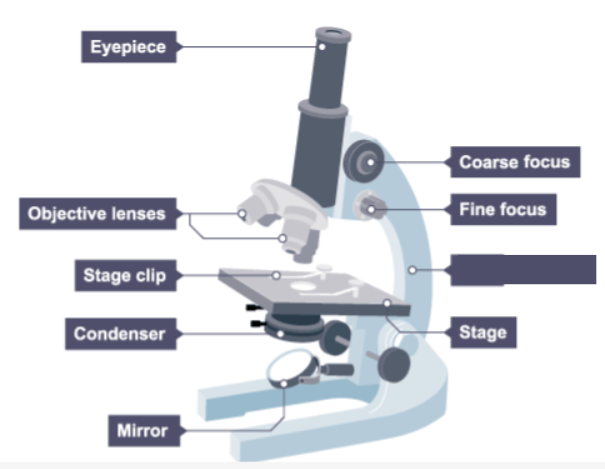
Name the missing label on the microscope.
Arm
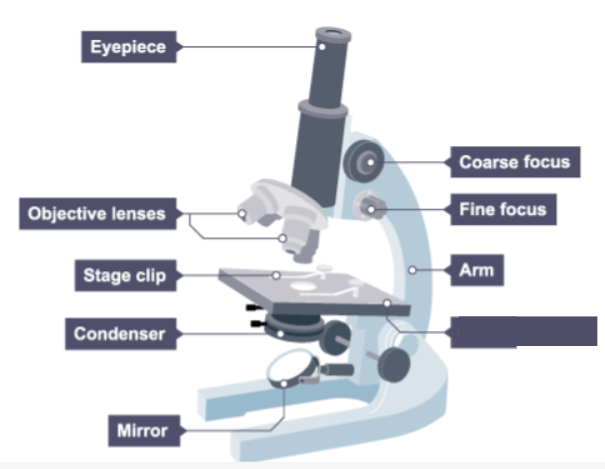
Name the missing label on the microscope.
Stage
Using a light microscope to investigate a selection of plant and animal cells: Step 1
Peel off an epidermal layer on the onion using forceps.
Using a light microscope to investigate a selection of plant and animal cells: Step 2
Mount onto the microscope slide with a drop of water using a pipette, making sure the tissue lies flat.
Using a light microscope to investigate a selection of plant and animal cells: Step 3
Add 2 drops of iodine solution to stain the cells.
Using a light microscope to investigate a selection of plant and animal cells: Step 4
Place the cover slip on by first placing one edge down on the slide and slowly lowering the other side of the cover slip using forceps. Make sure no air bubbles are trapped.
Using a light microscope to investigate a selection of plant and animal cells: Step 5
Remove any excess stain by soaking it with paper towels.
Using a light microscope to investigate a selection of plant and animal cells: Step 6
Place the slide on the stage of the microscope.
Using a light microscope to investigate a selection of plant and animal cells: Step 7
Turn the nosepiece to select a low power objective lens.

Using a light microscope to investigate a selection of plant and animal cells: Step 8
Set up the microscope - Use the coarse focus knob to raise the stage until the cover slip just touches the objective lens.
Using a light microscope to investigate a selection of plant and animal cells: Step 9
Look into the eyepiece and turn the coarse focus knob to move the stage away until the image comes into focus.
Using a light microscope to investigate a selection of plant and animal cells: Step 10
Turn the nosepiece to select a high power objective lens.
Using a light microscope to investigate a selection of plant and animal cells: Step 11
Repeat the same process as above and then look unto the eyepiece and turn the fine focus knob until the image comes into focus.
Using a light microscope to investigate a selection of plant and animal cells: Step 12
Make a labelled drawing of a few of the cells including any sub-cellular structures that can be seen. Write down the magnification.
Using a light microscope to investigate a selection of plant and animal cells: Step 13
Repeat these steps using a prepared slide.
How do you calculate the magnification of a microscope?
magnification of eyepiece × magnification of objective
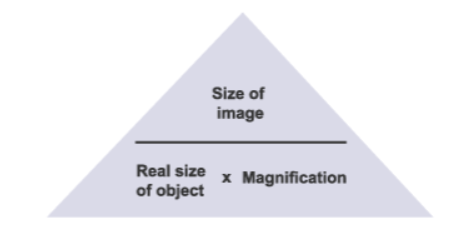
How do you calculate the magnification of an image?
Magnification of image = size of image / size of real object
What is a centimetre (cm)?
1 × 10⁻² metres
What is a millimetre (mm)?
1 × 10⁻³ metres
What is a micrometre (μm)?
1 × 10⁻⁶ metres
What is a nanometre (nm)?
1 × 10⁻⁹ metres

What is a low power diagram used to show?
As a plan to show the arrangement of any distinct regions of the tissue and to show the outline of individual cells that make up the tissue, if the tissue is uniform.
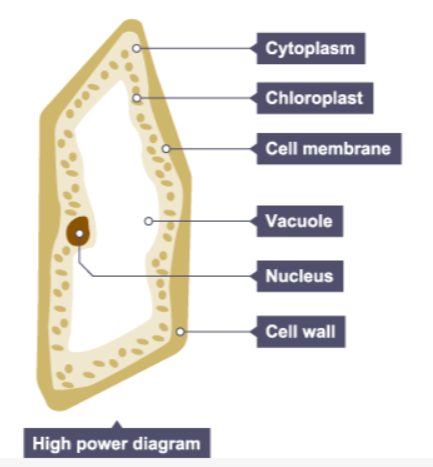
What is a high power diagram?
A detailed image of a part of the slide. It is usually drawn to show a single cell.
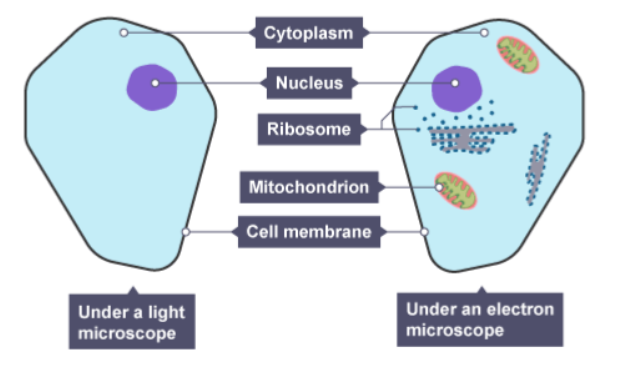
Can you see all the sub-cellular structures in an animal cell through a light microscope?
No you can only see the nucleus, cell membrane and cytoplasm.
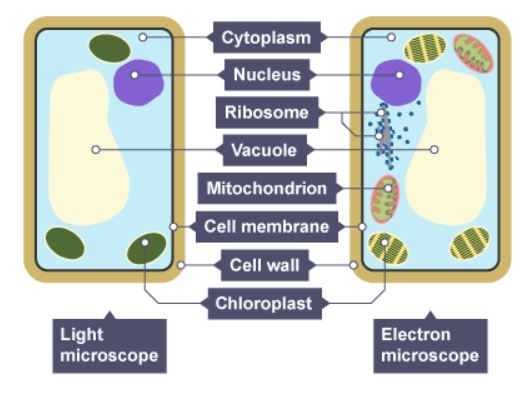
Can you see all the sub-cellular structures in a plant cell through a light microscope?
No you can only see the nucleus, cell membrane, cytoplasm, permanent vacuole, chloroplasts and cell wall.
Measuring cell size: Step 1
Place a stage micrometer on the stage of the microscope

Measuring cell size: Step 2
Line up one of the divisions on the eyepiece graticule with a fixed point on the stage micrometer.

Measuring cell size: Step 3
Count the number of divisions on the eyepiece graticule that correspond with a set measurement on the stage micrometer.
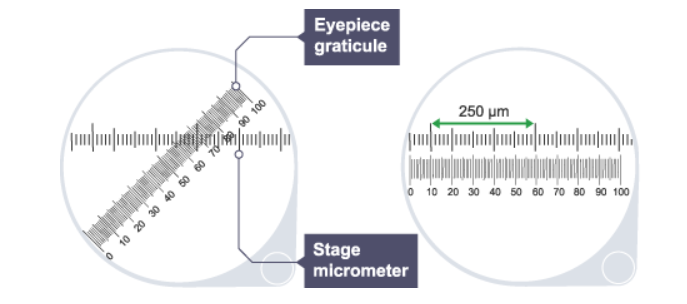
Measuring cell size: Step 4
Calculate the distance in micrometres of one division on the eyepiece graticule.
How do you calculate the distance in micrometres of one division on the eyepiece graticule?
stage micrometers / no. of divisions on the eyepiece graticule
Measuring cell size: Step 5
Use the same calibrated eyepiece graticule to measure in eyepiece graticule divisions.
Measuring cell size: Step 6
Multiply the size of the cell in eyepiece graticule divisions by the distance in micrometres of one division on the eyepiece graticule.
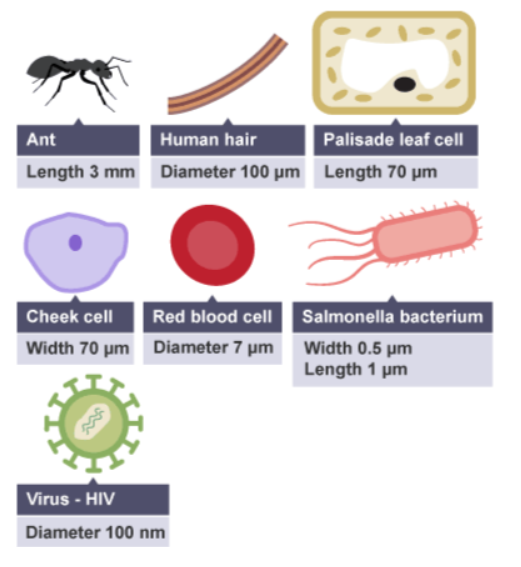
How many times bigger is a human hair compared to HIV ?
1000×

How many times bigger is a palisade leaf cell compared to a red blood cell?
10×

A student prepared some onion cells. The student viewed the onion cells using a light microscope.
This is the method used.
1. Cut an onion into pieces using a sharp knife.
2. Peel off a thin layer of onion epidermis from one piece of onion.
3. Place the onion epidermis onto a microscope slide in a single flat layer.
4. Add three drops of iodine solution.
5. Slowly lower a cover slip at an angle onto the onion epidermis.
6. Place the slide on the stage of the microscope.
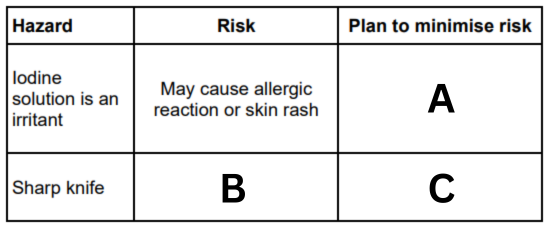
The table below shows a risk assessment for this experiment. Complete the table. (A)
Wash skin immediately after contact.

A student prepared some onion cells. The student viewed the onion cells using a light microscope.
This is the method used.
1. Cut an onion into pieces using a sharp knife.
2. Peel off a thin layer of onion epidermis from one piece of onion.
3. Place the onion epidermis onto a microscope slide in a single flat layer.
4. Add three drops of iodine solution.
5. Slowly lower a cover slip at an angle onto the onion epidermis.
6. Place the slide on the stage of the microscope.
The table below shows a risk assessment for this experiment. Complete the table. (B)
May cut you/someone else
A student prepared some onion cells. The student viewed the onion cells using a light microscope.
This is the method used.
1. Cut an onion into pieces using a sharp knife.
2. Peel off a thin layer of onion epidermis from one piece of onion.
3. Place the onion epidermis onto a microscope slide in a single flat layer.
4. Add three drops of iodine solution.
5. Slowly lower a cover slip at an angle onto the onion epidermis.
6. Place the slide on the stage of the microscope.
The table below shows a risk assessment for this experiment. Complete the table. (C)
Cut away from the body.
A student prepared some onion cells. The student viewed the onion cells using a light microscope.
This is the method used.
1. Cut an onion into pieces using a sharp knife.
2. Peel off a thin layer of onion epidermis from one piece of onion.
3. Place the onion epidermis onto a microscope slide in a single flat layer.
4. Add three drops of iodine solution.
5. Slowly lower a cover slip at an angle onto the onion epidermis.
6. Place the slide on the stage of the microscope.
Give a reason for using a thin layer of onion epidermis.
To help see individual cells
A student prepared some onion cells. The student viewed the onion cells using a light microscope.
This is the method used.
1. Cut an onion into pieces using a sharp knife.
2. Peel off a thin layer of onion epidermis from one piece of onion.
3. Place the onion epidermis onto a microscope slide in a single flat layer.
4. Add three drops of iodine solution.
5. Slowly lower a cover slip at an angle onto the onion epidermis.
6. Place the slide on the stage of the microscope.
Give a reason for adding iodine solution to the onion epidermis.
To stain parts of the cell.
A student prepared some onion cells. The student viewed the onion cells using a light microscope.
This is the method used.
1. Cut an onion into pieces using a sharp knife.
2. Peel off a thin layer of onion epidermis from one piece of onion.
3. Place the onion epidermis onto a microscope slide in a single flat layer.
4. Add three drops of iodine solution.
5. Slowly lower a cover slip at an angle onto the onion epidermis.
6. Place the slide on the stage of the microscope.
Give a reason for why the cover slip is lowered onto the onion epidermis at an angle.
To prevent air bubbles.

A student prepared some onion cells. The student viewed the onion cells using a light microscope.
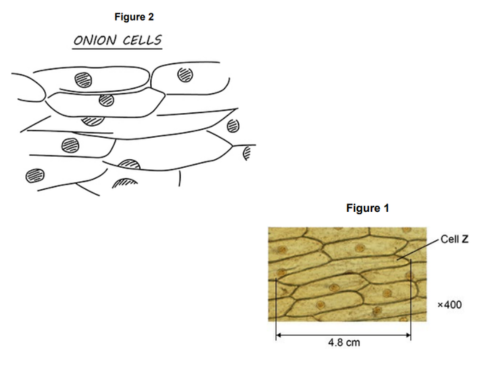
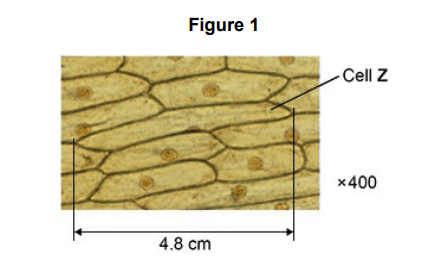
Figure 1 shows what the student saw under the microscope at a magnification of ×400. The length of cell Z in Figure 1 is 4.8 cm. Calculate the real length of cell Z. Give your answer in micrometres (µm).
120 µm
A student prepared some onion cells. The student viewed the onion cells using a light microscope.
Figure 2 shows the student’s drawing of Figure 1.
Give two ways the student could improve the drawing in Figure 2.
Include the magnification, do not draw overlapping cells.
A student prepared some onion cells. The student viewed the onion cells using a light microscope.
Onion cells can be seen using an electron microscope. Give two ways onion cells would look different when seen using an electron microscope.
The image would be more magnified and you could see more sub-cellular structures.