Microbiology (Laboratory): MICROSCOPE
1/80
There's no tags or description
Looks like no tags are added yet.
Name | Mastery | Learn | Test | Matching | Spaced |
|---|
No study sessions yet.
81 Terms
Base
It is the basal, horse shoe-shaped structure. It provides support to all the remaining parts of the microscope.
Pillar
A small, strong vertical projection developing from the foot or base.
Arm
It is a curved and strong structure used for handling the entire instrument.
Stage
It is a flat rectangular plate attached to the lower end of the arm. Slides or objects are placed on the stage and studied.
Aperture
A hole is present in the centre of the stage. Light rays pass through this hole.
Stage Clip
Two clips are attached on the upper part of the stage. These are used for holding the slide in position.
Body tube
It is the tubular, hollow part attached to the upper part of the arm of the microscope. It can be moved up and down with the help of adjustment knobs.
Draw tube
It is the cylindrical structure on top of the body tube that holds the ocular lens.
Revolving Nosepiece
It is a circular and revolving metallic part attached to the lower end of the body tube. It has holes in which objective lenses can be fitted.
Dust shield
It lies atop the revolving nosepiece and keeps dusts from settling in the objectives.
Coarse focus knob
It is a large-sized knob used to move the body tube up and down for bringing the object into focus.
Fine focus knob
It is a small-sized knob. It is used for fine and sharp focussing of the object. Exact focussing is done by this knob.
Ocular / Eyepiece
It is a small tube consisting of lenses that indicate the relative power of magnification.
Scanning objective
It is used for the initial location of the specimen. It has 4X magnification.
Low Power Objective
It may also be used for the initial location of the specimen.
It magnifies the specimens 10 X.
It views the specimen in a larger field.
High Power Objective
It obtains greater magnification and views detailed structures of the specimen
Oil Immersion Objective
It is used for magnification of extremely small specimens, such as bacterial cells.. In using this, a drop of oil is placed on the slide for better refraction.
Illuminator/ Lamp
A steady light source (110 volts in the US) that shines up through the slide
Mirror
reflects light rays through the object. One side of the mirror is plain (used with natural light); the other is concave (used with artificial light)
a. Iris diaphragm
This part can be adjusted to vary the intensity that is projected through the slide. As there is no set rule on which setting to use for a particular power, the setting depends on the transparency of the specimen and the degree of contrast you desire in your image
b. Condenser
This is a lens that concentrates light to the specimen.
MAGNIFICATION
- is the ability to make small objects seem larger, such as making a microscopic organism visible.
RESOLUTION
- is the ability to distinguish two objects from each other.
TOTAL MAGNIFICATION
- is determined by multiplying the power of the ocular by the power of the objective in use.
The measuring unit for bacteria
micrometer
Ocular micrometer
located within the eyepiece lens, is used to determine the sizes of microorganisms that are seen under a light microscope.
Refractive index
a measure of the relative velocity at which light passes through a material.
The total magnification achieved
the product of the lens that is use
Scanning
use coarse knob
Low power
use coarse knob
High power
use fine knob
Cedar-wood oil (for an oil-immersion lens)
Sugar solution is frequently used.
It has the same refractive index as the glass of the cover slip so that the object is effectively immersed in it.
The presence of the liquid increases the effective aperture of the objective, thus increasing the resolution.
Xylol cleaning method
The most widely used technique to clean the objectives of a microscope, especially the 100X objective, involves wiping out of immersion oil from the same and its surrounding mount by a piece of lens paper or a soft piece of clean cotton cloth followed by a cloth dampened with small amount of xylol.
Electron Microscope
making use of streams of electrons travelling at high speed in a vacuum
Electron Microscope image
The image produced is visible when projected into a fluorescent screen.
Principles in Electron Microscope
• Resolution strongly dependent of wavelength:
- electron microscope: about 0.2 nm
- optical microscope: about 500 nm
• Image formed due to different lateral absorption of the beam
- heavy atoms darkest
- light atoms high transmissions
• Electron microscopes often equipped with instrumentation for elemental analysis
- EDAX (Energy Dispersive Analysis of X-rays)
• Two techniques:
- Transmission Electron Microscopy (TEM)
- Scanning Electron Microscopy (SEM)
Fluorescence Microscope
a type of microscope that makes use of ultraviolet light to view the object
Fluorescence Microscope staining
a certain dyes are applied to the specimen and the specimen is exposed to the UV light and the image appears "self luminance"
Fluorescence Microscope
This is used in the examination of antigen-antibody reactions.
Principles in Fluorescence Microscope
Fluorescence microscopy uses a much higher intensity light to illuminate the sample.
This light excites fluorescence species in the sample, which then emit light of a longer wavelength.
The image produced is based on the second light source or the emission wavelength of the fluorescent species - rather than from the light originally used to illuminate, and excite…
Phase Contrast Microscope
a type of microscope that makes use of special lenses, condenser and filter which permit one to observe not only the structure revealed by light passing directly through the object
Phase Contrast Microscope image
the details of object are outlined on a gray background
Phase Contrast Microscope use
used for examination of suspension of living microorganism or other transparent materials and bacteria in tissue section.
Principles in Phase contrast Microscope
It is based on the wavelength (nature) of light rays and the fact that light rays can be in phase or out of phase.
Different shades of grey are distinguished to our eyes due to differences in amplitude of light rays.
PCM converts invisible small phase changes caused by the cell component into visible intensity changes.
Darkfield Microscope
Make use of a special condenser which produces a hollow cone of visible light such that it will pass only through the object on focus and none of the light goes directly up to the objective, the field will appear dark and the object on focus appear bright, this is used in examination of unstained microorganism suspended in fluid.
Principles in Darkfield Microscope
Uses a light microscope with an extra opaque disc underneath the condenser lens, or a special condenser having a central blacked-out area, due to which the light coming from the source cannot directly enter into the objective.
The path of the light is directed in such a way that it can pass through the outer edge of the condenser at a wide-angle and strike the sample at an oblique angle.
Only the light scattered by the sample reaches the objective lens for visualization.
All other light that passes through the specimen will miss the objective, thus the specimen is brightly illuminated on a dark background.
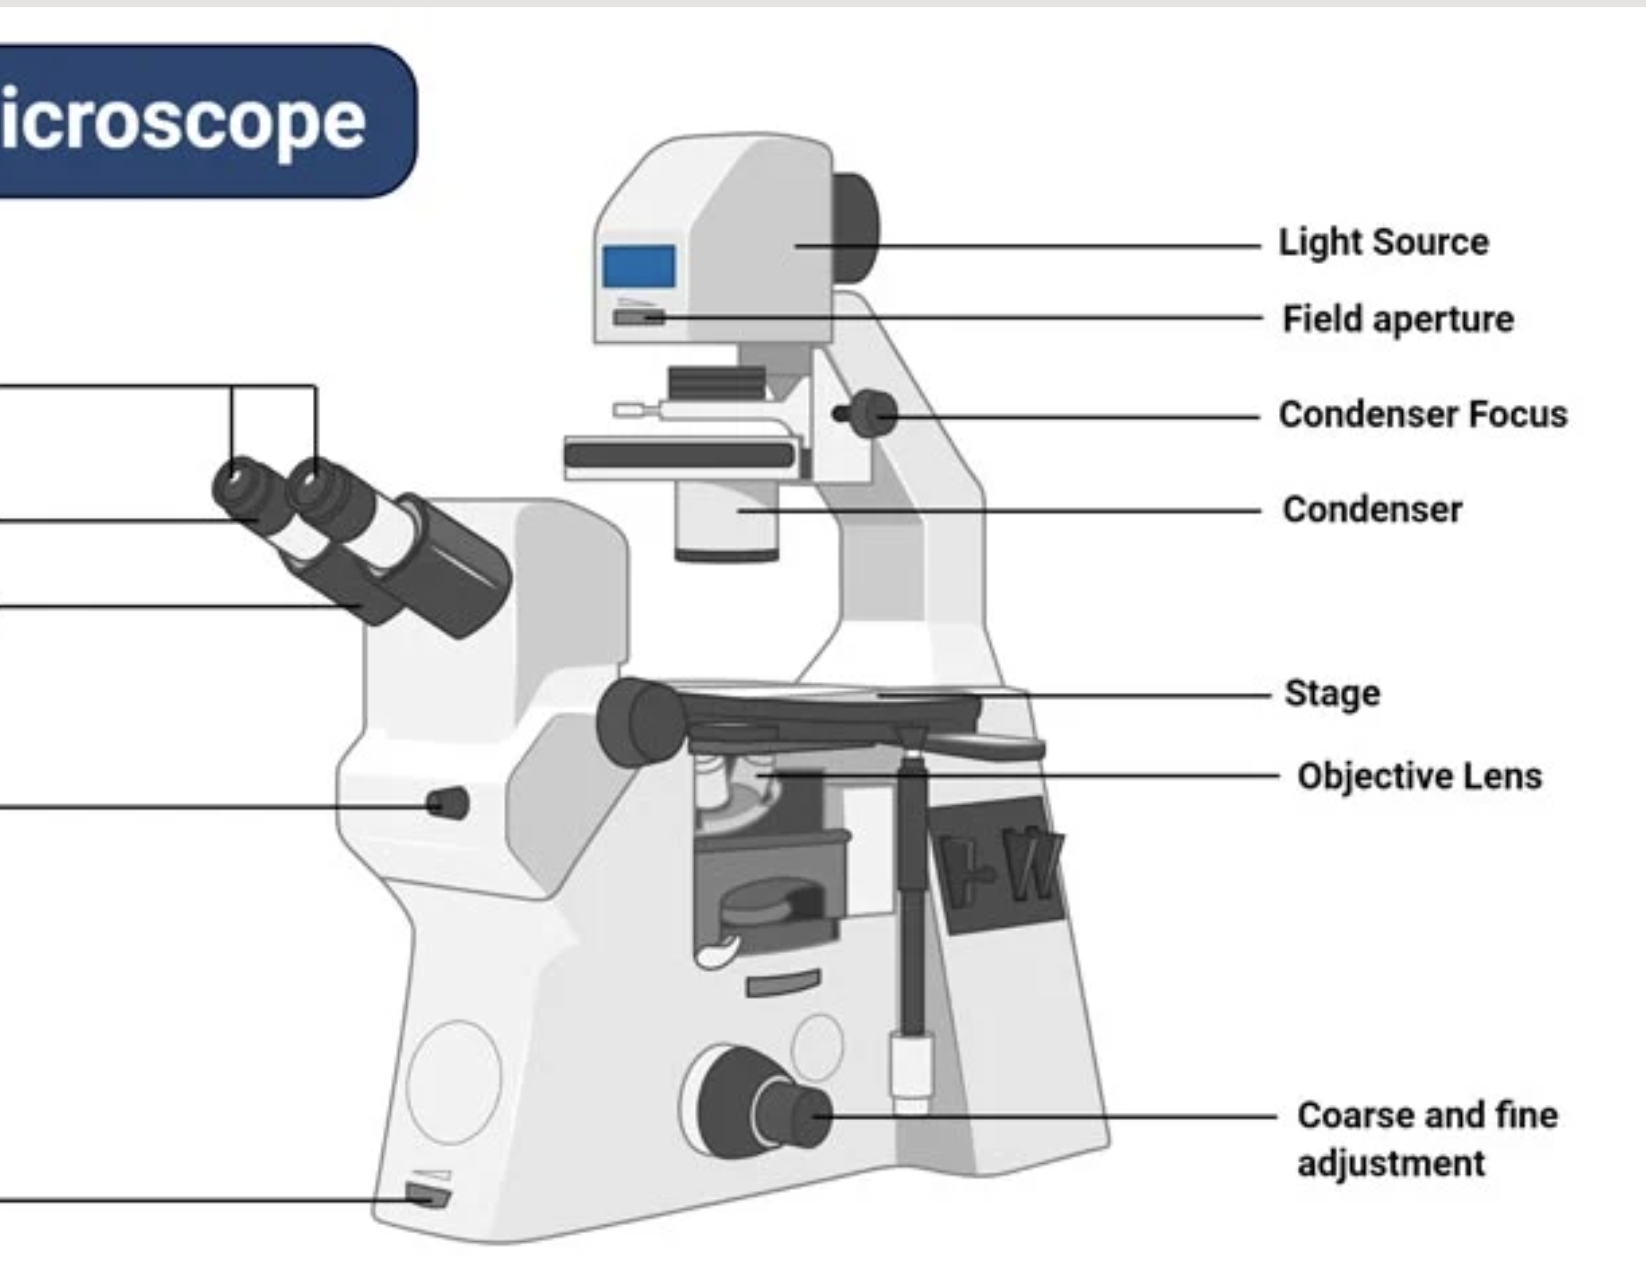
Inverted Microscope
is a microscope with its light source and condenser on the top, above the stage pointing down, while the objectives and turret are below the stage pointing up.
Inverted Microscope
It was invented in 1850 by J. Lawrence Smith,
A faculty member of Tulane University (then named the Medical College of Louisiana).
Principles in Inverted Microscope
The working principle of the inverted microscope is basically the same as that of a light microscope.
In an inverted microscope, the source for transmitted light and the condenser are placed on the top of the stage as shown in the above picture, pointing down toward the stage.
The objectives are located below the stage pointing up. The specimens or cells are observed through the bottom of the cell culture vessel.
To meet the criteria for successfully inverted microscopy, the bottom of the culture vessel must have the highest optical features, which are given for the ibidi Polymer Coverslip and the ibidi Glass Coverslip.
1850 - J. Lawrence Smith
Who invented the inverted microscope?
Care and Maintenance of the Microscope
Good preventive maintenance and care includes:
Regular cleaning of oculars and objectives
Avoid damaging oculars and other optics with eye make-up or other debris
Careful handling to avoid abrupt motions
Protect from direct sunlight, high temperature, humidity, dust and vibration
Use appropriate materials to clean the lenses
Microscope Care
Always carry with 2 hands
Never touch the lenses with your fingers.
Only use lens paper for cleaning
Keep objects clear of desk and cords
When you are finished with your "microscope", rotate the nosepiece so that it's on the low power objective, roll the stage down to lowest level, rubber band the cord, then replace the dust cover.
Electron Microscope
Fluorescence Microscope
Phase Contrast Microscope
Inverted Microscope
Darkfield Microscope
What are the types of microscope?
Using High Power
Your slide MUST be focused on low power before attempting this step
Click the nosepiece to the longest objective
Do NOT use the Coarse Focusing Knob, this could crack the slide or the lens
Use the Fine Focus Knob to bring the slide into focus
16th Century
Having been constructed in the ________, microscopes have revolutionized science with their ability to magnify small objects and produce images with definitive structures that are identifiable.
MICROSCOPE
are instruments that are used in science laboratories, to visualize very minute objects such as cells, tissues, microorganisms, giving a contrasting image that is magnified.
are made up of lenses for magnification, each with their own magnification powers.
depending on the type of lens, it will magnify the specimen according to its focal strength.
offer the ability to see great detail of objects that are hundreds of times too small to see with your naked eye.
are generally made up of structural parts for holding and supporting the microscope and its components and the optical parts which are used for magnification and viewing of the specimen images