Spinal and Epidural Placement
 Call Kai
 Learn
Learn Practice Test
 Spaced Repetition
 Match
Match Flashcards
 Knowt Play
1/115

Earn XP
Description and Tags
Neuraxial Anesthesia 2/ POA EXAM 4
Name | Mastery | Learn | Test | Matching | Spaced | Call with Kai | Chat |
|---|
No analytics yet
Send a link to your students to track their progress
116 Terms
Four sequential clinical phases of spinal placement
Preparation, Access, Placement, and Delivery
Five core steps during the Preparation phase for Spinal and Epidural Placement
Monitors (NIBP and pulse ox), Position patient, PPE (mask/cap on, jewelry removed), cleanly open the kit and don sterile gloves/drapes, and identify/mark landmarks and clean the skin
Three step sequence to safely navigate from the skin to the interspinous ligament during the Access phase
inject 1% Lidocaine to create a skin wheal, advance the introducer needle into the same opening until seated in the interspinous ligament, and hold the introducer steady with the non-dominant hand
Four steps executed during the Placement phase to safely enter the subarachnoid space
advance the spinal needle through the introducer using the dominant hand, feel for a "pop" as it pierces the ligamentum flavum and dura mater, remove the stylet only, and verify a steady flow of 2-3 drops of CSF
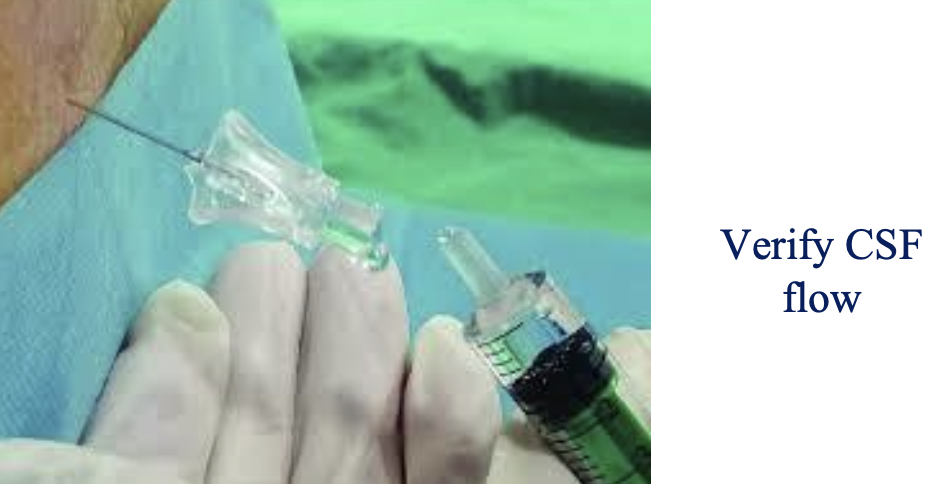
Five steps that comprise the Delivery phase of a spinal block
stabilize the needle hub with the non-dominant hand while attaching the syringe with the dominant hand, barbotage (aspirate a small amount of CSF) to verify placement, inject medications, re-aspirate and re-inject a small amount of CSF to confirm stability, and remove the needles and syringe together as a unit in one motion
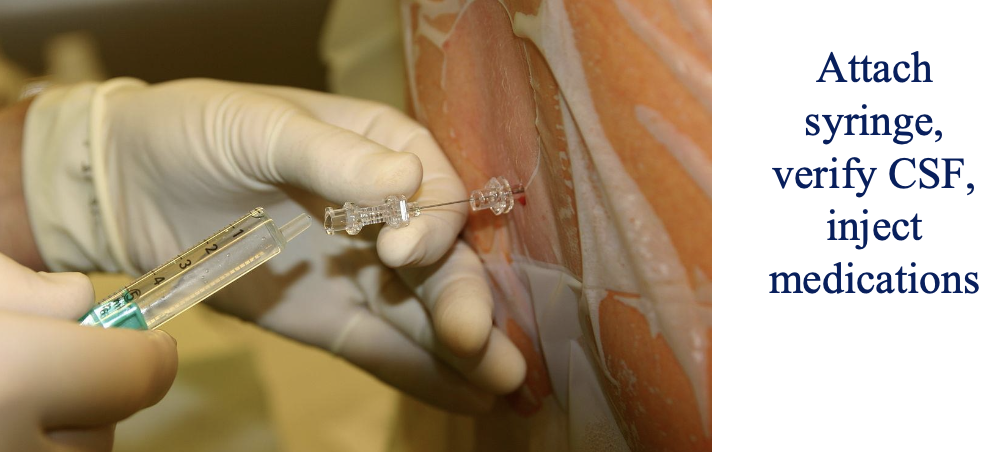
Immediate action required at the very end of the Delivery phase to finalize the block
place the patient in the position needed to allow spinal medications to migrate to the appropriate height
Primary medication and concentration used to create a skin wheal at the correct interspace
1% Lidocaine
Anatomical structure where the introducer needle must be firmly seated before introducing the spinal needle
interspinous ligament
Respective roles of the dominant and non-dominant hands during spinal needle advancement through the introducer
non-dominant hand holds the introducer steady; dominant hand grabs the spinal needle and carefully advances it
Anatomic layers traversed when the clinician feels a characteristic "pop" during spinal needle advancement
ligamentum flavum and dura mater
Immediate procedural action to take after feeling the "pop" indicating entry through the dura mater
remove the stylet ONLY (leave the spinal needle in place)
Benchmark to confirm successful entry into the subarachnoid space
steady flow of CSF (2-3 drops)
Hand placements when attaching the medication syringe to the spinal needle
non-dominant hand stabilizes the hub of the spinal needle; dominant hand attaches the syringe
Procedural safety action performed immediately after completing the medication injection but before needle removal
re-aspirate and re-inject a small amount of CSF to ensure the needle remained in the correct location
Nine anatomical layers traversed in sequence when using the midline approach for a spinal block
Skin, subcutaneous tissue, supraspinous ligament, interspinous ligament, ligamentum flavum, epidural space, dura mater, arachnoid mater, and subarachnoid space
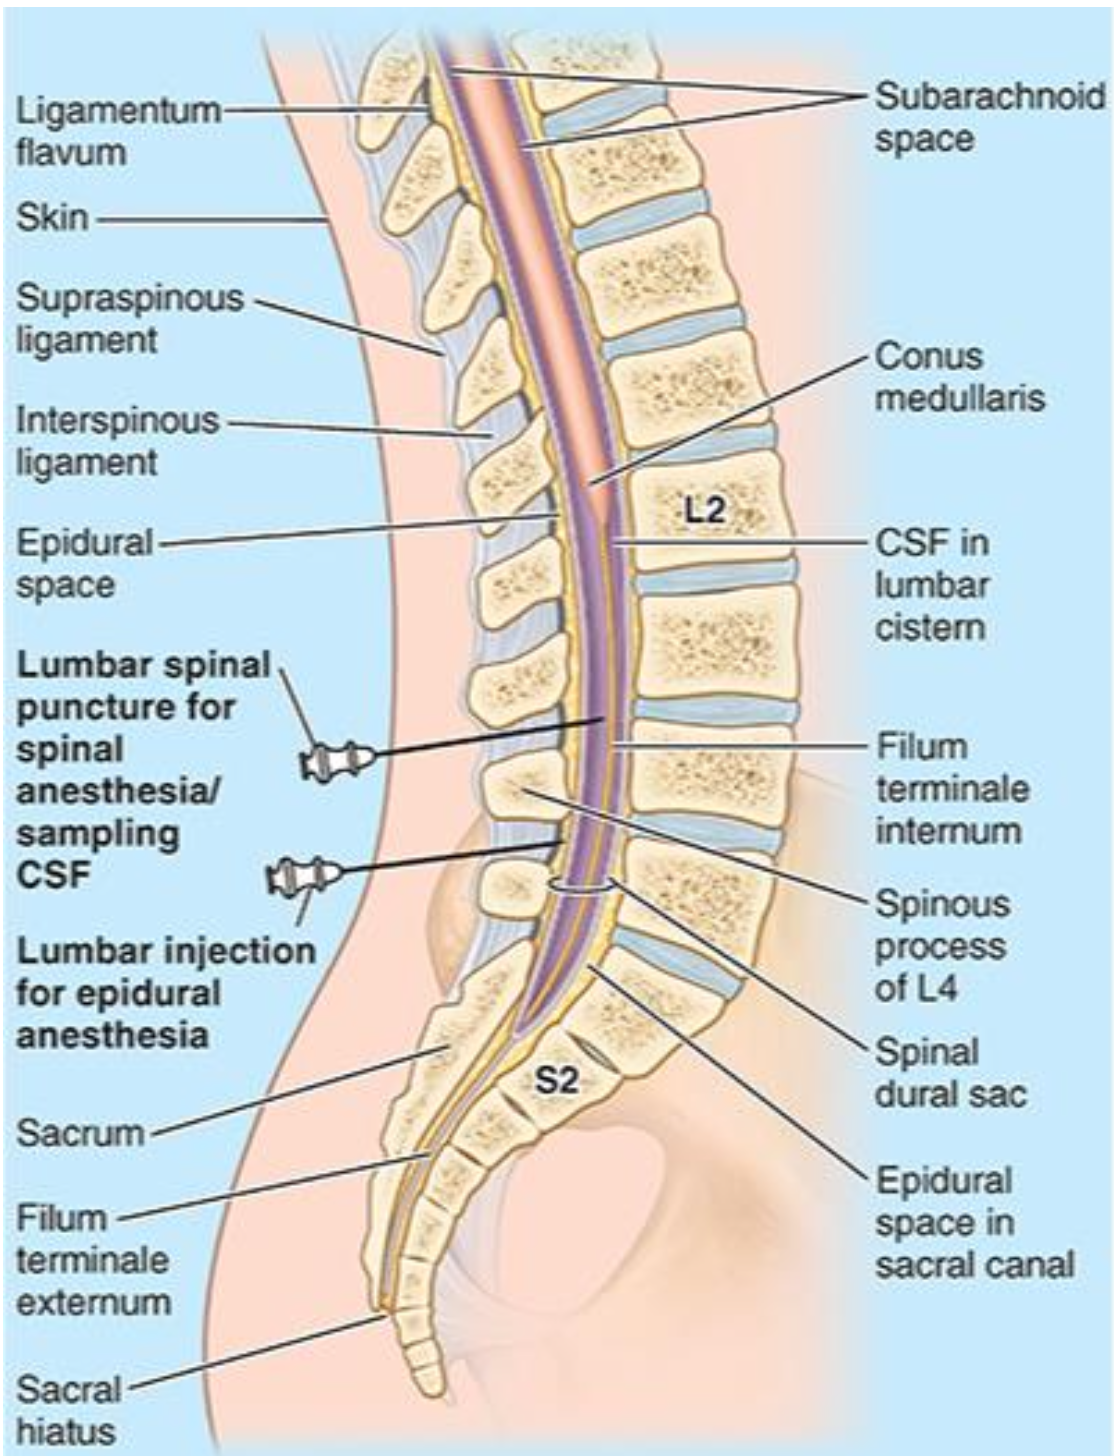
Seven anatomical layers traversed in sequence when using the paramedian approach for a spinal block
Skin, subcutaneous tissue, ligamentum flavum, epidural space, dura mater, arachnoid mater, and subarachnoid space
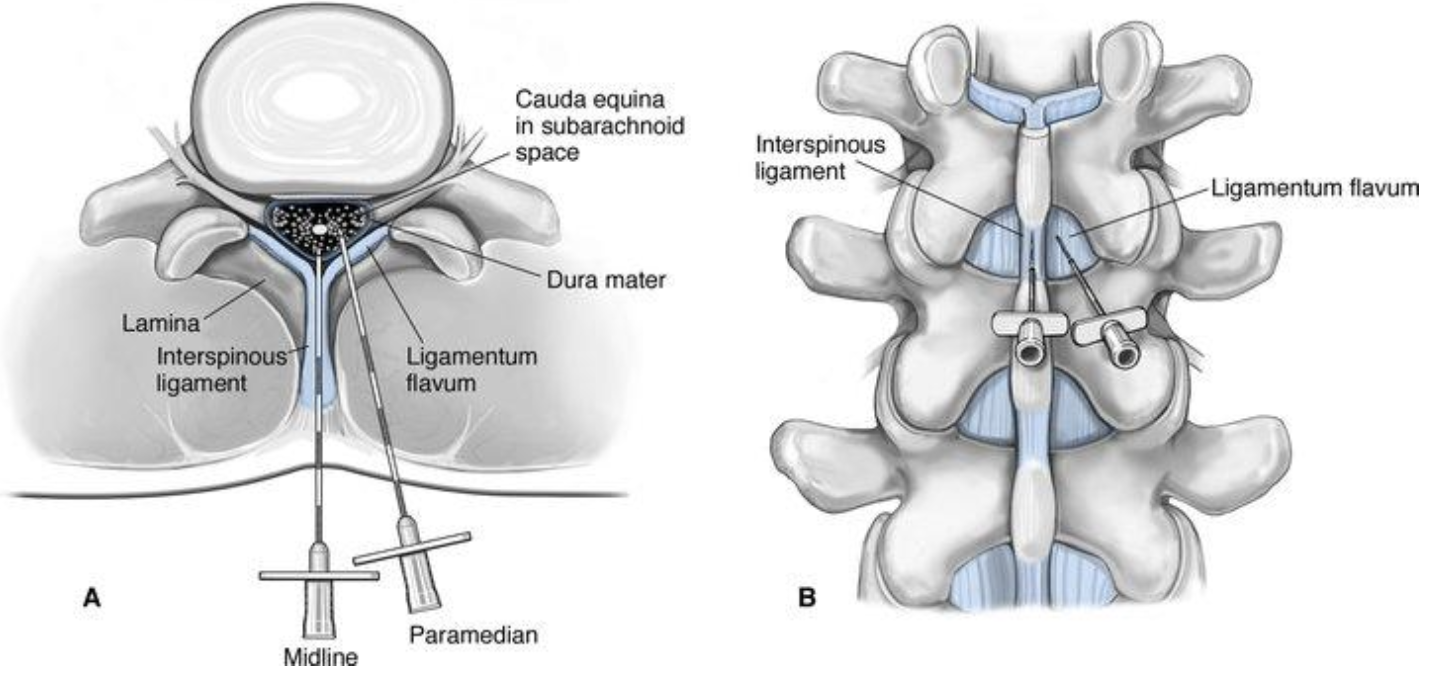
Two distinct spinal ligaments passed during a midline approach that are completely bypassed in a paramedian approach
Supraspinous ligament and interspinous ligament
First dense, resistance-yielding ligament encountered during a paramedian spinal insertion after passing through the skin and subcutaneous tissue
Ligamentum flavum
Specific anatomical space crossed immediately after traversing the ligamentum flavum but before piercing the dura mater
Epidural space
Orientation of the epidural needle (Tuohy) when first advancing into the skin
Bevel up
Target anatomical structure for initial firm seating of the Tuohy needle
Interspinous ligament
Typical volume of saline or air used in the Loss of Resistance (LOR) syringe
3-4 mL
Physical sensation confirming the Tuohy needle has passed through the ligamentum flavum into the epidural space
Sudden "loss of resistance" to pressure on the syringe plunger
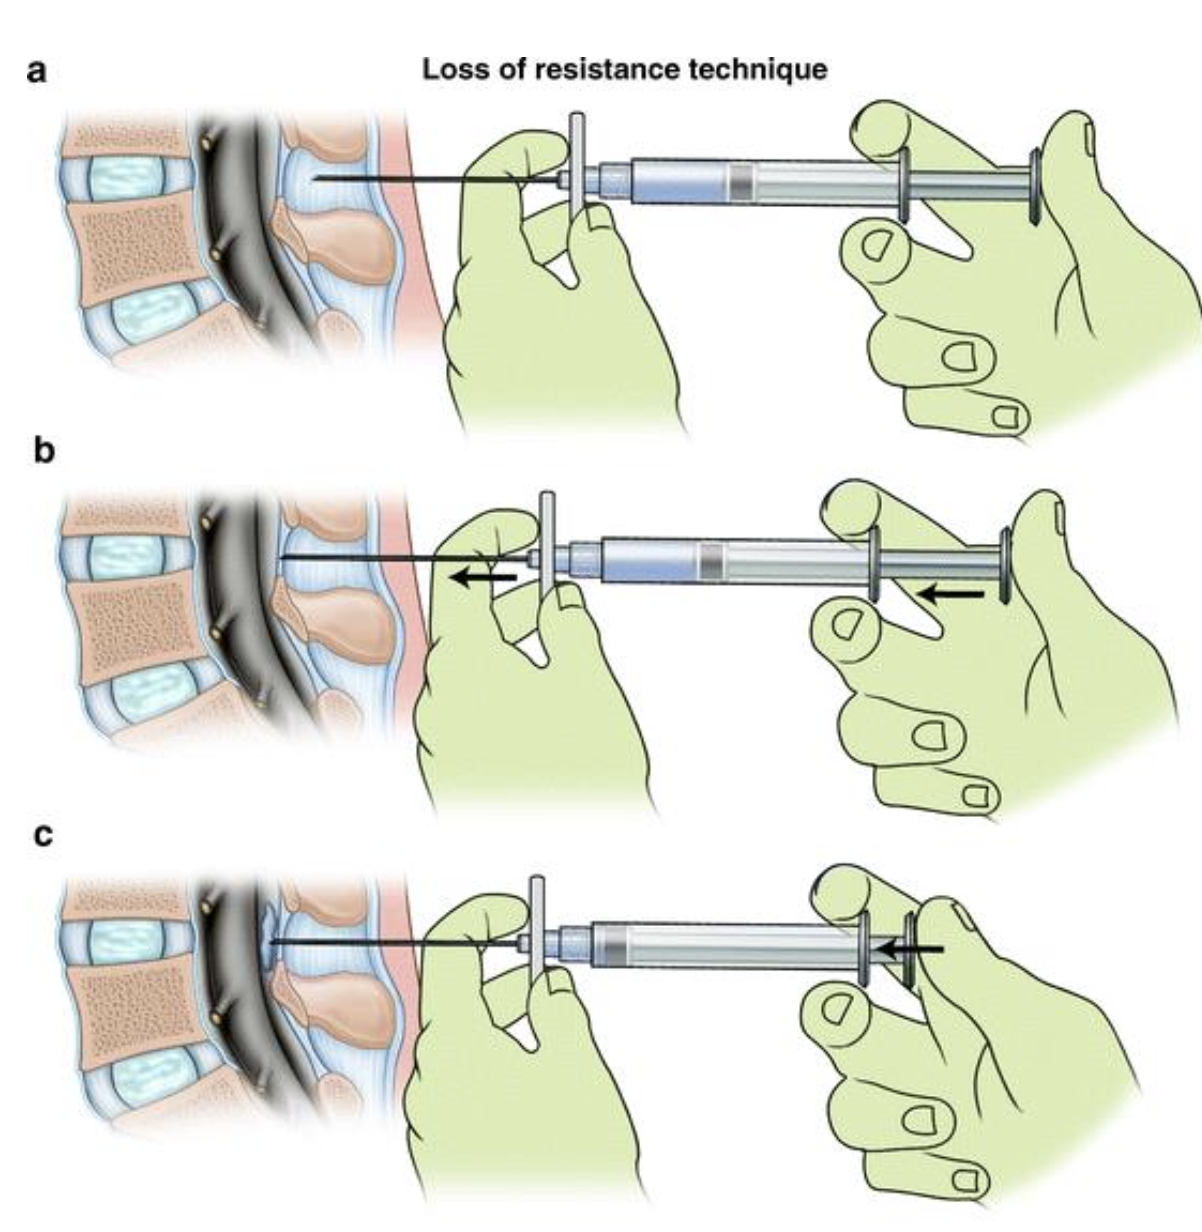
Standard distance for threading the epidural catheter beyond the point of Loss of Resistance
3-5 cm
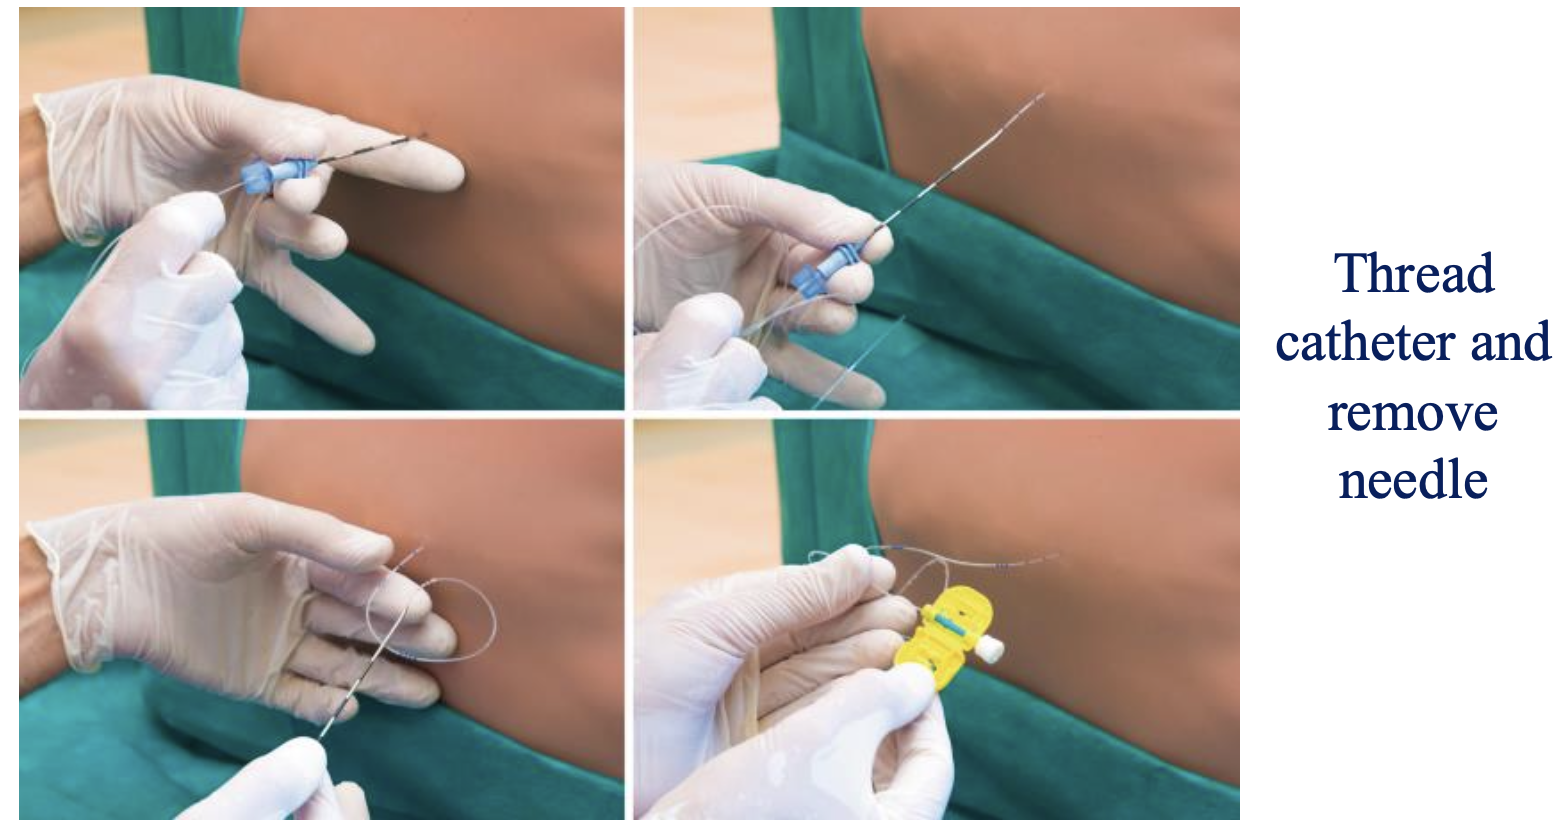
Procedural step performed after catheter placement to check for intravascular or subarachnoid placement
Negative aspiration of heme or CSF through the catheter using a 3 cc syringe
Medication and dose used for the epidural "test dose"
3 mL of 1.5% Lidocaine with 1:200,000 epinephrine
Final procedural step taken after confirming a negative test dose
Secure the catheter and then position the patient to the appropriate height for the procedure
Four sequential clinical phases used to divide the workflow of epidural placement
Preparation, Access & Setup phase, Identification & Threading, and Securing & Safety phase
Four precise steps required to transition from the skin to the loss of resistance setup during the Access & Setup phase
Inject 1% Lidocaine for a skin wheal, advance the Tuohy needle bevel up until seated in the interspinous ligament (~2-3 mm), stabilize the needle with the non-dominant hand, and attach the LOR syringe containing 3-4 mL of saline or air using the dominant hand
Hand mechanics and visual cues that define the Identification & Threading phase of an epidural
Non-dominant hand slowly advances the needle (1 mm at a time) while the dominant thumb maintains constant/intermittent pressure on the plunger until a sudden "loss of resistance" occurs, then the needle is stabilized with the non-dominant hand while the dominant hand slowly advances the catheter
Continuous motion required when removing the Tuohy needle over the newly placed catheter
Maintain a constant forward threading motion on the catheter while slowly removing the epidural needle from the skin
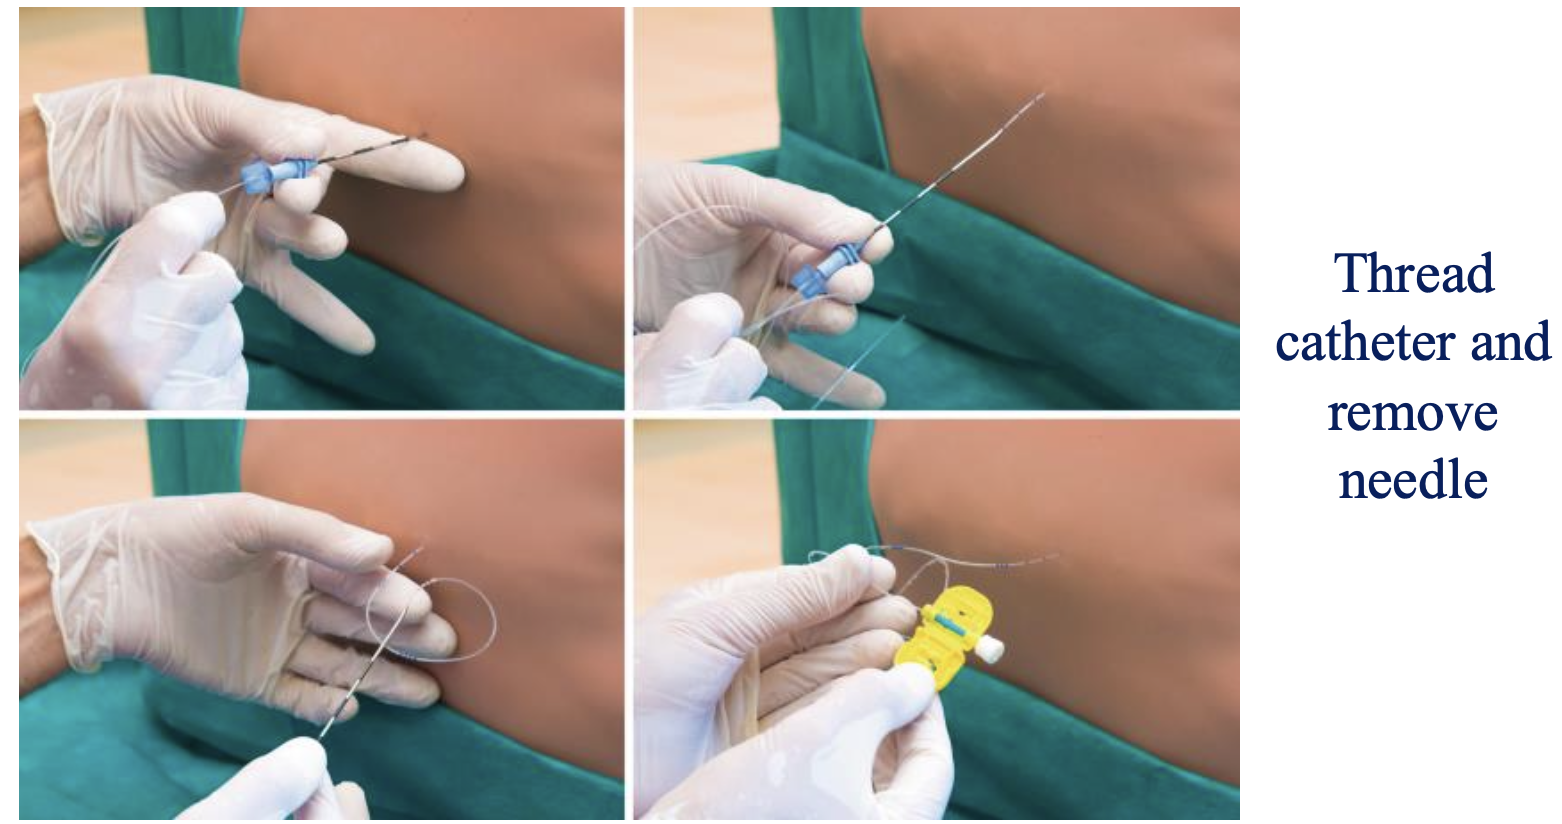
Six layers traversed in sequence when using the midline approach for an epidural block
Skin, subcutaneous tissue, supraspinous ligament, interspinous ligament, ligamentum flavum, and epidural space
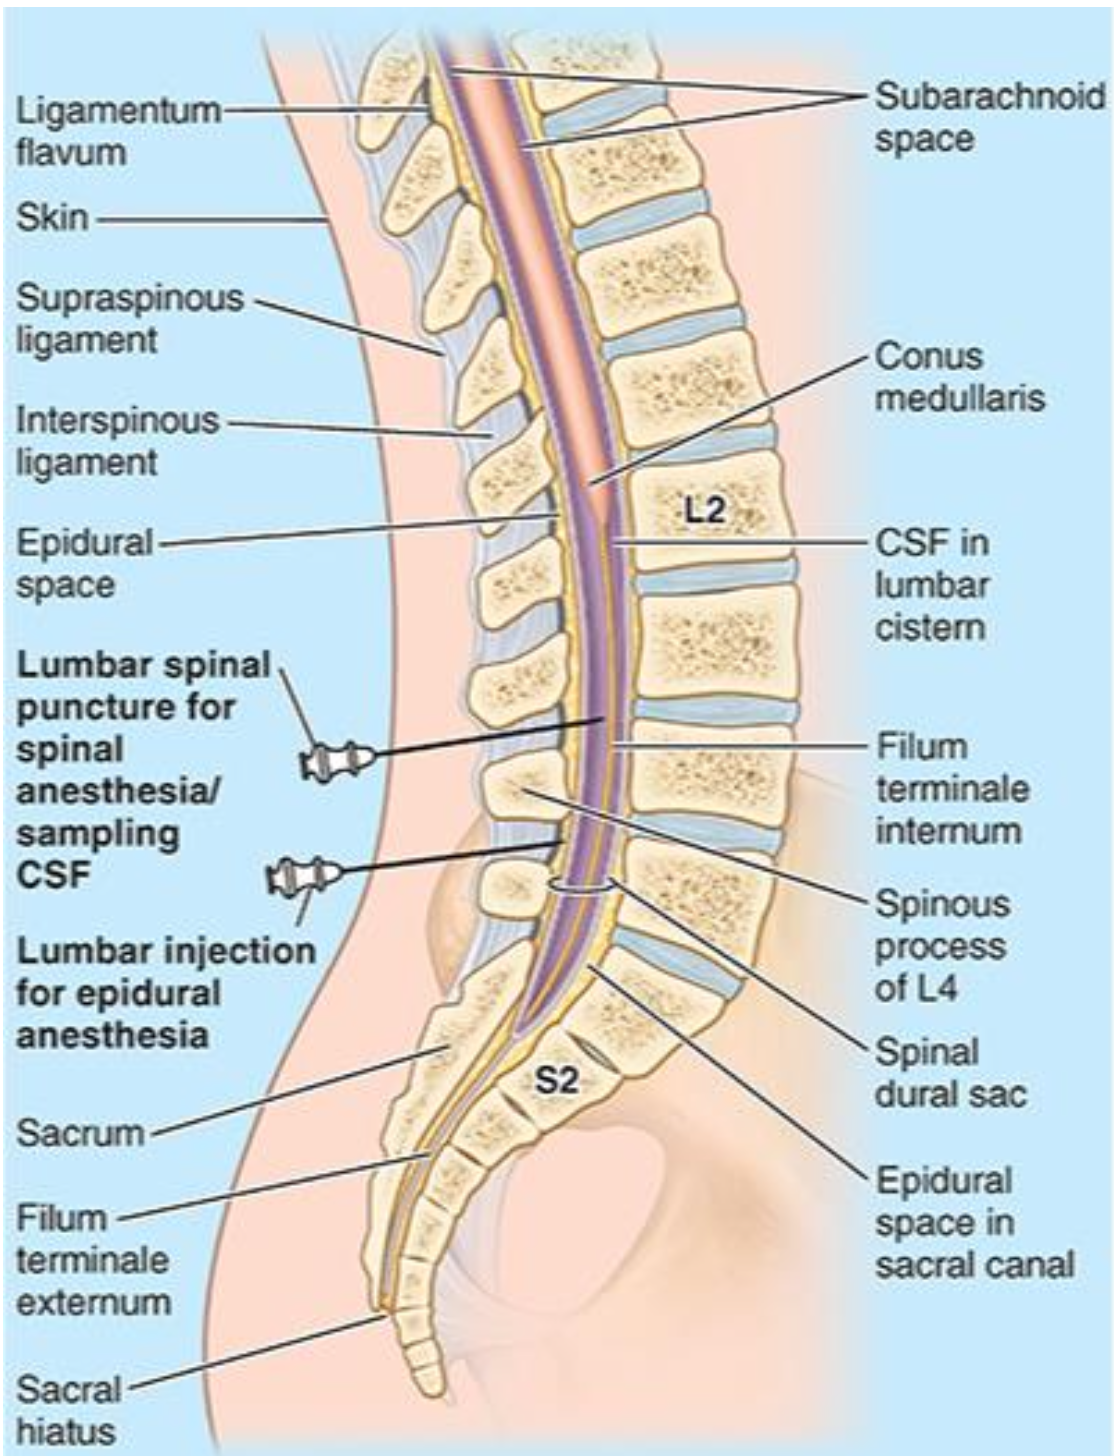
Four anatomical layers traversed in sequence when using the paramedian approach for an epidural block
Skin, subcutaneous tissue, ligamentum flavum, and epidural space
First dense, resistance-yielding ligament encountered during a paramedian epidural insertion after passing through the skin and subcutaneous tissue
Ligamentum flavum
Final anatomical endpoint layer where the needle terminates for a successful epidural placement
Epidural space
Landmark that must be reached with the Tuohy needle before performing a dural puncture epidural (DPE)
Loss of resistance (LOR) is noted
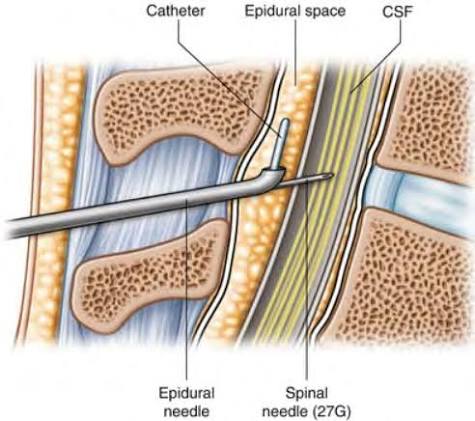
Specific size of the spinal needle used to intentionally puncture the dura during a DPE technique
25g
Visual confirmation required before removing the spinal needle during a DPE procedure
CSF is noted
Absolute restriction regarding the spinal needle during a DPE
No medications are given through the spinal needle
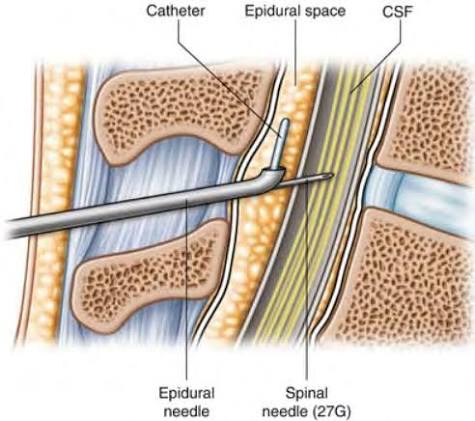
Ultimate clinical mechanism and therapeutic goals of performing a dural puncture epidural technique
Local anesthetic (LA) and opioids given through the epidural will migrate through the hole in the dura to enhance epidural block density, improve block bilaterality, and enhance sacral analgesia
Core neuraxial technique that simultaneously offers the therapeutic benefits of both spinal and epidural anesthesia
Combined Spinal Epidural (CSE)
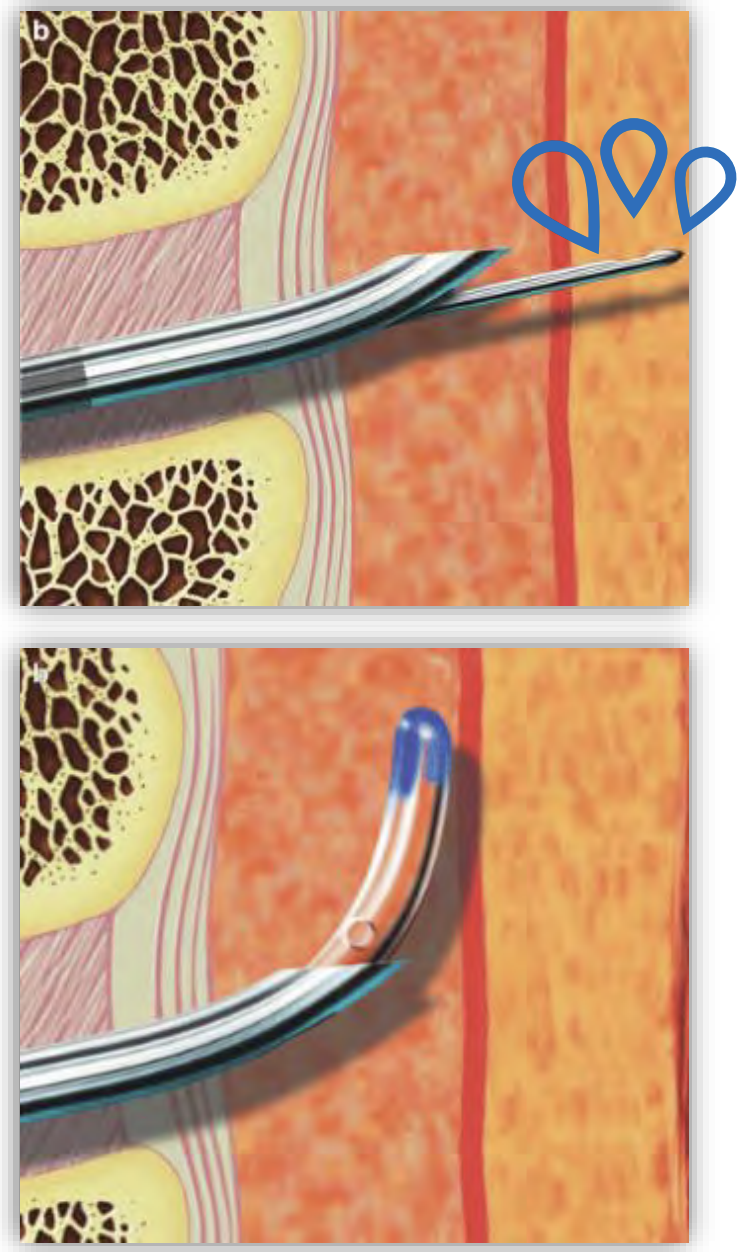
Dosing strategy used for intrathecal medications administered via the spinal needle during a CSE
Low dose spinal medications
Primary clinical goal of a Combined Spinal Epidural (CSE) regarding onset and duration
Immediate sensory and motor block with the spinal and ability to supplement/continue anesthesia or analgesia through the epidural catheter
Two environments where a CSE is most frequently utilized
OB practice or long surgical procedures (such as orthopedic)
Two distinct clinical circumstances under which continuous spinal anesthesia may be performed
Electively or after an inadvertent entrance into the subarachnoid space
Specific distance an epidural catheter should be threaded into the subarachnoid space for continuous spinal anesthesia
2-3 cm
Anatomical direction the catheter must be directed when threading into the subarachnoid space during continuous spinal anesthesia
Cephalad
Minimum duration to continue a lipid emulsion infusion once hemodynamic stability is achieved
<15 minutes.