Resin Restoration Terms | Class I & II Definitions in Medicine
1/101
There's no tags or description
Looks like no tags are added yet.
Name | Mastery | Learn | Test | Matching | Spaced | Call with Kai |
|---|
No analytics yet
Send a link to your students to track their progress
102 Terms
pros of resin for posterior restorations (5)
- esthetics
- preservation of tooth structure
- adhesion to tooth structure
- low thermal conductivity
- elimination of galvanic currents
cons of resin for posterior restorations (6)
- polymerization shrinkage
- ↓ wear resistance
- post-op sensitivity
- water sorption
- technique sensitivity
- variable degree of conversion
resin vs amalgam longevity
10 yr period: resin composite performs as well as amalgam in posterior restorations
long term success of resin restoration depends on which 5 factors in the mouth
- cavity size
- functional/occlusal stresses
- caries risk
- restoration type
- tooth type
longevity of resin for premolars vs molars
premolars = better longevity than molars
longevity of resin for class I vs class II
class I = better longevity than class II
longevity of resin for small/moderate vs large restorations
small/moderate restorations = better longevity than large restorations
dentist and patient factors influencing longevity of resin composite
- operator skills
- material and technique
- patient OH
main reason for RBC failure is ___ which are responsible for failure ___% of the time
secondary caries
35
3 other reasons for RBC failure other than secondary caries (main reason)
- fracture/ degradation
- tooth fracture
- pain
resin indications
- small/ moderate class I and II
- conservative preparations
- esthetics area
- metal allergy
resin contraindications
- heavy occlusal stress
- isolation issues
- allergy/ sensitivity to resin-based materials
success with direct resin dental composites is based on what 3 broad categories
1. clinician
2. patient
3. material science
clinician role in success with direct resin dental composites
judgement and skill
patient role in success with direct resin dental composites
caries risk, habits, genetics
material science role in success with direct resin dental composites
adhesives, composite, light curing
resin preps are ___ invasive with ___ removal of carious tissue
minimally
selective
class I/II resin preps do not need (4)
- typical resistance
- typical retention
- flat walls (axial, pulpal)
- bevel
resin preps should create a ___ surface with no ___
smooth
unsupported enamel
what type of enamel is included in outline form for resin preps
decalcified chalky flaking enamel
armamentarium
all equipment used in the practice of medicine
armamentarium needed for resin
- FG carbide composite finishing burs
- composite polishing points
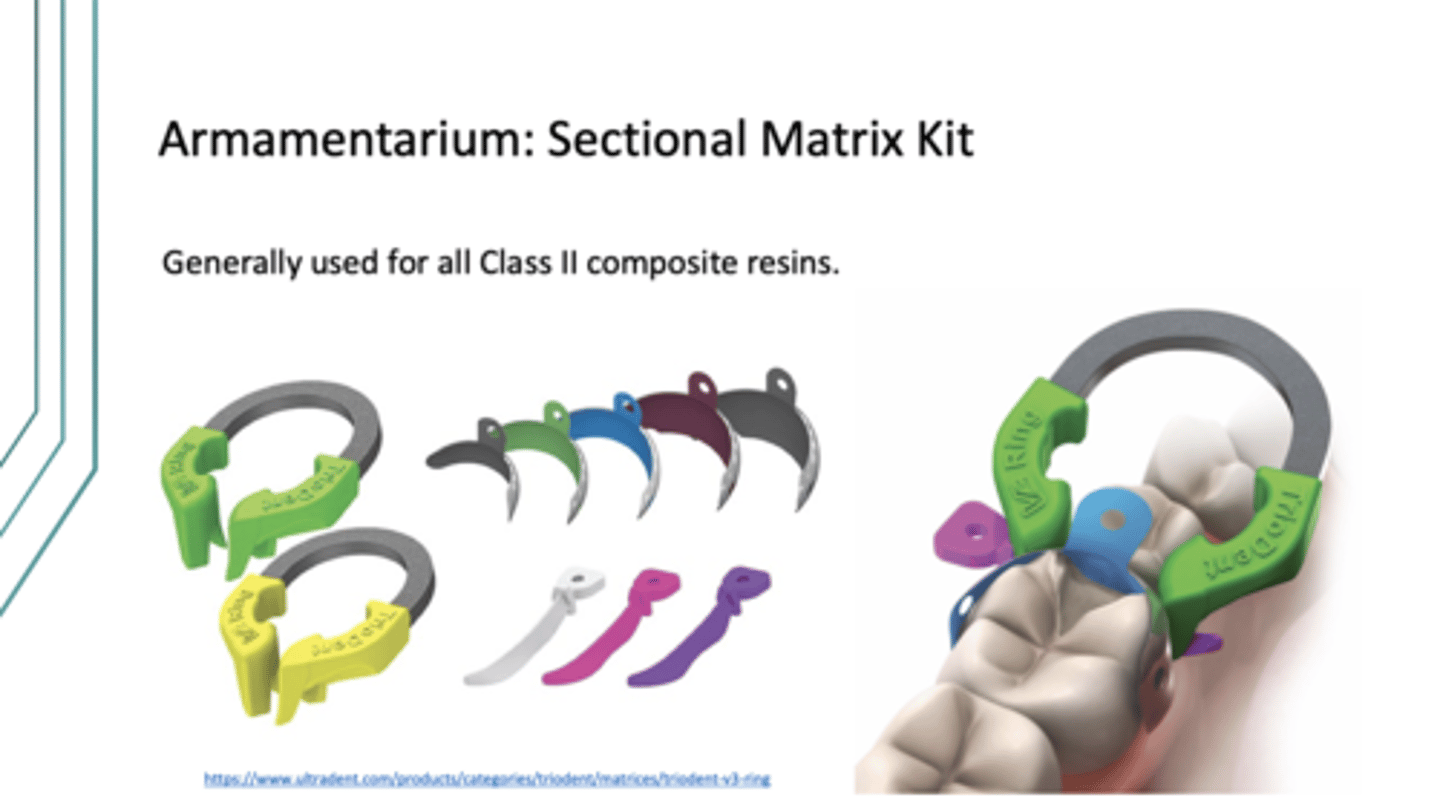
- sectional matrix kit
- mylar strips (NEVER for class 2 tho, just resin in general)
- composite finishing strips
trident sectional matrix kit is used for class ___ composite resins
2
clear matrix mylar strips are used for class ___ restorations but never for class ___
3 and 4
2
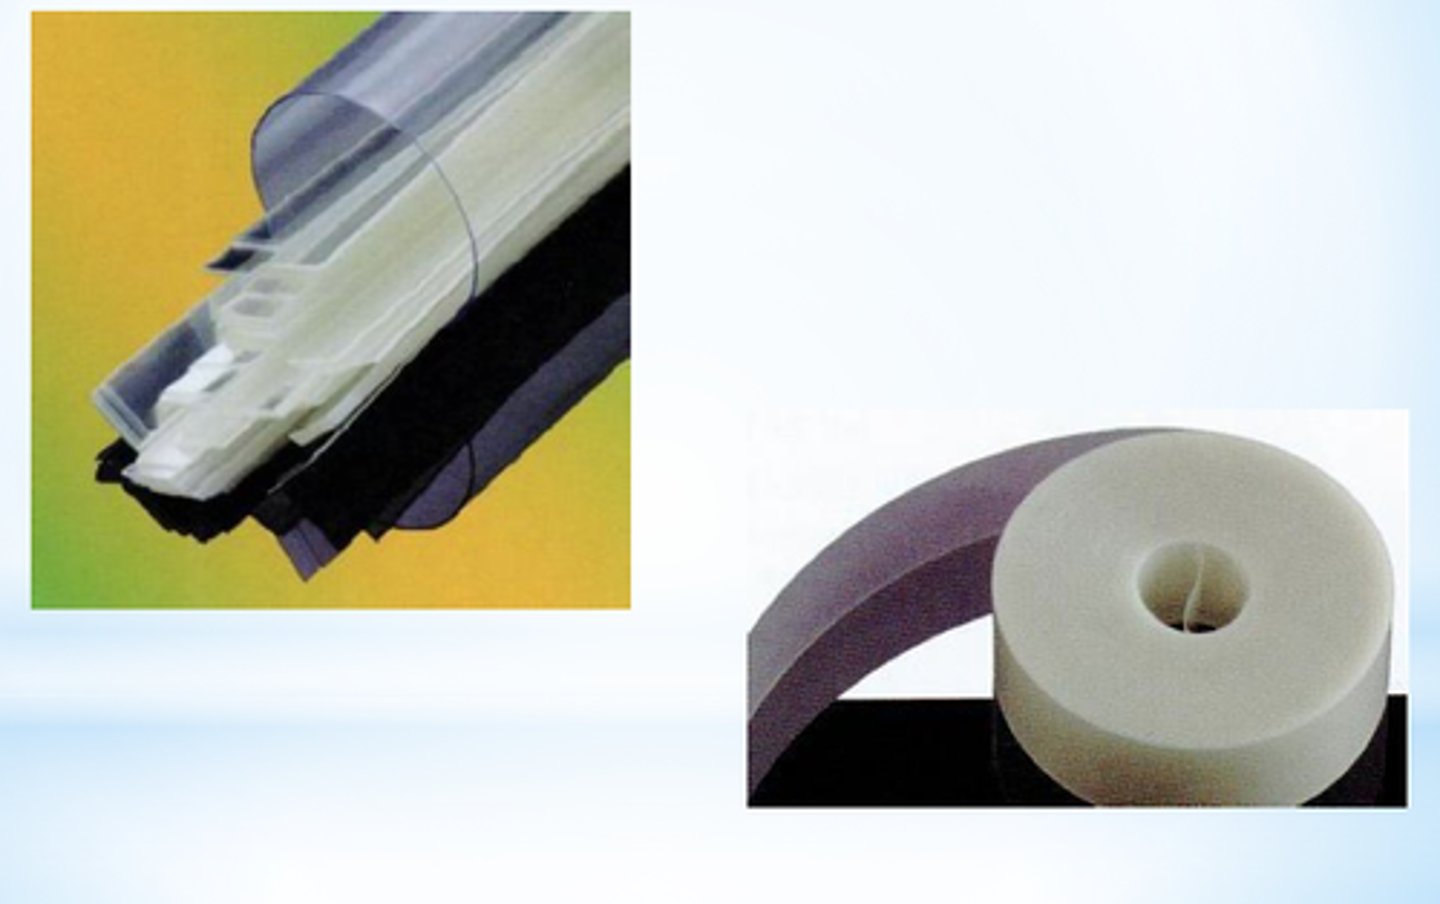
< ___cm of mylar strip is needed for an average restorations
1
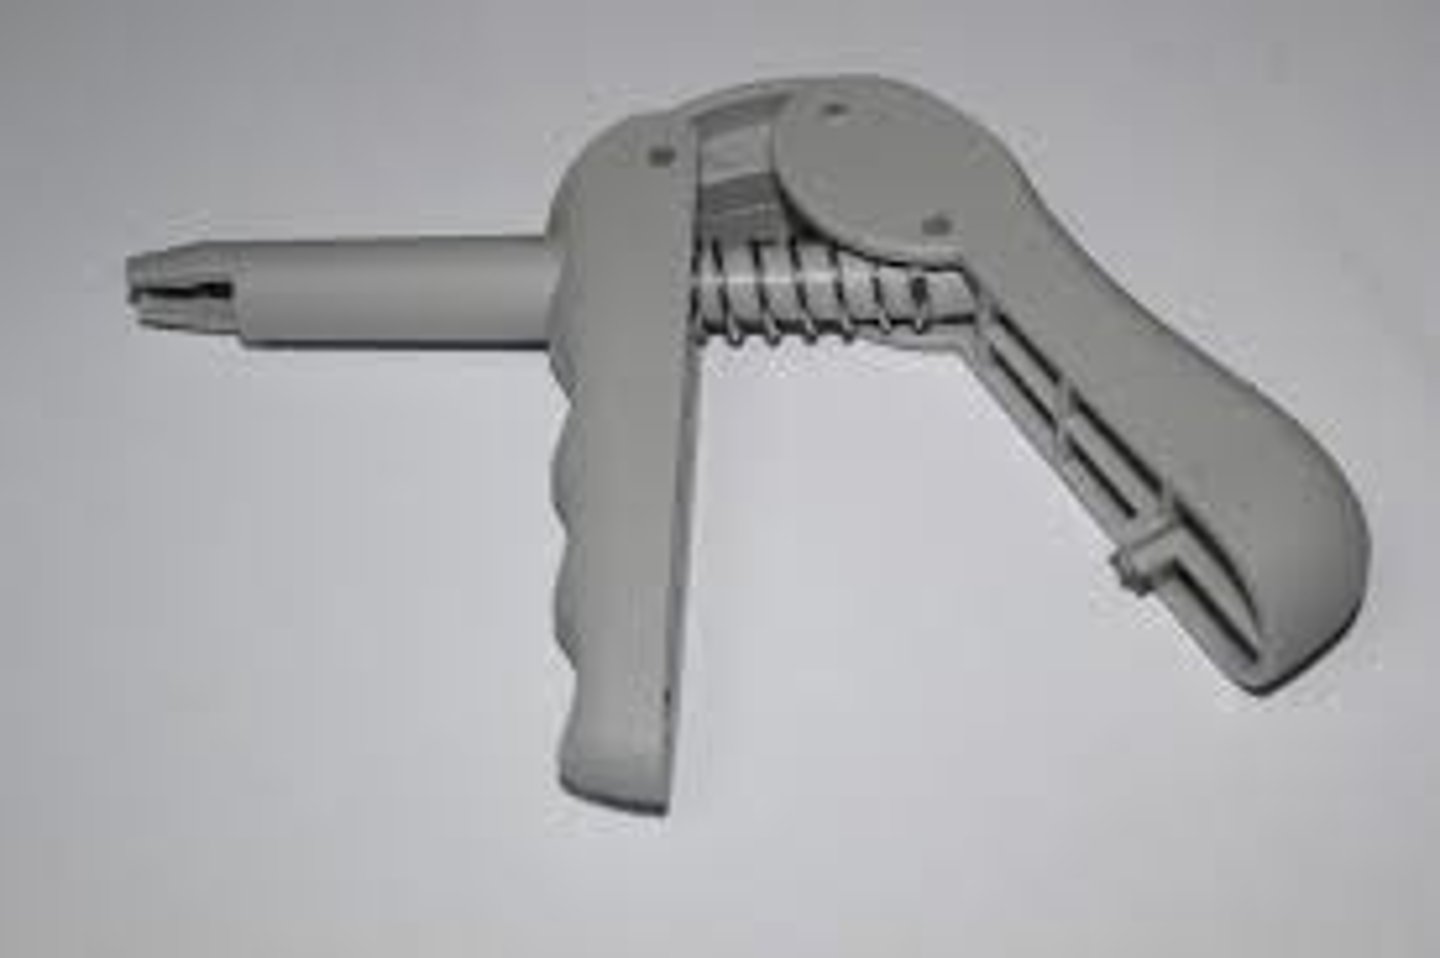
additional instruments that may be useful in manipulating composite resins
- resin instrument
- ball burnisher
- acorn burnisher
- half-hollenbeck
red vs yellow finishing bur
red = step 1, high fluted carbides
yellow = step 2, higher fluted carbides
composite polishing point kit components
finishing points/cups/discs + prismagloss paste
shade selection should be ___ rubber dam placement when tooth is ___
before
hydrated
dehydration increases/decreases ___ of teeth
increases
value
after shade selection ___, ___, and ___ before drilling on tooth
pre-check occlusion
isolate w/ rubber dam
pre-wedge
how do you clean un-instrumented enamel? instrumented enamel?
un-instrumented enamel = flour of pumice or non-fluoridated prophy paste
instrumented enamel = water spray and air
place resin in ___ no more than ___ thick
increments
2mm
how long do you cure each increment of resin?
20 seconds
for resin, contour as
you place resin
once you contour resin, remove wedge/ matrix/ dam and then
check interproximal contacts (visual + floss) and check occlusion
once occlusion and interproximal contacts are good
finish and polish restoration
when you pre-check occlusion, centric stop should be on ___ and not ___
enamel
restoration
garrison sectional matrix system
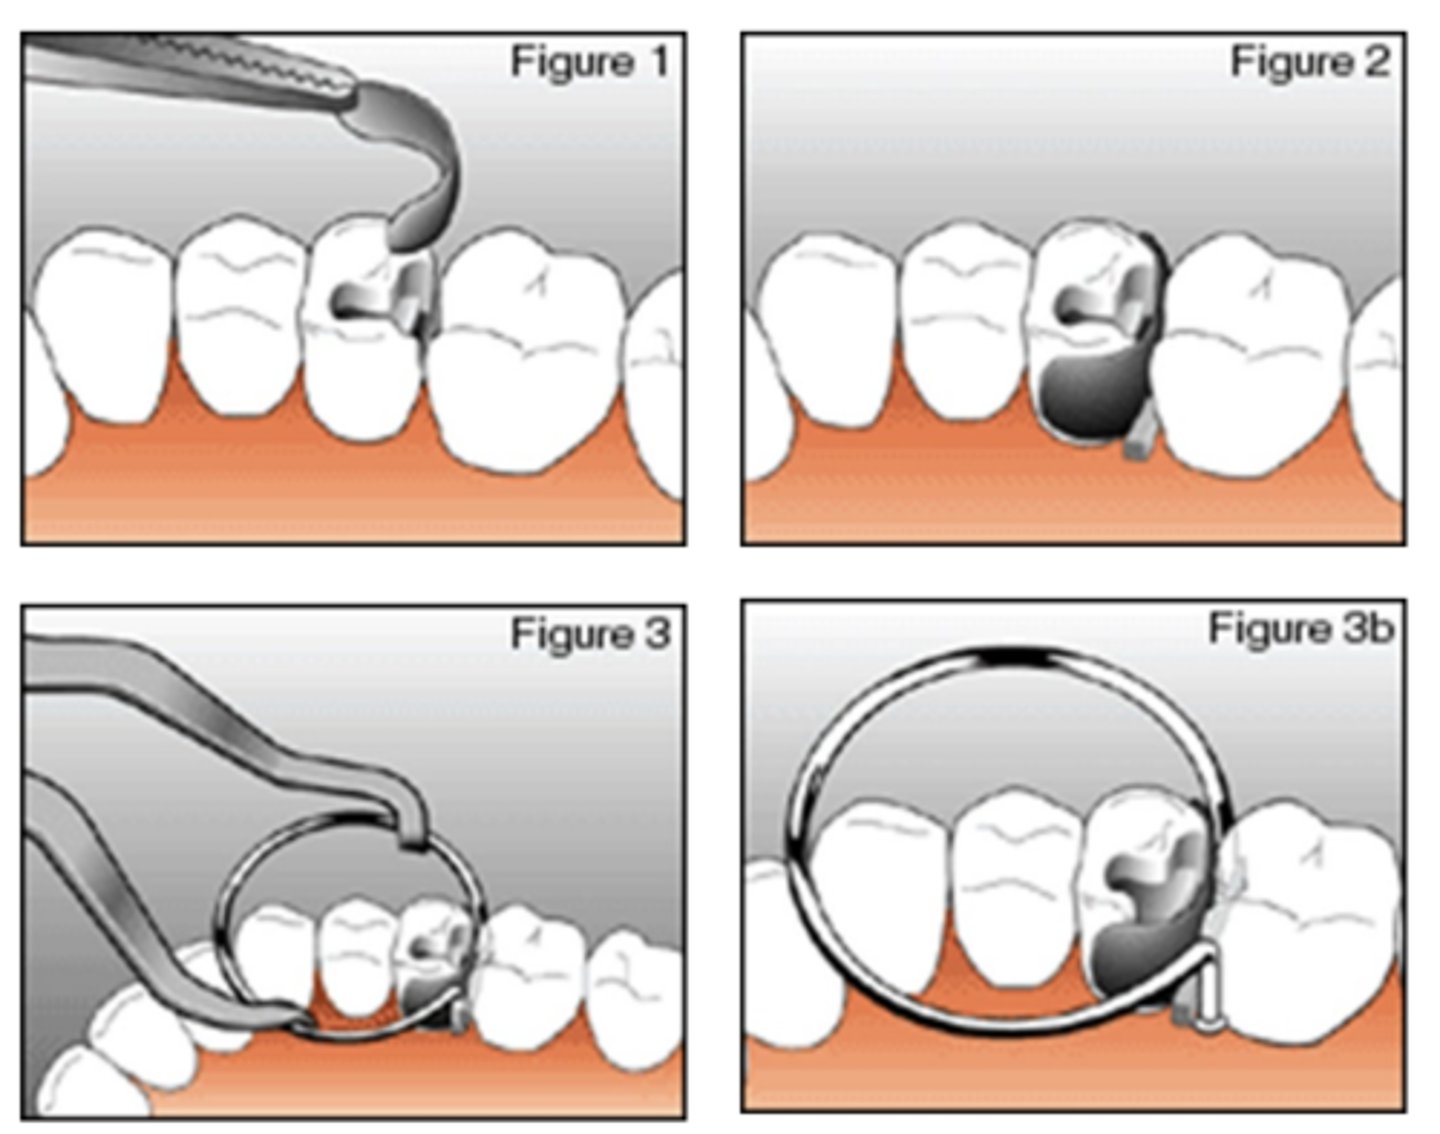
garrison steps
1. place Garrison sectional matrix
2. place standard wedge
3. place retainer (Garrison system)
what side is retainer/ Garrison system placed on compared to wedge?
prepped tooth side of wedge
can be opposite side in some cases
once you place Garrison retainer verify
shape/ contour of matrix
you may need to burnish metal band
sectional matrix band and gingival seat
matrix band is gingival to gingival seat (proper seal)
true for garrison and triodent
sectional matrix should extend ___ to the anticipated ___ height
occlusal
marginal ridge
for garrison and triodent
triodent sectional matrix system
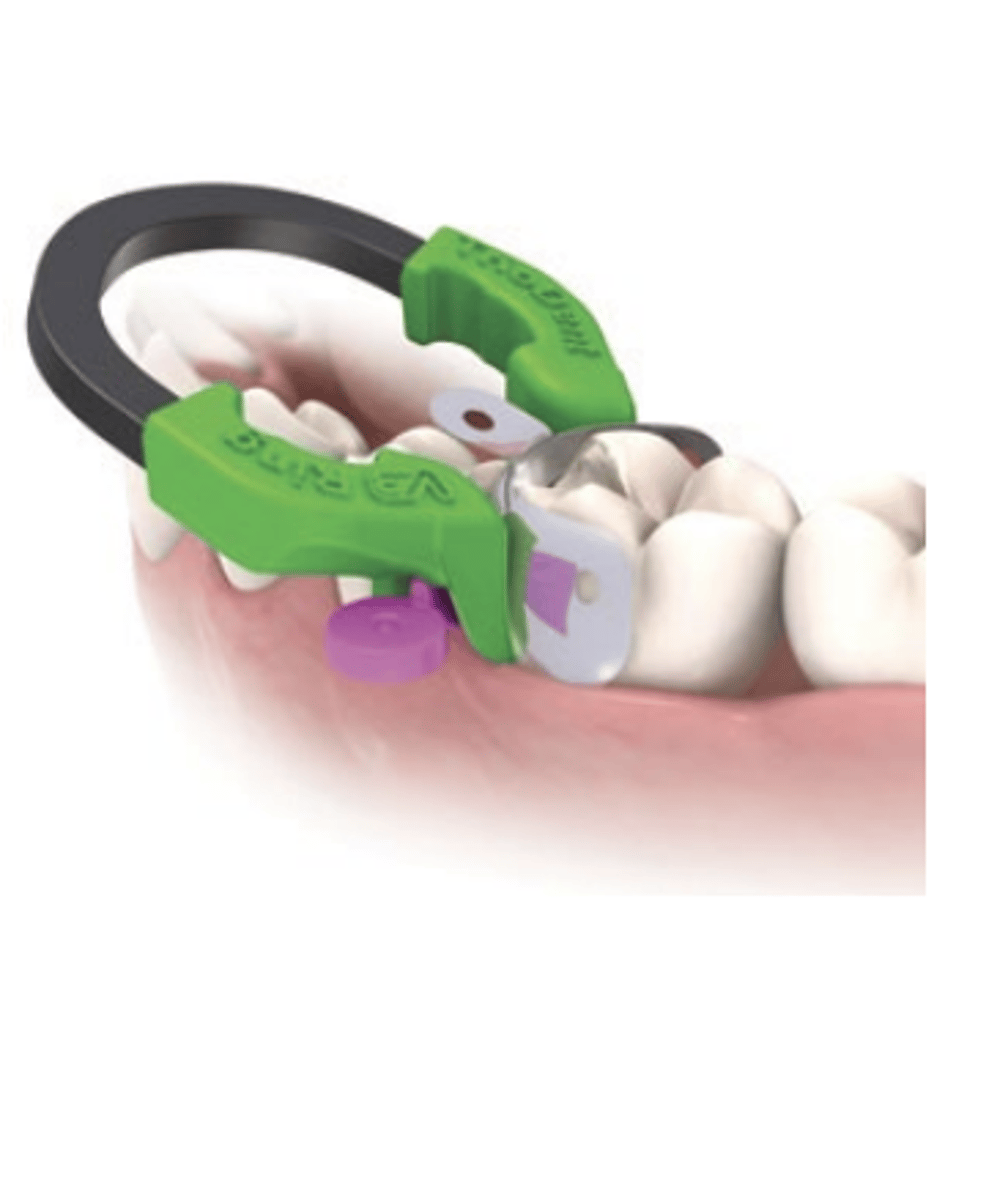
triodent section matrix system has its own ___ which functions to ___
wedge guard
pre-wedge + provide proximal protection
triodent matrix application steps
1. place matrix
2. place wedge
3. place retainer (triodent system)
once you place triodent retainer verify
shape/ contour + position of sectional matrix
you may need to burnish metal band
pulpal protectors are ___ and are used when distance between resin prep and pulp is ___
bases and liners
less than or equal to 1.5mm
chemical and name brands of pulpal protection
calcium hydroxide (dycal)
RMGI (vitrebond)
when light curing you must complete full curing cycle because
uncured monomer can be leached
light should be ___ to RBC as possible
as close
___mm layer thickness before it's time to cure... this ensures ___
1-2
thorough polymerization
once retainers and matrices have been removed, you can ___ to ensure even curing
cure B/L sides
what can be done clinically to ensure a marginal seal for class 2 restorations?
layer of flowable resin or RMGI can be placed on gingival seat
polymerization shrinkage will vary between ___-___% volume
2.6-7.1%
what direction does shrinkage occur?
shrinkage occurs toward the bulk of the material
stress from polymerization shrinkage may cause
- cusp movement
- enamel cracks
- sensitivity
- debonding/ marginal gap
- bacterial infiltration (micro leakage)
- secondary caries
bond strength and polymerization stress move in ___ directions
opposite (pull against each other)
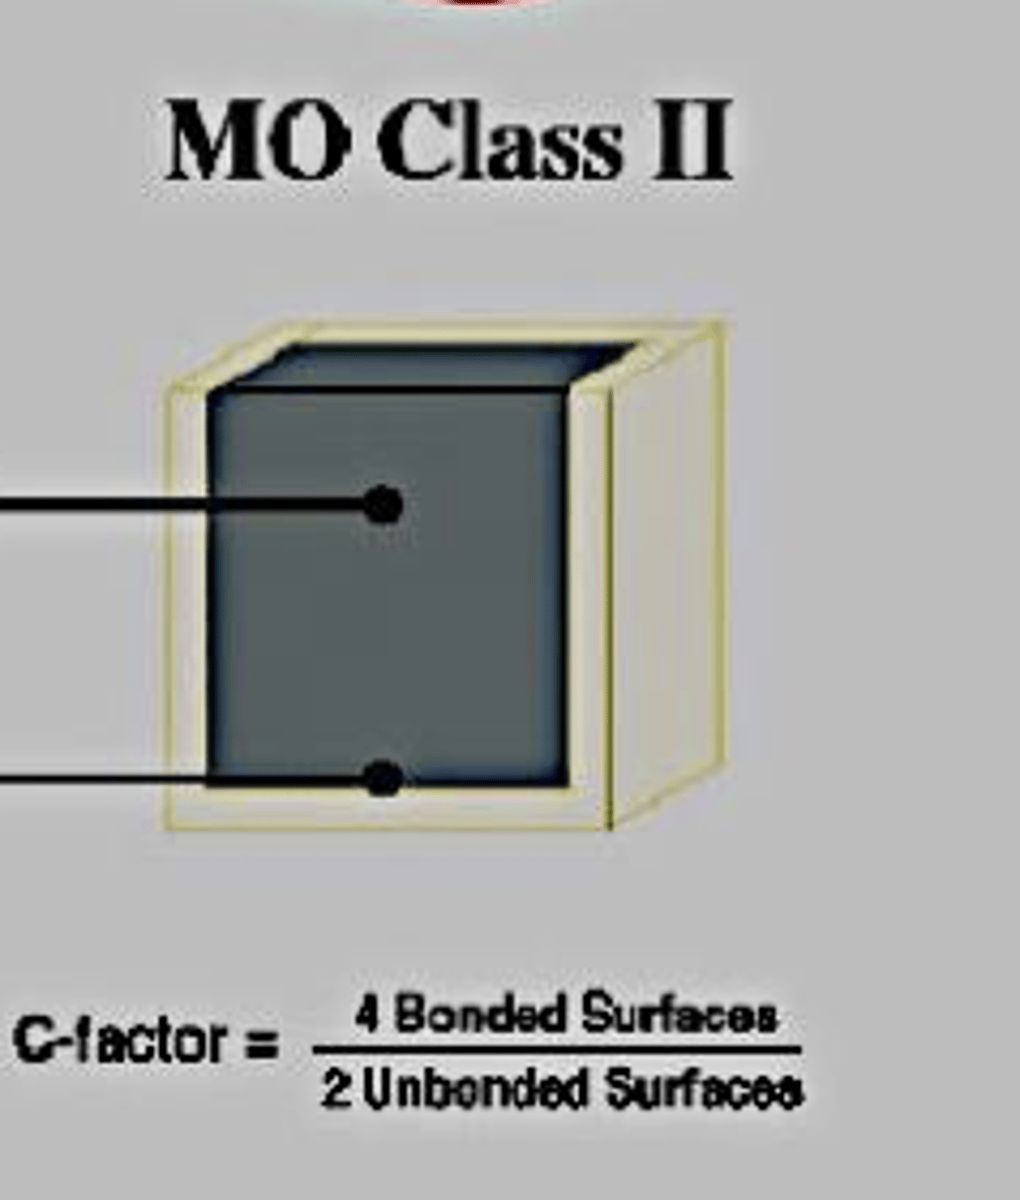
c factor full name
configuration factor
c factor =
bonded surface/ unbounded surfaces
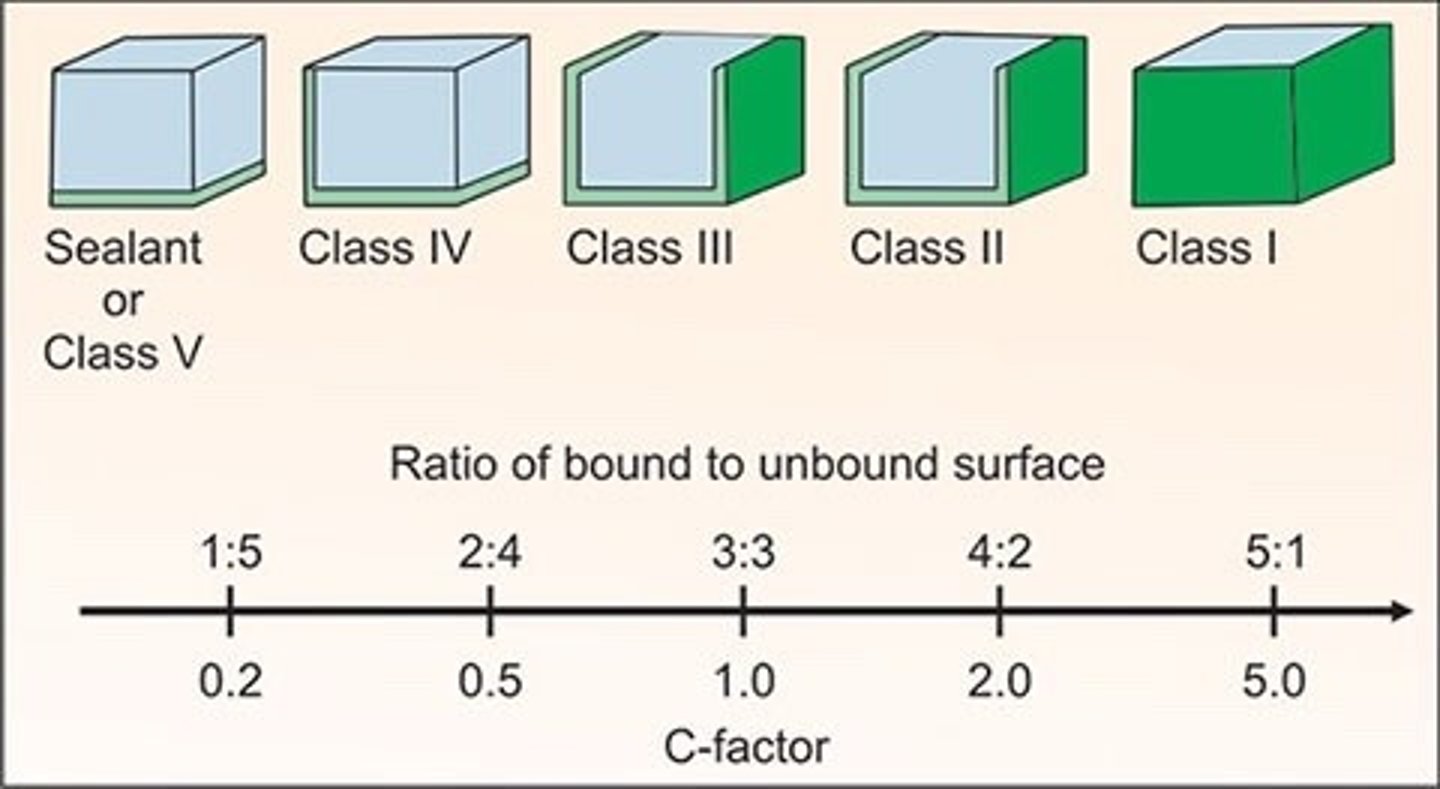
class 1 c factor if placed in one increment
5
high c factor = more polymerization shrinkage risk
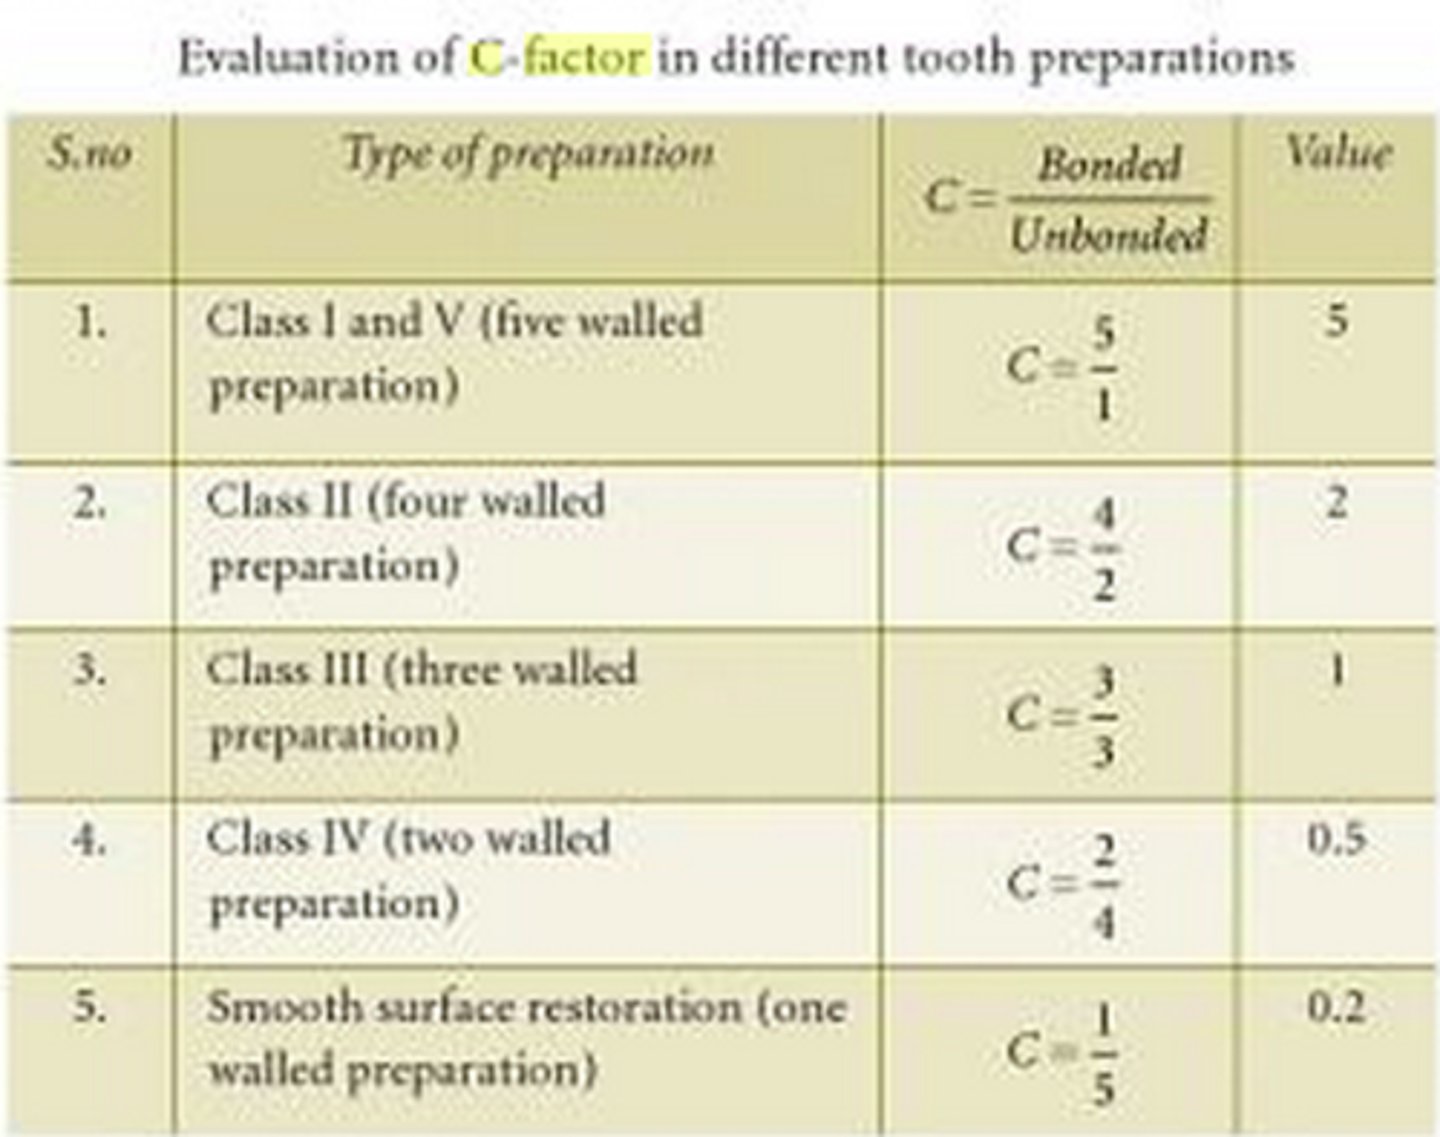
class 2 c factor if placed in one increment
2
bulk fill resin composites can be placed in ___mm increments and are more ___ in color
4-5
translucent
bulk fill resin composites should only be used for ___ teeth b/c they are translucent
posterior
some varieties of bulk fill resin composites must be capped with
conventional RBC
incremental technique for resin placement
see slides, place in 5 triangles to create anatomy
pros of incremental technique for resin placement
- ↓ polymerization shrinkage stress
- proper polymerization (depth of cure)
- creates occlusal anatomy
bulk placement can result in ___; incremental layer can counteract the effects of ___
debonding + stresses
polymerization shrinkage
when placing resin, ___ as you work and be sure material does not pull from ___
contour
internal/ external prep walls
resin finishing steps
1. red --> yellow finishing carbide
2. polishing discs (super snap)
3. finishing strip (sof lex)
4. finishing diamonds
5. enhance system
order for super snap polishing discs
black --> violet --> green --> red
sof-lex finishing strip order
coarse --> fine
after you finish, polish using ___ that is applied with ___
prisma gloss
enhance system
why are thinner layers (1-2mm) of resin better?
less shrinkage effect on tooth
do not overfill ___; overfill ___
resin
amalgam
matrix bands need to be snug at margins to prevent
overhangs and voids
resin = ___ restorations that cost less than ___ restorations
esthetic
ceramic
how does composite resin get its retention?
acid etching + enamel/ dentin adhesive (bond)
aka micro mechanical retention
what other dental materials are resin composites just w/ different chemistries?
- pit and fissure sealants
- bonding agents
major con of resin
occlusal and proximal wear
critical elements w/ resin placement
1. impeccable isolation
2. tissue management
3. proper bonding technique
impeccable isolation
rubber dam... surfaces must be free from saliva and other oral fluids
tissue managements
packing retraction cord (can be treated w/ epi or hemostatic agents)
proper bonding technique for resin
etch, prime, bond (meet requirements of manufacturer)
how to handle resin material properly
- avoid contamination with gloves, rubber dams, syringes
- avoid early photopolymerization with light
why should each layer be no more than 2mm in thickness?
shrinkage of composite resin + curing light penetration
proper finishing and polishing results in
high luster, plaque resistance, stain resistance
not following manufacturer instructions can result in restoration failure b/c it causes
- ↓ physical properties
- ↓ longevity
- ↑ secondary caries
- ↑ sensitivity/ pain
poor isolation can be caused by
no rubber dam, leaking rubber dam, inadequate cotton roll isolation, careless technique, sub gingival prep
solutions to prevent poor isolation
- better technique
- matrix system
- repeat all bonding procedure that happened before contamination
- use a material that does not require bonding
what causes halo white lines adjacent to enamel margins?
- bad contouring/ finishing
- bad etching/ bonding
- high-intensity light curing (causes excessive polymerization stress)
solutions to prevent halo white lines adjacent to enamel margins
- repeat all bonding procedures in sequence
- remove the defect and re-restore
- good finishing techniques (light, intermittent)
- use soft-start (ramping) polymerization curing lights
- *leave & monitor at set intervals for leakage
what causes voids?
- materials that require mixing (self-cure)
- spaces left between increments
- composite (tacky) pulling away from prep
solutions to prevent voids
- more careful technique
- repairing marginal voids by preparing defects and re-restoring (repeating all bonding procedures in sequence)
causes of light/ missing proximal contact
- inadequately contoured matrix band
- inadequate wedging
including PRE-WEDGING (during prep) and during restoration
- matrix band movement during restoration
- matrix band not in direct contact with adjacent proximal surface
- matrix band too thick
- tacky composite pulling away from contact area during insertion
- circumferential matrix band use
solutions to prevent light or missing proximal contacts
- contour matrix band
- matrix contacts adjacent tooth
- firm wedging (pre-wedging during prep + during restoration)
- use sectional matrix system
- use hand instrument to hold matrix while placing increments
- use specialized (triangular) light curing tips instrument to hold matrix in place while placing increments
- careful insertion technique
causes of inaccurate shade selection
- inappropriate operator lighting while selecting shade
- selection of shade after tooth has been dried
- shade tab not matching the actual composite shade
- wrong shade chosen
solutions to prevent inaccurate shade selection
- natural light when selecting
- select shade first (before isolation)
- pre-op shade verification on tooth (curing, then removing)
- know zones of different shades for natural teeth
causes of poor retention
- contamination of operating field
- poor bonding technique
- use of incompatible bonding material