Concepts of the Exploring Technique
1/27
There's no tags or description
Looks like no tags are added yet.
Name | Mastery | Learn | Test | Matching | Spaced | Call with Kai |
|---|
No analytics yet
Send a link to your students to track their progress
28 Terms
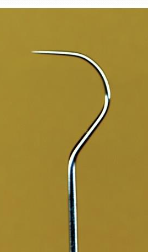
Shepherd hook design
Resembles the long curved stick used by shepherds to catch sheep
Supragingival use
Examinations for dental caries (decay)
Examination of the margins of restorations
Opposite side of probe
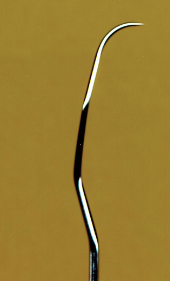
Explorer 11/12
Tip bent at 90-degree angle to lower shank
Long, complex shank design
Can access deeper pockets
Complex=posterior and anterior teeth use
Supra + sub due to rounded back
An assessment instrument with a flexible wire-like working-end
Used to detect subgingival calculus deposits
Made of flexible metal that conducts vibrations from the working-end to the clinician’s fingers
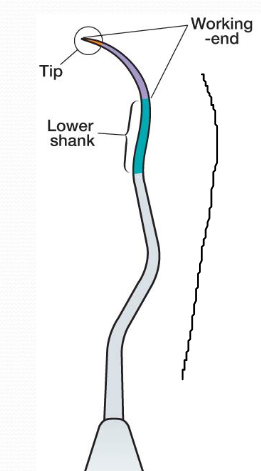
Shank design of explorer
Long Functional Shank
Long, curved working end
Only terminal 2mm of the side of the tip is adapted to the tooth
surface
Uses of an explorer
Calculus deposits
Decalcified and carious lesions
Dental anomalies
Anatomic features of the teeth
Don't put direct tip into carious lesions
Determine if there's dental anomalies
Help feel anatomical features (CEJ)
Supragingival
use of an instrument coronal to(above) the gingival margin
Subgingival
Use of an instrument apical to(beneath) the gingival margin
Advantages of 11/12 explorer
Smooth back of tip is in contact with soft tissue base
of sulcus or pocket
Complex shank excellent for anterior and posterior teeth
Can access deeper pockets due to long shank
Disadvantages of 11/12 explorer
NONE!
This explorer works well throughout the mouth and can be used in healthy sulci and deep periodontal pockets.
Assessment/exploratory stroke
Used to detect calculus deposits or other tooth surface irregularities on the tooth surface
During subgingival instrumentation, the clinician relies on his or her sense of touch to locate calculus deposits hidden beneath the gingival margin.
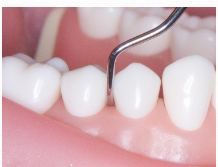
Technique tips for exploring
Grasp - relaxed grasp, middle finger rests lightly on shank
Adaptation - 1 to 2 mm of side of tip
Lateral Pressure - feather-light pressure against tooth
Strokes - fluid, sweeping strokes that overlap to cover the surface
Tactile sensitivity
the ability to detect calculus deposits by feeling vibrations transferred from the explorer tip to the instrument shank and handle.
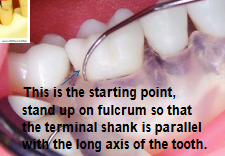
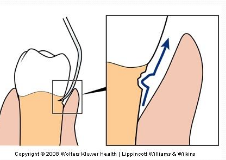
Select the correct working end
Observe the relationship of the lower shank to the distal surface of a premolar tooth.
Use the premolar tooth, for selection, as this tooth is easily seen.
V to the D for posterior teeth
Correct working end
The lower shank is parallel to the distal surface.
The functional shank goes “up and over” the tooth.
Instrument handle comes “outside the mouth”
Incorrect working end
The lower shank crosses the facial surface (not parallel)
The functional shank is “down and around” the tooth.
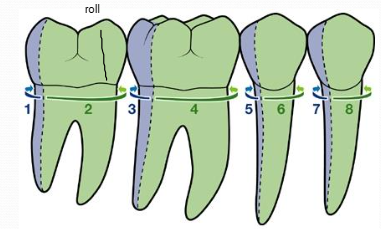
Tooth surface sequence
Start at the distofacial line and work back toward the distal surface
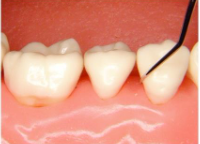
Steps for using the explorer
Place the explorer tip in the Get Ready Zone (distofacial line angle)
Lower the instrument handle. Gently insert beneath the gingival margin; Make feather-light strokes toward the distal surface
As you approach the distal surface, roll the instrument handle slightly to maintain adaptation; Explore at least halfway across the distal surface.
Begin at the distofacialline angle; Get Ready and position the tip in the middle-third of the crown
Lower the instrument handle. Gently insert beneath the gingival margin. Make a series of feather- light strokes across the facial surface.
Roll the instrument handle as you approach the mesiofacial line angle to maintain adaptation. Explore at least halfway across the mesial surface from the facial aspect.
Subgingival exploring
Assessment strokes should be short in length and involve
many overlapping strokes
Cover every square mm of the root surface as if “coloring the surface”
Sequence for posterior pic
Technique errors Exploring
AVOID a firm, tense, “death grip”.
AVOID applying pressure with the middle finger against the shank.
Both these errors reduce tactile information to the fingers.
•Do NOT remove the explorer tip from the sulcus or pocket as you
make an upward stroke. Keep the tip beneath the gingival margin.
•Removing and reinserting the tip repeatedly can injure the gingival tissue.
Calculus
not pathogenic itself, but the live bacteria/biofilm on top of it
Calcified plaque biofilm
Forms on teeth and prosthesis
“tartar”
Built up layer by layer over time
Plaque retentive=outer surface is typically covered with plaque
Supragingival deposits (above the gingiva)
Subgingival deposits (below the gingiva)
Residual (left over after instrumentation)
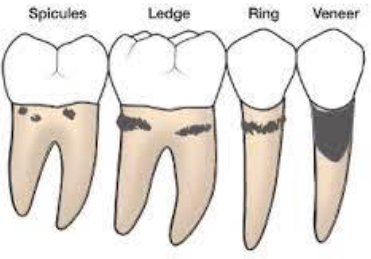
Common calculus formations
Spicule-isolated minute speck
Nodule-larger spicule-type with crusty or spiny surface
Ledge-long ridge running parallel to the gingiva
Ring-ridge that encircles the tooth
Veneer-thin, smooth sheet
Finger-like formation-runs parallel to long axis of tooth
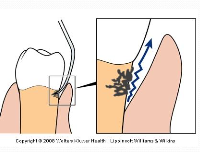
Normal conditions
Your fingers do not feel any interruptions in the path of the explorer.
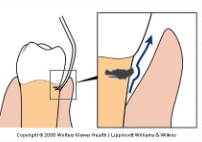
Small calculus deposits
You will feel a gritty sensation as the explorer passes over the small calculus deposit.
“Inline skating over a few pieces of gravel”
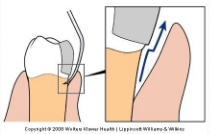
Large ledge of calculus
You will feel the tip move out and around the raised bump and return back to the tooth surface.
“Skating over a speed bump in a parking lot”
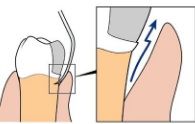
Overhanging restoration
Explorer must move away from tooth and over the restoration
“Skating over a section of a sidewalk that is higher than the adjacent section”
Deficient margin on restoration
Explorer dips into trace the restoration
“Skating onto a section of pavement that is lower than the surrounding pavement”
Carious lesion
Explorer tip dips in to a rough depression
“Skating into a pot hole”
Helpful tips
Lead with the tip, do not “back into” or “ out of ” an
area.
Light grasp! Lighter than you think
Roll the instrument handle between the fingers to keep the tip closely adapted as the tooth contour changes.
DON’T STOP....Continue strokes under the tooth contact into the interproximal area.
See pg. 313 for common errors and fixes