physics - core practicals IGCSE EDEXCEL
 Call Kai
 Learn
Learn Practice Test
 Spaced Repetition
 Match
Match Flashcards
 Knowt Play
1/19

There's no tags or description
Looks like no tags are added yet.
Name | Mastery | Learn | Test | Matching | Spaced | Call with Kai | Chat |
|---|
No analytics yet
Send a link to your students to track their progress
20 Terms
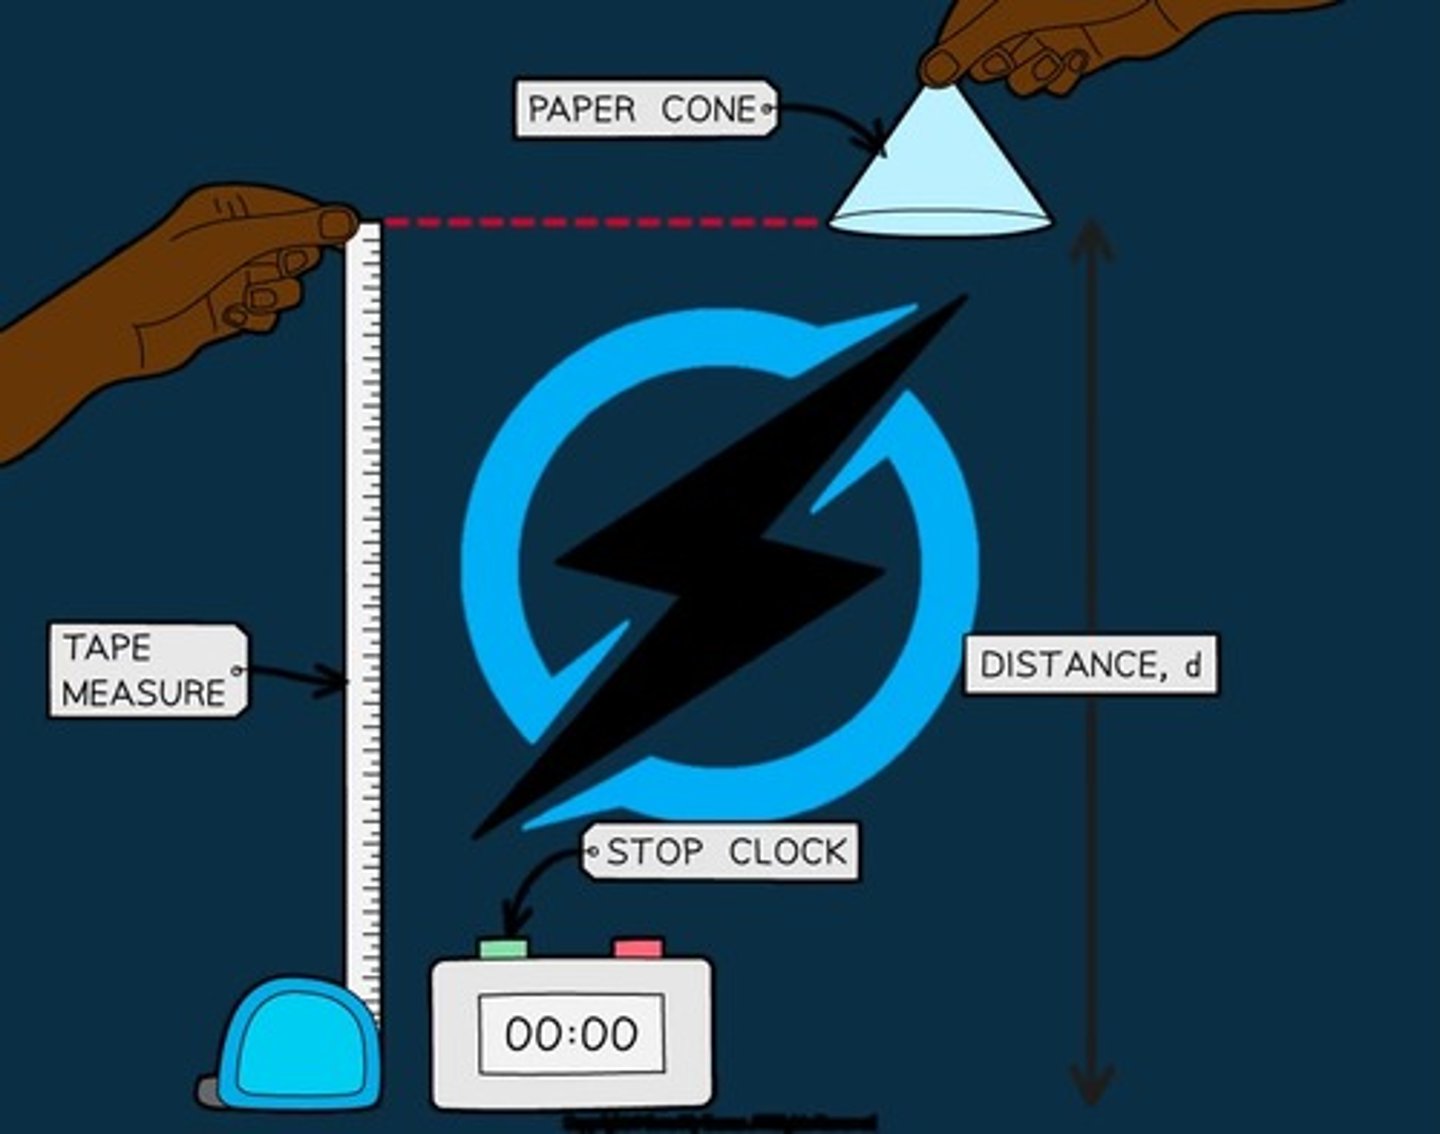
Investigating motion : method
1. Measure out a height using a tape measure or metre ruler
2. Drop the object (paper cone or tennis ball) from this height, which is the distance travelled by the object
3. Use the stop clock to measure how long the object takes to travel this distance
4. Record the distance travelled and time taken
5. Repeat steps 2-3 three times, calculating an average time taken for the object to fall a certain distance
6. Repeat steps 1-4 for different heights
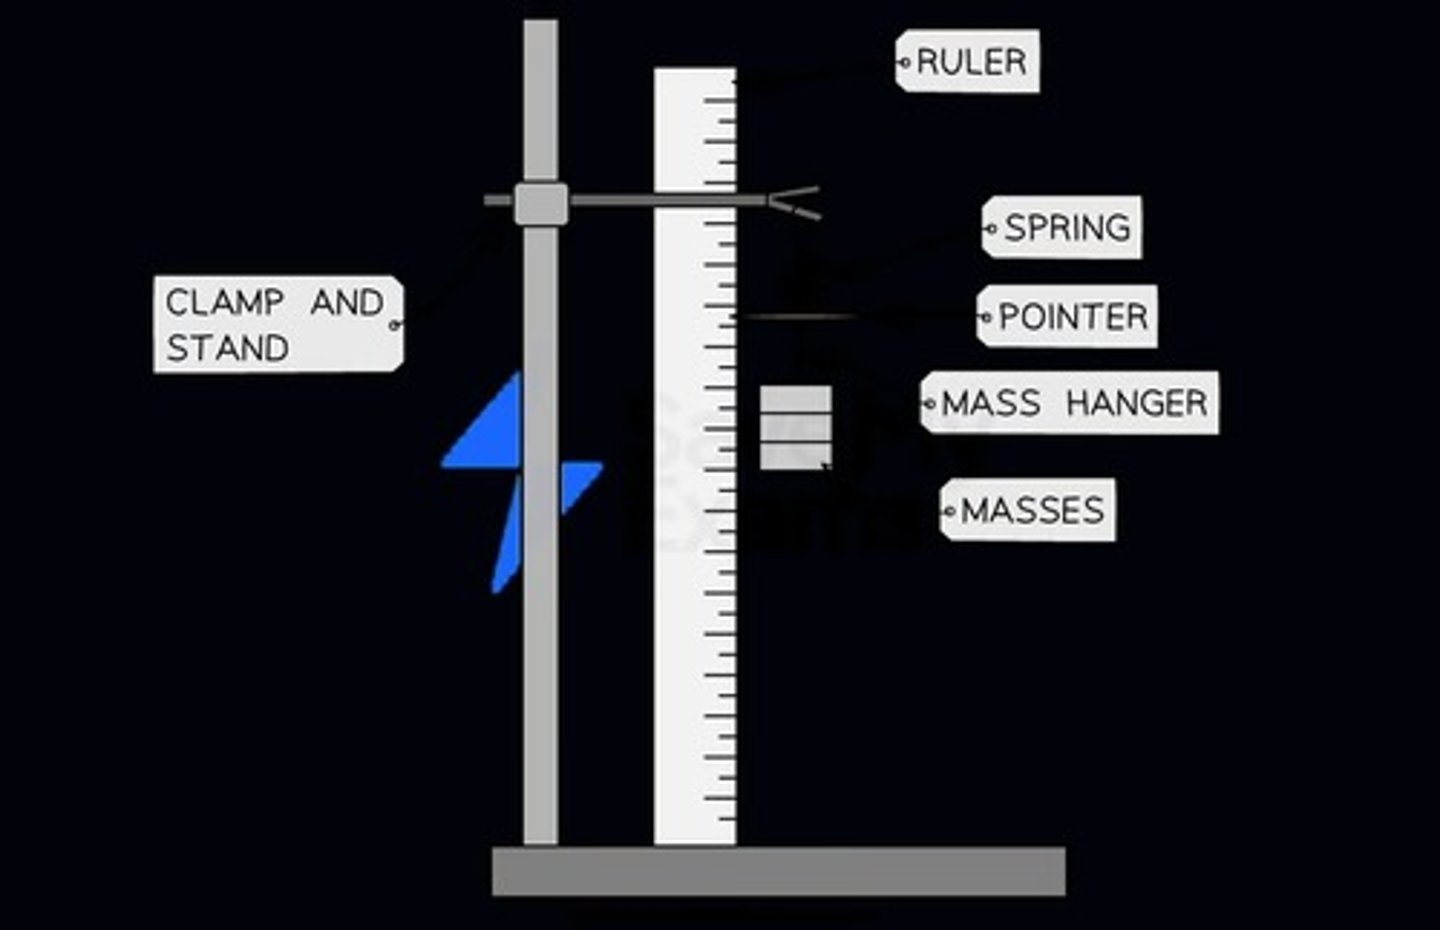
Investigating force and extension : springs and rubber bands
1. Align the marker to a value on the ruler with no mass added, and record this initial length of the spring / rubber band
2. Add the 100 g mass hanger onto the spring / rubber band
3. Record the mass (in kg) and position (in cm) from the ruler now that the spring / rubber band has extended
4. Add another 100 g to the mass hanger
5. Record the new mass and position from the ruler now that the spring / rubber band has extended further
6. Repeat this process until all masses have been added
7. Remove the masses and repeat the entire process again, until it has been carried out a total of three times, and an average length (for each mass attached) is calculated
Investigating force and extension: metal wires
1. Set up the apparatus so the wire is taut with no masses added
2. Measure the original length of the wire using a metre ruler and mark a reference point with tape preferably near the beginning of the scale eg. at 1 cm
3. Record the initial length of the wire to the marker
4. Add a 100 g mass onto the mass hanger
5. Read and record the new reading of the tape marker from the meter ruler now that the metal wire has extended
6. Repeat this process until all masses have been added
7. Remove the masses and repeat the entire process again, until it has been carried out a total of three times, and an average length (for each mass attached) is calculated

metal wire extensions apparatus
- Clamp a spring onto a stand, such that it is hanging vertically down.
- Measure the spring's original length.
- Place a known weight (100g = 1N) on to the end of the spring and measure how far it has extended. A pointer attached to the spring (fiducial marker) can help to reduce parallax errors.
- Repeat the process by adding one weight at a time and measuring the extended length each time.
- Calculate the extension for each weight (Extension = extended length - original length)
- Plot a graph of force against extension
- Draw a line of best fit. It should be a straight line through the origin. If it is, then the extension is proportional to the applied force, and the spring is said to obey Hooke's law.
- The Spring Constant can be calculated by dividing the change in Force by the extension.
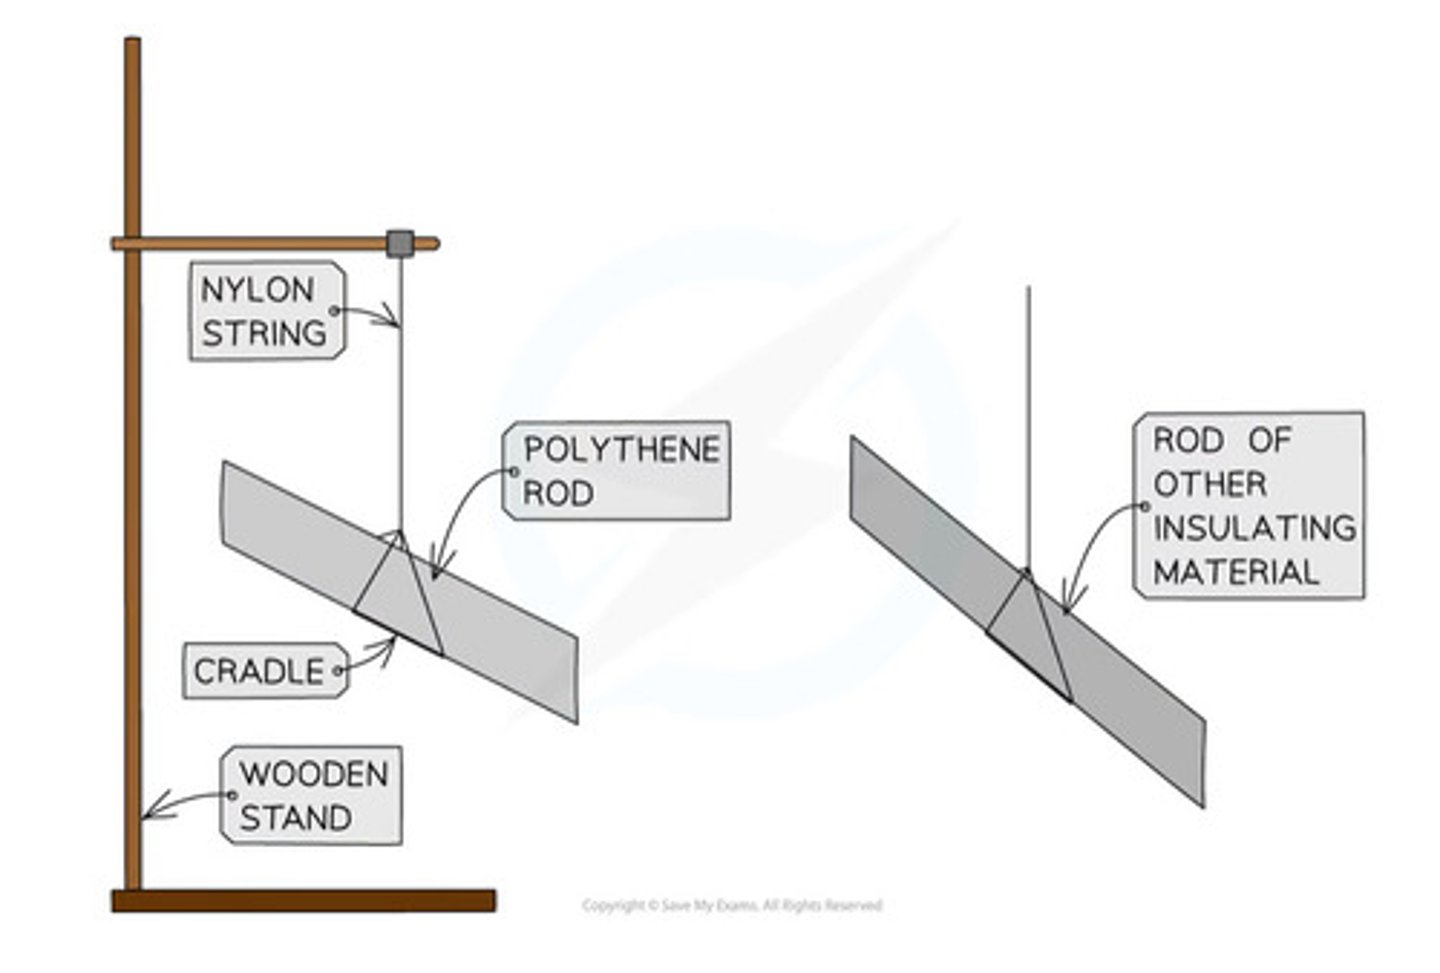
Investigate charging by friction
Aim : investigate how insulating materials can be charged by friction
1. Take a polythene rod, hold it at its centre and rub both ends with a cloth
2. Suspend the rod, without touching the ends, from a stand using a cradle and nylon string
3. Take an acrylic rod and rub it with another cloth
4. Without touching the ends of the acrylic rod bring each end of the acrylic rod up to, but without touching, each end of the polythene rod (if the ends do touch, the rods will discharge and the forces will no longer be present)
5. Record any observations of the polythene rod's motion
6. Repeat, changing out the acrylic rod for rods of different materials
- If the material is repelled by (rotates away from) the polythene rod, then the materials have the same charge
- If the material is attracted to (moves towards) the polythene rod, then they have opposite charges
In the example from the diagram above, the acetate rod would be attracted to the polythene rod, as they have opposite charges
Investigating refraction
1. Place the glass block on a sheet of paper, and carefully draw around the rectangular perspex block using a pencil
2. Switch on the ray box and direct a beam of light at the side face of the block
3. Mark on the paper:
A point on the ray close to the ray box
The point where the ray enters the block
The point where the ray exits the block
A point on the exit light ray which is a distance of about 5 cm away from the block
4. Draw a dashed line normal (at right angles) to the outline of the block where the points are
5. Remove the block and join the points marked with three straight lines
6. Replace the block within its outline and repeat the above process for a ray striking the block at a different angle
7. Repeat the procedure for each shape of perspex block (prism and semi-circular)
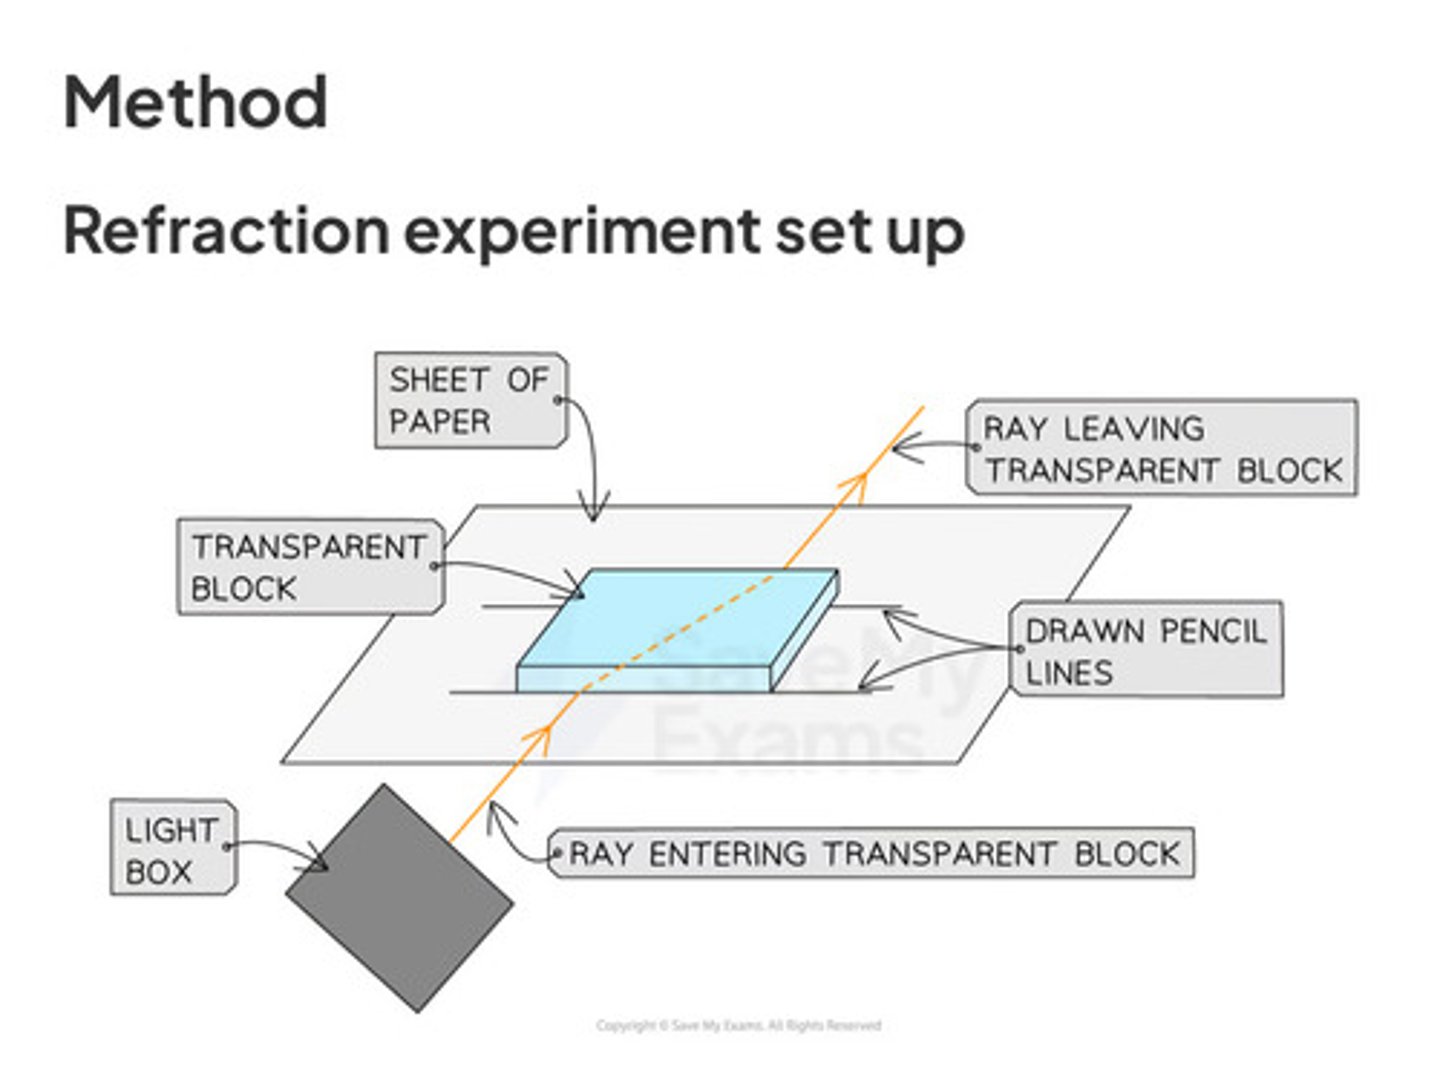
Method to prove Snell's law
Method: refraction practical
For refractive index do sin(I) / sin(r)
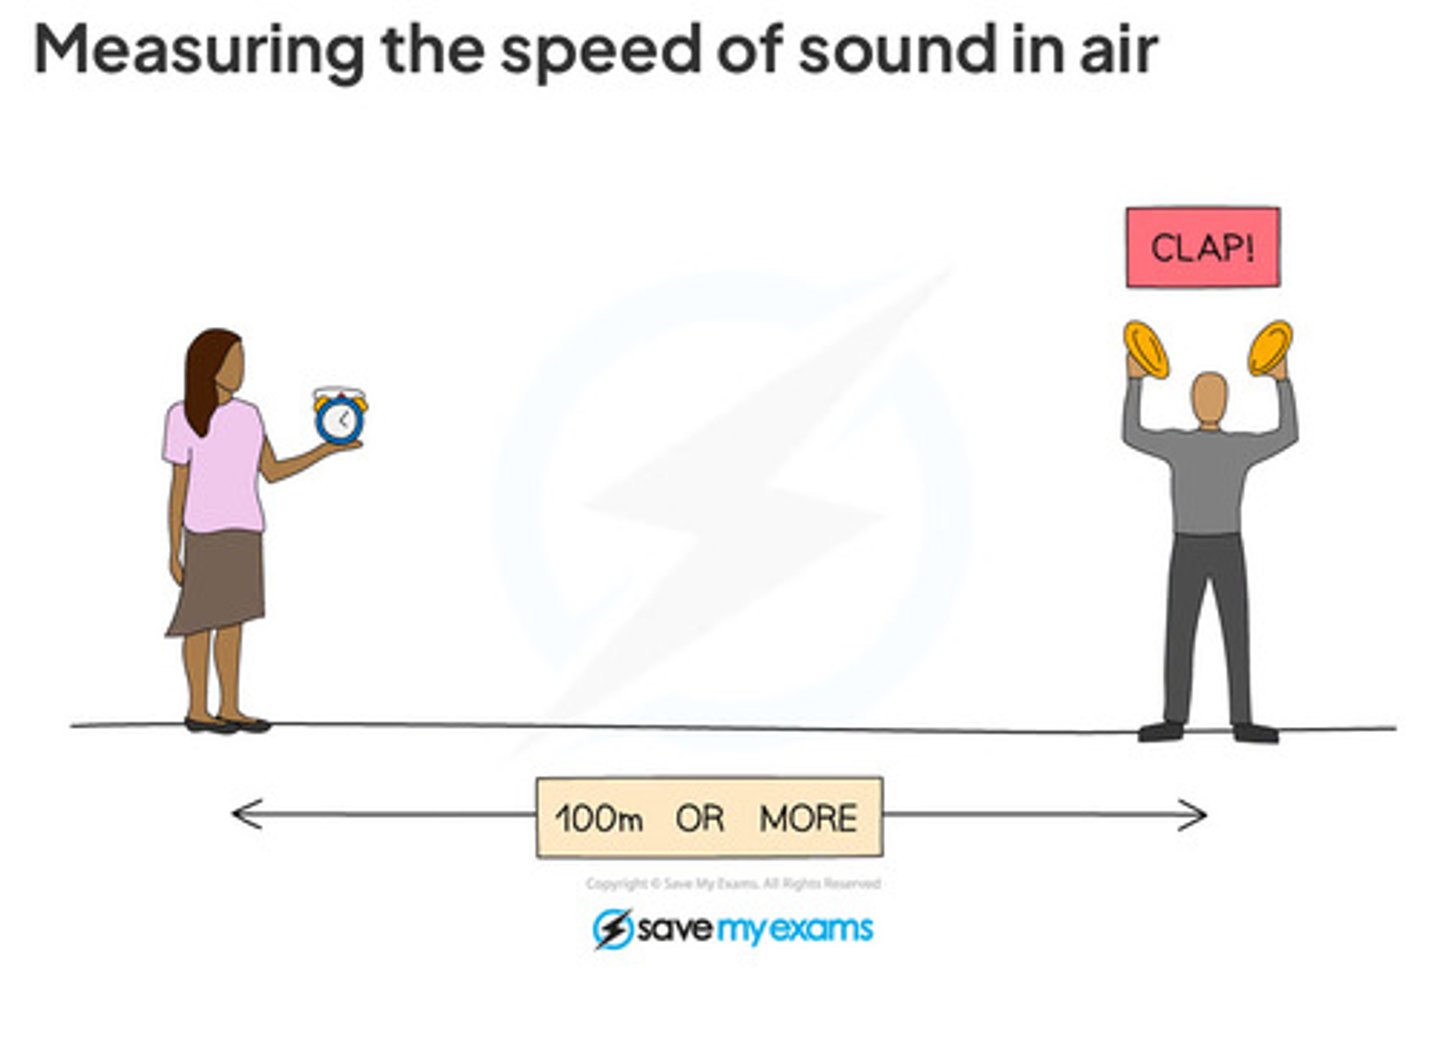
Investigating the speed of sound
1. Use the trundle wheel to measure a distance of 100 m between two people
2. One of the people should have two wooden blocks, which they will bang together above their head to generate sound waves
3. The second person should have a stopwatch which they start when they see the first person banging the blocks together and stop when they hear the sound
4. This should be repeated several times and an average taken for the time travelled by the sound waves
5. Repeat this experiment for various distances, e.g. 120 m, 140 m, 160 m, 180 m
Measuring the speed of sound with oscilloscopes
1. Connect two microphones to an oscilloscope
2. Place them about 2 m apart using a tape measure to measure the distance between them
3. Set up the oscilloscope so that it triggers when the first microphone detects a sound, and adjust the time base so that the sound arriving at both microphones can be seen on the screen
4. Make a large clap using the two wooden blocks next to the first microphone
5. Use the oscilloscope to determine the time at which the clap reaches each microphone and the time difference between them
6. Repeat this experiment for several distances, e.g. 2 m, 2.5 m, 3 m, 3.5 m
How to adjust the oscilloscope to show fewer wave cycles?
Adjust timebase: decrease it
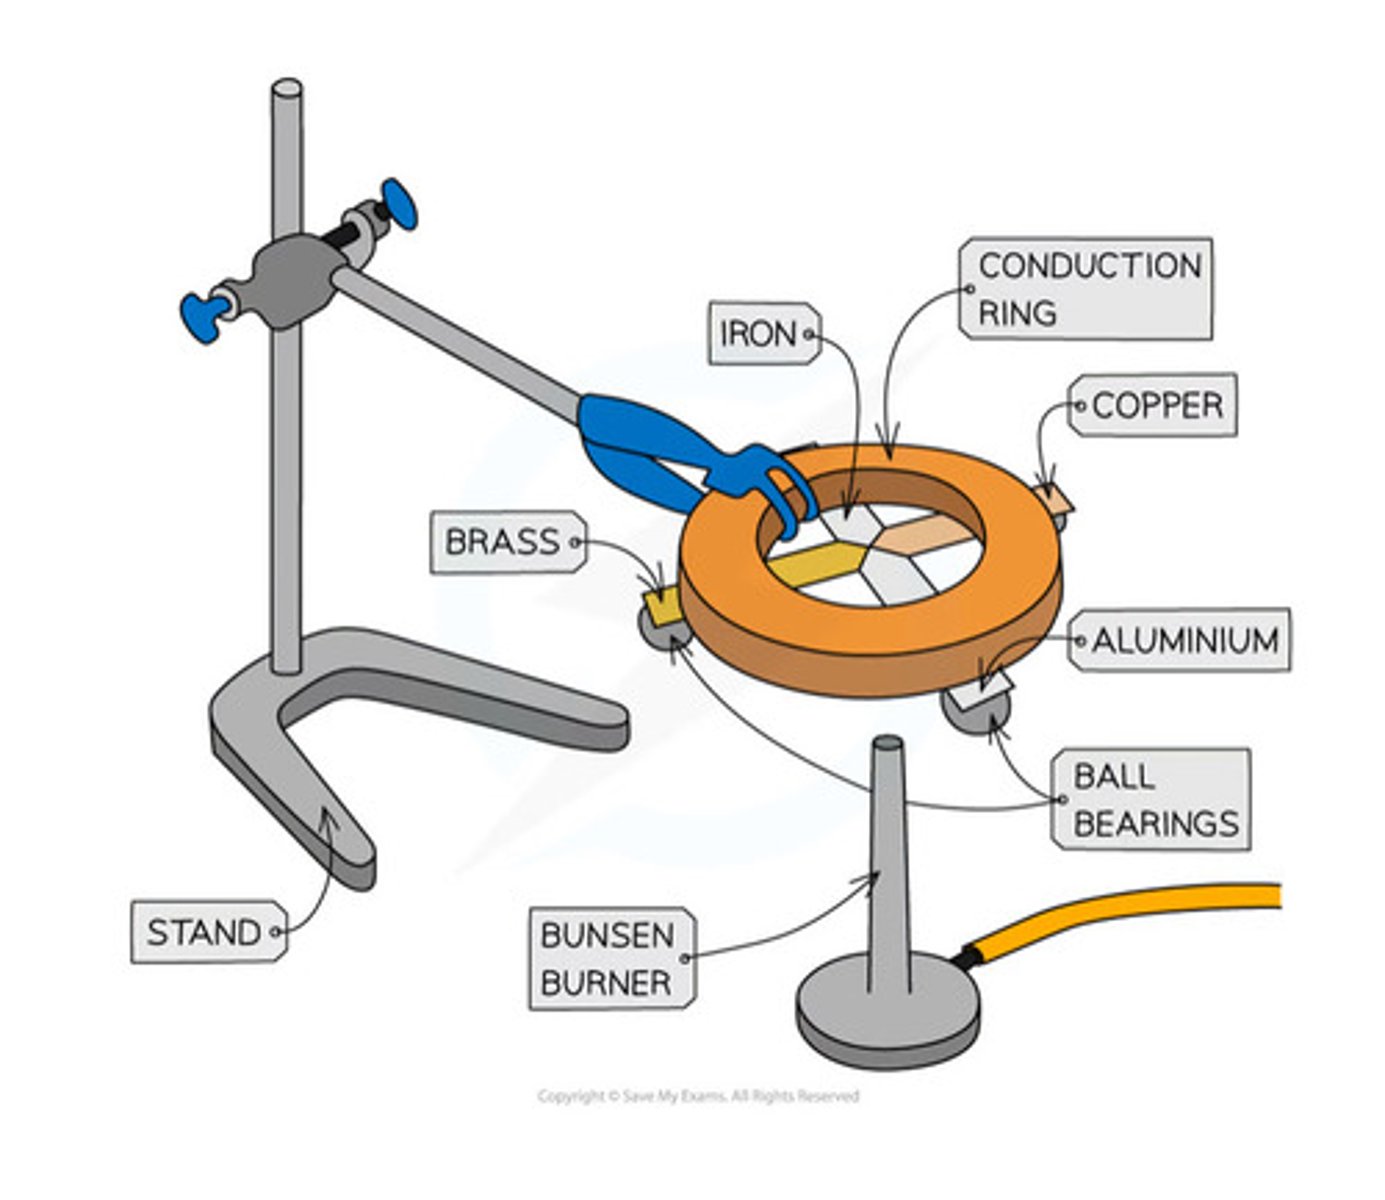
Investigating thermal energy
1. Attach ball bearings to the ends of each metal strip at an equal distance from the centre, using a small amount of wax
2. The strips should then be turned upside down and the centre heated gently using a bunsen burner so that each of the strips is heated at the central point where they meet
4. When the heat is conducted along to the ball bearing, the wax will melt and the ball bearing will drop
5. Time how long this takes for each of the strips and record in a table
6. Repeat the experiment and calculate an average of each time
The first ball bearing to fall will be from the rod that is the best thermal conductor.
This is because materials with high thermal conductivity heat up faster than materials with low thermal conductivity
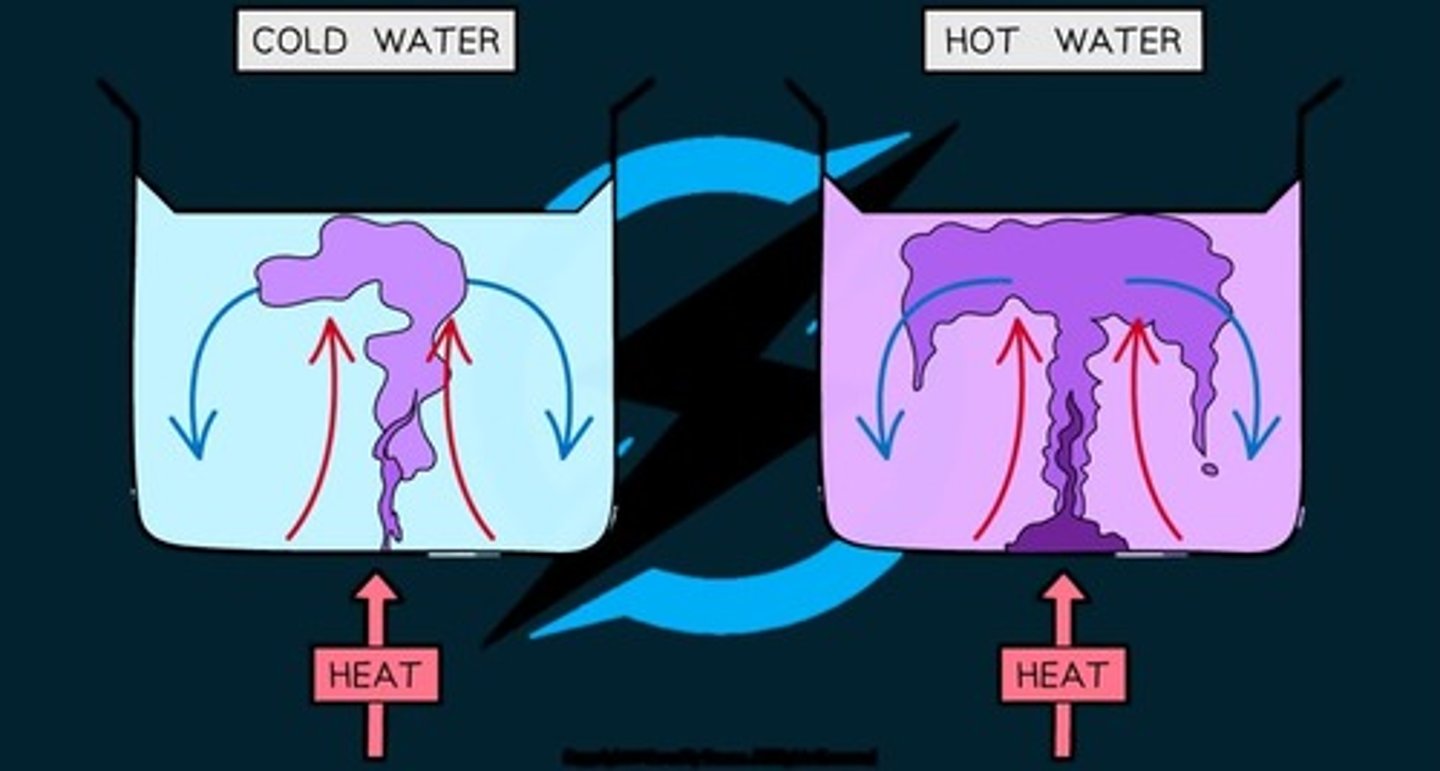
Investigating convection
1. Fill the beaker with cold water (not too full) and place it on top of a tripod and heatproof mat
2. Pick up the potassium permanganate crystal using forceps and drop it into the centre of the beaker - do this carefully to ensure the crystal does not dissolve prematurely
3. Heat the beaker using the Bunsen burner and record observations
4. Repeat experiment with hot water and record observations
Investigating radiation
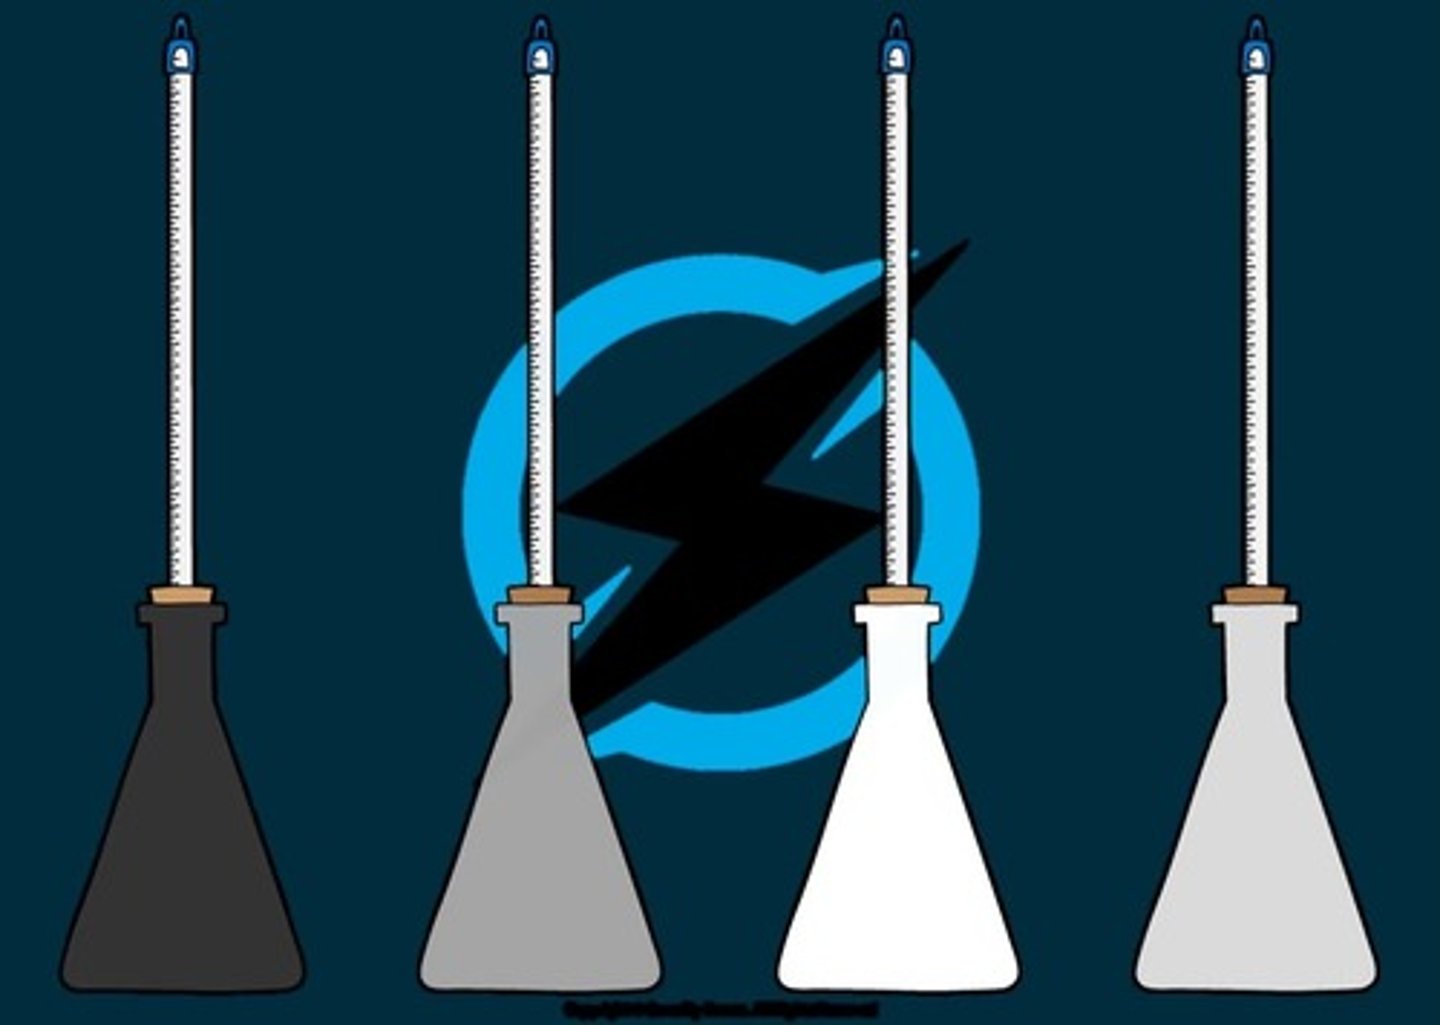
1. Set up the four identical flasks painted in different colours: black, grey, white and silver
2. Fill the flasks with hot water, ensuring the measurements start from the same initial temperature
3. Note the starting temperature, then measure the temperatures at regular intervals, e.g. every 30 seconds for 10 minutes
Measuring the density of regularly shaped objects
1. Place the object on a digital balance and note down its mass
2. Use either the ruler, Vernier callipers or micrometer to measure the object's dimensions (width, height, length, radius) - the apparatus will depend on the size of the object
3. Repeat these measurements and take an average of these readings before calculating the density
Measuring the density of irregularly shaped objects
1. Place the object on a digital balance and note down its mass
2. Fill the eureka can with water up to a point just below the spout
3. Place an empty measuring cylinder below its spout
Carefully lower the object into the eureka can
4. Measure the volume of the displaced water in the measuring cylinder
5. Repeat these measurements and take an average before calculating the density
Measuring the density of liquids
1. Place an empty measuring cylinder on a digital balance and note down the mass
2. Fill the cylinder with the liquid and note down the volume
3. Note down the new reading on the digital balance
Repeat these measurements and take an average before calculating the density
Investigating changes of state
1. Place the ice cubes in the beaker (it should be about half full)
2. Place the thermometer in the beaker
3. Place the beaker on the tripod and gauze and slowly start to heat it using the bunsen burner
4. As the beaker is heated, take regular temperature measurements (e.g. at one minute intervals)
5. Continue this whilst the substance changes state (from solid to liquid)
Investigating specific heat capacity
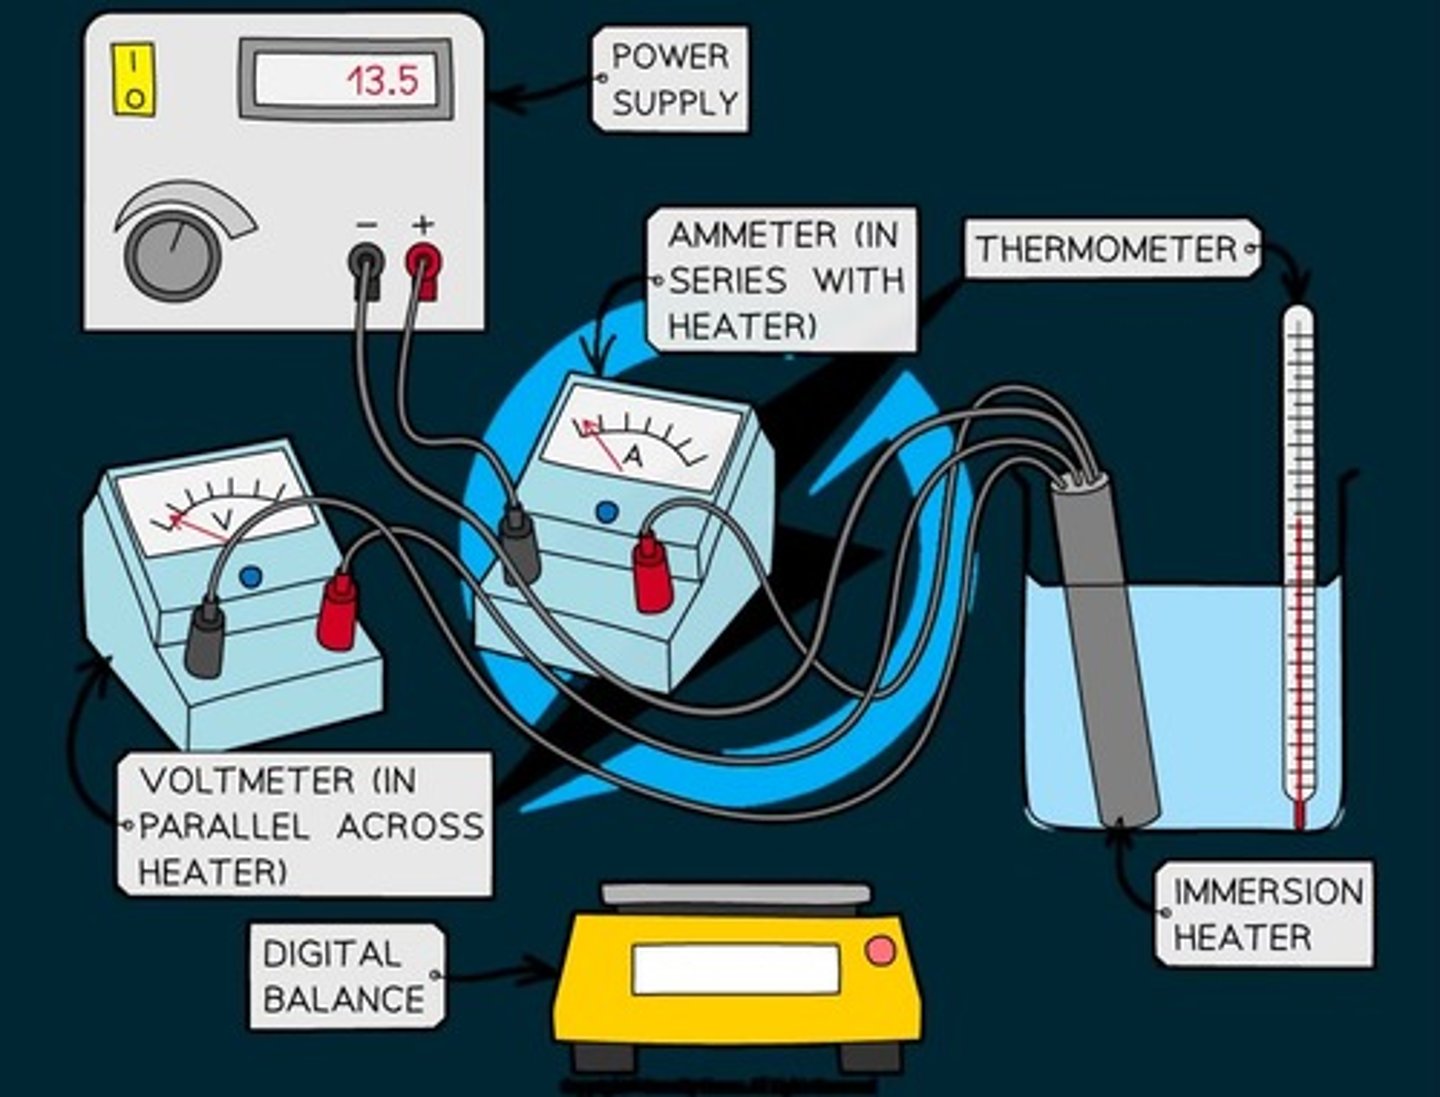
- place the beaker on the digital balance and press 'zero'
- add approximately 250ml of water and record the mass of the water using the digital balance
- place the immersion heater and thermometer in the water
- connect up the circuit as shown in the diagram, with the ammeter in series with the power supply and immersion heater, and the voltmeter in parallel with the immersion heater
- record the initial temperature of the water at time 0s
- turn on the power supply, set it at approximately 10V, and start the stopwatch
- record the voltage from the voltmeter and the current from the ammeter
- continue to record the temperature, voltage and current every 60 seconds for 10 minutes
- repeat steps 2-8, replacing the beaker of water for the solid block of aluminium and starting with recording its mass using the digital balance
Investigating magnetic fields
- place the magnet on top of a piece of paper
- draw a dot at one end of the magnet (near its corner)
- place a plotting compass next to the dot, so that one end of the needle of the compass points away from the dot
- use a pencil to draw a new dot at the other side of the compass needle
- move the compass so that it points away from the new dot, and repeat the process
- keep repeating the process until there is a chain of dots going from one end of the magnet to the other
- then remove the compass, and link the dots using a smooth curve, this will be the magnetic field line
- repeat the whole process several times to create several other magnetic field lines
- repeat the whole process for two bar magnets placed 5 cm apart first facing the same pole then facing opposite poles
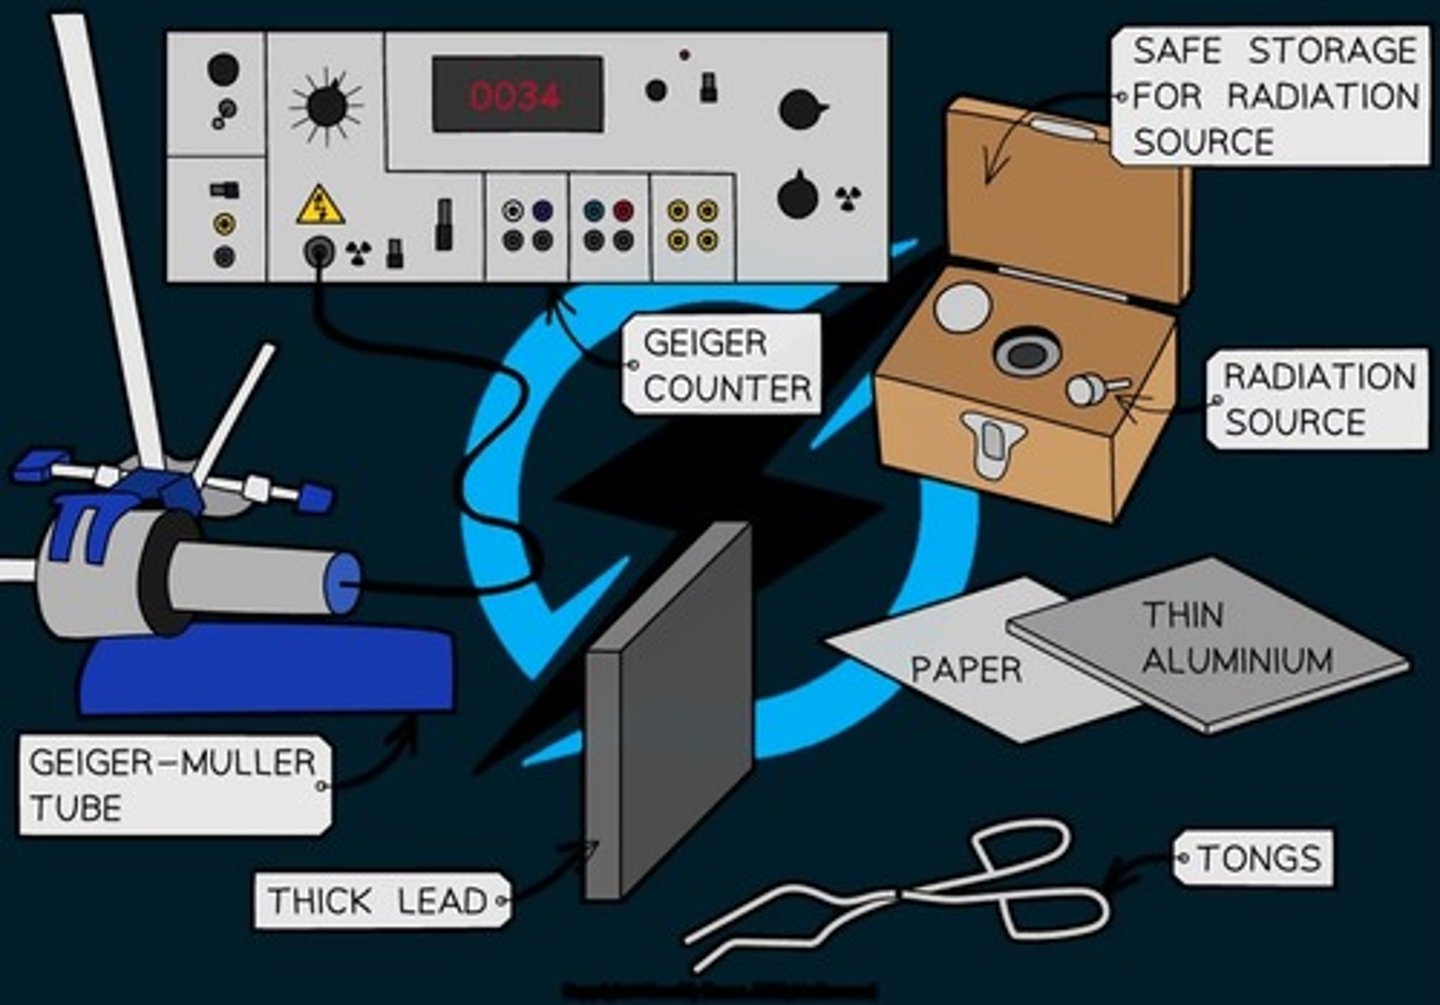
Investigating radiation
1. Connect the Geiger-Müller tube to the counter and, without any sources present, measure background radiation over a period of one minute
2. Repeat this three times, and take an average. 3. Subtract this value from all subsequent readings.
3. Place a radioactive source a fixed distance of 3 cm away from the tube and take another reading of count rate over a period of one minute
4. Take a set of absorbers, i.e. some paper, several different thicknesses of aluminium (increasing in 0.5 mm intervals) and different thicknesses of lead
5. One at a time, place these absorbers between the source and the tube and take another reading of count rate over a period of one minute
5. Repeat the above experiment for other radioactive sources