The Study of Microbial Structure
1/75
Earn XP
Description and Tags
Microscopy and Specimen Preparation
Name | Mastery | Learn | Test | Matching | Spaced |
|---|
No study sessions yet.
76 Terms
Microscopy
Microorganisms range in size from
Smallest = nanometers (nm)
Largest = protists; micrometers (μm)
Common units of measurement
Angstrom to look at DNA and Amino Acids
insert DIAGRAM
Two Major types of microscopes
Light (first invented) and Electron Microscope
using it because we can’t visualize it with naked eye
Lenses and the Bending of Light
How they generate images
light is visualization source
how we bend is going to determine how well able to resolve image
includes:
Refraction
Refractive index
Direction and magnitude
Glass has a higher refractive index than air
higher refractive means the more slowly light will move (through you)/the speed of light goes
the greater capacity to slow down the speed at which light is moving
Refraction
Bending of light when passing from one medium to another
how it bends from one to another
medium - air to glass
faster in air than hitting glass glass
as it moves between media types, speed of light changes along with bend
as it moves from air, it will slow down as it hits the glass = bend of light changes
Refractive index
Measure of how greatly a substance slows the velocity of light
change in velocity of light = change in bend of the light
Direction and magnitude of bending
Is determined by refractive indices of two media forming the interface (i.e., glass and air)
Direction: anytime when bending light, it will change direction
Magnitude: change in angle of the light; as we change the bend of light, either it will increase or decrease the angle of light
Refractive indices: direction and magnitude are determined by this
Depending on what we are moving from, air to glass, will determine how light will bend: what direction and angle the light will go in
Lenses
Involved in forming image, curved
curvature of lens help direct all light at one point, hit lens to end up in same place so that image is generated
focus light rays at a specific place called the focal point, where all light directs to
directed to the same point
distance between center of lens and focal point is the focal length
short length = stronger
Strength of the lens is related to the focal length
The Light Microscope
Making our image using a light microscope is all about the bending of the light
Many Varieties
bright-field microscope (common in lab, easy, first type invented, used for diff application)
Closely related, showing commonalities, used for similar application
dark-field microscope
phase-contrast microscope
differential interference contrast DIC (developed out of phase)
3D developing image
confocal microscope (type of fluorescence)
Other
florescence microscope
Modern microscopes are all compound microscopes
have multiple sets of lens
ocular and objective lenses
Objective lenses at diff magnifications
4
10
40
100
The Bright-Field Microscope
Can be used for lots of applications, getting name for image that is generated
both stained and unstained specimens
S: to enhance that contrast b/w the cell and the sub-cellular structure & inc contrast = visualization
US: fairly easy to visualize and natural, having natural intrinsic contrast b/w cell and sub-cell
produces a dark image in middle against a brighter background/field
have several objective lenses and magnifications
parfocal microscopes
find specimen at 10x, then in focus, switch power to 40x or 100x
as you switch b/w lenses, specimen should not go out of focus or too far our of focus
total magnification of the ocular lenses (10x) and the objective lenses (40x)
Total magnification: 400x
Diagram of Bright Field Microscope
Leeuwenhoek had one handle, focus knob
Bench top microscope, most common
Oculars are bifocal
objective lenses (4) for different magnifications
Stage, to put specimen
Coarse knob to zoom in quickly
Fine knob to focus on something
substage condenser to help focus the cone of light on your image
aperture diaphragm can cut the diameter of the cone of light that you're beaming at your specimen.
different ways that you can sort of manipulate the light that you're beaming at your specimen.
Microscope Resolution
Objective lens and magnifications are important
Resolution (or resolving power); not same as magnification
more important that magnification (take something little and blow it up)
Resolution: how close you can get two things together before they overlap and become one thing
ability of lens to distinguish small objects that are close together
Ex. Microscope with following resolving powers
2 nanometers - distinct
things are nanometers apart
2micrometers - overlap
If you have something that you can't tease apart in your resolution, making it bigger is not going to help = make that thing that you can't pull apart bigger.
Resolving power is what tells you how close you can get those things together and still being able to pull them apart.
Microscope Resolution CONT
Wavelength (of light) can be manipulated to gain resolution
light is illumination source
shorter wavelength → greater resolution
Long wavelength → decrease resolution
blue light (450-500 nm can not resolve structures smaller than o.2 um(
Numerical Aperture
Ability of objective lens to gather light
more light is better = increased light = increasing numerical aperture = increasing resolution
How to get more light? change the bend of light
refractive index - how much a substance bends a light ray
whatever our light is moving through will play a role in how much light we can get in our objective lens
The refractive index of air is 1.00, if we increase this by using immersion oil, we can increase the numerical aperture, gathering more light to inc resolution
Using Immersion oil to increase refractive index
When using immersion oil we are changing the bend in light, inc numerical aperture and resolution
we are able to force more light up objective lens
Diagram
Some light is moving off objective lens or passing when it is air
with oil, It will slow down the speed that light is traveling = impact on bend, more bend will change the direction and shunt more up objective lens
Numerical Aperture and Working distance
Smaller working distances give better resolution—can better separate close objects b/c the light spreads out more
As we work with a specimen, we lower our objective lens = working distance
distance b/w objective lens and specimen
as we decrease that distance, we increase our Numerical Aperture = inc resolution
as we dec distance, we are shunting more light up objective lens
The cone of light, as it comes down, it flattens out the cone of light, increasing the angle, allowing more light to go up, again inc Num Ape
Properties of Objective lenses
Diagram
Working distance - distance between the surface of lens and the surface of cover glass or specimen when it is in sharp focus
Resolving power - ability to distinguish close objects as separate
Three Microscopes
Can be used for same things
Dark field microscope - do not use dark field stop with bright field
Phase contrast
DIC, our differential interference contrast
Principles on generating image for all microscopes is based on physics, wavelengths or some may be quantum mechanics
Some microscopes have characteristic features associated with them (want to know about)
Also know about when to use for certain applications ( application based type questions on exam)
Remember about staining- any time you stain with a colored dye, you will kill your specimen
if it doesn’t have intrinsic contrast, visualization will be tricky = can’t stain or visualize in bright field, so you can use the three above
The Dark-Field Microscope
Gets name from the image it produces
inverse image of a bright field microscope in that here you're going to have a brighter image sitting in the middle of a dark field.
the dark field, the phase, and the DIC, for applications for which the bright field doesn't work so well
if we need to study them alive or doesn’t have intrinsic contrast to distinguish sub-cellular structure from the cell itself very well
if you can see it, you’ll need to stain it but you want it to be alive
so switch to dark field or DIC
image is formed by light reflected or refracted by specimen
used to observe living, unstained preparations
Brighter specimen in dark background/field
Dark Field Microscope Diagram
Uses a hollow cone of light so that only light that has ben reflected or refracted by the specimen enters the lens
Major characteristic is “dark field stop”
instead of beaming the full cone of light at specimen, we beam a hollow cone of light at it
this light goes around the dark field stop = hollow cone of light
With the specimen in the middle, light that is reflected or refracted by specimen will go up the objective and the rest of the light comes at an angle, and the other rest goes past objective resulting in a dark field background
Diagram comparing Bright and Dark field
Full Cone vs. Hollow Cone
With the bright field
we're beaming that full cone of light at the specimen
specimen is going to have differential absorption in places, and so we end up with that bright field in the background because there we've got all kinds of light going up on the objective, but the specimen looks a little darker because we have differential absorption going on within the specimen itself.
With the dark field
we're going to get some light that's reflected or refracted by the specimen, which will go up to the objective
specimen will be lighter
Any other light that's not reflected or refracted by the specimen, it passes the objective, it doesn't go up, so we don't have a bright field in the back, we have a dark field in the back.
Examples of Dark-Field Microscopy
Treponema Pallidum
Causative agent of syphilis
thin and narrow organisms, because of these characteristics, it won’t absorb light very well
under bright field = difficult to distinguish organism from BF or BG
Volvox
Eukaryotic microorganism
Can see daughter volvox cells inside larger mother volvox
Shows how even if we have sub-cellular structures that do not absorb light very well, it will scatter light = able to resolve it better in dark field microscope
organisms scatter light
The Phase-Contrast Microscope
Developed out of dark field (and DIC out of phase)
uses slight differences in refractive index and cell density
uses a hollow cone of light
cone of light passes through a specimen some is retarded (out of phase)
Biggest characteristic associated is Phase plate or Phase ring
there is going to be different densities in our specimen
taking those differences, we are going to exaggerate them in our specimen using phase plate or ring
take those density differences and turn them into variations in light to visualize
those variations in light that we can visualize help us generate our image
Light passes through phase plate (or ring) bringing it back into phase excellent way to observe unstained, living cells
share similar characteristic of using dark-field stopper
Phase-Contrast Microscope Diagram
Annular Stop = Dark Field stop, giving hollow cone of light, beaming toward specimen
specimens have density differences associated with it, and we want to turn those density differences into variations of light
then take those variations in light and exaggerate them to make the visualization of specimen easier
phase ring helps
As we have our specimen, we are going to have denser areas in it where light is going to be slowing down
at that point, our light is going to go out of phase vs. other light that’s in areas in specimen where its not that dense and will travel right through specimen, hitting phase plate or phase ring
light will hit phase plate or ring and will be sped up to a rate equal to which some of the light was slowed down = two wavelengths
wavelengths are completely out of phase from one another, up and down, opposite from one another = rays of light are completely out of phase from one another
we have taken those variation in light that are there because of high density differences within the specimen itself, exaggerated by differences by taking rays of light and pulling them out of phase
gives contrast that we use to generate our image
Why use any of the three microscopes?
It’s based on what you have
No point in buying an expensive DIC if you can use phase for it, for the same type of imagining
but moving from dark field to phase to DIC, each new microscope invented was developed to solve a particular problem other types of microscopy had
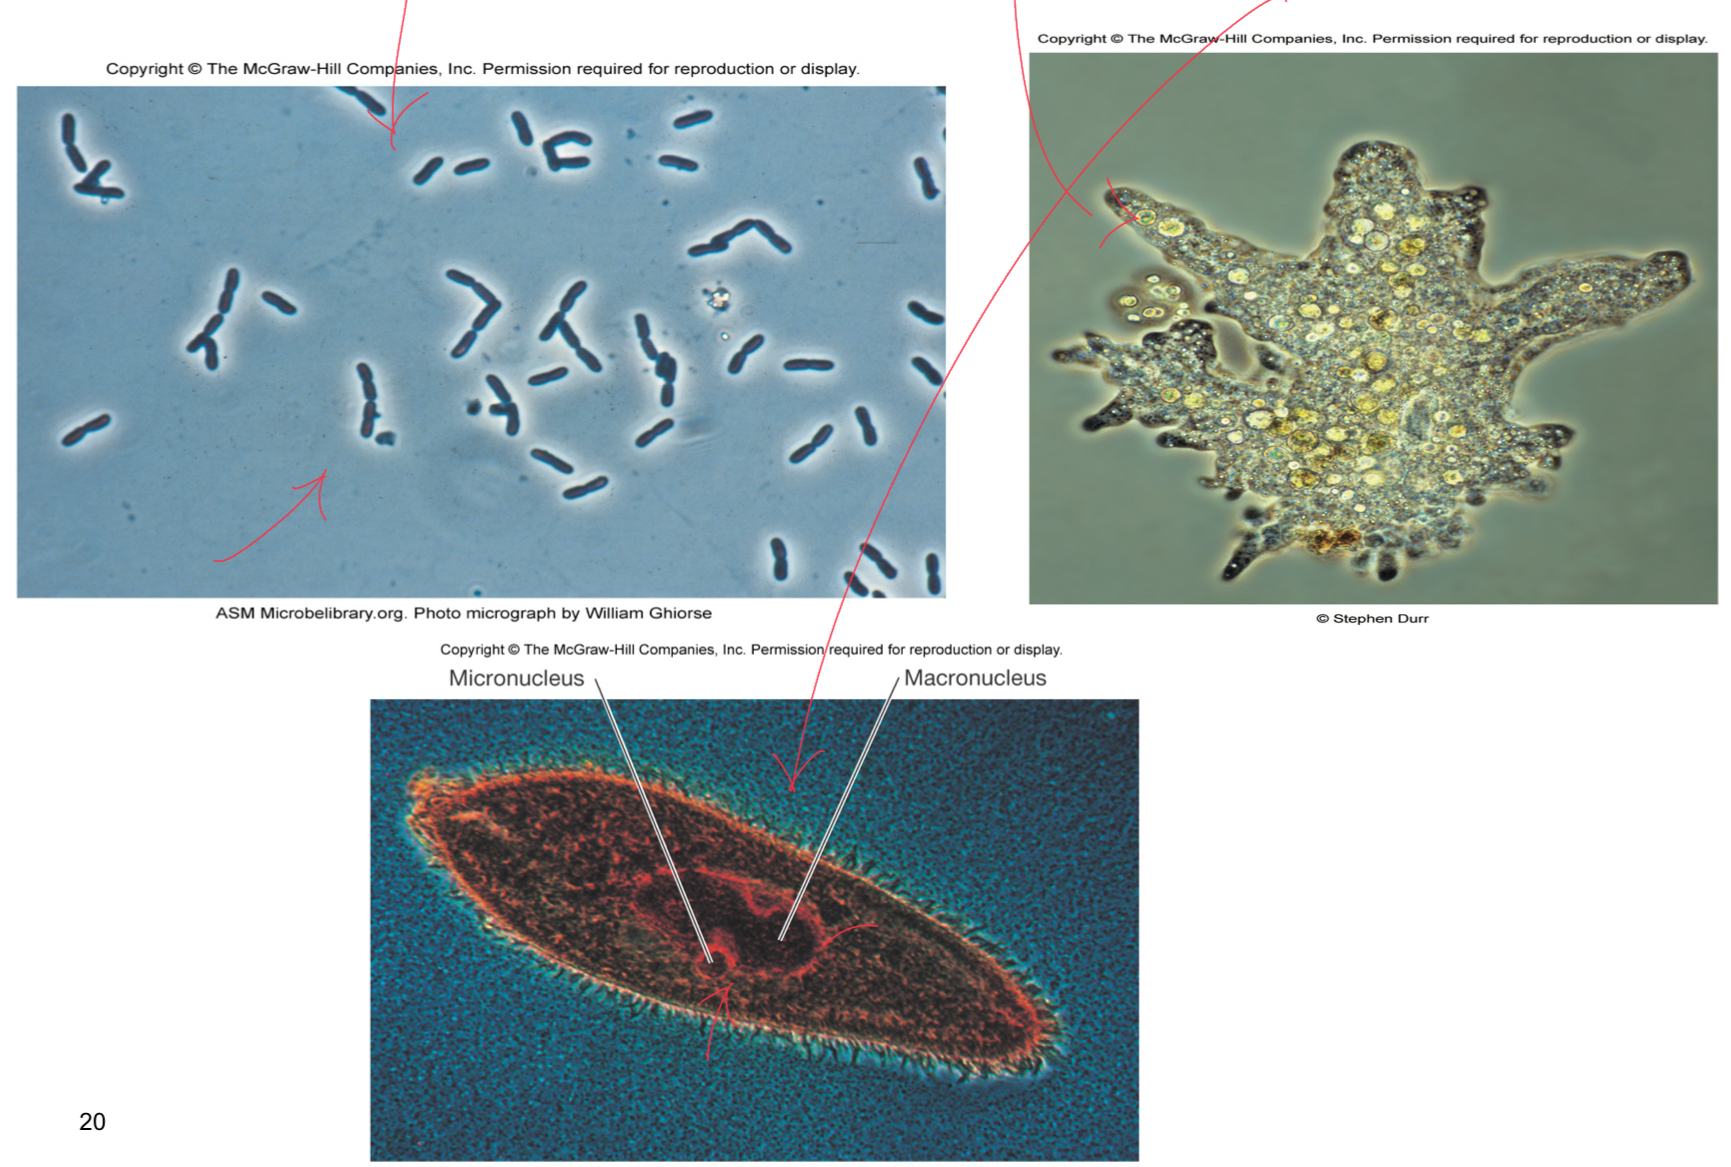
Examples of Phase Contrast Microscoppy
Blue is Pseudomonas sp.
rod shaped and tiny
Green is Amoeba
has good internal detail, seeing lots of vacuoles
Blue and Red Paramecium
good internal detail to, seeing the macronucleus which is bigger and micronucleus which is smaller
The Differential Interference Contract Microscope (DIC)
Developed out of phase contrast microscopy, developed to solve problems with Phase, giving sharper edges and things of that nature; also detecting density differences within the cell = using density differences to help generate the contrast needed to form our final image
sometimes called nomarski microscopy, developed in 1952 by Georges Nomarski
DO NOT USE DARK FIELD STOPS
Uses two beams of plain polarized light and two prisms to create a pseudo-3D image of specimen/generate image
all light that is traveling through our system is on the same plane, no light wavelengths of other planes coming to form image = if real it would cause the image to be blurry, hence plain polarized light
similar to phase-contrast — creates image by detecting differences in refractive indices and thickness of different parts of specimen
excellent way to observe living cells
live unstained cells appear brightly colored and PSEUDO three-dimensional image, it is called this because we can’t get a true 3d image of a specimen unless image is taken along different plans
(only confocal microscope can do this)
Differential Interference Diagram
First there is a polarizing filter that light it going to move through, and its gonna make sure that all the light that’s going through the system is along the same plane
Anything on different planes is going to be filtered out
only one plane of light going through
Hitting the first prism, Nomarksi’s prism, Marsky, after we go through the polarizing filter, there is one wavelength of light
when light ray hits the prism, it separates into two different light beams which are important to generate our final image
the two beams are traveling through the system, across the specimen, but they are different beams
as they go across the specimen, they will take slightly different paths, eventually hitting the second prisms
The two light beams have then been combined back into one and we are going to generate our contrast from there
generate images besed on the differences in the paths those light beams took as they traveled across the specimen = some same paths or some different, giving us the differences in paths the light beam took = areas of light and dark w/ in image
Differential Interference Contrast Microscopy — Amoeba Proteus
Can see lots of internal detail and structures, nice clear edges of the particular image
it is pseudo 3D, looking like it wants to jump of the screen
Last batch of microscopes
fluorescence, immunofluorescence, and confocal
The Fluorescence Microscope
For confocal, we are typically using fluorescently stained specimens
Developed by O. Shimomuram, M. Chalfie, and R. Tsien (received nobel prize)
exposes specimen to (short wavelength light) ultraviolet, violet, or blue light
short wavelength light means high energy light
specimens usually stained with fluorochromes (fluorescent dyes or florescent encoded proteins in its genome)
when we hit either that fluorescent protein or our fluorochrome with that short wavelength, really high energy light = molecules within the fluorochrome or the fluorescent protein get really excited, absorbing energy light and jump to a higher energy state for a moment
when they sit back down to normal energy state, they emit light, which is fluorescent
that fluorescence captured is going to generate image
shows a bright image of the object resulting from the fluorescent light emitted by the specimen, contrary to how light passes through or is reflected or refracted by specimen
Green Fluorescent Protein fused with
MBL cytoskeletal protein of Bacillus subtilis (bacterium)
w/ fluorochrome and fluorescence, it does not kill specimen
organisms w/ chlorophyll will implement florescence
has applications in medical microbiology and microbial ecology studies
medical, environmental, or to localize proteins within a particular specimen
MBL protein is localized within bacteria
to see this, attach a fluorescent protein to the protein of interest/localize
in the image GFP is used, the first fluorescent protein found, but now we have ROYGBIV
Anytime you see fluorescence right in your image, that tells you that's where your protein of interest is, we know this because we attached the fluorescent protein to it
DEFINING CHARACTERISTIC IS THAT WE FREQUENCY USE IT TO LOCALIZE PROTEINS LOCATED WITHIN A CELL AND CAN DO LIVE IMAGING
The Fluorescence Microscope CONT
Talked about staining w/ fluorochromes and conjugating things or cloning with fluorescent proteins or attach them to fluorescent proteins
some microorganisms may be naturally fluorescent
if an organism contains chlorophyll, it is naturally fluorescent and if you hit the correct wavelength of light, it will emit fluorescence
With pigmented organisms, hit it with the right wavelength of light and they will also emit fluorescence
= you do not have to use fluorochromes or use fluorescent proteins, there are some sys where you work w/ natural fluorescent microorg
When we stain
When we stain w/ organisms = kill
When we stain w/ color dyes = kill
when we stain w/ fluorochromes or add GFP protein = we don’t kill
so you can do live imaging using fluorescence microscopy = important because people working w/ in sys where they want to live image and visualize something without killing specimin
Epifluorescence Microscopy
1) mercury lamp is going to emit that short wavelength, high energy light for us
2) pass through this first filter, which is actually going to filter out any long wavelength light that might be making its way through, b/c we want this short wavelength light to bounce off this mirror (circled) and head down to our specimen.
when we hit our specimen, either fluorescent protein or fluorochrome are going to absorb that really high energy light
molecule are going to jump to higher energy level for a second, sit back down, and emit fluorescence
3) what they actually emit is a long wavelength light which will move back up over there towards the detector (circled)
4) the barrier up there is going to filter out UV or anything of that nature, but the long wavelength light will make it through, over the detector to form the image
Commonly Used Fluorochromes
Pigmented = might have a pigmented pigment in you that came after the last
Fluorochromes = will absorb energy and help give us our fluorescence or some other organisms.
Fluorochromes that are commonly used for staining:
Acridine orange, that's a big one. It will stain DNA along various moieties of the DNA molecule.
DAPI will also stain DNA, it will interact with the negative charge in the DNA to allow us to stain.
Last two classes are FITC and TRITC; usually used in immunofluorescence — And so for immunofluorescence, you are still going to use a fluorescent microscope to visualize your specimen but what we are using in the process is a little bit different
not using a fluorochrome, there's no naturally fluorescent, well we kind of are using a fluorochrome, but not by itself.
And we're not using any naturally fluorescent pigments, no fluorescent proteins there.
FITC - often attached to anti bodies that bind specific cellular components or to DNA probes
TRITC or rhodamines) - often attached to antibodies that bind specific cellular components
Immuno-fluorescence
Immuno refers to antibodies
We use a fluorochrome, but we conjugate that fluorochrome to an antibody, which will bind to specific things
they have specific antigens that they are targeted to = specific targeting sys b/c we know its only going to bind to the antigen that an antibody binds to
we also have the fluorochromes conjugated or attached to the antibody, so it is going to allow us to visualize where that antibody has attached to in a cell
In the image, we've got our fluorochromes conjugated to our antibody and our antibodies are binding.
Here it's along our bacterial cell to particular antigens that they are targeted toward
then we can visualize where they are localized to on the cell using our fluorescent microscope
Cells stained with fluorescent dyes
(a) Live dead staining; Living cells (green) dead cells (red)
useful in certain systems
ex. community of bacteria, have a chemical of interest and want to see how well it kills a population of bacteria (treat population with compound, and then come back and do a live dead strain to see how when the chemical worked)
live dead screen
can use fluorescent microscopy in live dead screens
(b) Streptococccus pyogenes (antibody staining; bound too)
immunofluorescence
looking to see if organisms has strep pyo present
Streptococcus pyogenes is the causative agent of strep throat
there is an antibody that is conjugated to a particular fluorochrome
that antibody will only bind to an antigen that is found on Streptococcus pyogenes
If they have Streptococcus pyogenes in their sample, they will go ahead and they will let their antibody bind and look through fluorescent microscope and see if they see any fluorescence.
fluorescence = Streptococcus pyogenes, only binding to antigen that is attached or that is found on Streptococcus pyogenes.
Confocal Microscopy
Only light microscopy that will give you a true 3D
because imaging is done along different planes compiled into one
confocal scanning laser microscopy (CLSM) creates sharp, composite 3-D image of specimens by using laser beam aperture to eliminate stray light, and computer interface
specimen is usually fluorescently stained, fluorescence to generate image
Biofilms
Confocal microscopy is heavily used in microbiology, particularly numerous applications including study of biofilms
when we think about bacteria, we think of them being like loners, hanging out in the environment alone, some live that way; however, we have others that will come together and for communities on often solid surfaces = biofilms
those communities can take on some really complex three-dimensional structures
the idea behind some of these microorganisms being formed biofilms and being able to live in a community is that it can offer them protection and greater survivability against maybe different antibiotics that they might encounter or other different environmental insults that they might encounter.
when looking at biofilms, because of complex 3D structures, you want to use confocal
Confocal Microscope Diagram
ONLY LIGHT MICROSCOPE TO GIVE TRUE 3D IMAGE AND SECOND APERTURE
2nd ape makes sure any of the light tha’s moving toward the detector is all on one plane
if there’s any light on a different plane, it won’t be able to make its way through that ape = helps sharpen the final image but could be blurry if some other light was able to make it way through the detector
Similarities with how our fluorescent microscopes work
Have a laser that is beaming short wavelength toward specimen, high energy, but we are going to use fluorescence, so there are fluorescent proteins or fluorochromes absorbing high energy light
molecules jumping up to high energy state, sit back down, release longer wavelength light, which moves through the scope and bounces off mirror and shunted to dectector in the end
Confocal Microscope Diagram two
F - final image is generated, it is a 3-Dimensional image because we have done imagining along many axis and planes, combined into one
there is a live dead staining because there is a green and red part on it
maybe tested to see how well a particular compound works at killing our biofilm, so we might treat our biofilm with that particular compound, and we might look to see how much red we have versus how much green we have
If we were looking for a scope that only gave us a two-dimensional image, we might see what's kind of going on at the top of our biofilm, which could look like everything has died, but since biofilms are three-dimensional in nature, it means that we're going to miss everything that's going on, right, along other planes, maybe on the bottom of our biofilm, which is where all kinds of cells could still be alive
that's what we're seeing when we're looking at this image, because it is a three-dimensional image, and because we can see along a number of different planes, we can see that we've got some red cells, but we also have in the middle here, we've got a bunch of green cells as well.
Preparation and staining of specimens
Staining can be really helpful because when it comes to generating an image, whenever you're using a microscope, it is all about contrast = more contrast b/w cell and subcellular structure = easy visualization in subcellular structure
increases visibility of specimen — if we're trying to look at an organism, not a lot of good intrinsic contrast, we need to stain it to help increase the visibility to make it easier to visualize that specimen for us
accentuates specific morphological features — delicate features like flagella, pili, and so what happens when we stain is that the stain will deposit on those appendages and it will thicken them
preserves specimens in lifelike state as possibly we can when looking at them dead
by fixing them, two major ways which depends on microscopic organisms, prokary or eukary
CONTRAST IS IMPORTANT
Fixation
When we fix, we are attaching our cells firmly to the slide itself and it will not be moving all over the place when looking at it
we fix = we kill so we try to preserve, inactivating enzymes (don’t like heat or chem) when using chemicals or reheating
Preserves internal and external structures and fixes them in position
life like state as possible
we're toughing cellular structures so that they don't change during the staining process
And organisms usually killed and firmly attached to microscope slide
Two ways:
heat fixation - routinely used with Prokaryotes, bacteria and archaea
evaporate = seal specimen to slide
small volume of liquid on your slide, maybe like five microliters or so
swirl your loop full of bacteria in that small volume on your slide
take your slide with your forceps and you move it through the Bunsen burner
moving it through the top of the burner where it is hot, not trying it
what we want to happen is the liquid that was on the slide needs to get evaporated because once it evaporates = help seal specimen to slide
chemical fixation - used with larger, more delicate organisms; eukaryotes
formaldehyde, glutaraldehyde, acetic acid
dehydrate the cell causing it to firmly affix to the slide (similar to heating, just not using heat)
When we fix, we degrade protein that may be involved in sub-cellular structure = could cause generation of artifacts in cell, something off of structure = particles
Dyes and simple staining
Enhance contrast of specimen via Dyes (color and bind)
contrast
have two common features
chromophore groups —chemical groups with conjugated double bonds, and it's particularly those conjugated double bonds that are going to give my dye its color
ability to bind cells — can’t be good dye if it can’t bind, either ionically, covalently, hydrophobically
Dyes and simple staining 2
Dyes
1) ionizable dyes (largest class) have charged groups
basic dyes have positive charges
interact with negative charges
cell surface, proteins or DNA that has negative charges
acid dyes have negative charges: used in negative staining,
ex. cell surface carries negative charges, which will be repelled by negative charge, and it will stain the BG = specimen will be translucent
stain BG and be translucent in BG
interact with positive charges, like proteins w/ positive charges
2) Simple stains (easy, one dye, specimen, fix to slide, add drops of dye (crystal violet), 30 seconds, rinse blots and then look at it)
a single stain is used
can determine size, shape (ex. Coccyx or rod), and arrangement of bacteria (ex. singlets or doublets, chains)
not really getting internal detail, but can get important info listed above
Simple Staining
Panel A looking at E. Coli, fairly small and stained with crystal violet (and ethylene blue; basic dyes), can see they look like chunks together, some alone but they are rod-shaped bacterium
Panel B looking at Corynebacterium, a piranha bacterium species, rod-shaped but are generally bigger than E. Coli and is forming doublets
Differential Staining
Used to differentiate between whether a bacteria has a particular feature and another one doesn't
Divides microorganisms into groups based on their staining properties and features or not; techniques:
gram stain —how much peptidoglycan in cell walls
telling us if it is gram positive or negative
acid-fast stain —(we don’t do) how much mycolic acid in cell walls
Based on characteristics of cell wall, and different things
differential stain also used to detect presence or absence of structures
have a flagella, form spores, have a capsule
Gram Staining
Developed by Christian Gram, 1884
most widely used differential staining procedure
divides bacteria (but not archaea because it doesn’t have peptoglycan in cell walls) into two groups
based on features in cell wall
Do I have a lot of peptidoglycan in my cell wall? If I do, that makes me gram positive.
Do I just have a little teeny tiny bit of peptidoglycan in my cell wall? If I do, that makes me gram negative.
We do not perform the gram stain on archaea because although archaea do have cell walls, they do not have peptidoglycan in their cell wall.
And so that's what we are specifically targeting in the gram stain, peptidoglycan.
Gram Stain Steps
Rod and Cocci
1) flood everything with crystal violet, our primary stain, sometimes hearing itself called the gram stain, and so everyone is purple (minute water rise)
2) add mordant, iodine, which enhances interaction b/w stain and cell feature, so stain and peptidoglycan, everyone is still purple (minute water rinse)
3) Decolorization(10-30s water rinse), using alcohol and you can tell which one is gram pos vs. neg
if you are gram positive, you have a helping like of a lot of peptidoglycan, it is stuck on it
Gram negative is if you have a teeny bit of peptidoglycan, so a thin layer that doesn’t hold out well, so the decolorizer pulls that purple out and GRAM NEGATIVE WILL BE CLEAR
4) Counterstain, Safranin for (30-60s water rise) blot dry
counterstain should not be the same color as your primary stain
Safranin or Counter stain can help us visualize who is gram negative a bit better
gram negative appears red
Acid-Fast Staining
particularly useful for staining members of the genus Mcobacterium
high lipid content in cell walls (myolic acid)
Uses high heat and phenol to drive basic fuchsin into cells
Differential Staining of Specific Structures
endospore-staining —exceptionally resistant to staining (e.g., Bacillus sp. and Clostridium sp.)
capsule stain used to visualize capsules surrounding bacteria (India ink or nigrosin)
Flagella staining —very thin and can only be seen with an electron microscope
Examples of Differential Stains
Electron Microscopy
the best light microscope has a resolving limit of 0.2 um (max. mag of 1500X)
electrons as source of illumination (resolution of 0.5 nm, max mag of 100,000X)
allows for study of microbial morphology in great detail
Limits of Resolution
Light Vs Electron Microscopy Rhodospirillum rubrum
The Transmission Electron Microscope (TEM)
electrons generated and focused on specimen by electromagnets
as electrons pass through specimen they form an image
denser areas of specimen will scatter some electrons
Transmission Electron Microscope
Comparison of Light Microscope and TEM
Characteristics of Light and Transmission Electron Microscopes
Specimen Preparation for TEM
analogous to procedures used for light microscopy
specimens must be cut very thin
specimens are chemically fixed and stained
Other TEM Preparation methods
Negative stain-specimen spread out in a thin film with heavy metals
heavy metals do not penetrate the specimen but render dark backround
used for study of viruses, bacterial gas vacuoles
Shadowing
coating specimen with a thin film of a heavy metal only on one side
useful for viral morphology, flagella, DNA
TEM Staining Methods
Other TEM preparation Methods
Freeze-etching
freeze specimen then fracture along lines of greatest weakness
intracellular structure
reduces artifacts
Freeze-Etching
Disadvantages of TEM
electrons can only penetrate very thin specimens
usually gives only 2D image
specimens must be viewed under high vacuum
specimens are dead/artifacts
The scanning Electron Microscope
electrons reflect from the surface of a specimen
3D image of specimen’s surface features
can determine actual in situ location of microorganisms in ecological niches
dried samples coated with a thin film of metal
SEM
SEM Mycobacterium Tuberculosis
Electron Cryotomography
Rapid freezing technique developed in the 1990s
tilt series created
provides extremely high resolution of ultrastructure
TEM vs Electron Cryotomography Caulobacter Crescentus
Scanning Probe Microscopy
Scanning tunneling Microscope (1980)
magnification 100 million times
steady current (tunneling current) maintained between microscope probe and specimen
up and down movement of probe maintaining constant current creates image of surface
Scanning Tunneling Microscopy of DNA
Scanning Probe Microscopy
Atomic force microscope
sharp probe moves over surface of specimen at constant distance
up and down movement of probe as it maintains constant distance
Used to study surfaces that do not conduct electricity well
Atomic Force Microscope
Atomic Form Microscopy Aquaporin membrane Protein